Luna-O / Luna-M / Stella Operating Instructions ... - IRO AB
Luna-O / Luna-M / Stella Operating Instructions ... - IRO AB
Luna-O / Luna-M / Stella Operating Instructions ... - IRO AB

Create successful ePaper yourself
Turn your PDF publications into a flip-book with our unique Google optimized e-Paper software.
Ref. No. 27-8930-0811-08/0550<br />
<strong>IRO</strong> <strong>AB</strong><br />
Box 54<br />
SE-523 22 Ulricehamn<br />
Sweden<br />
Tel: (Int+46) 321 297 00<br />
Fax: (Int+46) 321 298 00<br />
www.iroab.com<br />
info@iro.se<br />
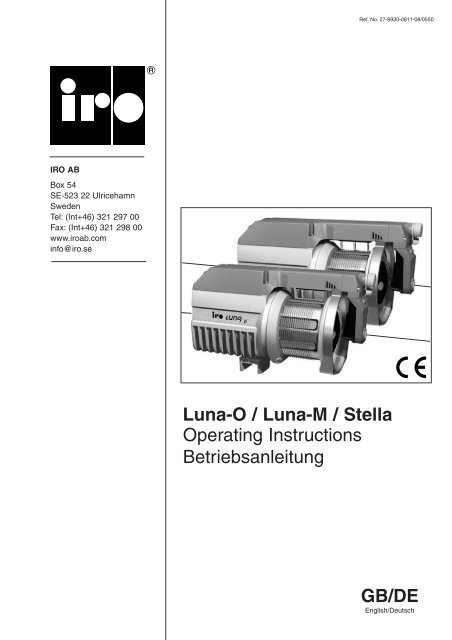
<strong>Luna</strong>-O / <strong>Luna</strong>-M / <strong>Stella</strong><br />
<strong>Operating</strong> <strong>Instructions</strong><br />
Betriebsanleitung<br />
GB/DE<br />
English/Deutsch
CONTENTS<br />
INHALT<br />
<strong>Luna</strong> / <strong>Stella</strong><br />
1<br />
Technical specifications ........................................................................................ 2<br />
Main parts ............................................................................................................... 3<br />
<strong>Operating</strong> diagrams ............................................................................................... 4<br />
Installation .............................................................................................................. 5<br />
Mains connection ................................................................................................... 6<br />
Wiring diagram ....................................................................................................... 8<br />
Interface connections ............................................................................................ 9<br />
Jumper settings....................................................................................................... 10<br />
Yarn control ............................................................................................................. 11<br />
S/Z Adjustment ....................................................................................................... 14<br />
Threading ................................................................................................................ 15<br />
Balloon adjustment ................................................................................................ 17<br />
CAT adjustment ...................................................................................................... 18<br />
Sensor adjustment ................................................................................................. 19<br />
Maintenance ............................................................................................................ 20<br />
Fault finding ............................................................................................................ 21<br />
Technische Spezifikation .......................................................................................... 2<br />
Hauptteile ................................................................................................................. 3<br />
Funktionsdiagramm .................................................................................................. 4<br />
Installation ................................................................................................................ 5<br />
Netzanschluß ........................................................................................................... 6<br />
Schaltplan ................................................................................................................. 8<br />
Anschluss an die Webmaschine .............................................................................. 9<br />
Jumpereinstellungen ................................................................................................. 10<br />
Fadenbremsung ....................................................................................................... 11<br />
S/Z-Einstellung ......................................................................................................... 14<br />
Einfädeln .................................................................................................................. 15<br />
Ballon-/Flexbremseinstellung ................................................................................... 17<br />
CAT-Einstellung ........................................................................................................ 18<br />
Sensoreinstellungen ................................................................................................. 19<br />
Wartung .................................................................................................................... 20<br />
Fehlersuche .............................................................................................................. 22<br />
<strong>IRO</strong> <strong>AB</strong> RESERVE THE RIGHT TO CHANGE THE CONTENTS OF THE USER’S GUIDE<br />
AND TECHNICAL SPECIFICATIONS WITHOUT PRIOR NOTIFICATION.<br />
Ref. No. 27-8930-0811-08/0550<br />
<strong>IRO</strong> <strong>AB</strong> BEHÄLT SICH DAS RECHT VOR, DEN INHALT DIESER BEDIENUNGSANLEITUNG UND<br />
DER TECHNISCHEN SPEZIFIKATION OHNE VORANKÜNDIGUNG ZU ÄNDERN.
TECHNICAL SPECIFICATIONS<br />
TECHNISCHE SPEZIFIKATION<br />
<strong>Luna</strong> / <strong>Stella</strong><br />
2<br />
WARNING!<br />
CAUTION MUST BE TAKEN IN THE CLOSE VICINITY OF THE FEEDER AS IT CONTAINS MOVING PARTS THAT CAN CAUSE<br />
INJURIES AND, IN NORMAL OPERATION, STARTS WITHOUT PRIOR WARNING.<br />
THE POWER SUPPLY MUST BE SWITCHED OFF AT THE MAINS BEFORE ANY WORK IS CARRIED OUT ON THE FEEDER,<br />
THE TRANSFORMER OR ANY OTHER ELECTRICAL COMPONENTS. THE FEEDER AND THE TRANSFORMER C<strong>AB</strong>INET<br />
MUST BE FULLY ASSEMBLED BEFORE THE POWER SUPPLY IS CONNECTED.<br />
THE FEEDER AND TRANSFORMER CONTAIN ELECTRICAL COMPONENTS THAT RETAIN AN ELECTRIC CURRENT UP TO<br />
THREE MINUTES AFTER DISCONNECTION<br />
ALL WORK ON ELECTRICAL COMPONENTS MUST BE CARRIED OUT BY A QUALIFIED ELECTRICIAN.<br />
WARNUNG!<br />
TO COMPLY WITH C. E. REGULATIONS ONLY REPLACEMENT PARTS APPROVED BY <strong>IRO</strong> <strong>AB</strong> MAY BE USED.<br />
IN DER UNMITTELBAREN UMGEBUNG DES VORSPULGERÄTES IST VORSICHT GEBOTEN, DA ES BEWEGLICHE TEILE<br />
ENTHÄLT, DIE VERLETZUNGEN VERURSACHEN KÖNNEN, UND IM NORMALBETRIEB OHNE VORHERIGE WARNUNG<br />
ANLÄUFT.<br />
VOR DER ARBEIT AM VORSPULGERÄT, AM TRANSFORMATOR ODER AN ANDEREN ELEKTROTEILEN MUSS DER STROM<br />
AM NETZANSCHLUSS AUSGESCHALTET WERDEN. VOR DEM ANSCHLIESSEN DER STROMVERSORGUNG MÜSSEN<br />
VORSPULGERÄT UND TRANSFORMATOR GANZ ZUSAMMENGEBAUT WERDEN.<br />
DIE SPEICHER UND TRANSFORMER SIND MIT ELEKTRONISCHEN KOMPONENTEN BESTÜCKT DIE NOCH BIS 3 MINUTEN<br />
LANG EINE GEWISSE ELEKTRISCHE SPANNUNG H<strong>AB</strong>EN, NACHDEM DIE STROMVERSORGUNG <strong>AB</strong>GESCHALTET WURDE.<br />
ALLE ARBEITEN AN ELEKTROTEILEN SIND VON EINEM QUALIFIZIERTEN ELEKTRIKER AUSZUFÜHREN.<br />
GEMÄSS CE-REGELUNG DÜRFEN NUR VON <strong>IRO</strong> <strong>AB</strong> GENEHMIGTE ERSATZTEILE VERWENDET WERDEN.<br />
<strong>Luna</strong><br />
<strong>Stella</strong><br />
m/min<br />
Max 1800 m/min<br />
Max 1500 m/min<br />
7,6 kg 7,6 kg<br />
O<br />
Min 10° C-Max 40° C<br />
Min 10° C-Max 40° C<br />
Max 95 % Max 95 %<br />
Max 5 mm<br />
Max 5 mm<br />
5,5 - 7 bar 5,5 - 7 bar<br />
200 - 600V 465VA 3 ph 200 - 600V 465VA 3ph<br />
Ref. No. 27-8930-0811-08/0550<br />
Fuse<br />
13,5 kg 13,5 kg<br />
Max T 10A Fuse/ Sicherung<br />
Max T 10A Fuse/ Sicherung
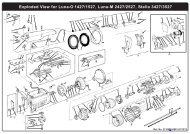
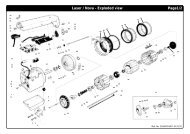
MAIN PARTS<br />
HAUPTTEILE<br />
<strong>Luna</strong> / <strong>Stella</strong><br />
3<br />
Ref. No. 27-8930-0811-08/0550<br />
S/Z Switch<br />
S/Z-Schalter<br />
Max speed<br />
Max. Geschwindigkeit<br />
<strong>Luna</strong>-M/<br />
<strong>Stella</strong><br />
<strong>Luna</strong>-O<br />
Mount<br />
Befestigung<br />
Indicator<br />
Anzeigelampe<br />
ON/OFF Switch<br />
EIN/AUS-Schalter<br />
Half threading<br />
Halbeinfädelung<br />
Full threading, <strong>Luna</strong>-M + O<br />
Volleinfädelung, <strong>Luna</strong>-M + O<br />
Winding disc<br />
Wickelscheibe<br />
O<br />
<strong>Luna</strong>-M/ <strong>Stella</strong><br />
Yarn break detector<br />
Fadenbruchwächter<br />
Yarn store sensors<br />
Garnlagersensoren<br />
<strong>Luna</strong>-O<br />
CAT<br />
Adjustment<br />
Einstellung<br />
Balloon control adjuster<br />
Ballonkontrolleinstellung<br />
Tension ring quick-release<br />
Spannring schnell abhebbar<br />
Spool body<br />
Spulenkörper
OPERATING DIAGRAM<br />
FUNKTIONSDIAGRAMM<br />
<strong>Luna</strong> / <strong>Stella</strong><br />
4<br />
Motor control unit and fuse panel · Motorsteuereinheit und Sicherungstafel<br />
O<br />
Motor<br />
Motor<br />
Motor control unit<br />
Motorsteuereinheit<br />
TB3<br />
TB1<br />
TB2<br />
TB2<br />
S/Z<br />
ON/OFF<br />
Yarn store sensors<br />
Garnlagersensoren<br />
Yarn break detector<br />
Fadenbruchwächter<br />
S/Z switch<br />
S/Z-Schalter<br />
ON/OFF switch<br />
EIN/AUS-Schalter<br />
TB3 – TB10<br />
+<br />
+<br />
Machine stop signal<br />
Maschinenstoppsignal<br />
TB12/TB19<br />
Fuse panel<br />
Sicherungstafel<br />
TB1 TB1 TB1<br />
Transformer<br />
Transformator<br />
Ref. No. 27-8930-0811-08/0550<br />
PE<br />
T 10A<br />
Mains supply<br />
Netzanschluß
INSTALLATION<br />
INSTALLATION<br />
<strong>Luna</strong> / <strong>Stella</strong><br />
5<br />
NOTE<br />
Condensation can form on the weft feeder when it is moved from the cold environment of the warehouse<br />
to the warmer environment of the loom room. Make sure that the feeder is dry before switching it on.<br />
ACHTUNG<br />
Kondensflüssigkeit kann sich bilden, wenn der Fadenspeicher aus der kalten Umgebung des Lagers in den wärmeren<br />
Webraum gebracht wird. Bitte darauf achten, dass das Gerät trocken ist, bevor es eingeschaltet wird.<br />
The unit should not be mounted directly on<br />
the weaving machine.<br />
Die Einheit darf nicht direkt an der<br />
Webmaschine montiert werden.<br />
Use a separate floor stand.<br />
Separates Gestell verwenden.<br />
Feeders with Mechanical sensors (<strong>Luna</strong>-M,<br />
<strong>Stella</strong>) must be mounted within 45° of the<br />
horizontal plane.<br />
*Max 15° with low sensor spring force.<br />
(see page 19)<br />
45°<br />
45° 45°<br />
Speicher mit mechanischem Abtastsystem<br />
(<strong>Luna</strong>-M, <strong>Stella</strong>) darf man maximal 45° verdreht<br />
installieren.<br />
*Max 15° auf Stufe 1 (siehe Seite 198)<br />
45°*<br />
Ref. No. 27-8930-0811-08/0550<br />
Ensure that the mount screws and locking<br />
nuts are correctly tightened.<br />
Sicherstellen, daß Befestigungsschrauben und<br />
Gegenmuttern richtig angezogen sind.
MAINS CONNECTION<br />
NETZANSCHLUSS<br />
<strong>Luna</strong> / <strong>Stella</strong><br />
6<br />
IMPORTANT!<br />
Turn off the main switch before any work is carried out on the electrical circuit.<br />
WICHTIG!<br />
Hauptschalter vor der Arbeit am Stromkreis ausschalten.<br />
The power supply to the feeder must not be<br />
disrupted when the weaving machine stops.<br />
Bei Anhalten der Webmaschine darf die<br />
Stromversorgung des Vorspulgeräts nicht<br />
unterbrochen werden.<br />
PE<br />
L1 L2 L3<br />
Main switch<br />
Hauptschalter<br />
Emergency stop<br />
Notstop Schalter<br />
Stop motion relay<br />
Abstellrelais<br />
Variations in main voltage.<br />
Zulässige Netzschwankungen.<br />
- +<br />
Connector Voltage Frequence<br />
Verbindung Spannung Frequenz<br />
Ref. No. 27-8930-0811-08/0550<br />
200/220V 190 - 230 V 50/60 Hz<br />
260 V 235 - 285 V 50/60 Hz<br />
346 V 310 - 380 V 50/60 Hz<br />
380 V 340 - 420 V 50/60 Hz<br />
400/415 V 365 - 445 V 50/60 Hz<br />
440 V/460 V 405 - 495 V 50/60 Hz<br />
480/500 V 440 - 540 V 50/60 Hz<br />
550/575/600 V 520 - 630 V 50/60 Hz
MAINS CONNECTION<br />
NETZANSCHLUSS<br />
<strong>Luna</strong> / <strong>Stella</strong><br />
7<br />
The wiring diagrams on the following pages refer to control boxes equipped with a main switch (as in fig.1 below).<br />
The mains supply must be connected to L1, L2, L3 and protective earth. When the control box is not equipped with<br />
a main switch the mains supply must be connected as in fig.2.<br />
Die Schaltpläne auf der nächsten Seite beziehen sich auf Schaltkästen mit Hauptschalter (wie in Bild 1 unten). Der Netzstrom<br />
wird an L1, L2, L3 und Schutzerde angeschlossen. Wenn der Schaltkasten nicht mit Hauptschalter ausgestattet ist, wird der<br />
Netzstrom wie in Bild 2 gezeigt angeschlossen.<br />
With main switch · Mit Hauptschalter<br />
Fig. 1<br />
Without main switch · Ohne Hauptschalter<br />
Fig. 2<br />
Colour Table · Farbentabelle<br />
COLOUR<br />
FARBE<br />
FÄRG<br />
COULEUR<br />
COLOR<br />
COLORE<br />
COR<br />
White<br />
Weiss<br />
Vit<br />
Blanc<br />
Blanco<br />
Bianco<br />
Branco<br />
Black<br />
Schwarz<br />
Svart<br />
Noir<br />
Negro<br />
Nero<br />
Preto<br />
Grey<br />
Grau<br />
Grå<br />
Gris<br />
Gris<br />
Grigio<br />
Cinza<br />
Blue<br />
Blau<br />
Blå<br />
Bleu<br />
Azul<br />
Blu<br />
Azul<br />
Yellow<br />
Gelb<br />
Gul<br />
Jaune<br />
Amarillo<br />
Giallo<br />
Amarelo<br />
Ref. No. 27-8930-0811-08/0550<br />
Red<br />
Green<br />
Brown<br />
Orange<br />
Violet<br />
Rot<br />
Grün<br />
Braun<br />
Orange<br />
Violett<br />
Röd<br />
Grön<br />
Brun<br />
Orange<br />
Violett<br />
Rouge<br />
Vert<br />
Marron<br />
Orange<br />
Violet<br />
Rojo<br />
Verde<br />
Marron<br />
Naranja<br />
Violeta<br />
Rosso<br />
Verde<br />
Marrone<br />
Arancione<br />
Viola<br />
Vermelho<br />
Verde<br />
Castanho<br />
Laranja<br />
Violeta
WIRING DIAGRAM<br />
SCHALTPLAN<br />
<strong>Luna</strong> / <strong>Stella</strong><br />
8<br />
Mains connection · Netanschluss<br />
Mains Supply<br />
Netzanschluß<br />
L1 L2 L3<br />
1<br />
3<br />
5<br />
2<br />
4<br />
6<br />
TB1 connection · TB1 anschluß<br />
135V Green TB1/1<br />
PRIM<br />
R<br />
SEC<br />
10V White TB1/4<br />
PRIM<br />
S<br />
SEC<br />
135V Green TB1/2<br />
10V White TB1/5<br />
F3 F4 F5 F6 F7<br />
F9 F10 F11 F12 F13 F14<br />
135V Green TB1/3<br />
1 TB2 6<br />
Ref. No. 27-8930-0811-08/0550<br />
PRIM<br />
T<br />
SEC<br />
10V White TB1/6<br />
Common TB1/7<br />
1 TB1 7
INTERFACE CONNECTIONS<br />
ANSCHLUß AN DIE WEBMASCHINE<br />
<strong>Luna</strong> / <strong>Stella</strong><br />
9<br />
Connections to weaving machine · Anschluß an die Webmaschine<br />
Feeders not in use should be set in the standby position (see page 14)<br />
or disconnected from the control box<br />
Vorspulgeräte, die nicht im Einsatz sind, müssen in Bereitschaftsstellung<br />
sein oder vom Schaltkasten getrennt werden (siehe Seite 14).<br />
Opto coupler/ Opto-Koppler<br />
Low / Niedrig<br />
High / Hoch<br />
1 2 3 4 5 6 7 8 9 10 11 1 2 3 4 5 6 7 8 9 10 11<br />
Common<br />
Stop signal to the weaving machine<br />
Stoppsignal an Webmaschine<br />
Power supply<br />
Stromversorgung<br />
Max 24 V<br />
Stop signal to the weaving machine<br />
Stoppsignal an Webmaschine<br />
Stop relays / Abstellrelais<br />
Machine stop / Maschinen-Stopp<br />
Stop indicator / Stoppanzeigelampe<br />
1 2 3 4 5 6 1 2 3 4 5 6<br />
NO NC COM<br />
NO COM NC<br />
1 11<br />
TB19<br />
(4725)<br />
TB19<br />
(4725)<br />
COM 1 8<br />
TB21<br />
(4925)<br />
C1<br />
1 6<br />
TB12<br />
(4025)<br />
C2<br />
C5<br />
F1 F2 F3 F4 F5 F6 F7 F8<br />
C3<br />
F9 F10 F1 1 F12 F13 F14<br />
TB1<br />
1 7<br />
C4<br />
Ref. No. 27-8930-0811-08/0550<br />
Fuses / Sicherungen F9-11 Fuses / Sicherungen F1-8 Fuses / Sicherungen F12-14<br />
Mains supply/<br />
Motor supply/<br />
Control supply/<br />
Netztrom<br />
Motorstrom<br />
Steuerstrom<br />
T4A<br />
T3,15A<br />
T3,15A
JUMPER/SPEED SETTINGS<br />
JUMPER/GESCHWINDIGKEIT-EINSTELLUNGEN<br />
<strong>Luna</strong> / <strong>Stella</strong><br />
10<br />
Motor circuit board jumpers • Jumper an den Motorleiterplatten<br />
The feeder is equipped with jumpers on the motor circuit board that adapt the feeders operation to<br />
the characteristics of the weaving process<br />
Das Vorspulgerät ist mit Jumper an den Motorleiterplatten ausgestattet, die die Funktion der Vorspulgeräte<br />
den Kennlinien des Webprozesses anpassen.<br />
J1<br />
J2<br />
J3<br />
J4<br />
J1<br />
J2<br />
J3<br />
J4<br />
<strong>Luna</strong>-M<br />
<strong>Luna</strong>-M<br />
<strong>Luna</strong>-O<br />
J1<br />
Fast-fill yarn store<br />
Schnelle Regulation<br />
J1<br />
For projectile weaving m/c<br />
für Projektilwebmaschinen<br />
J1<br />
Normalsetting<br />
Normaleinstellung<br />
J1<br />
For rapier weaving m/c<br />
für Greiferwebmaschinen<br />
J2<br />
J2<br />
Normalsetting<br />
Normaleinstellung<br />
For rigid yarns<br />
Für harte Garne<br />
J1<br />
J1<br />
<strong>Stella</strong><br />
Normal setting<br />
Normaleinstellung<br />
Floating yarn store<br />
Variabler Garnspeicher<br />
J2<br />
Normal setting<br />
Normaleinstellung<br />
J2<br />
For rigid yarns<br />
Für harte Garne<br />
Maximum speed • Maximale Geschwindigkeit<br />
Max. speed (<strong>Luna</strong>-M, <strong>Stella</strong>). To set the maximum speed rotate<br />
the disc to the appropriate position.<br />
Max. Geschwindigkeit (<strong>Luna</strong>-M, <strong>Stella</strong>). Schalter auf die gewünschte<br />
maximale Geschwindigkeit drehen.<br />
1 2 3 4<br />
Ref. No. 27-8930-0811-08/0550<br />
Pos <strong>Luna</strong>-M <strong>Stella</strong><br />
1 = 1500m/min 1500m/min<br />
2 = 1200m/min 1100m/min<br />
3 = 800m/min 750m/min<br />
4 = 500m/min 400m/min
YARN CONTROL<br />
FADENBREMSUNG<br />
<strong>Luna</strong> / <strong>Stella</strong><br />
11<br />
When weaving certain types of yarn and under special weaving conditions it may be necessary to use yarn control<br />
elements in positions 1 and 3. The tables below and on the following page describe suitable combinations.<br />
Beim Weben von gewissen Garnen bzw. unter besonderen Bedingungen können bei Position 1 und 3 Fadenbremsen<br />
erforderlich sein. Geeignete Kombinationen sind der untenstehenden Tabelle und der nächsten Seite zu entnehmen.<br />
Yarn control element positions / Plazierung Fadenbremsen<br />
O<br />
Yarn control element – type and position / Fadenbremse – Typ und Position<br />
ELEMENT TYPE / TYP<br />
POSITION<br />
ELEMENT TYPE / TYP<br />
POSITION<br />
Brush<br />
Bürste<br />
Ref. No. 27-8930-0811-08/0550<br />
K
YARN CONTROL RECOMMENDATIONS<br />
EMPFOHLENE FADENBREMSEN<br />
<strong>Luna</strong><br />
12<br />
Yarn/Garne Rapier/Greifer Projectile/Projektil<br />
YARN COUNT/ TENSIONERS/ YARN COUNT/ TENSIONERS/<br />
GARNNUMMER BREMSE GARNNUMMER BREMSE<br />
1 2 3<br />
1 2<br />
Spun cotton and<br />
covered elastic<br />
Spinnbaumll und<br />
beschichtete<br />
elastische Garne<br />
Ne 74 - 35 A G/ I K Ne > 35 A H/ I<br />
Ne 59 - 9 A G/ II K Ne 59 - 16 A F/ II<br />
Ne 15 - 4 A G/ III K Ne 20 - 4 A G/ III<br />
Ne 6 - 1,2 D G/ IIII K Ne 6 - 1,2 D G/ IIII<br />
Ne 6 - 0,9* D G/ IIII K Ne 6 - 0,9* D G/ IIII<br />
Wool<br />
Wolle<br />
Nm 120 - 60 A H/ I B+B+K Nm > 60 A H/ I<br />
Nm 100 - 14 A H/ II B+B+K Nm 100 - 27 A F/ II<br />
Nm 25 - 7 A G/ III K Nm 33 - 7 A G/ III<br />
Nm 10 - 2 D G/ IIII K Nm 10 - 2 D G/ IIII<br />
Nm 10 - 1,5* D G/ IIII K Nm 10 - 1,5* D G/ IIII<br />
Stiff yarns, Jute<br />
and Flax (linen)<br />
Steife Garne,<br />
Jute und Leinen<br />
Chenille<br />
Chenille<br />
Fancy yarns,<br />
Slub and Nub<br />
Effekt,- Noppenund<br />
Flammengarne<br />
Nm 120 - 30 A E/ II K Nm 120 - 27 A F/ II<br />
Nm 35 - 20 A E/ III K Nm 33 - 7 D G/ III<br />
Nm 26 - 7 A G/ III K Nm 10 - 2 D G/ IIII<br />
Nm 10 - 2 D G/ IIII K Nm 10 - 1,5* D G/ IIII<br />
Nm 10 - 1,5* D G/ IIII K<br />
Nm 120 - 20 A G/ II K Nm 120 - 50 A H/ I<br />
Nm 25 - 7 A G/ III K Nm 67 - 7 A H/ II<br />
Nm 10 - 2 D G/ IIII K Nm 10 - 2 D H/ III<br />
Nm 10 - 1,5* D G/ IIII K Nm 10 - 1,5* D H/ III<br />
Nm 120 - 50 B H/ I B+B+K Nm 120 - 50 B H/ I<br />
Nm 67 - 7 B H/ II B+B+K Nm 67 - 7 B H/ II<br />
Nm 10 - 2 B H/ III B+B+K Nm 10 - 2 B H/ III<br />
Nm 10 - 1,5* B H/ III B+B+K Nm 10 - 1,5* B H/ III<br />
High Twist<br />
Hochgedrehte<br />
Garne<br />
Tex 4 - 20 C E/ I K Tex 4 - 20 C H/ I<br />
Tex 15 - 50 C E/ II K Tex 15 - 100 C H/ II<br />
Tex 40 - 100 C E/ III B+B+K Tex 80 - 400 C H/ III<br />
Endless Filament<br />
Endloses Filament<br />
Tex 4 - 20 C H/ I J/ I+K Tex 4 - 20 C H/ I<br />
Tex 15 - 40 C H/ II J/ II+K Tex 15 - 100 C H/ II<br />
Tex 30 - 100 A H/ II J/ III+K Tex 80 - 350 A H/ III<br />
Tex 80 - 350 A H/ II B+B+K Tex 80 - 400* A H/ III<br />
Tex 80 - 400* A H/III B+B+K<br />
* = <strong>Luna</strong>-M only - Nur <strong>Luna</strong> M Tension rating: I=soft, II=medium, III=stiff, IIII=extra stiff<br />
Bremsspannung: I=weich, II=mittel, III=hart, IIII=S hart<br />
Ref. No. 27-8930-0811-08/0550<br />
NOTE: As tensioner performance can be affected by various factors connected to the specific yarns being<br />
used the above recommendations are intended purely as a guide. In case of any uncertainty it is recommended<br />
that a weft insertion test be carried out.<br />
ANMERKUNG: Die Wirkung der Bremsen kann von verschiedenen, mit spezifischen Garnen verbundenen Faktoren<br />
beeinflußt werden. Die obigen Empfehlungen sind daher lediglich als Richtlinien zu verstehen. Im Zweifelsfall empfehlen<br />
wir einen Schußeintragsversuch.
YARN CONTROL RECOMMENDATIONS<br />
EMPFOHLENE FADENBREMSEN<br />
<strong>Stella</strong><br />
13<br />
Yarn/Garne Rapier/Greifer Projectile/Projektil<br />
YARN COUNT/ TENSIONERS/ YARN COUNT/ TENSIONERS/<br />
GARNNUMMER BREMSE GARNNUMMER BREMSE<br />
1 2 3<br />
1 2<br />
Spun cotton and<br />
covered elastic<br />
Spinnbaumll und<br />
beschichtete<br />
elastische Garne<br />
Ne 74 - 35 A G/ I K Ne > 35 A H/ I<br />
Ne 59 - 9 A G/ II K Ne 59 - 16 A F/ II<br />
Ne 15 - 4 A G/ III K Ne 20 - 4 A G/ III<br />
Ne 6 - 2,4 D G/ IIII K Ne 6 - 1,2 D G/ IIII<br />
Wool<br />
Wolle<br />
Nm 120 - 60 A H/ I B+B+K Nm > 60 A H/ I<br />
Nm 100 - 14 A H/ II B+B+K Nm 100 - 27 A F/ II<br />
Nm 25 - 7 A G/ III K Nm 33 - 7 A G/ III<br />
Nm 10 - 4 D G/ IIII K<br />
Stiff yarns, Jute<br />
and Flax (linen)<br />
Steife Garne,<br />
Jute und Leinen<br />
Nm 120 - 30 A E/ II K Nm 120 - 27 A F/ II<br />
Nm 35 - 20 A E/ III K Nm 33 - 7 D G/ III<br />
Nm 26 - 7 A G/ III K<br />
Nm 10 - 4 D G/ IIII K<br />
Chenille<br />
Chenille<br />
Nm 120 - 20 A G/ II K Nm 120 - 50 A H/ I<br />
Nm 25 - 7 A G/ III K Nm 67 - 7 A H/ II<br />
Nm 10 - 4 D G/ IIII K<br />
Fancy yarns,<br />
Slub and Nub<br />
Effekt,- Noppenund<br />
Flammengarne<br />
Nm 120 - 50 B H/ I B+B+K Nm 120 - 50 B H/ I<br />
Nm 67 - 7 B H/ II B+B+K Nm 67 - 7 B H/ II<br />
Nm 10 - 4 B H/ III B+B+K Nm 10 - 2 B H/ III<br />
High Twist<br />
Hochgedrehte<br />
Garne<br />
Tex 4 - 20 C E/ I K Tex 4 - 20 C H/ I<br />
Tex 15 - 50 C E/ II K Tex 15 - 100 C H/ II<br />
Tex 40 - 100 C E/ III B+B+K Tex 80 - 400 C H/ III<br />
Endless Filament<br />
Endloses Filament<br />
Tex 4 - 20 C H/ I J/ I+K Tex 4 - 20 C H/ I<br />
Tex 15 - 40 C H/ II J/ II+K Tex 15 - 100 C H/ II<br />
Tex 30 - 100 A H/ II J/ III+K Tex 80 - 350 A G/ III<br />
Tex 80 - 250 A H/ II B+B+K<br />
Tension rating: I=soft, II=medium, III=stiff, IIII=extra stiff<br />
Bremsspannung: I=weich, II=mittel, III=hart, IIII=S hart<br />
Ref. No. 27-8930-0811-08/0550<br />
NOTE: As tensioner performance can be affected by various factors connected to the specific yarns<br />
being used the above recommendations are intended purely as a guide. In case of any uncertainty it is<br />
recommended that a weft insertion test be carried out. Especially when weaving very stiff yarns.<br />
ANMERKUNG: Die Wirkung der Bremsen kann von verschiedenen, mit spezifischen Garnen verbundenen Faktoren<br />
beeinflußt werden. Die obigen Empfehlungen sind daher lediglich als Richtlinien zu verstehen. Im Zweifelsfall empfehlen<br />
wir einen Schußeintragsversuch. Speziell beim Weben von sehr hartem Garn.
S/Z ADJUSTMENT<br />
S/Z-EINSTELLUNG<br />
<strong>Luna</strong> / <strong>Stella</strong><br />
14<br />
Switch off the feeder.<br />
Vorspulgerät ausschalten.<br />
Grip the winding disc and, whilst pressing the<br />
orange button on the front of the spool body,<br />
rotate the disc until the button is felt to<br />
locate. Aligning the mark on the winding disc<br />
with the line on the motor house gives the<br />
zero separation position.<br />
Wickelscheibe festhalten und unter Drücken des<br />
orangefarbenen Knopfes vorn am Spulenkörper<br />
drehen bis der Knopf spürbar einrastet. Wenn die<br />
Nullmarkierung an der Wickelscheibe mit dem<br />
Strich am Motorgehäuse fluchtet, beträgt die<br />
Separierung null.<br />
To adjust, press in the button and revolve the<br />
winding disc in the appropriate direction.<br />
The separation increases from 0 to 2,2 mm<br />
(<strong>Luna</strong>-O/<strong>Stella</strong>) 0 to 2,7 mm (<strong>Luna</strong>-M) the more<br />
the disc is rotated.<br />
min<br />
max<br />
Z<br />
Zur Einstellung Knopf drücken und Wickelscheibe<br />
in die betreffende Richtung drehen.<br />
Die Separierung beträgt je nach Wickelscheiberverdrehung<br />
0 bis 2,2 mm (<strong>Luna</strong>-O/<strong>Stella</strong>) bzw.<br />
0 bis 2,7 mm (<strong>Luna</strong>-M).<br />
max<br />
S<br />
The separation must be distinct, but not<br />
excessive.<br />
Die Separierung muß kennbar, aber nicht übermäßig<br />
sein.<br />
Ref. No. 27-8930-0811-08/0550<br />
Set the direction of rotation with the switch.<br />
(The feeder is deactivated in the standby<br />
position (0))<br />
Drehrichtung mit dem Schalter einstellen und<br />
Vorspulgerät einschalten. In Stellung 0 ist das<br />
Gerät auf Bereitschaft eingestellt.<br />
<strong>Luna</strong>-M<br />
<strong>Luna</strong>-O
PNEUMATIC THREADING<br />
PNEUMATISCHE EINFÄDLUNG<br />
<strong>Luna</strong> / <strong>Stella</strong><br />
15<br />
Switch on the feeder.<br />
The winding disc will automatically position<br />
itself (empty spool body)*.<br />
Vorspulgerät einschalten. Die Wickelscheibe wird<br />
automatisch positioniert (Spulenkörper leer)*.<br />
FULL THREADING*<br />
Insert the yarn into the eyelet and press both<br />
the threading buttons.<br />
VOLLEINFÄDELUNG*<br />
Faden in die Öse schieben und beide<br />
Einfädelknöpfe drücken.<br />
HALF THREADING **<br />
Insert the yarn into the eyelet and press the<br />
right threading button.<br />
HALBEINFÄDELUNG**<br />
Faden in die Öse schieben und rechten<br />
Einfädelknopf drücken.<br />
*<strong>Luna</strong> option<br />
*<strong>Luna</strong> option<br />
Ref. No. 27-8930-0811-08/0550<br />
**<strong>Luna</strong>/<strong>Stella</strong> option<br />
**<strong>Luna</strong>/<strong>Stella</strong> option
MANUAL THREADING<br />
MANUELLES EINFÄDELN<br />
<strong>Luna</strong> / <strong>Stella</strong><br />
16<br />
WITHOUT CAT<br />
• Switch off the feeder.<br />
• Align the winding disc eyelet (1).<br />
• Open the brush holder ( see page 17).<br />
• Thread the needle all the way through the<br />
feeder and output eyelet.<br />
• Pull the yarn through.<br />
• Restart the feeder.<br />
OHNE CAT<br />
• Speicher ausschalten.<br />
• Wickelscheibe in die richtige Position drehen (1).<br />
• Die Einfädel- Nadel durch den Speicher,<br />
einschliesslich Auslauföse, stossen. (siehe<br />
Seite 17).<br />
• Faden in Nadel einhängen und durchziehen.<br />
• Speicher starten.<br />
1<br />
WITH CAT<br />
• Switch off the feeder.<br />
• Align the winding disc eyelet.<br />
• Thread the needle through the feeder and<br />
balloon control brush.<br />
• Start the feeder and fill the yarn store.<br />
• Insert the threading needle into the CAT (2)<br />
as far as possible.<br />
• Pulling the yarn (3) will cause it to wrap<br />
around the threading needle.<br />
• When the threading needle is pulled out (4)<br />
the yarn will follow.<br />
O<br />
O<br />
3<br />
2<br />
MIT CAT<br />
• Speicher ausschalten.<br />
• Wickelscheibe in die richtige Position drehen.<br />
• Speicher starten und Garnlager aufwickeln.<br />
• Einfädeln- Nadel von vorne, bis zum Anschlag<br />
in die CAT einführen (2).<br />
• Durch Ziehen am Faden (3) wird dieser in die<br />
Nadel eingehängt.<br />
• Mit der Nadel wird der Faden aus der Bremse<br />
gezogen (4).<br />
O<br />
O<br />
4<br />
Ref. No. 27-8930-0811-08/0550
BALLOON/FLEX BRAKE ADJUSTMENT<br />
BALLON/FLEXBREMSEINSTELLUNG<br />
<strong>Luna</strong> / <strong>Stella</strong><br />
17<br />
Adjust the balloon control/Flex Brake tension.<br />
NOTE:<br />
Excessive brush tension will cause abnormal wear.<br />
Ballon/Flexbremsspannung einstellen.<br />
ANMERKUNG:<br />
Unzulässig starke Bürstenspannung führt zu abnormalem<br />
Verschleiß.<br />
+ - + - -<br />
A<br />
OK!<br />
Ensure that the brush ring/flex is correctly positioned.<br />
Sicherstellen dass der Bürstenring/ die Flexbremse richtig<br />
positioniert ist.<br />
SHIFTING THE BRUSH HOLDER<br />
Rotating the slide shift lever will detach the brush/flex from<br />
the spool body<br />
VERSCHIEBEN DES BÜRSTENHALTERS<br />
Bei Drehen des Schieberhebels wird die Bürste/Flex-Einheit vom<br />
Spulenkörper abgehoben.<br />
Ref. No. 27-8930-0811-08/0550<br />
WARNING: When using a threading needle, care must be<br />
taken to avoid damaging the FlexBrake. Ensure that the flex<br />
holder is in the forward position before threading.<br />
WARNUNG: Bei Verwendung einer Einziehnadel ist Vorsicht<br />
geboten, wenn die FlexBrake nicht beschädigt werden soll.<br />
Vor dem Einfädeln sicherstellen, daß der Flex-Halter in<br />
Vorwärtsstellung ist.
CAT ADJUSTMENT<br />
CAT-EINSTELLUNG<br />
<strong>Luna</strong> / <strong>Stella</strong><br />
18<br />
Adjust yarn tension to the CAT.<br />
Fadenspannung mit der CAT-Einheit regeln.<br />
NOTE: The brush ring shall only be used for<br />
balloon control.<br />
O<br />
ANMERKUNG: Der Bürstenring sollte nur für die<br />
Ballonkontrolle verwendet werden.<br />
Adjustment of the output tension.<br />
Einstellung der Auslaufspannung.<br />
O<br />
Ref. No. 27-8930-0811-08/0550
SENSOR ADJUSTMENT<br />
SENSOREINSTELLUNG<br />
<strong>Luna</strong> / <strong>Stella</strong><br />
19<br />
<strong>Luna</strong>-O<br />
Certain yarn types may stick to, or leave<br />
deposits on, the sensor mirror.<br />
In such cases the clearance between the<br />
yarn and the mirror can be increased.<br />
Gewisse Garnsorten können am Sensorspiegel<br />
kleben oder dort Ansammlungen<br />
zurücklassen. In diesem Fall kann der<br />
Abstand zwischen Garn und Spiegel vergrößert<br />
werden.<br />
O<br />
Adjust the clearance by rotating the mirror<br />
holder 180 degrees.<br />
Spiegelhalter zur Einstellung des Abstandes<br />
um 180° drehen.<br />
Normal Position<br />
Normalstellung<br />
Ensure that the blank<br />
part of the mirror is<br />
forward!<br />
Sicherstellen, daß die<br />
Blankseite des Spiegels<br />
vorn ist!<br />
Increased clearance<br />
Größerer Abstand<br />
<strong>Luna</strong>-M / <strong>Stella</strong><br />
Ref. No. 27-8930-0811-08/0550<br />
The sensors are adjustable in three<br />
stages:<br />
Level 1 - Very fine yarns<br />
Level 2 - Normal setting<br />
Level 3 - Very heavy yarns<br />
Die Sensoren sind einstellbar in 3 Stufen:<br />
Stufe 1 - Feine Garne<br />
Stufe 2 - Mittlere Garne<br />
Stufe 3 - Grobe Garne<br />
+ –
MAINTENANCE<br />
WARTUNG<br />
<strong>Luna</strong> / <strong>Stella</strong><br />
20<br />
It is recommended to carry out a periodical<br />
cleaning of any lint or dust accumulation on<br />
the feeder or the control box.<br />
Zur Vermeidung von Faserflug und Schmutzansammlungen<br />
am Vorspulgerät und am Schaltkasten<br />
wird regelmäßige Reinigung empfohlen.<br />
O<br />
min 20 cm<br />
The unit requires no extra lubrication.<br />
Zusätzliche Schmierung ist nicht erforderlich.<br />
O<br />
Always turn off the main switch or isolate the<br />
power supply and disconnect the air supply<br />
before connecting or disconnecting the<br />
feeder, the control board or any of the circuit<br />
boards.<br />
Main switch<br />
Hauptschalter<br />
Vor dem Anschließen oder Abtrennen des<br />
Gerätes, der Schalttafel oder der Leiterplatten<br />
immer den Hauptschalter ausschalten oder die<br />
Strom- und Druckluftversorgung unterbrechen.<br />
0<br />
Ref. No. 27-8930-0811-08/0550<br />
1
FAULT FINDING<br />
<strong>Luna</strong> / <strong>Stella</strong><br />
21<br />
Ref. No. 27-8930-0811-08/0550<br />
Fault Finding <strong>Luna</strong>-O <strong>Luna</strong>-M / <strong>Stella</strong><br />
FAULT CHECK IN THE FOLLOWING ORDER CHECK IN THE FOLLOWING ORDER<br />
Feeder will not start 1 - 2 - 3 - 4 - 6 - 7 - 8 - 24 - 25 - 26 1 - 2 - 3 - 5 - 6 - 7 - 8 - 24 - 25 - 26<br />
Feeder will not stop 2 - 4 - 24 - 25 9 - 13 - 5 - 15 - 24 - 25<br />
Low or empty yarn store 4 - 3 - 13 - 9 - 8 - 21 - 24 - 25 - 27 - 26 17 - 3 - 5 - 16 - 13 - 9 - 8 - 21 - 24 - 25 - 27 - 26<br />
Input yarn breaks frequently 22 - 10 - 13 22 - 10 - 18 - 14<br />
Output yarn breaks frequently 11 - 20 - 12 - 19 - 23 11 - 20 - 12 - 19 - 23<br />
Fuses F1-F14 blow repeatedly 25 - 28 25 - 28<br />
Feeder warning light flashes slowly 9 - 13 9 - 13<br />
Feeder warning light flashes rapidly 3 - 9 - 8 - 27 3 - 9 - 8 - 27<br />
POSSIBLE CAUSES: REMEDIES: SEE PAGE:<br />
1. Incorrect S/Z switch position Set the S/Z switch in appropriate position 14<br />
2. Incorrect spoolbody position Ensure the sensor unit is positioned upwards 19<br />
3. Winding disc jammed Free and clean the winding disc 20<br />
4. Contaminated sensor or mirror Clean the sensor and mirror using a mild cleaning agent 19<br />
5. Sensor arms jammed Free the arms and clean the sensing unit 20<br />
6. Faulty cable connections Check and rectify 6-9<br />
7. Fuses F1 - F14 blown Replace the relevant fuse 9<br />
8. Mains supply / primary voltage fault Check the mains supply and connections 6-9<br />
9. Insufficient input tension Increase the input tension 11-13<br />
10. Excessive input tension Reduce the input tension 11-13<br />
11. Insufficient balloon control Increase the balloon control 17<br />
12. Excessive output tension Reduce the output tension -<br />
13. Excessive yarn separation Reduce the yarn separation 14<br />
14. Incorrect jumper J2 setting Reposition jumper 10<br />
15. Excessive pressure on max sensor arm Reduce the spring pressure 19<br />
16. Max sensor bouncing Increase the spring pressure 19<br />
17. Insufficient max speed setting Increase the max speed setting 10<br />
18. Excessive max speed setting Reduce the max speed setting 10<br />
19. Insufficient yarn store See “low or empty yarn store” above -<br />
20. Damaged balloon control Repair/replace all defective parts 17<br />
21. Stop signal fault between control box and weaving M/C Check all connections/cable 9<br />
22. Misalignment between the bobbin and the feeder Realign the bobbin/feeder -<br />
23. Misalignment between the feeder and the machine Realign the feeder/machine -<br />
24. Defect yarn store sensor unit Replace the relevant sensor unit 4<br />
25. Defective motor circuit board Replace the relevant circuit board 4<br />
26. Defective fuse panel Replace the relevant fuse panel 4<br />
27. Defective control box interface Replace the relevant interface 4<br />
28. Defective feeder connection cable Replace the relevant connection cable 4
FEHLERSUCHE<br />
<strong>Luna</strong> / <strong>Stella</strong><br />
22<br />
Ref. No. 27-8930-0811-08/0550<br />
Fehlersuche <strong>Luna</strong>-O <strong>Luna</strong>-M / <strong>Stella</strong><br />
FEHLER IN FOLGENDER REIHENFOLGE KONTROLLIEREN IN FOLGENDER REIHENFOLGE KONTROLLIEREN<br />
Gerät startet nicht 1 - 2 - 3 - 4 - 6 - 7 - 8 - 24 - 25 - 26 1 - 2 - 3 - 5 - 6 - 7 - 8 - 24 - 25 - 26<br />
Gerät stoppt nicht 2 - 4 - 24 - 25 9 - 13 - 5 - 15 - 24 - 25<br />
Fadenreserve klein oder läuft leer 4 - 3 - 13 - 9 - 8 - 21 - 24 - 25 - 27 - 26 17 - 3 - 5 - 16 - 13 - 9 - 8 - 21 - 24 - 25 - 27 - 26<br />
Regelmässige Garnbrüche an der Einlaufseite 22 - 10 - 13 22 - 10 - 18 - 14<br />
Regelmässige Garnbrüche an der Auslaufseite 11 - 20 - 12 - 19 - 23 11 - 20 - 12 - 19 - 23<br />
Sicherungen F1-14 im Schaltkasten brennen wiederholt durch 25 - 28 25 - 28<br />
Anzeigelampe blinkt langsam 9 - 13 9 - 13<br />
Anzeigelampe blinkt schnell 3 - 9 - 8 - 27 3 - 9 - 8 - 27<br />
MÖGLICHE URSACHE: LÖSUNG: SIEHE SEITE:<br />
1. Position des S/Z Schalters falsch S/Z Schalter in korrekte Position stellen 14<br />
2. Falsche Spulenkörperposition Sicherstellen, dass der Spiegel oder der schwarze Plastikeinsatz gerade nach oben schaut 19<br />
3. Wickelscheibe geht streng Wickelscheibe ausbauen und hinterwickeltes Garn entfernen 20<br />
4. Verschmutzter Sensor oder Spiegel Reinigen des Sensors oder Spiegels mit einem milden Reinigungsmittel 19<br />
5. Sensorarm verklemmt Sensorarm befreien und evtl. mechanische Teile ersetzen 20<br />
6. Anschlusskabel falsch angeschlossen Kontrollieren und korrigieren 6-9<br />
7. Sicherung F1-F14 durchgebrannt Ersetzen der entsprechenden Sicherung 9<br />
8. Netzanschluss / Primärspannungsfehler Prüfe den Netzanschluss und die Verbindungen 6-9<br />
9. Einlaufspannung zu tief Erhöhen der Einlaufspannung 11-13<br />
10. Einlaufspannung zu hoch Reduzieren der Einlaufspannung 11-13<br />
11. Ungenügende Ballonkontrolle Auslaufspannung erhöhen durch Bremsbürste / Flexbremse 17<br />
12. Zu hohe Auslaufspannung Auslaufspannung reduzieren -<br />
13. Garnseparation zu gross Reduziere Separation 14<br />
14. Jumper J2 falsch gesteckt Korrigiere Position 10<br />
15. Zu hoher Druck am max. Sensorarm Reduziere die Federspannung 19<br />
16. Max. Sensorarm springt Erhöhe die Federspannung 19<br />
17. Ungenügende max. Geschwindigkeit Erhöhe die max. Geschwindigkeit 10<br />
18. Zu hohe max. Geschwindigkeit Reduziere die max. Geschwindigkeit 10<br />
19. Ungenügende Garnreserve Siehe oben “Fadenreserve klein oder läuft leer” -<br />
20. Defekte Ballonkontrolle Reparieren oder ersetzen von defekten Teilen 17<br />
21. Fehlabstellungen zwischen Kontrollkasten und Maschine Kontrolliere alle Verbindungen 9<br />
22. Garnspule nicht korrekt ausgerichtet Garnspule neu ausrichten -<br />
23. Speicher schlecht ausgerichtet zur Maschine Speicher korrekt ausrichten zur Maschine -<br />
24. Defekter Garnreservesensor Sensor austauschen 4<br />
25. Defekte Motorprintplatte Printplatte austauschen 4<br />
26. Defekte Sicherungsplatte Sicherungsplatte austauschen 4<br />
27. Defektes Interface im Kontrollkasten Interface austauschen 4<br />
28. Defektes Anschlusskabel zwischen Speicher und Kontrollkasten Anschlusskabel austauschen 4