

HARMON ROCKET III - Green Hobby & Model
HARMON ROCKET III - Green Hobby & Model
HARMON ROCKET III - Green Hobby & Model

You also want an ePaper? Increase the reach of your titles
YUMPU automatically turns print PDFs into web optimized ePapers that Google loves.
<strong>HARMON</strong> <strong>ROCKET</strong> <strong>III</strong>. Instruction Manual.<br />
the flashing around the tank opening using a<br />
modeling knife. If flashing is present, make<br />
sure none falls into the tank.<br />
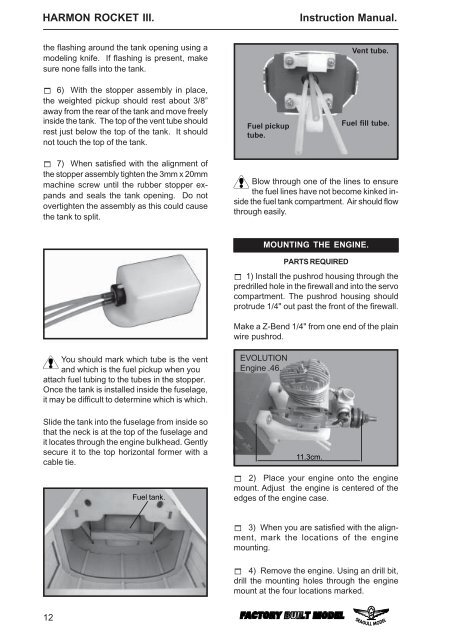
! 6) With the stopper assembly in place,<br />
the weighted pickup should rest about 3/8”<br />
away from the rear of the tank and move freely<br />
inside the tank. The top of the vent tube should<br />
rest just below the top of the tank. It should<br />
not touch the top of the tank.<br />
Fuel pickup<br />
tube.<br />
Vent tube.<br />
Fuel fill tube.<br />
! 7) When satisfied with the alignment of<br />
the stopper assembly tighten the 3mm x 20mm<br />
machine screw until the rubber stopper expands<br />
and seals the tank opening. Do not<br />
overtighten the assembly as this could cause<br />
the tank to split.<br />
Blow through one of the lines to ensure<br />
the fuel lines have not become kinked inside<br />
the fuel tank compartment. Air should flow<br />
through easily.<br />
MOUNTING THE ENGINE.<br />
PARTS REQUIRED<br />
! 1) Install the pushrod housing through the<br />
predrilled hole in the firewall and into the servo<br />
compartment. The pushrod housing should<br />
protrude 1/4" out past the front of the firewall.<br />
Make a Z-Bend 1/4" from one end of the plain<br />
wire pushrod.<br />
You should mark which tube is the vent<br />
and which is the fuel pickup when you<br />
attach fuel tubing to the tubes in the stopper.<br />
Once the tank is installed inside the fuselage,<br />
it may be difficult to determine which is which.<br />
EVOLUTION<br />
Engine .46.<br />
Slide the tank into the fuselage from inside so<br />
that the neck is at the top of the fuselage and<br />
it locates through the engine bulkhead. Gently<br />
secure it to the top horizontal former with a<br />
cable tie.<br />
Fuel tank.<br />
11.3cm.<br />
! 2) Place your engine onto the engine<br />
mount. Adjust the engine is centered of the<br />
edges of the engine case.<br />
! 3) When you are satisfied with the alignment,<br />
mark the locations of the engine<br />
mounting.<br />
! 4) Remove the engine. Using an drill bit,<br />
drill the mounting holes through the engine<br />
mount at the four locations marked.<br />
12


