HARMON ROCKET III - Green Hobby & Model
HARMON ROCKET III - Green Hobby & Model
HARMON ROCKET III - Green Hobby & Model
Create successful ePaper yourself
Turn your PDF publications into a flip-book with our unique Google optimized e-Paper software.
<strong>HARMON</strong> <strong>ROCKET</strong> <strong>III</strong>. Instruction Manual.<br />
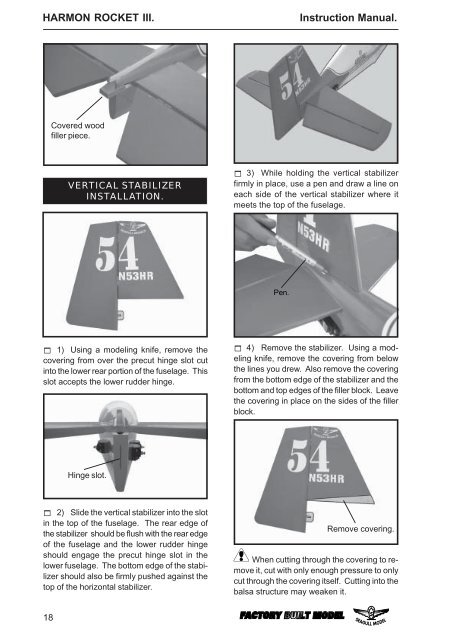
Covered wood<br />
filler piece.<br />
VERTICAL STABILIZER<br />
INSTALLATION.<br />
! 3) While holding the vertical stabilizer<br />
firmly in place, use a pen and draw a line on<br />
each side of the vertical stabilizer where it<br />
meets the top of the fuselage.<br />
Pen.<br />
! 1) Using a modeling knife, remove the<br />
covering from over the precut hinge slot cut<br />
into the lower rear portion of the fuselage. This<br />
slot accepts the lower rudder hinge.<br />
! 4) Remove the stabilizer. Using a modeling<br />
knife, remove the covering from below<br />
the lines you drew. Also remove the covering<br />
from the bottom edge of the stabilizer and the<br />
bottom and top edges of the filler block. Leave<br />
the covering in place on the sides of the filler<br />
block.<br />
Hinge slot.<br />
! 2) Slide the vertical stabilizer into the slot<br />
in the top of the fuselage. The rear edge of<br />
the stabilizer should be flush with the rear edge<br />
of the fuselage and the lower rudder hinge<br />
should engage the precut hinge slot in the<br />
lower fuselage. The bottom edge of the stabilizer<br />
should also be firmly pushed against the<br />
top of the horizontal stabilizer.<br />
Remove covering.<br />
When cutting through the covering to remove<br />
it, cut with only enough pressure to only<br />
cut through the covering itself. Cutting into the<br />
balsa structure may weaken it.<br />
18


