
You also want an ePaper? Increase the reach of your titles
YUMPU automatically turns print PDFs into web optimized ePapers that Google loves.
UNPACKING<br />
Thisproduct requiresassembly.<br />
• Carefully liftthe asw from the carton and place it on a<br />
level work surface.<br />
NOTE=This tool is heavy.To avoid back <strong>in</strong>jury,keep<br />
your knees bent and liftwithyour legs, notyour back,<br />
and do not liftsaw without help.<br />
• Inspect the tool carefullyto make sure no breakage or<br />
darnags occurred dur<strong>in</strong>gshipp<strong>in</strong>g.<br />
• Do not discardthe pack<strong>in</strong>gmaterial untilyou have<br />
caref_Jtty<strong>in</strong>spected and sstistacto_tyoperated the too_.<br />
• The _aw is factory setfar accurate cutt'_ng.After<br />
assembl<strong>in</strong>g it, check for accuracy.If shipp<strong>in</strong>g has<br />
<strong>in</strong>fluenced _e sett<strong>in</strong>gs,referto specificprocedures<br />
expta'med<strong>in</strong> _is manual.<br />
• If any parts are damaged or miss<strong>in</strong>g, plasea call<br />
1-800-932-3188 for ass]stance.<br />
_" WARNING: if any parts are miss<strong>in</strong>g, do not operate<br />
th_stoo_ unt_the miss<strong>in</strong>g parts are replaced. Failure<br />
to do so could rssult<strong>in</strong> possibleseriouspersonal<br />
<strong>in</strong>jury.<br />
_1= WARNING: Do not attempt to modify this tool<br />
or create accessories not recommendedfor use<br />
with this tool. Anysuch aiteratlonor modification is<br />
misuseand could result<strong>in</strong> a hazardouscondition<br />
lead<strong>in</strong>g to possible se_oL;spersonal<strong>in</strong>)ury.<br />
A WARNING: Do not connectto power supplyuntil<br />
assembly is complete. Fa(lursto comply couldresult<br />
<strong>in</strong> accidentalstart<strong>in</strong>g and possible seriouspersonal<br />
<strong>in</strong>jury.<br />
_1= WARNING: Do not liftthe saw without help. Hold<br />
it close to your body.Keep your knees bent and<br />
(iftwith yourlegs, not your back. Ignor<strong>in</strong>gthese<br />
precautionscan result<strong>in</strong> back <strong>in</strong>jury.<br />
A<br />
Am, WARNING: Never stand d}rs_')y<strong>in</strong>l<strong>in</strong>e with the<br />
blade or allow hands to corns closer than 3 <strong>in</strong>. to the<br />
blade. Do not reach over or across the blade. Failure<br />
to heed this warn<strong>in</strong>g can result<strong>in</strong> seriouspersonal<br />
<strong>in</strong>iury.<br />
A me, WARNING" Toavoid seriouspersonal <strong>in</strong>jury, always<br />
make sure the table saw is securely mountedto<br />
this leg stand. NEVERremove the saw from the 1eg<br />
stand.<br />
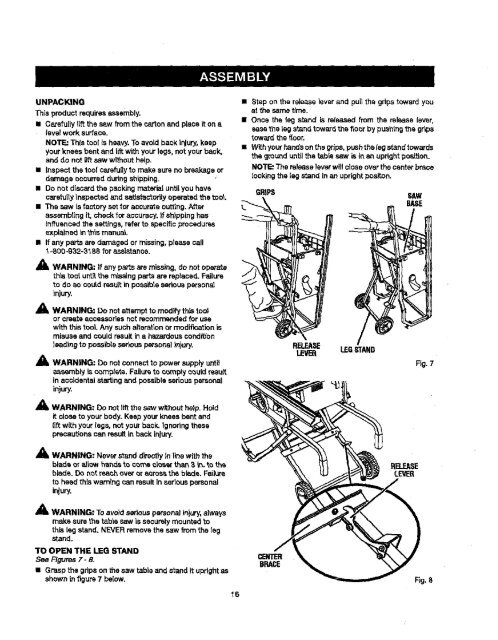
TO OPEN THE LEG STAND<br />
See Figures 7- 8.<br />
• Grasp the gripson the saw table and s_and it uprightas<br />
shown <strong>in</strong>figure 7 be(ow.<br />
16<br />
• Step on the release]everand pull the gripstoward you<br />
at the sametime.<br />
• Once the leg stand is released from the release lever,<br />
easethe leg s_n rttoward the _ocr by pashlngth_ grips<br />
toward the floor.<br />
• Withyourhandsonthegr_ps, pushthslegstand_owards<br />
the ground untilthe _.bis saw is <strong>in</strong> an uprightpos'_tion.<br />
NOTE: The releaseleverwill close overthe centerbrace<br />
lock<strong>in</strong>gthe legstand <strong>in</strong> an uprightposlton.<br />
GRIPS <strong>SAW</strong><br />
BASE<br />
cENTER<br />
BRACE<br />
RELEASE LEG,STAND<br />
LEVER<br />
Fig. 7<br />
Fig,8