
You also want an ePaper? Increase the reach of your titles
YUMPU automatically turns print PDFs into web optimized ePapers that Google loves.
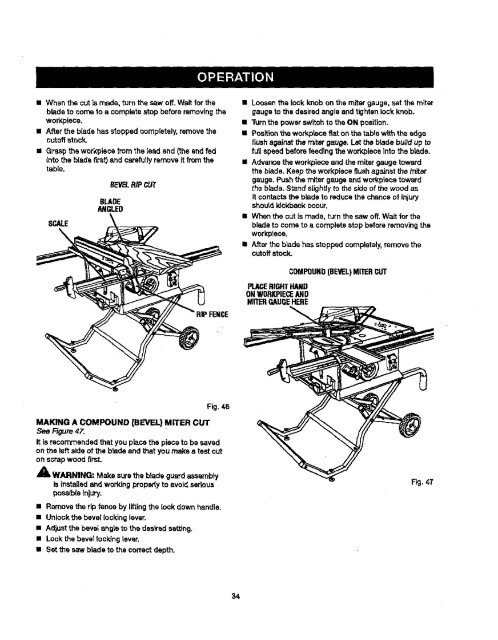
= When the outla made, turn the saw off.Wait forthe<br />
blade to come to a complete stop before remov<strong>in</strong>gthe<br />
workplace.<br />
• After the blade has stopped oomplateiy, removethe<br />
cutoffstock.<br />
• Grasp the workplece from the lead end (the and fed<br />
<strong>in</strong>to the b{ade first) and carefullyremove it from the<br />
table.<br />
SCALE<br />
\<br />
BEVEL. RiPCUT<br />
8LADE<br />
ANGLED<br />
MAKING A COMPOUND (BEVEL) MITER CUT<br />
See Figure 47.<br />
Fig. 46<br />
It is recommended that you place the piece to be saved<br />
on the left side of the blade and that you make a test cut<br />
on scrapwood firsL<br />
_1, WARNING: Make surethe blade guardass_"nbly<br />
is <strong>in</strong>stalledand work<strong>in</strong>g propedy to avoid sadoue<br />
posaibla<strong>in</strong>jury.<br />
• Remove the rip fence by lift<strong>in</strong>gthe lock down handle,<br />
• Unlock:he bevel lock<strong>in</strong>g lever.<br />
• Adjustthe bevel angle to the desiredsett<strong>in</strong>g.<br />
• Lock the bevellock<strong>in</strong>g lever.<br />
• Set the saw blade to the correct depth.<br />
34<br />
• Loosenthe lock knob on the miter gauge, set the miter<br />
gaugeto the desiredangle and tightenlock knob.<br />
• Turnthe power switch to the ON position.<br />
• Positionthe workpiece fiat on the tablewith the edge<br />
flushaga<strong>in</strong>st the miter gauge. Let the blade build up to<br />
full speed before feed<strong>in</strong>gthe workplace Into the blade.<br />
• Advance the workplaceand the miter gauge toward<br />
the blade. Keep the workpieceflushaga<strong>in</strong>st the miter<br />
gauge. Pushthe miter gauge and workplacetoward<br />
the blade. Stand slightlyto the sideof the wood as<br />
it contactsthe blade to reduosthe chance of <strong>in</strong>jury<br />
should kickback occur.<br />
II When the out Is made, turn the saw off. Wait for the<br />
blade to come to a complete stop beforeremov<strong>in</strong>gthe<br />
workplace.<br />
• Afterthe blade has stopped completely,remove the<br />
cutoffstock.<br />
PL_ RIGHTHAND<br />
ONWORKPIECEAND<br />
MR'ERGAUGEHERE<br />
COMPOUND(BEVEL)MITERCUT