
Create successful ePaper yourself
Turn your PDF publications into a flip-book with our unique Google optimized e-Paper software.
& WARNING: "1"oreduce the r_k of <strong>in</strong>jury, always<br />
make surethe rip fence is parallel to the b_adebefore<br />
b_<strong>in</strong>nfng any opar_t'_o_.<br />
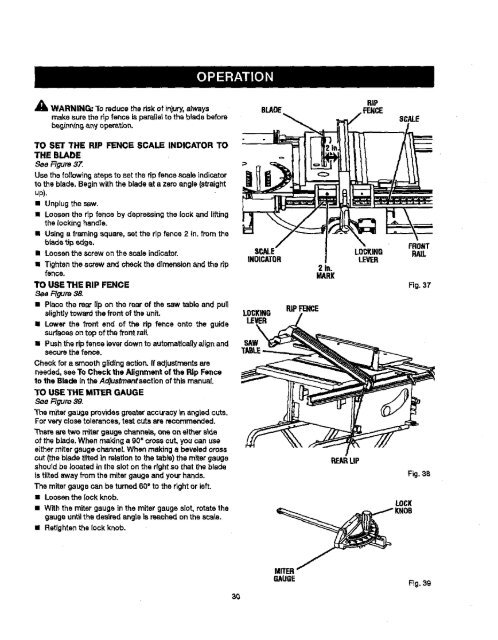
TO SET THE RIP FENCE SCALE INDICATOR TO<br />
THE BLADE<br />
See Figure 37.<br />
Use the follow<strong>in</strong>g steps to set the rip fence scale <strong>in</strong>dicator<br />
to the blade. Beg<strong>in</strong>with the blade at a zero angle (sVaight<br />
up).<br />
• Unplugthesaw.<br />
• Loosen the rip fence by depress<strong>in</strong>g the lock and lift<strong>in</strong>g<br />
the rook<strong>in</strong>g handle.<br />
• Us<strong>in</strong>g s fram<strong>in</strong>gsquare, set the rip fence 2 <strong>in</strong>. from the<br />
bride tipedge.<br />
• Loosenthe screw on the scale <strong>in</strong>dicator.<br />
• Tighten the screw and check the dimensionand the rip<br />
fence.<br />
TO USE THE RIP FENCE<br />
Figure 38.<br />
• Place the mar lip on the rear of the saw table and pull<br />
slighttytoward the front of the unit.<br />
• Lower the front end of the rip fence onto the guide<br />
surfacesontop ofthe front rail.<br />
• Pushthe rip fence lever down to automaticaflyalign and<br />
securethe fence.<br />
Cheek fora smooth glid<strong>in</strong>gaction. If adjustmentsare<br />
needed, see To Check the Alignment of the Rip Fence<br />
to the Blade <strong>in</strong> the Adjusfrnenfsectionof this manual.<br />
TO USE THE MITER GAUGE<br />
See F=Jgure39.<br />
The miter gauge providesgreater accuracy<strong>in</strong> angHd cuts.<br />
For very close tolerances, test cuts are recommended.<br />
Them aretwo miter gauge channels, one on either side<br />
of the blade.When maldng a 90° crosscut, you can use<br />
either miter gauge channel. When mak<strong>in</strong>g a beveled cross<br />
cut (the blade tilted <strong>in</strong> relationto the table)the miter gauge<br />
sheutd be located <strong>in</strong> the slot on the right so that the blade<br />
is tilted away from the miter gauge and your hands.<br />
The miter gauge can be turned60° to the rightor left.<br />
• Loosenthe lock knob.<br />
• With the miter gauge <strong>in</strong>the miter gauge slot, rotate the<br />
gauge untilthe desired angteis reached on the scale.<br />
• Retighten the lock knob.<br />
E<br />
BLADE<br />
INDICATOR<br />
LOCKING RiPFENCE<br />
LEVER<br />
<strong>SAW</strong><br />
MITER<br />
GAUGE<br />
2 <strong>in</strong>.<br />
MARl(<br />
RE_ L|P<br />
RiP<br />
FENCE SCALE<br />
LOCKING RA]L<br />
LEVER<br />
LOCK<br />
Fig. 37<br />
Fig.38<br />
Fig.39