
Create successful ePaper yourself
Turn your PDF publications into a flip-book with our unique Google optimized e-Paper software.
A WARNING." Before perform<strong>in</strong>g any adjustment,<br />
make sure the tool is unpluggedfrom the power<br />
suppty.Failureto heed thiswaTn'lngcoutdresu)t<strong>in</strong><br />
seriouspersona_<strong>in</strong>jury.<br />
A WARNING: Blades coast after turn off. Possib}e<br />
serious <strong>in</strong>jury can occur if hands come <strong>in</strong> contact<br />
with blade.<br />
The table sew has been adjusted at the factoryfor mak<strong>in</strong>gvery<br />
accurate cuts. However,some of the components<br />
might have been jarred out of alignmentdur<strong>in</strong>gshipp<strong>in</strong>g.<br />
ALso,overa period of t'rne, rsediustmentwill probably<br />
become necessary due to wear.<br />
3"0avoid unnecessary setups and adjustmen*.s,a good<br />
practice is to check your setupscarefullywith a fram<strong>in</strong>g<br />
square and make practice cuts <strong>in</strong> scrapwood before<br />
mak<strong>in</strong>g f<strong>in</strong>ishcuts <strong>in</strong> goodworkpiaces. Do not start any<br />
adjustments untilyou have checked with a square and<br />
made test cuts to be sure adjustments are needed.<br />
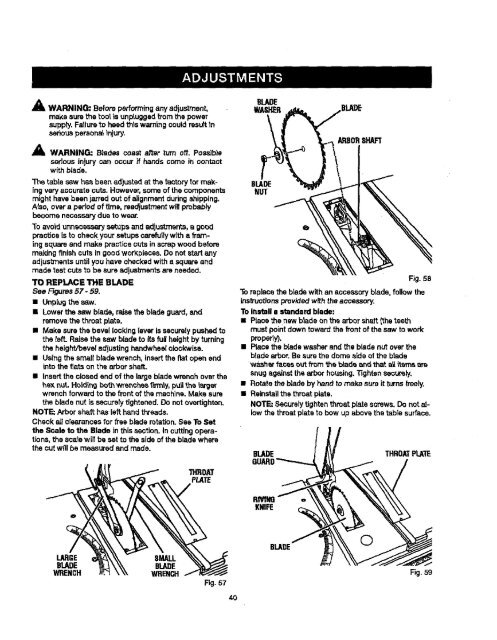
TO REPLACE THE BLADE<br />
See Figures57 - 59.<br />
• Unplugthe saw.<br />
• Lowerthe saw blade, raisethe blade guard, and<br />
remove the throet plate.<br />
• Make surethe bevel lock<strong>in</strong>gleveris securelypushed to<br />
the felt. Raise the sew bladeto its full heightby turn<strong>in</strong>g<br />
the haight/beve_ adjust<strong>in</strong>g handwheelclockwise.<br />
• Us<strong>in</strong>gthe smallblade wrench, <strong>in</strong>sertthe flat open and<br />
<strong>in</strong>to the fiats on the arbor shaft.<br />
• Insertthe closed and of the largeblade wrench overthe<br />
hax nut. Hold<strong>in</strong>g bo_.hwrenches li_nly, pull_.h_larger<br />
wrench forward to the f1"ontof the mach<strong>in</strong>e.Make sure<br />
the blade nut is securelytightened. De not overtighten.<br />
NOTE: Arbor shaft hasleft hand threads.<br />
Check allcrearancesfor free blade rotation.See ToSet<br />
the Scale to the Blade <strong>in</strong> thissection.In cutt<strong>in</strong>g operations,the<br />
scarewilt be set to the side of the blade where<br />
the cut will be measured and made.<br />
LARGE SMALL<br />
BLADE BLADE<br />
WRENCH WRENCH<br />
THROM<br />
PLATE<br />
Fig.57<br />
40<br />
BLADE<br />
NUT<br />
Fig. 58<br />
To replace the blade with an accessoryblade, followthe<br />
<strong>in</strong>structionsprov'_ed with the accessory.<br />
To Inatall e standard blade:<br />
• Place thenew blade onthe arbor shaft (the teeth<br />
must po<strong>in</strong>tdown toward the fi'ontof the saw to work<br />
properly),<br />
• Place the blade washer and the blade nut over the<br />
blade arbor.Be surethe dome side of the blade<br />
washer f_cas ou_.from _a blade and that all items ere<br />
snugaga<strong>in</strong>st the arbor hous<strong>in</strong>g,13ghtensecurely.<br />
• Rotate the blade by hand to make sure it turnsfreely.<br />
• Re<strong>in</strong>stallthe throat plate.<br />
NOTE: Seaurelytightenthroat plate screws. Do notallow<br />
the throat plate to bow up above the table surface.<br />
BLADE THROATPLATE<br />
RMNG<br />
KNIFE<br />
BLAI)E<br />
©<br />
Fig. 59