Owner's Manual - Hunter Fan
Owner's Manual - Hunter Fan
Owner's Manual - Hunter Fan

Create successful ePaper yourself
Turn your PDF publications into a flip-book with our unique Google optimized e-Paper software.
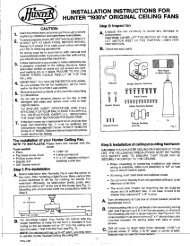
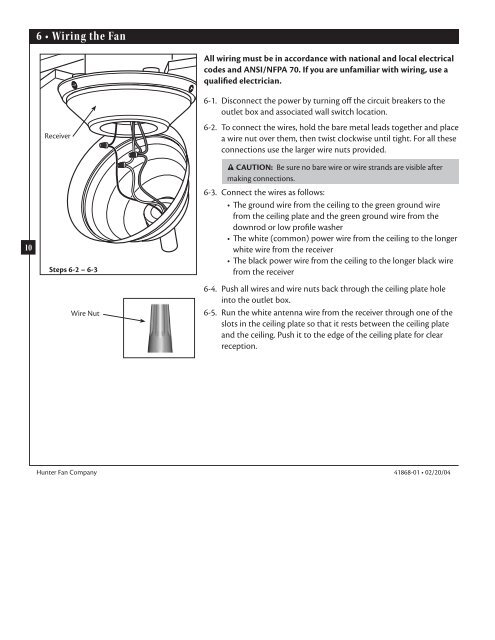
6 • Wiring the <strong>Fan</strong><br />
All wiring must be in accordance with national and local electrical<br />
codes and ANSI/NFPA 70. If you are unfamiliar with wiring, use a<br />
qualified electrician.<br />
10<br />
Receiver<br />
Steps 6-2 – 6-3<br />
Wire Nut<br />
6-1. Disconnect the power by turning off the circuit breakers to the<br />
outlet box and associated wall switch location.<br />
6-2. To connect the wires, hold the bare metal leads together and place<br />
a wire nut over them, then twist clockwise until tight. For all these<br />
connections use the larger wire nuts provided.<br />
CAUTION: Be sure no bare wire or wire strands are visible after<br />
making connections.<br />
6-3. Connect the wires as follows:<br />
• e ground wire from the ceiling to the green ground wire<br />
from the ceiling plate and the green ground wire from the<br />
downrod or low profile washer<br />
• e white (common) power wire from the ceiling to the longer<br />
white wire from the receiver<br />
• e black power wire from the ceiling to the longer black wire<br />
from the receiver<br />
6-4. Push all wires and wire nuts back through the ceiling plate hole<br />
into the outlet box.<br />
6-5. Run the white antenna wire from the receiver through one of the<br />
slots in the ceiling plate so that it rests between the ceiling plate<br />
and the ceiling. Push it to the edge of the ceiling plate for clear<br />
reception.<br />
<strong>Hunter</strong> <strong>Fan</strong> Company 41868-01 • 02/20/04