Owner's Manual - Hunter Fan
Owner's Manual - Hunter Fan
Owner's Manual - Hunter Fan

You also want an ePaper? Increase the reach of your titles
YUMPU automatically turns print PDFs into web optimized ePapers that Google loves.
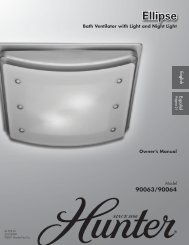
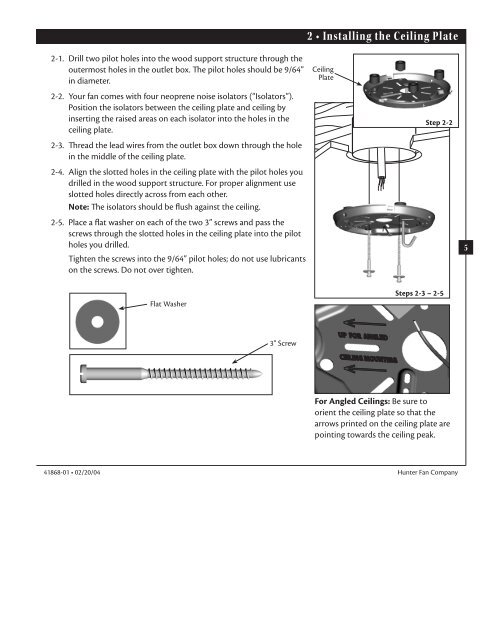
2 • Installing the Ceiling Plate<br />
2-1. Drill two pilot holes into the wood support structure through the<br />
outermost holes in the outlet box. e pilot holes should be 9/64”<br />
in diameter.<br />
2-2. Your fan comes with four neoprene noise isolators (“Isolators”).<br />
Position the isolators between the ceiling plate and ceiling by<br />
inserting the raised areas on each isolator into the holes in the<br />
ceiling plate.<br />
2-3. read the lead wires from the outlet box down through the hole<br />
in the middle of the ceiling plate.<br />
2-4. Align the slotted holes in the ceiling plate with the pilot holes you<br />
drilled in the wood support structure. For proper alignment use<br />
slotted holes directly across from each other.<br />
Note: e isolators should be flush against the ceiling.<br />
2-5. Place a flat washer on each of the two 3” screws and pass the<br />
screws through the slotted holes in the ceiling plate into the pilot<br />
holes you drilled.<br />
Tighten the screws into the 9/64” pilot holes; do not use lubricants<br />
on the screws. Do not over tighten.<br />
Ceiling<br />
Plate<br />
Step 2-2<br />
5<br />
Flat Washer<br />
Steps 2-3 – 2-5<br />
3” Screw<br />
For Angled Ceilings: Be sure to<br />
orient the ceiling plate so that the<br />
arrows printed on the ceiling plate are<br />
pointing towards the ceiling peak.<br />
41868-01 • 02/20/04 <strong>Hunter</strong> <strong>Fan</strong> Company