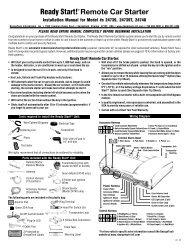
Model 28624TN - Ready Remote
Model 28624TN - Ready Remote
Model 28624TN - Ready Remote

You also want an ePaper? Increase the reach of your titles
YUMPU automatically turns print PDFs into web optimized ePapers that Google loves.
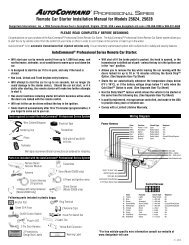
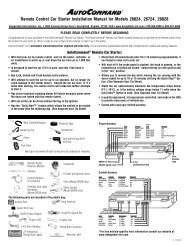
Safety Shutdown Wires<br />
With all ignition wires properly connected, find the appropriate<br />
safety shutdown wires. These are the brake wire and hood pin<br />
wires.<br />
WARNING! These wires are meant to protect the<br />
vehicle and anyone near the vehicle. They MUST<br />
be connected to prevent damage to the vehicle<br />
and possible bodily injury.<br />
First locate the factory brake wire using your multimeter. Find the<br />
switch at the top of the metal arm coming off the brake pedal. Use<br />
your vehicle specific wiring information to determine the color of<br />
this wire. With the black lead of your multimeter still in the kick<br />
panel, probe the suspected wire with the red lead of your multimeter.<br />
With the brake pedal at rest the multimeter should read 0<br />
volts. While watching the multimeter, depress the brake pedal.<br />
The multimeter should read 12 volts. Once you have located the<br />
correct brake wire, solder the small ORANGE wire in the 6-pin<br />
harness to it and wrap the connection with electrical tape.<br />
WARNING! Do not use the vehicle until you<br />
confirm the operation of the brake shutdown.<br />
Installing the hood pin switch requires drilling a hole in a metal<br />
lip under the hood. Choose a location that will allow the pin<br />
switch to be completely depressed when the hood is closed. The<br />
pin switch has a spade connector on the bottom for the wire<br />
connection.<br />
Crimp your spade connector to the hood pin wire and run the wire<br />
into the vehicle's passenger compartment through a factory rubber<br />
grommet (at the same time you might want to run Tachometer<br />
Input wire and Horn output wire from Optional Harness through<br />
the fire wall as you may need to connect them using the following<br />
steps).<br />
© 2006 Directed Electronics<br />
21