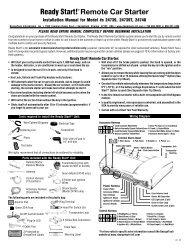
Model 28624TN - Ready Remote
Model 28624TN - Ready Remote
Model 28624TN - Ready Remote

Create successful ePaper yourself
Turn your PDF publications into a flip-book with our unique Google optimized e-Paper software.
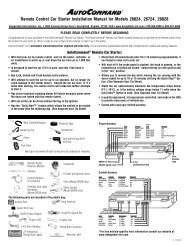
Step 5, Mounting the Receiver/Antenna<br />
Receiver/antenna position should be discussed with the vehicle<br />
owner prior to installation, since the antenna may be visible to<br />
the vehicle’s operator.<br />
The best location for the receiver/antenna is centered high on<br />
either the front or rear windshield. For optimal range, the antenna<br />
should be mounted vertically. It can be mounted horizontally<br />
in relation to the windshield or under the dashboard away from<br />
metal, but range will be diminished. Metallic window tint can also<br />
affect range, so this should be a consideration when determining<br />
the mounting location.<br />
After determining the best mounting location, follow these steps:<br />
1. Clean the mounting area with a quality glass cleaner or<br />
alcohol to remove any dirt or residue.<br />
2. Plug the receiver/antenna cable into the<br />
receiver/antenna.<br />
3. Mount the receiver/antenna using the supplied doublesided<br />
tape.<br />
4. Route the receiver/antenna cable to the control module<br />
and plug it into the four-pin antenna connector.<br />
important! To achieve the best possible range,<br />
DO NOT leave the antenna cable bundled under<br />
the dash. Always extend the cable full length during<br />
installation, regardless of the antenna mounting<br />
location.<br />
© 2006 Directed Electronics<br />
31