LASER PRINTER ML-1200 Series
LASER PRINTER ML-1200 Series
LASER PRINTER ML-1200 Series

You also want an ePaper? Increase the reach of your titles
YUMPU automatically turns print PDFs into web optimized ePapers that Google loves.
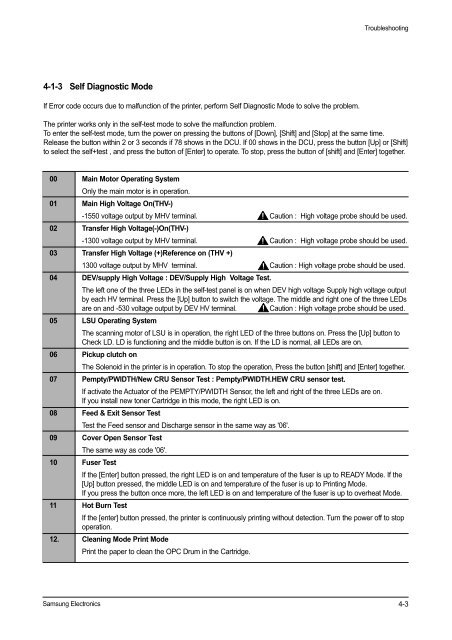
4-1-3 Self Diagnostic Mode<br />
If Error code occurs due to malfunction of the printer, perform Self Diagnostic Mode to solve the problem.<br />
Samsung Electronics<br />
Troubleshooting<br />
The printer works only in the self-test mode to solve the malfunction problem.<br />
To enter the self-test mode, turn the power on pressing the buttons of [Down], [Shift] and [Stop] at the same time.<br />
Release the button within 2 or 3 seconds if 78 shows in the DCU. If 00 shows in the DCU, press the button [Up] or [Shift]<br />
to select the self+test , and press the button of [Enter] to operate. To stop, press the button of [shift] and [Enter] together.<br />
00 Main Motor Operating System<br />
Only the main motor is in operation.<br />
01 Main High Voltage On(THV-)<br />
-1550 voltage output by MHV terminal. Caution : High voltage probe should be used.<br />
02 Transfer High Voltage(-)On(THV-)<br />
-1300 voltage output by MHV terminal. Caution : High voltage probe should be used.<br />
03 Transfer High Voltage (+)Reference on (THV +)<br />
1300 voltage output by MHV terminal. Caution : High voltage probe should be used.<br />
04 DEV/supply High Voltage : DEV/Supply High Voltage Test.<br />
The left one of the three LEDs in the self-test panel is on when DEV high voltage Supply high voltage output<br />
by each HV terminal. Press the [Up] button to switch the voltage. The middle and right one of the three LEDs<br />
are on and -530 voltage output by DEV HV terminal. Caution : High voltage probe should be used.<br />
05 LSU Operating System<br />
The scanning motor of LSU is in operation, the right LED of the three buttons on. Press the [Up] button to<br />
Check LD. LD is functioning and the middle button is on. If the LD is normal, all LEDs are on.<br />
06 Pickup clutch on<br />
The Solenoid in the printer is in operation. To stop the operation, Press the button [shift] and [Enter] together.<br />
07 Pempty/PWIDTH/New CRU Sensor Test : Pempty/PWIDTH.HEW CRU sensor test.<br />
If activate the Actuator of the PEMPTY/PWIDTH Sensor, the left and right of the three LEDs are on.<br />
If you install new toner Cartridge in this mode, the right LED is on.<br />
08 Feed & Exit Sensor Test<br />
Test the Feed sensor and Discharge sensor in the same way as '06'.<br />
09 Cover Open Sensor Test<br />
The same way as code '06'.<br />
10 Fuser Test<br />
If the [Enter] button pressed, the right LED is on and temperature of the fuser is up to READY Mode. If the<br />
[Up] button pressed, the middle LED is on and temperature of the fuser is up to Printing Mode.<br />
If you press the button once more, the left LED is on and temperature of the fuser is up to overheat Mode.<br />
11 Hot Burn Test<br />
If the [enter] button pressed, the printer is continuously printing without detection. Turn the power off to stop<br />
operation.<br />
12. Cleaning Mode Print Mode<br />
Print the paper to clean the OPC Drum in the Cartridge.<br />
4-3