

P-51B Mustang 32e ARF Manual - Horizon Hobby
P-51B Mustang 32e ARF Manual - Horizon Hobby
P-51B Mustang 32e ARF Manual - Horizon Hobby

Create successful ePaper yourself
Turn your PDF publications into a flip-book with our unique Google optimized e-Paper software.
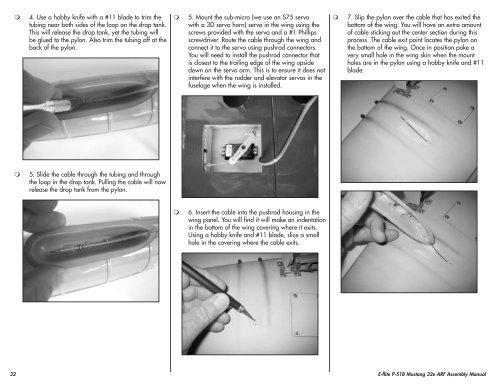
4. Use a hobby knife with a #11 blade to trim the<br />
tubing near both sides of the loop on the drop tank.<br />
This will release the drop tank, yet the tubing will<br />
be glued to the pylon. Also trim the tubing off at the<br />
back of the pylon.<br />
<br />
5. Mount the sub-micro (we use an S75 servo<br />
with a 3D servo horn) servo in the wing using the<br />
screws provided with the servo and a #1 Phillips<br />
screwdriver. Route the cable through the wing and<br />
connect it to the servo using pushrod connectors.<br />
You will need to install the pushrod connector that<br />
is closest to the trailing edge of the wing upside<br />
down on the servo arm. This is to ensure it does not<br />
interfere with the rudder and elevator servos in the<br />
fuselage when the wing is installed.<br />
<br />
7. Slip the pylon over the cable that has exited the<br />
bottom of the wing. You will have an extra amount<br />
of cable sticking out the center section during this<br />
process. The cable exit point locates the pylon on<br />
the bottom of the wing. Once in position poke a<br />
very small hole in the wing skin when the mount<br />
holes are in the pylon using a hobby knife and #11<br />
blade.<br />
<br />
5. Slide the cable through the tubing and through<br />
the loop in the drop tank. Pulling the cable will now<br />
release the drop tank from the pylon.<br />
<br />
6. Insert the cable into the pushrod housing in the<br />
wing panel. You will find it will make an indentation<br />
in the bottom of the wing covering where it exits.<br />
Using a hobby knife and #11 blade, slice a small<br />
hole in the covering where the cable exits.<br />
32 E-flite P-<strong>51B</strong> <strong>Mustang</strong> <strong>32e</strong> <strong>ARF</strong> Assembly <strong>Manual</strong>


