Terminal User Guide - Hicaps
Terminal User Guide - Hicaps
Terminal User Guide - Hicaps

Create successful ePaper yourself
Turn your PDF publications into a flip-book with our unique Google optimized e-Paper software.
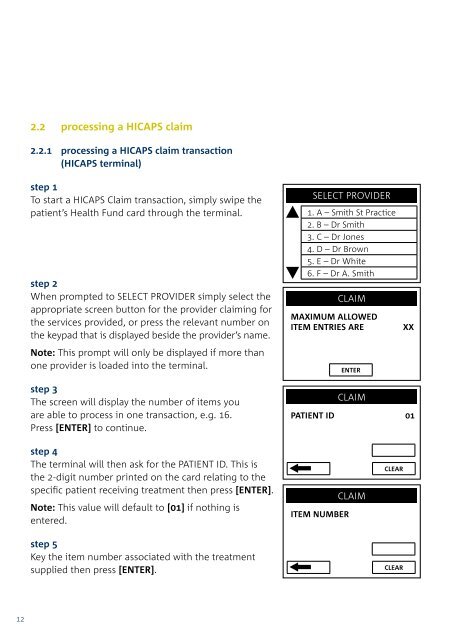
2.2 processing a HICAPS claim<br />
2.2.1 processing a HICAPS claim transaction<br />
(HICAPS terminal)<br />
step 6<br />
Key the clinical code or tooth number on which the<br />
treatment supplied was performed then press [ENTER]<br />
or just press [ENTER] to use the default of [00].<br />
CLAIM<br />
TOOTH NUMBER 01<br />
step 1<br />
To start a HICAPS Claim transaction, simply swipe the<br />
patient’s Health Fund card through the terminal.<br />
step 2<br />
When prompted to SELECT PROVIDER simply select the<br />
appropriate screen button for the provider claiming for<br />
the services provided, or press the relevant number on<br />
the keypad that is displayed beside the provider’s name.<br />
Note: This prompt will only be displayed if more than<br />
one provider is loaded into the terminal.<br />
step 3<br />
The screen will display the number of items you<br />
are able to process in one transaction, e.g. 16.<br />
Press [ENTER] to continue.<br />
step 4<br />
The terminal will then ask for the PATIENT ID. This is<br />
the 2-digit number printed on the card relating to the<br />
specific patient receiving treatment then press [ENTER].<br />
Note: This value will default to [01] if nothing is<br />
entered.<br />
SELECT PROVIDER<br />
1. A – Smith St Practice<br />
2. B – Dr Smith<br />
3. C – Dr Jones<br />
4. D – Dr Brown<br />
5. E – Dr White<br />
6. F – Dr A. Smith<br />
CLAIM<br />
MAXIMUM ALLOWED<br />
ITEM ENTRIES ARE<br />
ENTER<br />
CLAIM<br />
XX<br />
PATIENT ID 01<br />
ITEM NUMBER<br />
CLAIM<br />
CLEAR<br />
Note: <strong>Terminal</strong> Provider Setup prompt for Clinical code<br />
or Tooth Number may be changed through Provider<br />
Setup (Refer 2.1) and will only be displayed if setup<br />
(Refer to Step 15).<br />
step 7<br />
The date this part of the service was performed.<br />
dd, mmm = current date. To change the date enter<br />
DD = day, e.g. 26 and MM = 12, e.g. DEC.<br />
To accept the default of the current date just press<br />
[ENTER].<br />
step 8<br />
Enter the cost to be charged for this item.<br />
Note: This field will default to the last cost charged for<br />
the same item if item amount memory is enabled.<br />
step 9a<br />
You will be presented with a summary of the item(s)<br />
entered. By pressing the middle left screen button<br />
[Mod] you are able to modify the item that has been<br />
entered by repeating the steps above.<br />
step 9b<br />
To add another item, simply press [Add] and enter the<br />
options as above. Once all items have been added to<br />
the claim, press [ENTER].<br />
DATE SERVICE<br />
ITEM COST<br />
CLAIM<br />
CLAIM<br />
CLEAR<br />
dd, mmm<br />
DDMM<br />
CLEAR<br />
CLAIM – PATIENT ID 01<br />
ITEM # 0001<br />
DATE SERVICE<br />
26.MAR<br />
ITEM COST $52.52<br />
Press REPORTS to Print<br />
CLAIM<br />
$0.00<br />
ENTER<br />
ADD<br />
step 5<br />
Key the item number associated with the treatment<br />
supplied then press [ENTER].<br />
CLEAR<br />
step 10<br />
If the summary presented is correct, simply press<br />
[ENTER] and the claim will be sent to the Health Fund<br />
for approval.<br />
SEND TO HEALTH FUND<br />
01 RECORD(S)<br />
TOTAL $52.52<br />
Dr Smith 01<br />
1<br />
Note: To scroll through the items use top and bottom<br />
buttons beside the arrows at the left of the screen.<br />
NO<br />
YES<br />
1