Terminal User Guide - Hicaps
Terminal User Guide - Hicaps
Terminal User Guide - Hicaps

Create successful ePaper yourself
Turn your PDF publications into a flip-book with our unique Google optimized e-Paper software.
hicaps terminal<br />
user guide
contact phone numbers for HICAPS/EFTPOS<br />
HICAPS Help Desk 1300 650 852<br />
your merchant details<br />
Merchant No.<br />
Manual Merchant No.<br />
For Authorisations:<br />
• Credit Card (Credit) Account<br />
This is an Australia-wide number 13 25 15<br />
• Debit Card (Cheque) or (Savings) Account<br />
This is an Australia-wide number 1300 650 852<br />
lost or stolen cards<br />
Please call the above authorisation line appropriate for the card type used<br />
(credit or debit). Call 13 25 15 and select extension 500 when calling about lost<br />
or stolen credit cards.<br />
terminal number<br />
Attach your first log on receipt here!<br />
table of contents<br />
1 HICAPS/EFTPOS 4<br />
1.1 HICAPS help desk 4<br />
1.2 glossary 4<br />
1.3 diagram of HICAPS terminal 6<br />
2 HICAPS 7<br />
2.1 terminal provider setup 7<br />
2.1.1 adding a new provider 7<br />
2.1.2 changing and deleting providers 11<br />
2.2 processing a HICAPS claim 12<br />
2.2.1 processing a HICAPS claim transaction (HICAPS terminal) 12<br />
2.2.2 processing a HICAPS claim transaction (practice management system) 15<br />
2.3 cancelling a HICAPS claim 16<br />
2.3.1 cancelling a HICAPS claim (HICAPS terminal) 16<br />
2.3.2 cancelling a HICAPS claim (practice management system) 18<br />
2.4 manual daily transaction summary (HICAPS totals) 18<br />
2.5 settlement transaction report (HICAPS forced settlement) 19<br />
2.6 ordering terminal rolls 20<br />
2.7 performing terminal sign on/logon 21<br />
2.8 customising a HICAPS receipt (optional) 22<br />
3 EFTPOS 23<br />
3.1 processing an EFTPOS transaction 23<br />
3.1.1 processing an EFTPOS transaction following a successful claim transaction 23<br />
3.1.2 processing an EFTPOS transaction 25<br />
3.1.3 processing an EFTPOS transaction (practice management system) 28<br />
3.2 refunding an EFTPOS transaction 28<br />
3.2.1 refunding an EFTPOS transaction 28<br />
3.2.2 refund an EFTPOS transaction (practice management system) 31<br />
3.3 EFTPOS settlement 32<br />
3.3.1 manual EFTPOS settlement 32<br />
3.3.2 automatic terminal settlement 34<br />
3.3.3 merchant password 36<br />
3.3.4 host forced settlement 36<br />
1
4 terminal functions 37<br />
4.1 the screensaver (idle screens) 37<br />
4.2 main menu 38<br />
4.2.1 logon 38<br />
4.2.2 batch 38<br />
4.2.3 terminal 38<br />
4.2.4 setup 39<br />
4.2.5 tests 39<br />
4.2.6 reprint 39<br />
4.3 transaction menu 40<br />
4.3.1 balance / quote 40<br />
4.3.2 refund / cancel 40<br />
4.3.3 pre-auth 40<br />
4.3.4 completion 40<br />
4.3.5 cash out 41<br />
4.3.6 sale 41<br />
4.4 terminal function keys 42<br />
4.4.1 report [1] key (print EFTPOS and HICAPS reports) 42<br />
4.4.2 setup [2] key (refer help desk) 43<br />
4.4.3 reset [3] key 43<br />
4.4.4 lock [4] key 43<br />
4.4.5 sign on [5] key 43<br />
4.4.6 quote [6] key 44<br />
4.4.7 order [7] key 44<br />
4.4.8 reprint [8] key (reprint EFTPOS and HICAPS transactions) 44<br />
4.4.9 load [9] key 44<br />
4.4.10 initialise [0] key 44<br />
4.4.11 paper feed [*] key 44<br />
4.4.12 alpha [#] key 44<br />
4.5 changing the terminal security password 45<br />
4.6 fallback procedure 46<br />
5 terminal connections 47<br />
6 thermal printer 49<br />
7 HICAPS response codes 51<br />
7.1 transaction level HICAPS response codes 51<br />
7.2 item level HICAPS response codes 53<br />
8 EFTPOS error messages and corrective actions 55<br />
9 manual backup procedure 57<br />
10 merchant requirements to ensure EFTPOS transactions are valid 58<br />
11 terminal functions T4200 series 59<br />
12 Medicare Australia Easyclaim 60
1. HICAPS/EFTPOS<br />
1.1 HICAPS help desk<br />
HICAPS Help Desk phone number is 1300 650 852.<br />
For HICAPS Help Desk hours of operation, please refer to www.hicaps.com.au<br />
Provider information section.<br />
HICAPS fax number is 1300 725 726.<br />
1.2 glossary<br />
benefit<br />
cancel<br />
card<br />
claim<br />
<br />
claim declined<br />
<br />
claim receipt<br />
claim to sale<br />
clinical code<br />
date (of service)<br />
fallback<br />
gap payment<br />
Value of rebate authorised by a Health Fund.<br />
Reverses a transaction processed through the terminal.<br />
A membership card issued by the Health Fund or an EFTPOS or<br />
credit card, issued by a bank.<br />
After treatment is provided, details are sent electronically via<br />
the terminal to the Health Fund.<br />
When a Health Fund declines to pay the request a brief<br />
response message will print with each declined item<br />
and/or claim.<br />
Either the terminal or the associated Practice Management<br />
System prints a receipt, which must be signed by the patient to<br />
acknowledge services and approve the transfer of payment to<br />
the provider.<br />
The terminal facility allowing you to start an EFTPOS<br />
transaction using the Gap amount returned from the HICAPS<br />
Claim.<br />
Two digit numeric identifying the body part/primary<br />
condition/ diagnostic intervention on which the service was<br />
performed.<br />
The date the specific item of service was performed – format<br />
ddmm.<br />
The terminal was unable to contact the bank to process an<br />
EFTPOS transaction, but the transaction has been approved/<br />
declined and will be sent to the bank with the next<br />
transaction.<br />
The amount remaining after the Health Fund has approved a<br />
benefit for the specified services.<br />
HICAPS<br />
issue date<br />
item cost<br />
item number<br />
member<br />
MMF<br />
patient ID<br />
Practice Management System<br />
provider<br />
provider number<br />
refund<br />
reversal<br />
RRN<br />
swipe member card<br />
tooth number<br />
Health Industry Claims And Payments Service. The company<br />
responsible for the switching of transactions to health funds<br />
from the terminal.<br />
The date the membership card was issued. Those cards with<br />
issue dates have them printed on the bottom right-hand<br />
corner of the card.<br />
The amount charged for the given item of service.<br />
Numeric code identifying the type of service performed. Refer<br />
to the HICAPS Quick Reference <strong>Guide</strong> or the relevant schedule<br />
for a full list of item numbers.<br />
A customer of a Health Fund.<br />
The Multi-Merchant Facility. This is a feature of the HICAPS<br />
terminal which optionally allows you to settle the EFTPOS<br />
funds separately for each provider.<br />
A member listed on the card which identifies a given patient<br />
within a Health Fund membership.<br />
The PC-based system which allows a transaction to be sent<br />
directly to the HICAPS terminal.<br />
Practitioners who provide Health Services to patients.<br />
Is eight characters that uniquely identify each individual<br />
provider for a specific location. Provider numbers that HICAPS<br />
use are issued by Medicare Australia or Medibank Private.<br />
Provider numbers are location specific, so you must have a<br />
provider number for each location you wish to practice at.<br />
Refunds a previous EFTPOS or credit approved transaction.<br />
Reverses an approved transaction on the same day the<br />
transaction was processed.<br />
Receipt reference number (unique 12 digit field).<br />
Pass the membership card through the card reader on the<br />
right-hand side of the HICAPS terminal.<br />
Two digit FDI numeric identifying the tooth on which the<br />
service was performed.
1.3 diagram of HICAPS terminal 2. HICAPS<br />
2.1 terminal provider setup<br />
high speed<br />
thermal printer<br />
Note: To add providers you will need to contact HICAPS<br />
in writing. A ‘Change of Practice Details’ form will<br />
need to be completed and sent to HICAPS. This form is<br />
available from the HICAPS website www.hicaps.com.au<br />
or from the HICAPS Help Desk on 1300 650 852. You will<br />
receive notification from HICAPS in writing once the<br />
providers have been registered.<br />
account select<br />
and option keys<br />
Merchant Function 54 is used for Provider Setup.<br />
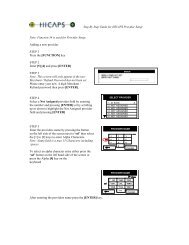
2.1.1 adding a new provider<br />
backlit graphics<br />
screen<br />
magnetic stripe<br />
card reader<br />
alphanumeric<br />
keypad<br />
smart card reader<br />
step 1<br />
Press the [FUNCTION] key.<br />
step 2<br />
Enter [5] [4] and press [ENTER].<br />
step 3<br />
Select a Not Assigned provider field by entering the<br />
number and pressing [ENTER] or by scrolling up or<br />
down to highlight the Not Assigned provider field<br />
and pressing [ENTER].<br />
step 4<br />
Enter the provider’s name by pressing ‘sel’ and using<br />
the [1] to [9] keys.<br />
To select an alpha character entry either press the ‘sel’<br />
button on the left-hand side of the screen or press the<br />
Alpha [#] key on the keyboard.<br />
sel<br />
SELECT PROVIDER<br />
1. Dr Smith A<br />
2. NOT ASSIGNED<br />
3. NOT ASSIGNED<br />
4. NOT ASSIGNED<br />
5. NOT ASSIGNED<br />
6. NOT ASSIGNED<br />
PROVIDER NAME<br />
1 2 3<br />
4 5 6<br />
7 8 9<br />
0<br />
Dr J___<br />
CLEAR
Pressing the Alpha [#] key again will change from upper case to lower case and symbols.<br />
E.g.<br />
sel<br />
PROVIDER NAME<br />
1_QZ 2<br />
ABC 3<br />
DEF<br />
4<br />
GHI 5<br />
JKL 6<br />
MNO<br />
7<br />
PRS 8<br />
TUV 9<br />
WXY<br />
0<br />
\+<br />
Dr J___<br />
CLEAR<br />
After entering the provider’s name press the [ENTER] key.<br />
step 5<br />
Key the provider number for this location then press<br />
[ENTER]. This is the 8-character number supplied<br />
by Medicare or Medibank Private. If your provider<br />
number is shorter than 8 characters you will need to<br />
include leading 0’s to make up 8 characters. Alpha<br />
character entry is entered the same as for entering<br />
the provider’s name.<br />
sel<br />
PROVIDER NAME<br />
1_qz 2<br />
abc 3<br />
def<br />
4<br />
ghi 5<br />
jkl 6<br />
mno<br />
7<br />
prs 8<br />
tuv 9<br />
wxy<br />
0<br />
.,”<br />
Dr Jones___<br />
CLEAR<br />
123456AJ<br />
sel<br />
PROVIDER NUMBER<br />
1 2 3<br />
4 5 6<br />
7 8 9<br />
0<br />
Dr J___<br />
CLEAR<br />
step 7<br />
This option will enable the terminal to prompt to<br />
automatically start an EFTPOS transaction for the gap<br />
amount. Select the appropriate option for this provider.<br />
CURRENT<br />
step 8<br />
Note: If a Claim to Sale is disabled the Claim Deposit<br />
is not displayed. This option will enable the terminal<br />
to prompt for deposits (optical only).<br />
step 9<br />
Select Item Memory enabled or disabled for this<br />
provider. Item Memory enables the terminal to recall<br />
the last amount entered for this item number.<br />
PROVIDER SETUP<br />
CLAIM TO SALE<br />
ENABLED<br />
ENABLE<br />
PROVIDER SETUP<br />
CLAIM TO DEPOSIT<br />
DISABLED<br />
ENABLE<br />
PROVIDER SETUP<br />
ITEM MEMORY<br />
DISABLED<br />
DISABLE<br />
DISABLE<br />
step 6<br />
Select the Merchant name for processing EFTPOS<br />
payments for this provider from the list presented then<br />
press [ENTER]. The list can contain up to 25 merchant<br />
details so please ensure you select the correct<br />
merchant from the list.<br />
SELECT MERCHANT<br />
1. A – Smith St Practice<br />
2. B – Dr Smith<br />
3. C – Dr Jones<br />
4. D – Dr Brown<br />
5. E – Dr White<br />
6. F – Dr A. Smith<br />
step 10<br />
Clear Item Memory will clear all amounts stored for<br />
item numbers.<br />
ENABLE<br />
PROVIDER SETUP<br />
CLEAR ITEM MEMORY<br />
DISABLE<br />
NO<br />
YES<br />
step 11<br />
Confirmation that the item memory will be cleared if<br />
Yes was selected at Clear Item Memory.<br />
PROVIDER SETUP<br />
ITEM MEMORY WILL<br />
BE CLEARED!<br />
NO<br />
YES
step 12<br />
Select if you want automatic HICAPS settlement<br />
enabled for this provider.<br />
step 13<br />
Select if you want a HICAPS transaction listing to print<br />
when automatic settlement takes place.<br />
step 14<br />
Key the security password for this provider then press<br />
[ENTER]. It is used to protect access to the provider table.<br />
step 15<br />
This option will tell the terminal to prompt for either<br />
a clinical code or tooth number, or no prompt at all.<br />
Select whichever is appropriate for this provider, or<br />
press [ENTER] to accept the highlighted option.<br />
step 16<br />
This option lets you select the type of provider you<br />
are for processing Medicare Australia Easyclaim<br />
transactions. Select whichever is appropriate for this<br />
provider, or press [ENTER] to accept the highlighted<br />
option.<br />
If you do not want to process Medicare Australia<br />
Easyclaim transaction section 5. Not applicable.<br />
step 17<br />
This option when completed pre-populates the Payee<br />
Provider Number when completing a claim. Use the 0-9<br />
keys to enter provider number and press [ENTER] or<br />
press [ENTER] to bypass.<br />
Note: This option should be used when the servicing<br />
provider is not the payee provider for Medicare<br />
Easyclaim transactions.<br />
step 18<br />
The provider has now been added, a confirmation<br />
receipt will be printed and the terminal will display a<br />
provider summary, press [ENTER] to finish.<br />
ENABLE<br />
PROVIDER SETUP<br />
HICAPS AUTO SETTLE<br />
DISABLED<br />
ENABLE<br />
PROVIDER SETUP<br />
ENTER PROVIDER TYPE<br />
1. General Practice<br />
2. optometrical<br />
3. spec/ah/dent<br />
4. diagnostic<br />
5. Pathology<br />
6. Not Applicable<br />
DISABLE<br />
HICAPS SETTLE TXT LISTING<br />
DISABLED<br />
DISABLE<br />
PROVIDER PASSWORD<br />
PROVIDER PASSWORD<br />
<br />
sel<br />
CLEAR<br />
SELECT PROMPT OPTION<br />
1. CLINICAL CODE<br />
2. TOOTH NUMBER<br />
3. NO PROMPT<br />
PAYEE PROVIDER NUMBER<br />
1 2 3<br />
4 5 6<br />
7 8 9<br />
0<br />
___<br />
CLEAR<br />
2.1.2 changing and deleting providers<br />
Note: To alter provider details you will need to contact HICAPS in writing. A ‘Change<br />
of Practice Details’ form will need to be completed and sent to HICAPS. This form is<br />
available from the HICAPS website www.hicaps.com.au or from the HICAPS Help Desk<br />
on 1300 650 852.<br />
step 1<br />
Press the [FUNCTION] key.<br />
step 2<br />
Enter [5] [4] and press [ENTER].<br />
step 3<br />
Select the provider that you want to change by<br />
entering the number and pressing [ENTER] or by<br />
scrolling up or down to highlight the provider and<br />
pressing [ENTER].<br />
Note: The password that was keyed when the provider<br />
was originally entered into the terminal is required to<br />
amend any of the provider details.<br />
step 4<br />
The Provider summary screen will be shown, use the<br />
down arrow to go to page 2 and press [CLEAR] to<br />
enable you to modify the provider’s details.<br />
step 5<br />
Once you have entered the modify provider function<br />
follow the steps used for adding a provider.<br />
SELECT PROVIDER<br />
1. Dr Smith A<br />
2. NOT ASSIGNED<br />
3. NOT ASSIGNED<br />
4. NOT ASSIGNED<br />
5. NOT ASSIGNED<br />
6. NOT ASSIGNED<br />
PROVIDER SUMMARY<br />
PROV<br />
PROV NUM<br />
MID<br />
CLAIM TO SALE<br />
CLAIM DEPOSIT<br />
ITEM MEMORY<br />
AUTO SETTLE<br />
Dr Smith<br />
123456AJ<br />
Dr Smith<br />
ENA<br />
DIS<br />
DIS<br />
ENA<br />
PROVIDER SUMMARY<br />
SETTLE TXT LIST<br />
PASSWORD<br />
PROMPT<br />
DIS<br />
DIS<br />
None<br />
Press REPORTS to Print<br />
Press CLEAR to Modify<br />
Press ENTER To Finish<br />
1 11
2.2 processing a HICAPS claim<br />
2.2.1 processing a HICAPS claim transaction<br />
(HICAPS terminal)<br />
step 6<br />
Key the clinical code or tooth number on which the<br />
treatment supplied was performed then press [ENTER]<br />
or just press [ENTER] to use the default of [00].<br />
CLAIM<br />
TOOTH NUMBER 01<br />
step 1<br />
To start a HICAPS Claim transaction, simply swipe the<br />
patient’s Health Fund card through the terminal.<br />
step 2<br />
When prompted to SELECT PROVIDER simply select the<br />
appropriate screen button for the provider claiming for<br />
the services provided, or press the relevant number on<br />
the keypad that is displayed beside the provider’s name.<br />
Note: This prompt will only be displayed if more than<br />
one provider is loaded into the terminal.<br />
step 3<br />
The screen will display the number of items you<br />
are able to process in one transaction, e.g. 16.<br />
Press [ENTER] to continue.<br />
step 4<br />
The terminal will then ask for the PATIENT ID. This is<br />
the 2-digit number printed on the card relating to the<br />
specific patient receiving treatment then press [ENTER].<br />
Note: This value will default to [01] if nothing is<br />
entered.<br />
SELECT PROVIDER<br />
1. A – Smith St Practice<br />
2. B – Dr Smith<br />
3. C – Dr Jones<br />
4. D – Dr Brown<br />
5. E – Dr White<br />
6. F – Dr A. Smith<br />
CLAIM<br />
MAXIMUM ALLOWED<br />
ITEM ENTRIES ARE<br />
ENTER<br />
CLAIM<br />
XX<br />
PATIENT ID 01<br />
ITEM NUMBER<br />
CLAIM<br />
CLEAR<br />
Note: <strong>Terminal</strong> Provider Setup prompt for Clinical code<br />
or Tooth Number may be changed through Provider<br />
Setup (Refer 2.1) and will only be displayed if setup<br />
(Refer to Step 15).<br />
step 7<br />
The date this part of the service was performed.<br />
dd, mmm = current date. To change the date enter<br />
DD = day, e.g. 26 and MM = 12, e.g. DEC.<br />
To accept the default of the current date just press<br />
[ENTER].<br />
step 8<br />
Enter the cost to be charged for this item.<br />
Note: This field will default to the last cost charged for<br />
the same item if item amount memory is enabled.<br />
step 9a<br />
You will be presented with a summary of the item(s)<br />
entered. By pressing the middle left screen button<br />
[Mod] you are able to modify the item that has been<br />
entered by repeating the steps above.<br />
step 9b<br />
To add another item, simply press [Add] and enter the<br />
options as above. Once all items have been added to<br />
the claim, press [ENTER].<br />
DATE SERVICE<br />
ITEM COST<br />
CLAIM<br />
CLAIM<br />
CLEAR<br />
dd, mmm<br />
DDMM<br />
CLEAR<br />
CLAIM – PATIENT ID 01<br />
ITEM # 0001<br />
DATE SERVICE<br />
26.MAR<br />
ITEM COST $52.52<br />
Press REPORTS to Print<br />
CLAIM<br />
$0.00<br />
ENTER<br />
ADD<br />
step 5<br />
Key the item number associated with the treatment<br />
supplied then press [ENTER].<br />
CLEAR<br />
step 10<br />
If the summary presented is correct, simply press<br />
[ENTER] and the claim will be sent to the Health Fund<br />
for approval.<br />
SEND TO HEALTH FUND<br />
01 RECORD(S)<br />
TOTAL $52.52<br />
Dr Smith 01<br />
1<br />
Note: To scroll through the items use top and bottom<br />
buttons beside the arrows at the left of the screen.<br />
NO<br />
YES<br />
1
example HICAPS claim receipt<br />
The claim receipt contains all of the information<br />
relating to the claim. A second [CUSTOMER COPY] is<br />
printed without the statutory declaration. The first<br />
copy is required to be signed by the Fund member and<br />
retained for your office records and may be required<br />
to be produced by the Health Fund. The second copy is<br />
for the customer’s own records.<br />
2.2.2 processing a HICAPS claim transaction<br />
(practice management system)<br />
To start a HICAPS Claim Transaction, simply send the<br />
transaction to HICAPS by clicking on the HICAPS icon<br />
on your Practice Management System screen.<br />
When the terminal receives the transaction details<br />
from your Practice Management System, the terminal<br />
will prompt for the customer card to be swiped. The<br />
terminal will recognise the card type that should be<br />
swiped by the type of transaction that is received from<br />
the Practice Management System. The results from<br />
the transaction will be returned directly to the Practice<br />
Management System.<br />
For further assistance on processing a Practice<br />
Management System transaction please contact your<br />
Practice Management System provider.<br />
1<br />
1
2.3 cancelling a HICAPS claim<br />
2.3.1 cancelling a HICAPS claim (HICAPS terminal)<br />
There are two options for cancelling HICAPS claim transactions, but for each option<br />
a transaction can only be cancelled on the same day that it was originally processed.<br />
OPTION 1 Transaction was processed by the same terminal.<br />
step 1<br />
Press the [REFUNDS] key.<br />
step 2<br />
The terminal will then prompt you to swipe/insert the<br />
card. Swipe the patient’s Health Fund card.<br />
step 3<br />
The terminal will then display the transaction(s)<br />
processed for your patient for the current day. If<br />
there is more than one transaction for that patient all<br />
transactions can be reviewed by using the up/down<br />
arrow buttons.<br />
step 4<br />
Select the transaction you want to cancel and press<br />
the [ENTER] key.<br />
step 5<br />
You will then be asked to confirm the cancel by<br />
pressing either the NO [CLEAR] or YES [ENTER] key.<br />
Alternatively you can use the option selection button<br />
beside the [NO] and [YES] prompts on the screen.<br />
Note: The terminal will produce two copies of the<br />
cancellation receipt. The first copy must be signed by<br />
the Fund member and retained for your records, the<br />
second copy is for the member’s own records.<br />
OPTION 2 Transaction was processed by a different<br />
terminal.<br />
REFUND / CANCEL<br />
SWIPE/INSERT CARD<br />
CANCEL TXN RRN:123456<br />
NAB Dr Smith<br />
26/03/085 14:15<br />
903600-802 S<br />
BENEFIT $25.88<br />
CLAIM $47.50<br />
Press ENTER to CANCEL TXN<br />
SEND CANCEL <br />
BENEFIT $25.88<br />
PROVIDER # 1234567A<br />
RRN # 000000123456<br />
NO<br />
YES<br />
step 1<br />
Press the [REFUNDS] key.<br />
step 2<br />
The terminal will then prompt you to swipe/insert the<br />
card. Swipe the patient’s Health Fund card.<br />
step 3<br />
The terminal will prompt for you to select a provider by<br />
entering the provider number or scrolling down and<br />
highlighting the provider and pressing [ENTER].<br />
step 4<br />
The terminal will then prompt you for the 12-digit<br />
Receipt Reference Number of the original claim.<br />
Key the RRN and press [ENTER].<br />
step 5<br />
The terminal will then prompt you for the Benefit<br />
amount approved by the Health Fund on the original<br />
claim. Key the amount and press [ENTER].<br />
step 6<br />
You will then be asked to confirm the cancel by<br />
pressing either the NO [CLEAR] or YES [ENTER] key.<br />
Alternatively you can select your response using the<br />
corresponding keys on the side of the display next to<br />
the [NO] or [YES] prompts on the screen.<br />
Note: The terminal will produce two copies of the<br />
cancellation receipt. The first copy must be signed by<br />
the Fund member and retained for your records, the<br />
second copy is for the member’s own records.<br />
REFUND / CANCEL<br />
SWIPE/INSERT CARD<br />
SELECT PROVIDER<br />
1. A – Smith St Practice<br />
2. B – Dr Smith<br />
3. C – Dr Jones<br />
4. D – Dr Brown<br />
5. E – Dr White<br />
6. F – Dr A. Smith<br />
RRN NUMBER<br />
CANCEL TXN <br />
000000123456<br />
ENTER BENEFIT AMOUNT<br />
SEND CANCEL <br />
CLEAR<br />
$25.88<br />
CLEAR<br />
BENEFIT $25.88<br />
PROVIDER # 1234567A<br />
RRN # 000000123456<br />
1<br />
Note: The transaction must still have been processed<br />
in the same day.<br />
NO<br />
YES<br />
1
2.3.2 cancelling a HICAPS claim<br />
(practice management system)<br />
To cancel a HICAPS claim transaction, simply send the transaction to HICAPS by selecting<br />
the appropriate option from your Practice Management System screen. When the<br />
terminal receives the transaction details from your Practice Management System<br />
the terminal will prompt for the customer card to be swiped. The results from the<br />
transaction will be returned directly to the Practice Management System.<br />
For further assistance on processing a cancel transaction using your Practice<br />
Management System transaction please contact your Practice Management System<br />
provider.<br />
2.4 manual daily transaction summary<br />
(HICAPS totals)<br />
step 1<br />
Press the [FUNCTION] key.<br />
step 2<br />
Enter [5] [1] and press [ENTER].<br />
2.5 settlement transaction report<br />
(HICAPS forced settlement)<br />
Prior to processing the first transaction of each day,<br />
the terminal will prompt you to print the HICAPS<br />
Settlement details from the previous day.<br />
step 1<br />
Select the YES [ENTER] key to produce the transaction<br />
listing.<br />
step 2<br />
Select the appropriate day, SUMMARY LISTING or<br />
DETAILED LISTING by entering [1] or [2] or scrolling to<br />
highlighting the option and pressing [ENTER].<br />
Note: The summary will report on totals for each<br />
provider, broken down by Health Fund. The detailed<br />
listing also includes all transactions processed. For<br />
Practice Management System users the totals are<br />
obtained from the Practice Management System.<br />
PRINT TXN LISTING<br />
HOST FORCED SETTLED<br />
PRINT TRANSACTIONS<br />
NO<br />
PRINT TXN LISTING<br />
YES<br />
1. SUMMARY LISTING<br />
2. DETAILED LISTING<br />
step 3a<br />
Select the appropriate day, TODAY or PREVIOUS DAY<br />
by entering [1] or [2] or scrolling to highlighting the<br />
option and pressing [ENTER].<br />
step 3b<br />
If you select today you will be provided with an option<br />
for either summary or detailed report.<br />
step 4<br />
Select the appropriate day, SUMMARY LISTING or<br />
DETAILED LISTING by entering [1] or [2] or scrolling to<br />
highlighting the option and pressing [ENTER].<br />
Note: If you select the previous day, only a summary<br />
report will be provided. In both cases the reports will<br />
be printed out by provider.<br />
HICAPS TOTALS<br />
1. TOTAL<br />
2. PREVIOUS DAY<br />
HICAPS TOTALS<br />
1. SUMMARY LISTING<br />
2. DETAILED LISTING<br />
1<br />
1
2.6 ordering terminal rolls<br />
step 1<br />
Press the [FUNCTION] key.<br />
step 2<br />
Enter [7] and press [ENTER].<br />
To confirm that you wish to order stationery for your<br />
terminal press the YES [ENTER] key. The terminal<br />
will now print a receipt confirming your order with<br />
a STATIONERY ORDER PLACED message.<br />
step 3<br />
Press the [FUNCTION] Key.<br />
step 4<br />
Enter [5] and press [ENTER].<br />
MERCHANT FUNCTION<br />
STATIONERY ORDER<br />
NO<br />
YES<br />
2.7 performing terminal sign on/logon<br />
If you receive a transaction response code [LR] (Logon<br />
Required) or when advised by the Help Desk, the<br />
terminal is required to logon to HICAPS. In most cases<br />
this is automatically done by the terminal, however,<br />
there may be some times when you are required to<br />
manually sign on to the switch.<br />
step 1<br />
Press the [FUNCTION] key.<br />
step 2<br />
Enter [5] and press [ENTER].<br />
The terminal will now communicate with HICAPS and<br />
print a receipt confirming your sign on.<br />
example sign on receipt<br />
1. NAB<br />
HOSTS<br />
Note: This will send a sign on message to the host<br />
and it must be approved. The stationery will take five<br />
business days for the rolls to arrive.<br />
<br />
1
2.8 customising a HICAPS receipt (optional)<br />
3. EFTPOS<br />
To customise your HICAPS receipt for seasonal or other<br />
messages.<br />
3.1 processing an EFTPOS transaction<br />
step 1<br />
Press the [FUNCTION] key.<br />
step 2<br />
Enter [2] [6] and press [ENTER].<br />
step 3<br />
Enter [0] to [4] depending on where you want your<br />
message to be printed on the receipt. You will then be<br />
prompted to enter your message using the keypad. The<br />
alpha entry for the receipt text is the same as that used<br />
for entering your provider names. Refer to section 2.1.1.<br />
example customised receipt.<br />
ENTER RECEIPT TEXT<br />
0 HEADER 4<br />
1 FOOTER 1<br />
2 FOOTER 2<br />
3 FOOTER 3<br />
4 FOOTER 4<br />
3.1.1 processing an EFTPOS transaction following<br />
a successful claim transaction<br />
step 1<br />
Note: The following screen will be displayed if the<br />
Provider is set up to accept a deposit and also if YES<br />
[ENTER] was answered to the deposit taken question<br />
at Step 1.<br />
step 2<br />
Enter the amount of the deposit.<br />
CLAIM<br />
DEPOSIT TAKEN<br />
FOR THIS CLAIM<br />
NO<br />
CLAIM<br />
YES<br />
ENTER DEPOSIT AMOUNT<br />
$10.50<br />
ENTER<br />
step 3<br />
Confirm that the outstanding value is correct and press<br />
YES [ENTER].<br />
CLAIM<br />
OUTSTANDING $42.02<br />
PAY BY CREDIT/DEBIT<br />
NO<br />
YES<br />
step 4<br />
Swipe or insert the credit or debit card.<br />
REFUND / CANCEL<br />
SWIPE/INSERT CARD
step 5<br />
The cardholder is to select their account using the<br />
buttons beside each account option.<br />
step 6<br />
The terminal will then prompt for the cardholder to<br />
enter their PIN and press [ENTER].<br />
For a Credit or Charge card transaction the cardholder<br />
can just press [ENTER] if they don’t have a PIN.<br />
step 7<br />
The transaction will be processed by the bank and<br />
be approved or declined. Please ensure you check<br />
the screen and receipt to confirm the transaction was<br />
approved or declined.<br />
SELECT ACCOUNT<br />
PINPAD<br />
CHEQUE<br />
SAVINGS<br />
CREDIT<br />
TOTAL $42.02<br />
KEY PIN AND ENTER<br />
RESPONSE<br />
CLEAR<br />
<br />
3.1.2 processing an EFTPOS transaction<br />
step 1<br />
To start an EFTPOS Sale transaction, simply swipe the<br />
patient’s EFTPOS card through the terminal. This could<br />
be Credit: Visa, MasterCard, Charge: Amex, Diners or<br />
JCB, or Debit: Cheque or Savings as per your EFTPOS<br />
agreement.<br />
step 2<br />
If the terminal has MMF active, you will then be<br />
prompted to select the appropriate provider from the<br />
merchant list.<br />
step 3<br />
Enter the amount of the sale.<br />
VISA<br />
SELECT MERCHANT<br />
1. A – Smith St Practice<br />
2. B – Dr Smith<br />
3. C – Dr Jones<br />
4. D – Dr Brown<br />
5. E – Dr White<br />
6. F – Dr A. Smith<br />
SALE AMOUNT<br />
PURCHASE<br />
$25.50<br />
step 8<br />
If the payment was made using a card without a PIN<br />
you will also be asked to confirm the signature once<br />
the transaction is approved by the bank.<br />
RESPONSE<br />
SIGNATURE REQUIRED<br />
step 4<br />
The cardholder is to select their account using the<br />
buttons beside each account option.<br />
SELECT ACCOUNT<br />
ENTER<br />
CHEQUE<br />
SAVINGS<br />
CREDIT<br />
step 9<br />
If the signature matches press YES [ENTER] and the<br />
transaction is complete. If the signature doesn’t match,<br />
press NO [CLEAR] to cancel the transaction and get<br />
payment by another means.<br />
SIGNATURE<br />
CORRECT<br />
SIGNATURE<br />
step 5<br />
The terminal will then prompt for the cardholder to<br />
enter their PIN and press [ENTER].<br />
For a Credit or Charge card transaction the cardholder<br />
can just press [ENTER] if they don’t have a PIN.<br />
PINPAD<br />
TOTAL $25.50<br />
KEY PIN AND ENTER<br />
NO<br />
YES<br />
CLEAR
step 6<br />
The transaction will be processed by the bank and<br />
be approved or declined. Please ensure you check<br />
the screen and receipt to confirm the transaction was<br />
approved or declined.<br />
step 7<br />
If the payment was made using a card without a PIN<br />
you will also be asked to confirm the signature once<br />
the transaction is approved by the bank.<br />
RESPONSE<br />
<br />
RESPONSE<br />
SIGNATURE REQUIRED<br />
example EFTPOS sale receipt<br />
The EFTPOS receipt contains all of the information<br />
relating to the EFTPOS transaction. A second<br />
[CUSTOMER COPY] is printed. The first copy is required<br />
to be signed by the cardholder and retained for your<br />
office records. The second copy is for the cardholder’s<br />
own records.<br />
step 8<br />
If the signature matches press YES [ENTER] and the<br />
transaction is complete.<br />
If the signature doesn’t match, press NO [CLEAR] to<br />
cancel the transaction and get payment by another<br />
means.<br />
SIGNATURE<br />
CORRECT<br />
NO<br />
SIGNATURE<br />
YES
3.1.3 processing an EFTPOS transaction<br />
(practice management system)<br />
To start an EFTPOS transaction, simply send the<br />
transaction to HICAPS by clicking on the HICAPS icon<br />
on your Practice Management System screen.<br />
The terminal will prompt for the customer’s EFTPOS<br />
(Credit or Debit) card to be swiped. It will then prompt<br />
for the remaining input: Provider (for MMF), Account,<br />
PIN, etc. The results from the transaction will be<br />
returned directly to the Practice Management System<br />
and a receipt for your records will be produced for the<br />
customer to sign, together with a copy for the customer.<br />
For further assistance on processing a Practice<br />
Management System transaction please contact your<br />
Practice Management System provider.<br />
3.2 refunding an EFTPOS transaction<br />
3.2.1 refunding an EFTPOS transaction<br />
There are two options for refunding an EFTPOS<br />
transaction.<br />
option 1<br />
Refunding an EFTPOS transaction processed by the<br />
same terminal<br />
step 1<br />
Press the [REFUNDS] key.<br />
step 2<br />
The terminal will then prompt you to swipe/insert the<br />
card. Swipe the cardholder’s card.<br />
step 3<br />
The terminal will then display the transaction(s) processed<br />
by this cardholder for the current day. If there is more<br />
than one transaction for that cardholder all transactions<br />
can be reviewed by using the up/down arrow buttons.<br />
REFUND / CANCEL<br />
SWIPE/INSERT CARD<br />
CANCEL TXN RRN:123456<br />
Merchant Name<br />
531539-870 S<br />
CASHOUT $25.88<br />
PURCHASE $47.50<br />
Press CLEAR to REFUND<br />
Press ENTER to CANCEL TXN<br />
step 4<br />
Pressing the NO [CLEAR] to enter a different value for the<br />
Refund for this cardholder (refer to option 2 below or the<br />
YES [ENTER] key to Refund the selected transaction.<br />
option 2<br />
Refunding any EFTPOS Transaction<br />
step 1<br />
Press the [REFUNDS] key.<br />
step 2<br />
The terminal will then prompt you to swipe/insert the<br />
card. Swipe the Cardholder’s card.<br />
step 3<br />
The terminal will prompt for you to select a Merchant<br />
by entering the number beside the Merchant’s name<br />
and press [ENTER] or scrolling down and highlighting<br />
the Merchant name and pressing [ENTER].<br />
step 4<br />
The terminal will then prompt you to enter the refund<br />
password for the selected merchant. Key the Password<br />
and press [ENTER].<br />
step 5<br />
The terminal will then prompt you for the amount for<br />
the Refund. Key the amount and press [ENTER].<br />
REFUND / CANCEL<br />
SWIPE/INSERT CARD<br />
SELECT MERCHANT<br />
1. A – Smith St Practice<br />
2. B – Dr Smith<br />
3. C – Dr Jones<br />
4. D – Dr Brown<br />
5. E – Dr White<br />
6. F – Dr A. Smith<br />
“Card Type”<br />
SALE AMOUNT<br />
REFUND<br />
ENTER MERCHANT PSWD<br />
“Merchant Name”<br />
CLEAR<br />
REFUND<br />
$0.00<br />
CLEAR
step 6<br />
The cardholder is to select their account using the<br />
buttons beside each account option.<br />
step 7<br />
The terminal will then prompt for the cardholder to<br />
enter their PIN and press [ENTER].<br />
For a Credit or Charge card transaction the cardholder<br />
can just press [ENTER] if they don’t have a PIN.<br />
step 8<br />
The transaction will be processed by the bank and<br />
be approved or declined. Please ensure you check<br />
the screen and receipt to confirm the transaction was<br />
approved or declined.<br />
step 9<br />
If the payment was made using a card without a PIN<br />
you will also be asked to confirm the signature once<br />
the transaction is approved by the bank.<br />
step 10<br />
If the signature matches press YES [ENTER] and the<br />
transaction is complete.<br />
If the signature doesn’t match, press NO [CLEAR] to<br />
cancel the transaction and get payment by another<br />
means.<br />
SELECT ACCOUNT<br />
PINPAD<br />
CHEQUE<br />
SAVINGS<br />
CREDIT<br />
TOTAL $25.50<br />
KEY PIN AND ENTER<br />
RESPONSE<br />
CLEAR<br />
<br />
RESPONSE<br />
SIGNATURE REQUIRED<br />
3.2.2 refund an EFTPOS transaction<br />
(practice management system)<br />
To refund an EFTPOS transaction, simply send the<br />
transaction to the HICAPS terminal by selecting the<br />
appropriate option from your Practice Management<br />
System screen.<br />
When the terminal receives the transaction details<br />
from your Practice Management System the terminal<br />
will prompt for the customer card to be swiped.<br />
The results from the transaction will be returned<br />
directly to the Practice Management System.<br />
For further assistance on processing a cancel<br />
transaction using your Practice Management System<br />
transaction please contact your Practice Management<br />
System provider.<br />
SIGNATURE<br />
CORRECT<br />
SIGNATURE<br />
NO<br />
YES<br />
<br />
1
3.3 EFTPOS settlement<br />
Settling EFTPOS simply advises HICAPS that you have<br />
finished EFTPOS processing for that day. Anything<br />
processed after performing the settlement will be<br />
included with the following day’s transactions.<br />
Note: For Pre Settlement and Last Settlement functions<br />
press [SETTLEMENT] button.<br />
step 3<br />
Once you have selected the provider/merchant from<br />
the list, you have 3 options.<br />
settlement<br />
To print your current EFTPOS settlement details and<br />
optionally a full transaction listing, then process your<br />
totals to your bank account.<br />
SETTLEMENT TXN LISTING<br />
1. SETTLEMENT<br />
2. PRE-SETTLEMENT<br />
3. LAST SETTLEMENT<br />
3.3.1 manual EFTPOS settlement<br />
Note: You cannot manually settle the terminal if<br />
Automatic Settlement is programmed (as in 3.2.2<br />
Automatic <strong>Terminal</strong> Settlement).<br />
pre-settle<br />
To print a report summarising the totals for EFTPOS<br />
transactions processed so far during the current<br />
settlement period.<br />
step 1<br />
To settle your EFTPOS facility manually, press the<br />
[SETTLE] key.<br />
step 2<br />
If the terminal has MMF active, you will then be prompted<br />
to select the appropriate provider from the merchant list.<br />
SELECT MERCHANT<br />
1. A – Smith St Practice<br />
2. B – Dr Smith<br />
3. C – Dr Jones<br />
4. D – Dr Brown<br />
5. E – Dr White<br />
6. F – Dr A. Smith<br />
last settle<br />
To print a report summarising the totals for EFTPOS<br />
transactions previous settlement period.<br />
step 4<br />
Once you have selected an option you will be asked<br />
to press YES [ENTER] or NO [CLEAR] to print out your<br />
selection.<br />
MERCHANT NAME<br />
Do <br />
NAB<br />
NO<br />
YES
3.3.2 automatic terminal settlement<br />
This option enables your terminal to settle<br />
automatically at a pre-determined time each day.<br />
To set up your terminal to settle automatically:<br />
step 1<br />
Press the [FUNCTION] key.<br />
step 2<br />
Enter [5] [6] and press [ENTER].<br />
step 3<br />
The terminal provides you with 3 options:<br />
EFTPOS SETUP<br />
1. SETTLEMENT<br />
2. AUTO SETTLE NAB<br />
3. MERCHANT PASSWORD<br />
SETTLEMENT NAB<br />
1. ALL MERCHANT<br />
2. SELECT MERCHANT<br />
step 5<br />
Once you have selected auto settle NAB you will be<br />
provided with 3 options. Select the appropriate Auto<br />
settle by entering [1] or scrolling to highlight the<br />
option and pressing [ENTER].<br />
step 6<br />
Press YES [ENTER] to confirm that auto settle is to be<br />
enabled for all providers/merchants.<br />
NAB<br />
ENABLED<br />
AUTO SETTLE NAB<br />
1. AUTO SETTLE<br />
2. AUTO LAST SETTLE<br />
3. CLEAR AUTO SETTINGS<br />
AUTO SETTLE<br />
step 3a<br />
1. Settlement allows you to enable or disable<br />
settlement for all providers/merchants or by each<br />
provider/merchant.<br />
step 3a.i<br />
Once you have selected settlement for all merchants<br />
you will be asked to enable or disable settlement by<br />
using the buttons beside each option.<br />
step 3b<br />
2. Auto Settle NAB allows you to set up the automatic<br />
settlement time by all providers/merchants or by each<br />
provider/merchant.<br />
step 4<br />
Select auto settle for all merchants by pressing [1]<br />
and [ENTER] or for a selected merchant by pressing<br />
[2] and [ENTER]. If you selected option 2 for a selected<br />
merchant you will be asked to select the merchant.<br />
NAB<br />
ENABLED<br />
ENABLE<br />
SETTLEMENT<br />
EFTPOS SETUP<br />
1. SETTLEMENT<br />
2. AUTO SETTLE NAB<br />
AUTO SETTLE NAB<br />
1. ALL MERCHANT<br />
DISABLE<br />
3. MERCHANT PASSWORD<br />
2. SELECT MERCHANT<br />
step 7<br />
The terminal will ask if you wish to print a complete<br />
transaction listing when each auto-settle is performed.<br />
Select YES [ENTER] to print the listing, or NO [CLEAR]<br />
to produce only totals.<br />
step 8<br />
The terminal will ask you to enter the time you wish to<br />
settle in 24 hour clock time.<br />
step 9<br />
The terminal will ask you to confirm the time entered.<br />
Select YES [ENTER] if the time displayed is correct, or<br />
NO [CLEAR] to re-enter the time.<br />
ENABLE<br />
ENABLE<br />
AUTO SETTLE<br />
PRINT TXN IN SETTLE<br />
DISABLED<br />
AUTO SETTLE<br />
DISABLE<br />
DISABLE<br />
ENTER SETTLEMENT TIME<br />
0000<br />
AUTO SETTLE<br />
2055<br />
CLEAR<br />
START AUTO SETTLEMENT<br />
AT 08.55PM<br />
NO<br />
YES
step 10<br />
You will be asked to confirm the number of times the<br />
terminal will retry to perform the settlement. To accept<br />
the default of 0 attempts, simply press [ENTER]. You<br />
may increase the number of retries to 2 or 3. Simply<br />
key [2] or [3] and press [ENTER].<br />
3.3.3 merchant password<br />
The terminal is able to have a known password, a<br />
password that is set up when your terminal is installed<br />
or a scrolling password.<br />
If you know your password you can change your<br />
password using this option.<br />
If you don’t know your password you will need to<br />
contact the HICAPS Helpdesk on 1300 650 852 and they<br />
will tell you how to change your password.<br />
3.3.4 host forced settlement<br />
The terminal automatically settles at 21:30EST each<br />
day. The automatic settlement time can optionally<br />
be moved. See Automatic <strong>Terminal</strong> Settlement 3.2.2.<br />
If the terminal is not settled then it will be automatically<br />
settled by the HICAPS switch at the relevant time.<br />
Note: If the HICAPS switch settles then no receipt is<br />
printed. To obtain Totals please use Last Settle Enquiry,<br />
refer to 4.2.3.<br />
Note: All times are Melbourne/Sydney times.<br />
AUTO SETTLE<br />
AUTO SETTLE RETRY 0<br />
<br />
EFTPOS SETUP<br />
1. SETTLEMENT<br />
2. AUTO SETTLE NAB<br />
CLEAR<br />
3. MERCHANT PASSWORD<br />
2<br />
4. terminal functions<br />
4.1 the screensaver (idle screens)<br />
The HICAPS T4200 has a built in screensaver function.<br />
While the terminal is not in use it will display the<br />
following screens. The screensaver will scroll between<br />
these screens until you start to use the terminal, either:<br />
> from your integrated Practice Management System,<br />
> by swiping a card,<br />
> by using any key including the clear key.
4.2 main menu<br />
The Main Menu is accessed by pressing the bottom<br />
right hand button beside the screen.<br />
MAIN MENU<br />
1. LOGIN<br />
2. BATCH<br />
3. TERMINAL<br />
4. SETUP<br />
5. TESTS<br />
6. REPRINT<br />
4.2.4 setup<br />
HICAPS use only.<br />
SETUP<br />
1. TERMINAL<br />
2. PRINTER<br />
3. COMMS<br />
4. PASSWORD<br />
5. TIPS<br />
4.2.1 logon<br />
The Logon option is used to logon to the NAB/HICAPS<br />
host, log on by terminal, by merchant or by provider.<br />
4.2.2 batch<br />
The Batch option is used to perform settlement, review<br />
and reprint transactions in the current batch.<br />
For Settlement see the Settlement section.<br />
Review – used to review transactions and reprint a<br />
receipt.<br />
Total – used to display EFTPOS totals.<br />
Find – used to find a previous transaction using the<br />
RRN and enables you to reprint a receipt.<br />
4.2.3 terminal<br />
<strong>Terminal</strong> options:<br />
View – is used to view the terminal and PIN pad<br />
software versions.<br />
LOGON<br />
1. LOGON HOST<br />
2. PARAM TID<br />
3. PARAM MERCHANT<br />
4. PARAM PROVIDER<br />
BATCH<br />
1. SETTLEMENT<br />
2. REVIEW<br />
3. TOTAL<br />
4. FIND<br />
TERMINAL<br />
1. VIEW<br />
2. LOAD TABLES<br />
3. TRAINING<br />
4.2.5 tests<br />
Perform tests on the terminals:<br />
HOST: HICAPS transactions host, EFTPOS transactions,<br />
and Loads & Initialisations host. Only to be used on<br />
advice from the HICAPS Help Desk.<br />
DISPLAY: to test the terminal’s display.<br />
Keyboard: to test the keypad.<br />
Printer: to test the printer.<br />
Card reader: to test the terminal’s card reader<br />
or any card.<br />
PINPAD: to confirm the PIN pad is functioning.<br />
4.2.6 reprint<br />
The Reprint option is used to either reprint the receipt<br />
for the last transaction or reprint any transaction by<br />
entering the invoice number, which is the last 6 digits<br />
of the RRN.<br />
TESTS<br />
1. HOST<br />
2. DISPLAY<br />
3. KEYBOARD<br />
4. PRINTER<br />
5. CARD READ<br />
6. PINPAD<br />
1. LAST<br />
2. INVOICE<br />
REPRINT<br />
Load Tables – is used to load configuration information<br />
from the NAB/HICAPS host.<br />
Training – is used to put the terminal into training for<br />
host transactions.
4.3 transaction menu<br />
The following menu lists the available transactions for<br />
the HICAPS T4200.<br />
4.3.1 balance/quote<br />
The Balance Inquiry option can be used to request an<br />
account balance, but only for NAB debit cardholders.<br />
The Quote option allows a provider to provide a<br />
quotation to a patient by checking with the patient’s<br />
Health Fund what they are covered for. Entering a<br />
quote transaction is the same as for a claim transaction.<br />
Note: Refer to HICAPS website www.hicaps.com.au for<br />
Health Funds participating in the quotations function.<br />
4.3.2 refund/cancel<br />
The Refund/Cancel option is used to either reverse<br />
an EFTPOS transaction or cancel a HICAPS Claim<br />
transaction (refer to section 2.3.1).<br />
4.3.3 pre-auth<br />
The Pre-auth option is available for credit cards only.<br />
A pre-authorisation is a non-value transaction. In order<br />
to process the value portion of a pre-authorisation,<br />
refer to the completion option below.<br />
4.3.4 completion<br />
The Completion option is used to process the value<br />
transaction relating to a pre-authorisation already<br />
obtained. A completion must be performed within four<br />
business days of obtaining a pre-authorisation, and is<br />
only available for CREDIT cards.<br />
TRANSACTION<br />
1. BALANCE / QUOTE<br />
2. REFUND / CANCEL<br />
3. PRE-AUTH<br />
4. COMPLETION<br />
5. CASHOUT<br />
6. SALE<br />
4.3.5 cash out<br />
The Cash Out option allows you to provide cash to<br />
your customers. The terminal will also prompt for cash<br />
out or tips if you have these options configured in<br />
the terminal. If you wish to ignore the cash out or tip<br />
option, press ENTER to bypass those steps.<br />
Cash out is available on cheque and savings accounts<br />
only.<br />
4.3.6 sale<br />
The Sale option is explained in section 3.1<br />
<br />
1
4.4 terminal function keys<br />
To access functions on the keypad, simply press the<br />
[FUNCTION] key followed by the function you want to<br />
use, e.g. REPORT [1].<br />
4.4.1 report [1] key<br />
(print EFTPOS and HICAPS reports)<br />
The REPORT [1] key allows you to print a number of<br />
different standard reports from the terminal.<br />
audit<br />
Produces an audit trail of transactions processed through<br />
the terminal. The details for each transaction include:<br />
Transaction Type: Claim, Cancel, Sale etc.<br />
Transaction Date and Time (format dd/mm/yy hh:mm).<br />
Transaction amount: in the case of a claim, the total<br />
amount requested.<br />
Card Type: HICAPS, VISA etc.<br />
Authorisation Number.<br />
Invoice Number: used to reprint an EFTPOS transaction<br />
receipt.<br />
Card Number: the full card number used for the<br />
transaction.<br />
Transaction Code:<br />
S/K – the card was Swiped or Keyed<br />
NO – the transaction was either Approved or<br />
processed offline<br />
x – the transaction has been sent to the acquiring<br />
bank, if the [X] is absent the transaction has<br />
been processed in [fallback] and will be passed<br />
to the host with the next transaction.<br />
shift<br />
As well as allowing the running shift total to be reset, you<br />
can produce a summary report of EFTPOS transactions<br />
processed since the last shift total reset was performed.<br />
reprint<br />
This is used to reprint the receipt for an EFTPOS or<br />
HICAPS transaction processed in the current batch. By<br />
using [LAST] for the previous transaction or [INVOICE]<br />
for any other receipt in the batch using the invoice<br />
number (last six digits of the RRN).<br />
provider<br />
This is used to print a summary of the provider’s set up.<br />
4.4.2 setup [2] key (refer help desk)<br />
This option should only be used on advice from the<br />
Help Desk.<br />
4.4.3 reset [3] key<br />
The RESET [3] key is used to re-start the terminal.<br />
4.4.4 lock [4] key<br />
The LOCK [4] key is used to lock and unlock your<br />
HICAPS terminal to provide added security. When<br />
active the Lock option prevents all use of the terminal<br />
until the security password is keyed in.<br />
Once the terminal is locked it will be unusable until<br />
your 4-digit terminal security password is keyed<br />
followed by [ENTER].<br />
Note: MMF – The provider password is also your refund<br />
password.<br />
4.4.5 sign on [5] key<br />
The SIGN ON [5] key is used to logon to the NAB/<br />
HICAPS host.
4.4.6 quote [6] key<br />
The QUOTE [6] key allows a provider to provide a<br />
quotation to a patient by checking with the patients<br />
Health Fund what they are covered for. Entering a<br />
quote transaction is the same as for a claim transaction.<br />
4.4.7 order [7] key<br />
The ORDER [7] key is used to order terminal paper rolls<br />
as detailed in section 2.6.<br />
4.4.8 reprint [8] key<br />
(reprint EFTPOS and HICAPS transactions)<br />
The REPRINT [8] key is used to either reprint the receipt<br />
for the last transaction or reprint any transaction by<br />
entering the invoice number. This is detailed in section<br />
4.2.6.<br />
4.4.9 load [9] key<br />
This option should only be used on advice from the<br />
Help Desk.<br />
4.4.10 initialise [0] key<br />
This option should only be used on advice from the<br />
Help Desk.<br />
4.4.11 paper feed [*] key<br />
The PAPER FEED [*] key is used to feed the paper in the<br />
printer.<br />
4.4.12 alpha [#] key<br />
The ALPHA [#] key is used to select alpha numeric<br />
characters used when configuring the provider details<br />
in the terminal.<br />
4.5 changing the terminal security password<br />
The terminal security password is used to process both<br />
EFTPOS Refunds and to also unlock the terminal for<br />
use.<br />
To change the password:<br />
step 1<br />
Press the [FUNCTION] key.<br />
step 2<br />
Enter [9] [0] and press the [ENTER] key.<br />
step 3<br />
Enter your existing 4-digit password and press the<br />
[ENTER] key.<br />
step 4<br />
Enter a new 4-digit password and press the<br />
[ENTER] key.<br />
step 5<br />
Enter your new password again and press the<br />
[ENTER] key.<br />
ENTER OLD PASSWORD<br />
MID: 33123433<br />
ENTER NEW PASSWORD<br />
NEW PASSWORD AGAIN<br />
CLEAR<br />
CLEAR<br />
CLEAR
4.6 fallback procedure<br />
In the event of the terminal being unable to<br />
communicate with the NAB/HICAPS host, it will default<br />
to a fallback situation. Amounts above your floor limit<br />
require an authorisation number to be obtained and<br />
entered when requested into the terminal.<br />
5. terminal connections<br />
step 1<br />
If a transaction is unable to be processed due to a<br />
communication problem, the following screen may be<br />
displayed at the end of the transaction.<br />
.<br />
step 2<br />
Enter authorisation number* (refer below for contact<br />
phone numbers) and press the [ENTER] key.<br />
If authorisation is not received, press the [CANCEL] key<br />
and request another form of payment.<br />
Note: The transaction will be stored within the terminal<br />
and passed on when communication is available.<br />
If the amount of the transaction is below your floor<br />
limit, the transaction will be approved on fallback.<br />
The receipt will detail APPROVED 08 (fallback). Please<br />
ask the customer to sign the receipt. The transaction<br />
will be stored in the terminal and passed on when<br />
communication is available. Please call the HICAPS Help<br />
Desk if your terminal processes more than 2 fallback<br />
transactions in a row.<br />
For authorisation call:<br />
Credit Cards 13 25 15<br />
Debit Cards 1300 650 852<br />
*Call the above contact number to obtain a valid<br />
authorisation number.<br />
ENTER AUTH CODE<br />
sel<br />
FALLBACK<br />
1 2 3<br />
4 5 6<br />
7 8 9<br />
0<br />
___<br />
CLEAR
6. thermal printer<br />
The HICAPS T4200 terminal has a high speed, whisper<br />
quiet thermal printer. It must only be loaded with special<br />
thermal paper available from HICAPS, ordered either<br />
through the terminal, refer: 2.6 Ordering <strong>Terminal</strong> Rolls or<br />
by contacting the HICAPS Help Desk on 1300 650 852.<br />
Loading the T4200 Thermal Printer
7. HICAPS response codes<br />
7.1 transaction level HICAPS response codes<br />
Code Receipt Print Out Description<br />
00 Approved (8) Approved or completed successfully<br />
01 Prov Not Approv (15) Provider not approved by fund<br />
02 Mship Under Invest (19) Membership under investigation<br />
03 Invalid Prov Nbr (16) Invalid Provider number<br />
04 Retain Card (11) Retain card<br />
12 Declined (8) Declined<br />
14 Invalid Card Nbr Invalid card number (no such number)<br />
19 No Items Entered No items entered<br />
21 Call Help Desk – note 1 No action taken<br />
40 Mship Not Covered Membership not covered<br />
42 Mship Ended at DOS Membership ceased/suspended at date of service<br />
51 Mship Unfinancial (17) HICAPS Membership unfinancial<br />
54 Expired card (12) Expired card<br />
56 Invalid Mship Nbr (18) Invalid Membership numbers<br />
57 No Ancillary Cover (19) No Ancillary cover<br />
58 Txn Not Permitted (17) Transaction not permitted to terminal<br />
60 Provider Not Recogd (16) Provider not recognised with fund<br />
61 Benefit Limit Excee (19) Benefit limit exceeded<br />
69 No Benefit Payable No Benefit payable<br />
76 Approved (8) Approved (terminal will request new key)<br />
91 System Inoperative (17) Health Fund system currently unavailable<br />
94 Duplicate Tax (13) Duplicate transmission<br />
96 System Malfunction (18) System Malfunction or Invalid Message<br />
97 Reconc Totals Reset (19) Reconciliation totals have been reset<br />
98 MAC ERROR (19) MAC Error<br />
<br />
1
P0-PZ Refer Health Fund (17) – note 2 Refer to Health Fund<br />
LP<br />
Locked Provider<br />
H1<br />
Time Out waiting for ACK from terminal<br />
IL<br />
Number of items exceeded limit<br />
H2<br />
Maximum number of ACK Time Outs reached<br />
TP<br />
The transaction password is protected<br />
H3<br />
Timed Out waiting for response message from terminal<br />
II<br />
Invalid max item setup<br />
H4<br />
H5<br />
H6<br />
HX<br />
BZ<br />
CE<br />
ED<br />
LRC Error in response message<br />
Unable to send, terminal not connected<br />
<strong>Terminal</strong> busy<br />
ActiveX Internal Error<br />
Communication Error<br />
Communication Error<br />
Destination Error<br />
FL<br />
FC<br />
An [empty] Claim initiated from Practice Management<br />
System. (i.e. only provider in the EA field)<br />
Field content error – (a) Non numeric field such as<br />
patient ID, Body part number, service date and amount<br />
contain non-numeric data (i.e. anything other than<br />
accept ‘0’ to ‘9’)<br />
(b) Alpha numeric field such as item number contains<br />
symbols. (i.e. anything other than ‘A’ to ‘Z’. ‘a’ to ‘z’, ‘0’<br />
to ‘9’ and space)<br />
EN<br />
Network Request Error<br />
Note 1: Response code for the unmatched reversal, void, cancellation) transactions.<br />
HM<br />
HW<br />
LC<br />
NA<br />
Hardware Error<br />
Hardware Error<br />
Unexpected loss of carrier<br />
Transaction Type not available<br />
Note 2: Response code in the range P0 – P9 and PA – PZ indicate that a transaction has<br />
been declined by the Health Fund for a specific reason. These transactions must be<br />
followed up directly with the fund.<br />
7.2 item level HICAPS response codes<br />
ND<br />
NM<br />
NS<br />
TO<br />
TC<br />
VN<br />
LR<br />
JF<br />
IM<br />
DI<br />
TA<br />
NP<br />
Reversal Time Out<br />
No sync with Modem network Failure<br />
Contact Help Desk<br />
Declined – Settlement required<br />
Time Out Error<br />
Cancelled by user or input time out<br />
Void not allowed<br />
<strong>Terminal</strong> Logon Required<br />
Journal Full<br />
Invalid MAC<br />
Duplicate Invoice<br />
Transaction Not Allowed<br />
Provider number not found<br />
Code Receipt Print Out Description<br />
00 Approved (8) Transaction Approved<br />
01 Item No Benefit (15) Nil benefit payable on this item<br />
02 Restricted Item (15) Nil benefit – restricted item<br />
03 Restricted Item (15) Reduced benefit – restricted item<br />
04 Previously Paid (15) Nil benefit – benefit previously paid<br />
05 Limit Reached Nil benefit – limit reached<br />
06 Limit Reached Reduced benefit – limit reached<br />
07 Waiting Period Nil benefit – qualifying period applies<br />
08 PreReq Ser Reqd Nil benefit – pre-requisite service required<br />
09 Pre Existing Nil benefit – pre existing ailment<br />
10 Item Nbr Invalid Item number invalid<br />
11 Item Nbr Ceased Item number ceased
12 Item Not Valid Item not valid for provider<br />
13 Item Not Apprvd Item not approved – not payable by HICAPS<br />
14 Max Nbr Ser Exc Service exceeds number of times permitted<br />
15 Cost Missing Cost must be entered<br />
16 DOS Not Valid Date of service must be before today<br />
17 DOS too Old Date of service too old<br />
18 Body Part Reqd Body part required<br />
19 Pat Not Covered Patient not covered<br />
20 Depd Status End Dependent status ceased<br />
21 Invald Pat Code Invalid patient code<br />
22 Mship Not Cover Membership not covered<br />
23 Mship Ended DOS Membership ceased/suspended at date of service<br />
24 Mship Unfin DOS Membership unfinancial at date of service<br />
25 No Ancill Cover No ancillary cover<br />
26 Item Not Coverd Not covered for this service<br />
27 Duplicate Serv Duplicate service already processed<br />
28 Excess on Serv Nil benefit – excess on service applied<br />
29 Excess on Serv Reduced benefit – excess on service applied<br />
30 Quote Required Nil benefit – quote required prior to service<br />
31 Quote Required Reduced benefit – quote required prior to service<br />
32 Exceeds Quote Nil benefit – claim exceeds quote<br />
33 Exceeds Quote Reduced benefit – claim exceeds quote<br />
34 Age Restriction Nil benefit – Age restriction applies<br />
35 Age Restriction Reduced benefit – Age restriction applies<br />
36 Gender Restrict Nil benefit – Gender restriction applies<br />
37 Gender Restrict Reduced benefit – Gender restriction applies<br />
38 Invalid Charge Nil benefit – Amount charged is invalid<br />
39 Notional Charge Notional Charge<br />
40 Converted Item Converted item<br />
41 Refer to Health Fund Refer to fund<br />
42 System Problem System Problem<br />
50 Prov Not Appro Provider not approved by Fund (at date of service)<br />
51 Prov Not Appro Provider not approved by Fund for this service at DOS<br />
P0-PZ Refer to Fund Refer Health Fund – note 1<br />
Note 1: Item codes in the range P0 – P9 and PA – PZ indicate that an item has been<br />
declined by the Health Fund for a specific reason. These items must be followed up<br />
directly with the Fund.<br />
8. EFTPOS error messages and corrective actions<br />
Code Short Description Details<br />
00 Approved Transaction approved or completed successfully<br />
04 Pick up card Declined. The Card Issuer has requested the card be<br />
retained by the merchant and returned to the acquirer<br />
with the merchant vouchers<br />
05 Declined The transaction has been declined<br />
07 Pick up card Pick up card– The Card Issuer has requested the card be<br />
retained by the merchant and returned to the acquirer<br />
with the merchant vouchers – special condition<br />
13 Invalid Amount The amount of the transaction is invalid for the type of<br />
transaction or merchant<br />
14 Invalid Card Either the Card Issuer does not recognise the card or<br />
the card number is not allowed to be processed by the<br />
terminal<br />
15 No such issuer The card issuer is not known by the terminal or switch<br />
21 No action taken The card issuer did not process the requested<br />
transaction<br />
31 Issuer Not Supported The acquirer does not have an acquiring arrangement<br />
with the issuer of this card<br />
32 Partially Completed The transaction was not fully completed and has been<br />
reversed<br />
33 Expired Card The terminal has advised that the card used for the<br />
transaction is expired or has been replaced
38 PIN Retried Exceeded The allowable number of pin retries has been exceeded<br />
for the card<br />
39 No Credit Account The Credit account was selected for the transaction, but<br />
one is not attached to the card<br />
43 Pick up card Pick up card – The Card Issuer has requested the card be<br />
retained by the merchant and returned to the acquirer<br />
with the merchant vouchers – stolen card<br />
52 No Cheque Account The Cheque account was selected for the transaction,<br />
but one is not attached to the card<br />
53 No Savings Account The Savings account was selected for the transaction,<br />
but one is not attached to the card<br />
54 Expired Card The Card Issuer has advised that the card used for the<br />
transaction is expired or has been replaced<br />
55 Incorrect PIN The PIN entered by the cardholder is not valid for the<br />
card used<br />
58 Not Permitted This type of transaction is not permitted to be<br />
performed at this terminal<br />
61 Exceeds Limit The transaction amount exceeds the daily or weekly<br />
withdrawal limit<br />
65 Exceeds Frequency The number of transactions exceeds the number<br />
allowed by the Card Issuer<br />
75 PIN Retried Exceeded The allowable number of pin retries has been exceeded<br />
for the card<br />
76 Approved The transaction was approved but the terminal will<br />
perform an automatic sign on for security reasons<br />
91 System Inoperative The Switch or Card Issuer is currently not available<br />
96 System Malfunction The Switch has experienced a serious malfunction or<br />
the message is unable to be processed due to invalid<br />
details in one or more fields<br />
97 Totals Reset Settlement has been processed and the terminal totals<br />
have been reset<br />
98 MAC Error The Switch has identified a possible security error or the<br />
message is unable to be processed due to invalid details<br />
in one or more fields<br />
N1 Upgrade Available Transaction approved – a new version of terminal<br />
software is available and the terminal will automatically<br />
attempt to upgrade overnight<br />
N2 PIN PAD Error Transaction declined – the PINPAD connected to the<br />
terminal is invalid and cannot be used on the terminal<br />
N3 Upgrade Required Transaction declined – the current version of terminal<br />
software is no longer supported, the terminal will need<br />
to be upgraded before proceeding<br />
Note: If the screen display is blank, power reset the<br />
terminal and check connections. If problem persists,<br />
call the Help Desk.<br />
If any other error messages are displayed, please call<br />
the Help Desk.<br />
9. manual backup procedure<br />
Manual Backup Procedure involves the use of the<br />
manual imprinter and vouchers.<br />
This procedure should only be used when you are<br />
advised in the terminal error message section.<br />
Do not use manual backup procedure for any of these<br />
situations:<br />
• Declined<br />
• Faulty and damaged cards<br />
• Invalid card<br />
• Expired card<br />
• Card number error<br />
• Retain card<br />
If you have any doubt on whether you should use the<br />
manual backup procedure, please call the Help Desk.<br />
However, for many of these messages, the Help Desk<br />
cannot assist any further as the details of specific<br />
customer account details cannot be revealed. For<br />
example, if a transaction is declined due to lack of<br />
funds, this will not be advised to you.
10. merchant requirements to ensure<br />
EFTPOS transactions are valid<br />
1. For all manual transactions:<br />
(a) Always try the transactions through the PIN pad<br />
first.<br />
(b) Check the card is being used after its ‘valid from’<br />
date and before its ‘valid to’ date.<br />
(c) Ensure the card is not recorded on any warning<br />
bulletin.<br />
(d) Ensure that the card imprint is legible and<br />
complete.<br />
(e) Obtain authorisation for above floor limit<br />
transactions.<br />
2. For any signature based transaction verify the<br />
cardholder’s signature matches the signature on<br />
their card. If the signature does not match, or you<br />
are suspicious of the sale, contact the appropriate<br />
centre listed on the next page.<br />
3. Ensure the accuracy of any card information keyed<br />
into the PIN pad.<br />
4. Retain your electronic transaction receipts and<br />
manual transaction vouchers for a period of not less<br />
than 12 months.<br />
If any of these conditions are not met, it is possible<br />
that the transaction may be invalid and the merchant<br />
account debited for the value of the disputed<br />
transaction.<br />
11. terminal functions T4200 series<br />
# Description<br />
1 Reports:<br />
1 Audit (print txn listings: 1 all txns. 2 eftpos only. 3 hicaps only).<br />
2 Shift Totals (reset).<br />
3 Reprint (last or invoice).<br />
4 Provider (print provider table).<br />
2 Merchant Programming – HICAPS USE<br />
3 <strong>Terminal</strong> Reset – reset & restart terminal s/w, power reset.<br />
4 Physical <strong>Terminal</strong> Lock – (password configuration thru F90).<br />
5 Signon<br />
6 Balance/Quote – (balance for NAB debit accounts only).<br />
7 Stationery Order<br />
8 Reprint:<br />
1 Last.<br />
2 Invoice – enter last 6 digits of RRN.<br />
9 Program Load<br />
10 Date/Time – (<strong>Terminal</strong> Password).<br />
11 Config Print<br />
13 Journal Status – No. of Transactions 0000. Room Left 0142.<br />
14 Pre-Auth/Completion of Pre-Auth.<br />
15 Paper Feed<br />
21 Review/Reprint Receipt – enter last 6 digits of RRN.<br />
22 Batch review – Scroll thru txns and reprint any in current batch.<br />
26 Receipt Text – Enter customer text on the receipt (Christmas greeting, Happy Easter, etc)<br />
50 <strong>Terminal</strong> Config – HICAPS USE<br />
51 HICAPS Totals:<br />
1 Today.<br />
2 Previous Day. (<strong>Hicaps</strong> midnight settlement enable/disable F54)<br />
53 Refund/Cancel transaction.
54 Provider Table (including: item amount memory & hicaps settlement enable/disable)<br />
55 Provider Lock / Unlock (password configuration thru F54; also accepts rolling p/w to<br />
unlock)<br />
56 Eftpos Setup:<br />
1 Settlement enable/disable.<br />
2 Auto Settle NAB.<br />
3 Merchant Password (known or rolling password)<br />
59 Default Sponsor Initalise<br />
60 Initialise<br />
72 Reprint Last Receipt<br />
73 Reprint Receipt – reprint any txn receipt (in current batch) using last 6 digits of RRN<br />
76 Cashout<br />
79 Reports:<br />
1 Audit (print txn listings: 1 all txns. 2 eftpos only. 3 hicaps only).<br />
2 Shift Totals (reset).<br />
3 Reprint (1 last. 2 invoice.).<br />
4 Provider (print provider table).<br />
82 Printer Test:<br />
1 Receipt.<br />
2 Char map.<br />
83 Display Test<br />
84 Keyboard Test<br />
89 Card Reader Test<br />
90 <strong>Terminal</strong> Password Change<br />
91 Identification – <strong>Terminal</strong> Software Version. <strong>Terminal</strong> ID.<br />
94 Pinpad Test<br />
99 Maintenance Options – HICAPS USE<br />
12. Medicare Australia Easyclaim<br />
HICAPS have developed Medicare Australia’s Easyclaim solution for the HICAPS<br />
T4200 terminal. The user guide for the Easyclaim solution is a separate user guide that<br />
is available from HICAPS by contacting the HICAPS Helpdesk on 1300 650 852.
HICAPS Pty Ltd ABN 11 080 688 866<br />
67197A1008