- Page 1: HP LaserJet 1022, 1022n, 1022nw Ser
- Page 4 and 5: Table of contents 1 Product Informa
- Page 6 and 7: 5 Removal and replacement Removal a
- Page 8 and 9: List of tables Table 1-1 Physical s
- Page 10 and 11: List of figures Figure 1-1 Front an
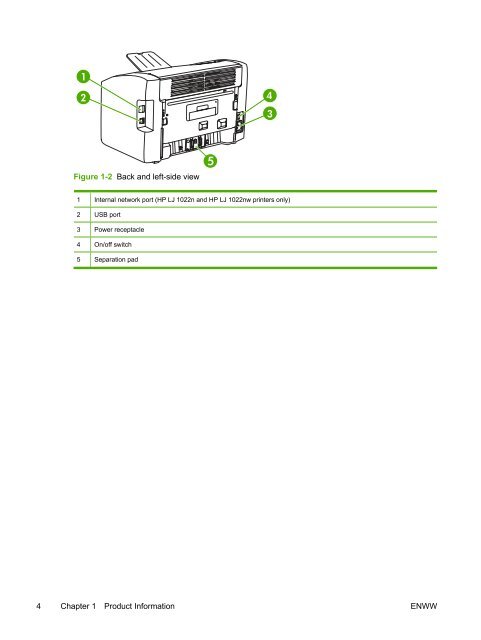
- Page 12 and 13: 1 Product Information This chapter
- Page 16 and 17: Model and serial numbers The model
- Page 18 and 19: Electrical specifications Table 1-4
- Page 20 and 21: Print-cartridge information The pri
- Page 22 and 23: Laser statement for Finland LASERTU
- Page 24 and 25: 2 Installation and Operation This c
- Page 26 and 27: Identifying the control-panel compo
- Page 28 and 29: Guidelines for using media HP Laser
- Page 30 and 31: Card stock and heavy media For opti
- Page 32 and 33: Setting media types Use the procedu
- Page 34 and 35: 3 Maintenance This chapter describe
- Page 36 and 37: Table 3-1 Life expectancies of part
- Page 38 and 39: Cleaning the print-cartridge area Y
- Page 40 and 41: Cleaning the pickup roller If you w
- Page 42 and 43: 3 Locate the pickup roller. 4 Gentl
- Page 44 and 45: Replacing the separation pad If the
- Page 46 and 47: Replacing the main input tray (pape
- Page 48 and 49: Jams Clearing jams CAUTION Do not u
- Page 50 and 51: 3 When you have removed the jammed
- Page 52 and 53: 4 Operational overview This chapter
- Page 54 and 55: Formatter system The formatter coor
- Page 56 and 57: Printer operation Printer functions
- Page 58 and 59: Printer laser/scanner unit The ECU
- Page 60 and 61: Engine controller PCB Power supply
- Page 62 and 63: 6 Fusing stage—During this proces
- Page 64 and 65:
Jam detection The top-of-page senso
- Page 66 and 67:
Basic sequence of operation (format
- Page 68 and 69:
5 Removal and replacement This chap
- Page 70 and 71:
Print cartridge 1 Open the print-ca
- Page 72 and 73:
User-replaceable parts To order a n
- Page 74 and 75:
7 Rotate the top of the new pickup
- Page 76 and 77:
3 Remove the separation pad. 4 Inse
- Page 78 and 79:
Replacing the output-bin extension
- Page 80 and 81:
3 Open the print-cartridge door. Gr
- Page 82 and 83:
4 Squeeze the two retaining tabs on
- Page 84 and 85:
7 Lift up on the top-cover assembly
- Page 86 and 87:
Front cover 1 Remove the following
- Page 88 and 89:
Internal assemblies When replacing
- Page 90 and 91:
Reinstallation tip A small groundin
- Page 92 and 93:
4 Remove two screws from the back o
- Page 94 and 95:
4 Remove three screws (callout 2).
- Page 96 and 97:
Engine control unit (ECU) assembly
- Page 98 and 99:
6 Two sheet-metal hook hinges (one
- Page 100 and 101:
Laser/scanner assembly 1 Remove the
- Page 102 and 103:
6 Troubleshooting This chapter desc
- Page 104 and 105:
Table 6-1 Basic troubleshooting (co
- Page 106 and 107:
Control-panel lights The printer in
- Page 108 and 109:
Jams Clearing jams CAUTION Do not u
- Page 110 and 111:
3 When you have removed the jammed
- Page 112 and 113:
Table 6-4 Solving print-quality pro
- Page 114 and 115:
Table 6-4 Solving print-quality pro
- Page 116 and 117:
Table 6-4 Solving print-quality pro
- Page 118 and 119:
Table 6-4 Solving print-quality pro
- Page 120 and 121:
Table 6-4 Solving print-quality pro
- Page 122 and 123:
Solving paper-feed problems Use the
- Page 124 and 125:
Functional checks This section incl
- Page 126 and 127:
High-voltage-contacts check The hig
- Page 128 and 129:
Troubleshooting tools If the printe
- Page 130 and 131:
Solenoid, sensors, switches, and mo
- Page 132 and 133:
7 Parts and diagrams This chapter p
- Page 134 and 135:
Accessories and consumables Accesso
- Page 136 and 137:
How to use the parts lists and diag
- Page 138 and 139:
Table 7-3 Printer exchange Ref Desc
- Page 140 and 141:
Table 7-4 External covers and panel
- Page 142 and 143:
Table 7-5 Internal components (1 of
- Page 144 and 145:
Table 7-6 Internal components (2 of
- Page 146 and 147:
Table 7-7 Internal components (3 of
- Page 148 and 149:
Table 7-8 Paper-pickup assembly Ref
- Page 150 and 151:
Table 7-9 Alphabetical parts list (
- Page 152 and 153:
Table 7-10 Numerical parts list (co
- Page 154 and 155:
Index A ac bias 50 ac power distrib
- Page 156 and 157:
HP Customer Care Online 122 HP Jetd
- Page 158 and 159:
disconnecting 58 engine power assem
- Page 160 and 161:
media sizes supported 16 multifeeds
- Page 163:
© 2005 Hewlett-Packard Development