1642-VLZ3 16-Channel Mic/Line Mixer Owner's Manual
1642-VLZ3 16-Channel Mic/Line Mixer Owner's Manual
1642-VLZ3 16-Channel Mic/Line Mixer Owner's Manual

You also want an ePaper? Increase the reach of your titles
YUMPU automatically turns print PDFs into web optimized ePapers that Google loves.
<strong>16</strong>. MONO LEVEL<br />
If Mr. Mono's main mono mix is maxed, just reach for<br />
this knob and turn it down a bit. Just the thing for sending<br />
mono signals to mic inputs like camcorders, telephone<br />
interface boxes, even answering machines. With<br />
the pot all the way up (fully clockwise), you’ll have 6 dB<br />
of extra gain, and unity gain is at the 12 o'clock position.<br />
17. VOLTAGE SELECTOR<br />
WARNING: Before you plug the AC power<br />
cord into the <strong><strong>16</strong>42</strong>-<strong>VLZ3</strong>, you must make sure<br />
that this slide switch is set to the same voltage<br />
as your local AC main supply. Only slide the voltage<br />
switch with the power cord unplugged.<br />
Use a flat headed screwdriver to slide the switch if<br />
needed. The switch allows you to use the mixer in different<br />
countries and voltages, meet interesting people<br />
from other cultures, and entertain them.<br />
18. POWER CONNECTION<br />
Just in case you lose the cord provided with the <strong><strong>16</strong>42</strong>-<br />
<strong>VLZ3</strong>, its power jack accepts a standard 3-prong IEC<br />
cord like those found on most professional recorders,<br />
musical instruments, and computers.<br />
WARNING: Before you plug the AC power<br />
cord into the <strong><strong>16</strong>42</strong>-<strong>VLZ3</strong>, you must make sure<br />
that the VOLTAGE SELECTOR [17] slide<br />
switch is set to the same voltage as your local AC mains<br />
supply.<br />
WARNING: Disconnecting the plug’s ground<br />
pin can be dangerous. Please don’t do it.<br />
19. FUSE<br />
The <strong><strong>16</strong>42</strong>-<strong>VLZ3</strong> is fused for your (and its own) protection.<br />
If you suspect a blown fuse, disconnect the power<br />
cord, pull the fuse drawer out (located just below the<br />
cord receptacle) and replace the fuse with a 1 A SLO<br />
BLO, 5x20mm, available at electronics stores or your<br />
dealer (or a 0.5 A SLO BLO 5x20mm if your <strong><strong>16</strong>42</strong>-<strong>VLZ3</strong> is<br />
set to 220V-240V).<br />
If two fuses blow in a row, something is very wrong.<br />
Please call our toll-free number 1-800-898-3211 from<br />
within the U.S. (or call the distributor in your country)<br />
and find out what to do.<br />
20. POWER SWITCH<br />
Press the top of this rocker switch inwards to turn<br />
on the mixer. The POWER LED [21] on the top surface<br />
of the mixer will glow with happiness, or at least it will<br />
if you have the mixer plugged in to a suitable live AC<br />
mains supply.<br />
Press the bottom of this switch to turn off the mixer,<br />
whenever you feel that this would be a safe thing to do.<br />
As a general guide, you should turn on your mixer<br />
first, before the power amplifier or powered speakers,<br />
and turn it off last. This will reduce the possibilities of<br />
any turn-on, or turn-off thumps in your speakers.<br />
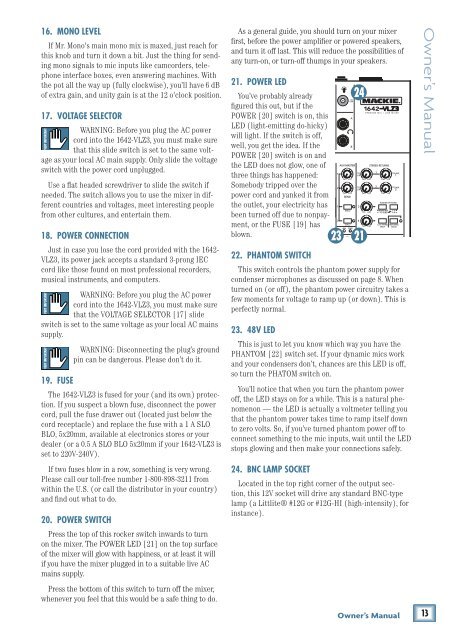
21. POWER LED<br />
You’ve probably already<br />
figured this out, but if the<br />
POWER [20] switch is on, this<br />
LED (light-emitting do-hicky)<br />
will light. If the switch is off,<br />
well, you get the idea. If the<br />
POWER [20] switch is on and<br />
the LED does not glow, one of<br />
three things has happened:<br />
Somebody tripped over the<br />
power cord and yanked it from<br />
the outlet, your electricity has<br />
been turned off due to nonpayment,<br />
or the FUSE [19] has<br />
blown.<br />
24<br />
23 21<br />
22. PHANTOM SWITCH<br />
This switch controls the phantom power supply for<br />
condenser microphones as discussed on page 8. When<br />
turned on (or off), the phantom power circuitry takes a<br />
few moments for voltage to ramp up (or down). This is<br />
perfectly normal.<br />
23. 48V LED<br />
This is just to let you know which way you have the<br />
PHANTOM [22] switch set. If your dynamic mics work<br />
and your condensers don’t, chances are this LED is off,<br />
so turn the PHATOM switch on.<br />
You’ll notice that when you turn the phantom power<br />
off, the LED stays on for a while. This is a natural phenomenon<br />
— the LED is actually a voltmeter telling you<br />
that the phantom power takes time to ramp itself down<br />
to zero volts. So, if you’ve turned phantom power off to<br />
connect something to the mic inputs, wait until the LED<br />
stops glowing and then make your connections safely.<br />
24. BNC LAMP SOCKET<br />
Located in the top right corner of the output section,<br />
this 12V socket will drive any standard BNC-type<br />
lamp (a Littlite® #12G or #12G-HI (high-intensity), for<br />
instance).<br />
Owner’s <strong>Manual</strong><br />
Owner’s <strong>Manual</strong><br />
13