1642-VLZ3 16-Channel Mic/Line Mixer Owner's Manual
1642-VLZ3 16-Channel Mic/Line Mixer Owner's Manual
1642-VLZ3 16-Channel Mic/Line Mixer Owner's Manual

You also want an ePaper? Increase the reach of your titles
YUMPU automatically turns print PDFs into web optimized ePapers that Google loves.
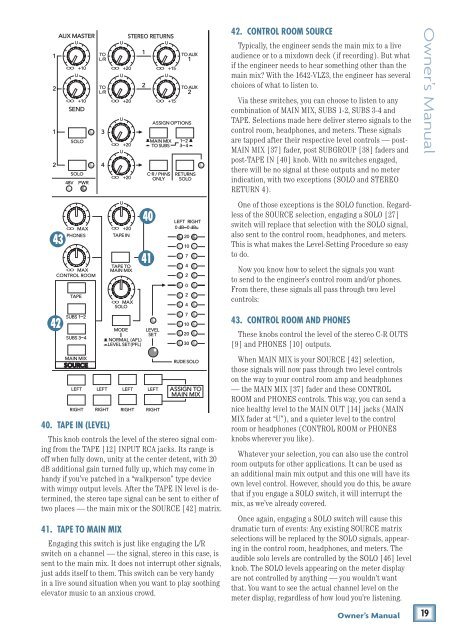
43<br />
40<br />
41<br />
42. CONTROL ROOM SOURCE<br />
Typically, the engineer sends the main mix to a live<br />
audience or to a mixdown deck (if recording). But what<br />
if the engineer needs to hear something other than the<br />
main mix With the <strong><strong>16</strong>42</strong>-<strong>VLZ3</strong>, the engineer has several<br />
choices of what to listen to.<br />
Via these switches, you can choose to listen to any<br />
combination of MAIN MIX, SUBS 1-2, SUBS 3-4 and<br />
TAPE. Selections made here deliver stereo signals to the<br />
control room, headphones, and meters. These signals<br />
are tapped after their respective level controls — post-<br />
MAIN MIX [37] fader, post SUBGROUP [38] faders and<br />
post-TAPE IN [40] knob. With no switches engaged,<br />
there will be no signal at these outputs and no meter<br />
indication, with two exceptions (SOLO and STEREO<br />
RETURN 4).<br />
One of those exceptions is the SOLO function. Regardless<br />
of the SOURCE selection, engaging a SOLO [27]<br />
switch will replace that selection with the SOLO signal,<br />
also sent to the control room, headphones, and meters.<br />
This is what makes the Level-Setting Procedure so easy<br />
to do.<br />
Now you know how to select the signals you want<br />
to send to the engineer’s control room and/or phones.<br />
From there, these signals all pass through two level<br />
controls:<br />
Owner’s <strong>Manual</strong><br />
42<br />
40. TAPE IN (LEVEL)<br />
This knob controls the level of the stereo signal coming<br />
from the TAPE [12] INPUT RCA jacks. Its range is<br />
off when fully down, unity at the center detent, with 20<br />
dB additional gain turned fully up, which may come in<br />
handy if you’ve patched in a “walkperson” type device<br />
with wimpy output levels. After the TAPE IN level is determined,<br />
the stereo tape signal can be sent to either of<br />
two places — the main mix or the SOURCE [42] matrix.<br />
41. TAPE TO MAIN MIX<br />
Engaging this switch is just like engaging the L/R<br />
switch on a channel — the signal, stereo in this case, is<br />
sent to the main mix. It does not interrupt other signals,<br />
just adds itself to them. This switch can be very handy<br />
in a live sound situation when you want to play soothing<br />
elevator music to an anxious crowd.<br />
43. CONTROL ROOM AND PHONES<br />
These knobs control the level of the stereo C-R OUTS<br />
[9] and PHONES [10] outputs.<br />
When MAIN MIX is your SOURCE [42] selection,<br />
those signals will now pass through two level controls<br />
on the way to your control room amp and headphones<br />
— the MAIN MIX [37] fader and these CONTROL<br />
ROOM and PHONES controls. This way, you can send a<br />
nice healthy level to the MAIN OUT [14] jacks (MAIN<br />
MIX fader at “U”), and a quieter level to the control<br />
room or headphones (CONTROL ROOM or PHONES<br />
knobs wherever you like).<br />
Whatever your selection, you can also use the control<br />
room outputs for other applications. It can be used as<br />
an additional main mix output and this one will have its<br />
own level control. However, should you do this, be aware<br />
that if you engage a SOLO switch, it will interrupt the<br />
mix, as we’ve already covered.<br />
Once again, engaging a SOLO switch will cause this<br />
dramatic turn of events: Any existing SOURCE matrix<br />
selections will be replaced by the SOLO signals, appearing<br />
in the control room, headphones, and meters. The<br />
audible solo levels are controlled by the SOLO [46] level<br />
knob. The SOLO levels appearing on the meter display<br />
are not controlled by anything — you wouldn’t want<br />
that. You want to see the actual channel level on the<br />
meter display, regardless of how loud you’re listening.<br />
Owner’s <strong>Manual</strong><br />
19