SONAbeam -E Series Installation Manual
SONAbeam -E Series Installation Manual
SONAbeam -E Series Installation Manual

You also want an ePaper? Increase the reach of your titles
YUMPU automatically turns print PDFs into web optimized ePapers that Google loves.
Installing Your <strong>SONAbeam</strong> Terminal<br />
Installing the (Optional) Pedestal Mount<br />
The optional Pedestal Mount provides a stable, allweather,<br />
surface-mounted platform for the <strong>SONAbeam</strong> E-<br />
<strong>Series</strong> terminal. With suitable installer-provided anchors<br />
installed in your base surface, the Pedestal Mount bolts in<br />
place for rapid FSO deployment.<br />
Installing the Optical Head<br />
The optical head for <strong>SONAbeam</strong> E-<strong>Series</strong> terminals is pre–assembled with a<br />
mounting/alignment plate, which easily affixes to the installed mount.<br />
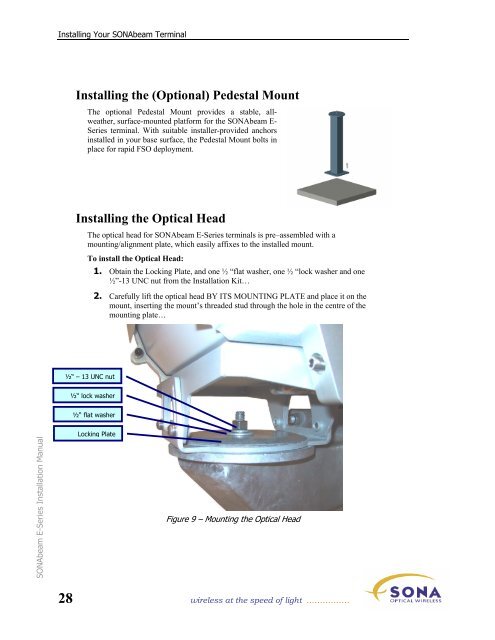
To install the Optical Head:<br />
1. Obtain the Locking Plate, and one ½ “flat washer, one ½ “lock washer and one<br />
½”-13 UNC nut from the <strong>Installation</strong> Kit…<br />
2. Carefully lift the optical head BY ITS MOUNTING PLATE and place it on the<br />
mount, inserting the mount’s threaded stud through the hole in the centre of the<br />
mounting plate…<br />
½“ – 13 UNC nut<br />
½“ lock washer<br />
½“ flat washer<br />
<strong>SONAbeam</strong> E-<strong>Series</strong> <strong>Installation</strong> <strong>Manual</strong><br />
Locking Plate<br />
Figure 9 – Mounting the Optical Head<br />
28 wireless at the speed of light …………….