SK-ACPE - Secura Key
SK-ACPE - Secura Key
SK-ACPE - Secura Key

You also want an ePaper? Increase the reach of your titles
YUMPU automatically turns print PDFs into web optimized ePapers that Google loves.
<strong>SK</strong>-ACPe<br />
Installation & Operating Manual<br />
POWER & BATTERIES<br />
The <strong>SK</strong>-<strong>ACPE</strong> unit must be connected to a source of low voltage power. The <strong>SK</strong>-<strong>ACPE</strong> should NOT be connected<br />
to the same power supply that is providing power to an electric lock or strike. To power the <strong>SK</strong>-<strong>ACPE</strong>, you<br />
must use a power supply, which is properly rated for the panel, plus any connected equipment:<br />
<strong>SK</strong>-<strong>ACPE</strong> with RK-WM / RK-WS readers<br />
<strong>SK</strong>-<strong>ACPE</strong> with <strong>SK</strong>-WLSE-MOD<br />
Add RK-WL readers to either of the above<br />
24VDC, 500 mA or 16.5VAC 40VA transformer<br />
24VDC, 500 mA or 16.5VAC 40VA transformer<br />
16.5VAC 40VA transformer<br />
The basic configuration can be powered by the <strong>SK</strong>-ACP-PS, which includes a 24VDC 1A supply and a 4AH<br />
backup battery, or by a 16.5VAC 40VA transformer (<strong>SK</strong>-XFRMR)<br />
Terminals 7 & 8 on plug “J7” must be connected to 16.5 to 24 volts, AC or DC. You may also connect the<br />
<strong>SK</strong>-<strong>ACPE</strong> to 12 VDC, but in this case you must connect your power supply to the red (+) and black (-)<br />
wire leads on the lower left corner of the panel instead of the “J7” plug. If you use 12 VDC you cannot<br />
install a standby battery in the <strong>SK</strong>-<strong>ACPE</strong>.<br />
When 16.5 – 24 volts is used to power the <strong>SK</strong>-<strong>ACPE</strong>, you may connect the red and black wires to a 12 volt<br />
standby battery. Polarity (+/-) must be observed. The, 10” X 11” <strong>SK</strong>-<strong>ACPE</strong>-LE can accommodate batteries<br />
up to 4.0 Amp-hours<br />
Do not energize the <strong>SK</strong>-<strong>ACPE</strong> until all other connections are made.<br />
READERS<br />
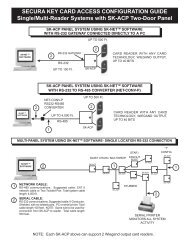
<strong>SK</strong>-<strong>ACPE</strong> is designed to accept any reader or keypad with a standard Wiegand interface. The reader for door<br />
#1 is connected to plug “J5”, the reader for door #2 is connected to plug “J6”. (See figure 3) SUGGESTED<br />
CABLE IS Alpha 1296C. The <strong>SK</strong>-<strong>ACPE</strong> will provide up to 400mA to power each reader. If the readers you use<br />
require more current, an external power supply must be used.<br />
INPUTS<br />
Each reader may be associated with up to two auxiliary inputs. Inputs might include remote switches, door contact<br />
sensors, vehicle presence detectors, etc. If you connect inputs to the <strong>SK</strong>-<strong>ACPE</strong> you must define those inputs using<br />
<strong>SK</strong>-NET software (see <strong>SK</strong>-NET manual, section 5.31). Note that input 1 (#7) and input 2 (#9) share a common<br />
terminal (#8) on plugs “J1” and “J2”. All inputs are configured as normally open circuits. However, in many cases a<br />
“Door Monitor” input should be a normally closed circuit. To convert any input defined as “Door Monitor” to normally<br />
closed, you must reconfigure the inputs as Normally Closed, using the <strong>SK</strong>-NET software (see <strong>SK</strong>-NET Manual.)<br />
For testing and troubleshooting purposes, LED indicators are located on the circuit board near the input terminals,<br />
just below the LED Indicator for the Latch Relay. The LED lights when the input is in the alarm (off-normal) state.<br />
CHASSIS GROUND<br />
The <strong>SK</strong>-<strong>ACPE</strong> has a chassis ground terminal at the bottom of the PCBA just to the left of J8. This terminal<br />
must be connected to a good, reliable Earth ground, to enable the on-board gas tube surge<br />
suppressors to work effectively. If this is not done, damage to the controller may result. A crimptype<br />
wire lug is supplied with the unit. Secure the lug to the terminal using the provided screw. Crimp the<br />
ground wire to 10AWG stranded, insulated wire, and connect the wire to the closest Earth ground available,<br />
such as a 10-ft buried copper grounding stake, Building Electrical Ground, or a steel cold water pipe, which<br />
must be contiguous, with no PVC or ABS sections.<br />
5