Perkins Motor Operation and Maintenance Manual (English) - REED
Perkins Motor Operation and Maintenance Manual (English) - REED
Perkins Motor Operation and Maintenance Manual (English) - REED

Create successful ePaper yourself
Turn your PDF publications into a flip-book with our unique Google optimized e-Paper software.
SEBU8325-01 59<br />
<strong>Maintenance</strong> Section<br />
Crankcase Breather (Canister) - Replace<br />
1. Slowly loosen the cooling system filler cap in<br />
order to relieve the pressure. Remove the cooling<br />
system filler cap.<br />
Note: Always discard drained fluids according to<br />
local regulations.<br />
2. If necessary, drain some coolant from the cooling<br />
system into a suitable container in order to allow<br />
space for the extraSCA.<br />
3. Add the correct amount of SCA. Refer to the<br />
<strong>Operation</strong> <strong>and</strong> <strong>Maintenance</strong> <strong>Manual</strong>, “Refill<br />
Capacities <strong>and</strong> Recommendations” for more<br />
information on SCA requirements.<br />
4. Clean the cooling system filler cap <strong>and</strong> inspect the<br />
gasket. If the gasket is damaged, discard the old<br />
filler cap <strong>and</strong> install a new filler cap. If the gasket<br />
is not damaged, use a suitable pressurizing pump<br />
in order to pressure test the filler cap. The correct<br />
pressure is stamped on the face of the filler cap. If<br />
the filler cap does not retain the correct pressure,<br />
install a new filler cap.<br />
i02690442<br />
Crankcase Breather (Canister)<br />
- Replace<br />
NOTICE<br />
Ensure that the engine is stopped before any servicing<br />
or repair is performed.<br />
3. Lubricate the O ring seal (2) on the new canister<br />
with clean engine lubricating oil. Install the new<br />
canister. Tighten the canister to 12 N·m (8 lb ft).<br />
Do not overtighten the canister.<br />
4. Remove the container. Dispose of the old canister<br />
<strong>and</strong> any split oil in a safe place.<br />
Driven Equipment - Check<br />
i02676008<br />
Refer to the OEM specifications for more information<br />
on the following maintenance recommendations for<br />
thedrivenequipment:<br />
• Inspection<br />
• Adjustment<br />
• Lubrication<br />
• Other maintenance recommendations<br />
Perform any maintenance for the driven equipment<br />
which is recommended by the OEM.<br />
Engine - Clean<br />
i02683047<br />
Note: The breather assembly is not installed on all<br />
engines.<br />
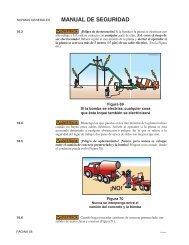
Personal injury or death can result from high voltage.<br />
Moisture can create paths of electrical conductivity.<br />
Make sure that the electrical system is OFF. Lock<br />
out the starting controls <strong>and</strong> tag the controls “DO<br />
NOT OPERATE”.<br />
NOTICE<br />
Accumulatedgrease<strong>and</strong>oilonanengineisafire hazard.<br />
Keep the engine clean. Remove debris <strong>and</strong> fluid<br />
spills whenever a significant quantity accumulates on<br />
the engine.<br />
Illustration 24<br />
Typical example<br />
1. Place a container under the canister (1).<br />
g01350307<br />
2. Clean the outside of the canister. Use a suitable<br />
tool in order to remove the canister.<br />
NOTICE<br />
Failure to protect some engine components from<br />
washing may make your engine warranty invalid.<br />
Allow the engine to cool for one hour before washing<br />
the engine.