Perkins Motor Operation and Maintenance Manual (English) - REED
Perkins Motor Operation and Maintenance Manual (English) - REED
Perkins Motor Operation and Maintenance Manual (English) - REED

You also want an ePaper? Increase the reach of your titles
YUMPU automatically turns print PDFs into web optimized ePapers that Google loves.
SEBU8325-01 65<br />
<strong>Maintenance</strong> Section<br />
Engine Oil <strong>and</strong> Filter - Change<br />
• If the engine is not equipped with a drain valve,<br />
remove the oil drain plug (1) in order to allow the<br />
oil to drain. If the engine is equipped with a shallow<br />
sump, remove the bottom oil drain plugs from both<br />
ends of the oil pan.<br />
After the oil has drained, the oil drain plugs should<br />
be cleaned <strong>and</strong> installed. If necessary, renew the O<br />
ring seal on the drain plug.<br />
Some types of oil pans have oil drain plugs that are<br />
on both sides of the oil pan, because of the shape of<br />
the pan. This type of oil pan requires the engine oil to<br />
be drained from both plugs.<br />
Replace the Spin-on Oil Filter<br />
NOTICE<br />
<strong>Perkins</strong> oil filters are manufactured to <strong>Perkins</strong> specifications.<br />
Use of an oil filter that is not recommended<br />
by <strong>Perkins</strong> could result in severe damage to the engine<br />
bearings, crankshaft, etc., as a result of the larger<br />
waste particles from unfiltered oil entering the engine<br />
lubricating system. Only use oil filters recommended<br />
by <strong>Perkins</strong>.<br />
1. Remove the oil filter with a suitable tool.<br />
Note: The following actions can be carried out as<br />
part of the preventive maintenance program.<br />
2. Cut the oil filter open with a suitable tool. Break<br />
apart the pleats <strong>and</strong> inspect the oil filter for metal<br />
debris. An excessive amount of metal debris in<br />
the oil filter may indicate early wear or a pending<br />
failure.<br />
Use a magnet to differentiate between the ferrous<br />
metals <strong>and</strong> the nonferrous metals that are found in<br />
the oil filter element. Ferrous metals may indicate<br />
wear on the steel <strong>and</strong> cast iron parts of the engine.<br />
Nonferrous metals may indicate wear on the<br />
aluminum parts, brass parts, or bronze parts of<br />
the engine. Parts that may be affected include<br />
the following items: main bearings, rod bearings,<br />
turbocharger bearings, <strong>and</strong> cylinder heads.<br />
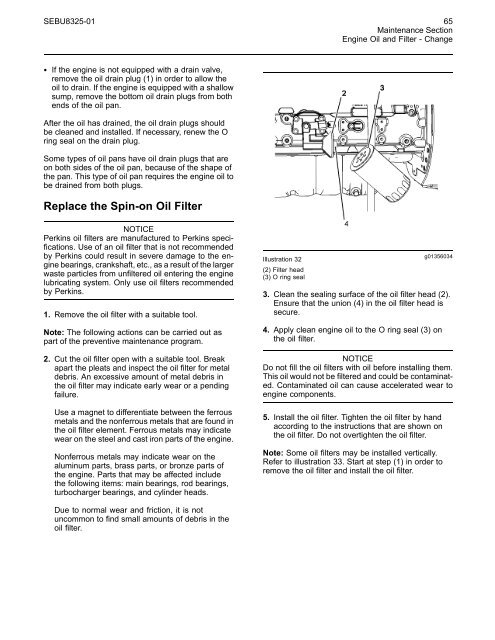
Illustration 32<br />
(2) Filter head<br />
(3) O ring seal<br />
g01356034<br />
3. Clean the sealing surface of the oil filter head (2).<br />
Ensure that the union (4) in the oil filter head is<br />
secure.<br />
4. Apply clean engine oil to the O ring seal (3) on<br />
the oil filter.<br />
NOTICE<br />
Do not fill the oil filters with oil before installing them.<br />
This oil would not be filtered <strong>and</strong> could be contaminated.<br />
Contaminated oil can cause accelerated wear to<br />
engine components.<br />
5. Install the oil filter. Tighten the oil filter by h<strong>and</strong><br />
according to the instructions that are shown on<br />
the oil filter. Do not overtighten the oil filter.<br />
Note: Some oil filters may be installed vertically.<br />
Refer to illustration 33. Start at step (1) in order to<br />
remove the oil filter <strong>and</strong> install the oil filter.<br />
Due to normal wear <strong>and</strong> friction, it is not<br />
uncommon to find small amounts of debris in the<br />
oil filter.