Coin changer - National Rejectors Inc. GmbH
Coin changer - National Rejectors Inc. GmbH
Coin changer - National Rejectors Inc. GmbH

You also want an ePaper? Increase the reach of your titles
YUMPU automatically turns print PDFs into web optimized ePapers that Google loves.
Technical Documentation<br />
<strong>Coin</strong> <strong>changer</strong><br />
Manual<br />
for configuration<br />
08.11 Schn/JMo/Roe<br />
Version 1.1<br />
HB.C2K-EN<br />
Crane Payment Solutions <strong>GmbH</strong> • Zum Fruchthof 6 • D-21614 Buxtehude<br />
Phone: +49 (0) 41 61-729-0 • Fax: +49 (0) 41 61-729-115 • E-mail: info@craneps.com • www.craneps.com
c 2 Configuration<br />
Ta b l e o f c o n t e n t<br />
Tabel of contents<br />
1 About this manual 7<br />
Text conventions 7<br />
Additional technical documentation 8<br />
2 General information 9<br />
The vending machine interfaces 9<br />
The user interfaces 9<br />
When to use the HENRI setting module? 9<br />
Connecting HENRI 10<br />
3 Presettings 11<br />
Selecting menu language 11<br />
Setting display contrast (only c 2 blue) 12<br />
Specifying display message for operating mode (only c 2 blue) 13<br />
4 Settings for filling and emptying cassette 14<br />
Which settings should be done? 14<br />
Settings for tube refilling by coin insertion 14<br />
Settings for direct refilling the removed cassette 14<br />
Configuring float levels 15<br />
Specifying float level per tube 15<br />
Activating/deactivating float-up function 16<br />
Setting tube counters to float levels automatically 17<br />
Correcting tube counters according to filling level sensors 18<br />
Resetting tube counters before fill-up 19<br />
Redirecting cash-box coins to return area 20<br />
Reporting inserted coins to machine (only c 2 MDB) 21<br />
Disabling/enabling inventory keys / disabling/enabling<br />
inventory keys using MDB/BDV protocol (only c 2 blue/green) 22<br />
<strong>National</strong> <strong>Rejectors</strong>, <strong>Inc</strong>. <strong>GmbH</strong>, Buxtehude<br />
3
Ta b l e o f c o n t e n t s<br />
c 2 Configuration<br />
5 Prices and vending modes<br />
(only c 2 BDV/Executive) 23<br />
Price holding in the coin <strong>changer</strong> 23<br />
Setting prices 24<br />
Activating coin <strong>changer</strong> price holding 25<br />
Displaying price 26<br />
Configuring "Committed to vend" or change return at any time 27<br />
Configuring single or multi vend 28<br />
Resetting or storing credit which cannot be paid out 29<br />
6 Cash acceptance 30<br />
Limiting acceptance of coins and banknotes<br />
(only c 2 BDV/Executive) 31<br />
Limiting acceptance of tube coins (filling level limitation) 32<br />
Inhibiting coins 33<br />
Inhibiting high-value coins if there is not enough change<br />
(only c 2 BDV/Executive) 34<br />
Optimising acceptance of genuine coins/rejection of fraud coins<br />
(defining acceptance tolerances) 35<br />
Selecting coin group A or B 36<br />
Preventing coins from getting stuck in the tubes 38<br />
Configuring security stock for each tube 38<br />
Transmitting tube filling level incl. security stock to VMC<br />
(only c 2 MDB) 39<br />
Enabling VMC to payout security stock with DISPENSE<br />
(only c 2 MDB) 39<br />
7 Change payout 40<br />
Reassigning coin cassette 40<br />
Limiting change return (only c 2 BDV/Executive) 42<br />
Configuring conditions for tube empty message<br />
(only c 2 BDV/Executive) 43<br />
Activating low-power single-motor payout 45<br />
4<br />
<strong>National</strong> <strong>Rejectors</strong>, <strong>Inc</strong>. <strong>GmbH</strong>, Buxtehude
c 2 Configuration<br />
Ta b l e o f c o n t e n t<br />
8 Peripheral 46<br />
Hopper settings 46<br />
Setting hopper coins 47<br />
Setting up communication with hopper(s) 48<br />
Specifying active levels of the hopper payout and<br />
empty signal 49<br />
Recycler settings 50<br />
Setting up communication with recycler 50<br />
Inhibiting high-value banknotes depending on change stock<br />
(only c 2 MDB) 52<br />
Paying out all banknotes<br />
(compensating the machine‘s security stock) (only c 2 MDB) 53<br />
Bill validator settings (only c 2 BDV/Executive) 54<br />
Setting up communication with MDB bill validator 54<br />
Inhibiting/releasing banknote acceptance depending on<br />
change stock or card payments 55<br />
Card reader settings (only c 2 BDV/Executive) 56<br />
Setting up communication with MDB/BDV card reader 56<br />
Activating second price list for card transactions 57<br />
Limiting debit card recharging<br />
(only for BDV/MDB card readers) 58<br />
Reinitialising card reader after each transaction 59<br />
Setting up communication with external audit unit<br />
(only c 2 BDV/Executive) 60<br />
9 Audit (option) 61<br />
Setting vending machine number 61<br />
Setting date and time 63<br />
Specifying data to be printed 64<br />
Setting output device 65<br />
Selecting printing format 65<br />
Selecting type of output device 66<br />
Activating maximum IrDA readout speed<br />
(only c 2 with IrDA interface on coin validator) 67<br />
<strong>National</strong> <strong>Rejectors</strong>, <strong>Inc</strong>. <strong>GmbH</strong>, Buxtehude<br />
5
Ta b l e o f c o n t e n t s<br />
c 2 Configuration<br />
10 Basic settings 68<br />
Changing smallest coin value (base value) 68<br />
Configuring alternative coin value for second currency or<br />
as token value 70<br />
Changing currency/calling code (only c 2 MDB) 71<br />
Changing MDB level (only c 2 MDB) 72<br />
Selecting mains operation or battery operation (only c 2 MDB) 73<br />
Configuring wake-up time (only c 2 MDB) 74<br />
Providing coin <strong>changer</strong> configuration with write protection for<br />
BDV machines (only c 2 BDV) 75<br />
11 Batch configuration 76<br />
Configuring coin <strong>changer</strong> master 76<br />
Storing desired configuration in HENRI 77<br />
Transferring desired configuration to coin <strong>changer</strong>s 77<br />
Adapting individual settings 78<br />
12 Index 79<br />
6<br />
<strong>National</strong> <strong>Rejectors</strong>, <strong>Inc</strong>. <strong>GmbH</strong>, Buxtehude
c 2 Configuration<br />
Ab o u t t h i s m a n u a l<br />
1<br />
About this manual<br />
This manual describes how to set the c 2 concerning:<br />
• Language and display (Presettings)<br />
• <strong>Coin</strong> cassette filling and emptying<br />
• Prices and vending modes<br />
• Cash acceptance<br />
• Change payout<br />
• Peripherals<br />
• Audit<br />
This manual does not describe the whole functional range of the coin<br />
<strong>changer</strong> currenza c 2 or HENRI setting module. In order to be able<br />
to use the whole functional range of the devices safely as well as<br />
to configure all possible functions, all manuals and short reference<br />
guides for the NRI <strong>changer</strong> currenza c 2 and HENRI setting module<br />
must be read carefully (PDF download at www.nri24.com).<br />
Text conventions<br />
To make it easier for you to navigate within these instructions and to operate<br />
the devices, the following accentuations were made in the text:<br />
Safety instructions, which you must observe in order to protect<br />
operators and equipment.<br />
Notes, which you must observe in order to protect the environment.<br />
Special notes, which are to facilitate the use of the devices.<br />
At the beginning of a chapter you will find a short "guide", which<br />
summarises the content of the chapter.<br />
1 2 3 ... Requests to perform an action are numbered in another typeface<br />
and, if possible, listed in a table.<br />
Di s p l ay t e x t s are set in small capitals.<br />
Buttons and menu items are shown in bold capitals.<br />
<strong>National</strong> <strong>Rejectors</strong>, <strong>Inc</strong>. <strong>GmbH</strong>, Buxtehude<br />
7
Ab o u t t h e m a n u a l<br />
c 2 Configuration<br />
Additional technical documentation<br />
Apart from the manual you already have, there is further documentation<br />
for the currenza c 2 and HENRI setting module, e.g. about service work and<br />
technical data. All product descriptions are available in a compressed PDF<br />
format at www.nri24.com (→ Download).<br />
8<br />
<strong>National</strong> <strong>Rejectors</strong>, <strong>Inc</strong>. <strong>GmbH</strong>, Buxtehude
c 2 Configuration<br />
Ge n e r a l i n f o r m at i o n<br />
2<br />
General information<br />
In order to keep the manual as short as possible, this chapter provides<br />
you with all general information, which will not be repeated in the following<br />
chapters (e.g., connecting the HENRI setting module).<br />
The vending machine interfaces<br />
This manual refers to the configuration of all currenza c 2 models. The<br />
models have different configuration options, e.g., due to different vending<br />
machine interfaces.<br />
The chapter title supplement put in brackets limits a certain function or<br />
setting for one or several interfaces.<br />
The user interfaces<br />
Beyond that the currenza c 2 models differ in their user interface. The c 2 blue<br />
is the only model with a user interface allowing a direct configuration at the<br />
coin <strong>changer</strong>. All other models (green, orange, white) must be connected<br />
to the HENRI setting module for configuration, that cannot be carried out<br />
using the switching block on the rear of the coin validator.<br />
When to use the HENRI setting module?<br />
2<br />
• To configure the c green/orange/white<br />
2<br />
• To configure a second currency/special token values in the c blue/<br />
green/orange/white<br />
• As data transfer unit for e.g. current configuration and firmware files,<br />
which are supposed to be loaded into a c 2 blue/green/orange/white<br />
<strong>National</strong> <strong>Rejectors</strong>, <strong>Inc</strong>. <strong>GmbH</strong>, Buxtehude<br />
9
Ge n e r a l i n f o r m at i o n<br />
c 2 Configuration<br />
Connecting HENRI<br />
In the HENRI short reference guide you learn how to connect the<br />
HENRI setting module to the currenza c 2 with full details. At this point<br />
you will only find a short description for on-site configurations.<br />
Plug the RJ-45 connector of the HENRI connecting cable into the top right<br />
socket of the coin <strong>changer</strong>.<br />
Fig. 1: Connecting HENRI<br />
HENRI is powered by the vending machine, switches over to the c² mode<br />
automatically and shows the (vending machine) display in normal operating<br />
mode, e.g., the current change stock.<br />
In the following chapters it has been assumed that HENRI needs to be<br />
connected to the coin <strong>changer</strong>s c 2 green/orange/white for configuration<br />
and shall not be explained again.<br />
10 <strong>National</strong> <strong>Rejectors</strong>, <strong>Inc</strong>. <strong>GmbH</strong>, Buxtehude
c 2 Configuration<br />
Pr e s e t t i n g s<br />
3<br />
Presettings<br />
This chapter describes settings which are not concerned with the coin<br />
<strong>changer</strong> operation itself but must be carried out once before configuring<br />
the coin <strong>changer</strong>, if not set at NRI:<br />
• Menu language<br />
• Display contrast<br />
• Display message<br />
Selecting menu language<br />
The c² supports the following languages:<br />
• English<br />
• German<br />
Quick approach:<br />
• French (option)<br />
• Italian (option)<br />
• Spanish (option)<br />
and is provided with three installed languages. The third language is<br />
customised. If required, the coin <strong>changer</strong> may also be provided with other<br />
languages than listed above.<br />
To select the menu language (also language for audit receipts):<br />
= Main menu > E = Settings > Other settings > Language<br />
Press key ... How often? Effect<br />
1 1 x You enter the main menu<br />
2 1 x You enter the Se t t i n g menu<br />
3 until Other settings<br />
You want to enter submenu Ot h e r<br />
s e t t i n g s<br />
4 1 x You enter the submenu<br />
5 1 x You want to set the menu La n g u a g e<br />
6 1 x Now you can set the La n g u a g e<br />
7 / until language desired You want to set this language<br />
8 1 x<br />
9 1 x/2 x<br />
You lock the language selected in<br />
memory<br />
You return to main menu/operating<br />
mode<br />
<strong>National</strong> <strong>Rejectors</strong>, <strong>Inc</strong>. <strong>GmbH</strong>, Buxtehude<br />
11
Pr e s e t t i n g s<br />
c 2 Configuration<br />
Setting display contrast (only c 2 blue)<br />
The contrast of the c 2 blue display has a default setting of "46".<br />
To change the contrast:<br />
Quick approach:<br />
= Main menu > E = Settings > Other settings > Display contrast<br />
Press key ... How often? Effect<br />
1 1 x You enter the main menu<br />
2 1 x You enter the Se t t i n g menu<br />
3 until Other settings<br />
You want to enter submenu Ot h e r<br />
s e t t i n g s<br />
4 1 x You enter the submenu<br />
5 until Display contrast You want to set the Di s p l ay c o n t r a s t<br />
6 1 x Now you can set the Co n t r a s t<br />
7 / until required digit You highlight the digit to be changed<br />
8 until required value<br />
This value is to be set (the contrast is<br />
/<br />
changing with the value set)<br />
9 Please repeat steps 7 and 8 to set the second digit of the contrast value, if necessary<br />
10 1 x<br />
11 1 x/2 x<br />
You lock the set value in memory. The<br />
display has the new contrast<br />
You return to main menu/operating<br />
mode<br />
12 <strong>National</strong> <strong>Rejectors</strong>, <strong>Inc</strong>. <strong>GmbH</strong>, Buxtehude
c 2 Configuration<br />
Pr e s e t t i n g s<br />
Specifying display message for operating mode (only c 2 blue)<br />
During normal operating mode the currenza c² blue may<br />
display one of the following messages:<br />
• Total Ch a n g e stock in coin cassette<br />
• Ca s h b o x stock and total change stock in coin cassette<br />
by turns<br />
• Total change stock and coin number per tube<br />
(In v e n t o r y)<br />
OK<br />
Change<br />
67.85<br />
OK<br />
Cashbox<br />
46.13<br />
Inventory:<br />
EUR<br />
010.20<br />
000 000<br />
008 000 048 025<br />
To specify the display message:<br />
Quick approach:<br />
= Main menu > E = Settings > Other settings > Display<br />
Press key ... How often? Effect<br />
1 1 x You enter the main menu<br />
2 1 x You enter the Se t t i n g menu<br />
3 until Other settings<br />
You want to enter submenu Ot h e r<br />
s e t t i n g s<br />
4 1 x You enter the submenu<br />
5 until Display<br />
6 1 x<br />
You want to set the Di s p l ay message<br />
for normal operating mode<br />
Now you can select the Di s p l ay<br />
message<br />
7 / until required message You want to set this message<br />
8 1 x<br />
9 1 x/2 x<br />
You lock the message selected in<br />
memory<br />
You return to main menu/operating<br />
mode<br />
<strong>National</strong> <strong>Rejectors</strong>, <strong>Inc</strong>. <strong>GmbH</strong>, Buxtehude<br />
13
Se t t i n g s f o r filling a n d e m p t y i n g c a s s e t t e<br />
c 2 Configuration<br />
4<br />
Settings for filling and emptying cassette<br />
This chapter describes useful or required settings for refilling and emptying<br />
the coin cassette:<br />
• Configuring float level<br />
• Setting tube counters to float-level automatically<br />
• Correcting tube counters according to filling level sensors<br />
• Resetting tube counters before refilling cassette<br />
• Redirecting cash-box coins to return area<br />
2<br />
• Reporting inserted coins to machine (only c MDB)<br />
• Disabling/enabling inventory keys / disabling/enabling inventory keys<br />
using MDB/BDV protocol<br />
Which settings should be done?<br />
To enable the coin <strong>changer</strong> to register the exact coin number we recommend<br />
the following settings depending on the filling method used:<br />
Settings for tube refilling by coin insertion<br />
If the cassette is refilled by inserting the tube coins (and without emptying<br />
the cassette completely beforehand), see that the tube counters are not<br />
corrected according to the filling level sensors automatically, as the inserted<br />
coins will be registered exactly in the tube filling mode.<br />
Whereas, if you remove and completely empty the cassette before inserting<br />
the tube coins, you should set the following in order to reset the tube<br />
counters before refilling the cassette:<br />
• Resetting the tube counters before refilling the cassette<br />
• Correcting tube counters according to filling level sensors automatically<br />
Settings for direct refilling the removed cassette<br />
If the cassette is removed to be directly refilled with a certain number of coins<br />
per tube, i.e. counted coins, the coin <strong>changer</strong> must be set as follows to ensure<br />
the exact registration of the coin number:<br />
• Configuration of the coin number as float level per tube<br />
• Automatic tube counter setting to float levels<br />
• Deactivation of the automatic tube counter correction according to filling<br />
level sensors<br />
If the cassette is removed to be directly refilled with any number of coins, the tube<br />
counters must be corrected according to filling level sensors automatically.<br />
14 <strong>National</strong> <strong>Rejectors</strong>, <strong>Inc</strong>. <strong>GmbH</strong>, Buxtehude
c 2 Configuration<br />
Se t t i n g s f o r filling a n d e m p t y i n g c a s s e t t e<br />
Configuring float levels<br />
Should you wish the service personal to always fill or empty the tubes at<br />
a filling level of a certain and always identical coin number, it is advisable<br />
to configure so-called float levels.<br />
First of all specify a number of coins for each change tube (see section<br />
"Specifying float level per tube" in this chapter).<br />
If the tubes are refilled by inserting the tube coins with the cassette installed,<br />
you also have to activate the float-up function (see section "Activating/<br />
deactivating float-up function" in this chapter).<br />
If the coin cassette is going to be removed to be refilled directly, you have<br />
to activate the automatic tube counter programming (see section "Setting<br />
tube counters to float levels automatically" in this chapter).<br />
Specifying float level per tube<br />
To specify the float levels:<br />
Quick approach:<br />
= Main menu > E = Settings > <strong>Coin</strong> settings > Float level<br />
How often? Effect Ziel<br />
1 1 x You enter the main menu<br />
2 1 x You enter the Se t t i n g menu<br />
3 until <strong>Coin</strong> settings<br />
You want to enter submenu Co i n<br />
s e t t i n g s<br />
4 1 x You enter the submenu<br />
5 until Float level You want to enter submenu Fl o at l e v e l<br />
6 1 x You enter the submenu<br />
7 /<br />
8 1 x<br />
until tube desired<br />
You want to set a float level for this<br />
tube<br />
Now you can set a float level for this<br />
tube<br />
9 / until required digit You highlight the digit to be set<br />
10 until required value<br />
This value is to be set<br />
/<br />
11 Please repeat steps 9 and 10 to set the other two digits of the float level, if necessary<br />
12 1 x You lock the set float level in memory<br />
13 Please repeat steps 7 to 12 to set the float levels of the other tubes, if necessary<br />
14 1 x/2 x<br />
You return to main menu/operating<br />
mode<br />
<strong>National</strong> <strong>Rejectors</strong>, <strong>Inc</strong>. <strong>GmbH</strong>, Buxtehude<br />
15
Se t t i n g s f o r filling a n d e m p t y i n g c a s s e t t e<br />
c 2 Configuration<br />
Activating/deactivating float-up function<br />
You should activate the float-up function if the cassette is refilled by inserting<br />
the tube coins on site. This makes sure that all tube coins being inserted<br />
after the float level has been reached will be directed to the return area.<br />
If the float-up function is activated but no float level configured (float<br />
level for the single tubes = 000), the tube will be filled until the optional<br />
50% filling level sensor is covered, or emptied until this sensor is no<br />
longer covered.<br />
Quick approach:<br />
To activate/deactivate the float-up function:<br />
= Main menu > E = Settings > Operating modes > Float-up<br />
Press key ... How often? Effect<br />
1 1 x You enter the main menu<br />
2 1 x<br />
You enter the Se t t i n g menu. The<br />
correct menu item has already been<br />
selected<br />
3 1 x You enter submenu Op e r at i ng m o d e s<br />
4 until Float-up<br />
5 1 x<br />
6 /<br />
until setting desired<br />
You want to activate/deactivate the<br />
Fl o at -u p function<br />
Now you can activate/deactivate the<br />
Fl o at -u p function<br />
You want to activate/deactivate the<br />
function<br />
7 1 x You lock the setting in memory<br />
8 1 x/2 x<br />
You return to main menu/operating<br />
mode<br />
16 <strong>National</strong> <strong>Rejectors</strong>, <strong>Inc</strong>. <strong>GmbH</strong>, Buxtehude
c 2 Configuration<br />
Se t t i n g s f o r filling a n d e m p t y i n g c a s s e t t e<br />
Setting tube counters to float levels automatically<br />
Quick approach:<br />
Activate this function if you remove the coin cassette to directly refill it<br />
with a certain number of coins (float levels). This is to ensure that the tube<br />
counters will be set to the float level coin number automatically in the tube<br />
filling mode as soon as you remove the cassette from the coin <strong>changer</strong>.<br />
To activate/deactivate the automatic tube counter programming:<br />
= Main menu > E = Settings > Operating modes > Program tube counters autom.<br />
Press key ... How often? Effect<br />
1 1 x You enter the main menu<br />
2 1 x<br />
You enter the Se t t i n g menu. The<br />
correct menu item has already been<br />
selected<br />
3 1 x You enter submenu Op e r at i ng m o d e s<br />
4<br />
5 1 x<br />
6 /<br />
until Program tube<br />
counters autom.<br />
until setting desired<br />
You want to activate/deactivate the<br />
function<br />
Now you can activate/deactivate the<br />
function<br />
You want to activate/deactivate the<br />
function<br />
7 1 x You lock the setting in memory<br />
8 1 x/2 x<br />
You return to main menu/operating<br />
mode<br />
<strong>National</strong> <strong>Rejectors</strong>, <strong>Inc</strong>. <strong>GmbH</strong>, Buxtehude<br />
17
Se t t i n g s f o r filling a n d e m p t y i n g c a s s e t t e<br />
c 2 Configuration<br />
Correcting tube counters according to filling level sensors<br />
Six tube counters are monitoring the exact number of coins in the tubes<br />
and register each coin collected by and paid out from the tubes.<br />
In addition each tube is equipped with up to four filling level sensors. If the<br />
coin <strong>changer</strong> is supposed to compare the tube counter readings with the<br />
measured filling levels of the sensors after a coin has been accepted or<br />
paid out and correct the tube counters if necessary, you should activate<br />
the automatic tube counter correction.<br />
If the vending machine control is unable to process the automatic<br />
correction of the tube counters, you must deactivate this function.<br />
If the tube counter correction is deactivated, ensure that the tubes<br />
are emptied either using the inventory keys or the service menu.<br />
Otherwise the tube counters do not equal zero before refilling the<br />
tubes, but the number of coins registered before emptying the tubes<br />
(cp. separate service manual).<br />
Quick approach:<br />
To activate/deactivate the tube counter correction:<br />
= Main menu > E = Settings > Operating modes > Tube counter correction<br />
Press key ... How often? Effect<br />
1 1 x You enter the main menu<br />
2 1 x<br />
You enter the Se t t i n g menu. The<br />
required menu item has already been<br />
selected<br />
3 1 x You enter submenu Op e r at i ng m o d e s<br />
4<br />
5 1 x<br />
until Tube counter<br />
correction<br />
6 / until setting desired<br />
You want to activate/deactivate the<br />
Tu b e c o u n t e r c o r r e c t i o n<br />
Now you can activate/deactivate the<br />
Tu b e c o u n t e r c o r r e c t i o n<br />
You want the tube counters to be<br />
corrected/not corrected according to<br />
filling level sensors<br />
7 1 x You lock the setting in memory<br />
8 1 x/2 x<br />
You return to main menu/operating<br />
mode<br />
18 <strong>National</strong> <strong>Rejectors</strong>, <strong>Inc</strong>. <strong>GmbH</strong>, Buxtehude
c 2 Configuration<br />
Se t t i n g s f o r filling a n d e m p t y i n g c a s s e t t e<br />
Resetting tube counters before fill-up<br />
Quick approach:<br />
If change is refilled by inserting the tube coins but the cassette is removed<br />
to be completely emptied before fill-up, the coin <strong>changer</strong> should be set so<br />
that the tube counters will be reset when removing the cassette, i.e. before<br />
refilling the tubes.<br />
To activate/deactivate the tube counter reset:<br />
= Main menu > E = Settings > Operating modes > Tube counters correct. to zero<br />
Press key ... How often? Effect<br />
1 1 x You enter the main menu<br />
2 1 x<br />
You enter the Se t t i n g menu. The<br />
required menu item has already been<br />
selected<br />
3 1 x You enter submenu Op e r at i ng m o d e s<br />
4<br />
until Tube counters<br />
correct. to zero<br />
You want the Tu b e c o u n t e r s to be<br />
reset/ignored<br />
5 1 x Now you can set the function<br />
6 / until setting desired<br />
You want the tube counters to be<br />
reset/ignored when removing the coin<br />
cassette<br />
7 1 x You lock the setting in memory<br />
8 1 x/2 x<br />
You return to main menu/operating<br />
mode<br />
<strong>National</strong> <strong>Rejectors</strong>, <strong>Inc</strong>. <strong>GmbH</strong>, Buxtehude<br />
19
Se t t i n g s f o r filling a n d e m p t y i n g c a s s e t t e<br />
c 2 Configuration<br />
Redirecting cash-box coins to return area<br />
Quick approach:<br />
If you replenish change by inserting coins and if you do not want the cashbox<br />
coins to be accepted but only the tube coins, the coin <strong>changer</strong> can be<br />
set so that all cash-box coins will be inhibited and redirected to the return<br />
area when the <strong>changer</strong> is in tube filling mode.<br />
To disable/enable the cash-box coins when refilling the coin cassette:<br />
= Main menu > E = Settings > Operating modes > Only tube coins in filling mode<br />
Press key ... How often? Effect<br />
1 1 x You enter the main menu<br />
2 1 x<br />
You enter the Se t t i n g menu. The<br />
required menu item has already been<br />
selected<br />
3 1 x You enter submenu Op e r at i ng m o d e s<br />
4<br />
until Only tube coins in<br />
filling mode<br />
You want only tube coins/also cash-box<br />
coins to be accepted<br />
5 1 x Now you can set the function<br />
6 / until setting desired<br />
In tube filling mode you want only<br />
tube coins/also cash-box coins to be<br />
accepted<br />
7 1 x You lock the setting in memory<br />
8 1 x/2 x<br />
You return to main menu/operating<br />
mode<br />
20 <strong>National</strong> <strong>Rejectors</strong>, <strong>Inc</strong>. <strong>GmbH</strong>, Buxtehude
c 2 Configuration<br />
Se t t i n g s f o r filling a n d e m p t y i n g c a s s e t t e<br />
Reporting inserted coins to machine (only c 2 MDB)<br />
Quick approach:<br />
If you replenish change by inserting the tube coins in the tube filling mode<br />
and if you want the machine to count the coins inserted and display them<br />
for checking purposes, the coin <strong>changer</strong> may transfer a filling report to the<br />
machine.<br />
To activate/deactivate the filling report function:<br />
= Main menu > E = Settings > Operating modes > Manual fill report<br />
Press key ... How often? Effect<br />
1 1 x You enter the main menu<br />
2 1 x<br />
You enter the Se t t i n g menu. The<br />
required menu item has already been<br />
selected<br />
3 1 x You enter submenu Op e r at i ng m o d e s<br />
4 until Manual fill report<br />
You want the machine to receive/not<br />
receive a filling report<br />
5 1 x Now you can set the function<br />
6 /<br />
until setting desired<br />
You want the <strong>changer</strong> to transfer/not<br />
transfer a filling report<br />
7 1 x You lock the setting in memory<br />
8 1 x/2 x<br />
You return to main menu/operating<br />
mode<br />
<strong>National</strong> <strong>Rejectors</strong>, <strong>Inc</strong>. <strong>GmbH</strong>, Buxtehude<br />
21
Se t t i n g s f o r filling a n d e m p t y i n g c a s s e t t e<br />
c 2 Configuration<br />
Disabling/enabling inventory keys / disabling/enabling<br />
inventory keys using MDB/BDV protocol (only c 2 blue/green)<br />
During normal operating mode as well as in the Inventory menu the coin<br />
<strong>changer</strong> keys A, B, C, D, E and F are used as inventory keys. When operating<br />
the inventory keys the coin <strong>changer</strong> pays out coins from the corresponding<br />
change tube A, B, C, D, E or F.<br />
You may configure the coin <strong>changer</strong> so that the inventory keys are<br />
• enabled,<br />
Quick approach:<br />
• disabled or<br />
• enabled/disabled by the VMC<br />
To disable/enable the inventory keys:<br />
= Main menu > E = Settings > Operating modes > Configure inventory keys<br />
Press key ... How often? Effect<br />
1 1 x You enter the main menu<br />
2 1 x<br />
3 1 x<br />
4 1 x<br />
5 /<br />
until setting desired<br />
You enter the Se t t i n g menu. The<br />
required menu item has already been<br />
selected<br />
You enter submenu Op e r at i ng m o d e s.<br />
The required menu item has already<br />
been selected<br />
You want to enable/disable the<br />
In v e n t o r y k e y s<br />
You want the keys to be disabled/<br />
enabled/controlled by the VMC<br />
6 1 x You lock the setting in memory<br />
7 1 x/2 x<br />
You return to main menu/operating<br />
mode<br />
22 <strong>National</strong> <strong>Rejectors</strong>, <strong>Inc</strong>. <strong>GmbH</strong>, Buxtehude
c 2 Configuration Pr i c e s a n d v e n d i ng m o d e s (o n ly c 2 BDV/Ex e c u t i v e)<br />
5<br />
Prices and vending modes<br />
(only c 2 BDV/Executive)<br />
This BDV & Executive chapter describes how to<br />
• hold the prices in the coin <strong>changer</strong><br />
• configure "Committed to vend" or change return at any time<br />
• configure single or multi vend<br />
• reset or store credit which cannot be paid out<br />
Price holding in the coin <strong>changer</strong><br />
Usually, the prices for the Executive protocol are set in the vending machine,<br />
so that the coin <strong>changer</strong> does not know which product has been selected<br />
and sold.<br />
In order to be able to hold the prices in the coin <strong>changer</strong> and include the<br />
single product-specific turnovers in the audit in this section you will learn<br />
how to<br />
• set prices in the coin <strong>changer</strong> and<br />
• activate price holding in the coin <strong>changer</strong>.<br />
Beyond that the coin <strong>changer</strong> may display the price of the product<br />
selected.<br />
<strong>National</strong> <strong>Rejectors</strong>, <strong>Inc</strong>. <strong>GmbH</strong>, Buxtehude<br />
23
Pr i c e s a n d v e n d i ng m o d e s (o n ly c 2 BDV/Ex e c u t i v e)<br />
c 2 Configuration<br />
Setting prices<br />
You can set up to 100 prices:<br />
Quick approach:<br />
= Main menu > E = Settings > Selling prices<br />
Press key ... How often? Effect<br />
1 1 x You enter the main menu<br />
2 1 x You enter the Se t t i n g menu<br />
3 until Selling prices<br />
You want to enter submenu Selling<br />
p r i c e s<br />
4 1 x You enter the submenu<br />
5 / until price desired You want to set this price<br />
6 1 x Now you can set this price<br />
7 /<br />
until required digit<br />
You highlight the digit of the price to<br />
be set<br />
8 /<br />
until required value<br />
This value is to be set<br />
9 Please repeat steps 7 and 8 to set the other digits of the price, if necessary<br />
10 1 x You lock the set price in memory<br />
11 Please repeat steps 5 to 10 to the other prices, if necessary<br />
12 1 x/2 x<br />
You return to main menu/operating<br />
mode<br />
You may divide the 100 prices into 2 x 50 prices for card and cash<br />
payment. The first price list (prices 1–50) is valid for transactions<br />
without any card inserted (cash payment), and the second price list<br />
(prices 51–100) for transactions with a card inserted (see section<br />
"Activating second price list for card transactions" in Chap. 8<br />
"Peripheral").<br />
24 <strong>National</strong> <strong>Rejectors</strong>, <strong>Inc</strong>. <strong>GmbH</strong>, Buxtehude
c 2 Configuration Pr i c e s a n d v e n d i ng m o d e s (o n ly c 2 BDV/Ex e c u t i v e)<br />
Activating coin <strong>changer</strong> price holding<br />
Quick approach:<br />
If you want the coin <strong>changer</strong> to hold the prices and include the product-specific<br />
sales data in the audit, you must activate the price holding function.<br />
To activate/deactivate the price holding function:<br />
= Main menu > E = Settings > Operating modes > Selling mode > Price Holding ><br />
Price Holding<br />
Press key ... How often? Effect<br />
1 1 x You enter the main menu<br />
2 1 x<br />
You enter the Se t t i n g menu. The<br />
required menu item has already been<br />
selected<br />
3 1 x You enter submenu Op e r at i ng m o d e s<br />
4 until Selling mode<br />
You want to enter submenu Selling<br />
m o d e<br />
5 1 x You enter the submenu<br />
6 until Price Holding<br />
7 1 x<br />
8 1 x<br />
9 /<br />
until setting desired<br />
You want to enter submenu Pr i c e<br />
Ho l d i ng<br />
You enter the submenu Pr i c e Ho l d i ng.<br />
The required menu item has already<br />
been selected<br />
Now you can activate/deactivate the<br />
Pr i c e Ho l d i ng function<br />
You want to activate/deactivate the<br />
function<br />
10 1 x You lock the setting in memory<br />
11 1 x/2 x<br />
You return to main menu/operating<br />
mode<br />
<strong>National</strong> <strong>Rejectors</strong>, <strong>Inc</strong>. <strong>GmbH</strong>, Buxtehude<br />
25
Pr i c e s a n d v e n d i ng m o d e s (o n ly c 2 BDV/Ex e c u t i v e)<br />
c 2 Configuration<br />
Displaying price<br />
Quick approach:<br />
If you want the machine to display the price of the product selected, you<br />
have to adapt the coin <strong>changer</strong> configuration accordingly.<br />
To display/suppress the price:<br />
= Main menu > E = Settings > Operating modes > Selling mode > Price Holding ><br />
Indicate price of product<br />
Press key ... How often? Effect<br />
1 1 x You enter the main menu<br />
2 1 x<br />
You enter the Se t t i n g menu. The<br />
required menu item has already been<br />
selected<br />
3 1 x You enter submenu Op e r at i ng m o d e s<br />
4 until Selling mode<br />
You want to enter submenu Selling<br />
m o d e<br />
5 1 x You enter the submenu<br />
6 until Price Holding<br />
You want to enter submenu Pr i c e<br />
Ho l d i ng<br />
7 1 x You enter the submenu Pr i c e Ho l d i ng<br />
8<br />
9 1 x<br />
10 /<br />
until Indicate price of<br />
product<br />
until setting desired<br />
You want the price of the product<br />
selected to be displayed/not displayed<br />
Now you can activate/deactivate the<br />
function<br />
You want the price to be displayed/not<br />
displayed<br />
11 1 x You lock the setting in memory<br />
12 1 x/2 x<br />
You return to main menu/operating<br />
mode<br />
26 <strong>National</strong> <strong>Rejectors</strong>, <strong>Inc</strong>. <strong>GmbH</strong>, Buxtehude
c 2 Configuration Pr i c e s a n d v e n d i ng m o d e s (o n ly c 2 BDV/Ex e c u t i v e)<br />
Configuring "Committed to vend" or change return at any time<br />
To ensure that the vending machine is not used as a money <strong>changer</strong> and<br />
inserted cash is returned whenever you want, the coin <strong>changer</strong> can be set<br />
up so that change is only paid out after a vending operation.<br />
If the <strong>changer</strong> is not set to "Committed to vend", the customer, at any time,<br />
can cause the return of the (residual) credit by pressing the return button,<br />
even without having pressed a selection button or bought something.<br />
In addition, a maximum amount of money, which is allowed to be<br />
accepted at most for a transaction, can be configured (see section<br />
"Limiting acceptance of coins and banknotes (only c 2 BDV/Executive)"<br />
in Chap. 6 "Cash acceptance").<br />
Quick approach:<br />
To activate/deactivate "Committed to vend":<br />
= Main menu > E = Settings > Operating modes > Selling mode > Committed to vend<br />
Press key ... How often? Effect<br />
1 1 x You enter the main menu<br />
2 1 x<br />
You enter the Se t t i n g menu. The<br />
required menu item has already been<br />
selected<br />
3 1 x You enter submenu Op e r at i ng m o d e s<br />
4 until Selling mode<br />
You want to enter submenu Selling<br />
m o d e<br />
5 1 x You enter the submenu<br />
6 until Committed to vend<br />
You want/do not want the customer<br />
to buy something before he can claim<br />
back the change<br />
7 1 x Now you can set the function<br />
8 /<br />
until setting desired<br />
You want to activate/deactivate the<br />
"Committed to vend" function<br />
9 1 x You lock the setting in memory<br />
10 1 x/2 x<br />
You return to main menu/operating<br />
mode<br />
<strong>National</strong> <strong>Rejectors</strong>, <strong>Inc</strong>. <strong>GmbH</strong>, Buxtehude<br />
27
Pr i c e s a n d v e n d i ng m o d e s (o n ly c 2 BDV/Ex e c u t i v e)<br />
c 2 Configuration<br />
Configuring single or multi vend<br />
Quick approach:<br />
In principle the customer can purchase a number of products one after the<br />
other once he has inserted his money (multi vend). The change is not paid<br />
out until the customer has operated the return lever.<br />
However, the coin <strong>changer</strong> can also be set to "single vend", i.e. the customer<br />
can only insert coins until the value of the highest set price is reached.<br />
Change is then paid out automatically after each vend.<br />
To set single or multi vend:<br />
= Main menu > E = Settings > Operating modes > Selling mode > Single/Multi vend<br />
Press key ... How often? Effect<br />
1 1 x You enter the main menu<br />
2 1 x<br />
You enter the Se t t i n g menu. The<br />
required menu item has already been<br />
selected<br />
3 1 x You enter submenu Op e r at i ng m o d e s<br />
4 until Selling mode<br />
5 1 x<br />
You want to enter submenu Selling<br />
m o d e<br />
You enter the submenu. The required<br />
menu item has already been selected<br />
6 1 x You want to set Si ng l e or Mu lt i v e n d<br />
7<br />
/<br />
until setting desired<br />
Single or multi vend is to be activated<br />
8 1 x You lock the setting in memory<br />
9 1 x/2 x<br />
You return to main menu/operating<br />
mode<br />
28 <strong>National</strong> <strong>Rejectors</strong>, <strong>Inc</strong>. <strong>GmbH</strong>, Buxtehude
c 2 Configuration Pr i c e s a n d v e n d i ng m o d e s (o n ly c 2 BDV/Ex e c u t i v e)<br />
Resetting or storing credit which cannot be paid out<br />
Quick approach:<br />
If the remaining credit cannot be paid out of the coin cassette or connected<br />
hoppers or recyclers (payout units are empty or no appropriate tube/hopper<br />
coin/recycler banknote programmed), that credit can either be reset or<br />
saved for the next vending operation or customer.<br />
To reset/store the credit which cannot be paid out:<br />
= Main menu > E = Settings > Operating modes > Residual credit<br />
Press key ... How often? Effect<br />
1 1 x You enter the main menu<br />
2 1 x<br />
You enter the Se t t i n g menu. The<br />
required menu item has already been<br />
selected<br />
3 1 x You enter submenu Op e r at i ng m o d e s<br />
4 until Residual credit<br />
You want to specify how to manage the<br />
Re s i d u a l c r e d it<br />
5 1 x Now you can set the function<br />
6 /<br />
until setting desired<br />
You want the residual credit which<br />
cannot be paid out to be De l e t e d/stored<br />
7 1 x You lock the setting in memory<br />
8 1 x/2 x<br />
You return to main menu/operating<br />
mode<br />
<strong>National</strong> <strong>Rejectors</strong>, <strong>Inc</strong>. <strong>GmbH</strong>, Buxtehude<br />
29
Ca s h a c c e p ta n c e<br />
c 2 Configuration<br />
6<br />
Cash acceptance<br />
This chapter describes how to adapt the acceptance of coins (and banknotes)<br />
to the machine environment:<br />
2<br />
• Limiting acceptance of coins and banknotes (only c BDV/Executive)<br />
• Limiting acceptance of tube coins (filling level limitation)<br />
• Inhibiting coins<br />
• Inhibiting high-value coins if there is not enough change<br />
(only c 2 BDV/Executive)<br />
• Optimising acceptance of genuine coins/rejection of fraud coins<br />
(defining acceptance tolerances)<br />
• Selecting coin group A or B<br />
• Preventing coins from geting stuck in the tubes (security stock)<br />
30 <strong>National</strong> <strong>Rejectors</strong>, <strong>Inc</strong>. <strong>GmbH</strong>, Buxtehude
c 2 Configuration<br />
Ca s h a c c e p ta n c e<br />
Limiting acceptance of coins and banknotes<br />
(only c 2 BDV/Executive)<br />
Quick approach:<br />
In order to prevent the vending machine from being used as a money<br />
<strong>changer</strong>, you can set a maximum amount of money which may be accepted<br />
during a single vending operation (acceptance limitation). If this amount is<br />
reached or exceeded, the acceptance of coins and bills is inhibited.<br />
In addition, you may set the coin <strong>changer</strong> so that the change is returned<br />
only after a transaction and automatically (see section "Configuring<br />
"Committed to vend" or change return at any time" in Chap. 5 "Prices<br />
and vending modes").<br />
To configure the acceptance limitation:<br />
= Main menu > E = Settings > Operating modes > Limitations > Acceptance limit<br />
Press key ... How often? Effect<br />
1 1 x You enter the main menu<br />
2 1 x<br />
You enter the Se t t i n g menu. The<br />
required menu item has already been<br />
selected<br />
3 1 x You enter submenu Op e r at i ng m o d e s<br />
4 until Limitations You want to enter submenu Limitations<br />
5 1 x<br />
6 1 x<br />
You enter the submenu. The required<br />
menu item has already been selected<br />
You want to set the acceptance<br />
limitation<br />
7 / until required digit You highlight the digit to be set<br />
8 /<br />
until required value<br />
This value is to be set<br />
9 Please repeat steps 7 and 8 to set the other digits of the acceptance limitation, if necessary<br />
10 1 x<br />
11 1 x/2 x<br />
You lock the set acceptance limitation<br />
in memory<br />
You return to main menu/operating<br />
mode<br />
<strong>National</strong> <strong>Rejectors</strong>, <strong>Inc</strong>. <strong>GmbH</strong>, Buxtehude<br />
31
Ca s h a c c e p ta n c e<br />
c 2 Configuration<br />
Limiting acceptance of tube coins (filling level limitation)<br />
Quick approach:<br />
The <strong>changer</strong> can be configured so that each change tube accepts no more<br />
than a specific number of coins. When this number of coins is reached in<br />
a tube, all further coins for this tube are then directed into the cash-box<br />
temporarily. Only when coins have been paid out of this tube, coins are<br />
again sorted into the tube.<br />
If this function is not used (setting "000"), the upper filling level sensor<br />
(full sensor) of the tubes determines, irrespective of the number of<br />
coins, from when the coins will be sorted into the cash-box and no<br />
longer into the tubes.<br />
To configure the filling level limitation:<br />
= Main menu > E = Settings > <strong>Coin</strong> settings > Filling level limitation<br />
Press key ... How often? Effect<br />
1 1 x You enter the main menu<br />
2 1 x You enter the Se t t i n g menu<br />
3 until <strong>Coin</strong> settings<br />
You want to enter submenu Co i n<br />
s e t t i n g s<br />
4 1 x You enter the submenu<br />
5<br />
until Filling level<br />
limitation<br />
You want to enter submenu Filling<br />
l e v e l limitation<br />
6 1 x You enter the submenu<br />
7 /<br />
8 1 x<br />
until tube desired<br />
You want to set a filling level limitation<br />
for this tube<br />
Now you can set a limitation for this<br />
tube<br />
9 /<br />
until required digit<br />
You highlight the digit to be set<br />
10 until required value<br />
This value is to be set<br />
/<br />
Please repeat steps 9 and 10 to set the other two digits of the filling level limitation, if<br />
11<br />
necessary<br />
12 1 x<br />
You lock the set filling level limitation in<br />
memory<br />
13 Please repeat steps 7 to 12 to set the filling level limitations of the other tubes, if necessary<br />
14 1 x/2 x<br />
You return to main menu/operating<br />
mode<br />
32 <strong>National</strong> <strong>Rejectors</strong>, <strong>Inc</strong>. <strong>GmbH</strong>, Buxtehude
c 2 Configuration<br />
Ca s h a c c e p ta n c e<br />
Inhibiting coins<br />
Quick approach:<br />
If you want certain coins to be no longer accepted for payment at the<br />
machine, you may inhibit these coins (temporarily).<br />
The coin <strong>changer</strong> stores the coins 1–16 in ascending coin value<br />
order, i.e. "coin 01" is always the lowest-value and "coin 16" always<br />
the highest-value coin programmed.<br />
To inhibit/release a certain coin:<br />
= Main menu > E = Settings > Inhibit mask > Inhibit mask<br />
Press key ... How often? Effect<br />
1 1 x You enter the main menu<br />
2 1 x You enter the Se t t i n g menu<br />
3 until Inhibit mask You want to enter submenu In h i b it m a s k<br />
4 1 x<br />
You enter the submenu. The required<br />
menu item has already been selected<br />
5 1 x You want to inhibit/release a coin<br />
6 / until coin desired You want to inhibit/release this coin<br />
7 1 x Now you can inhibit/release this coin<br />
8 /<br />
until setting desired<br />
You want this coin to be inhibited/<br />
released<br />
9 1 x You lock the setting in memory<br />
10 1 x/2 x<br />
You return to main menu/operating<br />
mode<br />
<strong>National</strong> <strong>Rejectors</strong>, <strong>Inc</strong>. <strong>GmbH</strong>, Buxtehude<br />
33
Ca s h a c c e p ta n c e<br />
c 2 Configuration<br />
Inhibiting high-value coins if there is not enough change<br />
(only c 2 BDV/Executive)<br />
Quick approach:<br />
If you want high-value coins to be no longer accepted whenever the machine<br />
displays "tube empty" (see section "Configuring conditions for tube empty<br />
message (only c 2 BDV/Executive)" in Chap. 7 "Change payout"), they can<br />
be inhibited automatically depending on this message.<br />
To inhibit/release a certain coin if there is not enough change:<br />
= Main menu > E = Settings > Inhibit mask > Inhibit if tube empty<br />
Press key ... How often? Effect<br />
1 1 x You enter the main menu<br />
2 1 x You enter the Se t t i n g menu<br />
3 until Inhibit mask You want to enter submenu In h i b it m a s k<br />
4 1 x You enter the submenu<br />
5<br />
until Inhibit if tube<br />
empty<br />
You want to inhibit/release coins<br />
automatically if there is not enough<br />
change<br />
6 1 x Now you can select the relevant coin<br />
7 / until coin desired You want to inhibit/release this coin<br />
8 1 x Now you can inhibit/release this coin<br />
9 /<br />
until setting desired<br />
You want this coin to be inhibited/<br />
released if there is not enough change<br />
10 1 x You lock the setting in memory<br />
11 1 x/2 x<br />
You return to main menu/operating<br />
mode<br />
34 <strong>National</strong> <strong>Rejectors</strong>, <strong>Inc</strong>. <strong>GmbH</strong>, Buxtehude
c 2 Configuration<br />
Ca s h a c c e p ta n c e<br />
Optimising acceptance of genuine coins/rejection of fraud<br />
coins (defining acceptance tolerances)<br />
For the acceptance of (high-value) coins programmed the coin <strong>changer</strong> is<br />
capable of having up to three acceptance bands with different acceptance<br />
tolerances. In order that genuine coins are always accepted and fraud<br />
coins rejected reliably you may assign a "normal", "narrow" or "very narrow"<br />
(smallest acceptance tolerances) acceptance band.<br />
Narrow and very narrow acceptance bands possess a lower acceptance<br />
rate of genuine coins.<br />
To select the acceptance tolerances:<br />
Quick approach:<br />
= Main menu > E = Settings > <strong>Coin</strong> settings > Security level<br />
Press key ... How often? Effect<br />
1 1 x You enter the main menu<br />
2 1 x You enter the Se t t i n g menu<br />
3 until <strong>Coin</strong> settings<br />
You want to enter submenu Co i n<br />
s e t t i n g s<br />
4 1 x You enter the submenu<br />
5 until Security level<br />
You want to specify a coin’s<br />
acceptance tolerances<br />
6 1 x Now you select the coin<br />
7 /<br />
8 1 x<br />
9 /<br />
until coin with problematic<br />
acceptance<br />
until acceptance band width<br />
desired<br />
You want to select a No r m a l /n a r r o w/<br />
v e r y n a r r o w acceptance band for this<br />
coin<br />
Now you can select the acceptance<br />
band<br />
You want the coin to be accepted in<br />
this band width<br />
10 1 x You lock the setting in memory<br />
11 1 x/2 x<br />
You return to main menu/operating<br />
mode<br />
<strong>National</strong> <strong>Rejectors</strong>, <strong>Inc</strong>. <strong>GmbH</strong>, Buxtehude<br />
35
Ca s h a c c e p ta n c e<br />
c 2 Configuration<br />
Selecting coin group A or B<br />
The coins porgrammed in the coin <strong>changer</strong> may have been assigned to<br />
two coin groups A or B at the manufacturer, e.g., to differentiate between<br />
two currencies (1 st currency = coin goup A, 2 nd currency = coin group B).<br />
In future you can modify the coin group setting using the configuration<br />
software currenza heartbeat (cp. separate heartbeat manual)<br />
These two coin groups can be selected using the switching block on the<br />
rear of the coin validator, in order that the coin <strong>changer</strong> accepts either coin<br />
group A or B:<br />
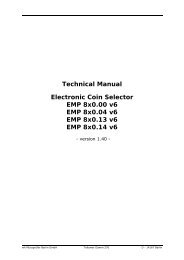
1 Turn machine’s power off.<br />
2 Unlatch coin validator and remove it from the <strong>changer</strong> (see Fig. 2,<br />
A & B).<br />
C<br />
B<br />
A<br />
Fig. 2: Removing and reinstalling coin validator<br />
36 <strong>National</strong> <strong>Rejectors</strong>, <strong>Inc</strong>. <strong>GmbH</strong>, Buxtehude
c 2 Configuration<br />
Ca s h a c c e p ta n c e<br />
3 Use DIL switch 10 to select coin group A or B (see Fig. 3).<br />
<strong>Coin</strong> group B<br />
<strong>Coin</strong> group A<br />
Fig. 3: Selecting coin group<br />
4 Reinsert coin validator until it clicks in position (see Fig. 2, B & C).<br />
5 Turn power on.<br />
6 Turn power off and on again.<br />
<strong>National</strong> <strong>Rejectors</strong>, <strong>Inc</strong>. <strong>GmbH</strong>, Buxtehude<br />
37
Ca s h a c c e p ta n c e<br />
c 2 Configuration<br />
Preventing coins from getting stuck in the tubes<br />
If a security stock is configured for the individual change tubes, the <strong>changer</strong><br />
does not pay out a minimum number of tube coins.<br />
For coins that cause problems during stacking and tend to stand<br />
upright instead of lying flat, a relatively high setting for the security<br />
stock should be selected since the coins will no longer spring back<br />
and stand upright when they fall onto a higher stack of coins.<br />
In case there is no setting (entry "00"), the security stock is set to 3<br />
automatically.<br />
MDB <strong>changer</strong>s can also be set so that the configured security stock can<br />
be paid out by the vending machine and the security stock can also be<br />
transmitted to the vending machine whenever the machine scans the tube<br />
filling level.<br />
Configuring security stock for each tube<br />
To configure the security stock (1–9 coins):<br />
Quick approach:<br />
= Main menu > E = Settings > <strong>Coin</strong> settings > Security stock<br />
Press key ... How often? Effect<br />
1 1 x You enter the main menu<br />
2 1 x You enter the Se t t i n g menu<br />
3 until <strong>Coin</strong> settings<br />
You want to enter submenu Co i n<br />
s e t t i n g s<br />
4 1 x You enter the submenu<br />
5 until Security stock<br />
You want to enter submenu Se c u r it y<br />
s t o c k<br />
6 1 x You enter the submenu<br />
7 /<br />
8 1 x<br />
until tube desired<br />
You want to set a security stock for this<br />
tube<br />
Now you can set a security stock for<br />
this tube<br />
9 / until required digit You highlight the digit to be set<br />
10 / until required value This value is to be set<br />
11 Please repeat steps 9 and 10 to set the other digit of the security stock, if necessary<br />
12 1 x<br />
You lock the set security stock in<br />
memory<br />
13 Please repeat steps 7 to 12 to the security stocks of the other tubes, if necessary<br />
14 1 x/2 x<br />
You return to main menu/operating<br />
mode<br />
38 <strong>National</strong> <strong>Rejectors</strong>, <strong>Inc</strong>. <strong>GmbH</strong>, Buxtehude
c 2 Configuration<br />
Ca s h a c c e p ta n c e<br />
Transmitting tube filling level incl. security stock to VMC<br />
(only c 2 MDB)<br />
Quick approach:<br />
The coin <strong>changer</strong> is able to transmit the filling level of the tubes inclusive<br />
of the security stock configured to the vending machine control system.<br />
To define the data to be transferred:<br />
= Main menu > E = Settings > Operating modes > Security stock to VMC<br />
Press key ... How often? Effect<br />
1 1 x You enter the main menu<br />
2 1 x<br />
You enter the Se t t i n g menu. The<br />
correct menu item has already been<br />
selected<br />
3 1 x You enter submenu Op e r at i ng m o d e s<br />
4<br />
until Security stock to<br />
VMC<br />
You want the security stock to be Se n t/<br />
n o t to b e s e n t to t h e VMC<br />
5 1 x Now can set the function<br />
6 /<br />
until setting desired<br />
The security stock is to be sent/not to<br />
be sent<br />
7 1 x You lock the setting in memory<br />
8 1 x/2 x<br />
You return to main menu/operating<br />
mode<br />
Enabling VMC to payout security stock with DISPENSE (only c 2 MDB)<br />
Quick approach:<br />
If you want the vending machine to be able to pay out also the security<br />
stock using the DISPENSE command:<br />
= Main menu > E = Settings > Operating modes > Security stock in the tubes<br />
Press key ... How often? Effect<br />
1 1 x You enter the main menu<br />
2 1 x<br />
You enter the Se t t i n g menu. The<br />
correct menu item has already been<br />
selected<br />
3 1 x You enter submenu Op e r at i ng m o d e s<br />
4<br />
until Security stock in<br />
the tubes<br />
You want a Paya b l e /n o t paya b l e security<br />
stock<br />
5 1 x Now you can set the function<br />
6 /<br />
until setting desired<br />
You want the VMC to be able/not to be<br />
able to payout the security stock<br />
7 1 x You lock the setting in memory<br />
8 1 x/2 x<br />
You return to main menu/operating<br />
mode<br />
<strong>National</strong> <strong>Rejectors</strong>, <strong>Inc</strong>. <strong>GmbH</strong>, Buxtehude<br />
39
Ch a n g e pay o u t<br />
c 2 Configuration<br />
7<br />
Change payout<br />
This chapter describes how to adapt the change payout to the machine<br />
environment:<br />
• Reassigning coin cassette<br />
2<br />
• Limiting change return (only c BDV/Executive)<br />
• Configuring conditions for tube empty message<br />
(only c 2 BDV/Executive)<br />
• Activating low-power single-motor payout<br />
Reassigning coin cassette<br />
If you exchanged the change tubes or coin cassette, in order to be able<br />
to pay out other or more coins, the new sorting must be set in the coin<br />
<strong>changer</strong>.<br />
The coin <strong>changer</strong> comes with pre-programmed coin cassette combinations,<br />
which can be selected depending on the new sorting.<br />
If the new tube combination is not part of the pre-programmed combinations,<br />
it may be configured manually.<br />
40 <strong>National</strong> <strong>Rejectors</strong>, <strong>Inc</strong>. <strong>GmbH</strong>, Buxtehude
c 2 Configuration<br />
Ch a n g e pay o u t<br />
To select a new tube combination:<br />
Quick approach:<br />
= Main menu > E = Settings > <strong>Coin</strong> settings > <strong>Coin</strong> sorting > Select tube cassette<br />
Press key ... How often? Effect<br />
1 1 x You enter the main menu<br />
2 1 x You enter the Se t t i n g menu<br />
3 until <strong>Coin</strong> settings<br />
You want to enter submenu Co i n<br />
s e t t i n g s<br />
4 1 x You enter the submenu<br />
5 until <strong>Coin</strong> sorting<br />
6 1 x<br />
7 1 x<br />
8 / until required tube combination<br />
You want to enter submenu Co i n<br />
s o r t i ng<br />
You enter the submenu. The required<br />
menu item has already been selected<br />
You want to select a new preprogrammed<br />
tube combination<br />
This tube combination matches<br />
your new coin cassette and is to be<br />
configured<br />
9 1 x You lock the setting in memory<br />
In case none of the tube combinations suggested fits the new coin cassette, you may also<br />
configure the individual tube coins:<br />
A<br />
B<br />
1 x<br />
until New payout<br />
combination<br />
You want to enter submenu Co i n<br />
s o r t i ng<br />
You want to configure the tube coins<br />
individually<br />
C 1 x Now you can configure the tube coins<br />
D /<br />
until required tube<br />
You want to set a new coin value for<br />
this tube<br />
E 1 x Now you can enter a value<br />
F / until required digit You highlight the digit to be set<br />
G / until required value This value is to be set<br />
H<br />
I<br />
J<br />
10/<br />
K<br />
Please repeat steps F and G to set the other digits of the coin value, if necessary<br />
You lock the set tube coin value in<br />
1 x<br />
memory<br />
Please repeat steps D to I to set the tube values of the other tubes, if necessary<br />
1 x/2 x<br />
You return to main menu/operating<br />
mode<br />
<strong>National</strong> <strong>Rejectors</strong>, <strong>Inc</strong>. <strong>GmbH</strong>, Buxtehude<br />
41
Ch a n g e pay o u t<br />
c 2 Configuration<br />
Limiting change return (only c 2 BDV/Executive)<br />
Quick approach:<br />
You have the possibility to define a maximum residual amount that the<br />
<strong>changer</strong> is supposed to pay out to the customer at most. The customer must<br />
then purchase enough during one vending operation so that the residual<br />
credit is less than the set change limitation.<br />
To configure the change limitation:<br />
= Main menu > E = Settings > Operating modes > Limitations > Change limit<br />
Press key ... How often? Effect<br />
1 1 x You enter the main menu<br />
2 1 x<br />
You enter the Se t t i n g menu. The<br />
required menu item has already been<br />
selected<br />
3 1 x You enter submenu Op e r at i ng m o d e s<br />
4 until Limitations You want to enter submenu Limitations<br />
5 1 x You enter the submenu<br />
6 until Change limit You want to set the change limitation<br />
7 1 x Now you can set the function<br />
8 / until required digit You highlight the digit to be set<br />
9 / until required value This value is to be set<br />
10 Please repeat steps 8 and 9 to set the other digits of the change limitation, if necessary<br />
11 1 x<br />
12 1 x/2 x<br />
You lock the set change limitation in<br />
memory<br />
You return to main menu/operating<br />
mode<br />
42 <strong>National</strong> <strong>Rejectors</strong>, <strong>Inc</strong>. <strong>GmbH</strong>, Buxtehude
c 2 Configuration<br />
Ch a n g e pay o u t<br />
Configuring conditions for tube empty message<br />
(only c 2 BDV/Executive)<br />
The lowest filling level sensor (empty sensor) signals that a tube is empty.<br />
When you want the vending machine to display "tube empty", i.e. which<br />
tube(s) is/are to be empty, in order that the empty message is displayed,<br />
you may specify depending on the tube coins.<br />
The following coding scheme can be configured:<br />
Code 00 "Tube empty" if tube M 1<br />
or M 2<br />
or tubes M 3<br />
and M 4<br />
empty<br />
Code 01 “Tube empty” if tubes M 1–4<br />
empty<br />
Code 02 “Tube empty” if tubes M 1–3<br />
empty<br />
Code 03 “Tube empty” if tubes M 1–2<br />
empty<br />
Code 04 “Tube empty” if tubes M 1<br />
and M 3<br />
empty<br />
Code 05 “Tube empty” if tubes M 1<br />
and M 2<br />
or tube M 3<br />
empty<br />
Code 06 “Tube empty” if tube M 1<br />
or M 2<br />
or M 3<br />
empty<br />
Code 07 “Tube empty” if tube M 1<br />
or M 2<br />
empty<br />
Code 08 “Tube empty” if tube M 1<br />
empty<br />
Code 09 “Tube empty” if tube M 2<br />
empty<br />
Code 10 “Tube empty” if tube M 3<br />
empty<br />
Code 11 “Tube empty” if tube M 4<br />
empty<br />
Code 12 “Tube empty” if tube M 5<br />
empty<br />
Code 13 “Tube empty” if tube M 6<br />
empty<br />
Code 14 “Tube empty” if tubes M 2–3<br />
empty<br />
Code 15 “Tube empty” if tubes M 2<br />
and M 4<br />
empty<br />
M 1<br />
= Tube coin with lowest value<br />
M 6<br />
= Tube coin with highest value<br />
<strong>National</strong> <strong>Rejectors</strong>, <strong>Inc</strong>. <strong>GmbH</strong>, Buxtehude<br />
43
Ch a n g e pay o u t<br />
c 2 Configuration<br />
To configure the tube empty code:<br />
Quick approach:<br />
= Main menu > E = Settings > <strong>Coin</strong> settings > Condition for tube empty<br />
Press key ... How often? Effect<br />
1 1 x You enter the main menu<br />
2 1 x You enter the Se t t i n g menu<br />
3 until <strong>Coin</strong> settings<br />
You want to enter submenu Co i n<br />
s e t t i n g s<br />
4 1 x You enter the submenu<br />
5<br />
6 1 x<br />
until Condition for tube<br />
empty<br />
You want to configure a tube empty<br />
code<br />
Now you can set the function (cp. table<br />
above)<br />
7 / until required digit You highlight the digit to be set<br />
8 / until required value This value is to be set<br />
9 Please repeat steps 7 and 8 to set the second digit of the code, if necessary<br />
10 1 x You lock the set code in memory<br />
11 1 x/2 x<br />
You return to main menu/operating<br />
mode<br />
44 <strong>National</strong> <strong>Rejectors</strong>, <strong>Inc</strong>. <strong>GmbH</strong>, Buxtehude
c 2 Configuration<br />
Ch a n g e pay o u t<br />
Activating low-power single-motor payout<br />
Quick approach:<br />
If you want the coin <strong>changer</strong> to use as less electricity as possible, e.g. in<br />
battery operation, it may use only one motor instead of all motors at the<br />
same time when paying out coins.<br />
To activate/deactivate the single-motor payout:<br />
= Main menu > E = Settings > Operating modes > Simple payout<br />
Press key ... How often? Effect<br />
1 1 x You enter the main menu<br />
2 1 x<br />
You enter the Se t t i n g menu. The<br />
required menu item has already been<br />
selected<br />
3 1 x You enter submenu Op e r at i ng m o d e s<br />
4 until Simple payout<br />
You want to Ac t i vat e /d e a c t i vat e the<br />
single-motor payout<br />
5 1 x Now you can set the function<br />
6 /<br />
until setting desired<br />
When paying out, you want one/all<br />
motors to be controlled<br />
7 1 x You lock the setting in memory<br />
8 1 x/2 x<br />
You return to main menu/operating<br />
mode<br />
<strong>National</strong> <strong>Rejectors</strong>, <strong>Inc</strong>. <strong>GmbH</strong>, Buxtehude<br />
45
Pe r i p h e r a l<br />
c 2 Configuration<br />
8<br />
Peripheral<br />
This chapter describes how to<br />
• set up communication between coin <strong>changer</strong> and peripherals<br />
connected<br />
• make settings on the coin <strong>changer</strong> in order to apply them to the<br />
peripherals.<br />
You can make settings for the following peripheral devices:<br />
• hoppers<br />
• recycler<br />
• bill validator<br />
• card reader<br />
• external audit unit<br />
Hopper settings<br />
If a coin type is frequently paid out as change, and the respective tube is<br />
often empty, you can use an NRI hopper interface to connect up to four<br />
hoppers to the coin <strong>changer</strong> from which the vending machine can pay out<br />
coins on an alternative basis.<br />
In the <strong>changer</strong>, a setting must be made that one hopper or more hoppers<br />
are connected and which coin is being collected in the hopper so that the<br />
coin <strong>changer</strong> can decide which residual credit can no longer be paid out<br />
by the <strong>changer</strong> and must be paid out from the hoppers.<br />
Beyond that the coin <strong>changer</strong> must know the active level (low/high) of the<br />
coin payout and empty detection (option) signals.<br />
46 <strong>National</strong> <strong>Rejectors</strong>, <strong>Inc</strong>. <strong>GmbH</strong>, Buxtehude
c 2 Configuration<br />
Pe r i p h e r a l<br />
Setting hopper coins<br />
To configure the value of the coins collected in the hopper(s):<br />
The hopper designations 1–4 refer to the connectors 1–4 on the<br />
hopper interface used to connect the hopper(s) to the coin <strong>changer</strong><br />
(cp. separate manual for the hopper interface). Hopper 1, e.g., is<br />
connected using hopper connector 1.<br />
Quick approach:<br />
= Main menu > E = Settings > Peripheral > Hopper > <strong>Coin</strong> value in hopper 1/2/3/4<br />
Press key ... How often? Effect<br />
1 1 x You enter the main menu<br />
2 1 x You enter the Se t t i n g menu<br />
3 until Peripheral You want to enter submenu Pe r i p h e r a l<br />
4 1 x You enter the submenu<br />
5 until Hopper You want to enter submenu Ho p p e r<br />
6 1 x You enter the submenu<br />
7<br />
until <strong>Coin</strong> value in<br />
hopper 1<br />
You want to set the value of the coins<br />
collected in hopper 1<br />
8 1 x Now you can set the value<br />
9 / until required digit You highlight the digit to be set<br />
10 / until required value This value is to be set<br />
11 Please repeat steps 9 and 10 to set the other digits of the coin value, if necessary<br />
12 1 x You lock the set coin value in memory<br />
13 Press -key and repeat steps 7 to 12 to set further hopper coins, if necessary<br />
14 1 x/2 x<br />
You return to main menu/operating<br />
mode<br />
The hopper connectors not in use retain coin value "00.00".<br />
<strong>National</strong> <strong>Rejectors</strong>, <strong>Inc</strong>. <strong>GmbH</strong>, Buxtehude<br />
47
Pe r i p h e r a l<br />
c 2 Configuration<br />
Setting up communication with hopper(s)<br />
To activate the communication between coin <strong>changer</strong> and hopper(s):<br />
Quick approach:<br />
= Main menu > E = Settings > Peripheral > Hopper > Communication with hopper<br />
Press key ... How often? Effect<br />
1 1 x You enter the main menu<br />
2 1 x You enter the Se t t i n g menu<br />
3 until Peripheral You want to enter submenu Pe r i p h e r a l<br />
4 1 x You enter the submenu<br />
5 until Hopper You want to enter submenu Ho p p e r<br />
6 1 x<br />
7 1 x<br />
8 /<br />
until setting desired<br />
You enter the submenu. The required<br />
menu item has already been selected<br />
Now you can set up the communication<br />
with the hopper(s)<br />
You want the communication to be<br />
Ac t i v e/No t a c t i v e<br />
9 1 x You lock the setting in memory<br />
10 1 x/2 x<br />
You return to main menu/operating<br />
mode<br />
48 <strong>National</strong> <strong>Rejectors</strong>, <strong>Inc</strong>. <strong>GmbH</strong>, Buxtehude
c 2 Configuration<br />
Pe r i p h e r a l<br />
Specifying active levels of the hopper payout and empty signal<br />
Quick approach:<br />
In order that the coin <strong>changer</strong> is able to evaluate the signals coming from<br />
the hopper(s), when a hopper pays out a coin or is empty and can no longer<br />
pay out coins (only with optional empty detection), you must set the signals’<br />
active levels (low/high).<br />
Make sure that all hoppers connected use the same active level for<br />
the coin signal or the empty signal (cp. separate manuals for the NRI<br />
hopper currenza h 2 and hopper interface).<br />
To specify the active levels:<br />
= Main menu > E = Settings > Peripheral > Hopper > <strong>Coin</strong> signal/empty signal of hopper<br />
Press key ... How often? Effect<br />
1 1 x You enter the main menu<br />
2 1 x You enter the Se t t i n g menu<br />
3 until Peripheral You want to enter submenu Pe r i p h e r a l<br />
4 1 x You enter the submenu<br />
5 until Hopper You want to enter submenu Ho p p e r<br />
6 1 x You enter the submenu<br />
7<br />
until <strong>Coin</strong> signal of<br />
hopper<br />
You want to specify the active level of<br />
the coin payout signals coming from<br />
the hopper<br />
8 1 x Now you can specify the active level<br />
9 /<br />
until setting desired<br />
The signals are supposed to be Hig h/<br />
a c t i v e / Lo w/a c t i v e<br />
10 1 x You lock the setting in memory<br />
11 Press -key and repeat steps 8 to 10 to specify the empty signal coming from the hopper<br />
(only for hoppers with empty detection)<br />
12 1 x/2 x<br />
You return to main menu/operating<br />
mode<br />
<strong>National</strong> <strong>Rejectors</strong>, <strong>Inc</strong>. <strong>GmbH</strong>, Buxtehude<br />
49
Pe r i p h e r a l<br />
c 2 Configuration<br />
Recycler settings<br />
If you want the vending machine to pay out banknotes as change, you may<br />
use the recycler interface to connect a recycler (banknote payout unit) to<br />
the coin <strong>changer</strong> from which the vending machine can pay out banknotes<br />
instead of coins.<br />
Please consider the following coin <strong>changer</strong> settings for communication<br />
between both devices:<br />
• Communication set-up<br />
• No acceptance of high-value banknotes if there is not enough change<br />
(only c 2 MDB)<br />
2<br />
• Compensation of banknote security stock (only c MDB)<br />
Setting up communication with recycler<br />
Quick approach:<br />
To activate the communication between an MDB coin <strong>changer</strong> and a<br />
recycler:<br />
= Main menu > E = Settings > Peripheral > Bill recycler > Communication with recycler<br />
Press key ... How often? Effect<br />
1 1 x You enter the main menu<br />
2 1 x You enter the Se t t i n g menu<br />
3 until Peripheral You want to enter submenu Pe r i p h e r a l<br />
4 1 x<br />
5 1 x<br />
6 1 x<br />
You enter the submenu. The required<br />
menu item has already been selected<br />
You enter submenu Bill r e c y c l e r. The<br />
required menu item has already been<br />
selected<br />
Now you can set up the communication<br />
with the recycler<br />
7 until setting desired<br />
You want the communication to be<br />
/<br />
Ac t i v e/No t a c t i v e<br />
8 1 x You lock the setting in memory<br />
9 1 x/2 x<br />
You return to main menu/operating<br />
mode<br />
50 <strong>National</strong> <strong>Rejectors</strong>, <strong>Inc</strong>. <strong>GmbH</strong>, Buxtehude
c 2 Configuration<br />
Pe r i p h e r a l<br />
Quick approach:<br />
To activate the communication between an BDV/Executive coin <strong>changer</strong><br />
and a recycler:<br />
= Main menu > E = Settings > Peripheral > Bill recycler<br />
Press key ... How often? Effect<br />
1 1 x You enter the main menu<br />
2 1 x You enter the Se t t i n g menu<br />
3 until Peripheral You want to enter submenu Pe r i p h e r a l<br />
4 1 x You enter the submenu<br />
5 until Bill recycler<br />
You want to set up the communication<br />
with the recycler<br />
6 1 x Now you can set up the communication<br />
7 /<br />
until setting desired<br />
You want the communication to be<br />
Ac t i v e/No t a c t i v e<br />
8 1 x You lock the setting in memory<br />
9 1 x/2 x<br />
You return to main menu/operating<br />
mode<br />
<strong>National</strong> <strong>Rejectors</strong>, <strong>Inc</strong>. <strong>GmbH</strong>, Buxtehude<br />
51
Pe r i p h e r a l<br />
c 2 Configuration<br />
Inhibiting high-value banknotes depending on change stock (only c 2 MDB)<br />
If a CashCode recycler is conntected to an MDB coin <strong>changer</strong>, you can<br />
inhibit the acceptance of high-value banknotes if there is not enough<br />
change. I.e. before each sale the coin <strong>changer</strong> decides which banknote<br />
can be accepted and which cannot be accepted, depending on the current<br />
change stock in the coin cassette and recycler.<br />
This setting is intended for applications in vending machines which<br />
do not support this function.<br />
To limit the banknote acceptance:<br />
Quick approach:<br />
= Main menu > E = Settings > Peripheral > Bill recycler > Inhibit bill acceptance<br />
Press key ... How often? Effect<br />
1 1 x You enter the main menu<br />
2 1 x You enter the Se t t i n g menu<br />
3 until Peripheral You want to enter submenu Pe r i p h e r a l<br />
4 1 x<br />
You enter the submenu. The required<br />
menu item has already been selected<br />
5 1 x You enter submenu Re c y c l e r<br />
6<br />
until Inhibit bill<br />
acceptance<br />
You want high-value banknotes to<br />
be inhibited/always be accepted<br />
depending on the change<br />
7 1 x Now you can set the function<br />
8 /<br />
until setting desired<br />
You want to activate/not activate the<br />
function<br />
9 1 x You lock the setting in memory<br />
10 1 x/2 x<br />
You return to main menu/operating<br />
mode<br />
52 <strong>National</strong> <strong>Rejectors</strong>, <strong>Inc</strong>. <strong>GmbH</strong>, Buxtehude
c 2 Configuration<br />
Pe r i p h e r a l<br />
Paying out all banknotes (compensating the machine‘s security stock)<br />
(only c 2 MDB)<br />
Quick approach:<br />
Some vending machines (particularly in the USA) keep a security stock of<br />
coins in the tubes. As the machine handles banknotes available for payout<br />
like tube coins not all of the banknotes can be payed out as change. If you<br />
want the vending machine to pay out all banknotes you can compensate<br />
the security stock. (For "security stock" details cp. section "Preventing coins<br />
from getting stuck in the tubes" in Chap. 6 "Cash acceptance")<br />
To compensate the security stock:<br />
= Main menu > E = Settings > Peripheral > Bll recycler > Empty recycler store<br />
Press key ... How often? Effect<br />
1 1 x You enter the main menu<br />
2 1 x You enter the Se t t i n g menu<br />
3 until Peripheral You want to enter submenu Pe r i p h e r a l<br />
4 1 x<br />
You enter the submenu. The correct<br />
menu item has already been selected<br />
5 1 x You enter submenu Re c y c l e r<br />
6<br />
until Empty recycler<br />
store<br />
You want the recycler to pay out all<br />
banknotes/keep at least 3 banknotes<br />
7 1 x Now you can set the function<br />
8 /<br />
until setting desired<br />
You want to activate/deactivate the<br />
function<br />
9 1 x You lock the setting in memory<br />
10 1 x/2 x<br />
You return to main menu/operating<br />
mode<br />
<strong>National</strong> <strong>Rejectors</strong>, <strong>Inc</strong>. <strong>GmbH</strong>, Buxtehude<br />
53
Pe r i p h e r a l<br />
c 2 Configuration<br />
Bill validator settings (only c 2 BDV/Executive)<br />
You may connect an MDB bill validator to the coin <strong>changer</strong>. Please<br />
consider the following coin <strong>changer</strong> settings for communication between<br />
both devices:<br />
2<br />
• Communication set-up (only c BDV/Executive)<br />
• No acceptance of banknotes when machine displays "Tube empty"<br />
(only c 2 BDV/Executive)<br />
• Acceptance of banknotes only for card payments<br />
(only c 2 BDV/Executive)<br />
Setting up communication with MDB bill validator<br />
Quick approach:<br />
To activate the communication between coin <strong>changer</strong> and MDB bill<br />
validator:<br />
= Main menu > E = Settings > Peripheral > Bill validator > Bill validator<br />
Press key ... How often? Effect<br />
1 1 x You enter the main menu<br />
2 1 x You enter the Se t t i n g menu<br />
3 until Peripheral You want to enter submenu Pe r i p h e r a l<br />
4 1 x You enter the submenu<br />
5 until Bill validator<br />
6 1 x<br />
7 1 x<br />
8 /<br />
until setting desired<br />
You want to enter submenu Billl<br />
va l id at o r<br />
You enter the submenu. The required<br />
menu item has already been selected<br />
Now you can set up the communication<br />
with the bill validator<br />
You want the communication to be<br />
Ac t i v e/No t a c t i v e<br />
9 1 x You lock the setting in memory<br />
10 1 x/2 x<br />
You return to main menu/operating<br />
mode<br />
54 <strong>National</strong> <strong>Rejectors</strong>, <strong>Inc</strong>. <strong>GmbH</strong>, Buxtehude
c 2 Configuration<br />
Pe r i p h e r a l<br />
Inhibiting/releasing banknote acceptance depending on change stock<br />
or card payments<br />
• Inhibiting banknote acceptance if machine displays "Tube empty":<br />
If the coin cassette has a shortage of change and the machine<br />
displays "Tube empty" (depending on conditions set), the bill validator<br />
can be blocked automatically.<br />
Quick approach:<br />
• Enabling bill validator for card payments only:<br />
The bill validator can always be enabled or only if a card is inserted<br />
into a card reader connected.<br />
To inhibit/release the banknote acceptance:<br />
= Main menu > E = Settings > Peripheral > Bill validator > Enable bill acceptance<br />
Press key ... How often? Effect<br />
1 1 x You enter the main menu<br />
2 1 x You enter the Se t t i n g menu<br />
3 until Peripheral You want to enter submenu Pe r i p h e r a l<br />
4 1 x You enter the submenu<br />
5 until Bill validator<br />
You want to enter submenu Bill<br />
va l id at o r<br />
6 1 x You enter the submenu<br />
7<br />
until Enable bill<br />
acceptance<br />
You want to limit the acceptance of<br />
banknotes<br />
8 1 x Now you can set the function<br />
9 / until setting desired<br />
You want the machine to accept<br />
banknotes: If tubes are n o t e m p t y/a<br />
Ca r d is inserted/Al w a y s<br />
10 1 x You lock the setting in memory<br />
11 1 x/2 x<br />
You return to main menu/operating<br />
mode<br />
<strong>National</strong> <strong>Rejectors</strong>, <strong>Inc</strong>. <strong>GmbH</strong>, Buxtehude<br />
55
Pe r i p h e r a l<br />
c 2 Configuration<br />
Card reader settings (only c 2 BDV/Executive)<br />
This section describes how to<br />
• set up communication between coin <strong>changer</strong> and MDB/BDV card<br />
reader<br />
• activate a second price list for card payments<br />
• limit card charging<br />
• reinitialise the card reader after a sale<br />
Setting up communication with MDB/BDV card reader<br />
Quick approach:<br />
The following card systems may be connected to the coin <strong>changer</strong>:<br />
• BDV card system<br />
• MDB card system (standard address)<br />
• MDB card system (address 0x60)<br />
To activate the communication between coin <strong>changer</strong> and card reader:<br />
= Main menu > E = Settings > Peripheral > Cashless > BDV cashless/MDB cashless<br />
(standard addr.)/MDB cashless (address 0x60)<br />
Press key ... How often? Effect<br />
1 1 x You enter the main menu<br />
2 1 x You enter the Se t t i n g menu<br />
3 until Peripheral You want to enter submenu Pe r i p h e r a l<br />
4 1 x<br />
You enter the submenu. The required<br />
menu item has already been selected<br />
5 1 x You enter submenu Ca s h l e s s<br />
6 until card reader connected<br />
You want to set up the communication<br />
with a BDV/MDB card system<br />
(standard address)/MDB card system<br />
(address 0x60)<br />
7 1 x Now you can set up communication<br />
8 /<br />
until setting desired<br />
You want the communication to be<br />
Ac t i v e/No t a c t i v e<br />
9 1 x You lock the setting in memory<br />
10 1 x/2 x<br />
You return to main menu/operating<br />
mode<br />
56 <strong>National</strong> <strong>Rejectors</strong>, <strong>Inc</strong>. <strong>GmbH</strong>, Buxtehude
c 2 Configuration<br />
Pe r i p h e r a l<br />
Activating second price list for card transactions<br />
Quick approach:<br />
You can divide the up to 100 prices into 2 x 50 prices. The first price list<br />
(prices 1–50) is valid without any card inserted (for cash sales), and the<br />
second price list (prices 51–100) is valid with a card inserted (for card<br />
payment).<br />
To activate/deactivate the second price list:<br />
= Main menu > E = Settings > Operating modes > Selling mode > Price Holding ><br />
2 price lists with cashless<br />
Press key ... How often? Effect<br />
1 1 x You enter the main menu<br />
2 1 x<br />
You enter the Se t t i n g menu. The<br />
correct menu item has already been<br />
selected<br />
3 1 x You enter submenu Op e r at i ng m o d e s<br />
4 until Selling mode<br />
You want to enter submenu Selling<br />
m o d e<br />
5 1 x You enter the submenu<br />
6 until Price Holding<br />
You want to enter submenu Pr i c e<br />
Ho l d i ng<br />
7 1 x You enter the submenu Pr i c e Ho l d i ng<br />
8<br />
until 2 price lists with<br />
cashless<br />
You want to apply another price list/the<br />
standard price list to sales with card<br />
9 1 x Now you can set the function<br />
10 /<br />
until setting desired<br />
You want the second price list to be<br />
activated/deactivated<br />
11 1 x You lock the setting in memory<br />
12 1 x/2 x<br />
You return to main menu/operating<br />
mode<br />
<strong>National</strong> <strong>Rejectors</strong>, <strong>Inc</strong>. <strong>GmbH</strong>, Buxtehude<br />
57
Pe r i p h e r a l<br />
c 2 Configuration<br />
Limiting debit card recharging (only for BDV/MDB card readers)<br />
Quick approach:<br />
In case a BDV or MDB card system is connected to the coin <strong>changer</strong>, you<br />
may define a maximum credit with which debit cards can be charged.<br />
If you do no longer want the customers to credit their debit cards, you<br />
can configure a credit of 099.00.<br />
To configure a credit limitation:<br />
= Main menu > E = Settings > Operating modes > Limitations > Credit limit for cashless<br />
Press key ... How often? Effect<br />
1 1 x You enter the main menu<br />
2 1 x<br />
You enter the Se t t i n g menu. The<br />
required menu item has already been<br />
selected<br />
3 1 x You enter submenu Op e r at i ng m o d e s<br />
4 until Limitations You want to enter submenu Limitations<br />
5 1 x You enter the submenu<br />
6<br />
until Credit limit for<br />
cashless<br />
You want to determine a credit<br />
limitation<br />
7 1 x Now you can set the function<br />
8 / until required digit You highlight the digit to be set<br />
9 / until required value This value is to be set<br />
10 Please repeat steps 8 and 9 to set the other digits of the credit limitation, if necessary<br />
11 1 x<br />
12 1 x/2 x<br />
You lock the set credit limitation in<br />
memory<br />
You return to main menu/operating<br />
mode<br />
58 <strong>National</strong> <strong>Rejectors</strong>, <strong>Inc</strong>. <strong>GmbH</strong>, Buxtehude
c 2 Configuration<br />
Pe r i p h e r a l<br />
Reinitialising card reader after each transaction<br />
Quick approach:<br />
Perhaps some of the older card systems have to be reinitialised after each<br />
transaction.<br />
To activate/deactivate the function "Reinitialise card reader after each<br />
transaction":<br />
= Main menu > E = Settings > Operating modes > Selling mode > CPC new start after vend<br />
Press key ... How often? Effect<br />
1 1 x You enter the main menu<br />
2 1 x<br />
You enter the Se t t i n g menu. The<br />
required menu item has already been<br />
selected<br />
3 1 x You enter submenu Op e r at i ng m o d e s<br />
4 until Selling mode<br />
You want to enter submenu Selling<br />
m o d e<br />
5 1 x You enter the submenu<br />
6<br />
until CPC new start after<br />
vend<br />
You want the connected card reader to<br />
be initialised/no longer initialised after<br />
each sale<br />
7 1 x Now you can set the function<br />
8 /<br />
until setting desired<br />
You want to activate/deactivate the<br />
function<br />
9 1 x You lock the setting in memory<br />
10 1 x/2 x<br />
You return to main menu/operating<br />
mode<br />
<strong>National</strong> <strong>Rejectors</strong>, <strong>Inc</strong>. <strong>GmbH</strong>, Buxtehude<br />
59
Pe r i p h e r a l<br />
c 2 Configuration<br />
Setting up communication with external audit unit<br />
(only c 2 BDV/Executive)<br />
Quick approach:<br />
If there is an external machine audit unit connected, the only thing to do is<br />
to set up communication with the coin <strong>changer</strong>.<br />
To activate the communication between coin <strong>changer</strong> and external audit<br />
unit:<br />
= Main menu > E = Settings > Peripheral > Audit unit in the machine<br />
Press key ... How often? Effect<br />
1 1 x You enter the main menu<br />
2 1 x You enter the Se t t i n g menu<br />
3 until Peripheral You want to enter submenu Pe r i p h e r a l<br />
4 1 x You enter the submenu<br />
5<br />
until Audit unit in the<br />
machine<br />
You want to set up the communication<br />
with the external audit unit<br />
6 1 x Now you can set up communication<br />
7 /<br />
until setting desired<br />
You want the communication to be<br />
Ac t i v e/No t a c t i v e<br />
8 1 x You lock the setting in memory<br />
9 1 x/2 x<br />
You return to main menu/operating<br />
mode<br />
60 <strong>National</strong> <strong>Rejectors</strong>, <strong>Inc</strong>. <strong>GmbH</strong>, Buxtehude
c 2 Configuration<br />
Au d it<br />
9<br />
Audit (option)<br />
This chapter describes all settings to be considered if the coin <strong>changer</strong> is<br />
equipped with an internal audit module. You learn how to<br />
• set the vending machine number<br />
• set date and time<br />
• specify data to be printed<br />
• set the output device (format/device type)<br />
• activate the maximum IrDA readout speed<br />
(only c 2 with IrDA interface on coin validator)<br />
The language of the audit receipts has been selected with the<br />
dialogue language (cp. section "Selecting menu language" in Chap. 3<br />
"Presettings").<br />
Setting vending machine number<br />
In order that the audits can easily and unambiguously be assigned to a<br />
certain vending machine, we recommend to store a vending machine<br />
number in the coin <strong>changer</strong>.<br />
Configuring a vending machine number reinitialises the coin<br />
<strong>changer</strong>, and all audit data since the last initialisation will be<br />
deleted. (For reading out/printing the c 2 audit data please refer<br />
to the separate service manual, if necessary).<br />
If you use a mobile data retrieval unit (MDE) to audit the coin <strong>changer</strong><br />
data, the vending machine number cannot be changed.<br />
<strong>National</strong> <strong>Rejectors</strong>, <strong>Inc</strong>. <strong>GmbH</strong>, Buxtehude<br />
61
Au d it<br />
c 2 Configuration<br />
To set the vending machine number:<br />
Quick approach:<br />
= Main menu > E = Settings > Audit module > Machine number<br />
Press key ... How often? Effect<br />
1 1 x You enter the main menu<br />
2 1 x You enter the Se t t i n g menu<br />
3 until Audit module<br />
4 1 x<br />
You want to enter submenu Au d it<br />
m o d u l e<br />
You enter the submenu. The required<br />
menu item has already been selected<br />
5 1 x Now you can set the Ma c h i n e n u m b e r<br />
6 / until required digit You highlight the digit to be changed<br />
7 / until required value This value is to be set<br />
8 Please repeat steps 6 and 7 to set the other nine digits of the machine number, if necessary<br />
9 1 x You lock the set number in memory<br />
10 1 x/2 x<br />
You return to main menu/operating<br />
mode<br />
62 <strong>National</strong> <strong>Rejectors</strong>, <strong>Inc</strong>. <strong>GmbH</strong>, Buxtehude
c 2 Configuration<br />
Au d it<br />
Setting date and time<br />
Quick approach:<br />
In order to be able to print or read out the audit data with date and time,<br />
you have to set the system time:<br />
= Main menu > E = Settings > Audit module > Set system date/time<br />
Press key ... How often? Effect<br />
1 1 x You enter the main menu<br />
2 1 x You enter the Se t t i n g menu<br />
3 until Audit module<br />
You want to enter submenu Au d it<br />
m o d u l e<br />
4 1 x You enter the submenu<br />
5 until Set system date You want to set the Sy s t e m d at e<br />
6 1 x Now you can set the date<br />
7 / until required digit You highlight the digit to be changed<br />
8 / until required value This value is to be set<br />
9 Please repeat steps 7 and 8 to set the other digits of the date, if necessary<br />
10 1 x You lock the set date in memory<br />
11 Press -key and repeat steps 5 to 10 to set the time<br />
12 1 x/2 x<br />
You return to main menu/operating<br />
mode<br />
<strong>National</strong> <strong>Rejectors</strong>, <strong>Inc</strong>. <strong>GmbH</strong>, Buxtehude<br />
63
Au d it<br />
c 2 Configuration<br />
Specifying data to be printed<br />
For the printout of audit data you can set the following:<br />
• Printing/Not printing time<br />
• Printing/Not printing product/price-specific audit data<br />
• Printing/Not printing tube and cash-box sales data<br />
The language of the audit receipts has been selected with the<br />
dialogue language (cp. section "Selecting menu language" in Chap. 3<br />
"Presettings").<br />
To specify data to be printed:<br />
Quick approach:<br />
= Main menu > E = Settings > Audit module > Configurate printer interface > Time/<br />
Product-specific data/Sales data<br />
Press key ... How often? Effect<br />
1 1 x You enter the main menu<br />
2 1 x You enter the Se t t i n g menu<br />
3 until Audit module<br />
You want to enter submenu Au d it<br />
m o d u l e<br />
4 1 x You enter the submenu<br />
5<br />
6 1 x<br />
7 1 x<br />
8 /<br />
until Configurate printer<br />
interface<br />
until setting desired<br />
You want to enter submenu<br />
Co n f ig u r at e p r i nt e r i nt e r fa c e<br />
You enter the submenu. The menu item<br />
for the first setting has already been<br />
selected<br />
Now you can set whether audit receipts<br />
are to be printed with or without date<br />
& time<br />
You want the date/time to be printed/<br />
not to be printed<br />
9 1 x You lock the setting in memory<br />
10 Press -key, then -key and repeat stepts 7 to 9 for settings "Product-specific data/<br />
Sales data"<br />
11 1 x/2 x<br />
You return to main menu/operating<br />
mode<br />
64 <strong>National</strong> <strong>Rejectors</strong>, <strong>Inc</strong>. <strong>GmbH</strong>, Buxtehude
c 2 Configuration<br />
Au d it<br />
Setting output device<br />
Please set once with which printer/data acquisition device you want to<br />
output audit receipts (with or without start button) and which format is<br />
going to be used.<br />
The language of the audit receipts has been selected with the<br />
dialogue language (cp. section "Selecting menu language"in Chap. 3<br />
"Presettings").<br />
Selecting printing format<br />
Quick approach:<br />
Two different formats can be used to print audit data:<br />
• Extra broad printout (24 characters/line):<br />
audit data can be separated in "since initialisation" and "since last<br />
printout" and printed out side by side.<br />
• Unsorted printout (12 characters/line)<br />
To select printing format:<br />
= Main menu > E = Settings > Audit module > Configurate printer interface > Printer format<br />
Press key ... How often? Effect<br />
1 1 x You enter the main menu<br />
2 1 x You enter the Se t t i n g menu<br />
3 until Audit module<br />
You want to enter submenu Au d it<br />
m o d u l e<br />
4 1 x You enter the submenu<br />
5<br />
until Configurate printer<br />
interface<br />
You want to enter submenu<br />
Co n f ig u r at e p r i nt e r i nt e r fa c e<br />
6 1 x You enter the submenu<br />
7 until Printer format You want to set the Pr i nt e r f o r m at<br />
8 1 x Now you can set the format.<br />
9 / until setting desired<br />
You want the audit receipts to have a<br />
broad format (24 characters/line) or<br />
normal format<br />
10 1 x You lock the selected format in memory<br />
11 1 x/2 x<br />
You return to main menu/operating<br />
mode<br />
<strong>National</strong> <strong>Rejectors</strong>, <strong>Inc</strong>. <strong>GmbH</strong>, Buxtehude<br />
65
Audit<br />
c 2 Configuration<br />
Selecting type of output device<br />
The coin <strong>changer</strong> must know whether the printer or mobile data acquisition<br />
device (MDE) has a start button or not, so that the output line of printers/<br />
readout devices without start button (they start to output data as soon as<br />
they are connected) will be monitored and the data output be stopped after<br />
all data has been transmitted.<br />
Set the NRI printer G-55.0510 to "(start button) not exists" and the<br />
NRI USB Audit Stick to "(start button) exists".<br />
To select the type of output device:<br />
Quick approach:<br />
= Main menu > E = Settings > Audit module > Configurate printer interface > Start<br />
button on printer<br />
Press key ... How often? Effect<br />
1 1 x You enter the main menu<br />
2 1 x You enter the Setting menu<br />
3 until Audit module<br />
You want to enter submenu Audit<br />
module<br />
4 1 x You enter the submenu<br />
5<br />
until Configurate printer<br />
interface<br />
You want to enter submenu<br />
Configurate printer interface<br />
6 1 x You enter the submenu<br />
7<br />
until Start button on<br />
printer<br />
You want to set the output device type<br />
8 1 x Now you can select the device type<br />
9 /<br />
until setting desired<br />
10 1 x<br />
11 1 x/2 x<br />
You want to output audit data using a<br />
device with/without start button<br />
You lock the selected type of output<br />
device in memory<br />
You return to main menu/operating<br />
mode<br />
66 <strong>National</strong> <strong>Rejectors</strong>, <strong>Inc</strong>. <strong>GmbH</strong>, Buxtehude
c 2 Configuration<br />
Au d it<br />
Activating maximum IrDA readout speed<br />
(only c 2 with IrDA interface on coin validator)<br />
Quick approach:<br />
speed<br />
If the <strong>changer</strong>’s coin validator is equipped with an IrDA interface and this<br />
interface is used to readout audit data, you can set a maximum readout<br />
speed of 19,200 Bd in the coin <strong>changer</strong>.<br />
To select the maximum IrDA readout speed:<br />
= Main menu > E = Settings > Audit module > Configurate printer interface > IrDA high<br />
Press key ... How often? Effect<br />
1 1 x You enter the main menu<br />
2 1 x You enter the Se t t i n g menu<br />
3 until Audit module<br />
You want to enter submenu Au d it<br />
m o d u l e<br />
4 1 x You enter the submenu<br />
5<br />
until Configurate printer<br />
interface<br />
You want to enter submenu<br />
Co n f ig u r at e p r i nt e r i nt e r fa c e<br />
6 1 x You enter the submenu<br />
7 until IrDA high speed<br />
You want to activate/deactivate the<br />
highest readout speed<br />
8 1 x Now you can set the function<br />
9 /<br />
until setting desired<br />
10 1 x<br />
11 1 x/2 x<br />
You want to read out audit data with<br />
19,200 Bd/at a slower rate<br />
You lock the selected readout speed in<br />
memory<br />
You return to main menu/operating<br />
mode<br />
<strong>National</strong> <strong>Rejectors</strong>, <strong>Inc</strong>. <strong>GmbH</strong>, Buxtehude<br />
67
Ba s i c s e t t i n g s<br />
c 2 Configuration<br />
10<br />
Basic settings<br />
This chapter describes how to perform basic <strong>changer</strong> settings, that seldom<br />
need to be changed (e.g. for a new installation site):<br />
• Smallest coin value as a basis of calculation for coin values/prices<br />
• Alternative coin value for second currency or as token value<br />
• Currency or calling code<br />
• MDB level<br />
• Mains or battery operation<br />
• Wake-up time<br />
• Write protection for coin <strong>changer</strong> configuration<br />
Changing smallest coin value (base value)<br />
For the coin <strong>changer</strong>, the smallest coin value is the reference value for<br />
the data management of all programmed coin and token values as well as<br />
prices. The values of all accepted coin types/tokens and all prices must be<br />
integral multiples of the smallest coin value.<br />
Whenever the smallest coin value is changed in such a way that<br />
it is no longer an integral and common divisor, the coin/token<br />
values and prices must be changed and adapted accordingly!<br />
68 <strong>National</strong> <strong>Rejectors</strong>, <strong>Inc</strong>. <strong>GmbH</strong>, Buxtehude
c 2 Configuration<br />
Ba s i c s e t t i n g s<br />
To change the smallest coin value:<br />
Quick approach:<br />
= Main menu > E = Settings > Other settings > Base coin value<br />
Press key ... How often? Effect<br />
1 1 x You enter the main menu<br />
2 1 x You enter the Se t t i n g menu<br />
3 until Other settings<br />
4 1 x<br />
5 1 x<br />
You want to enter submenu Ot h e r<br />
s e t t i n g s<br />
You enter the submenu. The required<br />
menu point is already selected<br />
You want to change the smallest coin<br />
value (Ba s e c o i n va l u e )<br />
6 / until required digit You highlight the digit to be changed<br />
7 / until required value This value is to be set<br />
8<br />
Please repeat steps 6 and 7 to set the other three digits of the smallest coin value, if<br />
necessary<br />
9 1 x You lock the set value in memory<br />
10 1 x/2 x<br />
You return to main menu/operating<br />
mode<br />
<strong>National</strong> <strong>Rejectors</strong>, <strong>Inc</strong>. <strong>GmbH</strong>, Buxtehude<br />
69
Ba s i c s e t t i n g s<br />
c 2 Configuration<br />
Configuring alternative coin value for second currency or as<br />
token value<br />
Quick approach:<br />
With the alternative coin value you may specify on the one hand the coin<br />
value of a second currency and on the other hand the value for a token.<br />
Configuring an alternative coin value invalidates the real coin value.<br />
The alternative coin value is only used as token value if the vending<br />
machine cannot identify the token ID coming from the coin <strong>changer</strong>.<br />
The alternative coin value does not report a token but a coin.<br />
Conventional token values are configured using the setting menu (cp.<br />
separate service manual).<br />
First of all the HENRI setting module must be connected to the coin <strong>changer</strong><br />
(see section "Connecting HENRI" in Chap. 2 "General information").<br />
To set an alternative coin value:<br />
= HENRI main menu > = Extended functions > = Channels<br />
Press key ... How often? Effect<br />
1 1 x You enter the HENRI main menu<br />
2 1 x You enter submenu Ex t e n d e d f u n c t i o n s<br />
3 1 x<br />
You want to set an alternative coin<br />
value<br />
4<br />
/<br />
/<br />
5 2 x<br />
until required coin/coin<br />
channel<br />
You highlight the coin an alternative<br />
value is to be set for<br />
Now you can set/change the<br />
Alt e r n at i v e va l u e<br />
6 / until required digit You highlight the digit to be changed<br />
7 / until required value This value is to be set<br />
8 Please repeat steps 6 and 7 to set the other digits of the alternative value, if necessary.<br />
9 1 x<br />
10 2 x<br />
11 1 x<br />
You lock the set alternative value in the<br />
HENRI memory<br />
You want to store the set alternative<br />
value in the coin <strong>changer</strong>?<br />
You lock the set alternative value in the<br />
coin <strong>changer</strong> memory<br />
12 1 x You enter the HENRI main menu again<br />
13 1 x/2 x<br />
You return to the c 2 operating mode/c 2<br />
main menu<br />
70 <strong>National</strong> <strong>Rejectors</strong>, <strong>Inc</strong>. <strong>GmbH</strong>, Buxtehude
c 2 Configuration<br />
Ba s i c s e t t i n g s<br />
Changing currency/calling code (only c 2 MDB)<br />
The numeric currency code (ISO 4217) which can be sent, e.g., for the<br />
VMC dialogue language is set to the main currency on delivery.<br />
Please use the last three digits of the 4-digit input field to set the 3-digit<br />
currency code. The first digit is not part of the currency code and must be<br />
set to "1".<br />
Example: euro currency code = 978 > input = 1978<br />
For more information on the currency code please refer to the MDB<br />
specification "NAMA document MDB/ICP 2.0" (www.vending.org).<br />
Quick approach:<br />
Some vending machines ask for the international country calling code and<br />
not for the currency code (ITU E.164, e.g. 0033 for France) (cp. vending<br />
machine manual).<br />
To change the currency/calling code:<br />
= Main menu > E = Settings > Other settings > Currency code<br />
Press key ... How often? Effect<br />
1 1 x You enter the main menu<br />
2 1 x You enter the Se t t i n g menu<br />
3 until Other settings<br />
You want to enter submenu Ot h e r<br />
s e t t i n g s<br />
4 1 x You enter the submenu<br />
5 until Currency code You want to change the Cu r r e n c y c o d e<br />
6 1 x Now you can change the code<br />
7 / until required digit You highlight the digit to be changed<br />
8 / until required value This value is to be set<br />
9 Please repeat steps 7 and 8 to set the other digits of the currency code, if necessary<br />
10 1 x You lock the set code in memory<br />
11 1 x/2 x<br />
You return to main menu/operating<br />
mode<br />
<strong>National</strong> <strong>Rejectors</strong>, <strong>Inc</strong>. <strong>GmbH</strong>, Buxtehude<br />
71
Ba s i c s e t t i n g s<br />
c 2 Configuration<br />
Changing MDB level (only c 2 MDB)<br />
Quick approach:<br />
In cases the coin <strong>changer</strong> is supposed to communicate as MDB level 2<br />
instead of MDB level 3 <strong>changer</strong>:<br />
= Main menu > E = Settings > Other settings > MDB level<br />
Press key ... How often? Effect<br />
1 1 x You enter the main menu<br />
2 1 x You enter the Se t t i n g menu<br />
3 until Other settings<br />
You want to enter submenu Ot h e r<br />
s e t t i n g s<br />
4 1 x You enter the submenu<br />
5 until MDB level You want to change the MDB l e v e l<br />
6 1 x Now you can change the level<br />
7 / until required level This level is to be set<br />
8 1 x<br />
9 1 x/2 x<br />
You lock the selected MDB level in<br />
memory<br />
You return to main menu/operating<br />
mode<br />
72 <strong>National</strong> <strong>Rejectors</strong>, <strong>Inc</strong>. <strong>GmbH</strong>, Buxtehude
c 2 Configuration<br />
Ba s i c s e t t i n g s<br />
Selecting mains operation or battery operation (only c 2 MDB)<br />
Depending on the installation site, MDB coin <strong>changer</strong>s equipped with a<br />
battery and a wake-up line, can always be switched to mains or battery<br />
operation. For this the <strong>changer</strong> has two DIL switches accessible when<br />
removing the coin cassette:<br />
A B C<br />
Fig. 4: Removing and reinstalling coin cassette<br />
1 Remove coin cassette:<br />
–– Pull latch (Fig. 4, A).<br />
–– Pull cassette straight out<br />
of the housing guides to<br />
the front (Fig. 4, B).<br />
2 For standard mains<br />
operation, use a pointed<br />
object to push the two DIL<br />
switches upward to Sta n-<br />
d a r d, for battery operation,<br />
downward to Bat t e ry (see<br />
Fig. 5 and markings on the<br />
coin <strong>changer</strong> housing).<br />
Standard<br />
Battery<br />
Fig. 5: Switches for mains/battery operation<br />
<strong>National</strong> <strong>Rejectors</strong>, <strong>Inc</strong>. <strong>GmbH</strong>, Buxtehude<br />
73
Ba s i c s e t t i n g s<br />
c 2 Configuration<br />
3 Reinsert coin cassette:<br />
–– Insert cassette in upper and lower housing guides (Fig. 4, B).<br />
–– Push cassette into the housing.<br />
–– Press cassette down and let it engage in the upper and lower<br />
housing guides (audible click) (Fig. 4, C).<br />
4 Switch the power off and then on again.<br />
The desired operating mode is activated.<br />
Configuring wake-up time (only c 2 MDB)<br />
Quick approach:<br />
For MDB coin <strong>changer</strong>s running in battery mode and with external wakeup<br />
line, a time can be set specifying how long the <strong>changer</strong> will continue to<br />
remain switched on since the last time the vending machine addressed the<br />
<strong>changer</strong> (wake-up time). After the wake-up time has elapsed, the <strong>changer</strong><br />
switches off automatically.<br />
The wake-up time is set in seconds. Settings under 1 and over 20 will be<br />
ignored. In this case, the coin <strong>changer</strong> will consider the default setting of<br />
4 seconds.<br />
To configure the wake-up time:<br />
= Main menu > E = Settings > Other settings > Wake-up time<br />
Press key ... How often? Effect<br />
1 1 x You enter the main menu<br />
2 1 x You enter the Se t t i n g menu<br />
3 until Other settings<br />
You want to enter submenu Ot h e r<br />
s e t t i n g s<br />
4 1 x You enter the submenu<br />
5 until Wake-up time You want to change the Wa k e-u p t i m e<br />
6 1 x Now you can change the time<br />
7 / until required digit You highlight the digit to be changed<br />
8 / until required value This value is to be set<br />
9 Please repeat steps 7 and 8 to set the other digit of the wake-up time, if necessary<br />
10 1 x You lock the set time in memory<br />
11 1 x/2 x<br />
You return to main menu/operating<br />
mode<br />
74 <strong>National</strong> <strong>Rejectors</strong>, <strong>Inc</strong>. <strong>GmbH</strong>, Buxtehude
c 2 Configuration<br />
Ba s i c s e t t i n g s<br />
Providing coin <strong>changer</strong> configuration with write protection<br />
for BDV machines (only c 2 BDV)<br />
Quick approach:<br />
You may provide the configuration data of the coin <strong>changer</strong> with a write<br />
protection in order that it cannot be overwritten by the BDV vending machine<br />
control.<br />
To activate/deactivate the write protection:<br />
= Main menu > E = Settings > Operating modes > Write protection for BDV VMC<br />
Press key ... How often? Effect<br />
1 1 x You enter the main menu<br />
2 1 x<br />
You enter the Se t t i n g menu. The<br />
required menu item has already been<br />
selected<br />
3 1 x You enter submenu Op e r at i ng m o d e s<br />
4<br />
until Write protection<br />
for BDV VMC<br />
You want the write protection to be<br />
Ac t i v e/No t a c t i v e<br />
5 1 x Now you can set the function<br />
6 /<br />
until setting desired<br />
The c 2 configuration is not to be<br />
overwritten/may be overwritten<br />
7 1 x You lock the setting in memory<br />
8 1 x/2 x<br />
You return to main menu/operating<br />
mode<br />
<strong>National</strong> <strong>Rejectors</strong>, <strong>Inc</strong>. <strong>GmbH</strong>, Buxtehude<br />
75
Bat c h c o n f ig u r at i o n<br />
c 2 Configuration<br />
11<br />
Batch configuration<br />
If the same settings are to be made for several coin <strong>changer</strong>s of the same<br />
series, it is sufficient to<br />
1.<br />
2.<br />
configure one <strong>changer</strong> as required,<br />
save this state of settings in the HENRI setting module and then<br />
3. transmit the state of settings from HENRI into the remaining <strong>changer</strong>s<br />
to be configured.<br />
Only the data that applies to the coin <strong>changer</strong> will be stored and transmitted<br />
but not the data saved in the coin validator or peripheral equipment. The<br />
following settings remain unaffected and may need to be adapted in<br />
addition:<br />
• <strong>Coin</strong> and currency data<br />
• Acceptance bands and coin values<br />
Please note that, whenever you are copying coin <strong>changer</strong> data<br />
from older devices with a smaller range of functions and load<br />
this data into a new device, the new functions may need to be<br />
adapted, if necessary. In the opposite case, an older device will<br />
also not be provided with the additional functions of the new<br />
device.<br />
Configuring coin <strong>changer</strong> master<br />
If you haven’t done so already, first of all you have to configure a coin<br />
<strong>changer</strong> so that its configuration can be used as clone for the other coin<br />
<strong>changer</strong>s to be configured (see Chap. 3 "Presettings" to Chap. 10 "Basic<br />
settings").<br />
76 <strong>National</strong> <strong>Rejectors</strong>, <strong>Inc</strong>. <strong>GmbH</strong>, Buxtehude
c 2 Configuration<br />
Bat c h c o n f ig u r at i o n<br />
Storing desired configuration in HENRI<br />
Quick approach:<br />
First of all connect the HENRI setting module to the coin <strong>changer</strong> with the<br />
configuration to be cloned (see section "Connecting HENRI" in Chap. 2<br />
"General information").<br />
= HENRI main menu > = Extended functions > = Clone > = c 2 ->HENRI<br />
Press key ... How often? Effect<br />
1 1 x You enter the HENRI main menu<br />
2 1 x You enter submenu Ex t e n d e d f u n c t i o n s<br />
3 1 x<br />
4 1 x<br />
You want the configuration of the coin<br />
<strong>changer</strong> connected to be saved for<br />
batch configuration in HENRI<br />
Data is being transferred to HENRI.<br />
Following the 100% display message:<br />
5 1 x You enter submenu Cl o n e again<br />
Transferring desired configuration to coin <strong>changer</strong>s<br />
Quick approach:<br />
First of all connect the HENRI setting module to the coin <strong>changer</strong> to be<br />
configured with the clone (see section "Connecting HENRI" in Chap. 2<br />
"General information").<br />
= HENRI main menu > = Extended functions > = Clone > = HENRI->c 2<br />
Press key ... How often? Effect<br />
1 1 x You enter the HENRI main menu<br />
2 1 x You enter submenu Ex t e n d e d f u n c t i o n s<br />
3 1 x<br />
4 1 x<br />
5 1 x<br />
You want the c 2 configuration stored<br />
in HENRI to be transferred to the coin<br />
<strong>changer</strong> connected<br />
The stored configuration file(s) is/are<br />
displayed<br />
Data is being transferred to the coin<br />
<strong>changer</strong>. Following the 100% display<br />
message:<br />
6 1 x You enter submenu Cl o n e again<br />
7 2 x You enter the HENR main menu again<br />
8 1 x/2 x<br />
You return to the c 2 operating mode/c 2<br />
main menu<br />
Please repeat cloning for all coin <strong>changer</strong>s to be configured.<br />
<strong>National</strong> <strong>Rejectors</strong>, <strong>Inc</strong>. <strong>GmbH</strong>, Buxtehude<br />
77
Bat c h c o n f ig u r at i o n<br />
c 2 Configuration<br />
Adapting individual settings<br />
Finally we recommend random checks of the data cloned and that individual<br />
settings of the <strong>changer</strong>s or the coin and currency data is adapted, if<br />
necessary.<br />
78 <strong>National</strong> <strong>Rejectors</strong>, <strong>Inc</strong>. <strong>GmbH</strong>, Buxtehude
c 2 Configuration<br />
In d e x<br />
12<br />
Index<br />
2 price lists with cashless 57<br />
12/24 character printout, audit module 65<br />
A<br />
Acceptance<br />
Band, select 35<br />
Limit. See Acceptance limitation<br />
Limitation 31<br />
Tube coins 32<br />
Tolerances, select 35<br />
Active level, hopper payout/empty signal 49<br />
Alternative coin value 70<br />
Attention 7<br />
Audit 61<br />
Module, internal 61<br />
Date/time 63<br />
Max. IrDA readout speed 67<br />
Output device 65<br />
With/without start button 66<br />
Printing format 65<br />
Vending machine number 61<br />
Which data is to be printed? 64<br />
Unit<br />
In the machine 60<br />
Set up communication 60<br />
Automatic tube counter<br />
Correction 18<br />
Programming 17<br />
B<br />
Banknote<br />
Acceptance<br />
Inhibit<br />
When there is not enough change 52, 55<br />
With card payment 55<br />
Limit 31<br />
Recycler. See Recycler<br />
Banknotes, payout all 53<br />
Base value. See Smallest coin value<br />
Basic settings 68<br />
Batch configuration 76<br />
Battery operation<br />
Save current 45<br />
Select 73<br />
Wake-up time 74<br />
BDV card system 56<br />
Bill<br />
Acceptance. See Banknote acceptance<br />
Recycler. See Recycler<br />
Validator 54<br />
Inhibit banknote acceptance 55<br />
Set up communication 54<br />
blue (c2) 9<br />
c2 9<br />
Brightness (display) 12<br />
C<br />
c2<br />
Machine interfaces 9<br />
User interfaces 9<br />
Calling code 71<br />
Card charging, limit 58<br />
Card reader 56<br />
2 price lists with cashless 57<br />
Initialise after sales 59<br />
Limit card recharging 58<br />
Set up communication 56<br />
Cashbox 13<br />
Cash-box coins, inhibit (in filling mode) 20<br />
Caution 7<br />
Change 13<br />
Limit 42. See Change limitation<br />
Limitation 42<br />
Payout, when? 27, 28<br />
Reset 29<br />
Store 29<br />
Tubes<br />
Float level 15, 17<br />
New 40<br />
Replenishment, display 21<br />
Security stock 38<br />
<strong>National</strong> <strong>Rejectors</strong>, <strong>Inc</strong>. <strong>GmbH</strong>, Buxtehude<br />
79
In d e x<br />
c 2 Configuration<br />
Chapter summary 7<br />
Charging cards, limit 58<br />
Clone coin <strong>changer</strong> configuration 76<br />
Code (tube empty message) 43<br />
Coding scheme (tube empty message) 43<br />
<strong>Coin</strong><br />
Acceptance<br />
Inhibit 33<br />
If „tube empty“ 34<br />
Limit 31<br />
Cassette<br />
Float level 15, 17<br />
New 40<br />
Remove/reinstall 73<br />
Replenishment, display 21<br />
Security stock 38<br />
/Empty signal, hopper 49<br />
Group A/B, select 36<br />
Stack, problems 38<br />
Validator, remove/reinstall 36<br />
Value<br />
Alternative 70<br />
In hopper 47<br />
<strong>Coin</strong>s<br />
Hopper 47<br />
Inhibit 33<br />
If „tube empty“ 34<br />
Comment 7<br />
Committed to vend 27<br />
Communication<br />
With bill validator, set up 54<br />
With card system, set up 56<br />
With external audit unit, set up 60<br />
With hopper, set up 48<br />
With recycler, set up 50<br />
Conditions for Tube empty 43<br />
Configuration<br />
Clone 76<br />
Save 75<br />
Configure inventory keys 22<br />
Connection 10<br />
Contrast (display) 12<br />
Conventions, manual 7<br />
Correction, automatic (tube counters) 18<br />
CPC new start after vend 59<br />
Credit<br />
Limit. See Credit limitation<br />
Limitation 58<br />
Currency<br />
Code 71<br />
Select 36<br />
currenza c2<br />
blue/green/orange/white 9<br />
Machine interfaces 9<br />
User interfaces 9<br />
D<br />
Data acquisition device, audit module 65<br />
Date/time, data acquisition device 63<br />
Debit card reader. See Card reader<br />
Dialogue language 11<br />
Machine control system 71<br />
DIL switches<br />
Select battery/mains operation 73<br />
Select coin group 36<br />
Disassembly/assembly<br />
<strong>Coin</strong> cassette 73<br />
<strong>Coin</strong> validator 36<br />
Display<br />
Contrast 12<br />
Message (operating mode) 13<br />
Price 26<br />
Texts 7<br />
Disposal 7<br />
Documentations, additional 8<br />
E<br />
Empty<br />
/Payout signal, hopper 49<br />
Recycler store 53<br />
Sensor 43<br />
Environmental protection 7<br />
External<br />
Audit unit 60<br />
Devices 46<br />
80<br />
<strong>National</strong> <strong>Rejectors</strong>, <strong>Inc</strong>. <strong>GmbH</strong>, Buxtehude
c 2 Configuration<br />
In d e x<br />
F<br />
Filling<br />
Display 21<br />
Level<br />
Limitation 32<br />
Sensors 18<br />
Lowest (empty sensor) 43<br />
Transmit to machine 21<br />
Fill report 21<br />
Float<br />
Level 15, 17<br />
-up function 15, 16<br />
Format for printout, audit module 65<br />
Fraud coin rejection, optimise 35<br />
G<br />
General information<br />
Configuration 9<br />
HENRI setting module 9<br />
Manual 7, 9<br />
Settings for tube filling 14<br />
Genuine coin acceptance, optimise 35<br />
green (c2) 9<br />
Guide (chapter) 7<br />
H<br />
Hazard 7<br />
HENRI<br />
Connect 10<br />
General information 9<br />
Hopper 46<br />
Active level, payout/empty signal 49<br />
<strong>Coin</strong> values 47<br />
Set up communication 48<br />
I<br />
Indicate of price of product 26<br />
Inhibit<br />
Banknote acceptance 55<br />
Cash-box coins (in filling mode) 20<br />
<strong>Coin</strong> acceptance 33<br />
If „tube emtpy“ 34<br />
High-value banknotes 52<br />
Keys 22<br />
Initialise card reader 59<br />
Instructions, additional<br />
Additional 8<br />
Interfaces, c2 9<br />
Introduction<br />
Configuration 9<br />
HENRI setting module 9<br />
Manual 7, 9<br />
Settings for tube filling 14<br />
Inventory 13<br />
Keys, disable 22<br />
IrDA high speed 67<br />
K<br />
Keyboard, disable 22<br />
Keys in the text 7<br />
L<br />
Language 11<br />
Vending machine control system 71<br />
Level, MDB 72<br />
<strong>National</strong> <strong>Rejectors</strong>, <strong>Inc</strong>. <strong>GmbH</strong>, Buxtehude<br />
81
In d e x<br />
c 2 Configuration<br />
M<br />
Machine<br />
Interfaces, c2 9<br />
Number 61<br />
Mains operation, select 73<br />
Manage prices (price holding) 25<br />
Manual<br />
Additional 8<br />
Conventions 7<br />
Markings in the text 7<br />
MDB<br />
Card system 56<br />
Level 72<br />
Menu<br />
Items in the text 7<br />
Language 11<br />
Texts 7<br />
Message, display in operating mode 13<br />
Minimum number, tube coins 38<br />
Money <strong>changer</strong> 27<br />
Motor, only one active 45<br />
Multiplier, cv. See Smallest coin value<br />
Multi vend 28<br />
N<br />
New payout combination 40<br />
Note<br />
Acceptance. See Banknote acceptance<br />
Recycler. See Recycler<br />
Validator. See Bill validator<br />
Notes 7<br />
O<br />
Only tube coin in filling mode 20<br />
orange (c2) 9<br />
Output device, audit unit 65, 66<br />
P<br />
Payout<br />
Combination 40<br />
/Empty signal, hopper 49<br />
Single-motor operation 45<br />
Peripheral devices 46<br />
Pictograms in the text 7<br />
Presettings 11<br />
Price holding 25<br />
Prices<br />
Display 26<br />
Extra for card payment 57<br />
Manage 23, 25<br />
Set 24<br />
Printer, audit module 65<br />
Printing<br />
Data, audit module 64<br />
Format, audit module 65<br />
Program tube counters autom.<br />
17<br />
R<br />
Readout speed, audit data 67<br />
Recycler 50<br />
Inhibit high-value banknotes 52<br />
Pay out all banknotes 53<br />
Set up communication 50<br />
Remaining credit<br />
Limit 42<br />
Reset 29<br />
Store 29<br />
Replenishment<br />
Display 21<br />
Transmit to machine 21<br />
Residual credit 29<br />
RJ-45 plug 10<br />
82<br />
<strong>National</strong> <strong>Rejectors</strong>, <strong>Inc</strong>. <strong>GmbH</strong>, Buxtehude
c 2 Configuration<br />
In d e x<br />
S<br />
Safety instructions 7<br />
Save configuration 75<br />
Second currency 70<br />
Security<br />
Level 35<br />
Stock 38<br />
Of machine, compensate (recycler) 53<br />
Payout (DISPENSE) 39<br />
Per tube 38<br />
To VMC 39<br />
Transmit with tube filling level 39<br />
Select tube cassette 40<br />
Selling price<br />
Display 26<br />
Extra for card payment 57<br />
Manage 23, 25<br />
Set 24<br />
Sensors, tubes 18<br />
Setting module<br />
Connect 10<br />
General information 9<br />
Settings<br />
Clone 76<br />
For printer 64<br />
Short reference guide, additional 8<br />
Simple payout 45<br />
Single<br />
-Motor payout 45<br />
Vend 28<br />
Smallest coin value 68<br />
Sorting, new 40<br />
Speed, audit data readout 67<br />
Standard operation, select 73<br />
Start button<br />
Output device 66<br />
Printer 66<br />
Summary<br />
Chapter 7<br />
Manual 7<br />
Switches<br />
Select<br />
Battery/mains operation 73<br />
<strong>Coin</strong> group 36<br />
Symbols in the text 7<br />
System time, audit module 63<br />
T<br />
Text conventions 7<br />
Time/date, audit module 63<br />
Token value 70<br />
Tube<br />
<strong>Coin</strong>s<br />
Maximum number 32<br />
Min. number (security stock) 38<br />
New 40<br />
Combination<br />
For tube empty 43<br />
New 40<br />
Counter correction, automatic 18<br />
Counters<br />
Automatic programming 17<br />
Correct. to zero 19<br />
Empty message, when? 43<br />
U<br />
User interfaces, c2 9<br />
W<br />
Wake-up time, battery operation 74<br />
white (c2) 9<br />
Write protection for BDV VMC 75<br />
<strong>National</strong> <strong>Rejectors</strong>, <strong>Inc</strong>. <strong>GmbH</strong>, Buxtehude<br />
83