
You also want an ePaper? Increase the reach of your titles
YUMPU automatically turns print PDFs into web optimized ePapers that Google loves.
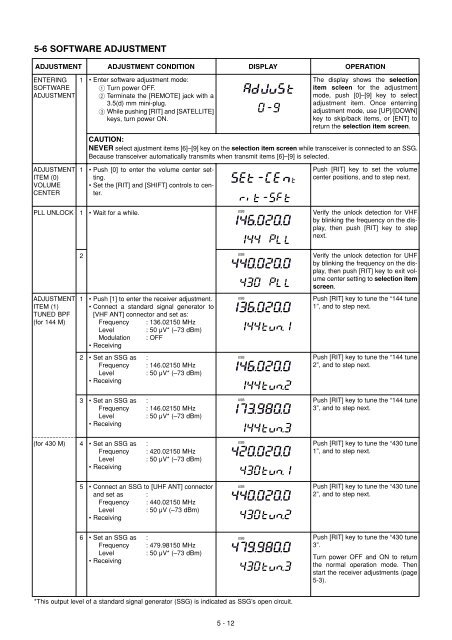
5-6 SOFTWARE ADJUSTMENT<br />
ADJUSTMENT ADJUSTMENT CONDITION DISPLAY OPERATION<br />
ENTERING<br />
SOFTWARE<br />
ADJUSTMENT<br />
1<br />
• Enter software adjustment mode:<br />
1 Turn power OFF.<br />
2 Terminate the [REMOTE] jack with a<br />
3.5(d) mm mini-plug.<br />
3 While pushing [RIT] and [SATELLITE]<br />
keys, turn power ON.<br />
The display shows the selection<br />
item scleen for the adjustment<br />
mode, push [0]–[9] key to select<br />
adjustment item. Once enterring<br />
adjustment mode, use [UP]/[DOWN]<br />
key to skip/back items, or [ENT] to<br />
return the selection item screen.<br />
CAUTION:<br />
NEVER select ajustment items [6]–[9] key on the selection item screen while transceiver is connected to an SSG.<br />
Because transceiver automatically transmits when transmit items [6]–[9] is selected.<br />
ADJUSTMENT<br />
ITEM (0)<br />
VOLUME<br />
CENTER<br />
1<br />
• Push [0] to enter the volume center setting.<br />
• Set the [RIT] and [SHIFT] controls to center.<br />
Push [RIT] key to set the volume<br />
center positions, and to step next.<br />
PLL UNLOCK<br />
1<br />
• Wait for a while.<br />
USB<br />
Verify the unlock detection for VHF<br />
by blinking the frequency on the display,<br />
then push [RIT] key to step<br />
next.<br />
2<br />
USB<br />
Verify the unlock detection for UHF<br />
by blinking the frequency on the display,<br />
then push [RIT] key to exit volume<br />
center setting to selection item<br />
screen.<br />
ADJUSTMENT<br />
ITEM (1)<br />
TUNED BPF<br />
(for 144 M)<br />
1<br />
• Push [1] to enter the receiver adjustment.<br />
• Connect a standard signal generator to<br />
[VHF ANT] connector and set as:<br />
Frequency : 136.02150 MHz<br />
Level : 50 µV* (–73 dBm)<br />
Modulation : OFF<br />
• Receiving<br />
USB<br />
Push [RIT] key to tune the “144 tune<br />
1”, and to step next.<br />
2<br />
• Set an SSG as :<br />
Frequency : 146.02150 MHz<br />
Level : 50 µV* (–73 dBm)<br />
• Receiving<br />
USB<br />
Push [RIT] key to tune the “144 tune<br />
2”, and to step next.<br />
3<br />
• Set an SSG as :<br />
Frequency : 146.02150 MHz<br />
Level : 50 µV* (–73 dBm)<br />
• Receiving<br />
USB<br />
Push [RIT] key to tune the “144 tune<br />
3”, and to step next.<br />
(for 430 M)<br />
4<br />
• Set an SSG as :<br />
Frequency : 420.02150 MHz<br />
Level : 50 µV* (–73 dBm)<br />
• Receiving<br />
USB<br />
Push [RIT] key to tune the “430 tune<br />
1”, and to step next.<br />
5<br />
• Connect an SSG to [UHF ANT] connector<br />
and set as :<br />
Frequency : 440.02150 MHz<br />
Level : 50 µV (–73 dBm)<br />
• Receiving<br />
USB<br />
Push [RIT] key to tune the “430 tune<br />
2”, and to step next.<br />
6<br />
• Set an SSG as :<br />
Frequency : 479.98150 MHz<br />
Level : 50 µV* (–73 dBm)<br />
• Receiving<br />
USB<br />
Push [RIT] key to tune the “430 tune<br />
3”.<br />
Turn power OFF and ON to return<br />
the normal operation mode. Then<br />
start the receiver adjustments (page<br />
5-3).<br />
*This output level of a standard signal generator (SSG) is indicated as SSG’s open circuit.<br />
5 - 12