LG Room Air Conditioner - Hawco
LG Room Air Conditioner - Hawco
LG Room Air Conditioner - Hawco

Create successful ePaper yourself
Turn your PDF publications into a flip-book with our unique Google optimized e-Paper software.
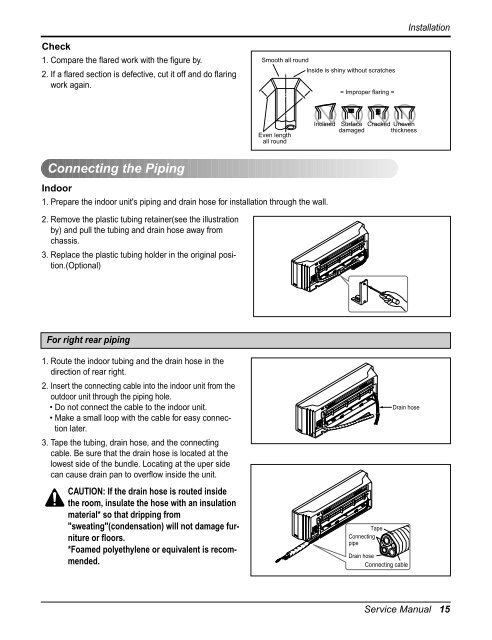
Check<br />
1. Compare the flared work with the figure by.<br />
2. If a flared section is defective, cut it off and do flaring<br />
work again.<br />
Connecting the Piping<br />
Indoor<br />
1. Prepare the indoor unit's piping and drain hose for installation through the wall.<br />
2. Remove the plastic tubing retainer(see the illustration<br />
by) and pull the tubing and drain hose away from<br />
chassis.<br />
3. Replace the plastic tubing holder in the original position.(Optional)<br />
For right rear piping<br />
1. Route the indoor tubing and the drain hose in the<br />
direction of rear right.<br />
2. Insert the connecting cable into the indoor unit from the<br />
outdoor unit through the piping hole.<br />
• Do not connect the cable to the indoor unit.<br />
• Make a small loop with the cable for easy connection<br />
later.<br />
3. Tape the tubing, drain hose, and the connecting<br />
cable. Be sure that the drain hose is located at the<br />
lowest side of the bundle. Locating at the uper side<br />
can cause drain pan to overflow inside the unit.<br />
CAUTION: If the drain hose is routed inside<br />
the room, insulate the hose with an insulation<br />
material* so that dripping from<br />
"sweating"(condensation) will not damage furniture<br />
or floors.<br />
*Foamed polyethylene or equivalent is recommended.<br />
Smooth all round<br />
Even length<br />
all round<br />
Inside is shiny without scratches<br />
Inclined<br />
= Improper flaring =<br />
Surface Cracked Uneven<br />
damaged thickness<br />
Tape<br />
Connecting<br />
pipe<br />
Drain hose<br />
Drain hose<br />
Connecting cable<br />
Installation<br />
Service Manual 15