LG Room Air Conditioner - Hawco
LG Room Air Conditioner - Hawco
LG Room Air Conditioner - Hawco

Create successful ePaper yourself
Turn your PDF publications into a flip-book with our unique Google optimized e-Paper software.
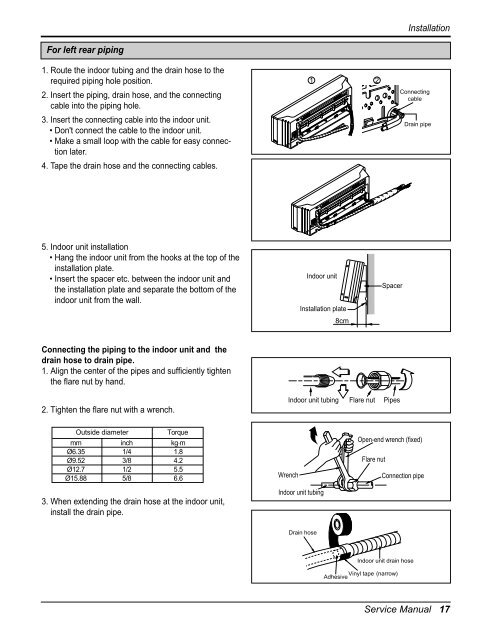
For left rear piping<br />
1. Route the indoor tubing and the drain hose to the<br />
required piping hole position.<br />
2. Insert the piping, drain hose, and the connecting<br />
cable into the piping hole.<br />
3. Insert the connecting cable into the indoor unit.<br />
• Don't connect the cable to the indoor unit.<br />
• Make a small loop with the cable for easy connection<br />
later.<br />
4. Tape the drain hose and the connecting cables.<br />
5. Indoor unit installation<br />
• Hang the indoor unit from the hooks at the top of the<br />
installation plate.<br />
• Insert the spacer etc. between the indoor unit and<br />
the installation plate and separate the bottom of the<br />
indoor unit from the wall.<br />
Connecting the piping to the indoor unit and the<br />
drain hose to drain pipe.<br />
1. Align the center of the pipes and sufficiently tighten<br />
the flare nut by hand.<br />
2. Tighten the flare nut with a wrench.<br />
Outside diameter Torque<br />
mm inch kg.m<br />
Ø6.35 1/4 1.8<br />
Ø9.52 3/8 4.2<br />
Ø12.7 1/2 5.5<br />
Ø15.88 5/8 6.6<br />
3. When extending the drain hose at the indoor unit,<br />
install the drain pipe.<br />
1 2<br />
Indoor unit<br />
Installation plate<br />
8cm<br />
Spacer<br />
Indoor unit tubing Flare nut Pipes<br />
Wrench<br />
Indoor unit tubing<br />
Drain hose<br />
Flare nut<br />
Vinyl tape<br />
Adhesive<br />
Installation<br />
Connecting<br />
cable<br />
Drain pipe<br />
Open-end wrench (fixed)<br />
Connection pipe<br />
Indoor unit drain hose<br />
(narrow)<br />
Service Manual 17