
You also want an ePaper? Increase the reach of your titles
YUMPU automatically turns print PDFs into web optimized ePapers that Google loves.
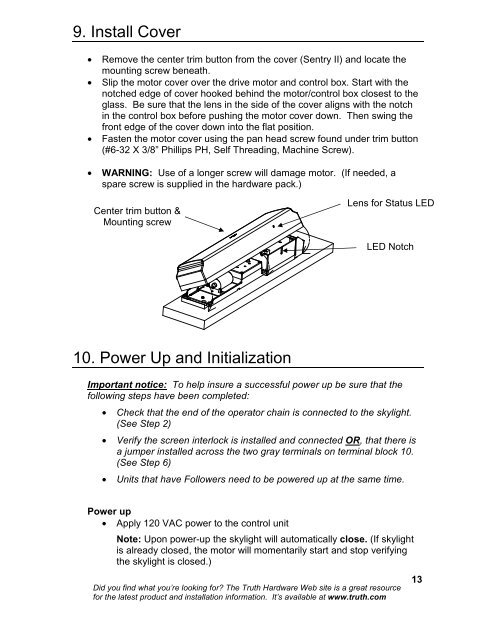
9. Install Cover<br />
• Remove the center trim button from the cover (<strong>Sentry</strong> <strong>II</strong>) and locate the<br />
mounting screw beneath.<br />
• Slip the motor cover over the drive motor and control box. Start with the<br />
notched edge of cover hooked behind the motor/control box closest to the<br />
glass. Be sure that the lens in the side of the cover aligns with the notch<br />
in the control box before pushing the motor cover down. Then swing the<br />
front edge of the cover down into the flat position.<br />
• Fasten the motor cover using the pan head screw found under trim button<br />
(#6-32 X 3/8” Phillips PH, Self Threading, Machine Screw).<br />
• WARNING: Use of a longer screw will damage motor. (If needed, a<br />
spare screw is supplied in the hardware pack.)<br />
Center trim button &<br />
Mounting screw<br />
Lens for Status LED<br />
LED Notch<br />
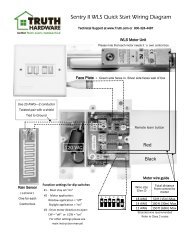
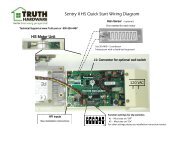
10. Power Up and Initialization<br />
Important notice: To help insure a successful power up be sure that the<br />
following steps have been completed:<br />
• Check that the end of the operator chain is connected to the skylight.<br />
(See Step 2)<br />
• Verify the screen interlock is installed and connected OR, that there is<br />
a jumper installed across the two gray terminals on terminal block 10.<br />
(See Step 6)<br />
• Units that have Followers need to be powered up at the same time.<br />
Power up<br />
• Apply 120 VAC power to the control unit<br />
Note: Upon power-up the skylight will automatically close. (If skylight<br />
is already closed, the motor will momentarily start and stop verifying<br />
the skylight is closed.)<br />
Did you find what you’re looking for? The <strong>Truth</strong> <strong>Hardware</strong> Web site is a great resource<br />
for the latest product and installation information. It’s available at www.truth.com<br />
13