- Page 1 and 2:
2009 Fox Racing Shox Owner’s Manu
- Page 3 and 4:
Adjusting Rebound .................
- Page 5 and 6:
Installing Your Fork ..............
- Page 7 and 8:
Changing Springs ..................
- Page 9 and 10:
32 TALAS RL (OE Edition) ..........
- Page 11 and 12:
Welcome to FOX Racing Shox & FOX- H
- Page 13 and 14:
Forks • Verify that the brakes on
- Page 15 and 16:
Rear Shocks • If the shock ever l
- Page 17 and 18:
Installing a 32 mm Fork Note: This
- Page 19 and 20:
Brakes Linear-pull Linear-pull brak
- Page 21 and 22:
Caution: Torque calipers to brake m
- Page 23 and 24:
Warning! Do not use a tire if any m
- Page 25 and 26:
1. Position your front wheel into t
- Page 27 and 28:
Figure 4: 15QR Lever Resistance Poi
- Page 29 and 30:
15QR Axle Lever Cam Tension Adjustm
- Page 31 and 32:
8. To safely secure your front whee
- Page 33 and 34:
32 FLOAT RLC weight travel 3.74 lbs
- Page 35 and 36:
6. Being careful not to further com
- Page 37 and 38:
6 (Factory setting) Average Rebound
- Page 39 and 40:
5 (Factory setting) Average Compres
- Page 41 and 42:
Travel Spacer Orientation Seal Orie
- Page 43 and 44:
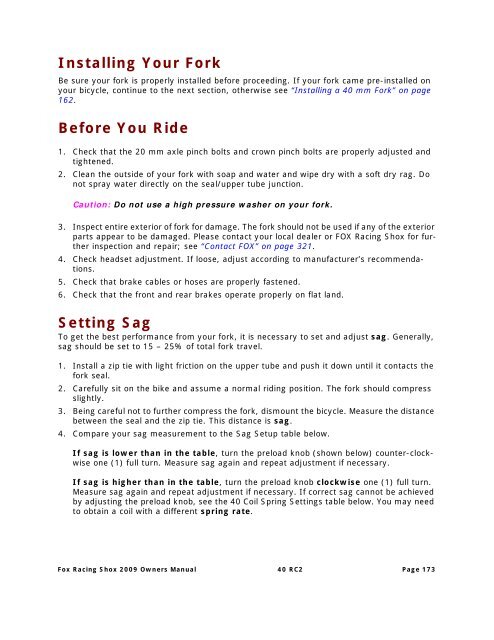
Installing Your Fork Be sure your f
- Page 45 and 46:
Sag Troubleshooting Symptom Too muc
- Page 47 and 48:
• Torque wrench • Oil drain pan
- Page 49 and 50:
Seal Orientation Be sure that the l
- Page 51 and 52:
Installing Your Fork Be sure your f
- Page 53 and 54:
Sag Troubleshooting Symptom Too muc
- Page 55 and 56:
1 803-00-078 32 mm Cartridge Seal K
- Page 57 and 58:
F29 120 RLC, F29 100 RLC, F29 80 RL
- Page 59 and 60:
5. Carefully sit on the bike and as
- Page 61 and 62:
Knob Setting (CLICKS OUT FROM FULL
- Page 63 and 64:
Knob Setting (CLICKS IN FROM FULL O
- Page 65 and 66:
Installing Your Fork Be sure your f
- Page 67 and 68:
Sag Troubleshooting Symptom Too muc
- Page 69 and 70:
Turn the knob clockwise to increase
- Page 71 and 72:
32 F120 RL, F100RL, F80RL weight tr
- Page 73 and 74:
5. Carefully sit on the bike and as
- Page 75 and 76:
6 Average Rebound (Factory setting)
- Page 77 and 78:
Installing Your Fork (See “32 Rem
- Page 79 and 80:
Sag Troubleshooting Symptom Too muc
- Page 81 and 82:
1 803-00-078 32 mm Cartridge Seal K
- Page 83 and 84:
32 Remote RL Fork Setup Guide Figur
- Page 85 and 86:
Figure 3: Positioning the Shimano L
- Page 87 and 88:
Figure 6: Actuation Lever and Thumb
- Page 89 and 90:
32 F120 R, F100R, F80R weight trave
- Page 91 and 92:
5. Carefully sit on the bike and as
- Page 93 and 94:
6 Average Rebound (Factory setting)
- Page 95 and 96:
Installing Your Fork Be sure your f
- Page 97 and 98:
Note: Sag and spring rate will self
- Page 99 and 100:
Turn the knob clockwise to increase
- Page 101 and 102:
32 TALAS RL weight travel features/
- Page 103 and 104:
4. Install a zip tie with light fri
- Page 105 and 106:
KNOB SETTING (CLICKS OUT FROM FULL
- Page 107 and 108:
32 TALAS R weight travel features/a
- Page 109 and 110:
4. Install a zip tie with light fri
- Page 111 and 112:
KNOB SET- TING (CLICKS OUT FROM FUL
- Page 113 and 114:
32 Vanilla RLC weight travel featur
- Page 115 and 116:
Vanilla Coil Spring Setting Guideli
- Page 117 and 118:
Locking Out the Fork The blue compr
- Page 119 and 120:
9 Firm Compression Too firm and you
- Page 121 and 122:
Installing Your Fork Be sure your f
- Page 123 and 124: Adjusting Rebound The rebound knob
- Page 125 and 126: 32 Vanilla R weight travel features
- Page 127 and 128: Vanilla Coil Spring Setting Guideli
- Page 129 and 130: 3. Wipe the spring dry with a rag a
- Page 131 and 132: 11. Using a crown race setter to in
- Page 133 and 134: The 36 is designed for use with dis
- Page 135 and 136: Fox Racing Shox 2009 Owners Manual
- Page 137 and 138: 2. Thread the axle in until hand ti
- Page 139 and 140: 4. Close both QR Levers by rotating
- Page 141 and 142: Installing Your Fork Be sure your f
- Page 143 and 144: Sag Troubleshooting Symptom Too muc
- Page 145 and 146: Adjusting Low-Speed Compression (RC
- Page 147 and 148: 4. Pull the air-shaft assembly from
- Page 149 and 150: 36 TALAS RC2 & R weight travel feat
- Page 151 and 152: 4. Using the 36 TALAS Air Spring Se
- Page 153 and 154: 1 Slow Rebound Too slow and your fo
- Page 155 and 156: Hydraulic Bottom-Out System The 36
- Page 157 and 158: Installing Your Fork Be sure your f
- Page 159 and 160: Harsh ride; full travel not utilize
- Page 161 and 162: Adjusting Low-Speed Compression (RC
- Page 163 and 164: Installing a 40 mm Fork 1. Verifyin
- Page 165 and 166: Caution: Fox Racing Shox does not m
- Page 167 and 168: Figure 4: 40 Upper Crown Installati
- Page 169 and 170: 7. Installing the Front Wheel: Figu
- Page 171 and 172: . Depending on the shape and size o
- Page 173: 40 RC2 weight travel features/adjus
- Page 177 and 178: Adjusting High-Speed Compression (R
- Page 179 and 180: 2. Remove the black spring spacers
- Page 181 and 182: ment in the fork or if it makes str
- Page 183 and 184: 18. Slide the lower leg down furthe
- Page 185 and 186: 3. Cut two four-inch (100 mm) strip
- Page 187 and 188: 7. Pour a small amount of suspensio
- Page 189 and 190: 11. Apply FLOAT Fluid to the foam r
- Page 191 and 192: 15. If you cannot push the seal in
- Page 193 and 194: Oil Volumes - Forks 2002-2009 Fork
- Page 195 and 196: 2003-2006 TALAS 125 & 130 (R, RL, R
- Page 197 and 198: 2009+ 36 TALAS III (R and RC2 dampe
- Page 199 and 200: General Maintenance There may be a
- Page 201 and 202: Adjusting the ProPedal Switch The P
- Page 203 and 204: DHX Air 4.0 weight 0.94 lbs. / 429
- Page 205 and 206: 6. Repeat steps 2-5 until proper sa
- Page 207 and 208: • For a softer ride, decrease the
- Page 209 and 210: 5. Pressurize your main air chamber
- Page 211 and 212: Boost Valve The Boost Valve creates
- Page 213 and 214: General Maintenance Some things to
- Page 215 and 216: Reading Your Spring Rate Adjusting
- Page 217 and 218: Note: If the knob feels gritty duri
- Page 219 and 220: General Maintenance Some things to
- Page 221 and 222: Reading Your Spring Rate Adjusting
- Page 223 and 224: For a softer ride, decrease the sho
- Page 225 and 226:
General Maintenance Some things to
- Page 227 and 228:
spring orientation. Correct spring
- Page 229 and 230:
VAN R weight 0.74 lbs. / 339 g (8.7
- Page 231 and 232:
Note: If after the preload ring eng
- Page 233 and 234:
ProPedal The ProPedal on your VAN R
- Page 235 and 236:
General Maintenance There may be a
- Page 237 and 238:
• OPEN • PROPEDAL Use each sett
- Page 239 and 240:
FLOAT RP2 weight features/ adjustme
- Page 241 and 242:
6. Repeat steps 2-5 until proper sa
- Page 243 and 244:
FLOAT R (rear shock) weight 0.44 lb
- Page 245 and 246:
Air Spring Setting Guidelines Shock
- Page 247 and 248:
Measuring Sag In general, sag on yo
- Page 249 and 250:
"Stuck Down" Shock Procedure Under
- Page 251 and 252:
emove wire rings and air sleeves. C
- Page 253 and 254:
15. When replacing the air sleeve w
- Page 255 and 256:
OE Custom Products These products a
- Page 257 and 258:
General Maintenance There may be a
- Page 259 and 260:
Adjusting Compression Some bicycles
- Page 261 and 262:
32 TALAS RLC (OE Edition) weight tr
- Page 263 and 264:
6. Being careful not to further com
- Page 265 and 266:
6 (Factory setting) Average Rebound
- Page 267 and 268:
5 (Factory setting) Average Compres
- Page 269 and 270:
32 TALAS RL (OE Edition) weight tra
- Page 271 and 272:
3. Using the Air Spring Settings ta
- Page 273 and 274:
1 Slow Rebound Too slow and your fo
- Page 275 and 276:
For safety reasons, it is recommend
- Page 277 and 278:
Installing Your Fork Be sure your f
- Page 279 and 280:
Sag Troubleshooting Symptom Too muc
- Page 281 and 282:
Turn the knob clockwise to increase
- Page 283 and 284:
32 F90 RL (OE Edition) weight trave
- Page 285 and 286:
7. Compare your sag measurement to
- Page 287 and 288:
12 Fast Rebound Too fast and you wi
- Page 289 and 290:
Installing Your Fork Be sure your f
- Page 291 and 292:
Sag Troubleshooting Symptom Too muc
- Page 293 and 294:
Turn the knob clockwise to increase
- Page 295 and 296:
1 803-00-078 32 mm Cartridge Seal K
- Page 297 and 298:
F29 100 RL & F29 80 RL (OE Edition)
- Page 299 and 300:
7. Compare your sag measurement to
- Page 301 and 302:
12 Fast Rebound Too fast and you wi
- Page 303 and 304:
14. Youre done. Go ride. Travel Spa
- Page 305 and 306:
36 mm Forks item new every ride/rac
- Page 307 and 308:
Solutions: Check damper suspension
- Page 309 and 310:
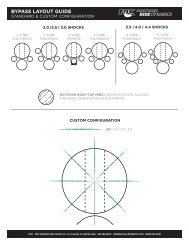
Control Direction Use the diagrams
- Page 311 and 312:
Dropout Thickness Inspection Over t
- Page 313 and 314:
Torque Values air-sprung 32mm FORKS
- Page 315 and 316:
40 part description torque value in
- Page 317 and 318:
Using the FOX High Pressure Pump Fo
- Page 319 and 320:
Warranty Information Warranty Polic
- Page 321 and 322:
• Also, thank you for taking spec