- Page 1:
last simulation evaluation and mana
- Page 4 and 5:
Disclaimer JKSimBlast is a suite of
- Page 6 and 7:
Contents Introduction .............
- Page 8 and 9:
Sample Blasts......................
- Page 10 and 11:
2DFace ............................
- Page 12 and 13:
Calculation Region.................
- Page 15 and 16:
Introduction Overview JKSimBlast co
- Page 17 and 18:
Introduction Equipment Requirements
- Page 19 and 20:
Introduction 1. Start the installat
- Page 21 and 22:
4. Customer Information Introductio
- Page 23 and 24:
6. Setup Type Select the type of in
- Page 25 and 26:
Introduction Select how and when to
- Page 27 and 28: 8. Ready to install Introduction Th
- Page 29 and 30: Introduction Fast Program Start The
- Page 31 and 32: JKBMS Overview The Blast Management
- Page 33 and 34: JKBMS Data Structure The BMS uses h
- Page 35 and 36: JKBMS When a BMS database is opened
- Page 37 and 38: JKBMS Function Toolbar Function Too
- Page 39 and 40: JKBMS To add a node, first select t
- Page 41 and 42: JKBMS The 3D Viewer can display any
- Page 43 and 44: JKBMS Always try to run JKSimBlast
- Page 45 and 46: Miscellaneous JKBMS The Misc. tab c
- Page 47 and 48: JKBMS To empty the Recycle Bin, [ri
- Page 49 and 50: JKBMS databases. The data is provid
- Page 51 and 52: JKBMS Both report options operate i
- Page 53 and 54: JKBMS JKSimBlast 39
- Page 55 and 56: JKBMS Tutorial Setup This tutorial
- Page 57 and 58: JKBMS Tutorial Add Object To add ob
- Page 59 and 60: JKBMS Tutorial such as a site (and
- Page 61 and 62: JKBMS Tutorial Add Blast from 2DBen
- Page 63 and 64: JKBMS Tutorial Select the blasts to
- Page 65 and 66: JKBMS Tutorial [Right-click] the bl
- Page 67 and 68: JKBMS Tutorial The blast will open
- Page 69 and 70: JKBMS Tutorial JKSimBlast 55
- Page 71 and 72: 2DBench Overview 2DBench is a graph
- Page 73 and 74: 2DBench Design Modes A blast is div
- Page 75 and 76: 2DBench in the centre of the hole.
- Page 77: 2DBench JKSimBlast 63
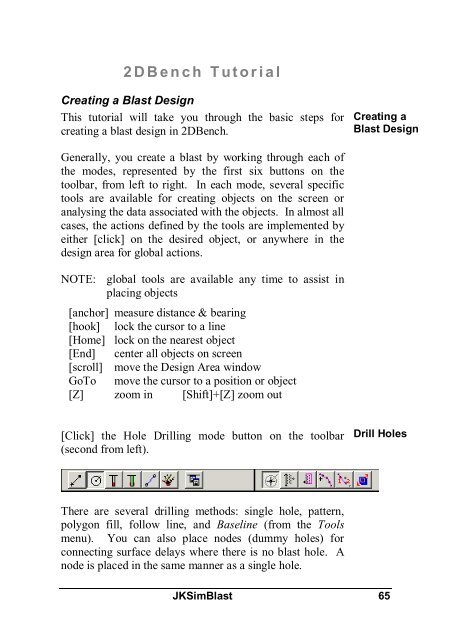
- Page 81 and 82: 2DBench Tutorial Press [End] to c
- Page 83 and 84: 2DBench Tutorial This mode is for d
- Page 85 and 86: 2DBench Tutorial >File >Save Blast
- Page 87 and 88: 2DBench Tutorial On the [Delay]
- Page 89 and 90: 2DBench Tutorial Open the paramete
- Page 91 and 92: 2DBench Tutorial Open the par
- Page 93 and 94: 2DBench Tutorial To run the sim
- Page 95 and 96: 2DBench Tutorial JKSimBlast 81
- Page 97 and 98: 2DRing General Functions 2DRing inc
- Page 99 and 100: 2DRing Title Bar Menu Bar Tool Bar
- Page 101 and 102: 2DRing Table 1.1 Change options dia
- Page 103 and 104: 2DRing The Object colour option all
- Page 105 and 106: 2DRing Global Construction Tools Se
- Page 107 and 108: 2DRing The user may also change the
- Page 109 and 110: 2DRing Figure 1.9 View of marked an
- Page 111 and 112: 2DRing Figure 1.10 Design Informati
- Page 113 and 114: 2DRing Loading & Saving Designs can
- Page 115 and 116: 2DRing Importing and Exporting 2DRi
- Page 117 and 118: 2DRing The user should also specify
- Page 119 and 120: 2DRing Once the appropriate informa
- Page 121 and 122: 2DRing The above reports are column
- Page 123 and 124: 2DRing paper). A logo and a comment
- Page 125 and 126: 2DRing Design Input Within 2DRing,
- Page 127 and 128: 2DRing Figure 2.2 Edit ring planes
- Page 129 and 130:
2DRing Multiple line segment drawin
- Page 131 and 132:
2DRing Drill Drives and Drill posit
- Page 133 and 134:
2DRing a) Ah = 1 b) Ar = W/2 c) Ar
- Page 135 and 136:
2DRing Individual holes can be posi
- Page 137 and 138:
2DRing Selection and Loading of Exp
- Page 139 and 140:
2DRing Selection and Loading of Del
- Page 141 and 142:
2DRing The surface delay mode allow
- Page 143 and 144:
2DRing Figure 3.1 Detonation simula
- Page 145 and 146:
2DRing e L 2 1 P 187. 5 D h 2
- Page 147 and 148:
2DRing Weighting 1 Time of referenc
- Page 149 and 150:
2DRing Figure 3.4 shows the 3D expl
- Page 151 and 152:
2DRing Fragmentation A review of br
- Page 153 and 154:
2DRing selection of fragmentation
- Page 155 and 156:
2DRing In the Rock Structure tab, t
- Page 157 and 158:
2DRing JKSimBlast 143
- Page 159 and 160:
2DFace General Functions 2DFace inc
- Page 161 and 162:
2DFace Title Bar Menu Bar Tool Bar
- Page 163 and 164:
2DFace Table 1.1 Change options dia
- Page 165 and 166:
2DFace The Object colour option all
- Page 167 and 168:
2DFace Figure 1.5 Move 2D cursor to
- Page 169 and 170:
2DFace Figure 1.7 New scale option
- Page 171 and 172:
2DFace Query Options Two functions
- Page 173 and 174:
2DFace Figure 1.10 Design summary i
- Page 175 and 176:
2DFace Figure 1.12 Save Design and
- Page 177 and 178:
2DFace Figure 1.14 Import data dial
- Page 179 and 180:
2DFace Figure 1.17 String closure d
- Page 181 and 182:
2DFace The configuration for a part
- Page 183 and 184:
2DFace The user must select the pri
- Page 185 and 186:
2DFace Design Input Within 2DFace,
- Page 187 and 188:
2DFace Figure 2.1 String In line an
- Page 189 and 190:
2DFace position of the new drive. T
- Page 191 and 192:
2DFace Figure 2.4 Defining sections
- Page 193 and 194:
2DFace As shown in Figure 2.5 four
- Page 195 and 196:
2DFace . Figure 2.7 Burn cut select
- Page 197 and 198:
2DFace 2. Select the multiple holes
- Page 199 and 200:
2DFace 2. Select the multiple holes
- Page 201 and 202:
2DFace Selection and Loading of Exp
- Page 203 and 204:
2DFace Selection & Loading of Delay
- Page 205 and 206:
2DFace Delay accessories are stored
- Page 207 and 208:
2DFace 6. Definition of drill holes
- Page 209 and 210:
2DFace Figure 3.3 Output of a digit
- Page 211 and 212:
2DFace Equation (6) can be integrat
- Page 213 and 214:
2DFace 11.Select type of calculatio
- Page 215 and 216:
2DFace Detonation Simulation and Ti
- Page 217 and 218:
2DFace Figure 3.8 Detonation simula
- Page 219 and 220:
2DFace JKSimBlast 205
- Page 221 and 222:
2DView Overview 2DView is an extend
- Page 223 and 224:
2DView Opening a Blast Opening a bl
- Page 225 and 226:
2DView When the list is complete, c
- Page 227 and 228:
2DView Choose View Several pre-defi
- Page 229 and 230:
2DView Scroll Bars The display can
- Page 231 and 232:
2DView use the mouse or GoTo (or [H
- Page 233 and 234:
Margin 2DView This sets an extra ma
- Page 235 and 236:
2DView the speed of calculation. Wh
- Page 237 and 238:
2DView [click] or press [Enter] aga
- Page 239 and 240:
2DView [Move All Points] : apply a
- Page 241 and 242:
2DView open cut mine after removal
- Page 243 and 244:
Regions 2DView Calculate for only t
- Page 245 and 246:
Choosing Results 2DView This step i
- Page 247 and 248:
2DView rock mass. After this time i
- Page 249 and 250:
2DView calculate the contours, the
- Page 251 and 252:
2DView Actual Downhole Connection L
- Page 253 and 254:
2DView line contours, only the mini
- Page 255 and 256:
2DView 2. Open the Extra Hole Data
- Page 257 and 258:
TimeHEx Overview TimeHEx (Time vs H
- Page 259 and 260:
TimeHEx Set the time interval for t
- Page 261 and 262:
TimeHEx delays. The data in the tex
- Page 263 and 264:
TimeHEx Toggle the visibility of gr


