Z1 300zx Brembo Front Brake Brackets - Z1Motorsports.com
Z1 300zx Brembo Front Brake Brackets - Z1Motorsports.com
Z1 300zx Brembo Front Brake Brackets - Z1Motorsports.com

Create successful ePaper yourself
Turn your PDF publications into a flip-book with our unique Google optimized e-Paper software.
<strong>Z1</strong> Motorsports 1200 Carrollton Villa Rica Hwy Carrollton GA 30116 770.838.7777<br />
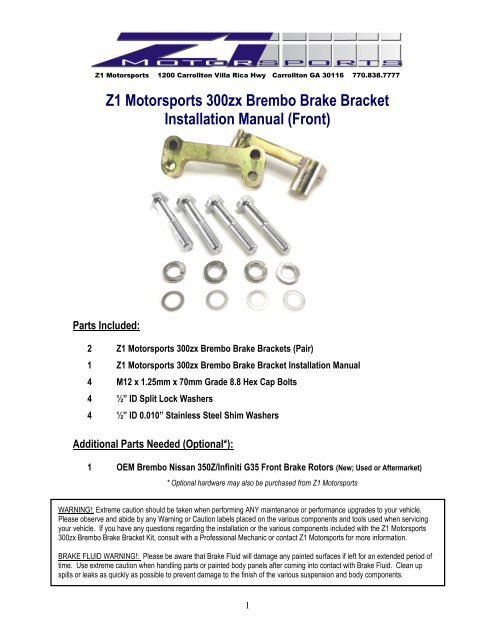
<strong>Z1</strong> Motorsports <strong>300zx</strong> <strong>Brembo</strong> <strong>Brake</strong> Bracket<br />
Installation Manual (<strong>Front</strong>)<br />
Parts Included:<br />
2 <strong>Z1</strong> Motorsports <strong>300zx</strong> <strong>Brembo</strong> <strong>Brake</strong> <strong>Brackets</strong> (Pair)<br />
1 <strong>Z1</strong> Motorsports <strong>300zx</strong> <strong>Brembo</strong> <strong>Brake</strong> Bracket Installation Manual<br />
4 M12 x 1.25mm x 70mm Grade 8.8 Hex Cap Bolts<br />
4 ½” ID Split Lock Washers<br />
4 ½” ID 0.010” Stainless Steel Shim Washers<br />
Additional Parts Needed (Optional*):<br />
1 OEM <strong>Brembo</strong> Nissan 350Z/Infiniti G35 <strong>Front</strong> <strong>Brake</strong> Rotors (New; Used or Aftermarket)<br />
* Optional hardware may also be purchased from <strong>Z1</strong> Motorsports<br />
WARNING!: Extreme caution should be taken when performing ANY maintenance or performance upgrades to your vehicle.<br />
Please observe and abide by any Warning or Caution labels placed on the various <strong>com</strong>ponents and tools used when servicing<br />
your vehicle. If you have any questions regarding the installation or the various <strong>com</strong>ponents included with the <strong>Z1</strong> Motorsports<br />
<strong>300zx</strong> <strong>Brembo</strong> <strong>Brake</strong> Bracket Kit, consult with a Professional Mechanic or contact <strong>Z1</strong> Motorsports for more information.<br />
BRAKE FLUID WARNING!: Please be aware that <strong>Brake</strong> Fluid will damage any painted surfaces if left for an extended period of<br />
time. Use extreme caution when handling parts or painted body panels after <strong>com</strong>ing into contact with <strong>Brake</strong> Fluid. Clean up<br />
spills or leaks as quickly as possible to prevent damage to the finish of the various suspension and body <strong>com</strong>ponents.<br />
1
*BEFORE YOU BEGIN!<br />
Remove all contents from the <strong>Z1</strong> Motorsports <strong>300zx</strong> <strong>Brembo</strong> <strong>Brake</strong> Bracket Kit and verify that ALL necessary hardware<br />
is present.<br />
1. Properly raise and support your <strong>300zx</strong> using jack stands and the proper jacking points on your vehicle’s<br />
chassis (Refer to vehicle’s Owner’s Manual)<br />
2. Apply the Parking <strong>Brake</strong><br />
3. Raise the vehicle’s Hood<br />
4. Remove both <strong>Front</strong> Wheels<br />
5. With the <strong>Front</strong> Wheels removed, begin the disassembly of the stock <strong>300zx</strong> brake system:<br />
a. Unbolt the TWO 19mm Bolts securing the <strong>Brake</strong> Caliper to the King Pin. Save these bolts as they will<br />
be reused!<br />
b. Remove the stock <strong>Brake</strong> Rotors from the Hub Assembly.<br />
c. Depress the brake caliper pistons so that they are at their widest position.<br />
Installation Note #1:<br />
Be careful when depressing the brake caliper pistons. DO NOT damage the brake caliper piston dust seals. Pay close<br />
attention to the <strong>Brake</strong> Master Cylinder Reservoir. Displaced brake fluid will fill up the reservoir. If fluid has been<br />
added the system it may leak out onto the body panels. Be sure to clean up all <strong>Brake</strong> Fluid spills immediately.<br />
6. Locate the two <strong>Z1</strong> Motorsports <strong>300zx</strong> <strong>Brembo</strong> <strong>Brake</strong> <strong>Brackets</strong> and the Stock <strong>Brake</strong> Caliper bolts removed in<br />
Step #5A.<br />
Installation Note #2:<br />
The <strong>Z1</strong> Motorsports <strong>300zx</strong> <strong>Brembo</strong> <strong>Brake</strong> <strong>Brackets</strong> can be installed on either side. There is NOT a specific RIGHT SIDE<br />
or LEFT SIDE bracket. Make sure that the Welded Spacers are facing towards the outside of the vehicle. Be sure to<br />
line up the threaded holes on the adapter bracket with the holes on vehicle’s King Pin (The factory mounting points for<br />
the OEM <strong>300zx</strong> <strong>Brake</strong> Caliper).<br />
7. After positioning the <strong>Brake</strong> Caliper Adapter Bracket, insert the factory Nissan brake<br />
caliper bolts through the original mounting points for the stock brake caliper. It is re<strong>com</strong>mended that a<br />
thread locking <strong>com</strong>pound (Loctite ®) is used. Evenly torque the two bolts in repeating series to ensure that<br />
the bracket is bolted on properly.<br />
The OEM <strong>Brake</strong> Caliper Bolts must be torque to between 72 ~ 87 ft/lbs.<br />
8. Install the OEM <strong>Brembo</strong> <strong>Brake</strong> Rotor onto the hub assembly. Using a set a few lug nuts and spare washers,<br />
torque the lug nuts to between 72 ~ 87 ft/lbs. This will ensure that the rotor is properly seated during the<br />
installation of the brake caliper. This is required so that the proper spacing is achieved between the brake<br />
caliper and the rotor.<br />
9. Using the supplied M12 brake caliper bolts; install the brake caliper as shown below. DO NOT apply thread<br />
locking <strong>com</strong>pound at this time. Torque the bolts to 70 ft/lbs.<br />
2
10. Refer to the image below. While looking at the brake disc, check for proper clearance around the brake disc<br />
between the disc itself and the caliper. If the clearance is too tight, use one of the supplied shim washers to<br />
correct the clearance issue.<br />
Make sure equal spacing is<br />
present between both disc faces<br />
and the brake caliper itself.<br />
a. Adding a shim washer between the <strong>Brake</strong> Caliper and the <strong>Z1</strong> Bracket will shift the caliper to the<br />
OUTSIDE of the vehicle.<br />
b. Adding a shim washer between the <strong>Z1</strong> Bracket and the Knuckle assembly will shift the caliper to<br />
the INSIDE of the vehicle.<br />
Add shims as needed. Generally shims ARE NOT needed, however due to casting differences between<br />
brake rotors, OEM pieces, rust/oxidation formation, machining tolerances and shims can be used to realign<br />
the rotor within the caliper.<br />
If there is a lack of clearance between the outer edges of the brake caliper and the disc, some material<br />
removal will be required. Use a file or pneumatic grinding tool to carefully remove material.<br />
Remove excess material along<br />
these faces ONLY. Remove<br />
enough material to create 1/16” ~<br />
1/8” clearance at the closest point.<br />
Majority of the material will only<br />
need to be removed along the<br />
extreme edges of the calipers.<br />
3
11. Once the calipers have been adjusted and clearance finalized, be sure to torque the M12 caliper bolts to 70<br />
ft/lbs.<br />
12. Before reinstalling the front wheels, check the clearance between the rotor disc and the front brake dust<br />
shield. If you see that the disc is <strong>com</strong>ing in contact with the dust shield, simply pry/bend the shield away to<br />
create the appropriate amount of clearance.<br />
13. Re-install any previously removed hardware and wheels.<br />
14. Perform a final test drive of the vehicle.<br />
NOTES:<br />
<strong>Z1</strong> Motorsports <strong>300zx</strong> <strong>Brembo</strong><br />
<strong>Brake</strong> Bracket<br />
Towards OEM <strong>Brake</strong> Caliper<br />
Apply thread<br />
locking<br />
<strong>com</strong>pound<br />
½” Split Lock Washers<br />
M12 x 1.25mm x 70 mm Bolts<br />
Use 19mm Socket.<br />
Torque to 70 FT/Lbs.<br />
4<br />
Apply thread<br />
locking<br />
<strong>com</strong>pound