Z1 Injector Adapter Install Manual - Z1Motorsports.com
Z1 Injector Adapter Install Manual - Z1Motorsports.com
Z1 Injector Adapter Install Manual - Z1Motorsports.com

You also want an ePaper? Increase the reach of your titles
YUMPU automatically turns print PDFs into web optimized ePapers that Google loves.
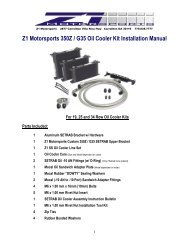
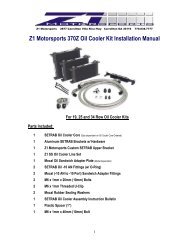
<strong>Z1</strong> <strong>Injector</strong> <strong>Adapter</strong> <strong>Install</strong> <strong>Manual</strong><br />
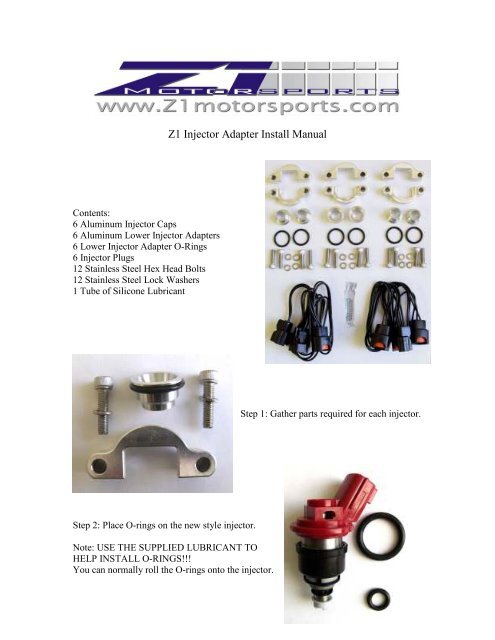
Contents:<br />
6 Aluminum <strong>Injector</strong> Caps<br />
6 Aluminum Lower <strong>Injector</strong> <strong>Adapter</strong>s<br />
6 Lower <strong>Injector</strong> <strong>Adapter</strong> O-Rings<br />
6 <strong>Injector</strong> Plugs<br />
12 Stainless Steel Hex Head Bolts<br />
12 Stainless Steel Lock Washers<br />
1 Tube of Silicone Lubricant<br />
Step 1: Gather parts required for each injector.<br />
Step 2: Place O-rings on the new style injector.<br />
Note: USE THE SUPPLIED LUBRICANT TO<br />
HELP INSTALL O-RINGS!!!<br />
You can normally roll the O-rings onto the injector.
Step 3: <strong>Install</strong> the lower injector adapter.<br />
This is done by pushing the injector into the<br />
lower injector adapter.<br />
AGAIN, USE LUBE!<br />
If the O-ring pinches instead of seating<br />
correctly gas will stream into the cylinder<br />
instead of being controlled by the injector.<br />
Step 4: <strong>Install</strong> the injector into the fuel rail by<br />
pushing down until it seats. Place the injector<br />
cap on top of the injector.<br />
MAKE SURE YOU HAVE LUBE ON THE<br />
O-RINGS BEFORE TRYING TO PUSH<br />
THEM IN!!!!!<br />
Step 5: Use an allen wrench to tighten the<br />
injector cap to the fuel rail and admire<br />
your finished product.<br />
Did you remember the lube?