Z1 300Zx Oil Cooler Kit Installation Manual - Z1Motorsports.com
Z1 300Zx Oil Cooler Kit Installation Manual - Z1Motorsports.com
Z1 300Zx Oil Cooler Kit Installation Manual - Z1Motorsports.com

Create successful ePaper yourself
Turn your PDF publications into a flip-book with our unique Google optimized e-Paper software.
<strong>Z1</strong> Motorsports 2877 Carrollton Villa Rica Hwy Carrollton GA 30116 770.838.7777<br />
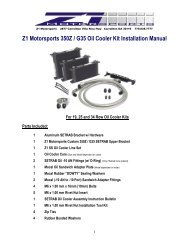
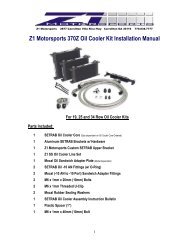
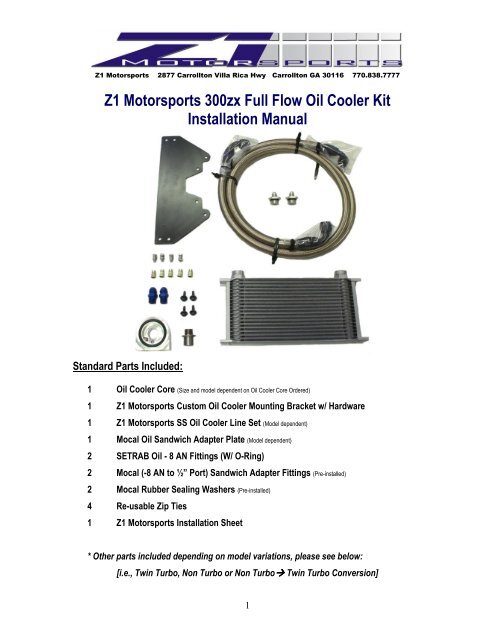
<strong>Z1</strong> Motorsports 300zx Full Flow <strong>Oil</strong> <strong>Cooler</strong> <strong>Kit</strong><br />
<strong>Installation</strong> <strong>Manual</strong><br />
Standard Parts Included:<br />
1 <strong>Oil</strong> <strong>Cooler</strong> Core (Size and model dependent on <strong>Oil</strong> <strong>Cooler</strong> Core Ordered)<br />
1 <strong>Z1</strong> Motorsports Custom <strong>Oil</strong> <strong>Cooler</strong> Mounting Bracket w/ Hardware<br />
1 <strong>Z1</strong> Motorsports SS <strong>Oil</strong> <strong>Cooler</strong> Line Set (Model dependent)<br />
1 Mocal <strong>Oil</strong> Sandwich Adapter Plate (Model dependent)<br />
2 SETRAB <strong>Oil</strong> - 8 AN Fittings (W/ O-Ring)<br />
2 Mocal (-8 AN to ½” Port) Sandwich Adapter Fittings (Pre-installed)<br />
2 Mocal Rubber Sealing Washers (Pre-installed)<br />
4 Re-usable Zip Ties<br />
1 <strong>Z1</strong> Motorsports <strong>Installation</strong> Sheet<br />
* Other parts included depending on model variations, please see below:<br />
[i.e., Twin Turbo, Non Turbo or Non Turbo Twin Turbo Conversion]<br />
1
Additional Model Specific Parts Included:<br />
Twin Turbo:<br />
Non Turbo:<br />
1 <strong>Z1</strong> Motorsports Twin Turbo By-Pass Supplemental <strong>Kit</strong><br />
1 Threaded Rivet Nut <strong>Installation</strong> Tool w/ Instructions Sheet<br />
5 M6-1.00mm Threaded Rivet Nuts<br />
4 M6-1.00mm Bolts<br />
Non Turbo Twin Turbo Conversion:<br />
1 <strong>Z1</strong> Motorsports Twin Turbo By-Pass Supplemental <strong>Kit</strong><br />
1 Threaded Rivet Nut <strong>Installation</strong> Tool w/ Instruction Sheet<br />
5 M6-1.00mm Threaded Rivet Nuts<br />
4 M6-1.00mm Bolts<br />
* This assumes that you are reusing the Twin Turbo <strong>Oil</strong> Filter Tree and Block. If you are not, please contact the <strong>Z1</strong> Motorsports Parts Department for<br />
more information as other parts may be necessary.<br />
Suggested Tools *:<br />
Assortment of Metric Wrenches (10 – 21mm) Assortment of Standard Wrenches (1/8” – 1”)<br />
10 & 12mm Sockets Ratchet 3” & 6” Socket Extensions<br />
Phillips Head Screw Driver Pliers <strong>Oil</strong> Catch Tray<br />
<strong>Oil</strong> Filter Wrench<br />
* Other tools may be necessary outside what is listed above. No specialty tools are required for a proper installation of this kit. Any local hardware<br />
or auto parts store will have any additional tools needed.<br />
2
<strong>Installation</strong> (FOR ALL MODELS!!):<br />
WARNING!: Extreme caution should be taken when performing ANY maintenance or performance upgrades to your<br />
vehicle. Please observe and abide by any Warning or Caution labels placed on the various <strong>com</strong>ponents and tools used<br />
when servicing your vehicle. If you have any questions regarding the installation of the various <strong>com</strong>ponents included<br />
with the <strong>Z1</strong> Motorsports 300zx Full Flow <strong>Oil</strong> <strong>Cooler</strong> <strong>Kit</strong>, please consult with a Professional Mechanic or contact <strong>Z1</strong><br />
Motorsports for more information.<br />
<strong>Installation</strong> Note #1:<br />
It is re<strong>com</strong>mended that you perform the installation of the <strong>Z1</strong> Motorsports 300zx Full Flow <strong>Oil</strong><br />
<strong>Cooler</strong> <strong>Kit</strong> at the scheduled <strong>Oil</strong> Change interval. This due to the fact that the <strong>Oil</strong> Filter and the some<br />
Engine <strong>Oil</strong> must be removed in order to properly install the kit.<br />
*BEFORE YOU BEGIN!<br />
Remove all contents from the <strong>Z1</strong> Motorsports 300zx Full Flow <strong>Oil</strong> <strong>Cooler</strong> <strong>Kit</strong> and verify that ALL<br />
necessary hardware is present.<br />
1. Properly raise and support your 300zx using jack stands and the proper jacking points on<br />
your vehicle’s chassis (Refer to vehicle’s Owner’s <strong>Manual</strong>)<br />
2. Apply the Parking Brake<br />
3. Raise the vehicle’s Hood<br />
4. Disconnect the NEGATIVE (--) Battery Terminal<br />
5. Remove Front Wheels (Only necessary on Non-Turbo Models)<br />
6. Remove both the Engine and Front Bumper Splash Shields (There are multiple 10mm and/or<br />
Phillips head screws securing these panels)<br />
7. Remove the Front Nose Panel (Between Headlights).<br />
8. Remove the factory Air Box Assembly or Aftermarket Air Intake Filter.<br />
<strong>Installation</strong> Note #2:<br />
Removal of the front fascia is not necessary, however it will allow for more room to work on the<br />
vehicle with less stress.<br />
9. Drain engine oil and remove engine oil filter (Dispose on engine oil properly and clean up<br />
any spills or leaks)<br />
10. Locate the supplied Mocal <strong>Oil</strong> Sandwich Plate Adapter Assembly provided in this kit.<br />
This assembly should have both -8 AN – ½” Port Fittings and Mocal Sealing Washers<br />
installed.<br />
<strong>Installation</strong> Note #3:<br />
The two supplied fittings and Mocal Sealing Washers have NOT been torqued down. Be sure to do<br />
this during the appropriate step below!<br />
3
11. With the oil filter removed, install the sandwich plate adapter so that the rubber o-ring<br />
seals against the factory oil filter tree. The threaded adapter bolt (supplied with the Mocal<br />
Sandwich Plate Adapter) will secure the sandwich plate adapter in place. Hand tighten the<br />
adapter bolt. DO NOT TIGHTEN DOWN THE ADAPTER BOLT YET AS SOME “CLOCKING”<br />
OF THE SANDWICH PLATE ADAPTER WILL BE NECESSARY!<br />
All further installation instructions are model specific. Please see the<br />
appropriate section based on the version of the kit you have ordered:<br />
4
Twin Turbo <strong>Kit</strong>:<br />
12a: Remove the factory 300zx Twin Turbo <strong>Oil</strong> <strong>Cooler</strong> <strong>Kit</strong> and associated hardware. This<br />
includes the following items:<br />
1) <strong>Oil</strong> <strong>Cooler</strong> Core<br />
2) <strong>Oil</strong> <strong>Cooler</strong> Bracket (Keep the four M6 x 1.00mm bolts as they will be reused)<br />
3) 4x Rubber <strong>Oil</strong> <strong>Cooler</strong> Lines<br />
4) Formed Metal <strong>Oil</strong> <strong>Cooler</strong> Lines (Near Radiator/Condenser Assembly)<br />
5) Plastic Filler Panel (Used to finish around the OEM Formed Metal <strong>Oil</strong> <strong>Cooler</strong> Lines. Between the<br />
Passenger Side Frame Rail and the Radiator/Condenser Assembly.)<br />
12b: Locate the supplied <strong>Z1</strong> Motorsports Custom <strong>Oil</strong> <strong>Cooler</strong> Bracket and Hardware <strong>Kit</strong>.<br />
12c: Using the factory M6 x 1.00mm bolts, secure the <strong>Z1</strong> Motorsports <strong>Oil</strong> <strong>Cooler</strong> Bracket in<br />
place of the factory bracket.<br />
12d: Locate the supplied <strong>Oil</strong> <strong>Cooler</strong> Core and both Setrab – 8 AN Fittings.<br />
<strong>Installation</strong> Note #4:<br />
It is highly re<strong>com</strong>mended that the oil cooler core be pre-filled with fresh engine oil before<br />
installation. This will prevent the possibility of a dry start up when cranking the engine and will<br />
limit the time the engine will be without oil while the oil cooler lines are primed.<br />
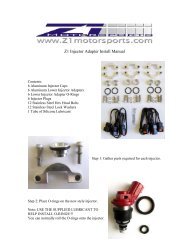
12e: Using a suitable lubricant, apply a thin coat of lubricant to the AN Fittings’ O-rings,<br />
install the fittings onto the oil cooler core.<br />
12f: Install the pre- filled oil cooler core onto the previously installed <strong>Oil</strong> <strong>Cooler</strong> Bracket. Use<br />
the supplied hardware to do so. Be sure not to tip over or spill any oil while installing<br />
the oil cooler core. This step is achieved by dropping the oil cooler core down thru the<br />
nose panel (if the front fascia has not been removed).<br />
12g: Locate the <strong>Z1</strong> SS - 8 Twin Turbo <strong>Oil</strong> <strong>Cooler</strong> Line Set included in this kit.<br />
12h: Beginning at the oil cooler, begin routing the oil cooler lines thru the chassis. Be sure<br />
to route the lines between the frame rail and the radiator/condenser assembly. The<br />
shorter of the two lines will attach to the Passenger side fitting on the <strong>Oil</strong> <strong>Cooler</strong> Core<br />
while the longer hose will attach to the Driver Side. Please refer to <strong>Installation</strong> Note #5<br />
and #6 regarding line routing procedures.<br />
<strong>Installation</strong> Note #5:<br />
It is highly re<strong>com</strong>mended that you plug off [seal] the ends of the hose being passed thru the<br />
chassis. This will prevent any dirt or debris from entering the lines and contaminating the engine<br />
oil. Use the supplied plastic bags and zip ties if necessary.<br />
5
<strong>Installation</strong> Note #6:<br />
Be sure to route the oil cooler lines so that the fittings are arranged in the pattern below:<br />
Passenger Side of <strong>Oil</strong> <strong>Cooler</strong> = 120° Fitting<br />
Driver Side of <strong>Oil</strong> <strong>Cooler</strong> = 90° Fitting<br />
Sandwich Plate Adapter (Both) = 120° Fitting (x2)<br />
12i: Route the oil cooler line along the passenger side frame rail. Be sure to route the lines as<br />
far away from belts, pulleys and the turbo chargers as possible.<br />
12j: Connect the remaining 120° fittings to the previously installed sandwich plate adapter.<br />
You will have to “Clock” the sandwich plate adapter to help aim the oil cooler line around<br />
the engine without damaging the lines.<br />
12k: Once the position of the lines and sandwich plate adapter has been determined. Tighten<br />
down all fittings and secure the adapter bolt on the sandwich plate adapter.<br />
12l: Re-install the oil filter (New preferably). Be sure to pre-fill the oil filter before installing<br />
it on the engine.<br />
12m: Use the supplied Zip Ties to keep the SS <strong>Oil</strong> <strong>Cooler</strong> Lines routed neatly.<br />
12n: Refer to the supplied <strong>Z1</strong> Motorsports Full Flow <strong>Oil</strong> <strong>Cooler</strong> By-Pass Supplemental<br />
Instructions before proceeding to step 12o.<br />
12o: Re-fill the engine with oil. Keep in mind, the oil capacity will be increased by about 0.5 ~<br />
0.75 Quarts. (It is safer to add about 3.5 qt when doing this installation to begin with.)<br />
12p: Start the engine and ensure that the oil pressure returns to NORMAL. Once it has done<br />
so, turn the engine back off and inspect for any possible oil leaks.<br />
12q: Re-check the engine oil level.<br />
12r: Re-install any previously removed hardware or panels.<br />
12s: Perform a final test drive of the vehicle. Make sure you periodically check for any oil<br />
leaks until you are satisfied.<br />
This <strong>com</strong>pletes the installation of the 300zx Twin Turbo version of the <strong>Z1</strong> Motorsports Full<br />
Flow <strong>Oil</strong> <strong>Cooler</strong> <strong>Kit</strong>.<br />
6
Non Turbo <strong>Kit</strong>:<br />
12a: Locate the following supplied items:<br />
a. Threaded Rivet Nut <strong>Installation</strong> Tool w/ Instruction Sheet.<br />
b. Threaded Insert Rivets (x5)<br />
c. M6-1.00mm Bolts (x4)<br />
d. <strong>Z1</strong> Motorsports Custom <strong>Oil</strong> <strong>Cooler</strong> Mounting Bracket w/ Hardware<br />
12b: Located under the nose panel, just in front of the A/C Condenser Fan, there are 4 predrilled<br />
holes that mark where the factory Nissan <strong>Oil</strong> <strong>Cooler</strong> <strong>Kit</strong> is placed on the Twin<br />
Turbo models. These holes are not tapped and will not accept any bolts. Following<br />
the instruction sheet supplied in the Threaded Rivet Nut Tool, install four of the<br />
Threaded Rivet Nuts into these four holes. A fifth threaded rivet nut is supplied in the<br />
event a rivet nut is damaged during installation.<br />
12c: Using the four M6-1.00mm bolts, attach the <strong>Z1</strong> Motorsports Custom <strong>Oil</strong> <strong>Cooler</strong><br />
Mounting Bracket to the lower core support.<br />
12d: Locate the supplied <strong>Oil</strong> <strong>Cooler</strong> Core and both Setrab – 8 AN Fittings.<br />
<strong>Installation</strong> Note #4:<br />
It is highly re<strong>com</strong>mended that the oil cooler core be pre-filled with fresh engine oil before<br />
installation. This will prevent the possibility of a dry start up when cranking the engine and will<br />
limit the time the engine will be without oil while the oil cooler lines are primed.<br />
12e: Using a suitable lubricant on the AN Fittings’ O-rings, install the fittings onto the oil<br />
cooler core.<br />
12f: Install the filled oil cooler core onto the previously installed <strong>Oil</strong> <strong>Cooler</strong> Bracket. Use the<br />
supplied hardware to do so. Be sure not to tip over or spill any oil while installing the oil<br />
cooler core. This step is achieved by dropping the oil cooler core down thru the nose<br />
panel (if the front fascia has not been removed).<br />
12g: Locate the <strong>Z1</strong> SS - 8 Non-Turbo <strong>Oil</strong> <strong>Cooler</strong> Line Set included in this kit.<br />
12h: Beginning at the oil cooler, begin routing the oil cooler lines thru the chassis. The<br />
shorter of the two lines will attach to the Passenger side fitting on the <strong>Oil</strong> <strong>Cooler</strong> Core<br />
while the Longer hose will attach to the Driver Side. Please refer to <strong>Installation</strong> Note #5<br />
thru #7 regarding line routing procedures.<br />
7
<strong>Installation</strong> Note #5:<br />
There are multiple paths in which the <strong>Z1</strong> SS <strong>Oil</strong> <strong>Cooler</strong> Lines can be routed. Please refer to the<br />
suggested routing method below as a guide:<br />
a. <strong>Oil</strong> <strong>Cooler</strong> Core <br />
b. Underneath Passenger Side Headlight Bucket (Opening between the headlight bucket<br />
and frame rail) <br />
c. Along the Passenger Side Frame Rail (2+2 and ‘94+ models will have to route the lines<br />
around the Windshield Washer Bottle).<br />
d. Route the lines through the opening between the frame rail and the tension rod bracket.<br />
This opening is just large enough to route both lines through. It is easier to route one<br />
line thru first, then to feed the second once <strong>com</strong>pleted.<br />
e. Route the lines along the passenger side frame rail, terminating at the <strong>Oil</strong> Filter Tree near<br />
the transmission. Make sure you “clock”, or rotate the oil filter sandwich plate so that<br />
the lines are routed as far from the exhaust manifolds as possible. -- END<br />
<strong>Installation</strong> Note #6:<br />
It is highly re<strong>com</strong>mended that you plug off [seal] the ends of the hose being passed thru the<br />
chassis. This will prevent any dirt or debris from entering the lines and contaminating the engine<br />
oil. Use the supplied plastic bags and zip ties if necessary.<br />
<strong>Installation</strong> Note #7:<br />
Be sure to route the oil cooler lines so that the fittings are arranged in the pattern below:<br />
Passenger Side of <strong>Oil</strong> <strong>Cooler</strong> = 90° Fitting<br />
Driver Side of <strong>Oil</strong> <strong>Cooler</strong> = 90° Fitting<br />
Sandwich Plate Adapter (Both) = 120° Fitting (x2)<br />
12i: Route the oil cooler lines along the passenger side frame rail. Be sure to route the lines<br />
as far away from belts, pulleys and the exhaust manifolds as possible.<br />
12j: Connect the remaining 120° fittings to the previously installed sandwich plate adapter.<br />
You will have to “Clock” the sandwich plate adapter to help aim the oil cooler line around<br />
the engine without damaging the lines.<br />
12k: Once you are pleased with the position of the lines and sandwich plate adapter. Tighten<br />
down all fittings and secure the adapter bolt on the sandwich plate adapter.<br />
12l: Re-install the oil filter (New preferably). Be sure to pre-fill the oil filter before installing<br />
it on the engine to prevent dry starting the engine.<br />
12m: Use the supplied Zip Ties to keep the SS <strong>Oil</strong> <strong>Cooler</strong> Lines routed neatly.<br />
8
12n: If you drained the engine of oil, be sure to re-fill the engine with oil. Keep in mind, the<br />
oil capacity will be increased by about 0.5 ~ 0.75 Quarts. (It is safer to add about 3.5 qt when<br />
doing this installation to begin with.)<br />
12o: Start the engine and ensure that the oil pressure returns to NORMAL. Once it has done<br />
so, turn the engine back off and inspect for any possible oil leaks.<br />
12p: Re-check the engine oil level.<br />
12q: Re-install any previously removed hardware or panels.<br />
12r: Perform a final test drive of the vehicle. Make sure you periodically check for any oil<br />
leaks until you are satisfied.<br />
This <strong>com</strong>pletes the installation of the 300zx Twin Turbo version of the <strong>Z1</strong> Motorsports Full<br />
Flow <strong>Oil</strong> <strong>Cooler</strong> <strong>Kit</strong>.<br />
9
Non Turbo Twin Turbo Conversion <strong>Kit</strong>:<br />
<strong>Installation</strong> of the 300zx Full Flow <strong>Oil</strong> <strong>Cooler</strong> <strong>Kit</strong> onto a Non-Turbo Twin Turbo<br />
Conversion Vehicle is a hybridization of both the Non-Turbo and the Twin Turbo <strong>Oil</strong><br />
<strong>Cooler</strong> versions of this kit. Please refer to the following sections below for <strong>com</strong>plete<br />
installation details:<br />
- Begin with steps 1 – 11 of the generic <strong>Z1</strong> Motorsports 300zx Full Flow <strong>Oil</strong> <strong>Cooler</strong> <strong>Kit</strong>.<br />
- Once <strong>com</strong>pleted, jump to steps 12a - 12f in the NON-TURBO <strong>Kit</strong>.<br />
- Complete the installation with steps 12a – 12r in the Twin–Turbo <strong>Kit</strong>.<br />
This <strong>com</strong>pletes the installation of the 300zx Non TurboTwin Turbo Conversion of the <strong>Z1</strong><br />
Motorsports Full Flow <strong>Oil</strong> <strong>Cooler</strong> <strong>Kit</strong>.<br />
For further information and MORE full color pictures and installation<br />
suggestions, follow the installation instructions link on the <strong>Z1</strong> Motorsports<br />
300zx Full Flow <strong>Oil</strong> <strong>Cooler</strong> <strong>Kit</strong> product page at <strong>Z1</strong>Motorsports.<strong>com</strong><br />
10