Z1 Z32 Front Upper Control Arm Install M... 331KB Jul 19 2012 05 ...
Z1 Z32 Front Upper Control Arm Install M... 331KB Jul 19 2012 05 ...
Z1 Z32 Front Upper Control Arm Install M... 331KB Jul 19 2012 05 ...

Create successful ePaper yourself
Turn your PDF publications into a flip-book with our unique Google optimized e-Paper software.
<strong>Z1</strong> Motorsports 2877 Carrollton Villa Rica Hwy Carrollton GA 30116<br />
770.838.7777 www.<strong>Z1</strong>Motorsports.com<br />
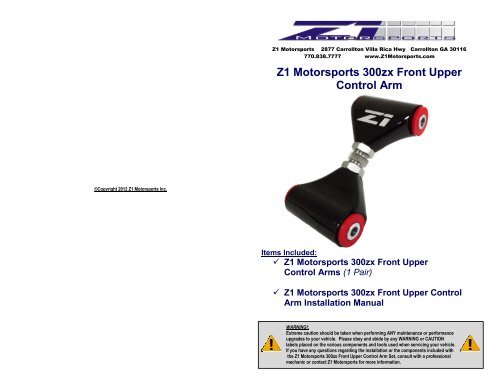
<strong>Z1</strong> Motorsports 300zx <strong>Front</strong> <strong>Upper</strong><br />
<strong>Control</strong> <strong>Arm</strong><br />
©Copyright <strong>2012</strong> <strong>Z1</strong> Motorsports Inc.<br />
Items Included:<br />
<strong>Z1</strong> Motorsports 300zx <strong>Front</strong> <strong>Upper</strong><br />
<strong>Control</strong> <strong>Arm</strong>s (1 Pair)<br />
<strong>Z1</strong> Motorsports 300zx <strong>Front</strong> <strong>Upper</strong> <strong>Control</strong><br />
<strong>Arm</strong> <strong>Install</strong>ation Manual<br />
WARNING!:<br />
Extreme caution should be taken when performing ANY maintenance or performance<br />
upgrades to your vehicle. Please obey and abide by any WARNING or CAUTION<br />
labels placed on the various components and tools used when servicing your vehicle.<br />
If you have any questions regarding the installation or the components included with<br />
the <strong>Z1</strong> Motorsports 300zx <strong>Front</strong> <strong>Upper</strong> <strong>Control</strong> <strong>Arm</strong> Set, consult with a professional<br />
mechanic or contact <strong>Z1</strong> Motorsports for more information.
<strong>Install</strong>ation Note:<br />
Professional <strong>Install</strong>ation is HIGHLY recommended. A complete<br />
four- wheel alignment is recommended in order to prevent<br />
accelerated tire wear, vehicle instability, and potentially hazardous<br />
vehicle handling behavior.<br />
<strong>19</strong>90 – <strong>19</strong>99 Nissan 300zx (Fairlady Z)<br />
<strong>Front</strong> Suspension Torque<br />
Specifications<br />
Disassembly:<br />
1) Apply the Parking Brake<br />
2) Properly raise and support the front of your 300zx using jack stands<br />
and the proper jacking points on your vehicle’s chassis (Refer to the<br />
vehicle’s Owner’s Manual).<br />
3) Raise the vehicle’s hood.<br />
4) Disconnect the NEGATIVE (--) Battery Terminal<br />
5) Remove both Driver and Passenger <strong>Front</strong> wheels<br />
6) Remove both Inner and Outer <strong>Front</strong> <strong>Upper</strong> <strong>Control</strong> <strong>Arm</strong> Nuts (DO<br />
NOT DISCARD!)<br />
7) Remove the Outer <strong>Front</strong> <strong>Upper</strong> <strong>Control</strong> <strong>Arm</strong> Bolt (DO NOT<br />
DISCARD!). Be sure to mark the Outer Bolt properly in order to<br />
prevent confusion with the Inner Bolt (removed in Step 10). This bolt can<br />
only be re-installed in this location.<br />
8) Remove the four (4) <strong>Front</strong> <strong>Upper</strong> <strong>Control</strong> <strong>Arm</strong> Bracket Nuts<br />
9) Remove the <strong>Front</strong> <strong>Upper</strong> <strong>Control</strong> <strong>Arm</strong> Bracket with the <strong>Front</strong> <strong>Upper</strong><br />
<strong>Control</strong> <strong>Arm</strong> Attached as an assembly. DO NOT mix the LEFT and<br />
RIGHT side brackets.<br />
10) Remove the Inner <strong>Front</strong> <strong>Upper</strong> <strong>Control</strong> <strong>Arm</strong> Bolt (DO NOT<br />
DISCARD!) Be sure to mark the Inner Bolt Properly in order to<br />
prevent confusion with the Outer Bolt (removed in Step 7).<br />
80-94 ft/lbs<br />
(108-127 N m)<br />
43-58 ft. lbs.<br />
(59-78 N m)<br />
FIGURE #3<br />
65-80 ft. lbs.<br />
(88-108 N m)
Notes:<br />
7) Insert the OUTER <strong>Front</strong> <strong>Upper</strong> <strong>Control</strong> <strong>Arm</strong> Bolt into the Third<br />
Member/ King Pin. Again, be sure to insert the bolt in the proper<br />
direction.<br />
8) <strong>Install</strong> and hand tighten a <strong>Front</strong> <strong>Upper</strong> <strong>Control</strong> <strong>Arm</strong> Nut on the Outer<br />
Bolt.<br />
9) Re-install any previously removed hardware and wheels.<br />
10) Torque the <strong>Front</strong> <strong>Upper</strong> <strong>Control</strong> <strong>Arm</strong> Jam Nuts to 80 ft. lbs. (108.5<br />
Nm) while the vehicle is at static height (with the weight of the<br />
vehicle resting on the suspension). This step is easier to complete<br />
after the arms have been bolted onto the vehicle.<br />
**A special 30mm adapter (Crowfoot Wrench) will be required to do<br />
this**<br />
This is easier to achieve while the vehicle is on a 4-Post Lift or<br />
Alignment Rack. Access to the Inner and Outer <strong>Control</strong> <strong>Arm</strong><br />
Bolts/Nuts can be made under the car by reaching around the<br />
front suspension.<br />
11) Torque the Inner and Outer <strong>Control</strong> <strong>Arm</strong> Bolts/Nuts as indicated in<br />
Figure #3 while the vehicle is at static height (with the weight of the<br />
vehicle resting on the suspension).<br />
12) Perform a final test drive of the vehicle.<br />
13) Have a professional, four-wheel alignment performed by a certified<br />
shop.<br />
<strong>19</strong>90 – <strong>19</strong>99 Nissan 300zx (Fairlady Z)<br />
<strong>Front</strong> Suspension Diagram<br />
<strong>Front</strong> <strong>Upper</strong> <strong>Control</strong> <strong>Arm</strong><br />
Inner Bolt<br />
<strong>Front</strong> <strong>Upper</strong> <strong>Control</strong><br />
<strong>Arm</strong> Outer Bolt<br />
FIGURE #1<br />
<strong>Front</strong> <strong>Upper</strong> <strong>Control</strong><br />
<strong>Arm</strong> Bracket<br />
<strong>Front</strong> <strong>Upper</strong> <strong>Control</strong> <strong>Arm</strong><br />
Bracket Nut<br />
<strong>Front</strong> <strong>Upper</strong><br />
<strong>Control</strong> <strong>Arm</strong> Nut<br />
Third Member<br />
(King Pin)<br />
Hardware Note:<br />
Inspect all suspension and brake components for damage or abnormal wear.<br />
Replace any damaged components before continuing with the installation of<br />
the <strong>Z1</strong> Motorsports 300zx <strong>Front</strong> <strong>Upper</strong> <strong>Control</strong> <strong>Arm</strong>s. Pay close attention to<br />
all fasteners which will be re-used during installation.
<strong>Install</strong>ation Note:<br />
If you are attempting to install the <strong>Z1</strong> Motorsports 300zx <strong>Front</strong> <strong>Upper</strong> <strong>Control</strong><br />
<strong>Arm</strong>s WHILE AWAY from an alignment shop, refer to Step #1. If you are<br />
installing the arms WHILE AT an alignment shop, skip to Step #2.<br />
<strong>Install</strong>ation:<br />
1) Before installing the <strong>Z1</strong> Motorsports 300zx <strong>Front</strong> <strong>Upper</strong> <strong>Control</strong> <strong>Arm</strong>s,<br />
adjust the arms initial length to match the factory length.<br />
Be sure to adjust the length of the arms by turning the Adjuster Bolt<br />
ONLY to ensure an even amount of movement and thread engagement<br />
inside of the <strong>Front</strong> <strong>Upper</strong> <strong>Control</strong> <strong>Arm</strong> Bodies.<br />
2) Orient the <strong>Front</strong> <strong>Upper</strong> <strong>Control</strong> <strong>Arm</strong> Bodies as shown in Figure #2.<br />
ENGINE<br />
Ensure that there is an equal amount<br />
of spacing and adjustment along the<br />
Adjuster Bolt as shown below when<br />
installing the <strong>Z1</strong> Motorsports 300zx<br />
<strong>Front</strong> <strong>Upper</strong> <strong>Control</strong> <strong>Arm</strong>s.<br />
WHEEL<br />
3) Hand tighten the jam nuts<br />
4) Before re-attaching the <strong>Front</strong> <strong>Upper</strong> <strong>Control</strong> Brackets to the chassis.<br />
<strong>Install</strong> the new <strong>Front</strong> <strong>Upper</strong> <strong>Control</strong> <strong>Arm</strong>s as indicated in Figure #2<br />
using the Inner <strong>Front</strong> <strong>Upper</strong> <strong>Control</strong> <strong>Arm</strong> Bolt.<br />
It may be possible that the <strong>Front</strong> <strong>Upper</strong> <strong>Control</strong> <strong>Arm</strong> Bracket<br />
or the Third Member side of the control arm mounting<br />
bracket may be damaged from previous alignment/<br />
suspension servicing. If the arms will not fit properly due to<br />
over-tightening of the Inner and Outer <strong>Front</strong> <strong>Upper</strong><br />
<strong>Control</strong> <strong>Arm</strong> Bolts, additional work will be required to<br />
adjust the brackets to the original OEM specifications.<br />
DOUBLE CHECK that you have inserted the correct side of<br />
the <strong>Z1</strong> <strong>Front</strong> <strong>Upper</strong> <strong>Control</strong> <strong>Arm</strong> into the brackets BEFORE<br />
attempting any adjustments.<br />
Be sure to insert the INNER <strong>Front</strong> <strong>Upper</strong> <strong>Control</strong> <strong>Arm</strong> Bolt in the<br />
proper direction!<br />
The ENGINE Side (WIDER end) of the <strong>Z1</strong> <strong>Front</strong> <strong>Upper</strong> <strong>Control</strong><br />
<strong>Arm</strong> should be inserted into the <strong>Front</strong> <strong>Upper</strong> <strong>Control</strong> <strong>Arm</strong><br />
Bracket.<br />
* A Paint Mark found on the control arm will indicate<br />
the ENGINE side (WIDER end).<br />
<strong>Front</strong> <strong>Upper</strong> <strong>Control</strong><br />
<strong>Arm</strong> Body<br />
Jam<br />
Nuts<br />
Adjuster Bolt<br />
<strong>Front</strong> <strong>Upper</strong> <strong>Control</strong><br />
<strong>Arm</strong> Body<br />
** The Race Version of the <strong>Z1</strong> Motorsports <strong>Front</strong> <strong>Upper</strong><br />
<strong>Control</strong> <strong>Arm</strong>s will have a bolt included for the<br />
ENGINE side (WIDER end) of the arm. This bolt will<br />
reuse the OEM Nut and will replace the OEM bolt.<br />
Failure to use the supplied bolt will prevent proper<br />
installation of the <strong>Z1</strong> <strong>Front</strong> <strong>Upper</strong> <strong>Control</strong> <strong>Arm</strong>s.<br />
FIGURE #2<br />
5) <strong>Install</strong> and hand tighten a <strong>Front</strong> <strong>Upper</strong> <strong>Control</strong> <strong>Arm</strong> Nut onto the<br />
INNER bolt.<br />
<strong>Install</strong>ation Note:<br />
1) Hand<br />
The arms should only be able to be installed ONE WAY. The WIDER end<br />
3) Hand tighten the Jam Nuts.<br />
should be installed into the <strong>Front</strong> <strong>Upper</strong> <strong>Control</strong> <strong>Arm</strong> Bracket (ENGINE<br />
SIDE). The NARROWER end should be installed into the King Pin (WHEEL<br />
SIDE).<br />
6) Attach the <strong>Front</strong> <strong>Upper</strong> <strong>Control</strong> <strong>Arm</strong>/Bracket assembly onto the<br />
chassis using the previously removed <strong>Front</strong> <strong>Upper</strong> <strong>Control</strong> <strong>Arm</strong><br />
Bracket Nuts. Torque the bolts as indicated in Figure #3.