Z1 370Z G37 R35 Urethane Mount Kit.pdf 362KB Jan 03 2012 03:50 ...
Z1 370Z G37 R35 Urethane Mount Kit.pdf 362KB Jan 03 2012 03:50 ...
Z1 370Z G37 R35 Urethane Mount Kit.pdf 362KB Jan 03 2012 03:50 ...

You also want an ePaper? Increase the reach of your titles
YUMPU automatically turns print PDFs into web optimized ePapers that Google loves.
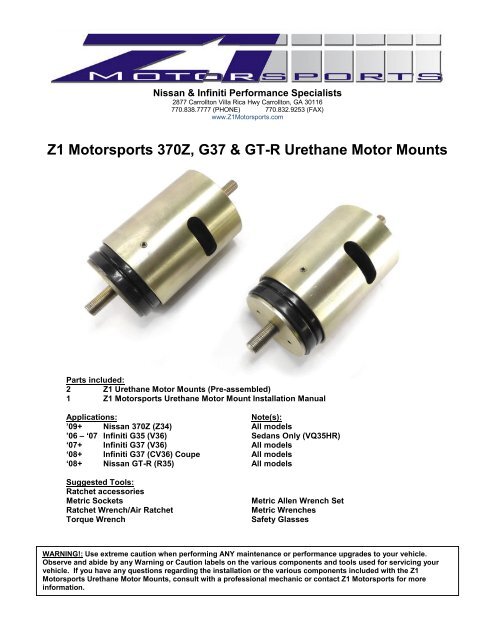
Nissan & Infiniti Performance Specialists<br />
2877 Carrollton Villa Rica Hwy Carrollton, GA 30116<br />
770.838.7777 (PHONE) 770.832.9253 (FAX)<br />
www.<strong>Z1</strong>Motorsports.com<br />
<strong>Z1</strong> Motorsports <strong>370Z</strong>, <strong>G37</strong> & GT-R <strong>Urethane</strong> Motor <strong>Mount</strong>s<br />
Parts included:<br />
2 <strong>Z1</strong> <strong>Urethane</strong> Motor <strong>Mount</strong>s (Pre-assembled)<br />
1 <strong>Z1</strong> Motorsports <strong>Urethane</strong> Motor <strong>Mount</strong> Installation Manual<br />
Applications:<br />
Note(s):<br />
’09+ Nissan <strong>370Z</strong> (Z34) All models<br />
’06 – ‘07 Infiniti G35 (V36) Sedans Only (VQ35HR)<br />
‘07+ Infiniti <strong>G37</strong> (V36) All models<br />
‘08+ Infiniti <strong>G37</strong> (CV36) Coupe All models<br />
‘08+ Nissan GT-R (<strong>R35</strong>) All models<br />
Suggested Tools:<br />
Ratchet accessories<br />
Metric Sockets<br />
Ratchet Wrench/Air Ratchet<br />
Torque Wrench<br />
Metric Allen Wrench Set<br />
Metric Wrenches<br />
Safety Glasses<br />
WARNING!: Use extreme caution when performing ANY maintenance or performance upgrades to your vehicle.<br />
Observe and abide by any Warning or Caution labels on the various components and tools used for servicing your<br />
vehicle. If you have any questions regarding the installation or the various components included with the <strong>Z1</strong><br />
Motorsports <strong>Urethane</strong> Motor <strong>Mount</strong>s, consult with a professional mechanic or contact <strong>Z1</strong> Motorsports for more<br />
information.
Please note: This installation manual is intended to be used as a guide with the<br />
installation and servicing of the <strong>Z1</strong> Motorsports <strong>Urethane</strong> Motor <strong>Mount</strong>s ONLY.<br />
This manual does not include or offer any suggestions for either removing the<br />
engine or replacing the motor mounts while the engine is still installed in the vehicle.<br />
BEFORE YOU BEGIN!<br />
Remove all contents from the <strong>Z1</strong> Motorsports <strong>Urethane</strong> Motor <strong>Mount</strong> <strong>Kit</strong> and verify that ALL necessary hardware<br />
is present.<br />
Installation:<br />
Installation Note #1:<br />
The <strong>Z1</strong> Motorsports <strong>Urethane</strong> Motor <strong>Mount</strong>s come pre-assembled from <strong>Z1</strong> Motorsports. There is no need to disassemble or service the<br />
bushing units prior to installation. If you find that additional height, spacing or adjustment is needed due to a custom installation or<br />
application, these motor mounts can be adjusted +0.375” (~10.00 mm) [Raising the motor] and – 0.2<strong>50</strong>” (5.75mm) [Lowering the motor].<br />
Due to limitations and spacing issues between the cross member and the oil pan, as well as other potential alignment concerns on<br />
standard applications, the <strong>Z1</strong> Motorsports <strong>Urethane</strong> Motor <strong>Mount</strong>s should not be lowered further. Do not attempt to modify the mounts in<br />
any way beyond what this installation manual details in order to achieve a lower engine height.<br />
1) Remove existing motor mounts from the engine. Retain the factory motor mount nuts. DO NOT DISCARD THESE!<br />
2) Insert the upper motor mount stud into the factory motor mount bracket on the engine block. Tighten the 14mm motor<br />
mount nut by hand at this time.<br />
3) Keeping in mind such items as the Turbos (on Twin Turbo/GT-R applications), A/C Compressor and brackets, exhaust<br />
manifolds/downpipes, etc. Rotate the <strong>Z1</strong> Motorsports <strong>Urethane</strong> Motor <strong>Mount</strong> so that the access window exposing<br />
the 17mm bolt head is easily reached once installed on the motor.<br />
When tightening the both upper and lower mm motor mount nuts, you may find that it is beneficial to insert a<br />
14mm wrench into the opening on the <strong>Z1</strong> <strong>Urethane</strong> Motor <strong>Mount</strong>s to prevent the internal urethane<br />
motor mount bolt from slipping while completing the installation.<br />
4) Torque the upper nut to between 36 ft/lbs. It is also recommended that some form of thread locking compound be<br />
applied for additional security.<br />
14mm Motor<br />
<strong>Mount</strong> Nut<br />
Engine Assembly<br />
Motor <strong>Mount</strong><br />
Bracket<br />
17mm Motor<br />
<strong>Mount</strong> Nut<br />
Motor <strong>Mount</strong><br />
Assembly<br />
5) Once the motor has been reinstalled onto the engine’s cross member, torque the lower nut to between 68 ft/lbs. Again, it<br />
is recommended that some form of thread locking compound be applied for additional security.<br />
Installation Note #2:<br />
Due to the nature of urethane bushings and its increased stiffness, additional engine vibration will be transferred into the chassis. No<br />
additional engine noise or harshness will result of installing the <strong>Z1</strong> Motorsports <strong>Urethane</strong> Motor <strong>Mount</strong>s.
Servicing, Disassembly & Reassembly:<br />
Motor <strong>Mount</strong><br />
Body<br />
Upper <strong>Mount</strong><br />
Stud<br />
Apply thread<br />
locking<br />
compound<br />
<strong>Urethane</strong> Motor<br />
<strong>Mount</strong> Bolt<br />
M5 x 0.80mm Set<br />
Screw<br />
Apply thread<br />
locking<br />
compound<br />
Motor <strong>Mount</strong><br />
Upper Plate<br />
Apply thread<br />
locking<br />
compound<br />
Energy Suspension<br />
Upper Bushing<br />
Energy Suspension<br />
Lower Bushing<br />
Motor <strong>Mount</strong><br />
Adjuster<br />
Apply ARP<br />
assembly lube or other<br />
suitable lubricant to threads.<br />
Motor <strong>Mount</strong><br />
Lower Plate
When servicing or adjusting the <strong>Z1</strong> Motorsports <strong>Urethane</strong> Motor <strong>Mount</strong> Bushings, follow below mentioned steps<br />
in sequence when disassembling or reassembling the units. (Refer to the Motor <strong>Mount</strong> exploded view on the<br />
previous page for part sequencing and locations).<br />
Disassembly:<br />
1) Remove the Motor <strong>Mount</strong> Lower Plate by unthreading it from the assembly.<br />
The out rim of the lower plate can be placed into a bench vise. Using a 17mm wrench, insert it into the<br />
window on the Motor <strong>Mount</strong> Body and attach it to the 17mm Motor <strong>Mount</strong> Bolt. Turn the wrench counter<br />
clockwise to loosen the bolt. The entire body assembly will spin, unscrewing the motor mount lower<br />
plate.<br />
2) Remove the 17mm wrench from the opening and set aside.<br />
3) Remove the Energy Suspension Lower Bushing from the Motor <strong>Mount</strong> Body.<br />
4) Remove the M5 x 0.80mm Set Screw.<br />
5) Unscrew the Motor <strong>Mount</strong> Adjuster from the body.<br />
BE CAREFUL NOT TO DAMAGE THE THREADS ON EITHER THE MOTOR MOUNT BODY OR THE MOTOR MOUNT<br />
ADJUSTER.<br />
Reassembly:<br />
6) Remove the Energy Suspension Upper Bushing from the Motor <strong>Mount</strong> Body.<br />
7) The <strong>Urethane</strong> Motor <strong>Mount</strong> Bolt and Upper Plate can remain inside of the Motor <strong>Mount</strong> Body.<br />
Removal is not needed unless to replace a damaged component.<br />
1) Reinstall all previously removed components in the reverse order<br />
mentioned above.<br />
Be sure to lubricate the threads on the Motor <strong>Mount</strong> Adjuster and those on<br />
the Motor <strong>Mount</strong> Body to ensure smooth travel/engagement. Apply a<br />
suitable thread locking compound to the threads on the Motor <strong>Mount</strong> Bolt.<br />
Screw the Motor <strong>Mount</strong> Adjuster until it reaches a depth of 9/16” (0.5625”)<br />
to achieve a factory motor mount height. Re-insert the M5 x 0.80mm Set<br />
Screw to prevent the Motor <strong>Mount</strong> Adjuster from spinning while<br />
completing the final steps of assembly.<br />
2) Once all components are reinserted into the Motor <strong>Mount</strong> Body, use the<br />
14mm Wrench previously used and reinsert it into the Motor <strong>Mount</strong> Body’s<br />
window.<br />
3) Tighten the 17mm Motor <strong>Mount</strong> Bolt by turning the wrench Clockwise. Tighten<br />
the bolt/Motor <strong>Mount</strong> Body Assembly until the bolt bottoms out.<br />
By tightening the 17mm Motor <strong>Mount</strong> Bolt, you are pre-loading the Energy<br />
Suspension bushings to the proper specification. Some resistance will be<br />
felt as you tighten the bolt. Only when the bolt stops spinning,<br />
successfully compressing the upper and lower bushings, will the preload<br />
be achieved.