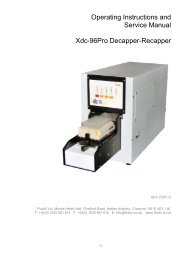
Quick setup Guide - FluidX
Quick setup Guide - FluidX
Quick setup Guide - FluidX

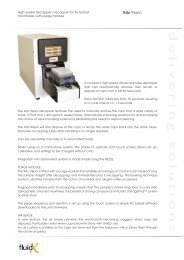
Create successful ePaper yourself
Turn your PDF publications into a flip-book with our unique Google optimized e-Paper software.
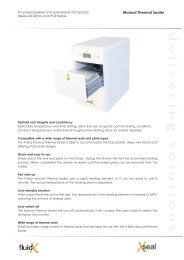
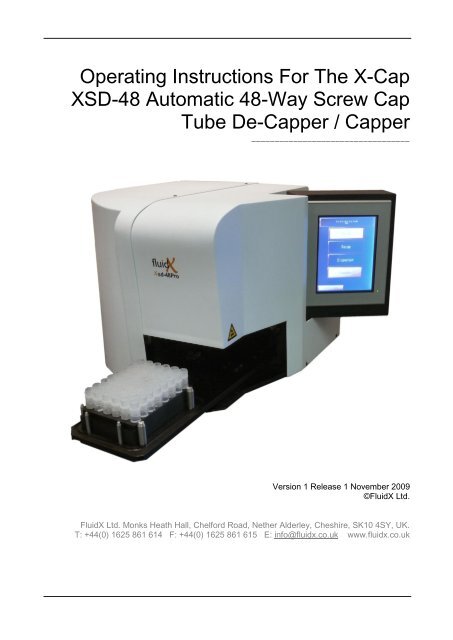
Operating Instructions For The X-Cap<br />
XSD-48 Automatic 48-Way Screw Cap<br />
Tube De-Capper / Capper<br />
__________________________________<br />
Version 1 Release 1 November 2009<br />
©<strong>FluidX</strong> Ltd.<br />
<strong>FluidX</strong> Ltd. Monks Heath Hall, Chelford Road, Nether Alderley, Cheshire, SK10 4SY, UK.<br />
T: +44(0) 1625 861 614 F: +44(0) 1625 861 615 E: info@fluidx.co.uk www.fluidx.co.uk
This document is for information only; the manufacturer accepts no liability for errors contained<br />
herein or for incidental or consequential damages with the furnishing, performance, or use of this<br />
material.<br />
Unless otherwise specified references to names or parts is purely casual and has the purpose of<br />
illustrating the product. The contents of this publication may not be reproduced in any form or by<br />
any means (including electronic storage and retrieval or translation into a foreign language) without<br />
prior agreement and written consent from the copyright owner.<br />
The information contained in this document is subject to change without notice.<br />
Manufactured for:<br />
fluidX Ltd.<br />
Monks Heath Hall<br />
Helford Road<br />
Nether Alderley<br />
Cheshire<br />
SK10 4SY<br />
UK<br />
Manufactured by:<br />
Cedrex A/S<br />
Notgangen 3<br />
DK-2690 Karlslunde<br />
Denmark<br />
www.cedrex.dk<br />
Tel: +44 (0) 1625 861 614<br />
Fax: +44 (0) 1625 861 615<br />
Email: sales@fluidx.co.uk<br />
www.fluidx.co.uk
1 IMPORTANT SAFETY INFORMATION<br />
Read through this manual and the safety instructions carefully and consider dangers and the prevention of<br />
accidents when operating the machine.<br />
The machine must only be operated when the service manual has been read carefully.<br />
The machine must be screened off appropriately before operation.<br />
The machine must only be used to remove and replace screw caps on micro tubes in specific rack<br />
types.<br />
The machine settings must not be changed.<br />
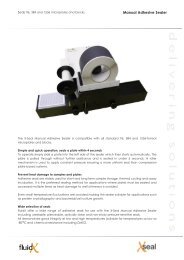
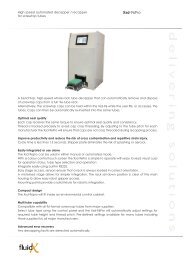
2 MACHINE DESCRIPTION AND OPERATION<br />
The present unit, hereafter termed as “XSD-48Pro” is designed to remove and replace caps from tubes with<br />
screw caps placed in a rack on close set tubes in specific rack types. (Screw caps are hereafter termed as<br />
Caps)<br />
The machine is configured by default at the factory for use with specific tube and rack types and this<br />
machine description applies to different versions that are programmed to different tube and rack<br />
manufacturers.<br />
It can be manually controlled or by integrated with a robot cell.<br />
Mode of operation:<br />
The rack with tubes is loaded into the front of the rack container. The machine functions are manually<br />
activated via the control panel or via robot integration from PC via command set.<br />
“bits” are moved vertically and automatically into a range of Caps, then a full rack of 48 or 24 is simultaneous<br />
decapped – i.e. Caps are screwed counter-clockwise synchronous with an upward return on the bits.<br />
The Caps are hold on the Bits until recapping program is activated.<br />
When the rack container is in its initial position it will be away from the machine and the robotic gripper or<br />
other equipment will have free access to remove the rack for further operation in the system. While further<br />
operation takes place the decapped Caps will remain in the machine.<br />
Recapping takes place in reverse order. The bits holding the Caps will move vertical to that rack with<br />
uncapped tubes and recap all tubes at once. An integrated function ensures that all Caps are equally<br />
tightened with a defined torque.<br />
The full process is controlled by an integrated PLC that is pre-programmed by the factory.<br />
3 LIMITATIONS ON MACHINE USE<br />
XSD48Pro is only designed for the above-mentioned purpose. Any other use is considered improper.
4 SPECIFICATIONS<br />
Noise level, energy equivalent: < 70 dB(A)<br />
Supply voltage EC: 220-240 VAC 1/N/PE – 5.0 A<br />
Supply voltage US: 100-120 VAC 1/N/PE - 5.0 A<br />
Use IEC 320 plugs only. Ground must be connected at all times<br />
Fuse 2 pcs.: 250 V, 5A (5x20 mm) Use IEC 60127 fuse only<br />
Communication: RS 485 – Windows Hyper Terminal<br />
The machine must only be operated under the following conditions:<br />
Indoor<br />
At temperatures between 5°C and 40°C<br />
Max. 80% relative humidity up to 31°C, linear decrease to 50% relative humidity at 40°C.<br />
The following symbols are used on the machine:<br />
This symbol is placed on the side of the machine close to the net plug and implies the<br />
risk of electric shock on the opposite side of the machine cover.<br />
This symbol is placed on the table top and implies the danger of jamming fingers near<br />
the tower or rack container.<br />
5 INSTALLATION INSTRUCTIONS<br />
Installation<br />
By default the machine is equipped with T-slots in the base plate that fits the deck of various pipettes –<br />
among others Tecan freedom evo. If the T-slot is not used the machine must be placed at an even and<br />
stable base (table etc.). For increased security with robot control the machine can be fixed at the table top<br />
with fittings that can be ordered separately.<br />
The enclosed net plug is connected to an earthed 230V/115V outlet. The socket MUST be switched to ”0”<br />
before it is connected. Failure to do so may damage the electric circuit.<br />
The enclosed RS 485 socket (female/male) is connected to the machine for robot communication with PLC.<br />
This plug is also used for general service of PLC. List of applicable ASCII codes are found in the end of this<br />
documentation.<br />
Noise level reduction<br />
The machine does not emit noise during operation; therefore no other measures in terms of noise level<br />
reduction apply.<br />
General<br />
Avoid that moving parts are subject to pressure and weight e.g. do not rest a hand on the rack container or<br />
twist the container as it may pull the machine out of position or at worst damage moving parts.
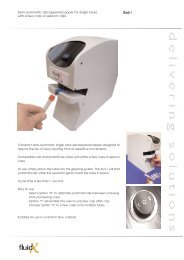
6 INSTRUCTIONS FOR USE<br />
Manual operation<br />
Starting procedure<br />
Unpack the XSD48Pro and place it on the rubber<br />
feet and on a flat solid table.<br />
Please have at least 6” / 200mm free space in<br />
front of the XSD48Pro.<br />
Plug in the machine with a net cable (230VAC<br />
EC or 110VAC US)<br />
Switch on the machine.<br />
Please pay attention that the rack container will<br />
automatically move approx. 180 mm out to the<br />
load position for the rack during the initialization<br />
process.
“initialization” icon blinking and await<br />
automatically initialization process – approx. 2<br />
minutes<br />
Machine is ready for use when the initialization<br />
button stops blinking and the Decap is<br />
highlighted.<br />
Decap a rack of tubes<br />
Load a rack with capped tubes to be “Decapped”<br />
in position of the container.<br />
Please pay attention that the rack can vary<br />
depending on tubes.<br />
Ask you supplier for correct rack<br />
Note:<br />
The unit is set up and prepared for handling<br />
certain tube and please pay attention to use the<br />
correct tube and rack.<br />
In some configurations can the machine operate<br />
with different tube size and different adaptors are<br />
available on request.<br />
Please always be sure you use the right tube,<br />
rack and adaptors before using the machine.
Press ”Decap”<br />
The Decap process will start up and the rack and<br />
container will move into the machine all caps on<br />
tubes will automatically be unscrewed in few sec.<br />
When the caps is unscrew will the rack move out<br />
of the machine.<br />
All caps will stay on the pins until the Recap<br />
process later is finished.<br />
Note.<br />
In case the unit unexpected is turned off while<br />
caps are on the pins will the machine<br />
automatically dispatch all caps in the machine<br />
when the unit is started up again and the<br />
initialization process has finished.<br />
We recommend moving all caps manually before<br />
restarting.<br />
Recap<br />
Press “Recap”<br />
Recapping process starts and runs.<br />
After a few seconds the decapping process is<br />
complete and the container returns to its initial<br />
position.<br />
All caps are replaced and screwed on the tubes<br />
again and tightened with a certain individual<br />
factory set torque.
Standby<br />
Press “Standby”<br />
You can always move in the tray and close the<br />
machines safety door and protect against dust or<br />
others<br />
The unit will automatically go in a Standby mode<br />
after 300sec.<br />
Press ZZZ to return
7 SAFETY FUNCTION<br />
The device have a safety door which close<br />
automatically during Decap and Recap process<br />
and will enclosed the machine so access to<br />
moving parts inside the device not is possible.<br />
Please keep your fingers or foreign objects away<br />
from the door opening.<br />
If the door accidentally comes in contact with<br />
fingers and object a build in clutch will secure that<br />
the door not can close and harm fingers or<br />
objects. The machine will not start running before<br />
the door is completely closed.<br />
In case something accidentally blocks the door<br />
we recommend switch off the machine for 5 sec.<br />
and turn it on again. The machine will reinitializing<br />
and the door automatically move to the open<br />
position.
8 INSTRUCTIONS FOR MAINTENANCE<br />
Normally, it is not possible for the operator to maintain the machine. It is advisable to maintain the machine<br />
every 50 hours of operation and minimum once yearly. (100 hours of operation corresponds to approximately<br />
500 racks).<br />
Check whether the machine has damages and make sure to repair these before operation.<br />
Service<br />
The moving mechanical parts and components do not require additional lubrication and the machine requires<br />
no maintenance other than cleaning.<br />
However, non-acid oil (sewing machine oil) can be used on the moving parts to reduce friction.<br />
In Service menu you get access to manual<br />
movement and running of the device.<br />
This menu is dedicated to an authorized service<br />
partner and only used to adjust settings.<br />
Access to that menu is secured by a password to<br />
accommodate rules of validation and un attended<br />
adjustments.<br />
Repair<br />
If the machine needs repairing, please contact the service partner.
9 SCALE DRAWING<br />
XSD48Pro & XSD24Pro<br />
10 WEEE STATEMENT (EUROPEAN UNION)
The symbol above indicates that Waste Electrical and Electronic Equipment (WEEE) is not to be disposed of<br />
as unsorted municipal waste. Equipment marked with this symbol is to be collected separately.<br />
The objectives of this program are to preserve, protect and improve the quality of the environment, protect<br />
human health and utilize natural resources prudently and rationally. Specific treatment of WEEE is<br />
indispensable in order to avoid the dispersion of pollutants into the recycled material or waste stream. Such<br />
treatment is the most effective means of protecting the customer’s environment.<br />
The waste collection, reuse, recycling, and recovery programs available to Cedrex-customers, vary by<br />
customer location. Please contact the responsible body (e.g., your laboratory manager) for information about<br />
local requirements.<br />
11 EC DECLARATION OF CONFORMITY
We<br />
Cedrex A/S<br />
Notgangen 3<br />
DK-2690 Karlslunde<br />
Phone +45 32 57 51 81<br />
Hereby declares that the product, cited below,<br />
Screw Decapper/Recapper<br />
Type: XSD48&24Pro<br />
Serial number: 164-25-001 to 164-25-999<br />
Machine to ”De-cap” and ”Re-cap” Caps on Micro tubes in racks<br />
Conforms to the requirements of the EC Declaration of Conformity for Machines (Directive 98/37/EC) of 22<br />
June 1998.<br />
Conforms to other relevant EC Directives:<br />
Low Voltage Directive (LVD) – Directive 73/23/EEC<br />
EMC Directive 89/336/EEC<br />
Karlslunde, 01 September 2009<br />
Stig Christensen,<br />
Mechanical Engineer