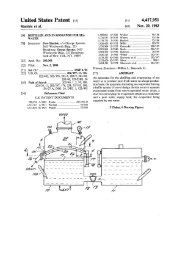
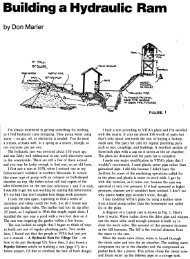
CD-Sextant - Build your own sextant - Pole Shift Survival Information
CD-Sextant - Build your own sextant - Pole Shift Survival Information
CD-Sextant - Build your own sextant - Pole Shift Survival Information

Create successful ePaper yourself
Turn your PDF publications into a flip-book with our unique Google optimized e-Paper software.
Navigator Light Software<br />
Navigator uses a custom chart file format, with the CHT extension. These are plain text ASCII files and can be edited with<br />
the Windows Notepad or Wordpad. Because providing detailed vector charts of all regions of the Earth is a demanding task,<br />
I choose to give users a tool to roll their <strong>own</strong> charts. Producing a vector chart means using a raster chart image to digitalize<br />
the points in the shoreline.<br />
Chartmaker accepts three image formats: Windows BMP, GIF and JPG. If you are scanning paper charts, JPG is probably<br />
the best format, because files are smaller. It's a compressed format.<br />
The CHT file<br />
Once you have the image of the chart, load it in Chartmaker. Now you have to define the scale for this chart. Click and enter<br />
the Earth Coordinates for three distinct reference points of the image, as described above.<br />
1. Choose three points that are relatively distant to each other (at least 1/3 of the screen). Select points that form a right<br />
angle. Click the points and enter their Earth coordinates.<br />
2. After the third point, the caption will show the coordinates of the cursor, as you move the mouse. Check the<br />
coordinates of other points, to certify that <strong>your</strong> scale is accurate.<br />
3. Select "Edit, Draw Axis" in the menu. The program will draw vertical and horizontal axis in 30' intervals. Check if<br />
they are the same as the image's axis. Draw again to erase the axis.<br />
4. Now draw the shoreline, clicking the points with the mouse. Draw different polygons to represent the islands and<br />
continents.<br />
5. After clicking all points of a given polygon, press the "close polygon" button. The last point will be connected to the<br />
first. All polygons must be closed.<br />
6. Give a name for the polygon.<br />
7. After drawing all the polygons, save the CHT file.<br />
8. Open it in Navigator chart viewer, to see the result. Zoom in and out, to check the details.<br />
In the figure to the left, the 3 reference<br />
points are marked 1, 2 and 3. The<br />
coordinates are:<br />
1) 24°00.0S 46°25.0W<br />
2) 23°50.0S 46°25.0W<br />
3) 24°00.0S 46°06.6W<br />
If you open the supplied myworld.cht<br />
file in Navigator, you will see a<br />
simplified chart of the whole world. I<br />
made it more detailed in one part<br />
(44°00'W 23°30'S), the region I usually<br />
navigate. You can do this for <strong>your</strong><br />
region, by directly editing the CHT file<br />
with a text editor and adding the<br />
polygons of <strong>your</strong> region. This is a little<br />
tricky. You might prefer to roll a chart<br />
of <strong>your</strong> region only.<br />
You may also merge CHT files, using an ASCII text editor (like the Notepad or Wordpad). Take a look in the CHT file<br />
header for more technical details on the CHT file format.<br />
xxx<br />
http://www.tecepe.com.br/nav/navpro.htm (22 of 23) [9/2/2004 11:05:07 PM]