CD-Sextant - Build your own sextant - Pole Shift Survival Information
CD-Sextant - Build your own sextant - Pole Shift Survival Information
CD-Sextant - Build your own sextant - Pole Shift Survival Information

You also want an ePaper? Increase the reach of your titles
YUMPU automatically turns print PDFs into web optimized ePapers that Google loves.
<strong>CD</strong>-<strong>Sextant</strong> - <strong>Build</strong> <strong>your</strong> <strong>own</strong> <strong>sextant</strong><br />
level of difficulty beginner intermediate advanced<br />
The <strong>CD</strong>-<strong>Sextant</strong><br />
<strong>Build</strong> <strong>your</strong> <strong>own</strong> <strong>sextant</strong><br />
One of the obstacles to learn and practice celestial navigation is the price and availability of <strong>sextant</strong>s. Even the simplest plastic<br />
models cost between US$ 50 and 150 and can only be found in a few specialized stores, in big centers. This scares many<br />
interested people away from celestial navigation.<br />
That's why a few months ago I published the X-tant Project , a "do-it-<strong>your</strong>self" octant design. But while that octant is cheap to<br />
build, it requires electric tools, some hard to find materials and considerable work.<br />
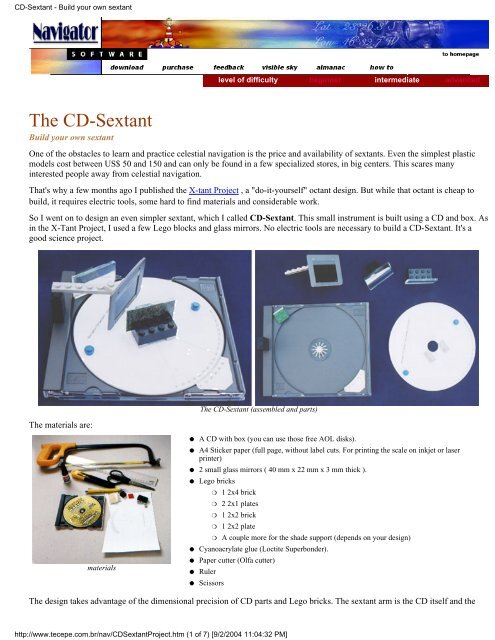
So I went on to design an even simpler <strong>sextant</strong>, which I called <strong>CD</strong>-<strong>Sextant</strong>. This small instrument is built using a <strong>CD</strong> and box. As<br />
in the X-Tant Project, I used a few Lego blocks and glass mirrors. No electric tools are necessary to build a <strong>CD</strong>-<strong>Sextant</strong>. It's a<br />
good science project.<br />
The materials are:<br />
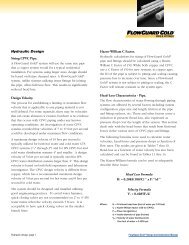
The <strong>CD</strong>-<strong>Sextant</strong> (assembled and parts)<br />
materials<br />
●<br />
●<br />
●<br />
●<br />
●<br />
●<br />
●<br />
●<br />
A <strong>CD</strong> with box (you can use those free AOL disks).<br />
A4 Sticker paper (full page, without label cuts. For printing the scale on inkjet or laser<br />
printer)<br />
2 small glass mirrors ( 40 mm x 22 mm x 3 mm thick ).<br />
Lego bricks<br />
❍ 1 2x4 brick<br />
❍ 2 2x1 plates<br />
❍ 1 2x2 brick<br />
❍ 1 2x2 plate<br />
❍ A couple more for the shade support (depends on <strong>your</strong> design)<br />
Cyanoacrylate glue (Loctite Superbonder).<br />
Paper cutter (Olfa cutter)<br />
Ruler<br />
Scissors<br />
The design takes advantage of the dimensional precision of <strong>CD</strong> parts and Lego bricks. The <strong>sextant</strong> arm is the <strong>CD</strong> itself and the<br />
http://www.tecepe.com.br/nav/<strong>CD</strong><strong>Sextant</strong>Project.htm (1 of 7) [9/2/2004 11:04:32 PM]
<strong>CD</strong>-<strong>Sextant</strong> - <strong>Build</strong> <strong>your</strong> <strong>own</strong> <strong>sextant</strong><br />
<strong>sextant</strong> frame is the <strong>CD</strong> box. The angle is changed by turning the <strong>CD</strong>.<br />
Of course the small <strong>CD</strong> radius gives limited precision to the instrument when compared to larger <strong>sextant</strong>s, but it is enough for<br />
celestial navigation practice. Because the instrument is so small, care must be taken in all steps (cutting, sticking etc) to achieve<br />
the best possible precision.<br />
The <strong>CD</strong>-<strong>Sextant</strong> is not only useful for celestial navigation, but also in coast navigation, using simple trigonometric relations. And<br />
it is surprisingly strong (I have dropped mine a couple times, with pieces flying in all directions, and it is still working).<br />
Vernier scale <strong>sextant</strong>s<br />
Minutes of arc are very small and reading them is only possible with a precise scale. There are two kinds of minute scales used in<br />
<strong>sextant</strong>s. Modern <strong>sextant</strong>s use a drum to trim and read the minutes. One full turn of this drum equals one degree ( or 60' ). This<br />
device requires sofisticated machining to build.<br />
The <strong>CD</strong>-<strong>Sextant</strong> uses a vernier scale, a simpler but usefull minute scale type. Since the <strong>CD</strong>-<strong>Sextant</strong> degrees are small ( due to the<br />
small <strong>CD</strong> radius ) I used a single 60' vernier (larger <strong>sextant</strong>s usually divide each degree in three ticks of 20' ).<br />
For more details on vernier scales click here.<br />
Printing the Scale<br />
The scale is the most difficult <strong>sextant</strong> component to do using traditional techniques. Fortunately, most of us have a precise<br />
printing equipment right on our desktop: an inkjet or laser printer. These machines can print 300 dots per inch (1200 for laser),<br />
with enough precision to print a <strong>sextant</strong> scale.<br />
<strong>Sextant</strong> scale printer program<br />
In order to achieve the best results, I wrote a small <strong>sextant</strong> scale printing program. This will print the <strong>sextant</strong> scale using vector<br />
rendering, for best resolution. This is the same program used in the X-tant project.<br />
XtantScalePrinter - version 1.1 - d<strong>own</strong>load here<br />
For Windows, 192.874 bytes - This program can be freely used for personal, noncommercial purposes, provided that<br />
the credit (name and URL) is not removed from the printed scales.<br />
Mac and Linux users may print this high definition image<br />
(300 DPI) with similar results.<br />
1) To print the <strong>CD</strong>-<strong>Sextant</strong> scale, run the program and check the <strong>CD</strong>-<strong>Sextant</strong> checkbox.<br />
2) The <strong>CD</strong>-<strong>Sextant</strong> is a vernier <strong>sextant</strong> (see X-tant Project for more details on Verniers). In the case of the <strong>CD</strong>-<strong>Sextant</strong>, the small<br />
scale radius makes it impossible to divide the scale degrees into smaller ticks. Set the div/degree property to 1. This will give a<br />
scale with ticks only for full degrees and a 60' vernier.<br />
3) Select <strong>your</strong> favorite font. Use size 7.<br />
4) Press the [Print scale] button.<br />
5) After printing, cut around the scale precisely. Don't cut the <strong>CD</strong> axis hole yet.<br />
Sticking the scale<br />
Sticking the scale is a critical operation. If the scale is not perfectly centered when you stick, you will probably have to remove it<br />
in pieces and print a new one. I did this:<br />
1) Lift an edge of the sticker paper backing, in the scale part.<br />
http://www.tecepe.com.br/nav/<strong>CD</strong><strong>Sextant</strong>Project.htm (2 of 7) [9/2/2004 11:04:32 PM]
<strong>CD</strong>-<strong>Sextant</strong> - <strong>Build</strong> <strong>your</strong> <strong>own</strong> <strong>sextant</strong><br />
2) Cut the paper backing edge, to expose a small area of the sticker surface.<br />
3) Position the scale on the <strong>CD</strong> (use the data side), making sure the scale is perfectly centered.<br />
Look against a light source to check if scale is centered in the <strong>CD</strong> axis hole. Hold the <strong>CD</strong> and<br />
printed scale with both hands, making sure the printed scale is not out of the <strong>CD</strong> in any side.<br />
4) Once the scale is centered, press the exposed sticker surface against the <strong>CD</strong> to stick it. This<br />
will secure the scale to the <strong>CD</strong> in the correct position.<br />
5) Remove the rest of the sticker paper backing and carefully stick the scale, working in one<br />
direction, to avoid bubbles and ripples. In the end, the printed scale must be centered and match<br />
<strong>CD</strong> surface perfectly.<br />
6) Use the paper cutter to open the <strong>CD</strong> axis hole.<br />
Save the printed Vernier. It will be the last thing to be stuck, after the mirrors are positioned.<br />
Mirrors<br />
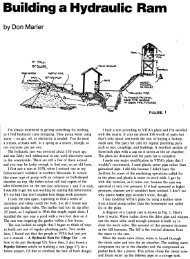
I used 2 equally sized glass mirrors (40 mm x 22 mm, 3 mm tick). Any glass shop will cut these for you. As you know, one of the<br />
mirrors must be half silvered. So you must remove half of the mirror silver backing. I used a paper cutter blade for this job (Olfa<br />
cutter).<br />
First make a sharp longitudinal cut along the middle of the mirror. Then scratch half of the<br />
epoxy protective layer from the back of the mirror, with the blade inclined. The epoxy<br />
backing is a hard material, but will come out with patience.<br />
Go easy and don't use any abrasive material or the blade point, to avoid scratching the<br />
glass. Once the epoxy is gone, the silver is easy to remove, rubbing with a wet cloth or<br />
thin steel sponge (the ones used to clean windows). In the end, the glass must be clear and<br />
scratch free (fig. below).<br />
http://www.tecepe.com.br/nav/<strong>CD</strong><strong>Sextant</strong>Project.htm (3 of 7) [9/2/2004 11:04:32 PM]
<strong>CD</strong>-<strong>Sextant</strong> - <strong>Build</strong> <strong>your</strong> <strong>own</strong> <strong>sextant</strong><br />
Note: You may be tempted at this point to use a thinner mirror<br />
and eliminate the transparent part altogether. Don´t do that.<br />
This would introduce a refraction error. The direct (horizon)<br />
light ray must pass thru the glass, as the light ray from the star<br />
does.<br />
This can only be done if you use a front mirrored surface, such<br />
as a polished inox plate.<br />
Mirror supports<br />
I used Lego bricks to hold the mirrors. They have good dimensional precision and will guarantee a nearly correct 90° angle<br />
between the mirrors and <strong>CD</strong> parts. They will also allow the <strong>sextant</strong> to be assembled, disassembled, trimmed and parts to be<br />
replaced as needed.<br />
Of course other materials can be used if Lego bricks are not available. Try to use dimensionally precise objects, to build the<br />
mirror supports with right angles.<br />
Bonding the mirrors<br />
<strong>CD</strong> Center mirror:<br />
1) Working on a flat surface, bond the center mirror back to the large side of a 2x4 Lego<br />
brick. Make sure the mirror is perpendicular to the flat surface.<br />
http://www.tecepe.com.br/nav/<strong>CD</strong><strong>Sextant</strong>Project.htm (4 of 7) [9/2/2004 11:04:32 PM]
<strong>CD</strong>-<strong>Sextant</strong> - <strong>Build</strong> <strong>your</strong> <strong>own</strong> <strong>sextant</strong><br />
2) Assemble the 2x4 brick over two 2x1 Lego plates (gray ones). The space between the<br />
plates will be over the <strong>CD</strong> axis hole.<br />
3) Bond the mirror assembly to the <strong>CD</strong>. A few things to watch here:<br />
● Align the the large Lego side to the 180° scale line. This way, the mirror silvered<br />
surface (i.e. the back surface of the glass mirror) will be over the <strong>CD</strong> center.<br />
● Take care to center the Lego plates well. They will be very close to the <strong>CD</strong> center<br />
hole. Don't let them interfere with it.<br />
<strong>CD</strong> Box mirror (half silvered):<br />
I used a 2x2 Lego brick mounted on a 2x2 Lego plate, to hold the <strong>CD</strong><br />
box mirror. Cut the 4 brick bumps out, because they will be visible<br />
thru the transparent part of the half silvered mirror.<br />
1) Working on a flat surface, bond the half silvered mirror to the 2x2<br />
Lego brick. Make sure the mirror is perpendicular to the flat surface.<br />
2) Assemble the box mirror brick to the plate.<br />
3) Position and bond the box mirror assembly in the <strong>CD</strong> box corner.<br />
Make sure that:<br />
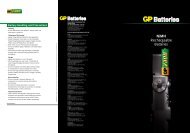
● The <strong>CD</strong> is positioned pointing more or less as sh<strong>own</strong> in the<br />
layout to the left, so you will have space to place the Vernier in<br />
the other box corner afterwards.<br />
● Place the half silvered mirror assembly parallel to the center<br />
mirror. Position it visually.<br />
● Bond the assembly to the <strong>CD</strong> box.<br />
Sticking the Vernier<br />
<strong>CD</strong>-<strong>Sextant</strong> Layout<br />
> high definition 300 DPI image<br />
At this point, <strong>your</strong> <strong>CD</strong>-<strong>Sextant</strong> is almost done. You must now stick the Vernier in 0° position:<br />
1) Cut the vernier in a triangular form, to fit the <strong>CD</strong> box corner. I did stick the vernier on a blank sticker paper piece, in order to<br />
make the vernier paper ticker. This is important because the vernier edge will be unsupported.<br />
1) Trim the mirrors (see trimming the mirrors below)<br />
2) Turn the <strong>CD</strong> until the mirrors are parallel.<br />
3) Hold the instrument in observation position, looking thru the half silvered mirror and focus on a far away object. Turn the <strong>CD</strong><br />
slowly until the reflected image and the direct image coincide. This must be the instrument zero, so....<br />
http://www.tecepe.com.br/nav/<strong>CD</strong><strong>Sextant</strong>Project.htm (5 of 7) [9/2/2004 11:04:32 PM]
<strong>CD</strong>-<strong>Sextant</strong> - <strong>Build</strong> <strong>your</strong> <strong>own</strong> <strong>sextant</strong><br />
4) ...Carefully place and stick the vernier in the <strong>CD</strong> box, reading 0°00'. This means that the vernier tick A most coincide with the<br />
0° scale line. On the other side of the vernier, the 60' tick must coincide with the 59° tick in the scale.<br />
Make sure the vernier and <strong>CD</strong> scale are very close together. The vernier probably will be a little higher than the <strong>CD</strong>, and you<br />
might want to bend it d<strong>own</strong> a bit.<br />
Shades<br />
●<br />
●<br />
●<br />
●<br />
●<br />
The Sun is kn<strong>own</strong> to have destroyed many navigator retinas in the past. Extreme care must be taken while<br />
observing it, to protect <strong>your</strong> eye. This means <strong>your</strong> instrument must have a good Sun filter. I cannot guarantee<br />
that the design that follows is 100% safe. Tips:<br />
Make sure the shade is in place before observing the Sun.<br />
Avoid observing the Sun for more than a few seconds.<br />
Never stare at it directly.<br />
If you feel uncomfortable, stop the observation immediately.<br />
In this case, consider adding some more filter (i.e. one more film layer).<br />
As shades for Sun and Moon sights, I used 35 mm dark negative photography film (there is one in the end of every film roll).<br />
The negatives were mounted in slide frames. I used two layers of dark film for the Sun frame and single for the Moon. Both slide<br />
frames are removable and are attached to the instrument frame using Lego pieces. I did trim the lower edge of the slide, to make<br />
it thinner. The slide window must match the imaginary "tube" formed by the mirror edges.<br />
In the image to the left we have 3<br />
different shade support designs.<br />
The shade must be positioned<br />
between the two mirrors and the<br />
filter surface must be orthogonal to<br />
the line connecting both mirror<br />
centers. This is to avoid introducing<br />
a refraction error.<br />
Try to position the slide center in the<br />
line connecting the two mirror<br />
centers. The Sun observation is<br />
made by looking thru the half<br />
silvered mirror, below the shade.<br />
Trimming the mirrors<br />
For simplicity, the <strong>CD</strong>-<strong>Sextant</strong> is not equipped with screws to trim the mirrors.<br />
But the mirrors can be trimmed by inserting small sticker paper pieces between<br />
the Lego brick and plates (or by sanding the brick) at suitable positions.<br />
First check the angle of the <strong>CD</strong> mirror (center mirror). As you look to this mirror,<br />
the reflected <strong>CD</strong> edge must be perfectly aligned with the edge you see outside the<br />
mirror (green arrows in the image). This must hold for all directions.<br />
The half silvered mirror can be trimmed by setting the instrument to 0°00',<br />
aiming to a far away object and making sure the direct and reflected images<br />
coincide.<br />
After this initial trimming, the Lego bricks will hold the trimming surprisingly,<br />
even after disassembled. Of course you must read the index error after each set of<br />
observations, as with all <strong>sextant</strong>s.<br />
<strong>CD</strong> center mirror trim<br />
http://www.tecepe.com.br/nav/<strong>CD</strong><strong>Sextant</strong>Project.htm (6 of 7) [9/2/2004 11:04:32 PM]
<strong>CD</strong>-<strong>Sextant</strong> - <strong>Build</strong> <strong>your</strong> <strong>own</strong> <strong>sextant</strong><br />
Final touches<br />
Bond a round 1x1 Lego piece to the <strong>CD</strong> surface, to use as a turning knob<br />
(the blue piece).<br />
The <strong>CD</strong> may be hard to turn. In this case, rub the <strong>CD</strong> hole with a pencil.<br />
The graphite is a good lubricant, and will make turning the <strong>CD</strong> easier.<br />
This is important for fine adjustments.<br />
I made 8 such <strong>sextant</strong>s. I will be publishing test results here soon. Stay<br />
tuned.<br />
-x-x-x-x-x-<br />
Sun sight with the <strong>CD</strong>-<strong>Sextant</strong><br />
Bibliography<br />
>> "The American Practical Navigator " by Nathaniel<br />
Bowditch<br />
ISBN 0781220211 - 1200 pages<br />
buy from Amazon<br />
©Copr 92-2k Omar F. Reis - All rights reserved<br />
http://www.tecepe.com.br/nav/<strong>CD</strong><strong>Sextant</strong>Project.htm (7 of 7) [9/2/2004 11:04:32 PM]
Navigator Light Software<br />
Web services<br />
Star Finder<br />
Almanac<br />
Interactive <strong>Sextant</strong><br />
Software<br />
Purchase<br />
User manual<br />
News<br />
D<strong>own</strong>load trial<br />
Screen shots<br />
Feedback<br />
Chart Library<br />
and links<br />
Learn<br />
Celestial Navigation<br />
Using Navigator<br />
Stars & planets<br />
Navigator methods<br />
<strong>Build</strong> <strong>your</strong> <strong>sextant</strong><br />
The <strong>CD</strong>-<strong>Sextant</strong><br />
Navigator Store<br />
exclusive Navigator designs<br />
> Navigator News<br />
Navigator "in the box" released<br />
Yet another <strong>sextant</strong>: the <strong>CD</strong>-<strong>Sextant</strong><br />
The Navigator Store is on the air<br />
Real and virtual <strong>sextant</strong>s<br />
Moon calculations improved. Navigator 4.1<br />
released<br />
> <strong>Sextant</strong> Corner<br />
<strong>Build</strong> <strong>your</strong> <strong>own</strong> Octant<br />
The interactive <strong>Sextant</strong> - Flash movie<br />
> D<strong>own</strong>load<br />
D<strong>own</strong>load Navigator for Windows<br />
Celestial and chart navigation software . Free trial.<br />
Chart library<br />
Vector charts for the registered edition. Links for raster chart images in the<br />
Internet.<br />
Navigator for DOS<br />
For old DOS machines and HP LX 95/100 palmtops. Free. Service release 1.3<br />
available.<br />
> Learn<br />
Theory<br />
Celestial navigation fundamentals<br />
English › Français › Português<br />
Identification of stars and planets<br />
keeping the time...<br />
object distances and Lunar calculation.<br />
Navigator calculation methods<br />
Practice<br />
How to find <strong>your</strong> position using Navigator<br />
- Navigator 4 User Manual<br />
- How to find <strong>your</strong> position using celestial navigation.<br />
- How to scan, import and use existing paper charts.<br />
- Tips for improving results.<br />
Navigator screen shots<br />
Texto em português<br />
> Navigator software purchase<br />
register and get the<br />
full Navigator<br />
- Vector and raster charts with routes and tracks.<br />
- NMEA compatible GPS interface. Save <strong>your</strong> track in real time .<br />
- <strong>Build</strong> <strong>your</strong> <strong>own</strong> vector charts with ChartMaker.<br />
- Import and use GIF and JPG images as raster charts.<br />
- Star Finder, for easy star identification.<br />
- Meridian Passage and artificial horizon support.<br />
- Leg calculator (Great circle and rhumb lines).<br />
- Print Nautical Almanac pages.<br />
- Secure online registration.<br />
- Register, d<strong>own</strong>load and install in minutes.<br />
- One year e-mail support and software upgrades.<br />
Cartoon<br />
<strong>your</strong> guide to the navigation sky<br />
- sky map in any position and time<br />
- stars, constellations and planets with complete positional data.<br />
- specify position or choose one of 300 listed cities<br />
- requires a Java enabled browser<br />
- printer friendly results<br />
- free web service<br />
Perpetual online<br />
Nautical Almanac<br />
free web service<br />
©Copr 92-2k Omar F. Reis - All rights reserved<br />
http://www.tecepe.com.br/nav/default.htm [9/2/2004 11:04:37 PM]
Navigator Light Software D<strong>own</strong>load<br />
> Navigator 4 - for Windows 95/98/Me/NT/XP/2000<br />
Navigator software d<strong>own</strong>load<br />
>> buy Navigator 4.1 online<br />
- Check the list of extended features<br />
> Navigator Light free shareware version 1.0 for Windows 95/98/Me/NT/XP/2000<br />
Note: This is an old 97 trial version which I no longer support. I'm working on a new reduced feature version of Navigator, for<br />
free d<strong>own</strong>load. In the mean time, use this one as-is or register as a version 4 user (see above). The same goes for the two<br />
programs below. Check the kn<strong>own</strong> issues<br />
> Navigator Light 16 free shareware version 1.0 for Windows 3.1 - For older machines...<br />
> Navigator for DOS and HP 95 LX - freeware version 1.3 - For even older machines...<br />
D<strong>own</strong>load and installation instructions for shareware versions<br />
1) D<strong>own</strong>load to a temporary directory (p.e. c:\windows\temp).<br />
2) After the complete d<strong>own</strong>load, run the program (click 'open' or double click the file in the Windows Explorer) . This will<br />
automatically install the software in <strong>your</strong> system.<br />
Shareware versions features<br />
The shareware versions do all the calculations needed for celestial navigation, including:<br />
● Automatic altitude corrections, including Index Error, Parallax, refraction and height of the eye.<br />
● Full astronomical calculations for Sun, Moon, 4 planets and 56 stars.<br />
http://www.tecepe.com.br/nav/d<strong>own</strong>load.htm (1 of 2) [9/2/2004 11:04:42 PM]
Navigator Light Software D<strong>own</strong>load<br />
●<br />
●<br />
●<br />
●<br />
●<br />
●<br />
●<br />
Nautical Almanac calculations, from 1950 to 2050.<br />
Full information for all celestial objects used in celestial navigation (rise, set, transit and twilights)<br />
List of visible stars with polar chart. Select the best stars to observe using the mouse.<br />
Calculation of Lines Of Position (LOP)<br />
Transport and edition of Lines of Position.<br />
Calculation of the astronomical position - Your position.<br />
Easy-to-use user interface.<br />
Navigator 4 registered version features<br />
The registered version includes all features found in the shareware, plus:<br />
● A redesigned Star Finder.<br />
● Chart viewer, with support for vector and raster charts.<br />
● GPS interface - Connect a GPS and plot <strong>your</strong> position. And save <strong>your</strong> track.<br />
● Improved celestial navigation. Better meridian passage.<br />
● Automatic LOP transport, when calculating the astronomical position.<br />
● Nautical Almanac pages printer. For navigation in the traditional way.<br />
● Leg calculator, for great circle and rhumb line calculations.<br />
● ChartMaker program, for creating vector charts and importing GIF and JPG chart images<br />
● Extensive printer support. Even if you are not taking the computer on board, Navigator can help you, printing nearly<br />
all the necessary navigation data and charts.<br />
>> Buy Navigator 4.1 online<br />
Click here for more Navigator details<br />
©Copr 91-03 Omar Reis<br />
http://www.tecepe.com.br/nav/d<strong>own</strong>load.htm (2 of 2) [9/2/2004 11:04:42 PM]
Navigator Software Registration<br />
Navigator software purchase<br />
Registration benefits - You receive:<br />
1- Latest version of Navigator software.<br />
2- E-mail support for two years.<br />
3- Software upgrades for two years.<br />
4- Many extra features, not available in the shareware version >> read more...<br />
5- No shareware nag messages.<br />
Current version is 4.1 for Windows 95/98/Me/NT/2000/XP<br />
What to expect from Navigator ?<br />
1- Complete celestial navigation module.<br />
2- Powerful star finder for celestial navigation.<br />
3- Useful chart tools, specially for those willing to roll their <strong>own</strong> charts or scan existing paper charts.<br />
4- Simple GPS interface, to plot the position and save the track in real time.<br />
What not to expect ?<br />
1- Navigator is not compatible with any commercial electronic chart format. Only the custom vector chart format and popular GIF/JPEG raster image<br />
formats are supported.<br />
2- Navigator accepts NMEA GPS messages, but does not implement any proprietary or model specific features, such as waypoint uploads or<br />
instrument setup.<br />
2 payment methods:<br />
Online - Credit card, money order and US check registrations. Handled by authorized<br />
resellers ( RegNow and Celestaire )<br />
Cash Orders via regular mail to the Author - All currencies accepted. See below.<br />
2 media options:<br />
Navigator - Internet d<strong>own</strong>load version Software and<br />
documentation d<strong>own</strong>loaded over the Internet ( a 2.7 MB<br />
file ).<br />
Navigator - Packaged version<br />
<strong>CD</strong>-ROM and User´s Manual (68 pages illustrated<br />
booklet).<br />
US$ 35.00<br />
buy from RegNow, an authorized electronic reseller. Credit card,<br />
money order or US check accepted. Secure server.<br />
US$ 59.95<br />
buy from Celestaire, an authorized reseller. Credit card,<br />
money order or US check accepted. Secure server.<br />
Notes:<br />
> Both licenses include the same versions of Navigator and ChartMaker programs.<br />
> Single user license. See license details here.<br />
http://www.tecepe.com.br/nav/purchase.htm (1 of 2) [9/2/2004 11:04:45 PM]
Navigator Software Registration<br />
Or send cash orders to:<br />
Omar Fontana dos Reis<br />
R. Dr Alberto Seabra, 448<br />
05452-000 Sao Paulo - SP - Brazil<br />
If sending cash:<br />
> Wrap securely in opaque envelope.<br />
> Post me an e-mail message. I'll email the d<strong>own</strong>load instructions ASAP, so you don't have to wait for the snail mail latency.<br />
> Remember to include a card with <strong>your</strong> name and e-mail address (and regular mail address for the packaged version)<br />
don't send checks directly to me. If you want to pay with a check, use the online registration above. > All currencies<br />
accepted. Use the current exchange rate to USD price.<br />
Registration and installation steps - Internet version<br />
1- Register using either credit card, money order, US check or cash.<br />
2- After registering you will receive an e-mail with the d<strong>own</strong>load location (URL) and a registration code. The location points to the Navigator software<br />
installer file. Click the link start the d<strong>own</strong>load. Choose to save the file.<br />
3- Save the file to a temporary directory.<br />
File size is 2,7 MB. 8 minutes, with a 56k modem.<br />
4- After the d<strong>own</strong>load is finished, run the file. This will install the software in <strong>your</strong> computer.<br />
5- Type the registration code when prompted for a password. Proceed until the installation is complete.<br />
6- Remember to backup the installer file (and the password) for future installations. Only the original installer can properly setup the software<br />
components on a new computer. No hacking with directories is recommended.<br />
©Copr 92-2k Omar F. Reis - All rights reserved<br />
http://www.tecepe.com.br/nav/purchase.htm (2 of 2) [9/2/2004 11:04:45 PM]
Navigator Software Feedback form - Author information<br />
Contacting the Author<br />
The author may be contacted by this email address: omar@tecepe.com.br.<br />
Regular mail address is:<br />
Omar F. dos Reis<br />
R. Dr Alberto Seabra, 448<br />
05452-000 Sao Paulo - SP - Brazil<br />
Bug reports<br />
Please report bugs in this form. This makes sure that they get "in" the system.<br />
In order to identify and correct the bug, I need to reproduce the problem here. That's why it's important that<br />
you give a full description of the conditions and test data associated with the problem.<br />
Your name :<br />
Feedback/Bug Report form<br />
email address:<br />
Navigator version:<br />
Windows version:<br />
1) Feedback text or ..<br />
2) Bug description and test data:<br />
About the author<br />
http://www.tecepe.com.br/nav/feedback.htm (1 of 4) [9/2/2004 11:04:51 PM]
Navigator Software Feedback form - Author information<br />
My name is Omar Fontana dos Reis. I'm 43<br />
years old and live in São Paulo, Brazil. I'm<br />
married to Monica and have two kids: Raul<br />
(5) and Renato (3).<br />
The dog in this 1996 picture was called<br />
Tonel. After a friendly life, he passed away.<br />
I have another now called Rex , a very funny<br />
B&W Border Collie.<br />
I'm a mechanical engineer, graduated in<br />
1982. But have been programming PCs<br />
since 85, mostly software for the financial<br />
information market.<br />
I'm partner and chief developer of Enfoque Sistemas Ltda, a real-time financial<br />
information company. I also write airport information software.<br />
I sail since I was 16. Started with a Hobie Cat 14'.<br />
Currently I sail Laser and J/24 in Ubatuba, SP. Also<br />
enjoy drawing.<br />
I Started the Navigator project in 1992, first as a<br />
hobby. The first version was for DOS and old HP LX<br />
palmtop computers, still available for d<strong>own</strong>load.<br />
In 96 I started this website, after translating the<br />
Navigator to English and Windows, the globalization<br />
languages.<br />
I enjoy communicating with users. You are welcome<br />
to e-mail me telling how you use the Navigator (fun,<br />
navigation, training, educational tool), what features<br />
should be added, removed or changed. And bug<br />
reports, of course.<br />
this is how I would look, if I tried<br />
to climb the Everest...<br />
I apologize for English errors, which - I suspect - are<br />
present in most of my texts. I would appreciate any<br />
error report or clarification request.<br />
I hope this web site and software have increased <strong>your</strong><br />
knowledge and interest for navigation.<br />
http://www.tecepe.com.br/nav/feedback.htm (2 of 4) [9/2/2004 11:04:51 PM]
Navigator Software Feedback form - Author information<br />
Why Celestial navigation ?<br />
Many people ask me "why do you care about celestial navigation, an obsolete<br />
technology ?" - Mostly for the fun. And it is a niche software market, not in the sight<br />
of larger software companies.<br />
And why should you care about celnav ? Of course the GPS system is great. In fact, it<br />
is the single most important navigation technology of the 20th century. It' s very<br />
precise and reliable. But still, there are a few reasons to know celnav, if you are going<br />
to high seas:<br />
● If you love the sea, you probably like that no-strings-attached feeling. And GPS<br />
dependency is a huge string.<br />
● Celnav is fun and will bring you closer to the Nature and other navigation<br />
concepts.<br />
● Some areas may sometimes be subject to GPS jamming. Remember that GPS is a<br />
great service but is also a military system.<br />
Another common question is "how much conventional celnav one must know to<br />
attempt a large passage? At least the meridian passage, which is simple and requires<br />
a single table.<br />
http://www.tecepe.com.br/nav/feedback.htm (3 of 4) [9/2/2004 11:04:51 PM]
Navigator Software Feedback form - Author information<br />
http://www.tecepe.com.br/nav/feedback.htm (4 of 4) [9/2/2004 11:04:51 PM]
Navigator Star Finder<br />
Navigator Star Finder shows the celestial bodies used in celestial navigation (most visible stars (56) and planets (4), Sun and Moon).<br />
For more details on calculations and abreviations, check the FAQ. For a more powerfull celestial navigation application, visit the<br />
Navigator software website. Access to this service requires a Java enabled browser.<br />
Choose a city from one of the listboxes...<br />
Africa:<br />
Americas:<br />
Asia:<br />
Australia:<br />
CIS(ex USSR):<br />
..or input <strong>your</strong> position. In this case, follow these examples:<br />
●<br />
●<br />
Latitude :<br />
Longitude:<br />
Lat: for 23°45.6'N type 23.456 (use negative values for<br />
South)<br />
Lon: for 53°35.2'W type 53.352 (use negative values for<br />
East)<br />
Europe:<br />
Middle East:<br />
Pacific:<br />
Use GMT time in the format "hh:mm:ss"<br />
Printer friendly<br />
GMT Date (dd/mm/yy):<br />
GMT Time (hh:mm:ss):<br />
e-mail Navigator Star Finder 2.0 ©Copr 97-2k Omar Reis<br />
http://www.tecepe.com.br/cgi-win/cgiasvis.exe [9/2/2004 11:04:54 PM]
"The Online Nautical Almanac"<br />
This service generates "Nautical Almanac" like daily pages.<br />
Date range: between 1950 and 2050<br />
Parameter: initial date of a 3 day period.<br />
Generated data includes:<br />
- Star position table (SHA and declination).<br />
- Sun and Moon hour tables, complete with increments and Semi diameter.<br />
- Planets hour tables, with increments.<br />
- Aries hour table.<br />
A few tables are not included:<br />
- Twilights, Sun and Moon rise and set.<br />
- Sun E.T. and meridian passage.<br />
- Moon meridian passage, age and phase.<br />
- Correction tables (yellow pages) - Tables from an old Almanac can be used instead.<br />
While not intended to substitute the Nautical Almanac, this information is enough to do celestial<br />
navigation using the traditional methods.<br />
Other celestial navigation stuff in this site:<br />
> Navigator Software - Theory and practice in celestial navigation. Software for Windows.<br />
> Navigator Star Finder - Polar chart of the sky in a given time and position.<br />
Questions? check Online Nautical Almanac tips<br />
Date [mm/dd/yyyy] :<br />
Navigator Light® Almanac Pages<br />
http://www.tecepe.com.br/nav<br />
(c)Copr 99-04 Omar Reis<br />
http://www.tecepe.com.br/scripts/AlmanacPagesISAPI.isa [9/2/2004 11:04:55 PM]
Navigator Light Software<br />
Table of contents<br />
Version 4.1 new features<br />
Navigator 4.1 user manual<br />
The access window<br />
>> Chapter 1 - Celestial Navigation<br />
●<br />
●<br />
●<br />
●<br />
●<br />
●<br />
●<br />
Preparing the sky<br />
The twilights<br />
Taking altitudes<br />
The meridian passage for the Sun (noon sight)<br />
Better meridian passage<br />
Using artificial horizons<br />
Print <strong>your</strong> <strong>own</strong> Nautical Almanac pages<br />
>> Chapter 2 - Star Finder<br />
>> Chapter 3 - Chart Navigation<br />
●<br />
●<br />
●<br />
●<br />
●<br />
●<br />
●<br />
●<br />
Vector and raster charts<br />
Using raster images<br />
Printing chart images<br />
Chart tools<br />
Navigator desktop files<br />
Using the GPS interface<br />
Troubleshooting the GPS connection<br />
The Leg calculator<br />
>> Chapter 4 - ChartMaker<br />
●<br />
●<br />
●<br />
●<br />
●<br />
●<br />
●<br />
How it works<br />
Mercator latitude scale correction<br />
Which images can be used ?<br />
Tips for scanning charts<br />
Choosing the 3 reference points<br />
Importing a raster chart image<br />
Making vector charts<br />
Celestial Navigation links<br />
1. New to celestial navigation? To understand how it works, go to the Fundamentals page.<br />
2. Other Navigator screen shot<br />
3. Navigator software Homepage<br />
http://www.tecepe.com.br/nav/navpro.htm (1 of 23) [9/2/2004 11:05:07 PM]
Navigator Light Software<br />
Version 4 new features to table of contents<br />
Version 4 of the Navigator software has many new features and improvements.<br />
In the celestial navigation side, I implemented several features suggested by users and Brazilian Navy School officers. I'm<br />
proud to announce that the program was adopted by this school, for use in celestial navigation classes.<br />
These are the new features:<br />
Star Finder<br />
The star finder was improved, particularly the printed results.<br />
> Now the star chart and table are printed in a single sheet of paper.<br />
> Boat course indication, for easy orientation.<br />
> Improved celestial object identification in the chart . Now all planets have their <strong>own</strong> icons, for easy identification. The<br />
most visible stars (mag Checkbox do select/deselect LOPs, for Astronomical Position calculation. Now you don't have to delete a LOP that is<br />
either wrong or nearly parallel with other LOP. Just deselect it and recalculate the position.<br />
> Automatic LOP transport. In the prior versions, to calculate a running fix, it was necessary to transport each LOP by hand.<br />
In version 4.0, you can specify the boat course and speed; and the LOPs will be automatically transported ( either to current<br />
time, LOPs mean time or last LOP time ) when calculating the astronomical position. This feature makes calculating running<br />
fixes as easy as normal twilight positions.<br />
> Better Moon position calculations (version 4.+).<br />
Chart Navigation<br />
Perhaps the most dramatic usability improvement is in the chart navigation area. For a long time I have been looking for a<br />
way to import electronic charts into the program's chart viewer. I have considered many "popular" electronic chart formats,<br />
but was always confronted with same problems:<br />
● Proprietary formats - Most electronic chart formats in use today are proprietary, and there is little or no documentation<br />
on how parse these chart files. Many chart vendors sell charts and viewer software, and are not interested in releasing<br />
chart format documentation.<br />
● Low availability and high price - Electronic charts are sometimes more expensive than printed versions and not<br />
available for all areas in the world, as printed charts are.<br />
For the reasons above, I choose to implement plain raster chart import directly from popular image formats (.bmp, .gif and<br />
.jpg). This has the following advantages:<br />
● Scanners today are very cheap. One can buy a good A4 page scanner for less than US$100.<br />
● Gif and jpg are very popular image formats in the Internet. There are many charts available in these formats on the<br />
Internet.<br />
● Most users already have paper charts on the areas of interest. That is, they have already paid for the license to use<br />
these charts.<br />
● Some satellite images can also be used .<br />
● Allows the flexible 'do it <strong>your</strong>self' approach.<br />
Also:<br />
> Fixed strange chart scrollbar behavior.<br />
> Changed the help format from Windows help to html.<br />
The access window<br />
back to the top<br />
Both Navigator and ChartMaker programs have access windows. These are the main menus of these applications. From<br />
the access window you choose the module you want to work with.<br />
For Navigator you have the following options (buttons):<br />
● Chart Navigation<br />
● Celestial Navigation<br />
http://www.tecepe.com.br/nav/navpro.htm (2 of 23) [9/2/2004 11:05:07 PM]
Navigator Light Software<br />
●<br />
Star Finder<br />
For ChartMaker:<br />
● Make vector chart<br />
● Import chart image<br />
Take some time to read the License Agreement and disclaimer (click "important information"). Closing the access window<br />
will terminate the program.<br />
Chapter 1 - Celestial Navigation to table of contents<br />
The goal of the celestial navigation is to find the astronomical position, the position of the boat. In this section we will see<br />
how this can be done with the help of Navigator software. As we have seen in the fundamentals, crossings of two or more<br />
Lines of Position, taken for two or more celestial objects, define this position.<br />
Preparing the sky<br />
back to the top<br />
But before you start taking altitudes of celestial objects, you must be able to find them with the <strong>sextant</strong>. Trying to find a star<br />
with the <strong>sextant</strong> on a rocking boat is not easy The eyepiece has a relatively small angle of view and the sight is twisted by<br />
the <strong>sextant</strong> mirrors.<br />
One technique to find a star is to turn the <strong>sextant</strong> upside d<strong>own</strong>, point it to the star, and bring the horizon by adjusting the<br />
arm.<br />
Better yet is to know the approximate altitudes and azimuths of the stars you are going to observe. This is kn<strong>own</strong> as<br />
preparing the sky.<br />
The twilights<br />
back to the top<br />
Navigators wake up early. They do so to take advantage of the two times of the day when the sky is in best condition for<br />
celestial navigation: the twilights. In the civil twilights - times when the sun is 6° below the horizon - it's dark enough to see<br />
the stars and planets, and light enough to see the horizon. This happens before sunrise and after sunset.<br />
The first step of the sky preparation is to determine the time of the twilights.<br />
To calculate the times of twilights do:<br />
● Select the Sun in the celestial objects listbox.<br />
● Set the date of the observation. Since you are probably going to prepare the sun in the night before, set the date to the<br />
following day.<br />
● Set the assumed position (Latitude and Longitude). It's the position you think you are going to be in the time of the<br />
observations.<br />
● Select the tab "Other calculations"<br />
● Press "Object data" button.<br />
The last two lines show the time of twilights. Like this:<br />
dawn civil twilight: 9:13 GMT<br />
Set civil twilight: 20:46 GMT<br />
Selecting stars and planets<br />
back to the top<br />
Now that we know the twilight times, you can select the celestial objects you are going to observe. At any time, Navigator<br />
gives you more than 33 celestial objects to choose from. Of course you will only need 4 or 5. To select stars and planets you<br />
will observe, follow these guidelines:<br />
● Select stars and planets that you are most familiar with.<br />
● Select the brighter objects. Planets are easier to spot, because they are very bright. Some stars are also very bright and<br />
easy to find. Some constellations have distinct look and are easier to locate.<br />
● Select objects with altitudes between 30° and 60°. Less than that you result in greater atmospheric refraction error,<br />
http://www.tecepe.com.br/nav/navpro.htm (3 of 23) [9/2/2004 11:05:07 PM]
Navigator Light Software<br />
●<br />
which is not easy to correct (because it depends changing on atmospheric conditions). And altitudes higher than 60°<br />
are more difficult to measure.<br />
Do not select stars that have similar azimuths or that are in opposition. The resultant Lines of Position will be nearly<br />
parallel, which is undesirable.<br />
To prepare the sky do:<br />
● Set date and twilight time of <strong>your</strong> next observation.<br />
● Set the assumed position (Latitude and Longitude).<br />
● Select the tab "Visible stars".<br />
● Press the "Calculate" button.<br />
Now choose the stars in the spreadsheet or chart. To see the name of star in the chart, click the mouse over it. The name will<br />
show in a "hint label". Or select the star in the spreadsheet. A circle will show around the correspondent star in the chart.<br />
If a printer is available, Navigator can print a convenient sky preparation (one page), with visible objects table and polar<br />
chart.<br />
Input tip: When unsure about how to enter a value (date/time format, number<br />
format or number unit), place the mouse cursor over the input box. A hint will show<br />
with the field name, input format and/or example.<br />
Taking altitudes<br />
back to the top<br />
Now lets take the actual measurements. Take the following items to the deck of the boat:<br />
1) <strong>Sextant</strong>.<br />
2) Watch.<br />
3) Pencil.<br />
4) Paper with <strong>your</strong> sky preparation. Attach the paper to a board, so it's easy to take notes and <strong>your</strong> work will not be carried<br />
away by the wind.<br />
Try to establish a routine to handle these items. You will be observing two numbers (altitude and time) at once, possibly on<br />
a rocking boat, so don't let these items make things difficult in the critical time. You might want to use preprinted tables to<br />
organize <strong>your</strong> data, like the one below. Save them as the documentation of <strong>your</strong> work.<br />
Date: twilight time: assumed lat: assumed lon:<br />
index error: watch error: time zone: Obs:<br />
celestial object sky preparation observations results<br />
LOP Name Altitude Az Time Hi Delta Dir Az<br />
1<br />
2<br />
3<br />
4<br />
5<br />
6<br />
Astronomical position for ____ LOPs Lat: Lon:<br />
-> Click here to open this table in a new window, to print some copies<br />
When taking an observation, set <strong>your</strong> <strong>sextant</strong> to the expected altitude and point it to the expected azimuth (from <strong>your</strong><br />
"preparation"), using a hand compass. The celestial body will probably show in <strong>your</strong> view.<br />
● Adjust the <strong>sextant</strong> to the correct instrumental altitude. Write name, time and altitude of the observed celestial object.<br />
http://www.tecepe.com.br/nav/navpro.htm (4 of 23) [9/2/2004 11:05:07 PM]
Navigator Light Software<br />
1. It's good practice to adjust the <strong>sextant</strong> micrometer drum always in the same direction. For example, put the star<br />
below the horizon and then bring it up by turning the drum in the same direction in all observations. If you go<br />
past, repeat the operation from the start. Do the same for the Index Error measurement. The <strong>sextant</strong> will give<br />
different readings, depending on the direction you adjust the drum. Using the same direction for both altitudes<br />
and index error measurements cancels this problem.<br />
2. After adjusting the <strong>sextant</strong>'s drum, read the watch first, because it's changing fast. Write the time. Then write<br />
the <strong>sextant</strong> altitude.<br />
Before and after taking altitudes, measure the Index Error:<br />
● Set the altitude to 0°00' and point to the horizon.<br />
● Adjust the drum until both sides of the horizon are level.<br />
● Read the Index Error and write it.<br />
Back to the navigation table, run Navigator.<br />
● Enter the index error.<br />
● Enter Height of the eye (Dip). In version 3.0+, you can choose the Dip units (meters, feet or minutes) .<br />
● Enter watch error, in seconds. See keeping the time for more information on time keeping methods.<br />
Note on the index error: In versions prior to 2.5, the IE was typed with the<br />
plus signal when the index error was inside the drum scale. This number was<br />
then subtracted from <strong>sextant</strong> reading by the program.<br />
Many users complained that this input convention was against the common<br />
practice in celestial navigation. They were used to work with the Index<br />
Correction (IC), with signal - when the IE was inside the arc scale.<br />
After many messages, I agreed. Starting with version 2.5 and up, I changed<br />
this. So, if you are upgrading, make sure you use the correct input convention,<br />
as illustrated on the right.<br />
Navigator 2.5 and up<br />
Type IC = -2 type IC = +2<br />
Old versions (navigator 2.0 and prior)<br />
Type +2 type -2<br />
Clear all previous LOPs:<br />
● Select the tab "Astronomical Position".<br />
● Press the toilet button, to clear all LOPs.<br />
● Now select the "Line of Position" tab.<br />
● Set the assumed position (Latitude and Longitude).<br />
Now enter the measurements, one by one. For each celestial object, do:<br />
● Select the celestial object from the listbox.<br />
● Enter time of the observation.<br />
1. You can use local time or GMT time edit boxes. In this case, automatic conversion to GMT is done.<br />
2. If using local time, make sure the time zone and watch error edit boxes are correctly set.<br />
● Enter altitude of the celestial body.<br />
● Press the "Calculate" button.<br />
The result will be something like this:<br />
http://www.tecepe.com.br/nav/navpro.htm (5 of 23) [9/2/2004 11:05:07 PM]
Navigator Light Software<br />
LOP for Sun<br />
05/04/2001 13:43:54 GMT<br />
Ass.Pos. Lat:23°40.0'S Lon:40°30.0'W<br />
Inst. Altitude: 56°24.5'<br />
Altitude of lower limb<br />
Altitude corrections ------------<br />
Par: 0.0' Refr:-0.6' SD:16.0'<br />
Dip:-3.1' IE:-2.0'<br />
Total Altitude Correction:10.3'<br />
Corrected Inst Altitude: 56°34.8'<br />
Object Positional data -----<br />
LHA: 344°48.9'<br />
GHA: 25°18.9'<br />
Decl: 6°13.8'N<br />
LOP Results------------------<br />
Calculated Altitude: 56°37.8'<br />
Intercept: -3.0 NM (away)<br />
Az.calc: 28°<br />
The two last lines have the results (Delta and Azimuth).<br />
If you feel the result is consistent with the expected , press the button "Save LOP". This will save this Line of Position for<br />
the calculation of the Astronomical Position (Fix), which will be done after you calculate all LOPs.<br />
After calculating and saving all LOPs, go for the astronomical position calculation:<br />
● Select the tab "Astronomical Position". The LOPs you have just saved will be in the spreadsheet.<br />
● Press the "Calculate" button, to calculate the astronomical position. Your astronomical position will show. Please note<br />
that, in order to calculate the astronomical position, you have to have two or more LOPs. Having more lines is<br />
advisable, because errors in one observation will show more easily. A good number is 4 LOPs. Also, as we will see,<br />
sometimes we are going to discard some of them.<br />
Refining <strong>your</strong> calculations<br />
back to the top<br />
To achieve good results in celestial navigation, you need to be methodic. As you can see, there are many steps, and a<br />
mistake in one of them will only show in the end, if at all.<br />
Enumerate the tasks you are doing - or are going to do - and read the measurements loud before taking note (navigators are<br />
said to speak to themselves). Make <strong>your</strong> notes in an organized table, one row for each celestial object. In the header of the<br />
table, write date, assumed position, time of twilight and index error. Have the sky preparation ready before going to the<br />
deck.<br />
But even with all the care, some errors will eventually show. Wrong time or altitude (the so called 60 mile error). Bad star<br />
identification. Even wrong date. The important thing is to detect mistakes, and drop the LOPs with problem.<br />
Having good dead reckoning navigation helps a lot. It's also a good idea to take a look in the chart showing the Lines of<br />
Position. If one of them seems out of the flock, you may deselect it and recalculate de position. This is why it's good to have<br />
more lines.<br />
Another problem is to have two or more LOPs that are nearly parallel. They will probably cross very far from the correct<br />
position, even if they are close together. Navigator accounts for this situation by giving a small weight to crossings forming<br />
small angles. But it's better to deselect one of them and recalculate the position.<br />
http://www.tecepe.com.br/nav/navpro.htm (6 of 23) [9/2/2004 11:05:07 PM]
Navigator Light Software<br />
LOPs 3 and 4 nearly parallel. Select only one of them.<br />
In the figure above, we can see that LOP 3 and 4 are nearly parallel. Deselecting one of them would improve the resulting<br />
calculated astronomical position.<br />
Observing the Sun<br />
During the day, you can observe the Sun and the Moon. If you can see both at the same time, and they are in suitable<br />
positions for observation, you can calculate a fix, using the two lines of position. The procedure is the same described above<br />
for stars and planets.<br />
The only difference is that the Sun and Moon have appreciable diameters (about 32'). When measuring the altitude of Sun<br />
and Moon, align the lowest part of the body with the horizon. This is kn<strong>own</strong> as the lower limb. Navigator will correct for the<br />
semi-diameter automatically.<br />
<strong>Sextant</strong> image<br />
You can also use the upper limb. In this case, uncheck the "Use lower limb" checkbox.<br />
Running fix<br />
back to the top<br />
The altitude of the same celestial object in two different times may be used to find the position. For example, you can take<br />
two Lines of Position for the Sun, one in the morning and one in the afternoon. Because <strong>your</strong> boat is moving, you will have<br />
to transport the first line to the second line time. The position obtained with this method is called running fix.<br />
Navigator (version 4.0 and up) can be set to transport LOPs automatically, when calculating the astronomical position. This<br />
is done by moving the assumed position. The LOPs chart shows the original LOP (blue) and the transported (red).<br />
Take a look at the Auto Transport frame n<br />
the image to the left. This is where LOP<br />
transport is setup.<br />
● Choose one of the following<br />
transport modes.<br />
❍ Don't transport<br />
❍ To latest LOP time<br />
❍ To LOPs mean time<br />
❍ To Selected Time (i.e.<br />
specified in the top time<br />
frame)<br />
●<br />
Click 'Edit boat C&S' (course and<br />
speed) and update boat movement<br />
http://www.tecepe.com.br/nav/navpro.htm (7 of 23) [9/2/2004 11:05:07 PM]
Navigator Light Software<br />
●<br />
data.<br />
Click 'Calculate' to calculate the<br />
astronomical position.<br />
Simple meridian passage (noon sight)<br />
back to the top<br />
When the Sun crosses our meridian, its azimuth is either 0° or 180° (North or South). This means that a Line of Position<br />
(LOP) for the Sun, taken at this time, will have constant latitude. This event is called transit or meridian passage. For the<br />
Sun, it happens around local noon (+/- 20 minutes).<br />
The navigator can take advantage of this event to check the latitude. The longitude can also be calculated, although with<br />
smaller precision.<br />
This is what you must do:<br />
● Start taking observations of the Sun (time and altitude) about 25 minutes before the expected transit time. In<br />
Navigator, select the Sun and use the command Object Data to estimate the transit time for the Sun in <strong>your</strong> assumed<br />
position. Take a couple altitude observations (p.e. 5 minutes apart) until 15 minutes before transit.<br />
●<br />
At transit time, observe the highest altitude the Sun reaches. This is kn<strong>own</strong> as culmination altitude. It´s easy to<br />
measure, since the Sun will appear to hang with constant altitude while passing <strong>your</strong> meridian. After that, it will start<br />
to go d<strong>own</strong>.<br />
●<br />
●<br />
Write the culmination (maximum) altitude.<br />
Keep checking the altitude until the Sun, now going d<strong>own</strong>, is at the same altitude it was in one of the observations<br />
made before transit. The time of transit is the average of two times with equal altitudes (before and after transit).<br />
For example, if you measured 61°32' at 11:45:30 and 61°32' at 12:10:10, the time of transit is (11:45:30+12:10:10)/2<br />
or 11:57:50. The altitude value is the maximum altitude you observed (near transit time).<br />
●<br />
Enter the transit time (the average you calculated) and the culmination altitude in Navigator. Select the tab "Other<br />
calculations" and click the "Simple Sun Meridian Passage" button. Program will give <strong>your</strong> position.<br />
It's important to understand that the Latitude result is related to the maximum altitude the Sun reaches, and the Longitude to<br />
http://www.tecepe.com.br/nav/navpro.htm (8 of 23) [9/2/2004 11:05:07 PM]
Navigator Light Software<br />
the exact time of the passage. So, the latitude can be safely determined even if you don´t have a reliable watch.<br />
Better meridian passage calculation<br />
back to the top<br />
While the method just described is OK, is does not account for two factors: Sun declination change and boat position<br />
change. These two factors can affect the longitude result.<br />
The Sun declination is always changing. It changes faster on equinoxes (spring and fall) and slower in solstices (summer and<br />
winter). So, the Sun 30 minutes after the passage is not in the same place (in the celestial sphere) as 30 minutes before the<br />
passage.<br />
The boat movement during this period can also be of significance, particularly if the boat is fast and is moving along the<br />
meridian.<br />
These two changes affect the actual meridian passage time. In this case, the average time between two equal altitude<br />
observations (before and after transit) is not the meridian passage time, but rather the culmination time. A correction must be<br />
applied to find the right passage time (and the Longitude).<br />
To perform this calculation on the Navigator, select the tab "Other calculations" and click the "Sun Meridian Passage by<br />
Equal Altitudes" button. The form below will show.<br />
Enter maximum altitude (w/o corrections), IE, Dip, GMT date, GMT time of altitude 1 (before transit, w/o watch<br />
correction), GMT time of altitude 2 (after transit), watch error, boat speed, boat course and assumed position. The GMT<br />
times 1 and 2 are the ones of equal altitude observations (the actual value of the altitude is not used in the calculation, but<br />
remember to write it d<strong>own</strong>, because you will have to use the <strong>sextant</strong> to measure the maximum altitude between the two<br />
observations).<br />
The correction i is the difference, in seconds, between the culmination time and the transit time. It can be as much as a<br />
minute, or 15' in the longitude.<br />
Please note that there are a couple conditions to use this method:<br />
1. Sun altitude must be at least 65°.<br />
2. The Sun's azimuth must be at least +/-20° on equal altitude observations.<br />
3. The equal altitude observations must be up to 40 minutes - before and after - transit time.<br />
This method is particularly useful near the Equator.<br />
Tip: If there are clouds in the sky, it's recommended that you take several observations before transit. If you take only one, the<br />
Sun may become covered in the critical time after transit. By having many observations, you increase the chance of having one<br />
usable observation pair.<br />
http://www.tecepe.com.br/nav/navpro.htm (9 of 23) [9/2/2004 11:05:07 PM]
Navigator Light Software<br />
Source: Navegação Astronômica e derrotas<br />
Artificial Horizon<br />
back to the top<br />
If you live in a city far from the sea, you can't take altitudes of celestial bodies with a marine <strong>sextant</strong>, because you can't see<br />
the sea horizon. One way to work around this problem is to use an artificial horizon. The artificial horizon can easily be<br />
made with a plate filled with liquid. Water will do, but oil is better. The surface of a pool can also be used, if there is no<br />
wind or waves (the water surface must be completely flat).<br />
To take the altitude with the artificial horizon, point the <strong>sextant</strong> towards the<br />
artificial horizon and make reflected image of the celestial body coincide with the<br />
direct image. The angle you read is twice the altitude of the body, as illustrated in<br />
the figure below.<br />
Also read the index error.<br />
Navigator automatically corrects for the use of artificial horizons:<br />
● The program divides instrumental altitude by two. Enter <strong>sextant</strong> reading directly.<br />
● The Dip and semi-diameter corrections are set to zero.<br />
● The index error is also divided by two.<br />
Printing Nautical Almanac Pages<br />
back to the top<br />
Navigator (registered version 2.5 or latter) has a Nautical Almanac page generator/printer. These pages are not exactly the<br />
same as real almanac pages, but they contain most of the information needed to do celestial calculations in the traditional<br />
way, without the computer.<br />
Navigator generates the so-called "daily pages" (the ones with 3-day celestial data for planets, stars, Sun, Aries and Moon).<br />
The yellow ("increments") pages are not generated because they don't change from year to year. You can use the yellow<br />
pages of an old almanac or do the interpolations with a pocket calculator.<br />
I choose to make the Navigator daily pages as similar as possible to actual almanac pages. But there are differences:<br />
● Did not include the latitude dependent tables (Twilights, Sunrise, Moonrise, Sunset, Moonset).<br />
● Did not include the Aries meridian passage time. This number is used to calculate the meridian passage of stars, and is<br />
seldom used.<br />
● Did not include the Sun's Equation of Time and meridian passage table. You may use an old almanac for the Sun's<br />
meridian passage calculations, as these tables are almost unchanged from year to year. Just use the table of the same<br />
day.<br />
● Did not include the Moon's meridian passage and age table.<br />
● Did not include the planets' SHA and meridian passage table.<br />
● Added three stars not included in most Nautical Almanacs<br />
I plan to include some of these numbers in future versions. Feedback from users about what features are most important is<br />
welcome.<br />
If you compare the Navigator's almanac pages with nautical almanac pages, you will note small differences in the numbers.<br />
These are caused by different celestial calculation methods and should not be bigger than 0.5'. This error is small when<br />
compared with other imprecisions that affect celestial navigation, and will not impact <strong>your</strong> position significantly.<br />
Printing the almanac pages<br />
To print almanac daily pages, do:<br />
1. Go to the celestial navigation window.<br />
2. Select the "Other calculations" tab.<br />
3. Press the "almanac pages" button. The "Almanac Pages" window will show.<br />
4. Set the initial date for the 3-day page.<br />
5. Select "Aries and planets" (left side page).<br />
http://www.tecepe.com.br/nav/navpro.htm (10 of 23) [9/2/2004 11:05:07 PM]
Navigator Light Software<br />
6. Press "<strong>Build</strong> page" and "Print".<br />
7. Select "Sun, Moon and Stars" (right side page).<br />
8. Press "<strong>Build</strong> page" and "Print".<br />
9. Click in the "Arrow" button to advance 3 days and repeat operations from step 5). Proceed until you have printed all<br />
the pages for the desired period.<br />
In order to print <strong>your</strong> almanac pages, you have to use a non-proportional font (a font with fixed pitch). The default font is<br />
Courier New, size 7. Pages printed with this font will use a single sheet of paper (size A4). I know this is a small font, but<br />
using a larger one will result in two paper sheets for each page. You may experiment with other non-proportional fonts. True<br />
type fonts are better, because they can be resized to any small size.<br />
Check the online web service, open to the public. Click to visit this service.<br />
Chapter 2 - Star Finder to table of contents<br />
Navigator Star<br />
Finder (version 3.0+)<br />
was completely<br />
redesigned. To<br />
accommodate the<br />
new set of features,<br />
this chart of the<br />
visible sky was<br />
moved to its <strong>own</strong><br />
window (in previous<br />
versions, it was part<br />
of the celestial<br />
navigation window).<br />
The new features include:<br />
● Constellation lines and names make it easy to identify constellations and celestial objects.<br />
● Ecliptic plot shows the path of the Sun, Moon and planets.<br />
● Celestial objects grid can be sorted by columns (ascending and descending order) clicking the column<br />
header.<br />
● The spreadsheet now includes object magnitudes (note: many celestial objects have changing<br />
magnitudes. These values are fixed, to be used only as rough estimate).<br />
● Mouse cursor shows altitude and declination when moving. When pointing an object, its name, altitude,<br />
azimuth, declination and right ascension are sh<strong>own</strong>. Values cursor is transparent, so you don't loose the<br />
big picture.<br />
● Prints the object list and chart. The printed chart uses the printer higher resolution.<br />
http://www.tecepe.com.br/nav/navpro.htm (11 of 23) [9/2/2004 11:05:07 PM]
Navigator Light Software<br />
●<br />
●<br />
●<br />
Time zone is now imported from the operating system, accounting for Day Light Savings time.<br />
Sky background color indicates the light conditions (day=blue, night=black and twilight=navy).<br />
Windows® Clipboard support allows to cut-and-paste the chart to other applications.<br />
●<br />
Overhead view option, so you can look up to the sky and the chart<br />
simultaneously. In this representation, E and W are flipped and the chart is<br />
to be viewed upside d<strong>own</strong><br />
(see figure to the left)<br />
●<br />
●<br />
●<br />
Options tab allows easy and interactive chart setup (see figure to the left).<br />
Boat course plot, to easy printed chart orientation.<br />
Star finder chart and table now print in the same sheet of paper, much more<br />
convenient.<br />
Using the Star Finder is easy:<br />
1. Set <strong>your</strong> position (Lat/Lon)<br />
2. Set the GMT date and time. If you opened the star finder by clicking the button in<br />
the celestial navigation window, these values are automatically set.<br />
3. Set the boat course (optional)<br />
4. Click the Calculate button<br />
You can also animate the sky, specifying time increments and calculation frequency.<br />
This can produce very interesting animations, like how the sky changes from hour to<br />
hour, day to day and year to year.<br />
And it can also be set to show the current sky.<br />
Chapter 3 - Chart Navigation to table of contents<br />
The Navigator chart module is relatively new (started in version 2.5), but has received important additions in version 4.0.<br />
It's now much more useful with the addition of raster chart capabilities.<br />
Instead of supporting the existing electronic chart formats, I choose to provide a set of tools to allow the user to import<br />
existing paper chart images into the program. This 'do-it <strong>your</strong>self' approach gives the user maximum flexibility.<br />
All Navigator files are in text format and their structures are easy to understand, to allow integration with other applications<br />
and Internet file sharing. The table below enumerates the Navigator data file types.<br />
File extension<br />
Description<br />
http://www.tecepe.com.br/nav/navpro.htm (12 of 23) [9/2/2004 11:05:07 PM]
Navigator Light Software<br />
.CHT<br />
.NAV<br />
.CID<br />
Navigator vector chart file<br />
Navigator desktop file<br />
Navigator chart image description (raster image)<br />
Vector and raster charts<br />
back to the top<br />
The Navigator chart engine can show two kinds of charts: vector charts and raster charts.<br />
Vector charts - In this type of chart, islands, continents, routes and tracks are represented by polygons and lines, defined by<br />
a collection of points (Lat/Lon pairs). This kind of chart can be easily zoomed in and out, and is very fast to render.<br />
Navigator uses its <strong>own</strong> vector chart file format. No other chart file format is supported at this time. These files can be<br />
produced, from scanned charts, using the ChartMaker program.<br />
Raster charts - These charts are images (normally scans of paper charts). Navigator can use raster images in formats JPG,<br />
GIF or BMP. These are popular file formats in the Internet, and many charts can be found for d<strong>own</strong>load over the Net.<br />
All raster chart image files must first be imported - using ChartMaker program - before they can be used in the Navigator.<br />
This step is necessary to describe the chart image scale (i.e. how pixels in the image map to the real world).<br />
Both vector and raster charts can be produced or imported using the ChartMaker program, which is described in the next<br />
chapter.<br />
Using raster chart images<br />
back to the top<br />
In the image above you can see two raster chart images visible in a desktop, on a zoom animation. Before opening it in the<br />
Navigator, a raster chart image it must be imported. This is done only once for each image, with the ChartMaker program.<br />
The step creates a .CID file that is associated with the chart image (GIF or JPG). This file contains:<br />
- Name of the associated image file (GIF, JPG or BMP)<br />
- File description<br />
- Reference points (which define how the image pixels map to the real world)<br />
- Image MD5 digital signature (to prevent accidental changes in the chart image)<br />
- Chart limits (outside rectangle)<br />
Once the CID file is created, it can be added to a desktop. Click the chart image open button and select the CID file. Many<br />
chart images can be added to a given desktop. Images can be either visible or not. To play with chart visibility, use the small<br />
checkbox in the chart images listbox.<br />
http://www.tecepe.com.br/nav/navpro.htm (13 of 23) [9/2/2004 11:05:07 PM]
Navigator Light Software<br />
Tip: Since images are large in size, making many visible at the same time would consume a lot of memory.<br />
Making only the charts you need visible reduces the amount of memory used by the program. A memory of at<br />
least 32MB is recommended to use raster charts.<br />
The image resampling process also consumes a lot of CPU power. To reduce the bumpy behavior while<br />
zooming or scrolling, these calculations are implemented in different threads of program execution . That's<br />
why it takes some time for the raster charts to show after you zoom or scroll.<br />
You can also play with raster image opacities, making them partially transparent. This allows you to see how two charts<br />
overlap each other or compare them with the vector chart underneath.<br />
Tip: Partially opaque (i.e. transparent) chart images consume CPU power - a 100% opaque chart will display a<br />
lot faster.<br />
The chart images rendering order can also be changed, using the up and d<strong>own</strong> arrow buttons in the right. The rendering<br />
order is:<br />
1- Background (sea color)<br />
2- Vector chart polygons<br />
3- Chart images (top-d<strong>own</strong> order in the listbox)<br />
4- Routes, tracks and marks<br />
Tip: To transfer a CID file to another computer (or to share it over the Internet) , you also need to transfer the<br />
associated image file (GIF or JPG). Since the CID file contains the image file digital signature, there is no risk<br />
of accidentally changing the image while copying.<br />
Printing Chart Images<br />
back to the top<br />
Navigator Desktops containing raster chart images can be printed. You can use this to integrate different charts together in a<br />
single and compact printout. Quality is even better than the computer screen, because printers have a much higher pixel<br />
resolution than monitors (monitors typically 75 DPI x printers 300 or 600 DPI ).<br />
This quality comes at a cost. Ressampled chart images may turn out big, requiring a lot of CPU cycles and memory to<br />
calculate. So be patient and make sure <strong>your</strong> computer has at least 64MB of memory. If you have a laser printer, limit the<br />
print resolution to 600 DPI. Don´t use 1200 DPI, because this would result in really big ressampled image and would<br />
probably hang <strong>your</strong> computer.<br />
I´m working to make sure that the printing process is smooth. You may find problems in extreme situations (printing large<br />
chart images with high resolution printers and little memory available).<br />
Partially opaque (transparent) images are not supported by printers. When printing, all chart images will be rendered opaque.<br />
Chart tools<br />
back to the top<br />
The Navigator chart viewer has the following tools:<br />
Zoom - Lets you zoom in and out the chart, from<br />
the whole world to a very small scale. To zoom<br />
in, press the left mouse button in the point you<br />
want to focus (screen center). To zoom out, use<br />
the right mouse button or click the left mouse<br />
button with <strong>Shift</strong> key pressed.<br />
Measure - Click a position and drag the mouse.<br />
The caption will show two numbers: COG and<br />
Range.<br />
http://www.tecepe.com.br/nav/navpro.htm (14 of 23) [9/2/2004 11:05:07 PM]
Navigator Light Software<br />
COG is Course Over Ground. It's the true<br />
direction of the line. Range is the distance<br />
between the end points, in nautical miles.<br />
Both COG and Range are calculated using Lines<br />
of Great Circle (LGC). This means that they are<br />
accurate, even for large distances.<br />
Zoom tool<br />
Route - This tool is used to draw<br />
routes. A route is a set of points in<br />
the surface of the earth, with<br />
optional associated text. Routes can<br />
have any number of points or<br />
waypoints. You can draw as many<br />
routes as you wish. Routes can be<br />
stored in Navigator Desktop files<br />
(.NAV files). You can make some<br />
routes invisible and concentrate on<br />
<strong>your</strong> current route. You can also edit<br />
routes, change their colors and<br />
names.<br />
Navigator's vector chart interface<br />
At anytime you can check the COG and Range between two points of a route, and the total length of a route. To edit a route,<br />
click the checkbox "Edit routes/tracks". The route editor will show. You can change all attributes of a route (Color, Name,<br />
and Visible). You can also edit coordinates of points, by double-clicking the point in the spreadsheet. To add a point to an<br />
existing route (or track), click the route tool. In the menu, select Routes Add Point to route. Choose the route. Add one or<br />
more points. Right click to save points and end addition.<br />
To create a new route, click the route tool and click the route points. Right click end route. When prompted, enter route<br />
name.<br />
Tracks - This tool is used to draw tracks. Tracks are like routes, except that each track point has an associated date/time<br />
value. They are used to log the positions on a trip. Like routes, they can have any number of points. Tracks can be stored in<br />
Navigator Desktop files (.NAV files). You can make tracks invisible to concentrate on <strong>your</strong> current track. You can also edit<br />
tracks, change their colors and names.<br />
http://www.tecepe.com.br/nav/navpro.htm (15 of 23) [9/2/2004 11:05:07 PM]
Navigator Light Software<br />
To edit a track, click the checkbox "Edit routes/tracks". The track editor will show. You can change all attributes of a route<br />
(Color, Name, and Visible). You can edit point data, by double-clicking the point in the spreadsheet.<br />
To create a new track, select the track tool and click the first route point (left button). If you want, add more points with left<br />
clicks. When done adding points, right clicks the chart. Enter track name.<br />
To add a point to an existing track, click the route tool. In the menu, select Tracks Add Point to route. Choose the track. Add<br />
one or more points. Right click to save points and end addition.<br />
Marks- You can also add marks to the desktop. Select the mark tool and click one point, specify optional text for the mark<br />
and choose a mark icon.<br />
Pointer- Use the pointer tool to point chart objects (islands, tracks, marks etc). If a name is associated with the object, a text<br />
will appear near the cursor.<br />
Navigator Desktop files<br />
back to the top<br />
After loading a vector chart and/or raster charts; changing routes or tracks, you can save all to a desktop file. A Navigator<br />
desktop file contains the state of the chart viewer, including:<br />
- One Vector charts.<br />
- Raster charts (i.e. chart images)<br />
- Routes<br />
- Tracks<br />
- Marks<br />
Desktop files have the extension .NAV, and are in text format.<br />
GPS Interface<br />
back to the top<br />
Navigator has GPS interface. This interface accepts NMEA (National Marine Electronics Association) standard GPS<br />
messages. Two kinds of NMEA messages are accepted:<br />
RMC - Transit Specific Navigation information message- This is the recommended (default) accepted message, because<br />
it has date and course information. RMC messages give Latitude, Longitude, date, time, course and speed.<br />
GLL - Geographic Position Latitude/Longitude message - Select this one if <strong>your</strong> GPS does not support RMC messages.<br />
GLL messages have only Latitude, Longitude and time (no date).<br />
Note: The NMEA interface, available in most GPS devices, uses a RS422 hardware interface. This is not the same<br />
as the RS232c serial interface, available in PCs. While the 422 interface uses +12/-12V electric signals, the RS232<br />
uses 0/5V. But since the PC uses the level of about 3V to distinguish between 0s and 1s, the connection works<br />
fine in most cases. However, they are different things, and you may experience problems connecting them.<br />
You will need a connection cable, which is an optional part for some GPS models. Check <strong>your</strong> GPS documentation for more<br />
details on activating the NMEA interface and selecting the messages. Some GPS devices disable the dataport, to save<br />
battery. You probably will have to change the default configuration to enable the GPS data output.<br />
To open the GPS interface dialog click the GPS Interface<br />
button. A window will show, with current GPS position.<br />
Clicking the Settings button will show the GPS settings page,<br />
as sh<strong>own</strong> below. Clicking again hides the settings.<br />
● Set the baud rate to the same value as <strong>your</strong> GPS device.<br />
Most GPSs have a default baud rate of 4800.<br />
● Choose computer port number.<br />
● Click the "connected" checkbox to open the<br />
communications port and start receiving GPS data.<br />
The upper panel will show the current position, date/time and<br />
position status (as reported by GPS device).<br />
http://www.tecepe.com.br/nav/navpro.htm (16 of 23) [9/2/2004 11:05:07 PM]
Navigator Light Software<br />
The GPS interface can be set to save a position periodically (AutoSave feature). Positions are saved to the current GPS<br />
track. A given desktop can have only one GPS Track. Use the "Choose GPS Track" button to choose the GPS track. If<br />
starting a new travel, use the "New track" button.<br />
You can also save positions manually, by clicking the "Save position!" button. Just make sure the current position status is<br />
"valid".<br />
Tip: If you use RMC messages, Navigator will plot a small boat in the current position, pointing to the actual course. If you use<br />
GLL, which has no course information, a square will be plotted.<br />
Troubleshooting the GPS connection<br />
back to the top<br />
PC/GPS connections are sometimes tricky. A problem of either PC or GPS settings will unable the communication.<br />
First, make sure that the GPS device is transmitting data. Stop the Navigator and open the Windows terminal (or<br />
Hyperterminal in Windows 95/98). Set terminal communications settings to 4800 baud, 8 data bits, parity None, 1 stop bit.<br />
If the GPS device is set correctly, you will see text messages coming from the GPS, like these:<br />
$GPRMC,001556,A,2332.648,S,04642.969,W,000.9,045.8,230997,018.5,W*6E<br />
or<br />
$GPGLL,2337.479,S,04718.352,W,235808,V*3<br />
The first is a RMC message and the second a GLL. If you don't see any message, the GPS is probably not sending data. You<br />
may have to activate the GPS dataport and/or the transmission of each message type (Some GPS devices disable the data<br />
port every time they are turned off). After you start receiving one of these messages (choose RMC if available), return to the<br />
Navigator and make sure the correct data port, baud rate and NMEA message type are set. You may set the Navigator's GPS<br />
interface to beep on each incoming message.<br />
Leg Calculator<br />
back to the top<br />
When planning a route between two points far away (over 1000 NM), many issues must be carefully considered: sea<br />
currents, prevailing winds, ship routes, shallow and dangerous areas, foul weather, etc. While these points are very<br />
important, there are also geometric considerations: the Earth is a sphere and routes are not straight lines but arcs in the<br />
spherical surface. Two kinds of routes are of special interest: the lines of great circle and the rhumb lines.<br />
A Line of great circle (LGC) is the shortest path between two Earth points. This kind of route is contained in a plane<br />
defined by three points: the two route end points and the center of the Earth. When plotted in a Mercator chart, a LCG is<br />
represented by a curve, and a straight line in Gnomonic charts. While LGCs are shortest, they have a few problems:<br />
● True course changes constantly from point to point.<br />
● Depending on the end points, a LGC can take you to high latitudes, which is sometimes undesirable.<br />
http://www.tecepe.com.br/nav/navpro.htm (17 of 23) [9/2/2004 11:05:07 PM]
Navigator Light Software<br />
Rhumb lines (RL) are routes with constant true course. They are represented by straight lines in Mercator charts and curves<br />
in Gnomonic charts (the opposite of LGCs). RLs are easy to navigate because the course is constant. They are, however, a<br />
little longer (the difference is larger in higher latitudes).<br />
Navigator Leg Calculator will calculate both LGC and<br />
RL routes between the two end points. To open the Leg<br />
Calculator, press the calculator button in the toolbar or<br />
choose 'Routes, Leg Calculator' in the menu.<br />
Besides distance and course, Navigator shows the<br />
difference between the two options and builds routes with<br />
specified number of segments.<br />
These routes can be inserted in the current desktop.<br />
Routes are added to the desktop with names "Rhumb<br />
Line" and "Great Circle". You may change these names in<br />
the route editor.<br />
In the picture to the left, the yellow line is the RL route<br />
and the red one is the LCG (both created with 22 points).<br />
The difference between the two is 41.8 NM (1.26%). The<br />
LGC route has a crosstrack difference of 241 NM to the<br />
RL route (that is, it goes up to 4° south of the RL).<br />
When building the routes, LGC route points are set by the<br />
program at constant longitude increments. RL route points<br />
are set at constant distance increments.<br />
Chapter 4- ChartMaker program<br />
to table of contents<br />
The ChartMaker program was designed to work with chart images in formats GIF, JPG and BMP, and prepare them for<br />
use in the Navigator chart viewer.<br />
This program has two main functions:<br />
1. Importing a raster chart images, producing CID files.<br />
2. Making vector charts (i.e. digitalizing points and polygons), producing CHT files.<br />
How it works<br />
back to the top<br />
A computer image is formed by a large number colored dots - also kn<strong>own</strong> as pixels - disposed in a rectangular mesh. If the<br />
image is from a nautical chart or satellite photo, an algorithm can be designed to find the real world coordinates of any of<br />
these pixels and vice-versa. This is exactly how ChartMaker works.<br />
The first step to make a vector chart or to import a raster chart image is to establish the scale model between the image and<br />
the real world. To do this, you have to click 3 reference points and enter their world coordinates (Lat/Lon pair). This is<br />
enough to define a scale between the real world and the image pixels.<br />
http://www.tecepe.com.br/nav/navpro.htm (18 of 23) [9/2/2004 11:05:07 PM]
Navigator Light Software<br />
Technically, when you click the three reference points and enter the Earth coordinates, you are actually defining four vectors: two<br />
in screen coordinates (S12 and S13) and two in Earth coordinates (E12 and E13). Since both geometries are similar, for any point<br />
P, we can write:<br />
SP = S1 + k * S12 + r * S13<br />
EP = E1 + k * E12 + r * E13<br />
where:<br />
SP = Screen coordinates of point P<br />
EP = Earth coordinates of point P<br />
S1 = Screen coordinates of reference point 1<br />
E1 = Earth coordinates of reference point 1<br />
r and k constants<br />
(1)<br />
(2)<br />
From relation (1), we can calculate constants k and r. With these constants, we can calculate the earth coordinates of P from<br />
relation (2). This is how the program calculates the earth coordinates of any screen point (and screen coordinates of a Lat/Lon<br />
pair).<br />
Mercator Latitude scale correction<br />
back to the top<br />
The method above works for linear latitude and longitude scale charts. But most navigation charts (and particularly the<br />
detail charts) are Mercator projections. Mercator projections have a great advantage: distances and courses between points<br />
can be measured directly from the chart. Angles are true, no correction is needed.<br />
As any coast navigator knows, distances in these "regular" charts must be measured in the latitude scale, one minute of<br />
latitude being one nautical mile. To allow this, the Mercator projection latitude scale is not linear.<br />
If you look at the picture below, you will see that, as latitudes get higher, distance between parallels in Mercator charts<br />
expands. The size, measured in screen pixels, of a given latitude minute is proportional to 1/cos(Lat). For instance, when<br />
Lat=0, cos(0)=1.0. For Lat=60°, cos(60)=0.5, and so a minute of latitude at this point twice as large as at Lat=0. Of course<br />
this "latitude grow" is variable, and integral calculations are needed to calculate the size factor between two latitude<br />
intervals.<br />
Navigator's screen chart representation is not a Mercator chart. The latitude scale is linear and the<br />
factor between latitude and longitude axis tick sizes is equal to Mercator projections in the center<br />
of the chart window. This is, however, of no consequence, since you are not going to "measure"<br />
anything on the screen. You will use programs calculators and measurement tools, which use the<br />
mathematically perfect Lines of Great Circle (LGC) for distance and course calculations.<br />
Still, Navigator knows how to deal with Mercator chart images. When using a Mercator chart<br />
image on the Navigator, remember to check the Mercator latitude scale checkbox. The program<br />
will correct for the Mercator scale automatically.<br />
Which chart images can be used ?<br />
back to the top<br />
●<br />
●<br />
●<br />
Mercator chart images are OK, even if the image is rotated (like chart 1 on the left). It's<br />
difficult to perfectly align a large chart when scanning. ChartMaker will rotate the chart<br />
in order to align its grid with the vertical direction (chart 2). This is necessary to speed up<br />
chart resampling, for displaying.<br />
Gnomonic and other curved grid projections cannot be used.<br />
Some images (particularly satellite images) are skewed. Their constant latitude and<br />
constant longitude lines are not orthogonal (like chart 3 on the left). These images cannot<br />
be used. After entering the three reference points, Chartmaker will inform you if this kind<br />
of problem is present.<br />
http://www.tecepe.com.br/nav/navpro.htm (19 of 23) [9/2/2004 11:05:07 PM]
Navigator Light Software<br />
Tips for scanning charts<br />
back to the top<br />
●<br />
●<br />
●<br />
●<br />
●<br />
●<br />
Scan using resolutions between 75 and 150 dpi. Avoid large files (over 1MB GIFs or JPGs). Images will have to be<br />
ressampled by the Navigator at run time while zooming. Large images will consume a lot of CPU cycles, resulting in<br />
poor and bumpy performance.<br />
When scanning large paper charts, you may detach the page scanner cover (if the scanner allows) to avoid folding the<br />
chart. Put some weight over the scanner cover, so that the paper is flat and perfectly in contact with scanner bed.<br />
If the chart doesn't fit in the scanner bed, scan it in parts, overlapping between them. Then make a CID file for each<br />
image. Navigator can display different charts together, and will even allow partially opaque rendering, merging the<br />
overlaps.<br />
Larger scanners (A3) are preferred, when available. A4 scanners are small for large paper charts.<br />
Hand scanners are not recommended, because they can distort the image scale. Use only page scanners.<br />
Images should be saved in GIF or JPG format (JPG is usually better).<br />
Choosing the 3 reference points<br />
back to the top<br />
The 3 reference points indicate how the pixels in the chart image map to the actual world. Care must be taken in choosing<br />
these points, in order to achieve a precise scale. Below are some guidelines for choosing the reference points:<br />
Choose reference points that are as far from each other as possible. This will result<br />
in a more precise scale. If possible, choose points near the corners of the image. In<br />
the image on the left, points are too close and the scale will be poor.<br />
bad points- too close!<br />
http://www.tecepe.com.br/nav/navpro.htm (20 of 23) [9/2/2004 11:05:07 PM]
Navigator Light Software<br />
Reference points must not be aligned. In the image on the left, points are nearly<br />
aligned and the scale will be poor.<br />
bad points- nearly aligned!<br />
In the image on the left, points are well positioned (i.e. far from each other and not<br />
aligned). Choose points that are close to the corners of the image, if possible.<br />
If the chart has a grid, the grid line crossings are logical candidates for reference<br />
points (like point 2). But other points can be used and they don't need to define a<br />
right angle between them.<br />
good reference points<br />
Importing a raster chart image<br />
back to the top<br />
1. Open the chartmaker program and click Import chart image and load the image to be imported.<br />
2. Check the Mercator scale checkbox, if chart is a Mercator projection (most are).<br />
3. Take a good look in chart and choose the 3 reference points, as described above. Click each reference point with<br />
great care. Inform the precise latitude and longitude for the point.<br />
4. Chartmaker will then calculate the scale and produce a summary, rotating the image as needed (rotation is considered<br />
necessary if the angle between a meridian and the vertical is larger than 0.001 rad).<br />
5. If the image was rotated by ChartMaker, you must save it. I use to save the image with a different name, keeping the<br />
original scan intact, but you may save with the same name, ovewriting the original.<br />
6. If you made any mistake or if the image is unsuitable for use, the summary will inform you of this. You may try<br />
again, if you think the image is suitable and you made a mistake.<br />
7. After the summary, you can click extra points in the chart. This is optional, but highly desirable, to further check if<br />
any error was done in the reference points.<br />
8. If everything is OK, save the CID file (Chart Image Definition). This text file contains the information for the<br />
Navigator program to use the image: the reference points data, image file name and description.<br />
9. The CID file also contains the image digital signature (of type MD5). This is to make sure that the associated image is<br />
unchanged. So, if you do any changes in the image - even changing a single pixel color, the CID file will become<br />
invalid. This is a security feature to avoid accidental image change.<br />
Making vector charts<br />
back to the top<br />
While raster charts are very complete, with the all relevant navigation information, vector charts cosume less memory, are a<br />
lot faster to draw and are "zoomable". This is why is interesting to have a vector chart to be loaded underneath the local<br />
raster charts.<br />
http://www.tecepe.com.br/nav/navpro.htm (21 of 23) [9/2/2004 11:05:07 PM]
Navigator Light Software<br />
Navigator uses a custom chart file format, with the CHT extension. These are plain text ASCII files and can be edited with<br />
the Windows Notepad or Wordpad. Because providing detailed vector charts of all regions of the Earth is a demanding task,<br />
I choose to give users a tool to roll their <strong>own</strong> charts. Producing a vector chart means using a raster chart image to digitalize<br />
the points in the shoreline.<br />
Chartmaker accepts three image formats: Windows BMP, GIF and JPG. If you are scanning paper charts, JPG is probably<br />
the best format, because files are smaller. It's a compressed format.<br />
The CHT file<br />
Once you have the image of the chart, load it in Chartmaker. Now you have to define the scale for this chart. Click and enter<br />
the Earth Coordinates for three distinct reference points of the image, as described above.<br />
1. Choose three points that are relatively distant to each other (at least 1/3 of the screen). Select points that form a right<br />
angle. Click the points and enter their Earth coordinates.<br />
2. After the third point, the caption will show the coordinates of the cursor, as you move the mouse. Check the<br />
coordinates of other points, to certify that <strong>your</strong> scale is accurate.<br />
3. Select "Edit, Draw Axis" in the menu. The program will draw vertical and horizontal axis in 30' intervals. Check if<br />
they are the same as the image's axis. Draw again to erase the axis.<br />
4. Now draw the shoreline, clicking the points with the mouse. Draw different polygons to represent the islands and<br />
continents.<br />
5. After clicking all points of a given polygon, press the "close polygon" button. The last point will be connected to the<br />
first. All polygons must be closed.<br />
6. Give a name for the polygon.<br />
7. After drawing all the polygons, save the CHT file.<br />
8. Open it in Navigator chart viewer, to see the result. Zoom in and out, to check the details.<br />
In the figure to the left, the 3 reference<br />
points are marked 1, 2 and 3. The<br />
coordinates are:<br />
1) 24°00.0S 46°25.0W<br />
2) 23°50.0S 46°25.0W<br />
3) 24°00.0S 46°06.6W<br />
If you open the supplied myworld.cht<br />
file in Navigator, you will see a<br />
simplified chart of the whole world. I<br />
made it more detailed in one part<br />
(44°00'W 23°30'S), the region I usually<br />
navigate. You can do this for <strong>your</strong><br />
region, by directly editing the CHT file<br />
with a text editor and adding the<br />
polygons of <strong>your</strong> region. This is a little<br />
tricky. You might prefer to roll a chart<br />
of <strong>your</strong> region only.<br />
You may also merge CHT files, using an ASCII text editor (like the Notepad or Wordpad). Take a look in the CHT file<br />
header for more technical details on the CHT file format.<br />
xxx<br />
http://www.tecepe.com.br/nav/navpro.htm (22 of 23) [9/2/2004 11:05:07 PM]
Navigator Light Software<br />
(c) Copr. 1991-2001 Omar F. Reis - All rights reserved<br />
©Copr 92-2k Omar F. Reis - All rights reserved<br />
http://www.tecepe.com.br/nav/navpro.htm (23 of 23) [9/2/2004 11:05:07 PM]
XTant project - <strong>Build</strong> <strong>your</strong> <strong>own</strong> <strong>sextant</strong><br />
level of difficulty beginner intermediate advanced<br />
The X-tant project<br />
<strong>Build</strong> <strong>your</strong> <strong>own</strong> <strong>sextant</strong><br />
Note: Since I published this text, I've done another, much<br />
easier <strong>sextant</strong> using a <strong>CD</strong> and its box. Click the banner to<br />
the righ to visit it.<br />
But the octant described in this text is better ;-)<br />
From times to times I get tired of writing abstract computer programs. This time I decided to do a more concrete project: a<br />
<strong>sextant</strong> (actually, an octant). I'm not a very experienced craftsman and don't have a equipped shop. The design is simple and can<br />
be reproduced with hand tools. I used a small jigsaw and a belt sander. I have made no blue prints.<br />
In tests, when compared to a Davis plastic <strong>sextant</strong>, this octant did agree within 6' (see test results in the bottom of this page).<br />
My octant parts ...<br />
.. assembled<br />
Printing the Scale<br />
The scale is probably the most difficult <strong>sextant</strong> component to do using traditional techniques. It must be very precise and allow<br />
reading degrees and minutes, with accuracy at least within 5' of arc.<br />
Fortunately, most of us have a precise printing equipment right on our desktop: a inkjet or laser printer. These machines can print<br />
300 dots per inch (1200 for laser), with enough precision to print a good <strong>sextant</strong> scale.<br />
http://www.tecepe.com.br/nav/XTantProject.htm (1 of 11) [9/2/2004 11:05:18 PM]
XTant project - <strong>Build</strong> <strong>your</strong> <strong>own</strong> <strong>sextant</strong><br />
Laser or inkjet ?<br />
Laser printouts are more resistant to water than inkjet ones. And<br />
have better resolution. Use a laser printer, if available.<br />
But a inkjet printer will also do the work. If using a inkjet scale,<br />
protect it from water spray, either by adding a thin layer of<br />
transparent plastic or by taking extreme care with the instrument...<br />
<strong>Sextant</strong> scale printer program<br />
In order to achieve the best results, I wrote a small scale printing<br />
program. This will print the <strong>sextant</strong> scale using vector rendering,<br />
for best resolution. The scale will be the larger possible in the<br />
current printer page size.<br />
To the left, you see a screenshot of my XtantScalePrinter<br />
program. I used the default options in my project, but you may<br />
experiment with other designs (<strong>sextant</strong> types, ticks per degree<br />
etc.).<br />
XtantScalePrinter - d<strong>own</strong>load here<br />
For Windows, 192.874 bytes - This program can be freely used for personal,<br />
noncommercial purposes, provided that the credit (name and URL) is not removed from<br />
the printed scales.<br />
The Vernier scale<br />
Since I didn't have the sophisticated machining equipment<br />
required, I discarded the idea of a drum <strong>sextant</strong> and went on to<br />
build a vernier scale <strong>sextant</strong>. Vernier <strong>sextant</strong>s appeared before<br />
the modern drum <strong>sextant</strong>s. In the vernier scale <strong>sextant</strong>, each<br />
degree in the scale is divided in 3 ticks (20' wide).<br />
Vernier scale<br />
http://www.tecepe.com.br/nav/XTantProject.htm (2 of 11) [9/2/2004 11:05:18 PM]
XTant project - <strong>Build</strong> <strong>your</strong> <strong>own</strong> <strong>sextant</strong><br />
The vernier scale precision can be as good as a drum scale. The<br />
only difference is that the vernier scale requires a much more<br />
delicate handling of the <strong>sextant</strong> arm while trimming.<br />
Reading the vernier scale is easy, once you get used to it. In the<br />
scale to the left, the index reads 76° with minutes between 20'<br />
and 40' (tick A). In the vernier, we can see that the 6th vernier<br />
tick coincides with the index tick, so the reading is 76°26'.<br />
Below are the three basic X-tant types. The octant can measure up to 90°, the <strong>sextant</strong> up to 120° and the quadrant up to 180° (see<br />
below). I choose to build an Octant, since this design fits better in a A4 printer page, giving the largest possible degree size in the<br />
scale, for best detail. And the 90° scale is enough for most observations.<br />
X-tant types<br />
I used A4 ink jet sticker paper to print the scale (the ones used for printing labels). Choose a paper with no cuts. After printing the<br />
scale, check how good is <strong>your</strong> printer, using a compass to see if the index is a perfect circle segment.<br />
Scale Transfer - An alternative way to print the scale was suggested by Mr. Schmit, by email:<br />
"When you print documents with laser printers or photocopiers it is done by fusing the toner on the paper. You can transfer the print on any<br />
solid heat resistant material by refusing the toner with a very hot 'cloth iron'. Place the laser printed document on the cleaned material (printed<br />
side facing the surface) then apply the iron on the paper back just long enough to melt the toner. I used that to make gratings and reticules on<br />
glass or metal sheets and it's working fine if <strong>your</strong> print is strong enough... but the print must be reversed! "<br />
While this reversed print is not directly supported by the scale printer program, most printer drivers (e.g.: HP) offer this as an option. Open<br />
the "Printer Setup" dialog, click "Properties" and check the "reverse horizontally" checkbox.<br />
Another way was suggested by Mr. Kunnar:<br />
" I used inkjet iron transfer paper. It is a kind of plastic that can be transfered to clothes using a hot iron. Since the ink ends up trapped<br />
between the <strong>sextant</strong> frame and the plastic layer, this scale is water proof".<br />
Instrument frame<br />
I used a 3 mm tick acrylic board for the instrument frame. This material is easy to machine and is relatively rigid. Acrylic boards<br />
are usually sold in large sizes, so you might want to search for someone who works with this material, in order to get the small<br />
piece you need with minimum expense.<br />
http://www.tecepe.com.br/nav/XTantProject.htm (3 of 11) [9/2/2004 11:05:18 PM]
XTant project - <strong>Build</strong> <strong>your</strong> <strong>own</strong> <strong>sextant</strong><br />
The size of the <strong>sextant</strong> will depend on the printed scale size (that´s why there is no blue print). So, you will only "design" the<br />
instrument after you have stick the scale on the acrylic board.<br />
The acrylic board comes with plastic layers in both sides, for protection. It's a good idea to keep this protection as long as<br />
possible, because the acrylic will be easily scratched. I carefully lifted the plastic protection (see below), stuck the scale and put<br />
the plastic back in place, so the <strong>sextant</strong> scale was also protected while machining the frame.<br />
Lift the plastic protection, stick the scale, and put the protection back in place<br />
After printing, cut around the scale, leaving like 3 mm around the outside line.<br />
Sticking the printed scale in the board is a critical operation. It must be perfectly stuck, free of air bubbles or ripples. Otherwise<br />
the scale will not be correct.<br />
Remove from the sticker paper backing completely. Hold it with the two hands and gently place in the acrylic board, the arm axis<br />
circle first. Then use one hand to spread the scale, while holding the other side. Keep the paper slightly tensioned, but not so<br />
much as to distort it. If you make a mistake, you probably will have to print another scale and start again.<br />
After this, you can use a marker pen to draw<br />
the parts (frame, arm and vernier).<br />
The arm window (where the scale is read) must<br />
be sized and positioned so that you can see<br />
both the scale and the vernier touch point (that<br />
will define the arm radius). My octant arm is<br />
about 40 mm wide.<br />
When designing the arm, measure the scale<br />
radius and add 10mm on either side (towards<br />
and away from the arm axis). My arm window<br />
is 30 mm wide.<br />
The image to the left shows the 3 frame parts,<br />
marked and ready to be cut.<br />
http://www.tecepe.com.br/nav/XTantProject.htm (4 of 11) [9/2/2004 11:05:18 PM]
XTant project - <strong>Build</strong> <strong>your</strong> <strong>own</strong> <strong>sextant</strong><br />
Frame, arm and vernier, with cut lines<br />
I cut the parts with an electric jigsaw, with thin teeth blade. Take care when cutting along the scale ticks. Never cut across the<br />
scale line. If you are careful, you can cut as close as 0.5 mm from the scale. Then you will have little trouble sanding out the rest,<br />
until you precisely reach the fine scale line. Use fine sanding paper for finishing the scale arc.<br />
Also carefully cut and sand the vernier contact point, testing frequently against the scale arc. The vernier and scale contact must<br />
be as close as possible.<br />
To drill the arm axis hole, first mark it with a hard point. Drill a 2mm<br />
lead hole and then a 7 mm hole. Use sharp drills. Do the same in the<br />
frame and make sure the hole center is precisely positioned.<br />
I inserted a 7 mm hard plastic tube in the axis, so there is no contact<br />
between the arm and screw as the arm is moved (only between the tube<br />
and arm). Bond the tube to the frame.<br />
The axis screw goes in the middle, with twin nuts. Make sure there is no<br />
slack in the arm axis setup<br />
After cutting, drilling and sanding, you can assemble the arm and frame<br />
for the fist time. Then you can position and bond the vernier in the arm,<br />
using a couple small drops of loctite (Cyanoacrylate glue). Use small<br />
self tap screws to secure the vernier.<br />
If you did these steps right, the vernier should be in smooth, close<br />
contact with the index, as you slide the arm along the arc.<br />
Add a plastic device in the back of the arm to press it against the frame<br />
(the green part on the left image). It is important to have some friction<br />
between the arm and frame, so the instrument will hold the reading if<br />
left alone (i.e. the arm will not move by itself). This is also important for<br />
fine trimming.<br />
http://www.tecepe.com.br/nav/XTantProject.htm (5 of 11) [9/2/2004 11:05:18 PM]
XTant project - <strong>Build</strong> <strong>your</strong> <strong>own</strong> <strong>sextant</strong><br />
Mirrors<br />
I used 2 equally sized glass mirrors (46 mm x 24 mm, 3 mm tick). Any glass shop will cut these for you. As you know, one of the<br />
mirrors must be half silvered. So you must remove half of the mirror silver backing. I used a paper cutter blade for this job (Olfa<br />
cutter).<br />
First make a sharp longitudinal cut along the middle of the mirror. Then scratch half of the epoxy protective layer from the back<br />
of the mirror, with the blade inclined. The epoxy backing is a hard material, but will come out with patience. Don't use any<br />
abrasive material or the blade point, to avoid scratching the glass. Once the epoxy is gone, the silver is easy to remove, rubbing<br />
hard with a wet cloth. In the end, the glass must be clear and scratch free (fig. below).<br />
Mirrors<br />
Note: You may be tempted at this point to use a thinner mirror<br />
and eliminate the transparent part altogether. Don´t do that.<br />
This would introduce a refraction error. The direct (horizon)<br />
light ray must pass thru the glass, as the light ray from the star<br />
does.<br />
This can only be done if you use a front mirrored surface, such<br />
as a polished inox plate.<br />
Mirror holders<br />
I used a thicker acrylic for the mirror holders (4mm), as these parts are sometimes subjected to abuse. They will also have to be<br />
fixed with self tap screws so a thicker material is better.<br />
Both mirrors must be supported by three contact points (from geometry, we know that 3 points are required to define a plane). I<br />
used 3 supporting screws to position each mirror. Some of the screws are adjustable, for mirror trimming, and some are fixed. For<br />
the adjustable screws, I used Allen screws, which have a large head, easy to turn by hand. The fixed points are regular inox nut<br />
screws.<br />
http://www.tecepe.com.br/nav/XTantProject.htm (6 of 11) [9/2/2004 11:05:18 PM]
XTant project - <strong>Build</strong> <strong>your</strong> <strong>own</strong> <strong>sextant</strong><br />
Make a point in all screw tips, to reduce the contact area between mirror and<br />
screw to a point. I also added thin metal plates to prevent the mirrors from<br />
moving sideways while trimming.<br />
To ensure a perfect contact between the 3 screws and mirror, I used rubber<br />
bands (see right). These press the mirrors against the screws. Commercial<br />
<strong>sextant</strong>s use metal springs for this function, but I could not find any suitable<br />
part in my junk collection.<br />
backview<br />
Arm Mirror setup<br />
The arm mirror holder is basically a rectangle, with a side<br />
supporting plate. The arm mirror has one adjustable screw (top screw<br />
in the figure above). Make a 1mm deep housing for the adjustable<br />
screw nut and bond it to the acrylic, so it wont move when you trim<br />
the screw.<br />
The frame mirror holder is a T shaped part, with 2 adjustment screws (below). Cut a window, so that the sight thru the glass part<br />
of the frame mirror is clear.<br />
http://www.tecepe.com.br/nav/XTantProject.htm (7 of 11) [9/2/2004 11:05:18 PM]
XTant project - <strong>Build</strong> <strong>your</strong> <strong>own</strong> <strong>sextant</strong><br />
After completing the two mirror holder setups (i.e. after drilling, cutting, sanding and securing the mirror screws), you can bond<br />
them to the frame and arm. Start with the arm mirror.<br />
The arm mirror assembly must be positioned so that the center of the mirrored surface (the back surface of the mirror) is over the<br />
arm axis center. This way the center of the mirrored surface (i.e. the back of the mirror) remains fixed while the arm is moved.<br />
Make sure you have space to introduce and remove the arm axis screw, or you wont be able to assemble and disassemble the arm.<br />
After bonding with Loctite, use small flat head self tap screws to secure the assembly to the arm. Make a housing for the screw<br />
head, to avoid interfering in the arm movement.<br />
After securing the arm mirror assembly, set the arm to 0°00' reading and place the frame<br />
mirror assembly parallel to the arm mirror. I used a Lego Dupplo block (the large blue piece)<br />
to support the frame mirror assembly. This way the right angle between the frame mirror and<br />
instruments plane is garanteed.<br />
I like to use Lego parts (no, I'm not Lego sponsored) because they are widely available (at<br />
least in my house floor), have good dimensional precision and there are all sorts of blocks and<br />
devices.<br />
Make sure both mirror holders are firm, by bonding and securing with screws. Having reached this point, you already have a<br />
<strong>sextant</strong> to take twilight sights. But you still need shades do take Sun sights.<br />
Shades<br />
As shades for Sun and Moon sights, I used 35 mm dark negative photography film (there is<br />
one in the end of every film roll). The negatives were mounted in slide frames. I used double<br />
negatives for the Sun frame and single for the Moon.<br />
Both slide frames are removable and are attached to the instrument frame using Lego blocks<br />
(the yellow one in the pictures above). I must say I'm not happy with this fixation solution. A<br />
more skilled (less lazy) craftsman would probably do a better job, with some pivoting design.<br />
The thing to watch here is the shade position. The filter surface must be orthogonal to the line<br />
connecting both mirror centers. This is to avoid introducing a refraction error. Try to position<br />
the slide center in the line connecting the two mirror centers.<br />
Don't make the same mistake I did, letting the shade support interfere with the arm at large<br />
angles. The arm must go at least up to 90° (for the octant).<br />
Sun shade<br />
http://www.tecepe.com.br/nav/XTantProject.htm (8 of 11) [9/2/2004 11:05:18 PM]
XTant project - <strong>Build</strong> <strong>your</strong> <strong>own</strong> <strong>sextant</strong><br />
No eyepiece ?<br />
I was looking for a good 2x or 3x small telescope that I could use as an eyepiece for my <strong>sextant</strong>. I played with small toy<br />
telescopes, but results were poor. In the end, I decided to use no eyepiece. This actually gives a lot of freedom handling the<br />
<strong>sextant</strong>.<br />
When taking a sight, remember to hold the instrument so that <strong>your</strong> eye is on a plane parallel to the instrument's and containing the<br />
fixed mirror silver-glass division. This is easy to find: turn the instrument up until you face the fixed mirror. In this position, you<br />
should see half of <strong>your</strong> eye in the silvered part of the mirror. Move it sideways until you see it. Then turn the instrument back<br />
d<strong>own</strong> to observation position.<br />
Trimming the mirrors<br />
Trimming this octant is no different then any other <strong>sextant</strong>.<br />
First trim the arm mirror adjustment screw. The arm mirror must be<br />
perpendicular to the arm/frame plane. This may be checked by looking<br />
at the index scale reflected in the arm mirror. The reflected index must<br />
be perfectly aligned with the index part you see directly (green arrow<br />
on the right).<br />
Then trim the frame mirror. This is a little trickier, because two screws have to be trimmed simultaneously. Set the arm to 0°00'<br />
and point the instrument to a far object (like a star or boat far away). Then trim the two screws until the object remains a single<br />
image while you swing and rock about the instrument axis.<br />
- - - - - - - - - - - - - - -<br />
As future improvements, I would change to a better shade positioning system,<br />
add a nice handle and a case (I'm currently using a cardboard box). The case is<br />
probably the most important of the three, for a <strong>sextant</strong> - like a violin - is not be<br />
left hanging around, if it is to last long.<br />
There are many materials, design ideas and garage junk devices that can used<br />
to build a <strong>Sextant</strong>. If you build such an instrument - using these ideas or not - I<br />
would like to hear about it. I would also be happy to publish other design<br />
solutions here.<br />
A <strong>sextant</strong> is a fun thing to build, and getting a precise reading from <strong>your</strong> <strong>own</strong><br />
instrument is one thing that will make you feel good.<br />
- - - - - - - - -<br />
Sun sight<br />
http://www.tecepe.com.br/nav/XTantProject.htm (9 of 11) [9/2/2004 11:05:18 PM]
XTant project - <strong>Build</strong> <strong>your</strong> <strong>own</strong> <strong>sextant</strong><br />
<strong>Sextant</strong> Field Test<br />
I did some tests comparing the same vertical angles, measured by 3 different<br />
instruments:<br />
1. A Kern theodolite<br />
2. A Davis MK15 plastic <strong>sextant</strong><br />
3. My Octant<br />
The theodolite (a survey instrument) is presumably more precise than the <strong>sextant</strong>s and<br />
was used as a benchmark. <strong>Sextant</strong> angles were corrected for index error. I measured 4<br />
vertical objects, obtaining the following results:<br />
Object # Kern theodolite Davis <strong>sextant</strong> My Octant<br />
1 7°41' 7°42' +1' 7°42' +1'<br />
2 22°24' 22°19.5' -5' 22°25' +1'<br />
3 41°37' 41°44.5' +7' 41°42' +5'<br />
4 56°42' 57°01 +19' 56°55' +13'<br />
>> "The American Practical Navigator " by Nathaniel<br />
Bowditch<br />
ISBN 0781220211 - 1200 pages<br />
Bibliography<br />
buy from Amazon<br />
History:<br />
1. (jun/02) - Added text about inkjet printed scale problem with water spray.<br />
2. (oct/02) - Added a arm axis screw diagram<br />
http://www.tecepe.com.br/nav/XTantProject.htm (10 of 11) [9/2/2004 11:05:18 PM]
XTant project - <strong>Build</strong> <strong>your</strong> <strong>own</strong> <strong>sextant</strong><br />
3. (nov/02) - Added <strong>sextant</strong> test results and note about laser print transfer.<br />
4. (fev/04) - Added note about mirror refraction<br />
©Copr 92-2k Omar F. Reis - All rights reserved<br />
http://www.tecepe.com.br/nav/XTantProject.htm (11 of 11) [9/2/2004 11:05:18 PM]
http://www.tecepe.com.br/nav/cd<strong>sextant</strong>/<strong>CD</strong><strong>Sextant</strong>Scan300DPI.jpg<br />
http://www.tecepe.com.br/nav/cd<strong>sextant</strong>/<strong>CD</strong><strong>Sextant</strong>Scan300DPI.jpg (1 of 2) [9/2/2004 11:05:28 PM]
http://www.tecepe.com.br/nav/cd<strong>sextant</strong>/<strong>CD</strong><strong>Sextant</strong>Scan300DPI.jpg<br />
http://www.tecepe.com.br/nav/cd<strong>sextant</strong>/<strong>CD</strong><strong>Sextant</strong>Scan300DPI.jpg (2 of 2) [9/2/2004 11:05:28 PM]
LEGO.com Homepage<br />
· Preschool · Educators · About Us · Customer Service · My Opinions · Site Index |<br />
Quick Links<br />
Knights Kingdom<br />
BIONICLE<br />
Alpha Team<br />
Quick Links<br />
LEGO Club<br />
LEGOLAND<br />
Quick Links<br />
LEGO Shop at Home<br />
What's New in the Shop<br />
Sales and Deals<br />
Store Locator<br />
© 2004 The LEGO Group. All rights reserved. Use of this site signifies <strong>your</strong> agreement to the terms of use. Legal Notice<br />
© 2004 Lucasfilm Ltd. & TM. All rights reserved. Used under authorization.<br />
Spider-Man and all related characters: TM & © 2004 Marvel Characters, Inc. Spider-Man 2, the movie: © 2004 Columbia Pictures<br />
Industries Inc. All Rights reserved.<br />
http://www.lego.com/eng/ [9/2/2004 11:05:29 PM]
Amazon.com: The American Practical Navigator: An Epitome of Navigation 1995 Edition: Explore similar items<br />
Search<br />
Browse<br />
Subjects<br />
Bestsellers<br />
Magazines<br />
Corporate<br />
Accounts<br />
e-books<br />
& docs<br />
New & Used<br />
Textbooks<br />
Used<br />
Books<br />
Search:<br />
Browse:<br />
You clicked on this item...<br />
The American Practical Navigator<br />
by Nathaniel Bowditch<br />
Average Customer Review:<br />
Out of Print--Limited Availability<br />
16 used & new from<br />
$20.00<br />
buy used: $44.95<br />
You may also be interested in these items...<br />
Show items from:<br />
All Products<br />
Books (2)<br />
How to Read a Nautical<br />
Chart<br />
by Nigel Calder<br />
H.M.S. Surprise<br />
(Aubrey-Maturin<br />
(Paperback))<br />
by Patrick O'Brian<br />
http://www.amazon.com/exec/obidos/ASIN/0403098955/forumolimpico/102-4486973-5960147 (1 of 2) [9/2/2004 11:05:32 PM]
Amazon.com: The American Practical Navigator: An Epitome of Navigation 1995 Edition: Explore similar items<br />
$25 Off Tools &<br />
Hardware<br />
Take $25 off<br />
when you spend<br />
$199 or more on<br />
Tools &<br />
Hardware<br />
products offered<br />
by Amazon.com.<br />
Here's how<br />
(restrictions<br />
apply).<br />
New at Amazon.com<br />
Find more<br />
than 600,000<br />
china, crystal,<br />
and silver<br />
products in<br />
the<br />
Replacements,<br />
Ltd. Store.<br />
Find sound<br />
values on<br />
instruments<br />
and gear in our<br />
new Musical<br />
Instruments<br />
Store.<br />
Where's My Stuff?<br />
• Track <strong>your</strong> recent orders.<br />
• View or change <strong>your</strong> orders<br />
in Your Account.<br />
Shipping & Returns<br />
• See our shipping rates &<br />
policies.<br />
• Return an item (here's our<br />
Returns Policy).<br />
Need Help?<br />
• Forgot <strong>your</strong> password? Click<br />
here.<br />
• Redeem or buy a gift<br />
certificate.<br />
• Visit our Help department.<br />
Search<br />
for<br />
Turn <strong>your</strong> past books purchases into $$$<br />
Learn more about selling at Amazon.com today!<br />
Top of Page<br />
Books Search | Browse Subjects | Bestsellers | Magazines | Corporate Accounts<br />
e-Books & Docs | Bargain Books | Used Books<br />
Amazon.com Home | Directory of All Stores<br />
Our International Sites: Canada | United Kingdom | Germany | Japan | France<br />
Contact Us | Help | Shopping Cart | Your Account | Sell Items | 1-Click Settings<br />
Investor Relations | Press Releases | Join Our Staff<br />
Conditions of Use | Privacy Notice © 1996-2004, Amazon.com, Inc. or its affiliates<br />
http://www.amazon.com/exec/obidos/ASIN/0403098955/forumolimpico/102-4486973-5960147 (2 of 2) [9/2/2004 11:05:32 PM]
Navigator Software Registration Form<br />
Navigator - Electronic version<br />
Software for celestial navigation and chart navigation, with GPS interface.<br />
Delivery<br />
You will receive information electronically immediately after ordering!<br />
You will be able to d<strong>own</strong>load the product immediately after ordering!<br />
Order <strong>Information</strong><br />
Price: $35.00<br />
Quantity:<br />
Where did you hear about this product?:<br />
HACKERSAFE<br />
certified sites<br />
prevent over<br />
99% of hacker<br />
crime.<br />
https://www.regnow.com/softsell/nph-softsell.cgi?item=2249-1 [9/2/2004 11:07:24 PM]
Celestaire, Inc.: Navigator Software<br />
Top : Computer Software : Navigation Software : Navigator Software<br />
Sight Reduction<br />
Search<br />
More Search Options<br />
Customer Service<br />
Product Index<br />
Ordering <strong>Information</strong><br />
Contact Us<br />
Celestaire Home<br />
Shipping Rates<br />
United States<br />
International<br />
Shopping Cart<br />
View Cart<br />
Check Out Now<br />
NAVIGATOR<br />
Omar Reis<br />
Navigator is a remarkable program, and has<br />
received high praise from many expert<br />
navigators. It embodies many features rarely<br />
found in one program, and certainly not at<br />
such a low price. Its many celestial<br />
navigation features are:<br />
● Perpetual Almanac for all bodies (to<br />
year 2031)<br />
● Star Finder<br />
● Meridian passage calculation<br />
● Lines of position calculation<br />
● Fix calculation<br />
● Print star finder and star charts<br />
● Print daily pages of the almanac<br />
The star finder is a polar chart of the visible sky at a given time and position. You<br />
can point at a star and see its name, altitude and azimuth. Or you can point on the<br />
speadsheet and see the corresponding star on the chart.<br />
Lines of position are actually plotted on a small inset chart (centered at <strong>your</strong><br />
estimated position) with all the data affecting its computation sh<strong>own</strong>. Fixes are<br />
sh<strong>own</strong> as a result of the LOPs.<br />
Daily nautical almanac pages can be printed out. All that is needed is the initial<br />
date of a 3 day period. These pages are very similar to the official Nautical Almanac<br />
in arrangement and data, and show: star position tables (SHA and dec), sun and<br />
moon hour tables complete with increments and semi-diameter, planets hour tables<br />
with increments, aries hour table. Not included are: The latitude functions such as<br />
twilights and sun and moon rise and set, sun equation of time and meridian<br />
passage, and moon meridianpassage. While not intended to substitute for the<br />
official Nautical Almanac, it nevertheless is quite enough to do celestial navigation<br />
using the traditional methods.<br />
Charting Features<br />
● Scan <strong>your</strong> <strong>own</strong> charts<br />
● Import GIF and JPEG images as raster charts<br />
● NMEA GPS interface<br />
● Create routes and tracks<br />
● Plot position and save track in real time<br />
It should be understood though, that this is primarily a celestial navigation program,<br />
and is not meant to replace other more expensive and more complete charting<br />
software. It will not read commercially available raster or vector charts. It will,<br />
however, read charts you scan <strong>your</strong>self, and save as a GIF or JPEG image. In fact<br />
http://www.celestaire.com/catalog/products/3123.html (1 of 2) [9/2/2004 11:07:26 PM]
Celestaire, Inc.: Navigator Software<br />
you will have unlimited zoom in or out capability with excellent clarity. This feature<br />
of making <strong>your</strong> <strong>own</strong> charts from paper charts, cruising guides, or even roadmaps is<br />
becoming very popular with navigators using other programs (such as Fugawi).<br />
The program comes with a beautifully illustrated and comprehensive printed User1s<br />
Manual. System requirements are PC (486 or pentium) running Windows<br />
95/98/ME/NT/2000/XP. SW 1 lb.<br />
Navigator Software<br />
Item#: 3123 - $59.95<br />
Copyright © Celestaire, Inc. All Rights Reserved.<br />
Powered by virtualCART<br />
http://www.celestaire.com/catalog/products/3123.html (2 of 2) [9/2/2004 11:07:26 PM]
http://www.tecepe.com.br/nav/licenseagreement.txt<br />
Navigator - Celestial Navigation Software<br />
=========================================<br />
Please read the following terms and conditions.<br />
If you do not agree with any of the conditions in<br />
this text, delete any copies of this Software and<br />
contact for refund (registered version).<br />
LICENSE AGREEMENT<br />
Navigator and ChartMaker copyright © 1992-2003 by Omar Reis,<br />
all rights reserved.<br />
This software and accompanying documentation are protected<br />
copyright laws and by International Treaty provisions.<br />
In this text, the term "Software" designates programs Navigator<br />
and ChartMaker and associated documentation.<br />
The term "Author" designates Omar Reis.<br />
The software may be used by one person on as many computer<br />
systems as that person uses or by multiple persons on a single<br />
computer, but NOT by multiple persons on multiple computers<br />
simultaneously. Contact the Author for volume discounts and<br />
site licensing agreements.<br />
The Author authorizes you to make archival copies of this<br />
software for the sole purpose of back-up and protecting <strong>your</strong><br />
investment from loss. Under no circumstances may you copy this<br />
software or documentation for the purposes of distribution to<br />
others. Under no conditions may you remove the copyright notices<br />
made part of the software or documentation.<br />
With respect to the physical <strong>CD</strong> ROM and documentation provided<br />
with Navigator, the Author warrants the same to be free of defects<br />
in materials and workmanship for a period of 60 days from the<br />
date of receipt. If you notify us of such a defect within the<br />
warranty period, the Author will replace the defective disk or<br />
documentation at no cost to you.<br />
The Author warrants that the software will function as described<br />
in this documentation for a period of one year from receipt.<br />
If you encounter a bug or deficiency, we will require a problem<br />
report detailed enough to allow us to find and fix the problem.<br />
If you properly notify us of such a software problem within the<br />
warranty period, the Author will update the defective software<br />
at no cost to you.<br />
The Author further warrants that the purchaser will remain fully<br />
satisfied with the product for a period of 60 days from receipt.<br />
If you are dissatisfied for any reason, and the Author cannot<br />
correct the problem, contact the party from whom the software<br />
was purchased for a return authorization. If you purchased the<br />
product directly from the Author, we will refund the full purchase<br />
price of the software (not including shipping costs) upon receipt<br />
of the original program diskette(s) and documentation in undamaged<br />
condition. The Author honors returns from authorized dealers, but<br />
cannot offer refunds directly to anyone who did not purchase a<br />
product directly from us.<br />
THE AUTHOR DOES NOT ASSUME ANY LIABILITY FOR<br />
http://www.tecepe.com.br/nav/licenseagreement.txt (1 of 2) [9/2/2004 11:07:27 PM]
http://www.tecepe.com.br/nav/licenseagreement.txt<br />
THE USE OF THE SOFTWARE BEYOND THE ORIGINAL<br />
PURCHASE PRICE OF THE SOFTWARE.<br />
IN NO EVENT WILL THE AUTHOR BE LIABLE TO YOU<br />
FOR ADDITIONAL DAMAGES, INCLUDING ANY LOST<br />
PROFITS, LOST SAVINGS, PROPERTY DAMAGE OR OTHER<br />
INCIDENTAL OR CONSEQUENTIAL DAMAGES ARISING OUT<br />
OF THE USE OF OR INABILITY TO USE THESE PROGRAMS,<br />
EVEN IF THE AUTHOR HAS BEEN ADVISED OF THE<br />
POSSIBILITY OF SUCH DAMAGES.<br />
By using the software after reading this, you agree to the terms<br />
of this license. If you do not agree, contact the party from whom<br />
the software was purchased for refund.<br />
ACKNOWLEDGMENTS<br />
* Moon position routines (c)copr 91-92 by Jeffrey Sax<br />
* MD5 code by Greg Carter, CRYPTOCard Corp.<br />
All brand and product names cited in the text are trademarks or<br />
registered trademarks of their respective holders.<br />
http://www.tecepe.com.br/nav/licenseagreement.txt (2 of 2) [9/2/2004 11:07:27 PM]
Chapter 1: Celestial Navigation<br />
This page was moved. Click here<br />
Navigator's performance.<br />
Navigator Light - particularly the visible stars command - does a great deal of floating point<br />
calculations. The use of a computer with numeric coprocessor is recommended. This particular<br />
command, that takes less than 0.5 sec on a Pentium 133, takes 12 seconds in a 486 SX 25.<br />
Navigator's calculation methods.<br />
For the technically inclined.<br />
Celestial navigation fundamentals | On Line Almanac<br />
e-mail orion<br />
©Copr 91-99 Omar F. Reis<br />
http://www.tecepe.com.br/nav/howto.htm [9/2/2004 11:07:37 PM]
Navigator Light Software<br />
Navigator shareware version (1.0) kn<strong>own</strong> issues<br />
A few problems have been found in version 1.0 of Navigator, which currently is available for d<strong>own</strong>load as the "shareware"<br />
version. Unfortunately I no longer support this version to correct the bugs. I will release a new limited feature version for free<br />
d<strong>own</strong>load in the future. In the mean time use this version as-is.<br />
The kn<strong>own</strong> issues are:<br />
1- Problem in the Local Time, GMT Time and Date editboxes. These are set to update each other as you type. Sometimes the<br />
'stack overflow error' message appears, and the program terminates.<br />
2- There is a systematic error of as much as 0.5' in the GHA of the Moon. This is related to dynamical time correction, which is<br />
wrong in this version. Note that this error is relatively small, as it will result in a 0.5 NM error in the position (not much for<br />
celestial navigation).<br />
OFR nov/03<br />
©Copr 92-2k Omar F. Reis - All rights reserved<br />
http://www.tecepe.com.br/nav/Nav10issues.htm [9/2/2004 11:07:39 PM]
Navigator Light for DOS<br />
Navigator Light for DOS<br />
Important note (05/18/99): A bug was found in version 1.2 date input procedure that<br />
mislead the user to enter date in the wrong format (day and month switched). This<br />
resulted in absurd results.<br />
The error is corrected in the new version 1.3, which is available for d<strong>own</strong>load.<br />
The program version appears when you close the program. Check it out. If <strong>your</strong><br />
version is not 1.3 or latter, updating is strongly advised.<br />
Many people asked me about the DOS version. The reason: it is small enough to run on the little<br />
palmtop computers from HP, the HP95lx, HP100lx and HP200lx. These computers are very small<br />
and run on ordinary AA alcaline batteries. I made some changes in the graphics interface, so the<br />
program now draws the simplified chart in the palmtop screen, which has a different graphics<br />
interface.<br />
I know this documentation is incomplete. The original program documenation - in portuguese - has<br />
45 pages. Some of it is already translated in the web site (http://www.tecepe.com.br/nav/).<br />
This document explains some aspects of operating Navigator Light for DOS. The program has all<br />
the same calculation features found in the Windows version, and even some that are not. Users<br />
familiar with the Windows version should have no problem.<br />
Uploading NAV.EXE to the palmtop<br />
Palmtops don't have floppy disk drives, so you have to use its serial port to upload the program<br />
from a desktop computer. In order to do this, you will need a special serial cable (HP part<br />
82222A). To upload, use the Windows Terminal, or any communications program that support<br />
Xmodem or Kermit transfer protocols. You can also use the infrared port, if you have the IR<br />
adapter in <strong>your</strong> desktop computer.<br />
Once the cable is connected, run the terminal in the PC and press the COMM key in the palmtop.<br />
Set both programs to 19200 bps, 8 data bits, 1 stop bit, parity none. Try typing something, to see if<br />
the other computer is receiving ok. Select either Kermit or Xmodem transfer protocols in both<br />
sides. Do the binary transfer of the file NAV.EXE. This transfer takes about 2 minutes.<br />
Note: Once uploaded, you have to keep palmtop batteries charged or you loose the virtual disk<br />
http://www.tecepe.com.br/nav/navdos.htm (1 of 3) [9/2/2004 11:07:42 PM]
Navigator Light for DOS<br />
data - and the program. AA Duracells will last 2 months, with minimal usage. Palmtops have a<br />
backup battery that keeps the memory while changing the main batteries. Keep spare batteries of<br />
both types. Check battery charge often.<br />
Note: Navigator Light for DOS uses about 180k of memory. If the program gives a low memory<br />
error on start, try to allocate less memory to the virtual disk, leaving more memory for programs.<br />
Reserve at least 230k for programs. Read the palmtop manual for more details.<br />
Running the program<br />
This program runs in palmtops and PCS with MS DOS.<br />
Running in a PC<br />
type NAV PC (use the PC parameter)<br />
Make sure you have CGA.BGI and EGAVGA.BGI files in the same directory.<br />
Running in palmtops<br />
You don't need any parameter. Just run NAV.<br />
To start the program in the palmtop, use the FILER. Point the file NAV.EXE and press F4 (Run).<br />
Operating the program<br />
Once running, you can activate the menu, by pressing the space bar or the '/' key.<br />
Menu commands can be activated by the capital letter, or by moving the cursor and pressing Enter.<br />
Inputting data for Lines of Position calculation (LOPs)<br />
1) First, select a celestial body, pressing 'B' 'S' (Body Select). Choose the celestial body.<br />
2) To enter <strong>your</strong> measurements, press 'I' (Input)<br />
● Press 'I' (Instruments) to enter Dip, IE, watch error and Time Zone<br />
● Press 'D' (Date) to enter date of measurement (GMT date)<br />
● Press 'P' (Position) to enter assumed position. Enter position in decimal notation, as in the<br />
following examples:<br />
For 23°45.6'W, type 23.456 (Use negative for East longitudes)<br />
For 54°32.1'S, type 54.321 (Use negative for North latitudes)<br />
● Press 'A' (Altitude) to enter time of measurement and instrumental altitude. Enter altitude in<br />
decimal notation, as in the following example:<br />
For 34°67.8' , type 34.678<br />
http://www.tecepe.com.br/nav/navdos.htm (2 of 3) [9/2/2004 11:07:42 PM]
Navigator Light for DOS<br />
3) Calculate the LOP, by pressing 'C' 'L' (Calc Lop). If Lop looks ok, press 'S' to save it for the Fix<br />
calculation.<br />
Calculating an Astronomical Position (Fix)<br />
After saving two or more LOPs, press 'C' 'F' (Calc Fix). Program will calculate the Fix. Press 'M'<br />
to see the map with <strong>your</strong> LOPs and astronomical position.<br />
D<strong>own</strong>load Navigator Light for DOS<br />
This program is released as shareware. If you like it and plan to use it regularlly, please register<br />
<strong>your</strong> copy.<br />
Registration is only US$35.<br />
Click here to d<strong>own</strong>load version 1.3 for DOS.<br />
(navdos.zip - Zip compressed - 92047 bytes)<br />
Comments and bug reports<br />
Please contact me via e-mail or visit the website<br />
(http://www.tecepe.com.br/nav).<br />
e-mail orion<br />
©Copr 91-97 Omar F. Reis<br />
All rights reserved<br />
http://www.tecepe.com.br/nav/navdos.htm (3 of 3) [9/2/2004 11:07:42 PM]
Navigator Light Software<br />
level of difficulty beginner intermediate advanced<br />
Celestial Navigation Fundamentals<br />
Note: This is the first chapter of the manual of Navigator Light, a DOS program I developed in 1993 (yes, my Navigator is<br />
older than Netscape's). The original Portuguese full text is available in this site.<br />
This text is available in English, French and Portuguese<br />
Angles, angles, angles...<br />
Angles are the most common type of number used by the celestial navigator. The position of the celestial bodies and points on<br />
the surface of the earth may be described by angles. The <strong>sextant</strong> is an instrument that measures angles. Angles are usually<br />
measured in degrees, minutes and seconds. The complete circumference has 360 degrees (360°). One degree is equivalent to 60<br />
minutes. The seconds of arc are not used in the celestial navigation, since the angle measurement instrument - the <strong>sextant</strong> - is not<br />
precise enough to measure them. The smallest unit of angle used by navigators is the tenth of minute. Recently, the<br />
popularization of GPS devices added the 1/100 of minute.<br />
The nautical mile (=1852 m) is a unit conveniently selected to simplify the conversions between angles and distances. One<br />
nautical mile corresponds to an arc of one minute on the surface of earth. Angles and distances on the surface of earth are,<br />
therefore, equivalent. One exception is the minute of longitude, equivalent to one mile only near the Earth Equator. Another<br />
important equivalence is between time and degrees of longitude. Since the earth goes one complete turn (360°) in 24 hours, each<br />
hour corresponds to 15° of longitude. Or 900 Nautical miles (NM).<br />
The Earth and the Celestial Sphere.<br />
Imagine that the Earth is the center of the universe and that around the Earth there is a larger<br />
sphere, centered in the same point, in which the stars are fixed, as if they were painted in its<br />
internal surface. This other ball we call the Celestial Sphere.<br />
Fig. 1 - The Earth and the Celestial Sphere<br />
To specify a position on the surface of Earth we use a system of coordinates that<br />
consists of two angles: latitude and longitude. Latitude is the angle measured from<br />
the Equator in direction North-South. Longitude is the angle in the <strong>Pole</strong> between<br />
the Meridian of Greenwich and that of the considered position (fig. 2).<br />
fig. 2 - Earth coordinate system<br />
http://www.tecepe.com.br/nav/inav_c11.htm (1 of 4) [9/2/2004 11:08:03 PM]
Navigator Light Software<br />
A similar system is used for the Celestial Sphere. The angle analogous to<br />
the latitude in the celestial sphere we call declination. The declination is<br />
measured in the plane North-South, from the Celestial Equator. The analog<br />
to the longitude is named Right Ascension or RA. Like the longitude, the<br />
Right Ascension is measured from an arbitrary Meridian: the Vernal<br />
Equinox Point (a.k.a. first point of Aries).<br />
fig. 3- Celestial Coordinate System<br />
Apparent movement of the stars<br />
The stars have nearly fixed positions in the Celestial Sphere. The Sun, Moon and planets move around during the year, but their<br />
movement is slow when compared to the apparent movement due to the rotation of the Earth. So let's consider for now that the<br />
celestial objects ( stars, planets, Sun and Moon) are fixed in the Celestial Sphere.<br />
Using the Earth-at-the-center-of-the-universe model, imagine that the Earth is stopped and the celestial sphere is turning around<br />
it, completing a turn every 24 hours. You should not be confused by this idea: it's exactly what you observe if you seat and<br />
watch the night sky long enough.<br />
The Earth's and Celestial Sphere's axes of rotation are in the same line. Both equators are, therefore, in the same plane (see fig.<br />
1).<br />
The stars, fixed to the celestial sphere, turn around the earth. The celestial sphere poles, being in the axis of rotation, remain<br />
fixed in the sky. So, a star located near a celestial pole will appear to be stationary in the sky. That's the case of Polaris, a star<br />
that is near the North Celestial <strong>Pole</strong> (its declination is 89°05' N). It's always in the north direction, a wonderful fact kn<strong>own</strong> by<br />
every navigator. Unfortunately there's no corresponding bright star near the South Celestial <strong>Pole</strong>.<br />
Finding the Earth position by observing the stars<br />
Now consider a line connecting the center of a star and the center of the Earth. The<br />
point where this line crosses the surface of the Earth we call Geographical<br />
Position of this star (or GP). An observer positioned in the GP of a star will see it<br />
directly in the vertical, above the head.<br />
Since stars move with the celestial sphere, their GPs also move on the surface of<br />
the Earth. And they are fast. The Sun's GP, for example, travels a mile every four<br />
seconds. The GPs of other stars, closer to the celestial poles, move more slowly.<br />
The GP of Polaris moves very slowly, since it's very close to the North <strong>Pole</strong>.<br />
Fig. 4- Geographical Position of a Star<br />
Because both Earth and Celestial equators are in the same plane, the latitude of the GP is equal to the declination of the star. The<br />
longitude of the GP is kn<strong>own</strong> as Greenwich Hour Angle - or GHA - in a reference to the correspondence between hours and<br />
longitude.<br />
We can determine, using a Nautical Almanac, the GP of a star (it's GHA and declination) in any moment of time. But we must<br />
know the exact time of the observation. As we have seen, 4 seconds may correspond to one mile in the GP of a star. This shows<br />
the importance of having a watch with the correct time for the celestial navigation. The Beagle - ship of Charles Darwin's travel<br />
in 1830 - carried 22 chronometers on board when she went around the globe in a geographic survey.<br />
http://www.tecepe.com.br/nav/inav_c11.htm (2 of 4) [9/2/2004 11:08:03 PM]
Navigator Light Software<br />
Another important point is the Zenith. The Zenith is the point in the celestial sphere located in the vertical,<br />
over the head of the navigator. The line that connects the Zenith and the center of the Earth crosses the surface<br />
in the position of the navigator, the one we want to find. So, we have the following correspondence between<br />
points:<br />
Surface of Earth<br />
Celestial Sphere<br />
Geographical Position of a star<br />
Center of the star<br />
Position of the navigator<br />
Zenith<br />
Zenith<br />
In the figure 5, the GP of the star is represented by X and the Zenith by Z.<br />
The distance XZ, from the GP of the star to the point Z of the navigator is<br />
called Zenith Distance. This distance, as we have seen, can be expressed in<br />
miles or degrees, since it's an arc on the surface of the Earth.<br />
fig. 5 - GP of a star and the Zenith<br />
The angle that XZ makes with the True North (i.e. the "bearing" of the star) is<br />
called Azimuth ( Az ) (fig. 6).<br />
fig. 6 - Azimuth of a star<br />
The stars are at a great distance from the earth and so the light rays coming<br />
from them that reach the Earth are parallel.<br />
Therefore, as illustrated in the figure 7, we may say that the distance XZ (as<br />
an angle) is equal to the angle that the navigator observes between the star<br />
and the vertical. This is important. The distance XZ, measured as an<br />
angle, is equal to the angle that the navigator observes between the star<br />
and the vertical.<br />
fig.7 - Altitude and Zenith distance of a star<br />
However, it's difficult to determine the Zenith distance with precision, since it's difficult to find the vertical direction in a rocking<br />
boat. It's a lot easier to measure the angle between the star and the horizon. This important angle for the celestial navigator is<br />
http://www.tecepe.com.br/nav/inav_c11.htm (3 of 4) [9/2/2004 11:08:03 PM]
Navigator Light Software<br />
called altitude (H) of the star. The altitude of a star is taken with the <strong>sextant</strong> held in the vertical plane, measuring the angle<br />
between the horizon and the star. In the fig. 7, we can see that the zenith distance equals 90° less the altitude of the star.<br />
We have seen how to determine the zenith distance of a star using the<br />
<strong>sextant</strong>. The Zenith Distance and the GP of a star, however, are not enough<br />
to determine our position. With this data we can only say that our position<br />
is in a big circle, with the center in the GP of the star and radius equal to the<br />
Zenith Distance. This is kn<strong>own</strong> as the Circle of Position. Figure 8 shows a<br />
Circle of Position. Point X is the GP of the star.<br />
fig.8 - Circle of Position<br />
Any observer located on this circle will see the star at the same altitude, but with different Azimuths. In the example of the<br />
figure, suppose the navigator observes the star with an altitude of 65°. As we have seen, the Zenith Distance is 90°-H, or 25°. To<br />
determine this distance in miles, we multiply by 60, since one degree is equal to 60 nautical miles (NM). So, the Zenith Distance<br />
in the example - the radius of our circle - is 1500 NM.<br />
If we just could determinate the exact direction where the GP of the star is - it's Azimuth - that would establish where in the<br />
circle we are. How about using a compass? Unfortunately, the compass is not precise enough for celestial navigation. One error<br />
of just 3°, common when reading a compass, corresponds to 78 miles of error in our example! Not an acceptable error.<br />
The way to find our position is to draw two or more circles - for two or more celestial bodies - and see where they intercept each<br />
other. But drawing these big circles would require really big charts! We work around this problem by making a guess at our<br />
position. No matter how lost we are, we can always make a guess. Using this assumed position we can calculate expected<br />
altitude for the star at a given time (using the Nautical Almanac).<br />
This Calculated Altitude can then be compared with the Observed Altitude (the actual altitude, measured with the <strong>sextant</strong>).<br />
The difference is the error of our assumed position ( also kn<strong>own</strong> as Delta ) in the direction of the star. The Delta can be towards<br />
the star or away from it.<br />
>> Click here for the next page<br />
>> Homepage<br />
©Copr 92-2k Omar F. Reis - All rights reserved<br />
http://www.tecepe.com.br/nav/inav_c11.htm (4 of 4) [9/2/2004 11:08:03 PM]
Navigator Light Software<br />
Navigator screen shots<br />
In this section, you will see how Navigator features look like:<br />
Star Finder<br />
The figure below shows the Navigator's star finder window. This is a polar chart of the visible sky in a given time and position.<br />
You can point a star and see it's data (Name, Altitude and Azimuth). Or you can point on the spreadsheet and see the<br />
corresponding objects on the chart.<br />
The center of the chart is the Zenith and the external circle is the horizon. The two blue concentric circles are the 30° and 60°<br />
altitude. The best stars to observe are between these two circles (altitudes between 30° and 60°) .<br />
Line of Position<br />
Calculating a Line of Position is easy. Input:<br />
● Date and GMT time of the observation. You can also input the local time and click GMT!. The program will calculate the<br />
GMT time, adding the time zone and watch error. Click Now! to fill with the current date and time.<br />
● Select the star observed.<br />
● Instrumental altitude of the star. For the Sun and Moon, use the altitude of the lower limb, as sh<strong>own</strong>.<br />
●<br />
Estimated position (Latitude and Longitude).<br />
http://www.tecepe.com.br/nav/screenshots.htm (1 of 4) [9/2/2004 11:08:06 PM]
Navigator Light Software<br />
●<br />
Index Error in minutes and Height of the eye in meters or feet.<br />
Press Calculate. The LOP will show in the chart, as illustrated.<br />
All input fields and buttons have hints that explain what they are and what units should be used. Place the cursor over the field to<br />
see the hint.<br />
Astronomical position<br />
After you calculate two or more Lines of Position, you can calculate <strong>your</strong> astronomical position. The figure bellow shows an<br />
astronomical position calculated with 2 LOPs. Note the blue chart, showing the LOPs diagram. The astronomical position is<br />
indicated by the white circle. Use the cursor to zoom in and out. Auto transport LOP feature makes calculating a running fix an<br />
easy task.<br />
http://www.tecepe.com.br/nav/screenshots.htm (2 of 4) [9/2/2004 11:08:06 PM]
Navigator Light Software<br />
Chart Navigation<br />
Navigator Chart Viewer can work with vector and raster charts. Vector charts can be produced with ChartMaker program (also<br />
included in the registered version). There are a couple charts available in our chart library. It can also import popular raster<br />
image formats, like GIF, JPG and BMP. None of the other proprietary chart formats is supported at this time.<br />
In the Navigator chart viewer you can:<br />
- View multiple charts, integrated in a whole world vector chart background.<br />
- Draw routes and calculte leg distances and courses<br />
- Connect a GPS and save <strong>your</strong> track on-line<br />
- Draw marks, with text.<br />
- Calculate rhumb lines and lines of great circle and generate routes.<br />
http://www.tecepe.com.br/nav/screenshots.htm (3 of 4) [9/2/2004 11:08:06 PM]
Navigator Light Software<br />
Chart viewer showing a raster chart zoom animation<br />
©Copr 92-2k Omar F. Reis - All rights reserved<br />
http://www.tecepe.com.br/nav/screenshots.htm (4 of 4) [9/2/2004 11:08:06 PM]
Untitled Document<br />
Astronomical observations<br />
Date: twilight time: assumed lat: assumed lon:<br />
index error: watch error: time zone: Obs:<br />
celestial object sky preparation observations results<br />
LOP Name Altitude Az Time Hi Delta Dir Az<br />
1<br />
2<br />
3<br />
4<br />
5<br />
6<br />
Astronomical position for ____ LOPs Lat: Lon:<br />
Navigator Light Software - www.tecepe.com.br/nav<br />
http://www.tecepe.com.br/nav/LopListPrint.htm [9/2/2004 11:08:08 PM]
Time keeping<br />
level of difficulty beginner intermediate advanced<br />
Keeping the time<br />
keeping the time is crucial to have good results from celestial navigation. This is because the Earth is in constant rotation, moving<br />
15° each hour. So, each 4 seconds error in the time will result in a position error of up to one nautical mile.<br />
Longitude is the coordinate affected by time errors. In fact, if you don't have the correct time, you can't calculate <strong>your</strong> longitude<br />
by celestial navigation.<br />
The traditional way to calculate the time using celestial navigation is by performing a Lunar Calculation. This uses the Moon<br />
fast celestial sphere movement as a clock. More details click here.<br />
In the old days of mechanical clocks, keeping the time was a real nightmare. Chronometer paces were affected by boat movement<br />
and temperature. They were kept near the boat keel (where boats rocks less). Larger ships usually carried many chronometers, to<br />
improve reliability. The Beagle (the ship Charles Darwin went around the globe, in a geographical survey) carried 22<br />
chronometers on board.<br />
They were wound once a day, always in the same time by the same person and with the same number of turns. The expensive<br />
precise chronometers would remain on a safe place and the time would be copied to a smaller, cheaper watches for day to day<br />
use. All this care to make sure these devices behaved in a predictable way.<br />
Today quartz watches are much more reliable and predictable. They are not affected by boat movement and little affected by<br />
temperature. Any good quality quartz watch can be used for celestial navigation. But we still have to use some old techniques:<br />
● Having two or more watches is necessary, for reliability. At least one of them should be kept in a safe place, protected from<br />
the sun and water.<br />
● Know <strong>your</strong> watches (and the watches of other crew members). A watch behavior should be observed well before taking it<br />
to the sea as a navigator watch. You must know how much time the battery will last and how the watch error increases over<br />
time, compared to the official Universal Time (UTC).<br />
● Calculate the watch error change rate every two weeks, starting at least 3 months before the actual navigation use. Most<br />
electronic watches have a stable error change rate. I use a TIMEX that adds 4.5 seconds every month.<br />
● Keep a page in the navigation log book for each watch, were information about battery changes, time adjustments and<br />
watch error change pace are kept. This page can also be used calculate the current watch error.<br />
● Have spare batteries on board.<br />
● Forget the computer built in clock. These are very bad clocks and behave erratically. Use a good quartz watch instead.<br />
Getting the time from the Internet<br />
As I said, the computer clock is less reliable then a quartz watch. But you can use <strong>your</strong> computer to obtain the accurate time, as<br />
long as it is connected to the Internet. There are several reliable time sources in the Internet. These are accessible using SNMP,<br />
Time and Daytime protocols compatible clients.<br />
A good time keeping program is Dimension 4. It can be installed as a service and will automatically keep the computer clock<br />
adjusted while connected to the Internet. It is freeware. Reference time sources include the US Naval Observatory and several<br />
universities and research centers. Check Dimension 4 web site.<br />
An interesting URL is http://nist.time.gov. This is a Java applet with the official US Government time. Click the UTC link to get<br />
the GMT time. It's said to be within 0.6 sec, depending on <strong>your</strong> internet connection. And requires no client software installation.<br />
Other time sources<br />
Correct UTC time can be obtained in a number of sources.<br />
http://www.tecepe.com.br/nav/keepingthetime.htm (1 of 2) [9/2/2004 11:08:09 PM]
Time keeping<br />
●<br />
●<br />
●<br />
●<br />
There are short wave band radio stations that broadcast the time continuously. The Hydrographic Office publishes a list of<br />
these stations worldwide (H.O. 117).<br />
TV and radio networks usually have good time keeping, to coordinate their network activities.<br />
Large vessels always have the correct time.<br />
GPS receivers are also a good time source, as they receive time data from very precise atomic clocks on the GPS satellites.<br />
e-mail orion<br />
©Copr 92-99 Omar F. Reis<br />
©Copr 92-2k Omar F. Reis - All rights reserved<br />
http://www.tecepe.com.br/nav/keepingthetime.htm (2 of 2) [9/2/2004 11:08:09 PM]
Navigator Light Software<br />
level of difficulty beginner intermediate advanced<br />
Navigator celestial calculation methods<br />
Most of algorithms used in Navigator software come from two sources: the book "Astronomical Algorithms" by Jean Meeus and<br />
the Almanac for Computers (US Naval Observatory - 92).<br />
1) Calculation of celestial body positions: Right Ascension (RA) and declination (Decl)<br />
1.1) Sun - Positions calculated using the VSOP 87* theory, with accuracy within 0.2'.<br />
1.2) Stars - Starting from Nautical Almanac positions on 1/1/1993 00:00:00 UT, positions calculated by adding the effects of<br />
precession, nutation and aberration. The effects of the proper movement of stars were not calculated since they are small<br />
(considering the precision needed for celestial navigation). Star positions are precise when compared to planets and the Moon.<br />
The accuracy is within 0.2'. Positions valid at least until 2100.<br />
1.3) Planets - Planets have by far the most complicated calculation method of all celestial bodies. Calculated the rectangular<br />
heliocentric coordinates of the planet and the Earth, using numerical series (VSOP 87 theory*). Then added the apparent effect of<br />
the time of propagation of the light and calculated the geocentric coordinates, adding the effects of nutation and aberration.<br />
Accuracy within 0.6'.<br />
( * Variations Séculaires des Orbites Planétaires 87 - French planetary theory by Bretagnon and Francou of the Bureau des<br />
Longitudes of Paris).<br />
1.4) Moon - The coordinates of the Moon were calculated by formulas, which gives an accuracy within 0.2' ( In versions prior to<br />
Oct./2001, this accuracy was within 0.7')<br />
1.5) GHA of celestial bodies is calculated using the formula GHA=15* (GAST-RA) , were :<br />
GAST (Greenwich Apparent Sidereal Time) calculated with approximated formula.<br />
Precision within 0.2 sec.<br />
1.6) Universal Time (UT) to Dynamical Time (TD) difference calculated by a combination of tables (from 1620 to 1992), actual<br />
values (from 1992 to 2001), short term predictions (from 2001 to 2016) and prediction formula (after 2016 and before 1620).<br />
2) Solution of the position triangle PXZ<br />
Position triangle PXZ is an spherical triangle and the solution requires the use of spherical trigonometry formulas (law of sines<br />
and law of cosines). read more>><br />
3) Calculated Altitude and Azimuth:<br />
http://www.tecepe.com.br/nav/inav_met.htm (1 of 3) [9/2/2004 11:08:31 PM]
Navigator Light Software<br />
Calculated altitude Hc:<br />
sin (Hc)=sin j * sin d + cos j * cos d * cos (LHA)<br />
Calculated Azimuth Az:<br />
tan (Az) = sin (LHA) / (cos ( LHA) * sin j - tan d * cos j)<br />
were:<br />
j : Latitude of observer<br />
d : Declination of star<br />
LHA : Local Hour Angle ( LHA = GHA - Observer's Longitude)<br />
Also used the following relationships:<br />
j =90°-PZ<br />
d =90°-PX<br />
XZ=90°-Hc<br />
4) Corrections to the Instrumental Altitude<br />
Hc = Hi + TC<br />
TC = IC + Dip - R + SD + Par<br />
were:<br />
TC: Total Instrumental altitude correction<br />
Hc : Corrected altitude<br />
Hi : instrumental altitude<br />
IC : Instrumental correction (Index Error)<br />
Dip: Correction relative to the height of the eye is calculated with the formula:<br />
Dip = -0.97 * Sqrt(h/0.3048))<br />
Dip in minutes.<br />
h is the height of the eye, in meters<br />
Some users correctly noted that the factor in the formula deduced using trigonometry differs significantly from -0.97. I can only<br />
speculate that this is related to refraction correction, but I'm not sure. This formula is described in the Almanac for Computers (USNO)<br />
and I use it because does agree well with the Nautical Almanac table, which is my preferred benchmark.<br />
R: Atmospheric refraction (calculated with approximate formulas, depending on the body altitude)<br />
SD: Semidiameter (Calculated for the Moon and Sun and 0 for planets and stars)<br />
Par: Parallax in altitude (Calculated for the Moon, 0 for all others)<br />
5) Solution of the Astronomical Position (AP)<br />
http://www.tecepe.com.br/nav/inav_met.htm (2 of 3) [9/2/2004 11:08:31 PM]
Navigator Light Software<br />
For each LOP (Line of Position):<br />
LatQ = LatE + d* Cos Az<br />
LonQ = LonE - d* Sen Az / Cos LatE<br />
a = Az + 90°<br />
were:<br />
d : Delta (error of the estimated position, in the direction of the Azimuth<br />
E : Estimated position<br />
Q : Intersection point between line of Azimuth and LOP.<br />
a : Angle between the LOP and the true North<br />
Az : Azimuth of the star.<br />
The equation of the LOP i in the plane can be expressed by:<br />
Lat = ai * Lon + bi<br />
ai = - cos (LatQ) / tan Azi<br />
bi = LatQ + Lon Q * cos (LatQ) / tan Azi<br />
Factor Cos(LatQ) makes the conversion between horizontal Nautical Miles and minutes of longitude.<br />
Make the intersection of each two lines i and j<br />
LatX = ( bi . aj - bj . ai ) / ( aj - ai)<br />
LonX = ( LatX - bi ) / ai<br />
were X is the point of intersection.<br />
The astronomical position is found using the average of all the LOPs intersections, as follows:<br />
L= Sum ( Lij . cos aij ) / Sum( cos aij )<br />
for every i different from j, were L is the Latitude or Longitude. The use of the factor (cos a) gives smaller importance to<br />
intersections of LOPs forming small angles between them.<br />
Bibliography<br />
>> "Astronomical Algorithms" by Jean Meeus<br />
buy from Amazon<br />
ISBN 0943396611 - Willman-Bell<br />
Complete positional calculation methods for stars, planets, Sun and Moon. Accurate descriptions, with many examples. Excellent book<br />
for any astronomy programmer.<br />
>> "Astronomical Formulae for Calculators" by Jean<br />
Meeus<br />
buy from Amazon<br />
ISBN 0943396220 - Willman-Bell<br />
Simple positional astronomy formulas, easy to program on pocket calculators or personal computers.<br />
>> Almanac for Computers - 1992 publication by the US Naval Observatory, with simple formulas for the Sun. Also good source for<br />
<strong>sextant</strong> corrections.<br />
>> HP 65 Math Pack 1 documentation - Geodesic formulas<br />
1974 - Hewlett-Packard - Early programmable calculator software manual with many useful formulas.<br />
©Copr 92-2k Omar F. Reis - All rights reserved<br />
http://www.tecepe.com.br/nav/inav_met.htm (3 of 3) [9/2/2004 11:08:31 PM]
Chapter 1: Celestial Navigation<br />
Chapitre 1: Les bases du Point Astro.<br />
Note: Ceci est le premier chapitre du manuel de Navigator light, un programme DOS développé en 1993. (Hé<br />
oui ! Mon "Navigator" est plus vieux que Netscape!). Le texte intégral en Portugais est disponible sur ce site.<br />
This text is available in english, french and portuguese<br />
Traduction française©: William Talgorn (williamtalgorn@hotmail.com)<br />
"E pur si muove" Galileu Galilei<br />
Angles, angles, angles...<br />
L'angle, comme nous le verrons dans ce chapitre, est l'unité la plus utilisée par le navigateur Astro. La<br />
position des corps célestes et des coordonnées à la surface de la terre peut être représenté par des angles. Le<br />
<strong>sextant</strong> est un instrument qui mesure les angles. Alors rappelons quelques généralités sur les angles.<br />
Les angles sont généralement mesurés en Degrés, minutes et secondes. La circonférence d'un cercle fait 360<br />
Degrés. Un degré est équivalent à 60 minutes. Les secondes d'arc ne sont pas utilisées pour le point Astro, car<br />
le <strong>sextant</strong> n'est pas assez précis pour les mesurer. L'unité d'angles la plus petite utilisée par le navigateur est le<br />
dixième de minute.<br />
Le Mille Nautique (=1852 m) est lunité qui a été choisie pour simplifier les conversions entre angles et<br />
distances. Un mille nautique corresponds à un arc d'une minute, sur la surface de la terre. Ainsi, les angles et<br />
les distances, a la surface de la terre, sont égaux. Une exception a cette règle: Une minute de longitude est<br />
égale a 1 mille nautique, mais seulement près de l'équateur.<br />
Une autre équivalence importante se retrouve entre le temps et les degrés de longitude. Puisque la terre fait un<br />
tour complet (360°) en 24 heures, chaque heure correspond à 15° de longitude. C'est à dire 900 Milles<br />
Nautiques (MN), Compris ?<br />
La Terre et la Sphère Céleste<br />
Imaginez que la terre est au centre de l'univers - (y'en a qui ne croient plus a ça aujourd'hui, mais bon... ) - et<br />
qu'autour de la terre se trouve une plus grande sphère, le centre au même point, dans laquelle la position des<br />
astres est fixe, comme si ils étaient peints sur la surface intérieure de cette sphère. Cette autre sphère nous<br />
l'appelons la Sphère Céleste.<br />
http://www.tecepe.com.br/nav/frNav_c11.htm (1 of 6) [9/2/2004 11:08:52 PM]
Chapter 1: Celestial Navigation<br />
Fig. 1 - La terre et la sphère céleste.<br />
Pour définir une position à la surface de la terre nous utilisons un système de coordonnées qui représente deux<br />
angles: La latitude et la longitude. La Latitude est l'angle mesuré à partir de l'équateur, sur le plan Nord-Sud.<br />
La Longitude est l'angle entre le Méridien de Greenwich et une position donnée. (Fig. 2.<br />
fig.2 - Système de coordonnées Terrestre.<br />
C'est la même chose pour la sphère céleste. La mesure équivalente à la latitude sur la terre, s'appelle<br />
déclinaison sur la sphère céleste. La déclinaison se mesure aussi sur le plan Nord-Sud à partir de l'équateur.<br />
La mesure équivalente à la longitude sur la terre s'appelle l'Ascension Droite, ou AD. Comme la longitude,<br />
l'ascension droite est mesurée à partir d'un méridien arbitraire: Le point Vernal d'Equinoxe (alias Point origine<br />
du Bélier)<br />
fig.3 - Système de coordonnées céleste<br />
Le Mouvement Apparent Des Etoiles<br />
Les astres ont une position presque fixe dans la sphère céleste. Le soleil, la lune et les planètes bougent<br />
pendant l'année, mais leurs mouvements sont lents comparés au mouvement apparent dû à la rotation de la<br />
http://www.tecepe.com.br/nav/frNav_c11.htm (2 of 6) [9/2/2004 11:08:52 PM]
Chapter 1: Celestial Navigation<br />
terre. Alors imaginons pour l'instant que ces objets célestes<br />
immobiles dans la sphère céleste.<br />
( Les étoiles, les planètes et la lune) sont<br />
En reprenant l'idée que la terre est au centre de l'univers, imaginons que la terre s'arrête, et que la sphère<br />
céleste tourne autour, faisant un tour complet en 24 heures. Que cette idée ne vous désoriente pas... c'est<br />
exactement ce que l'on observe quand on regarde le ciel étoilé !<br />
Les axes de rotation de la terre et de la sphère céleste sont alignés. Les deux équateurs sont donc sur le même<br />
plan (fig. 1)<br />
Les astres, "collées" à la sphère céleste, tournent aussi autour de la terre. Les pôles de la sphère céleste, étant<br />
sur l'axe de la rotation, reste immobile dans le ciel. Donc, un astre qui se trouve près d'un pôle céleste<br />
apparaîtra comme étant stationnaire dans le ciel. C'est le cas de l'étoile polaire, qui est une étoile se trouvant<br />
près du pôle nord céleste (sa déclinaison est de: 89°05' N). Elle indique toujours le nord, un fait bien connu<br />
des navigateurs. Malheureusement, une étoile aussi brillante n'existe pas près du pôle sud.<br />
Trouver sa Position Grâce aux Etoiles<br />
Maintenant imaginons une droite connectant le centre d'une étoile au centre de la terre. Le point où cette<br />
droite touche la surface de la terre est appelé la Position Géographique de cette étoile (PG). Un observateur<br />
se trouvant à la position géographique d'une étoile se trouvera directement à sa verticale, et la verra<br />
exactement au-dessus de sa tête.<br />
Fig.4 - Position géographique d'une étoile.<br />
Puisque les astres suivent le mouvement de la sphère céleste, leurs PG bougent simultanément sur la surface<br />
de la terre. Le PG du soleil, par exemple, couvre une distance d'un mille nautique toutes les 4 secondes. Le<br />
PG d'autres astres, plus proches des pôles célestes, bougent plus lentement. Le PG de L'étoile Polaire se<br />
déplace très lentement, puisqu'il est très proche du pôle Nord.<br />
Parce que les deux équateurs sont sur le même plan, la latitude du PG est égale à la déclinaison de l' astre. La<br />
longitude du PG est appelée Angle Horaire du soleil a Greenwich ou AHvo. En référence à la<br />
correspondance entre les heures et la longitude.<br />
Nous pouvons déterminer, en utilisant les éphémérides nautiques, le PG (AHvo et déclinaison) d'un astre à<br />
n'importe quel moment dans le temps. Nous devons connaître l'heure exacte qui nous intéresse. Comme nous<br />
l'avons vu, 4 secondes peuvent correspondre à 1 mille pour le PG d'un astre. Ceci démontre l'importance<br />
d'avoir une montre très exacte pour le point Astro. Le "Beagle", (le bateau de Charles Darwin) transportait 22<br />
montres a bord durant sa circumnavigation en 1830.<br />
Un autre point important est le Zénith. Le Zénith est le point dans la sphère céleste, à la verticale, au-dessus<br />
du navigateur. La droite qui relie le Zénith et le centre de la terre transperce la surface de la terre au point<br />
exact où se trouve le navigateur, celui que nous cherchons à déterminer. Nous avons les correspondances<br />
http://www.tecepe.com.br/nav/frNav_c11.htm (3 of 6) [9/2/2004 11:08:52 PM]
Chapter 1: Celestial Navigation<br />
suivantes entre ces points:<br />
Surface de la terre<br />
Position Géographique de l'étoile<br />
Position du navigateur<br />
Sphère Céleste<br />
Centre de l'étoile<br />
Zénith<br />
Sur le schéma ci dessous, le PG de l' astre est représenté par X et le Zénith par Z.<br />
fig. 5 - PG d'une étoile et son Zénith<br />
La distance XZ, du point X (PG de l' astre) et le point Z du navigateur est appelé la distance Zénithale. Cette<br />
distance, comme nous l'avons vu, peut s'exprimer en milles ou en degrés, puisque c'est un arc sur la surface de<br />
la terre.<br />
L'angle que fait XZ avec le Nord vrai est appelé l'Azimut (Az) de l' astre (fig. 6). L'azimut est la direction<br />
horizontale vers laquelle se trouve le PG de l' astre.<br />
Fig. 6 - Azimut d'une étoile.<br />
Les astres se trouvent à une grande distance de la terre, c'est pourquoi leurs rayons lumineux qui atteignent la<br />
terre sont pratiquement parallèles. Ainsi, comme l'illustre le shema 7, Nous pouvons dire que la distance XZ<br />
(c.a.d l'angle) est égale a l'angle observé par le navigateur entre l' astre et la verticale. Ceci est TRES<br />
IMPORTANT. La distance XZ, mesurée en angle, est égale à l'angle que le navigateur observe entre l'<br />
astre et la verticale.<br />
http://www.tecepe.com.br/nav/frNav_c11.htm (4 of 6) [9/2/2004 11:08:52 PM]
Chapter 1: Celestial Navigation<br />
fig.7 - Altitude et Distance Zénithale d'une étoile<br />
Il est difficile de déterminer la distance Zénithale avec précision, car il est difficile de trouver la direction<br />
verticale exacte sur le pont chahuté d'un bateau. Il est beaucoup plus facile de mesurer l'angle que fait l'astre<br />
avec l'horizon. Cet angle important pour le navigateur Astro. est appellé la Hauteur (Ho) de l'astre. La<br />
hauteur d'un astre est déterminée avec un <strong>sextant</strong> sur le plan vertical, en mesurant l'angle entre l'horizon et<br />
l'astre. Sur le shema 7, on peut voir que la distance Zénithale est égale a 90° moins la hauteur de l'étoile.<br />
Nous avons vu comment déterminer la distance Zénithale d'un astre en utilisant le <strong>sextant</strong>. La distance<br />
Zénithale et le PG d'un astre, ne sont cependant pas suffisants pour déterminer notre position. Avec ces<br />
données nous pouvons seulement dire que notre position se trouve sur un grand cercle, dont le centre est le<br />
PG et dont le rayon est égal à la distance zénithale. Ce cercle est appelé le Cercle de Position. Le shema 8<br />
montre un cercle de position. Le point X est le PG de lastre.<br />
fig.8 - Le cercle de position<br />
Tout observateur situé sur ce cercle verra l' astre à la même hauteur, mais avec un azimut différent. Regardons<br />
le shema 8 et supposons que le navigateur a relevé une hauteur de 65°. Comme nous l'avons vu, la distance<br />
Zénithale est égale a 90°-H, soit 25°. Pour convertir cette distance en milles, on multiplie par 60, puisqu'un<br />
degré est égal à 60 milles. Donc, la distance Zénithale de notre exemple c.a.d. le rayon de notre cercle, est<br />
égal a 1500 MN (Milles nautiques).<br />
Si seulement nous pouvions déterminer la direction exacte du PG de l' astre et son azimut, cela nous<br />
permettrais de savoir où nous sommes sur ce cercle. Et si on utilisait le compas? Malheureusement, le compas<br />
n'est pas suffisamment précis pour un point Astro. Une erreur de seulement 3°, commune lorsqu'on lit un<br />
compas, correspond à une erreur de 78 milles dans notre exemple !<br />
La façon de connaître notre position exacte est de dessiner 2 cercles ou plus, pour 2 objets célestes ou plus, et<br />
http://www.tecepe.com.br/nav/frNav_c11.htm (5 of 6) [9/2/2004 11:08:52 PM]
Chapter 1: Celestial Navigation<br />
voir ou ils s'intersectent. Mais dessiner ces cercles demanderais des cartes géantes ! On évite ce problème en<br />
estimant notre position. Peu importe si l'on est complètement perdu, nous pouvons toujours l'estimer. A partir<br />
de cette position estimée, nous pouvons calculer une hauteur pour un astre observée à une heure donnée, en<br />
utilisant les Ephémérides Nautiques.<br />
Cette Hauteur Calculée peut maintenant être comparée avec notre Hauteur Observée (celle mesurée avec le<br />
<strong>sextant</strong>). La différence entre les deux représente l'erreur entre notre position estimée et notre position réelle,<br />
que l'on appellera l'Intercept. L'intercept peut se tracer vers l' astre ou au contraire, à l'écart de l' astre.<br />
Page suivante | Index<br />
e-mail orion<br />
©Copr 91-99 Omar F. Reis<br />
Traduction française©: William Talgorn (williamtalgorn@hotmail.com)<br />
http://www.tecepe.com.br/nav/frNav_c11.htm (6 of 6) [9/2/2004 11:08:52 PM]
Capítulo 1:Fundamentos da navegação astronômica.<br />
This text is available in english, french and portuguese<br />
Capítulo 1 - fundamentos da navegação<br />
astronômica.<br />
"E pur si muove" Galileu Galilei<br />
Ângulos, ângulos, ângulos...<br />
Ângulos, como veremos neste capítulo, são a matéria prima do astrônomo. As posições dos astros<br />
e dos objetos sobre a Terra são dadas por ângulos. O <strong>sextant</strong>e é um instrumento que mede ângulos.<br />
Até as distâncias na superfície da Terra podem ser expressas na forma de ângulos. Por esta razão,<br />
cabe uma pequena discussão sobre o assunto.<br />
Os ângulos são medidos em graus, minutos e segundos. A circunferência completa tem 360°. Um<br />
grau corresponde a 60 minutos. Os segundos de grau não são usados na navegação, uma vez que o<br />
<strong>sextant</strong>e não tem precisão suficiente para medi-los. A menor unidade de ângulo para o navegador<br />
astronômico é o décimo de minuto.<br />
A milha náutica (=1852 m) é uma medida que foi definida convenientemente de modo a<br />
simplificar as conversões entre ângulos e distâncias. Uma milha náutica corresponde a um arco de<br />
um minuto de grau sobre a superfície terrestre. A qualquer momento podemos converter ângulos<br />
de graus para milhas e vice-versa. Ângulos e distâncias são, portanto, equivalentes. Uma exceção<br />
são os minutos de longitude, que valem uma milha somente nas proximidades do Equador<br />
terrestre.<br />
Uma outra equivalência importante da navegação é entre horas e graus de longitude. Como a Terra<br />
faz uma volta de 360° a cada 24 horas, cada hora corresponde a 15° de longitude.<br />
A Terra e a Esfera Celeste<br />
Vamos imaginar por um momento que a Terra esteja no centro do universo. Embora hoje saibamos<br />
que este modelo é pouco realista, ele foi adotado por muito séculos e pode nos ajudar a<br />
compreender a navegação astronômica. Imaginemos que em torno da Terra está uma outra esfera<br />
maior, centrada no mesmo ponto, onde os astros estão fixados, como se estivessem pintados na sua<br />
http://www.tecepe.com.br/nav/Nav_c11.htm (1 of 7) [9/2/2004 11:08:55 PM]
Capítulo 1:Fundamentos da navegação astronômica.<br />
parede. Esta outra bola é chamada de Esfera Celeste.<br />
fig. 1 - A Terra e a Esfera Celeste<br />
Para especificar nossa posição na Terra, usamos um sistema de coordenadas que consiste de dois<br />
ângulos. A latitude é a distância em graus medida a partir do Equador terrestre na direção<br />
Norte-Sul. A longitude é o ângulo no polo entre os meridianos de Greenwich (na Inglaterra) e do<br />
ponto considerado (fig. 2).<br />
fig.2 - Sistema de coordenadas terrestres<br />
De modo análogo, a posição de um astro na esfera celeste pode ser descrita por dois ângulos. À<br />
medida equivalente à latitude do astro na esfera celeste chamamos declinação. A declinação é<br />
medida na direção Norte-Sul a partir do equador celeste. A medida correspondente à longitude do<br />
astro na Esfera Celeste é denominada Ascensão Reta, ou AR. A figura 3 mostra o sistema de<br />
coordenadas celestes. Assim como a longitude é medida a partir de um meridiano arbitrário<br />
(Greenwich), a Ascensão Reta é medida a partir do chamado Ponto Vernal (também chamado de<br />
primeiro ponto de Áries).<br />
http://www.tecepe.com.br/nav/Nav_c11.htm (2 of 7) [9/2/2004 11:08:55 PM]
Capítulo 1:Fundamentos da navegação astronômica.<br />
fig.3 - Sistema de coordenadas celestes<br />
O movimento aparente dos astros<br />
As estrelas tem suas posições quase fixas na Esfera Celeste. O Sol, a Lua e os planetas se movem<br />
ao longo do ano, mas este movimento é lento quando comparado ao movimento devido à rotação<br />
da Terra. Consideremos por hora que os astros tem posições fixas na Esfera Celeste.<br />
Usando ainda o conceito da Terra como centro do universo, vamos imaginar que a Terra esteja<br />
parada e que a Esfera Celeste gire em torno dela, completando uma volta a cada 24 horas. O Eixo<br />
de rotação da Esfera Celeste passa pelos polos da Terra e da Esfera Celeste. Os equadores da Terra<br />
e da Esfera Celeste estão, assim, no mesmo plano (fig. 1).<br />
Os astros, fixos na Esfera Celeste, também giram em torno da Terra. Os polos celestes, estando no<br />
eixo de rotação, ficam parados no céu. Assim, um astro situado próximo a um polo da Esfera<br />
Celeste parecerá estar estático quando visto da Terra. É o caso da estrela Polaris, que se situa nas<br />
proximidades do polo Norte Celeste (sua declinação é de 89°05'N). Ela está sempre na direção<br />
Norte. É fácil, portanto, determinar o Norte pela estrela Polaris. Infelizmente ela não pode ser vista<br />
aqui do hemisfério Sul e não existe nenhuma estrela tão convenientemente posicionada no Polo<br />
Sul Celeste.<br />
Determinação da posição pelos astros<br />
Suponha agora que em um determinado instante traçamos uma reta ligando o centro de um astro<br />
ao centro da Terra. O ponto onde esta reta "fura" a superfície da Terra é chamado de Posição<br />
Geográfica do astro, ou simplesmente PG (fig.4). Um observador colocado sobre a PG de um<br />
astro verá este astro diretamente na vertical, sobre a sua cabeça.<br />
http://www.tecepe.com.br/nav/Nav_c11.htm (3 of 7) [9/2/2004 11:08:55 PM]
Capítulo 1:Fundamentos da navegação astronômica.<br />
Fig.4 - Posição Geográfica do Astro<br />
Uma vez que o astro gira junto com a Esfera Celeste, a sua PG se move na superfície da Terra. A<br />
PG do Sol, por exemplo, se move a uma velocidade de aproximadamente 900 nós - cerca de 1<br />
milha náutica a cada 4 segundos. Outros astros mais próximos dos polos se movem mais<br />
lentamente. A PG de Polaris se move bem lentamente (cerca de 14 nós), uma vez que ela está<br />
próxima do Polo Norte.<br />
Como os equadores terrestre e celeste estão no mesmo plano, a latitude da PG é igual à declinação<br />
do astro. A longitude da PG é chamada de Ângulo Horário em Greenwich ou AHG, numa alusão<br />
à correspondência entre horas e longitude.<br />
Podemos determinar, com auxílio do Almanaque Náutico, a Posição Geográfica (AHG e<br />
declinação) de um astro em qualquer instante. Para isso é de fundamental importância que<br />
saibamos o momento exato que nos interessa. Como vimos, 4 segundos de erro podem significar<br />
até 1 milha de erro na PG do astro. Isto dá idéia da importância de se ter um relógio com a hora<br />
precisa para a navegação.<br />
Um outro ponto importante é o Zênite. O Zênite é o ponto da esfera celeste situado na vertical,<br />
sobre a posição do navegador. A reta que une o Zênite ao centro da Terra fura a superfície terrestre<br />
na posição do navegador, a posição que pretendemos determinar. Temos então as seguintes<br />
correspondências entre pontos:<br />
Superfície da Terra Esfera Celeste<br />
Posição Geográfica do Astro Centro do Astro<br />
Posição do navegador Zênite<br />
Na figura abaixo, a PG do astro é representada pela letra X e o Zênite pela letra Z.<br />
http://www.tecepe.com.br/nav/Nav_c11.htm (4 of 7) [9/2/2004 11:08:55 PM]
Capítulo 1:Fundamentos da navegação astronômica.<br />
fig. 5 - PG do astro e Zênite<br />
A distância XZ do ponto X (PG do astro) ao ponto Z do navegador é chamada de distância<br />
Zenital. Esta distância pode ser expressa em tanto em milhas como em graus, já que representa um<br />
arco sobre a superfície esférica da Terra.<br />
O ângulo horizontal que XZ forma com o norte verdadeiro é chamado Azimute (Az) do astro (fig.<br />
6). Azimute, assim, é a direção ou rumo em que se encontra a PG do astro.<br />
fig. 6 - Azimute do astro<br />
Os astros estão a grande distância da Terra de modo que os raios de luz provenientes deles que<br />
incidem sobre a PG (ponto X) e sobre o navegador (ponto Z) são paralelos. Deste modo, conforme<br />
ilustrado na figura 7, podemos concluir que a distância zenital (XZ), medida em graus, é igual ao<br />
ângulo que o navegador observa entre o astro e a vertical. Vou repetir. A distância zenital,<br />
medida em graus, é igual ao ângulo que o navegador observa entre o astro e a vertical.<br />
http://www.tecepe.com.br/nav/Nav_c11.htm (5 of 7) [9/2/2004 11:08:55 PM]
Capítulo 1:Fundamentos da navegação astronômica.<br />
fig.7 - Altura e distância zenital de um astro<br />
É difícil, porém, medir este ângulo dada a dificuldade de se determinar com precisão a direção<br />
vertical. É mais fácil medir o ângulo formado entre a horizontal e o astro. Este importante ângulo<br />
para a navegacão é denominado altura (H) do astro. A altura do astro é tomada com o <strong>sextant</strong>e na<br />
vertical, medindo-se o ângulo entre o horizonte e o astro. Ainda pela figura 7, podemos ver que a<br />
distância zenital é igual a 90° menos a altura do astro.<br />
Vimos como determinar a distância zenital de um astro usando o <strong>sextant</strong>e. A distância zenital e a<br />
PG do astro, contudo, ainda não são suficientes para determinarmos nossa posição. Com esses<br />
valores, sabemos somente que nossa posição real está sobre o círculo cujo o centro é a PG do astro<br />
e o raio é a distância zenital. Este círculo é chamado círculo de altura. A figura 8 mostra um<br />
círculo de altura. O ponto X é a PG do astro.<br />
fig.8 - Círculo de altura<br />
Qualquer observador posicionado sobre este círculo vê o astro com a mesma altura, só que em<br />
Azimutes diferentes. No exemplo da figura, suponhamos que um navegador posicionado sobre o<br />
círculo observe o astro a uma altura de 65°. Como já vimos, distância zenital é 90°-H, ou 25°. Para<br />
determinar a distância zenital em milhas, multiplicamos por 60, pois cada grau equivale a 60<br />
milhas. Assim, a distância zenital do exemplo da figura, que é também o raio do círculo, é de 1500<br />
milhas.<br />
http://www.tecepe.com.br/nav/Nav_c11.htm (6 of 7) [9/2/2004 11:08:55 PM]
Capítulo 1:Fundamentos da navegação astronômica.<br />
Se pudéssemos determinar com a bússola a direção exata em que se encontra a PG do astro - o<br />
Azimute - poderíamos dizer em que ponto do círculo de altura estamos. Esta determinação,<br />
contudo, não é possível com a precisão necessária à navegação. Ainda no exemplo da figura 8, um<br />
erro de apenas 3°, normal em leitura de bússolas, corresponde a um erro de 78 milhas na posição!<br />
Tomemos então uma estimativa de nossa posição. Por mais perdidos que estejamos, sempre é<br />
possível estimar mais ou menos nossa posição. Poderemos, a partir da Posição Geográfica do astro<br />
(obtida no Almanaque Náutico) e da distância zenital (calculada com a altura do astro medida com<br />
o <strong>sextant</strong>e), determinar o erro de nossa estimativa na direção do astro. Este erro pode tanto ser<br />
no sentido do astro como no sentido contrário ao astro. É chamado de Delta.<br />
2a parte do Capítulo 1 |Índice do manual<br />
e-mail orion<br />
©Copr 91-96 Omar F. Reis<br />
http://www.tecepe.com.br/nav/Nav_c11.htm (7 of 7) [9/2/2004 11:08:55 PM]
Navigator Light Software<br />
level of difficulty beginner intermediate advanced<br />
Celestial Navigation Fundamentals - Continued<br />
This text is available in English, French and Portuguese<br />
Navigator Light Software<br />
Using Navigator software, the GP of a star and the triangle of Position are solved by the computer using formulas. All you will<br />
have to do is enter the <strong>sextant</strong> reading (date, time and altitude), name of the star and the assumed position (latitude and<br />
Longitude).<br />
Determination of the Astronomical Position<br />
It's not necessary to draw the lines of position when using Navigator software. But let's see how this is done using pencil and<br />
paper:<br />
1. Plot <strong>your</strong> assumed position.<br />
2. Using a parallel ruler, draw a line passing on the assumed position, in the direction of the Azimuth of the star.<br />
3. Over this line, measure the error Delta of the estimate - in the direction of the star or contrary to it - according to the sign of<br />
the Delta.<br />
4. Draw the line of position, orthogonal to the Azimuth, at this point.<br />
Detailed Nautical Charts are usually only available for places near the shore. When in high seas, we normally don't have charts<br />
with the adequate scale to plot our position. Special plotting paper is used instead.<br />
When navigating using Navigator software, the computer determines the altitude lines interceptions and calculates the<br />
astronomical position. A simplified map is drawn, showing the parallels, meridians, lines of altitude and the astronomical<br />
position.<br />
The <strong>sextant</strong><br />
The <strong>sextant</strong> is an instrument that measures angles. Fig 12<br />
shows a schematic <strong>sextant</strong>. The eyepiece is aligned to the<br />
small mirror, which is fixed in the frame of the instrument.<br />
This mirror is half transparent. By the transparent part, the<br />
navigator can see the horizon directly. The small mirror also<br />
partially reflects the image from the big mirror, where you see<br />
the star. The big mirror is mobile and turns with the arm of<br />
the <strong>sextant</strong>. Doing that, we change the angle between the two<br />
mirrors. The altitude of the star is measured in the scale.<br />
There is a drum to make the fine adjustments. Whole degrees<br />
are read in the scale and the minutes in the drum.<br />
fig. 12 - The <strong>Sextant</strong><br />
<strong>sextant</strong> working model (requires Flash 5.0 plug-in)<br />
The <strong>sextant</strong> has two sets of filters (or shades) to eliminate the excess of light, especially when observing the Sun. The use of two<br />
or more filters in front of the big mirror is necessary when observing the Sun. Serious eye injuries will result from observing<br />
the Sun without filters, even for a brief period.<br />
When looking through the eyepiece and adjusting the <strong>sextant</strong>, you will see something like<br />
figure 13, to the left. <strong>Sextant</strong> readings must be made with the <strong>sextant</strong> in the vertical position.<br />
fig. 13 - Image of the Sun in the <strong>sextant</strong><br />
Inclining (rocking about the axis of the eyepiece) the adjusted instrument slightly, the image<br />
of the celestial body describes a small arc that touches the horizon in a point near the center<br />
of the mirror. In this situation, the angle is ready to be read in the instrument scale.<br />
http://www.tecepe.com.br/nav/inav_c12.htm (2 of 4) [9/2/2004 11:08:57 PM]
Navigator Light Software<br />
Altitude corrections<br />
But before we can use this apparent reading in our calculations, some corrections must be made, in order to obtain the true<br />
observed altitude. These corrections are: 1) the height of the eye, 2) semi diameter of the body (only for Sun and Moon), 3)<br />
instrumental error, 4) atmospheric refraction and 5) parallax (only for the Moon).<br />
Since most of these corrections depend only on the selected celestial object and altitude, they are performed automatically by<br />
Navigator software. The only information you will have to provide to the program are the height of the eye (a.k.a. Dip) and the<br />
instrumental error. The application of these corrections to the instrumental altitude gives the corrected altitude, the one used in<br />
calculations.<br />
An observer located in a high place will see a star with an altitude bigger than other at sea<br />
level, in the same location. This error is called height of the eye (Dip).<br />
fig. 14 - Error due to the height of the eye<br />
(Dip)<br />
fig. 15 - eyepiece image of the <strong>sextant</strong> index error<br />
The <strong>sextant</strong> index error (IE) is due to a small misalignment of the scale of the<br />
<strong>sextant</strong> (the "zero" of the instrument). To read the index error, adjust the scale to<br />
0°00.0' and point towards the horizon. In fig. 15 left we can see this error. Turn the<br />
drum until the horizon forms a single line (fig. 15 right). Then you can read the<br />
index error.<br />
The index error can be positive or negative, as sh<strong>own</strong> in fig. 16. The index<br />
correction has opposite signal (i.e. must be subtracted from altitude if positive and<br />
vice-versa)<br />
fig. 16 - Sign of the instrumental error<br />
Parallax error is illustrated in fig.17. Since the navigator is not in the Earth's<br />
center, but in its surface, the apparent object position is below the true geocentric<br />
position.<br />
Parallax is only meaningful for the Moon. Other objects are so far, their parallax<br />
is very small.<br />
fig. 17 - Parallax in altitude error<br />
Nautical Almanac data is tabulated for the centers of the celestial objects. For the Sun<br />
and Moon, however, it's easier to measure the altitude of the lower part of the body, as<br />
illustrated in fig. 18. This is kn<strong>own</strong> as the lower limb. Of course a correction must be<br />
applied in order to obtain the altitude of the center of the body. This correction is<br />
called semi diameter. Sometimes, the upper limb is also used.<br />
fig. 18 - Semi diameter correction<br />
Now that you know how celestial navigation works, take a look in the Navigator software manual.<br />
Bibliography<br />
---xxx---<br />
>> "Celestial Navigation for the Yachtsmen " by Mary<br />
Blewitt<br />
ISBN 0070059284 - 112 pages<br />
Good and small book, with easy methods. A classic.<br />
buy from Amazon<br />
http://www.tecepe.com.br/nav/inav_c12.htm (3 of 4) [9/2/2004 11:08:57 PM]
Navigator Light Software<br />
>> "Ocean Yachtmaster" by Pat Langley-Price, Philip Ouvry<br />
ISBN 0713645539- 215 pages<br />
Heavier book, with complete theory and practice of celestial navigation, with examples.<br />
buy from Amazon<br />
>> "The American Practical Navigator " by Nathaniel<br />
Bowditch<br />
buy from Amazon<br />
ISBN 0781220211 - 1200 pages<br />
A must in every advanced navigator library. The first edition of this book was published in 1802. It has been said to be one of the few things a sailor<br />
absolutely needs before going to the sea, the other things being a "Bible and the mother's blessing".<br />
Overtime, some of the original Bowditch's celestial navigation text was replaced by more modern subjects, like radar and radio communications.<br />
Unfortunately, the Lunar calculation section is one thing that was removed, apparently in 1914. If you have a copy of this text, I would like to read it<br />
.<br />
You may want visit the site Bowditch Online, where the full current edition text is available (PDF format).<br />
For those who don't know Bowditch, I recommend the book<br />
"Carry on, Mr. Bowditch" by Jean Lee Latham, a somewhat<br />
romanced biography of this great navigator.<br />
buy from Amazon<br />
Another interesting site is the Bowditch Initiative.<br />
>> "Memento Vagnon de la Navegacion Astronomique" by François Meyrier<br />
Good celestial navigation course in French, with step-by-step approach.<br />
>> "Navegação astronômica" por Geraldo Luiz Miranda de Barros<br />
Edições Marítimas - 250 páginas<br />
Bom livro de navegação astronômica em Português.<br />
©Copr 92-2k Omar F. Reis - All rights reserved<br />
http://www.tecepe.com.br/nav/inav_c12.htm (4 of 4) [9/2/2004 11:08:57 PM]
Navigator Chart Library<br />
Raster chart and satellite images on the Net<br />
> The best Internet raster chart source I know is the NOAA Nos Mapfinder. From this site you can d<strong>own</strong>load free charts<br />
for most of the US coast, in GIF format. Documentation says charts are not for use in navigation because they have low<br />
resolution, but they look fine to me.<br />
(Please note that any GIF chart you d<strong>own</strong>load must be imported with ChartMaker program (included) before it can be displayed in the<br />
Navigator. Raster chart support is only available in Navigator 4.0+).<br />
> Another interesting site is NASA's MrSid Image Server . In this site you can find high resolution satellite images from<br />
anywhere in the world. Click <strong>your</strong> region. Check the "Select Earth..." checkbox and click on the image again. Right click<br />
the image to save it in JPG format. Then you can import it and use in the Navigator chart viewer.<br />
Navigator Vector Chart Library<br />
This page contains vector charts (CHT files) for use with Navigator (registered edition). Most of the charts are work of users who have kindly<br />
agreed to share the files.<br />
> MYWORLD.CHT - Low resolution chart of the world. Higher<br />
resolution in Brazil, from Santos to Rio de Janeiro.<br />
64 polygons - 2479 points - File size 66317 bytes<br />
chart by Omar Reis<br />
D<strong>own</strong>load MYWORLD.ZIP (Zip compressed - 23767 bytes)<br />
> DENMARK.CHT - Denmark and sorrounding areas.<br />
140 polygons - 9461 points - File size 246028 bytes<br />
chart by Erik Nielsen<br />
D<strong>own</strong>load DENMARK.ZIP (Zip compressed - 69679 bytes)<br />
> USA.CHT - Islands in NW United States, British Columbia,<br />
Gulf Coast (Louisiania, Florida, Texas) and Caribean (Bahamas,<br />
British Virgin Islands). The rest of continental US included with<br />
low detail.<br />
1363 polygons - 70380 points - File size 1951491 bytes<br />
updated jan/02<br />
chart by Bill Newland<br />
> DANMARK.CHT - Another denmark chart , but this one with<br />
much more detail. Extensive use of site names.<br />
1123 polygons - 29385 points - File size 793808 bytes<br />
chart by Per Brun Jorgensen<br />
posted nov/3/1999<br />
D<strong>own</strong>load DANMARK.ZIP (Zip compressed - 195,582 bytes)<br />
D<strong>own</strong>load USA.ZIP (Zip compressed - 537,272 bytes)<br />
Note: The continental US polygon has more than 32k points and had to be splitted in two<br />
because of Windows 9x GDI limitation.<br />
> North Atlantic - Chart and desktop. Atlantic Ocean chart from<br />
Equator to Artic Circle, including islands and detailled continent<br />
shoreline. Desktop even contains a few icebergs!<br />
After d<strong>own</strong>load, unzip desktop (NorthAtlantic.nav) and chart<br />
(NA1.CHT) to the same directory.<br />
245 polygons - 7508 points - File size 202688 bytes<br />
chart by Ilmari Pirhonen<br />
posted nov/3/1999<br />
> New Zealand - Small NZ chart. Includes North, South and<br />
Stewart Islands.<br />
3 polygons - 595 points - File size 17361 bytes<br />
chart by Will Redfern<br />
posted jan/10/2003<br />
D<strong>own</strong>load NEWZEALAND.ZIP (Zip compressed - 5.713 bytes)<br />
D<strong>own</strong>load NorthAtlantic.zip (Zip compressed - 58,959 bytes)<br />
http://www.tecepe.com.br/nav/chartlib.htm (1 of 2) [9/2/2004 11:09:08 PM]
Navigator Chart Library<br />
> North Atlantic 2 - This is similar to the North Atlantic file<br />
above, but with more detail in the BVI region.<br />
708 polygons - 21460 points - File size 592538 bytes<br />
chart by Phil Gerber - jan/2003<br />
D<strong>own</strong>load NA2.zip (Zip compressed - 166.543 bytes)<br />
> Islands - 3 vector charts: Falklands Islands (Malvinas), Easter<br />
Island and Sri Lanka.<br />
Falklands - 101 plygons - 2605 points<br />
Easter Is. - 6 polygons - 347 points<br />
Sri Lanka - 35 polygons - 850 points<br />
charts by Will Redfern<br />
posted jan/20/2003<br />
D<strong>own</strong>load ISLANDS.ZIP (Zip compressed - 29.904 bytes)<br />
Contribute to the library<br />
If you made a vector chart and would like to share it, send me a message with the CHT file attached. For raster cahrts, send the image (GIF or<br />
JPG) and the CID file.<br />
My e-mail address is omar@tecepe.com.br.<br />
If you do send a chart, please answer these questions regarding the credit for the chart:<br />
1. Do you want <strong>your</strong> name appear as chart author? (i.e. "chart by..")<br />
2. Do you want the credit linked to <strong>your</strong> email address or URL ? (ex: chart by Omar Reis)<br />
Note that I don´t recommended this. E-mail addresses posted in the web end up in junk mail lists.<br />
DISCLAIMER<br />
The authors of these charts cannot and do not warrant that they will meet <strong>your</strong> requirements or are error free. The entire<br />
risk as to the chart quality is solely with the user and not the author.<br />
In no event shall the author be liable to you for damages, whether direct or indirect, incidental, special, or consequential<br />
arising out the use of or any defect in the files, even if the Author has been advised of the possibility of such damages, or<br />
for any claim by any other party.<br />
All other warranties of any kind, either express or implied, are expressly excluded.<br />
Omar F. Reis<br />
http://www.tecepe.com.br/nav/chartlib.htm (2 of 2) [9/2/2004 11:09:08 PM]
Angular distances and Lunar Calculation<br />
level of difficulty beginner intermediate advanced<br />
Angular Distances between two celestial objects and Lunar Calculation<br />
Every celestial navigator knows how to take a celestial object altitude, but few have ever measured the angular distances<br />
between two celestial objects. Yet these angular distances can be useful for two purposes: checking the <strong>sextant</strong> accuracy and<br />
determining the time.<br />
Consider the movement of celestial objects in the celestial sphere. It is the movement observed when the Earth rotation is<br />
removed from the picture.<br />
Stars are nearly fixed in the sky. Their so called "proper motion" is so slow, it can be ignored for celestial navigation. So, the<br />
angular distance between two stars is constant. One can take advantage of this fact to check the accuracy of the <strong>sextant</strong>.<br />
The Sun goes a complete turn in the celestial sphere in exactly one year. Planets move more slowly, with irregular paths and<br />
periods.<br />
The Moon does complete turn every 28 days. That's 12 degrees per day, or about 30' per hour. It is so fast, the distance between<br />
the Moon and other celestial object can be effectively used as a clock, to determine the time in a unkn<strong>own</strong> Earth position, as we<br />
will see.<br />
Measuring angular distances is different from measuring altitudes. Instead of the vertical plane,<br />
the <strong>sextant</strong> must be held inclined, so that its plane includes the two celestial objects. For the<br />
Sun and Moon, the near or far limbs are used rather than the lower or upper (see illustration).<br />
Since the celestial positions of the objects (i.e. their Right Ascension and Declination) can be calculated using the Nautical<br />
Almanac, one can calculate the angular distance between them by solving the spherical triangle formed by the object centers and<br />
a celestial pole. This gives the true calculated distance.<br />
Distance corrections<br />
What we observe with the <strong>sextant</strong> is the apparent distance. A couple corrections must be applied to convert from the <strong>sextant</strong><br />
apparent distance to true distance, before it can be compared with the calculated distance, obtained from the Almanac. These<br />
corrections are 1) the index error, 2) semi diameter of the object (SD), 3) atmospheric refraction and 4) parallax in altitude.<br />
Only the Sun and Moon have appreciable semi diameters (SD). For all other objects, SD can be considered 0.<br />
Parallax error is illustrated in fig.1. Since the navigator is not in the<br />
Earth's center, but in its surface, the apparent object position is<br />
below the true geocentric position.<br />
Parallax is only meaningful for the Moon. Other objects are so far,<br />
their parallax is very small.<br />
Refraction error is caused by light rays "bending" while crossing the air layers. It is a tricky correction, because it depends on<br />
atmospheric conditions. The best thing is to try to avoid too much refraction by selecting objects with altitudes greater then 20<br />
degrees.<br />
http://www.tecepe.com.br/nav/DistTwoObjects.htm (1 of 3) [9/2/2004 11:09:17 PM]
Angular distances and Lunar Calculation<br />
Both refraction and parallax displace the object in the<br />
vertical direction. In fig.2 (a navigator's perspective) the<br />
combined effect of parallax and refraction is represented by<br />
C (The solid circle is the apparent object and the dotted<br />
circle is the true object).<br />
DC is the correction C projected in the direction of the other<br />
celestial object. So, we have:<br />
DC = C . cos ß<br />
where ß is the angle between the vertical and the other<br />
celestial object (see fig.3). Note that, since both parallax and<br />
refraction corrections depend on the altitude, the objects<br />
altitudes must be either measured or calculated.<br />
The total distance correction is:<br />
Corr = SD + DC<br />
These corrections must be calculated for each of the two<br />
celestial objects and subtracted from the <strong>sextant</strong> angular<br />
distance. The index error is corrected once.<br />
After the corrections are applied, the corrected <strong>sextant</strong><br />
angular distance can be compared with the Almanac<br />
calculated distance. The difference is the <strong>sextant</strong> error.<br />
It's worth noting that this error is not the index error, which was already subtracted. It's a <strong>sextant</strong> construction error, and should<br />
be generally small. You might want to check <strong>your</strong> <strong>sextant</strong> periodically, or after it suffered some abuse, to check it's reliability.<br />
The Lunar Calculation<br />
Think about this situation:<br />
● You fall on a deserted island, with unkn<strong>own</strong> position. You have a <strong>sextant</strong> and a Nautical Almanac.<br />
● You got no watch. Or the one you got is badly wrong.<br />
● Also no radio or cell phone.<br />
● You want to find <strong>your</strong> position, so you can send it in a message on a bottle, asking for help (or at least a pepperoni pizza).<br />
You can always do a meridian passage observation and obtain the latitude. But the longitude cannot be computed unless you<br />
know the correct time. So, you must try to figure the time first. This can be done using the Moon.<br />
Using the angular distance between the Moon and other celestial object to determinate the time is kn<strong>own</strong> as the Lunar<br />
Calculation. It was very important for navigators in times prior to affordable chronometers and radio communications.<br />
Unfortunately, this technique was only perfected about the same time affordable chronometers appeared.<br />
Each Lunar calculation involves measuring three angles in about the same time: 1) the angular distance between the Moon and<br />
other celestial object and 2,3) the altitudes of both objects. The altitudes are used to calculate the parallax and refraction<br />
corrections.<br />
Since the angular distance between the Moon and other object changes relatively fast, one can calculate the distance at three<br />
different times, distributed evenly around the estimated time, and then do a quadratic interpolation with the actual measured<br />
distance, to find the actual time.<br />
http://www.tecepe.com.br/nav/DistTwoObjects.htm (2 of 3) [9/2/2004 11:09:17 PM]
Angular distances and Lunar Calculation<br />
It must be noted that the Moon movement in the celestial sphere is more or less along the Ecliptic. So the other celestial object<br />
chosen for this calculation must also be on the Ecliptic. Any planet or the Sun will do. As will a star close to the Ecliptic, such as<br />
Regulus, Spica or Antares. You also should avoid to choose a close object, for the distance line may be oblique to the Moon<br />
trajectory.<br />
You will find out that it is tricky to measure the angular distance with the <strong>sextant</strong> inclined. Try to rock the instrument, as to find<br />
the inclination that gives the lowest possible <strong>sextant</strong> reading.<br />
The Lunar calculation is not very precise, because the Moon is not that fast. Even a small 1.0' combined error (in the angular<br />
distance reading and calculation method) will result in nearly 2 minutes error (and 30NM in the position ). Not very good by<br />
today's standards. It is considered obsolete and is seldom used, except as a historical curiosity.<br />
Speaking of historical curiosity, I recommend a visit to the site Nathaniel Bowditch Initiative, about the life of the navigator who<br />
perfected this technique around 1790.<br />
>> Object distances and the Lunar calculation will be available in the next Navigator version, due to the year end.<br />
©Copr 92-2k Omar F. Reis - All rights reserved<br />
http://www.tecepe.com.br/nav/DistTwoObjects.htm (3 of 3) [9/2/2004 11:09:17 PM]
Thinking Man Software<br />
Thinking Man Software<br />
Welcome to Thinking Man Software.<br />
When Thinking Man Software started out, we only made software for<br />
our friends and co-workers. Most of that software is still in use today.<br />
But why stop there, when the Internet beckons?<br />
Dimension 4 was the first program that we unleashed on the Internet, in<br />
1996. It's been d<strong>own</strong>loaded over 3 million times from various sites<br />
around the world. It's recently been updated (now at v5.0) with many<br />
new features and the latest operating system support.<br />
Check out Dimension 4 ... and the people behind it ... And most<br />
importantly -- have fun!!<br />
Copyright 1992-2004, Thinking Man Software, webmaster@thinkman.com<br />
http://www.thinkman.com/ [9/2/2004 11:09:18 PM]
The official U.S. time<br />
http://nist.time.gov/ [9/2/2004 11:09:20 PM]
Amazon.com: Astronomical Algorithms: Explore similar items<br />
Search<br />
Browse<br />
Subjects<br />
Bestsellers<br />
Magazines<br />
Corporate<br />
Accounts<br />
e-books<br />
& docs<br />
New & Used<br />
Textbooks<br />
Used<br />
Books<br />
Search:<br />
Browse:<br />
You clicked on this item...<br />
Astronomical Algorithms<br />
by Jean Meeus<br />
Average Customer Review:<br />
Out of stock<br />
You may also be interested in these items...<br />
7 used & new from $28.00<br />
Or buy used: $28.00<br />
Customers also shopped for<br />
Show items from:<br />
All Products<br />
Books (9)<br />
Explanatory<br />
Supplement to the<br />
Astronomical<br />
Almanac<br />
by P. Kenneth<br />
Seidelmann<br />
Astronomy on the<br />
Personal Computer<br />
(with <strong>CD</strong>-ROM)<br />
by Oliver<br />
Montenbruck,<br />
Thomas Pfleger<br />
Practical<br />
Astronomy with<br />
<strong>your</strong> Calculator<br />
by Peter<br />
Duffett-Smith<br />
An Introduction to<br />
Celestial Mechanics<br />
by Forest Ray<br />
Moulton<br />
Fundamentals of<br />
Astrodynamics and<br />
Applications, 2nd.<br />
ed. (The Space<br />
Technology<br />
Library)<br />
by David A Vallado<br />
Fundamentals of<br />
Astrodynamics<br />
by Roger R. Bate<br />
http://www.amazon.com/exec/obidos/ASIN/0943396611/forumolimpico/102-4486973-5960147 (1 of 3) [9/2/2004 11:09:47 PM]
Amazon.com: Astronomical Algorithms: Explore similar items<br />
Satellite Orbits<br />
by Oliver<br />
Montenbruck,<br />
Eberhard Gill<br />
Textbook on<br />
Spherical<br />
Astronomy<br />
by William Marshall<br />
Smart, Robin<br />
Michael Green<br />
(Editor)<br />
Astronomical<br />
Formulae for<br />
Calculators<br />
by Jean Meeus<br />
$25 Off Tools &<br />
Hardware<br />
Take $25 off<br />
when you spend<br />
$199 or more on<br />
Tools &<br />
Hardware<br />
products offered<br />
by Amazon.com.<br />
Here's how<br />
(restrictions<br />
apply).<br />
New at Amazon.com<br />
Find more<br />
than 600,000<br />
china, crystal,<br />
and silver<br />
products in<br />
the<br />
Replacements,<br />
Ltd. Store.<br />
Find sound<br />
values on<br />
instruments<br />
and gear in our<br />
new Musical<br />
Instruments<br />
Store.<br />
Where's My Stuff?<br />
• Track <strong>your</strong> recent orders.<br />
• View or change <strong>your</strong> orders<br />
in Your Account.<br />
Shipping & Returns<br />
• See our shipping rates &<br />
policies.<br />
• Return an item (here's our<br />
Returns Policy).<br />
Need Help?<br />
• Forgot <strong>your</strong> password? Click<br />
here.<br />
• Redeem or buy a gift<br />
certificate.<br />
• Visit our Help department.<br />
Search<br />
Your Recent History<br />
Learn More<br />
for<br />
http://www.amazon.com/exec/obidos/ASIN/0943396611/forumolimpico/102-4486973-5960147 (2 of 3) [9/2/2004 11:09:47 PM]
Amazon.com: Astronomical Algorithms: Explore similar items<br />
Recently Viewed Products<br />
The American Practical Navigator by<br />
Nathaniel Bowditch<br />
Customers who bought items in <strong>your</strong><br />
Recent History also bought:<br />
How to Read a<br />
Nautical Chart<br />
by Nigel Calder<br />
H.M.S. Surprise<br />
(Aubrey-Maturin<br />
(Paperback))<br />
by Patrick<br />
O'Brian<br />
Visit the Page You Made<br />
Turn <strong>your</strong> past books purchases into $$$<br />
Learn more about selling at Amazon.com today!<br />
Top of Page<br />
Books Search | Browse Subjects | Bestsellers | Magazines | Corporate Accounts<br />
e-Books & Docs | Bargain Books | Used Books<br />
Amazon.com Home | Directory of All Stores<br />
Our International Sites: Canada | United Kingdom | Germany | Japan | France<br />
Contact Us | Help | Shopping Cart | Your Account | Sell Items | 1-Click Settings<br />
Investor Relations | Press Releases | Join Our Staff<br />
Conditions of Use | Privacy Notice © 1996-2004, Amazon.com, Inc. or its affiliates<br />
http://www.amazon.com/exec/obidos/ASIN/0943396611/forumolimpico/102-4486973-5960147 (3 of 3) [9/2/2004 11:09:47 PM]
Amazon.com: Astronomical Formulae for Calculators: Explore similar items<br />
Search<br />
Browse<br />
Subjects<br />
Bestsellers<br />
Magazines<br />
Corporate<br />
Accounts<br />
e-books<br />
& docs<br />
New & Used<br />
Textbooks<br />
Used<br />
Books<br />
Search:<br />
Browse:<br />
You clicked on this item...<br />
Astronomical Formulae for Calculators<br />
by Jean Meeus<br />
Average Customer Review:<br />
Out of stock<br />
You may also be interested in these items...<br />
Show items from:<br />
All Products<br />
Books (1)<br />
Astronomical Algorithms<br />
by Jean Meeus<br />
6 used & new from $15.00<br />
Or buy used: $43.19<br />
http://www.amazon.com/exec/obidos/ASIN/0943396220/forumolimpico/102-4486973-5960147 (1 of 3) [9/2/2004 11:09:48 PM]
Amazon.com: Astronomical Formulae for Calculators: Explore similar items<br />
$25 Off Tools &<br />
Hardware<br />
Take $25 off<br />
when you spend<br />
$199 or more on<br />
Tools &<br />
Hardware<br />
products offered<br />
by Amazon.com.<br />
Here's how<br />
(restrictions<br />
apply).<br />
New at Amazon.com<br />
Find more<br />
than 600,000<br />
china, crystal,<br />
and silver<br />
products in<br />
the<br />
Replacements,<br />
Ltd. Store.<br />
Find sound<br />
values on<br />
instruments<br />
and gear in our<br />
new Musical<br />
Instruments<br />
Store.<br />
Where's My Stuff?<br />
• Track <strong>your</strong> recent orders.<br />
• View or change <strong>your</strong> orders<br />
in Your Account.<br />
Shipping & Returns<br />
• See our shipping rates &<br />
policies.<br />
• Return an item (here's our<br />
Returns Policy).<br />
Need Help?<br />
• Forgot <strong>your</strong> password? Click<br />
here.<br />
• Redeem or buy a gift<br />
certificate.<br />
• Visit our Help department.<br />
Search<br />
Your Recent History<br />
Learn More<br />
for<br />
Recently Viewed Products<br />
Astronomical Algorithms by Jean<br />
Meeus<br />
The American Practical Navigator by<br />
Nathaniel Bowditch<br />
Customers who bought items in <strong>your</strong><br />
Recent History also bought:<br />
Explanatory<br />
Supplement to<br />
the<br />
Astronomical<br />
Almanac<br />
by P. Kenneth<br />
Seidelmann<br />
Astronomy on<br />
the Personal<br />
Computer (with<br />
<strong>CD</strong>-ROM)<br />
by Oliver<br />
Montenbruck,<br />
Thomas Pfleger<br />
Visit the Page You Made<br />
Turn <strong>your</strong> past books purchases into $$$<br />
Learn more about selling at Amazon.com today!<br />
Top of Page<br />
Books Search | Browse Subjects | Bestsellers | Magazines | Corporate Accounts<br />
e-Books & Docs | Bargain Books | Used Books<br />
http://www.amazon.com/exec/obidos/ASIN/0943396220/forumolimpico/102-4486973-5960147 (2 of 3) [9/2/2004 11:09:48 PM]
Amazon.com: Astronomical Formulae for Calculators: Explore similar items<br />
Amazon.com Home | Directory of All Stores<br />
Our International Sites: Canada | United Kingdom | Germany | Japan | France<br />
Contact Us | Help | Shopping Cart | Your Account | Sell Items | 1-Click Settings<br />
Investor Relations | Press Releases | Join Our Staff<br />
Conditions of Use | Privacy Notice © 1996-2004, Amazon.com, Inc. or its affiliates<br />
http://www.amazon.com/exec/obidos/ASIN/0943396220/forumolimpico/102-4486973-5960147 (3 of 3) [9/2/2004 11:09:48 PM]
Chapter 1: 2nd part<br />
Les Bases du Point Astro. - suite<br />
This text is available in english, french and portuguese<br />
Page précédente<br />
Parce que la Position Géographique d'un astre est normalement à des milliers de kilomètres de notre<br />
position, le cercle de position est extrêmement grand et cette toute petite partie qui nous intéresse - celle<br />
près de notre position - peut alors être considérée comme une droite, orthogonale à l'Azimut de l'astre.<br />
Cette droite est appelée La droite de Hauteur. (Schéma 9).<br />
fig. 9 - La droite de Hauteur<br />
Nous avons réussi, à partir de la Hauteur observée d'un astre à un moment donné et de notre position<br />
estimée, à dessiner une droite de hauteur. Nous savons que notre position réelle se trouve quelque part sur<br />
cette droite. Pour déterminer notre position exacte, nous pouvons dessiner une autre droite, celle d'un autre<br />
astre. Le point où ces deux droites s'intersectent sera notre position exacte - notre Point Astro.<br />
Normalement, le navigateur devrait répéter cette opération pour un troisième astre, juste pour être sur.<br />
Puisque ces mesures sont affectées par quelques imprécisions mineures, les 3 droites ne se recouperont<br />
probablement pas en un point unique, nous aurons un petit triangle. Notre position est probablement<br />
quelque part à l'intérieur de ce triangle. (Shéma 10). Plus le triangle est petit, mieux c'est. On estime<br />
généralement que notre position est au centre de ce triangle.<br />
http://www.tecepe.com.br/nav/frnav_c12.htm (1 of 5) [9/2/2004 11:09:59 PM]
Chapter 1: 2nd part<br />
Fig. 10 - Triangle formé par l'intersection de 3 droites de Hauteur.<br />
Sur le shema 10 nous pouvons voir comment 3 cercles de positions déterminent 3 droites de Hauteur r1, r2<br />
et r3.<br />
Le calcul classique du point astro exige pour déterminer une droite de hauteur, de calculer le PG d'un astre<br />
( AHvo et déclinaison) en utilisant les Ephémérides Nautiques ainsi que la résolution du Triangle de<br />
Position PXZ, formé par le pole terrestre (P), le PG de l' astre (X) et la position estimée du navigateur (Z)<br />
(voir shema 11). Cette solution, qui demande l'utilisation de tables, donne la Hauteur calculée et l'Azimut<br />
de l' astre. La différence, en minutes de degrés, entre la hauteur calculée et la hauteur de l' astre, mesurée<br />
avec le <strong>sextant</strong>, est la distance entre notre point astro et notre position estimée, c.a.d notre intercept.<br />
fig. 11 - Triangle de Position PXZ<br />
Navigator Light calcule le PG d'un astre et le triangle de position grâce à quelques formules<br />
mathématiques. Tout ce que vous avez à faire est d'entrer la Hauteur lue sur le <strong>sextant</strong> ainsi que la date de<br />
la visée et l'heure exacte, le nom de l' astre et votre position estimée.<br />
Détermination du point Astro.<br />
Il n'est pas nécessaire de dessiner les droites de hauteur quand vous utiliser Navigator Light. Mais<br />
regardons quand même comment faire. Une droite de hauteur est tracée sur une carte marine ( projection<br />
de Mercator) de la façon suivante:<br />
1. Tracez votre position estimée.<br />
2. A l'aide de votre règle parallèle, tracez une droite passant par votre position estimée, dans la<br />
http://www.tecepe.com.br/nav/frnav_c12.htm (2 of 5) [9/2/2004 11:09:59 PM]
Chapter 1: 2nd part<br />
3.<br />
4.<br />
direction de l'Azimut de l'étoile.<br />
Sur cette droite, tracez la distance de votre intercept - vers l'étoile ou à l'écart - comme l'indique le<br />
signe de l'intercept.<br />
Tracez la droite de Hauteur, perpendiculairement à l azimut, sur ce point.<br />
Les cartes marines détaillées ne sont en général disponible que pour les régions côtières. Au milieu des<br />
océans, nous n'avons pas généralement de cartes d'une précision suffisante pour tracer notre position. On<br />
utilise alors des feuilles de calcul de droite de hauteur spéciales ou bien du papier millimétré.<br />
Tracer sur du papier millimétré demande quelques étapes supplémentaires. Une minute de longitude est<br />
égale a 1 mille prés de l'équateur. Si nous utilisons 1 carré sur la feuille = 1 MN comme échelle, nous<br />
devrons convertir les distances horizontales en minutes en utilisant l'opération suivante:<br />
minutes de longitude = milles horizontaux / Cos ( Latitude )<br />
Il est plus simple d'utiliser les feuilles de calculs de droite parce qu'elle comporte une échelle pour opérer<br />
cette conversion.<br />
Si l'on utilise Navigator light en navigation, l'ordinateur calcule l'intersection des droites de hauteur ainsi<br />
que le point Astro. Une carte simplifiée est dessinée, montrant les parallèles, les méridiens, les droites de<br />
hauteur ainsi que le point Astronomique.<br />
Le <strong>Sextant</strong><br />
Le <strong>sextant</strong> est un instrument qui mesure des angles. Le dessin 12 montre un <strong>sextant</strong> schématisé. La lunette<br />
est alignée avec le petit miroir, qui est fixé au bâti de l'instrument. Ce miroir est à moitié transparent. Par<br />
le côté transparent, le navigateur peut voir l'horizon directement. Le petit miroir réfléchi également<br />
partiellement l'image du grand miroir où l'on voit l' astre. Le Grand Miroir est mobile, et s'incline avec<br />
l'alidade. En bougeant l'alidade, on change l'angle entre les deux miroirs. La hauteur de l' astre est lue sur<br />
le limbe. Un tambour permet d'affiner la visée. Les degrés entiers sont lus sur le limbe, et les minutes sur<br />
le tambour. Comme nous l'avons vu précédemment, chaque minute correspond à 1 mille et chaque degré a<br />
60 milles.<br />
http://www.tecepe.com.br/nav/frnav_c12.htm (3 of 5) [9/2/2004 11:09:59 PM]
Chapter 1: 2nd part<br />
fig. 12 - Le <strong>Sextant</strong><br />
Le <strong>sextant</strong> a également deux sets de filtre de façon à éliminer la lumière excessive, particulièrement<br />
lorsque l'on observe le soleil. L'utilisation de deux filtres ou plus, devant le grand miroir lorsqu'on<br />
observe le soleil est obligatoire. De sérieuses lésions oculaires peuvent résulter d'une observation du<br />
soleil sans l'utilisation des filtres.<br />
Lorsque l'on regarde à travers la lunette et en ajustant le <strong>sextant</strong>, vous verrez l'image suivante:<br />
Fig. 13 - Image du soleil au travers du <strong>sextant</strong>.<br />
Les observations au <strong>sextant</strong> doivent être faites avec le <strong>sextant</strong> dans une position la plus verticale possible.<br />
Incliner (balancer le <strong>sextant</strong> sur son axe de droite a gauche) doucement l'instrument ajusté, et l'image du<br />
corps céleste décrit un petit arc qui vient toucher l'horizon en un point près du centre du miroir. C'est alors,<br />
et alors seulement, que vous pouvez lire la hauteur en degrés directement sur le limbe.<br />
Les Corrections de Hauteur<br />
Mais avant de pouvoir utiliser ce relevé dans nos calculs, quelques corrections doivent être appliquées. Ces<br />
corrections sont: La hauteur de l'oeil, le semi-diamètre de l'astre (seulement pour le soleil et la lune),<br />
l'erreur instrumentale, la réfraction de l'atmosphère et la parallaxe.<br />
Puisque la plupart de ces corrections dépendent seulement de l'astre sélectionné et de la hauteur, elles sont<br />
effectuées automatiquement par Navigator Light. La seule information que vous aurez à fournir au<br />
programme est la Hauteur de l'oeil (c.a.d l'élévation de l'oeil au-dessus de la mer, en général 2 mètres sur<br />
le pont d'un bateau) et l'erreur instrumentale. L'ajout de ces corrections à la hauteur relevée sur le <strong>sextant</strong><br />
donne la Hauteur Corrigée, celle utilisée dans les calculs.<br />
Un observateur situé en altitude verra un astre avec une hauteur supérieure a celle observée s'il était au<br />
niveau de la mer, tout en restant au même endroit. Cette erreur est appelée Elévation de l'oeil. Sur les petits<br />
bateaux, la chose n'est pas critique. Mais si vous êtes sur le pont d'un navire important, cela le devient.<br />
Fig. 14 - Erreur due a l'élévation de lSil.<br />
L'erreur instrumentale du <strong>sextant</strong> est due à un mauvais alignement des graduations du <strong>sextant</strong>. Il est<br />
possible de corriger cette erreur par des ajustements, mais elle varie suivant le soin apporte à son<br />
utilisation. Il est plus facile de lire cette erreur, et de la retrancher de la hauteur observée. Pour lire l'erreur<br />
du <strong>sextant</strong>, réglez le curseur sur 0°00.0' et visez l'horizon. Sur le shema 15, on peut voir cette erreur.<br />
Tournez le tambour jusqu'a ce que l'horizon forme une ligne continue. (Shéma de droite). Puis lisez l'erreur<br />
instrumentale directement sur le tambour.<br />
http://www.tecepe.com.br/nav/frnav_c12.htm (4 of 5) [9/2/2004 11:09:59 PM]
Chapter 1: 2nd part<br />
Fig. 15 - Image de l'erreur instrumentale vue dans la lunette. L'erreur Instrumentale peut être positive ou<br />
négative, (voir shema16).<br />
fig. 16 - Signe de l'erreur instrumentale<br />
[ Fin du chapitre 1]<br />
Le reste de ce texte n'est pas encore traduit, mais comme la version portugaise est disponible, vous pouvez<br />
essayer une traduction automatique, avec Altavista Digital. Cette traduction sera un peu bizarre, mais vous<br />
aurez au moins l'idée générale. Cliquez sur les liens ci dessous pour la traduction.<br />
● Chapitre 3 - Waypoints et navigation orthodromique. De quelle façon la rotondité de la terre affecte<br />
t'elle la navigation ?<br />
● Chapitre 4 - Identifier les planètes et les étoiles, avec plusieurs photos de constellations.<br />
e-mail orion<br />
©Copr 91-96 Omar F. Reis<br />
©Traduction: William Talgorn (Williamtalgorn@hotmail.com)<br />
http://www.tecepe.com.br/nav/frnav_c12.htm (5 of 5) [9/2/2004 11:09:59 PM]
Macromedia - Flash MX 2004<br />
Accessibility<br />
●<br />
●<br />
●<br />
●<br />
●<br />
●<br />
●<br />
●<br />
●<br />
●<br />
●<br />
●<br />
●<br />
●<br />
●<br />
●<br />
Help<br />
International<br />
Cart 0<br />
Sign Out<br />
Sign In<br />
Your Account<br />
Welcome, Guest<br />
Home<br />
Products<br />
Showcase<br />
Support<br />
Developers<br />
Solutions<br />
D<strong>own</strong>loads<br />
Company<br />
Store<br />
Search<br />
You may not have everything you need to view certain sections of Macromedia.com. Please<br />
see our site requirements.<br />
●<br />
●<br />
●<br />
●<br />
●<br />
●<br />
●<br />
●<br />
●<br />
●<br />
●<br />
Products Home<br />
Studio<br />
Dreamweaver<br />
Flash<br />
ColdFusion<br />
Contribute<br />
Breeze<br />
Director<br />
Flex<br />
Buy<br />
More :<br />
http://www.macromedia.com/software/flash/ (1 of 10) [9/2/2004 11:10:12 PM]
Macromedia - Flash MX 2004<br />
●<br />
●<br />
●<br />
●<br />
●<br />
●<br />
●<br />
●<br />
●<br />
●<br />
●<br />
●<br />
●<br />
●<br />
●<br />
●<br />
●<br />
●<br />
●<br />
●<br />
●<br />
●<br />
●<br />
●<br />
●<br />
●<br />
●<br />
●<br />
●<br />
●<br />
●<br />
●<br />
●<br />
Showcase Home<br />
Site of the Day Archive<br />
Showcase Submissions<br />
Customer Success Program<br />
More :<br />
Support Home<br />
Customer Service<br />
Training Programs<br />
Support Programs<br />
Forums<br />
More :<br />
Developers Home<br />
DevNet Subscriptions<br />
Forums<br />
Exchange<br />
Sample Applications<br />
More :<br />
Solutions Home<br />
Partners<br />
Business<br />
Education<br />
Students<br />
Government<br />
Accessibility<br />
eLearning<br />
More :<br />
D<strong>own</strong>loads Home<br />
Free Trials<br />
Updates<br />
Get Flash Player<br />
Exchange<br />
More :<br />
Company Home<br />
http://www.macromedia.com/software/flash/ (2 of 10) [9/2/2004 11:10:12 PM]
Macromedia - Flash MX 2004<br />
●<br />
●<br />
●<br />
●<br />
●<br />
●<br />
●<br />
●<br />
●<br />
●<br />
●<br />
●<br />
●<br />
●<br />
News Room<br />
Investor Relations<br />
Community Affairs<br />
Jobs<br />
Events<br />
Contact<br />
More :<br />
Store Home<br />
Software<br />
Books<br />
Training<br />
Support Programs<br />
Order History<br />
More :<br />
Home / Products /<br />
Macromedia Flash MX 2004<br />
Create rich content and applications across<br />
desktops and devices.<br />
Flash MX 2004<br />
Buy | Upgrade | Free 30-day trial<br />
Flash MX Professional 2004<br />
Buy | Upgrade | Free 30-day trial<br />
http://www.macromedia.com/software/flash/ (3 of 10) [9/2/2004 11:10:12 PM]
Macromedia - Flash MX 2004<br />
Introducing Flash MX 2004 and Flash MX Professional 2004. See how the versions compare.<br />
Latest News<br />
New Updater<br />
Version 7.2 of Macromedia Flash MX 2004 and Flash MX Professional 2004 is now available<br />
with improvements in performance, stability and documentation. Learn more about the updater.<br />
Quick and Easy Video<br />
The Flash Video Kit is a set of extensions and resources to help you take video assets, convert<br />
them to Flash Video format (FLV), and insert them on <strong>your</strong> web pages using Dreamweaver MX<br />
2004. Find out how to get the kit for free.<br />
Why Upgrade<br />
You design. You code. See what's new for both sides of you.<br />
Flash Video Updater: Get the new 2-pass encoder plus samples and tutorials.<br />
Get started :<br />
Swift 3D XPRESS: Effortlessly convert 2D assets into 3D animations Flash.<br />
View more featured plug-ins :<br />
Flash MX 2004<br />
Create rich interactive experiences to achieve superior results.<br />
http://www.macromedia.com/software/flash/ (4 of 10) [9/2/2004 11:10:12 PM]
Macromedia - Flash MX 2004<br />
What's new in Flash MX 2004? (15 min)<br />
How do I use Flash MX 2004? (50 min)<br />
Twice as Fast<br />
Boost runtime performance by 2-8x with the enhanced compiler and the new Macromedia Flash<br />
Player 7.<br />
Third Party Extensions<br />
Create charts and graphs, animate text effects and more with extensions (sold separately)<br />
High Fidelity Import<br />
Integrate rich media content faster with high fidelity import of PDF and Adobe Illustrator 10 files.<br />
Timeline Effects<br />
Simplify common timeline and scripting tasks with new Timeline Effects and Behaviors<br />
● More new features ›<br />
● Top reasons to upgrade<br />
● System requirements<br />
● FAQ<br />
Flash MX Professional 2004<br />
New! Develop advanced Flash content, applications and video experiences.<br />
http://www.macromedia.com/software/flash/ (5 of 10) [9/2/2004 11:10:12 PM]
Macromedia - Flash MX 2004<br />
Deliver high-quality Flash video<br />
Everything in Flash MX 2004, plus great new features for:<br />
High Quality Video<br />
Deliver high-quality video with new professional video capabilities.<br />
Applications and Data<br />
<strong>Build</strong> rich Internet applications with a familiar forms-based development environment and<br />
powerful data binding.<br />
Advanced Interactive Content<br />
Create sophisticated interactive content using slides to organize and sequence <strong>your</strong> project.<br />
Mobile and Device Development<br />
Produce and test content for devices and mobile phones with device templates and emulators.<br />
Rich Media Advertising<br />
Create advanced rich media ads and deliver them seamlessly to DoubleClick DART Motif.<br />
● More new features :<br />
● Top reasons to upgrade<br />
● System requirements<br />
● FAQ<br />
● Read more :<br />
Macromedia Flash Player<br />
Deliver effective Macromedia Flash experiences across desktops and devices through Macromedia<br />
Flash Player. Installed on more than 97% of the Internet-enabled desktops and many popular<br />
devices, Macromedia Flash is the worldâ€s most pervasive rich client.<br />
● Read more :<br />
http://www.macromedia.com/software/flash/ (6 of 10) [9/2/2004 11:10:12 PM]
Macromedia - Flash MX 2004<br />
Get More Done with Studio MX 2004<br />
Get more done by purchasing Flash as part of Studio MX 2004, the integrated tool set that includes<br />
the newest versions of Flash, Dreamweaver, Fireworks and FreeHand. Studio MX 2004 is also<br />
available with Flash Professional.<br />
● Read more :<br />
● System requirements<br />
● FAQ<br />
Streamlines web development<br />
●<br />
●<br />
●<br />
●<br />
●<br />
Flash Home<br />
Flash Professional Home<br />
At a Glance<br />
Features<br />
Evaluation Guide<br />
http://www.macromedia.com/software/flash/ (7 of 10) [9/2/2004 11:10:12 PM]
Macromedia - Flash MX 2004<br />
●<br />
●<br />
●<br />
●<br />
●<br />
●<br />
Upgrade Center<br />
System Requirements<br />
FAQ<br />
Reviews and News<br />
Third-Party Extensions<br />
Flash Player Home<br />
Flash in Action<br />
●<br />
●<br />
●<br />
●<br />
●<br />
●<br />
●<br />
Showcase<br />
Flash & Applications<br />
Flash & Video<br />
Flash & Devices<br />
Flash & Accessibility<br />
Flash & Advertising<br />
Partners<br />
Flash Developer Center<br />
●<br />
●<br />
●<br />
●<br />
●<br />
Tutorials & Samples<br />
<strong>Build</strong>ing Applications<br />
Deploying Video<br />
Designing & Animating<br />
More :<br />
Support and Training<br />
●<br />
●<br />
●<br />
●<br />
●<br />
Flash Support Center<br />
Documentation<br />
Training & Certification<br />
Online Forums<br />
Register Your Product<br />
http://www.macromedia.com/software/flash/ (8 of 10) [9/2/2004 11:10:12 PM]
Macromedia - Flash MX 2004<br />
D<strong>own</strong>loads<br />
●<br />
●<br />
●<br />
●<br />
●<br />
●<br />
Get Flash Player<br />
Buy<br />
Upgrade<br />
Free Trial<br />
Flash Exchange<br />
More :<br />
Related Products<br />
Dreamweaver MX 2004<br />
Add Macromedia Flash elements to <strong>your</strong> HTML web page using Dreamweaver.<br />
Fireworks MX 2004<br />
Directly import native Fireworks PNG files into Macromedia Flash.<br />
ColdFusion MX<br />
<strong>Build</strong> dynamic applications with Flash and ColdFusion.<br />
RoboDemo<br />
Create interactive software demos and tutorials and import them into Flash.<br />
Read more about the MX 2004 product line :<br />
Company | Site Map | Privacy & Security | Contact Us | Accessibility | Report<br />
Piracy | Send Feedback<br />
©1995-2004 Macromedia, Inc. All rights reserved.<br />
Use of this website signifies <strong>your</strong> agreement to the Terms of Use.<br />
http://www.macromedia.com/software/flash/ (9 of 10) [9/2/2004 11:10:12 PM]
Macromedia - Flash MX 2004<br />
Search powered by<br />
http://www.macromedia.com/software/flash/ (10 of 10) [9/2/2004 11:10:12 PM]
Amazon.com: Celestial Navigation for Yachtsmen: Explore similar items<br />
Search<br />
Browse<br />
Subjects<br />
Bestsellers<br />
Magazines<br />
Corporate<br />
Accounts<br />
e-books<br />
& docs<br />
New & Used<br />
Textbooks<br />
Used<br />
Books<br />
Search:<br />
Browse:<br />
You clicked on this item...<br />
Celestial Navigation for Yachtsmen<br />
by Mary Blewitt<br />
Average Customer Review:<br />
Usually ships in 24 hours<br />
Eligible for FREE Super Saver<br />
Shipping on orders over $25. See<br />
details.<br />
Practical Sailor<br />
"For those interested in learning or brushing up<br />
on their celestial skills... not much on theory,<br />
just how to do it."<br />
You may also be interested in these items...<br />
Price: $10.36<br />
You Save: $2.59 (20%)<br />
13 used & new from $6.48<br />
Or buy used: $6.48<br />
Customers also shopped for<br />
Show items from:<br />
All Products<br />
Books (20)<br />
DVD (5)<br />
The <strong>Sextant</strong><br />
Handbook<br />
by Bruce Bauer<br />
The Complete<br />
On-Board Celestial<br />
Navigator<br />
by George C.<br />
Bennett<br />
Celestial<br />
Navigation in a<br />
Nutshell<br />
by Hewitt Schlereth<br />
Boat<strong>own</strong>er's<br />
Mechanical &<br />
Electrical Manual<br />
by Nigel Calder<br />
Storm Tactics<br />
Handbook<br />
by Lin Pardey, Larry<br />
Pardey<br />
Emergency<br />
Navigation<br />
by David Burch<br />
http://www.amazon.com/exec/obidos/ASIN/0070059284/forumolimpico/102-4486973-5960147 (1 of 3) [9/2/2004 11:10:15 PM]
Amazon.com: Celestial Navigation for Yachtsmen: Explore similar items<br />
Nigel Calder's<br />
Cruising Handbook<br />
by Nigel Calder,<br />
Nigel Calder<br />
How to Read a<br />
Nautical Chart<br />
by Nigel Calder<br />
World Cruising<br />
Routes<br />
by Jimmy Cornell,<br />
Jimmy Cornell<br />
$25 Off Tools &<br />
Hardware<br />
Take $25 off<br />
when you spend<br />
$199 or more on<br />
Tools &<br />
Hardware<br />
products offered<br />
by Amazon.com.<br />
Here's how<br />
(restrictions<br />
apply).<br />
New at Amazon.com<br />
Find more<br />
than 600,000<br />
china, crystal,<br />
and silver<br />
products in<br />
the<br />
Replacements,<br />
Ltd. Store.<br />
Find sound<br />
values on<br />
instruments<br />
and gear in our<br />
new Musical<br />
Instruments<br />
Store.<br />
Where's My Stuff?<br />
• Track <strong>your</strong> recent orders.<br />
• View or change <strong>your</strong> orders<br />
in Your Account.<br />
Shipping & Returns<br />
• See our shipping rates &<br />
policies.<br />
• Return an item (here's our<br />
Returns Policy).<br />
Need Help?<br />
• Forgot <strong>your</strong> password? Click<br />
here.<br />
• Redeem or buy a gift<br />
certificate.<br />
• Visit our Help department.<br />
Search<br />
Your Recent History<br />
Learn More<br />
for<br />
http://www.amazon.com/exec/obidos/ASIN/0070059284/forumolimpico/102-4486973-5960147 (2 of 3) [9/2/2004 11:10:15 PM]
Amazon.com: Celestial Navigation for Yachtsmen: Explore similar items<br />
Recently Viewed Products<br />
Astronomical Formulae for Calculators<br />
by Jean Meeus<br />
Astronomical Algorithms by Jean<br />
Meeus<br />
The American Practical Navigator by<br />
Nathaniel Bowditch<br />
Customers who bought items in <strong>your</strong><br />
Recent History also bought:<br />
Explanatory<br />
Supplement to<br />
the<br />
Astronomical<br />
Almanac<br />
by P. Kenneth<br />
Seidelmann<br />
Astronomy on<br />
the Personal<br />
Computer (with<br />
<strong>CD</strong>-ROM)<br />
by Oliver<br />
Montenbruck,<br />
Thomas Pfleger<br />
Visit the Page You Made<br />
Turn <strong>your</strong> past books purchases into $$$<br />
Learn more about selling at Amazon.com today!<br />
Top of Page<br />
Books Search | Browse Subjects | Bestsellers | Magazines | Corporate Accounts<br />
e-Books & Docs | Bargain Books | Used Books<br />
Amazon.com Home | Directory of All Stores<br />
Our International Sites: Canada | United Kingdom | Germany | Japan | France<br />
Contact Us | Help | Shopping Cart | Your Account | Sell Items | 1-Click Settings<br />
Investor Relations | Press Releases | Join Our Staff<br />
Conditions of Use | Privacy Notice © 1996-2004, Amazon.com, Inc. or its affiliates<br />
http://www.amazon.com/exec/obidos/ASIN/0070059284/forumolimpico/102-4486973-5960147 (3 of 3) [9/2/2004 11:10:15 PM]
Amazon.com: Books: Ocean Yachtmaster: Celestial Navigation an Instructional Handbook With Exercises<br />
Search<br />
Browse<br />
Subjects<br />
Bestsellers<br />
Magazines<br />
Corporate<br />
Accounts<br />
e-books<br />
& docs<br />
New & Used<br />
Textbooks<br />
Used<br />
Books<br />
SEARCH<br />
Ocean Yachtmaster: Celestial<br />
Navigation an Instructional<br />
Handbook With Exercises<br />
by Pat Langley-Price, Philip Ouvry<br />
4 used & new from $67.35<br />
Top Sellers in Books:<br />
Availability:<br />
Usually<br />
ships within<br />
1-2 business<br />
days<br />
Edition: Hardcover<br />
Look inside this book<br />
Have one to sell?<br />
4 used & new from $67.35<br />
Don't have one?<br />
We'll set one up for you.<br />
See more product details<br />
1.<br />
2.<br />
3.<br />
Unfit for<br />
Command by John<br />
E. O'Neill, Jerome<br />
R. Corsi<br />
The 9/11<br />
Commission<br />
Report by National<br />
Commission on<br />
Terrorist Attacks<br />
American Soldier<br />
by Tommy Franks,<br />
Malcolm<br />
McConnell<br />
BOOK<br />
INFORMATION<br />
Product Details<br />
● Hardcover: 215 pages ; Dimensions (in inches): 0.80 x 10.03 x<br />
7.53<br />
● Publisher: Adlard Coles Nautical Press; Revised edition (July<br />
1, 1997)<br />
● ASIN: 0713645539<br />
● Average Customer Review:<br />
Based on 1 review.<br />
Write a review.<br />
● Amazon.com Sales Rank: 724,801<br />
(Publishers and authors: improve <strong>your</strong> sales)<br />
Look Inside This Book<br />
You can view sample pages from this book.<br />
What's Your Advice?<br />
Is there an item you'd recommend instead of or in addition to this<br />
one? Let the world know! Enter the item's ASIN (what's an ASIN?) in<br />
the box below, select advice type, then click Submit.<br />
http://www.amazon.com/exec/obidos/ASIN/0713645539/forumolimpico/102-4486973-5960147 (1 of 4) [9/2/2004 11:10:18 PM]
Amazon.com: Books: Ocean Yachtmaster: Celestial Navigation an Instructional Handbook With Exercises<br />
buying info<br />
editorial reviews<br />
customer reviews<br />
look inside<br />
RECENTLY VIEWED<br />
Celestial<br />
Navigation for<br />
Yachtsmen by<br />
Mary Blewitt<br />
Astronomical<br />
Formulae for<br />
Calculators by<br />
Jean Meeus<br />
Astronomical<br />
Algorithms by<br />
Jean Meeus<br />
The American<br />
Practical<br />
Navigator: An<br />
Epitome of<br />
Navigation 1995<br />
Edition by<br />
Nathaniel<br />
Bowditch<br />
See more in the<br />
Page You Made<br />
Featured Item:<br />
I recommend:<br />
Editorial Reviews<br />
in addition to this book<br />
instead of this book<br />
From the Back Cover<br />
'This is a beautiful book, comprehensive in its coverage and clear in<br />
its instruction.' --SAIL<br />
'A comprehensive, clearly written handbook. It will be welcome not<br />
only in the classroom...but also as a self-tutor' --Nautical magazine<br />
Book Description<br />
Now revised and updated, this is the ideal textbook for anyone<br />
embarking on the RYA Yachtmaster Ocean Certificate. Using this<br />
book and its exercises the student will be able to study either in the<br />
classroom or from home.<br />
Covering both the theoretical and the practical aspects of the course,<br />
this edition includes satellite navigation and the use of calculators for<br />
celestial navigation.<br />
All Customer Reviews<br />
Average Customer Review:<br />
Write an online review and share <strong>your</strong> thoughts with other<br />
customers.<br />
5 of 5 people found the following review helpful:<br />
The <strong>Sextant</strong> Handbook<br />
by Bruce Bauer<br />
RATE THIS BOOK<br />
I dislike it<br />
I love it!<br />
1 2 3 4 5<br />
Edit <strong>your</strong> ratings<br />
Celestial Navigation made understandable, July<br />
7, 2000<br />
Reviewer: "johndoble" (Cape T<strong>own</strong>, South Africa) - See all my<br />
reviews<br />
At last, we have a book which will take the place of Mary Blewitt's<br />
dated "Celestial Navigation".<br />
These men have co-operated to write what will become the<br />
bench-mark manual for this subject which they explain in plain<br />
simple language.<br />
I learned Celestail Navigation using the sun and stars (I learned in<br />
that order too!) using this book and have now crossed the Atlantic<br />
three times using my <strong>sextant</strong> as my main navigation instrument - and<br />
the GPS as my back-up.<br />
There is nothing so satisfying as checking that the GPS is reading<br />
correctly using <strong>your</strong> <strong>sextant</strong>!<br />
Was this review helpful to you?<br />
Look for similar books by subject:<br />
(Report this)<br />
http://www.amazon.com/exec/obidos/ASIN/0713645539/forumolimpico/102-4486973-5960147 (2 of 4) [9/2/2004 11:10:18 PM]
Amazon.com: Books: Ocean Yachtmaster: Celestial Navigation an Instructional Handbook With Exercises<br />
Favorite Magazines!<br />
Browse for books in:<br />
● Subjects > Sports > General<br />
Explore our new<br />
Magazine Subscriptions<br />
store.<br />
Emerilware Rebate<br />
Search for books by subject:<br />
Boating - General<br />
Philanthropy & Charity<br />
Sailing - Navigation<br />
Sports<br />
Sports & Recreation<br />
Study Guides<br />
i.e., each book must be in subject 1 AND subject 2 AND ...<br />
Get 20% back after<br />
mail-in rebate when you<br />
buy select Emerilware<br />
cookware.<br />
Feedback<br />
● I have read this book, and I want to review it.<br />
● E-mail a friend about this book.<br />
● Write a So You'd Like to... guide.<br />
● Is there a specific product you'd like us to sell?<br />
Tell us about it.<br />
Suggestion Box<br />
Your comments can help make our site better for everyone. If you've found something incorrect, broken, or<br />
frustrating on this page, let us know so that we can improve it. Please note that we are unable to respond directly<br />
to suggestions made via this form.<br />
If you need help with an order, please contact Customer Service.<br />
Please mark as many of the following boxes that apply:<br />
Product information is missing important details.<br />
Product information is incorrect. Propose corrections using our Online Catalog Update Form.<br />
The page contains typographical errors.<br />
The page takes too long to load.<br />
The page has a software bug in it.<br />
Content violates Amazon.com's policy on offensive language.<br />
Product offered violates Amazon.com's policy on items that can be listed for sale.<br />
Comments or Examples:<br />
Examples: Missing information such as dimensions and model number, typos, inaccuracies, etc.<br />
http://www.amazon.com/exec/obidos/ASIN/0713645539/forumolimpico/102-4486973-5960147 (3 of 4) [9/2/2004 11:10:18 PM]
Amazon.com: Books: Ocean Yachtmaster: Celestial Navigation an Instructional Handbook With Exercises<br />
Where's My Stuff?<br />
• Track <strong>your</strong> recent orders.<br />
• View or change <strong>your</strong> orders<br />
in Your Account.<br />
Shipping & Returns<br />
• See our shipping rates &<br />
policies.<br />
• Return an item (here's our<br />
Returns Policy).<br />
Need Help?<br />
• Forgot <strong>your</strong> password? Click<br />
here.<br />
• Redeem or buy a gift<br />
certificate.<br />
• Visit our Help department.<br />
Search<br />
Your Recent History<br />
Learn More<br />
for<br />
Recently Viewed Products<br />
Celestial Navigation for Yachtsmen by<br />
Mary Blewitt<br />
Astronomical Formulae for Calculators<br />
by Jean Meeus<br />
Astronomical Algorithms by Jean<br />
Meeus<br />
The American Practical Navigator by<br />
Nathaniel Bowditch<br />
Customers who bought items in <strong>your</strong><br />
Recent History also bought:<br />
The Complete<br />
On-Board<br />
Celestial<br />
Navigator<br />
by George C.<br />
Bennett<br />
Practical<br />
Astronomy with<br />
<strong>your</strong> Calculator<br />
by Peter<br />
Duffett-Smith<br />
Visit the Page You Made<br />
Turn <strong>your</strong> past books purchases into $$$<br />
Learn more about selling at Amazon.com today!<br />
Top of Page<br />
Books Search | Browse Subjects | Bestsellers | Magazines | Corporate Accounts<br />
e-Books & Docs | Bargain Books | Used Books<br />
Amazon.com Home | Directory of All Stores<br />
Our International Sites: Canada | United Kingdom | Germany | Japan | France<br />
Contact Us | Help | Shopping Cart | Your Account | Sell Items | 1-Click Settings<br />
Investor Relations | Press Releases | Join Our Staff<br />
Conditions of Use | Privacy Notice © 1996-2004, Amazon.com, Inc. or its affiliates<br />
http://www.amazon.com/exec/obidos/ASIN/0713645539/forumolimpico/102-4486973-5960147 (4 of 4) [9/2/2004 11:10:18 PM]
Bowditch Online<br />
| Home | Mailing Lists | Bookstore | Forums | Weather | Tide Predictions | Bowditch |<br />
Bowditch -The American Practical Navigator<br />
These files are in Adobe Acrobat format.<br />
Title Page<br />
Preface<br />
Chapter 1 Introduction to Marine Navigation<br />
Chapter 2 Geodesy and Datums in Navigation<br />
Chapter 3 Nautical Charts<br />
Chapter 4 Nautical Publications<br />
Chapter 5 Short Range Aids to Navigation<br />
Chapter 6 Magnetic Compass Adjustment<br />
Chapter 7 Dead Reckoning<br />
Chapter 8 Piloting<br />
Chapter 9 Tides and Tidal Currents<br />
Chapter 10 Radio Waves<br />
Chapter 11 Satellite Navigation<br />
Chapter 12 Hyperbolic Systems<br />
Chapter 13 Radar Navigation<br />
Chapter 14 E<strong>CD</strong>IS and The Integrated Bridge<br />
Chapter 15 Navigational Astronomy<br />
Chapter 16 Instruments for Celestial Navigation<br />
Chapter 17 Azimuths and Amplitudes<br />
Chapter 18 Time<br />
Chapter 19 The Almanacs<br />
Chapter 20 Sight Reduction<br />
http://www.irbs.com/bowditch/ (1 of 2) [9/2/2004 11:10:19 PM]
Bowditch Online<br />
Chapter 21 Navigational Mathematics<br />
Chapter 22 Navigational Calculations<br />
Chapter 23 Navigational Errors<br />
Chapter 24 The Sailings<br />
Chapter 25 The Navigation Process<br />
Chapter 26 Emergency Navigation<br />
Chapter 27 Navigation Regulations<br />
Chapter 28 Global Maritime Distress and Safety System<br />
Chapter 29 Position Reporting Systems<br />
Chapter 30 Hydrography and Hydrographic Reports<br />
Chapter 31 The Oceans<br />
Chapter 32 Ocean Currents<br />
Chapter 33 Waves, Breakers, and Surf<br />
Chapter 34 Ice in The Sea<br />
Chapter 35 Weather Elements<br />
Chapter 36 Tropical Cyclones<br />
Chapter 37 Weather Observations<br />
Chapter 38 Weather Routing<br />
Glossary<br />
A B C D E F G H I JKL M N O P QR S T UVWXYZ<br />
Acronyms<br />
| Home | Mailing Lists | Bookstore | Forums | Weather | Tide Predictions | Bowditch |<br />
http://www.irbs.com/bowditch/ (2 of 2) [9/2/2004 11:10:19 PM]
The Bowditch Initiative, a project of Historic Salem, Inc., Salem, Massachusetts<br />
Home Introduction Bowditch The House The Programs<br />
P.O. Box 865, Salem, MA 01970<br />
(978) 745-0799<br />
Contact Us!<br />
Nathaniel Bowditch<br />
1773 - 1838<br />
Navigator, Astronomer, Mathematician<br />
"His fame is of the most durable kind, resting on the union of the highest genius with the most practical<br />
talents, and the application of both to the good of his fellow man."<br />
The Boston Athenaeum 1838<br />
A yearlong series of public programs and events in 2002 commemorated the<br />
200th anniversary of the publication of Bowditch's signature work,<br />
The New American Practical Navigator. Highlights included July<br />
visits to Salem by U.S. Navy and U.S. Coast Guard vessels,<br />
and the August visit by the U.S. Coast Guard, Bark Eagle.<br />
___________________________________________________________________<br />
Home Introduction Bowditch The House The Programs<br />
Site Index<br />
© Historic Salem, Inc.<br />
http://www.nathanielbowditch.org/ [9/2/2004 11:10:21 PM]
Amazon.com: Carry On, Mr. Bowditch: Explore similar items<br />
Search<br />
Browse<br />
Subjects<br />
Bestsellers<br />
Magazines<br />
Corporate<br />
Accounts<br />
e-books<br />
& docs<br />
New & Used<br />
Textbooks<br />
Used<br />
Books<br />
Search:<br />
Browse:<br />
You clicked on this item...<br />
Carry On, Mr. Bowditch<br />
by Jean Lee Latham, John O'Hara Cosgrave<br />
Average Customer Review:<br />
Out of stock<br />
60 used & new from<br />
$0.25<br />
Review<br />
"Illustrations, rich in detail, by John O'Hara Cosgrave II<br />
add authenticity and value."<br />
You may also be interested in these items...<br />
Or buy used: $0.25<br />
Customers also shopped for<br />
Show items from:<br />
All Products<br />
Books (19)<br />
DVD (6)<br />
Music (3)<br />
Software (4)<br />
The Bronze Bow<br />
by Elizabeth George<br />
Speare<br />
Johnny Tremain<br />
(Yearling Newbery)<br />
by Esther Forbes,<br />
Lynd Ward<br />
Amos Fortune<br />
by Elizabeth Yates,<br />
Nora S. Unwin<br />
Carry on Mr.<br />
Bowditch Study<br />
Guide<br />
by Carole Pelttari<br />
The Witch of<br />
Blackbird Pond<br />
(Laurel Leaf<br />
Books)<br />
by ELIZABETH<br />
GEORGE SPEARE<br />
The Trumpeter of<br />
Krakow<br />
by Eric P. Kelly<br />
http://www.amazon.com/exec/obidos/ASIN/0395137136/forumolimpico/102-4486973-5960147 (1 of 3) [9/2/2004 11:10:24 PM]
Amazon.com: Carry On, Mr. Bowditch: Explore similar items<br />
I, Juan de Pareja<br />
by Elizabeth Borton<br />
De Trevino<br />
The Wheel on the<br />
School<br />
by Meindert DeJong<br />
The Matchlock<br />
Gun<br />
by Walter Edmonds,<br />
Paul Lantz<br />
$25 Off Tools &<br />
Hardware<br />
Take $25 off<br />
when you spend<br />
$199 or more on<br />
Tools &<br />
Hardware<br />
products offered<br />
by Amazon.com.<br />
Here's how<br />
(restrictions<br />
apply).<br />
New at Amazon.com<br />
Find more<br />
than 600,000<br />
china, crystal,<br />
and silver<br />
products in<br />
the<br />
Replacements,<br />
Ltd. Store.<br />
Find sound<br />
values on<br />
instruments<br />
and gear in our<br />
new Musical<br />
Instruments<br />
Store.<br />
Where's My Stuff?<br />
• Track <strong>your</strong> recent orders.<br />
• View or change <strong>your</strong> orders<br />
in Your Account.<br />
Shipping & Returns<br />
• See our shipping rates &<br />
policies.<br />
• Return an item (here's our<br />
Returns Policy).<br />
Need Help?<br />
• Forgot <strong>your</strong> password? Click<br />
here.<br />
• Redeem or buy a gift<br />
certificate.<br />
• Visit our Help department.<br />
Search<br />
for<br />
http://www.amazon.com/exec/obidos/ASIN/0395137136/forumolimpico/102-4486973-5960147 (2 of 3) [9/2/2004 11:10:24 PM]
Amazon.com: Carry On, Mr. Bowditch: Explore similar items<br />
Your Recent History<br />
Learn More<br />
Recently Viewed Products<br />
Ocean Yachtmaster by Pat<br />
Langley-Price, Philip Ouvry<br />
Celestial Navigation for Yachtsmen by<br />
Mary Blewitt<br />
Astronomical Formulae for Calculators<br />
by Jean Meeus<br />
Astronomical Algorithms by Jean<br />
Meeus<br />
The American Practical Navigator by<br />
Nathaniel Bowditch<br />
Customers who bought items in <strong>your</strong><br />
Recent History also bought:<br />
The <strong>Sextant</strong><br />
Handbook<br />
by Bruce Bauer<br />
How to Read a<br />
Nautical Chart<br />
by Nigel Calder<br />
Visit the Page You Made<br />
Turn <strong>your</strong> past books purchases into $$$<br />
Learn more about selling at Amazon.com today!<br />
Top of Page<br />
Books Search | Browse Subjects | Bestsellers | Magazines | Corporate Accounts<br />
e-Books & Docs | Bargain Books | Used Books<br />
Amazon.com Home | Directory of All Stores<br />
Our International Sites: Canada | United Kingdom | Germany | Japan | France<br />
Contact Us | Help | Shopping Cart | Your Account | Sell Items | 1-Click Settings<br />
Investor Relations | Press Releases | Join Our Staff<br />
Conditions of Use | Privacy Notice © 1996-2004, Amazon.com, Inc. or its affiliates<br />
http://www.amazon.com/exec/obidos/ASIN/0395137136/forumolimpico/102-4486973-5960147 (3 of 3) [9/2/2004 11:10:24 PM]
NOAA's National Ocean Service: MapFinder<br />
In June 2004, the National Ocean Service<br />
(NOS) MapFinder Web site was revised and<br />
incorporated into NOS Data Explorer. This<br />
upgraded Web site uses new technologies,<br />
includes more NOS products, and features an<br />
improved user interface. MapFinder will be<br />
available through September 2004, and will<br />
then be retired.<br />
NOAA’s National Ocean Service (NOS)<br />
MapFinder service provides "one stop<br />
shopping" for images and data. MapFinder<br />
offers interactive mapping tools that allow<br />
users to locate specific products in any area<br />
in the United States and its territories, and<br />
provides immediate access to products that<br />
are available on-line. In MapFinder:<br />
● Products are offered by theme (e.g.,<br />
coastal aerial photography, coastal<br />
survey maps, environmental sensitivity<br />
index atlases, etc.).<br />
● An inventory helps locate and access<br />
the products.<br />
● Explanatory material and metadata are<br />
provided for each product theme.<br />
MapFinder no longer provides preview<br />
raster images (georeferenced digital<br />
pictures) of paper nautical charts or<br />
historical maps and charts. Click here for<br />
more information.<br />
MapFinder offers direct access to<br />
many NOS products including<br />
aerial photographs,<br />
environmental sensitivity index<br />
maps, coastal survey maps, and<br />
more.<br />
Search for Maps<br />
Using MapFinder<br />
About the Products<br />
Hydrographic Survey<br />
Estuarine Bathymetry<br />
Coastal Photography<br />
Environmental Sensitivity Index<br />
(ESI) Maps<br />
Nautical Charts<br />
Coastal Survey Maps<br />
Water Level Stations<br />
Geodetic Control Points<br />
(top)<br />
Revised August 20, 2004 | Questions, Comments? Contact Us | Report Error On This Page | Disclaimer | User Survey<br />
NOAA’s National Ocean Service | National Oceanic and Atmospheric Administration | U.S. Department of Commerce<br />
http://oceanservice.noaa.gov/mapfinder/welcome.html<br />
Best viewed in Internet Explorer 5+ or Netscape 6+.<br />
http://oceanservice.noaa.gov/mapfinder/ [9/2/2004 11:10:33 PM]
Please use https://zulu.ssc.nasa.gov/mrsid for all communication. (You will<br />
be redirected in 4 seconds...)<br />
http://zulu.ssc.nasa.gov/mrsid/ [9/2/2004 11:10:34 PM]
+ Visit NASA<br />
+ Visit Destination Earth<br />
+ Visit Stennis Space Center<br />
Scale<br />
Select Image<br />
https://zulu.ssc.nasa.gov/mrsid/ (1 of 2) [9/2/2004 11:10:38 PM]
This is the current Landsat circa 1990/2000 coverage available. Click on the map above to zoom in/out, or<br />
'Select Image' to open a new window (requires javascript) to view or d<strong>own</strong>load the Landsat scene.<br />
Please bear with us as we are experiencing increased demands on our network.<br />
GeoCover circa 1990 Product Description<br />
GeoCover circa 1990 <strong>CD</strong> Set Coverage Breakd<strong>own</strong><br />
GeoCover circa 1990 Coverage Point and Polygon Shapefiles<br />
GeoCover circa 2000 Product Description<br />
GeoCover circa 2000 Coverage Point and Polygon Shapefiles<br />
UTM Zones on World Map<br />
UTM Zone Shapefiles<br />
GeoCover Tutorial<br />
Where Is It?<br />
Help<br />
Provided through NASA's Earth Science Enterprise Scientific Data Purchase Program<br />
Produced, under NASA contract, by Earth Satellite Corporation<br />
+ Freedom of <strong>Information</strong> Act<br />
+ The President's Management Agenda<br />
+ FY2001 Agency Performance Report<br />
+ NASA Privacy Statement, Disclaimer,<br />
and Accessibility Certification<br />
+ Freedom to Manage<br />
NASA Official: Katie Wallace<br />
Curator: Gerard Ledet<br />
+ Contact ESA<br />
https://zulu.ssc.nasa.gov/mrsid/ (2 of 2) [9/2/2004 11:10:38 PM]
AltaVista - Babel Fish Translation<br />
Home › Tools › Babel Fish Translation<br />
Babel Fish Translation<br />
Translate a block of text - Enter up to 150 words<br />
Use the World Keyboard to enter accented or Cyrillic characters.<br />
Help<br />
Babel Fish Translation Tools<br />
Translate e-mails!<br />
Add translation to <strong>your</strong> personal or<br />
business site.<br />
Seamless translation plugins<br />
for MSOffice - Word, PowerPoint,<br />
Excel, Internet Explorer and Outlook!<br />
Translate a Web page<br />
Add Babel Fish Translation to <strong>your</strong> site.<br />
Tip: Click the "World Keyboard" link for a convenient method of<br />
entering accented or Russian characters.<br />
Business Services Submit a Site About AltaVista Privacy Policy Help<br />
© 2004 Overture Services, Inc.<br />
http://babelfish.altavista.digital.com/ [9/2/2004 11:10:57 PM]
AltaVista - Babel Fish Translation<br />
Home › Tools › Babel Fish Translation<br />
Babel Fish Translation<br />
Translate a block of text - Enter up to 150 words<br />
Use the World Keyboard to enter accented or Cyrillic characters.<br />
Help<br />
Babel Fish Translation Tools<br />
Translate e-mails!<br />
Add translation to <strong>your</strong> personal or<br />
business site.<br />
Seamless translation plugins<br />
for MSOffice - Word, PowerPoint,<br />
Excel, Internet Explorer and Outlook!<br />
Translate a Web page<br />
Add Babel Fish Translation to <strong>your</strong> site.<br />
Tip: If you do not want a word to be translated add a x on each side of<br />
it. Eg: I love xPinkx xFloydx<br />
Business Services Submit a Site About AltaVista Privacy Policy Help<br />
© 2004 Overture Services, Inc.<br />
http://babelfish.altavista.digital.com/babelfish/tr?&lan...ir=pt_en&urltext=HTTP://www.tecepe.com.br/nav/nav_c3.htm [9/2/2004 11:10:58 PM]
AltaVista - Babel Fish Translation<br />
Home › Tools › Babel Fish Translation<br />
Babel Fish Translation<br />
Translate a block of text - Enter up to 150 words<br />
Use the World Keyboard to enter accented or Cyrillic characters.<br />
Help<br />
Babel Fish Translation Tools<br />
Translate e-mails!<br />
Add translation to <strong>your</strong> personal or<br />
business site.<br />
Seamless translation plugins<br />
for MSOffice - Word, PowerPoint,<br />
Excel, Internet Explorer and Outlook!<br />
Translate a Web page<br />
Add Babel Fish Translation to <strong>your</strong> site.<br />
Tip: Click the "World Keyboard" link for a convenient method of<br />
entering accented or Russian characters.<br />
Business Services Submit a Site About AltaVista Privacy Policy Help<br />
© 2004 Overture Services, Inc.<br />
http://babelfish.altavista.digital.com/babelfish/tr?&lan...ir=pt_en&urltext=HTTP://www.tecepe.com.br/nav/nav_c4.htm [9/2/2004 11:10:59 PM]