CD-Sextant - Build your own sextant - Pole Shift Survival Information
CD-Sextant - Build your own sextant - Pole Shift Survival Information
CD-Sextant - Build your own sextant - Pole Shift Survival Information

You also want an ePaper? Increase the reach of your titles
YUMPU automatically turns print PDFs into web optimized ePapers that Google loves.
<strong>CD</strong>-<strong>Sextant</strong> - <strong>Build</strong> <strong>your</strong> <strong>own</strong> <strong>sextant</strong><br />
4) ...Carefully place and stick the vernier in the <strong>CD</strong> box, reading 0°00'. This means that the vernier tick A most coincide with the<br />
0° scale line. On the other side of the vernier, the 60' tick must coincide with the 59° tick in the scale.<br />
Make sure the vernier and <strong>CD</strong> scale are very close together. The vernier probably will be a little higher than the <strong>CD</strong>, and you<br />
might want to bend it d<strong>own</strong> a bit.<br />
Shades<br />
●<br />
●<br />
●<br />
●<br />
●<br />
The Sun is kn<strong>own</strong> to have destroyed many navigator retinas in the past. Extreme care must be taken while<br />
observing it, to protect <strong>your</strong> eye. This means <strong>your</strong> instrument must have a good Sun filter. I cannot guarantee<br />
that the design that follows is 100% safe. Tips:<br />
Make sure the shade is in place before observing the Sun.<br />
Avoid observing the Sun for more than a few seconds.<br />
Never stare at it directly.<br />
If you feel uncomfortable, stop the observation immediately.<br />
In this case, consider adding some more filter (i.e. one more film layer).<br />
As shades for Sun and Moon sights, I used 35 mm dark negative photography film (there is one in the end of every film roll).<br />
The negatives were mounted in slide frames. I used two layers of dark film for the Sun frame and single for the Moon. Both slide<br />
frames are removable and are attached to the instrument frame using Lego pieces. I did trim the lower edge of the slide, to make<br />
it thinner. The slide window must match the imaginary "tube" formed by the mirror edges.<br />
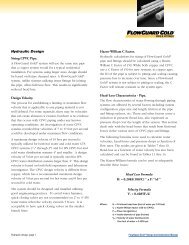
In the image to the left we have 3<br />
different shade support designs.<br />
The shade must be positioned<br />
between the two mirrors and the<br />
filter surface must be orthogonal to<br />
the line connecting both mirror<br />
centers. This is to avoid introducing<br />
a refraction error.<br />
Try to position the slide center in the<br />
line connecting the two mirror<br />
centers. The Sun observation is<br />
made by looking thru the half<br />
silvered mirror, below the shade.<br />
Trimming the mirrors<br />
For simplicity, the <strong>CD</strong>-<strong>Sextant</strong> is not equipped with screws to trim the mirrors.<br />
But the mirrors can be trimmed by inserting small sticker paper pieces between<br />
the Lego brick and plates (or by sanding the brick) at suitable positions.<br />
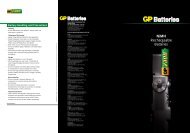
First check the angle of the <strong>CD</strong> mirror (center mirror). As you look to this mirror,<br />
the reflected <strong>CD</strong> edge must be perfectly aligned with the edge you see outside the<br />
mirror (green arrows in the image). This must hold for all directions.<br />
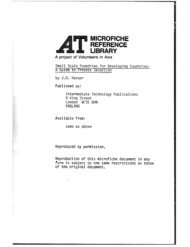
The half silvered mirror can be trimmed by setting the instrument to 0°00',<br />
aiming to a far away object and making sure the direct and reflected images<br />
coincide.<br />
After this initial trimming, the Lego bricks will hold the trimming surprisingly,<br />
even after disassembled. Of course you must read the index error after each set of<br />
observations, as with all <strong>sextant</strong>s.<br />
<strong>CD</strong> center mirror trim<br />
http://www.tecepe.com.br/nav/<strong>CD</strong><strong>Sextant</strong>Project.htm (6 of 7) [9/2/2004 11:04:32 PM]