Molluscan Research: Techniques for collecting, handling, preparing ...
Molluscan Research: Techniques for collecting, handling, preparing ...
Molluscan Research: Techniques for collecting, handling, preparing ...

You also want an ePaper? Increase the reach of your titles
YUMPU automatically turns print PDFs into web optimized ePapers that Google loves.
<strong>Molluscan</strong> <strong>Research</strong> 27(1): 1–50<br />
http://www.mapress.com/mr/<br />
ISSN 1323-5818<br />
Magnolia Press<br />
<strong>Techniques</strong> <strong>for</strong> <strong>collecting</strong>, <strong>handling</strong>, <strong>preparing</strong>, storing and examining small<br />
molluscan specimens<br />
DANIEL L. GEIGER 1 , BRUCE A. MARSHALL 2 , WINSTON F. PONDER 3 , TAKENORI SASAKI 4 & ANDERS WARÉN 5<br />
1 Santa Barbara Museum of Natural History, 2559 Puesta del Sol Road, Santa Barbara, CA 93105, USA. Email: geiger@vetigastropoda.com.<br />
2 Museum of New Zealand Te Papa Tongarewa, P.O. Box 467, 169 Tory Street, Wellington, New Zealand. Email: brucem@tepapa.govt.nz.<br />
3 Australian Museum Sydney, 6 College Street, Sydney NSW 2010, Australia. Email: winston.ponder@austmus.gov.au.<br />
4 The University Museum, The University of Tokyo, 7-3-1 Hongo, Bunkyo-ku, Tokyo 113-0033, Japan. Email: sasaki@um.u-tokyo.ac.jp.<br />
5 Department of Invertebrate Zoology, Swedish Museum of Natural History, Box 50007, SE-10405 Stockholm, Sweden.<br />
Email: anders.waren@nrm.se.<br />
Abstract<br />
Micromolluscs are small-sized molluscs (< 5 mm), and include the great majority of undescribed molluscan taxa. Such species<br />
require special <strong>collecting</strong>, sorting and <strong>handling</strong> techniques and different storage requirements to those routinely used <strong>for</strong> larger<br />
specimens. Similarly, the preparation of shells, opercula, radulae and animals poses some challenges <strong>for</strong> scanning electron<br />
microscopy (SEM). An overview of experiences with various techniques is presented, both positive and negative. Issues discussed<br />
include those relating to storage of dry specimens and interaction of specimens with glass, gelatine and paper products,<br />
<strong>handling</strong> techniques and storage in various fluids. <strong>Techniques</strong> <strong>for</strong> cleaning shells <strong>for</strong> SEM are described and compared, as well<br />
as those <strong>for</strong> radular extraction. The interactions of chemicals used <strong>for</strong> the dissolution of tissue with calcareous micromolluscs<br />
are described. Methods <strong>for</strong> <strong>handling</strong> and mounting small radulae <strong>for</strong> SEM are detailed and brief guides to SEM and light photography<br />
are given. An appendix listing details of frequently-used chemicals is provided.<br />
Key words: Review, methodology, collection, preservation, storage, museology, SEM, radula, shell, Byne's disease<br />
Introduction . . . . . . . . . . . . . . . . . . . . . . . . . . . . . . . . . . . . . . . . . 2<br />
Institutional Abbreviations. . . . . . . . . . . . . . . . . . . . . . . . . . 2<br />
Other abbreviations . . . . . . . . . . . . . . . . . . . . . . . . . . . . . . . 2<br />
The workspace . . . . . . . . . . . . . . . . . . . . . . . . . . . . . . . . . . . . . . . 2<br />
Equipment . . . . . . . . . . . . . . . . . . . . . . . . . . . . . . . . . . . . . . . . . . 5<br />
Sieves . . . . . . . . . . . . . . . . . . . . . . . . . . . . . . . . . . . . . . . . . . 6<br />
Microscope . . . . . . . . . . . . . . . . . . . . . . . . . . . . . . . . . . . . . . 7<br />
Pipettes . . . . . . . . . . . . . . . . . . . . . . . . . . . . . . . . . . . . . . . . . 7<br />
Forceps . . . . . . . . . . . . . . . . . . . . . . . . . . . . . . . . . . . . . . . . . 7<br />
Microscissors . . . . . . . . . . . . . . . . . . . . . . . . . . . . . . . . . . . . 7<br />
Scalpels. . . . . . . . . . . . . . . . . . . . . . . . . . . . . . . . . . . . . . . . . 7<br />
Pin and needle holders . . . . . . . . . . . . . . . . . . . . . . . . . . . . . 7<br />
Pins and needles . . . . . . . . . . . . . . . . . . . . . . . . . . . . . . . . . . 8<br />
Hairs . . . . . . . . . . . . . . . . . . . . . . . . . . . . . . . . . . . . . . . . . . . 8<br />
Brushes . . . . . . . . . . . . . . . . . . . . . . . . . . . . . . . . . . . . . . . . . 8<br />
Pliers. . . . . . . . . . . . . . . . . . . . . . . . . . . . . . . . . . . . . . . . . . . 8<br />
Drills. . . . . . . . . . . . . . . . . . . . . . . . . . . . . . . . . . . . . . . . . . . 8<br />
Tool sharpening . . . . . . . . . . . . . . . . . . . . . . . . . . . . . . . . . . 8<br />
Bowls . . . . . . . . . . . . . . . . . . . . . . . . . . . . . . . . . . . . . . . . . . 8<br />
Collecting . . . . . . . . . . . . . . . . . . . . . . . . . . . . . . . . . . . . . . . . . . . 9<br />
Hand <strong>collecting</strong> methods . . . . . . . . . . . . . . . . . . . . . . . . . . . 9<br />
Other methods . . . . . . . . . . . . . . . . . . . . . . . . . . . . . . . . . . 10<br />
Narcotisation and relaxation. . . . . . . . . . . . . . . . . . . . . . . . 10<br />
Wet micromolluscs. . . . . . . . . . . . . . . . . . . . . . . . . . . . . . . . . . . 11<br />
Sorting from bulk samples . . . . . . . . . . . . . . . . . . . . . . . . . 11<br />
Fixation. . . . . . . . . . . . . . . . . . . . . . . . . . . . . . . . . . . . . . . . 11<br />
Storage . . . . . . . . . . . . . . . . . . . . . . . . . . . . . . . . . . . . . . . . 12<br />
Switching storage media . . . . . . . . . . . . . . . . . . . . . . . . . . 13<br />
Boiling method. . . . . . . . . . . . . . . . . . . . . . . . . . . . . . . . . . 13<br />
Dry micromollusc shells . . . . . . . . . . . . . . . . . . . . . . . . . . . . . . 13<br />
Initial drying. . . . . . . . . . . . . . . . . . . . . . . . . . . . . . . . . . . . 14<br />
Handling. . . . . . . . . . . . . . . . . . . . . . . . . . . . . . . . . . . . . . . 14<br />
Storage . . . . . . . . . . . . . . . . . . . . . . . . . . . . . . . . . . . . . . . . 14<br />
Specimen containers. . . . . . . . . . . . . . . . . . . . . . . . . . . . . . 15<br />
Labels . . . . . . . . . . . . . . . . . . . . . . . . . . . . . . . . . . . . . . . . . 15<br />
Chemical deterioration . . . . . . . . . . . . . . . . . . . . . . . . . . . . 16<br />
Byne’s ‘disease’ . . . . . . . . . . . . . . . . . . . . . . . . . . . . 16<br />
Table of Contents<br />
Glass ‘disease’ . . . . . . . . . . . . . . . . . . . . . . . . . . . . . .16<br />
Preparation of micromollusc shells <strong>for</strong> SEM . . . . . . . . . . . . . .16<br />
Cleaning. . . . . . . . . . . . . . . . . . . . . . . . . . . . . . . . . . . . . . . .16<br />
Mounting . . . . . . . . . . . . . . . . . . . . . . . . . . . . . . . . . . . . . . .17<br />
Preventing charging . . . . . . . . . . . . . . . . . . . . . . . . . . . . . . .18<br />
SEM parameters. . . . . . . . . . . . . . . . . . . . . . . . . . . . . . . . . .18<br />
Specimen removal from stubs . . . . . . . . . . . . . . . . . . . . . . .21<br />
Separating the valves of minute bivalves . . . . . . . . . . . . . .20<br />
SEM imaging. . . . . . . . . . . . . . . . . . . . . . . . . . . . . . . . . . . .21<br />
SEM preparation of animals . . . . . . . . . . . . . . . . . . . . . . . . . . .22<br />
Preliminary inspection. . . . . . . . . . . . . . . . . . . . . . . . . . . . .22<br />
Limpets . . . . . . . . . . . . . . . . . . . . . . . . . . . . . . . . . . . . . . . .22<br />
Coiled gastropods . . . . . . . . . . . . . . . . . . . . . . . . . . . . . . . .22<br />
Opercula. . . . . . . . . . . . . . . . . . . . . . . . . . . . . . . . . . . . . . . .24<br />
Removing the shell the fast way . . . . . . . . . . . . . . . . . . . . .24<br />
Tissue preparation <strong>for</strong> SEM. . . . . . . . . . . . . . . . . . . . . . . . .24<br />
Extraction of radulae from micromolluscs . . . . . . . . . . . . . . . .26<br />
Standard method . . . . . . . . . . . . . . . . . . . . . . . . . . . . . . . . .26<br />
Maceration . . . . . . . . . . . . . . . . . . . . . . . . . . . . . . . . . . . . . .27<br />
Cleaning the radula . . . . . . . . . . . . . . . . . . . . . . . . . . . . . . .28<br />
SEM mounting of micromollusc radulae . . . . . . . . . . . . . . . . .29<br />
Orientation . . . . . . . . . . . . . . . . . . . . . . . . . . . . . . . . . . . . . .29<br />
Special techniques <strong>for</strong> small radulae . . . . . . . . . . . . . . . . . .29<br />
Very small specimens . . . . . . . . . . . . . . . . . . . . . . . . . . . . .30<br />
Manipulation of radula . . . . . . . . . . . . . . . . . . . . . . . . . . . .30<br />
Radula, histology and X-ray computer tomography . . . . . .30<br />
Optical photography . . . . . . . . . . . . . . . . . . . . . . . . . . . . . . . . . .32<br />
SLR camera (film or digital) . . . . . . . . . . . . . . . . . . . . . . . .32<br />
Stereo-microscope . . . . . . . . . . . . . . . . . . . . . . . . . . . . . . . .34<br />
Lighting . . . . . . . . . . . . . . . . . . . . . . . . . . . . . . . . . . . . . . . .34<br />
Depth of field . . . . . . . . . . . . . . . . . . . . . . . . . . . . . . . . . . .35<br />
Positioning . . . . . . . . . . . . . . . . . . . . . . . . . . . . . . . . . . . . . .35<br />
Chemicals. . . . . . . . . . . . . . . . . . . . . . . . . . . . . . . . . . . . . . . . . . .35<br />
Acknowledgements . . . . . . . . . . . . . . . . . . . . . . . . . . . . . . . . . . .35<br />
Literature Cited. . . . . . . . . . . . . . . . . . . . . . . . . . . . . . . . . . . . . .35<br />
Appendix 1. . . . . . . . . . . . . . . . . . . . . . . . . . . . . . . . . . . . . . . . . .39<br />
COPYRIGHT © 2007 MALACOLOGICAL SOCIETY OF AUSTRALASIA<br />
1
2<br />
Introduction<br />
The majority of biodiversity to be discovered and described<br />
is of small to minute size (e.g., Bouchet et al. 2002). For<br />
molluscs, that number is in the range of at least a hundred<br />
thousand (Steitz and Stengel 1984; Brusca and Brusca 2003).<br />
Bouchet et al. (2002) found that the modal size of molluscs<br />
from New Caledonia is only 3 mm in the most diverse size<br />
class of 1.9–4.1 mm, which contains a quarter of all<br />
specimens sampled. As investigators working on small sized<br />
molluscs, we have developed and assessed various<br />
<strong>collecting</strong>, sorting and <strong>handling</strong> techniques that facilitate<br />
their study. To our knowledge, there is no previous detailed<br />
and comprehensive account of working methods <strong>for</strong><br />
micromolluscs, other than a few very general discussions<br />
(e.g., Robertson 1961; McLean 1984; Kurtz 2005).<br />
We give here a summary of our joint experiences, while<br />
acknowledging that further refinement will inevitably be<br />
needed. The notes given here arise from trial and error<br />
experimentation by the authors over more than a century of<br />
professional working years. While the observations reported<br />
do not stem from controlled experiments, they provide<br />
important observational data and a starting point <strong>for</strong> future<br />
experimentation and improvements. Thus the methods<br />
presented are neither exhaustive nor foolproof. In part, our<br />
intention is also to provide guidelines that should assist<br />
others to find the most efficient methods <strong>for</strong> them and to<br />
avoid known problems. For that reason, we include<br />
discussions of failed methods and remarks on some of the<br />
problems encountered. There rarely is a single ‘best’<br />
technique <strong>for</strong> any given procedure and the techniques used<br />
by any given practitioner reflect personal preference and<br />
individual modification to some degree. Although most of<br />
the techniques described have been applied by us in marine<br />
or freshwater settings with shelled molluscs, many if not<br />
most of the techniques described here could also be applied<br />
to terrestrial shelled molluscs. However, different techniques<br />
to those given here may be necessary with shell-less species,<br />
specifically those relating to collection and narcotisation. We<br />
do not deal with methods relating to histology or<br />
transmission electron microscopy as these are well covered<br />
elsewhere. While we describe suitable equipment that can be<br />
used <strong>for</strong> dissection of micromolluscs, we do not elaborate on<br />
dissection methods and techniques.<br />
A mollusc is here considered small if the largest<br />
dimension of the animal or last whorl of the shell (if a<br />
gastropod – even if tall spired) is less than 5 mm in size. The<br />
smallest molluscs reach around 0.6 mm in adult size, but<br />
many larval or juvenile stages are smaller. While we use the<br />
term ‘micromolluscs’ <strong>for</strong> species that are less than 5 mm in<br />
maximum dimension as adults, this is clearly arbitrary.<br />
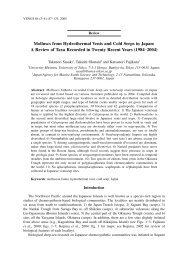
Figures 1–3 show some of the diversity of micromolluscs.<br />
Institutional Abbreviations<br />
AMS—Australian Museum Sydney, New South Wales,<br />
Australia<br />
BMNH—The Natural History Museum, London, Great<br />
GEIGER ET AL. (2007) MOLLUSCAN RESEARCH, VOL. 27<br />
Britain<br />
GNM—Natural History Museum, Gotenburg, Sweden<br />
LACM—Natural History Museum of Los Angeles County,<br />
Cali<strong>for</strong>nia, USA<br />
NHMB—Naturhistorisches Museum Berlin, Germany<br />
NMNZ—Museum of New Zealand Te Papa Tongarewa,<br />
Wellington, New Zealand<br />
NSMT—National Science Museum, Tokyo, Japan<br />
SMNH—Swedish Museum of Natural History, Stockholm,<br />
Sweden<br />
USNM—United States National Museum, Smithsonian<br />
Institution, Washington (DC), USA<br />
ZMO—The Zoological Museum, University of Oslo,<br />
Norway<br />
ZMUC—The Zoological Museum, University of<br />
Copenhagen, Denmark.<br />
Other abbreviations<br />
CPD—critical point dried.<br />
FST—Fine Science Tools (supplier of microtools).<br />
HCl—Hydrochloric acid.<br />
HMDS—Hexamethyldisilizane.<br />
KOH—Potassium hydroxide.<br />
MORIA—Microtool brand.<br />
NaOH—Sodium hydroxide.<br />
LaB 6 —Lanthanium hexaborite.<br />
LCD—Liquid crystal display.<br />
LED—Light emitting diode.<br />
OsO 4 —Osmium tetroxide.<br />
PVA—Polyvinyl acetate.<br />
PVC—Polyvinyl chloride.<br />
SCUBA—Self Contained Underwater Breathing Apparatus.<br />
SDS—Sodium lauryl sulphate.<br />
SEM—Scanning electron microscope, - microscopy, -<br />
micrograph.<br />
TEM—Transmission electron microscope, - microscopy, -<br />
micrograph.<br />
VPSE—Variable pressure secondary electron detector.<br />
The workspace<br />
Work with small molluscs is greatly facilitated by the use of<br />
proper tools. It is perhaps not as important to use exactly one<br />
model of something <strong>for</strong> a certain kind of work, but rather to<br />
be familiar with a range of tools so some alternative options<br />
are available.<br />
When working with small objects, the timing of various<br />
steps in a procedure is critical. There<strong>for</strong>e, it is important that<br />
tools and the workspace are clean and well organised. Also,<br />
as in most laboratory situations, suitable precautions should<br />
be taken when working with chemicals that are noxious,<br />
toxic, flammable and corrosive (e.g., ethanol, <strong>for</strong>malin, HCl,<br />
KOH, OsO 4 , HMDS: see Appendix, manufacturers’ Material<br />
Safety Data Sheets). In respect of these concerns, a fume<br />
hood with an extractor fan is an essential part of any<br />
laboratory space.
TECHNIQUES FOR STUDYING SMALL MOLLUSCAN SPECIMENS 3<br />
FIGURE 1. Selected SEM images of marine and freshwater micromolluscs illustrating their morphological diversity. A. Anatoma sp.<br />
(Vetigastropoda: Anatomidae). B. Sinezona n. sp. Geiger unpubl. data (Vetigastropoda: Scissurellidae). C. Emarginula sp. (Vetigastropoda:<br />
Fissurellidae). D. Biwakovalvata biwaensis (Prestion, 1916) (Heterobranchia: Valvatidae). E. Cingulina cingulata (Dunker, 1860)<br />
(Heterobranchia: Pyramidellidae). F. Spirolaxis exornatus Bieler, 1993 (Heterobranchia: Architectonicidae). G. Amathina tricarinata<br />
(Linnaeus, 1767) (Heterobranchia: Amathinidae). H. Cavolina sp. (Heterobranchia: Cavolinidae). I. Caecum gracile Carpenter, 1858, adult<br />
(Caenogastropoda: Caecidae). J. Caecum sp., juvenile (Caenogastropoda: Caecidae). K. Orbitestella sp. (Caenogastropoda:<br />
Orbitestellidae). L. Joculator ridicula (Watson, 1886) (Caenogastropoda: Cerithiopsidae). M. Microdaphnella trichodes (Dall, 1919)<br />
(Caenogastropoda: Turridae). N. Triphora sp. (Caenogastropoda: Triphoridae). O. Epitonium sp. (Caenogastropoda: Epitoniidae). P.<br />
Scaliola bella A. Adams, 1860 (Caenogastropoda: Scaliolidae). Q. Granulina sp. (Caenogatropoda: Cystiscidae). R. Parashiela sp.<br />
(Caenogastropoda: Rissoidae). S. Stosicia incisa (Laseron, 1956) (Caenogastropoda: Rissoidae). T. Barleeia sp. (Caenogastropoda:<br />
Barleeidae). U. Ringiculina doliaris (Gould, 1860) (Heterobranchia: Ringiculidae). Images: A–C, H, K–M, O, Q–R: DLG; D–G, I–J, N, P,<br />
S–U: TS; C, H, L, M, O, Q, R: kind permissions of Henry Chaney and Kirstie Kaiser.
4<br />
GEIGER ET AL. (2007) MOLLUSCAN RESEARCH, VOL. 27<br />
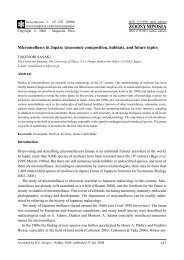
FIGURE 2. Automontage images of type specimens (NMNZ) of some New Zealand land snails (Heterobranchia: Pulmonata) (A,C,J,L:<br />
dorsal views; B,D,F,G-I,K,M,O: apertural views; E,N: ventral views). Dimensions given are the maximum diameter. A. Phenacohelix<br />
giveni Cumber, 1961, holotype, M.20254 (5.50 mm). B. Phrixgnathus murdochi Suter, 1894, holotype, M.88067 (5.60 mm). C.<br />
Flammoconcha stewartensis Dell, 1952, holotype, M.5450 (2.10 mm). D. Fectola trilamellata Climo, 1978, holotype, M.47445 (2.85 mm).<br />
E. Ptychodon takakaensis Climo, 1981, holotype, M.47451 (1.80 mm). F. Laoma spiralis Suter, 1896, syntype, M.83460 (2.90 mm). G.<br />
Cavellia oconnori Dell, 1950, holotype M.4067 (3.85 mm). H. Helix pseudoleiodon Suter, 1890, syntype M.30484 (2.50 mm). I,N.<br />
Climocella reinga Goulstone, 1996, holotype, M.129904 (3.02 mm). J. Phrixgnathus viridula caswelli Dell, 1955, holotype, M.6158 (2.38<br />
mm). K. Allodiscus austrodimorphus Dell, 1955, holotype, M.6149 (5.10 mm). L. Suteria raricostata Cumber, 1962, holotype, M.16935<br />
(6.70 mm). M. Charopa pseudocoma Suter, 1894, syntype, M.125163 (5.10 mm). O. Rhytida meesoni Suter, 1891, syntype, M.125139<br />
(11.45 mm). Images: Raymond Coory (NMNZ) and BAM.
TECHNIQUES FOR STUDYING SMALL MOLLUSCAN SPECIMENS 5<br />
FIGURE 3. Selected micromolluscs illustrating their morphological diversity. A. Nucula declivis Hinds, 1843 (Taxodonta: Nuculidae),<br />
shell length 3 mm. B. Nucula exigua Sowerby, 1833 (Taxodonta: Nuculidae), shell length 3.5 mm. C. Acila castrensis (Hinds, 1843)<br />
(Taxodonta: Nuculidae), shell length 4 mm. D. Runcina coronata (Quartefages, 1844) (Cephalaspidea: Runcinidae). Field photograph of<br />
live specimen with 28 mm lens reversed on bellows unit, illuminated with two flashes. At 8:1 magnification (animal approximately 3 mm<br />
in length) depth of field becomes very shallow. E. Colpodaspis pusilla M. Sars, 1870 (Cephalaspidea: Diaphanidae, animal approximately<br />
5 mm in length). Photograph of living animal with 50 mm macro lens on bellows unit, illuminated with two flashes. F. Cingula cingillus<br />
(Montagu, 1803) (Caenogastropoda: Rissoidae) photographed in the field with bellows unit, extension ring, 50 mm macro lens, flash<br />
illuminated. Shell length approximately 3 mm. Some blurring is apparent due to excessive closure of the diaphragm (f/11, fmax = f/4). G.<br />
Julia sp. (Ascoglossa: Juliidae). Animal approximately 5 mm long. H. Murchisoniella sp. (Heterogastropoda: Pyramidellidae). 3 mm. I.<br />
Discrevinia sp. (Caenogastropoda: Pickworthidae). Shell 2 mm long. J. Moerchinella sp. (Heterobranchia: Pyramidelloidea). Shell 1.8 mm<br />
wide. K. (Caenogastropoda: aff Vitrinellidae). Shell 1.3 mm long. L. Gibberula sp. (Caenogastropoda: Cystiscidae). Shell 2.5 mm long.<br />
Images: A–C: DLG, courtesy Paul Valentich-Scott; D–F: DLG; G–L: AW (courtesy Panglao 2004 Workshop/Philippe Bouchet).<br />
Equipment<br />
Important considerations include:<br />
• Keep tools clean and properly stored, to prevent<br />
damage to their delicate tips.<br />
• A glass jar with paper on the bottom is good <strong>for</strong> storing<br />
pipettes.<br />
• Fine paint brushes should be stored under cover in a jar,<br />
with their handles resting on the bottom, to avoid dust<br />
accumulation and de<strong>for</strong>mation of the hairs.
6<br />
GEIGER ET AL. (2007) MOLLUSCAN RESEARCH, VOL. 27<br />
• Use some kind of rack or stand to keep them available<br />
and ready <strong>for</strong> use.<br />
• Micro-pipette tips used in molecular biology (100–<br />
1000 µl) make excellent tip and needle protectors.<br />
• Preferably use tools made of material that will not<br />
deteriorate quickly in salt water (e.g., stainless steel).<br />
• For microscope work, a com<strong>for</strong>table seat of the correct<br />
height is essential. For fine manipulation, steady your<br />
body by resting your elbows and wrists on the table, use<br />
the back support of your chair, and place your feet<br />
firmly on the ground. Consider breathing rhythm as it<br />
moves the ribcage and arms.<br />
• Keep equipment clean to avoid deterioration and<br />
contamination.<br />
There are a number of suppliers of suitable equipment<br />
who can also offer useful in<strong>for</strong>mation (e.g., http://www.<br />
finescience.com; http://www.mccronemicroscopes.com). We<br />
do not illustrate most of the readily available tools, only<br />
those that are custom made or enlarged views ordinarily not<br />
shown (Fig. 4).<br />
Sieves<br />
For a more efficient examination of samples containing<br />
a large proportion of sediment, the residues should be<br />
divided into size fractions by using graded sieves (e.g., 10, 5,<br />
2.5, 1.0 and 0.4 mm mesh size). If one wants all specimens,<br />
including larval shells, 100 µm mesh is needed, while <strong>for</strong> all<br />
adult species 0.4 mm is suitable. Fractions larger than 5 mm<br />
can be examined with the naked eye. For 5–2 mm a low<br />
power magnifier can be used, although a stereomicroscope is<br />
preferable and gives a better yield as untypical molluscs are<br />
more easily recognised. For smaller fractions a<br />
stereomicroscope is essential. Commercially made sieves<br />
and even shakers <strong>for</strong> banks of sieves are available, or screens<br />
can be constructed from various sizes of wire mesh (Fig.<br />
4H). Sieves can also be made by using short pieces of PVCpipe,<br />
50–250 mm diameter (Fig. 4G). A piece of metal<br />
(preferably stainless steel) mesh slightly wider than the pipe<br />
can be placed on a piece of aluminum foil on a hot plate and<br />
the pipe pushed down on it until the end of the pipe starts to<br />
melt. At that point, put it on a cold surface, still with some<br />
pressure, so the net does not separate from the soft plastic.<br />
Trim off any surplus net and grind the edge to remove any<br />
free wires. Instead of a net, a per<strong>for</strong>ated sheet of stainless<br />
steel can be used. It is a little more difficult to work with but<br />
makes very sturdy sieves that are less readily clogged.<br />
For fieldwork, collapsible nets with a fine mesh<br />
(
TECHNIQUES FOR STUDYING SMALL MOLLUSCAN SPECIMENS 7<br />
Microscope<br />
A good-quality dissecting microscope is essential. A<br />
minimum magnification of 50x is desirable. In general, those<br />
with stepped magnifications have better optical quality than<br />
those with zooms. For illumination, traditional focusable<br />
light sources, halogen fibre optic, or light emitting diode<br />
(LED) lights can be used. The traditional lights can often be<br />
more precisely positioned and a greater working distance can<br />
be achieved because the lights can be focused, unlike<br />
standard fibre optic lights, allowing more freedom to<br />
manipulate objects. On the other hand, fibre optics lights<br />
have a higher light output and optional focus attachments are<br />
available. LED lights are similar to fibre optics, though a<br />
little weaker. They are particularly useful <strong>for</strong> field work due<br />
to being lightweight and in having long-lasting bulbs. A<br />
substage illuminator, a tiltable mirror, or a dark-field base<br />
can be helpful when searching <strong>for</strong> radulae in maceration<br />
solution (see below). The base of the microscope can be<br />
mounted in a hole in the working plat<strong>for</strong>m (bench or desk),<br />
so that the surface area of the microscope is level with the<br />
remainder of the desk.<br />
Pipettes<br />
Pasteur pipettes of glass with a rubber bulb are useful;<br />
the diameter of the tip can be adjusted by cutting. Disposable<br />
Pasteur pipettes of polyethylene do not deteriorate and can<br />
easily be cut to tip diameters of up to 5–6 mm. Pipettors<br />
(Eppendorf and similar brands) used in molecular biology<br />
are considered by some to be bulky and difficult to<br />
manoeuvre when used under a microscope, while others like<br />
their precise flow control. There are also devices that<br />
produce a constant vacuum on a very small bore to pick up<br />
specimens which are released when the vacuum is broken<br />
(Hemleben et al. 1988).<br />
For a pipette to <strong>for</strong>m very small droplets (e.g., <strong>for</strong><br />
radular work), use a commercially available disposable<br />
pipette tip <strong>for</strong> µl work; insert it in a fitting polyethylene tube<br />
50–80 mm long and seal the other end (Fig. 4E). The<br />
stiffness of the polyethylene tube gives better control over<br />
the quantity delivered. A ‘home-made’ capillary glass-tube<br />
can also be used as a tip.<br />
Forceps<br />
There are five main types of <strong>for</strong>ceps used <strong>for</strong> work with<br />
micromolluscs.<br />
1. Entomology <strong>for</strong>ceps. Made of thin spring steel, they are<br />
available with a variety of tip designs, which can be<br />
further adapted using a sharpening stone. Some users<br />
find they have good <strong>handling</strong> properties with a reduced<br />
risk of breaking fragile specimens while others find that<br />
the tips do not meet exactly, or are too slippery. With<br />
inexperienced users, specimens, especially smoothshelled<br />
gastropods, can be catapulted some distance.<br />
2. Watchmaker’s <strong>for</strong>ceps are available with very fine tips.<br />
Many qualities and shapes of tips are available ranging<br />
from the expensive straight MORIA MC-40 model<br />
which has the finest tips currently available and is made<br />
of stainless steel. There are a wide range of similar,<br />
cheaper models available. Watchmaker’s <strong>for</strong>ceps are<br />
most suited <strong>for</strong> anatomical and radular work, but with<br />
practice they can also be used <strong>for</strong> routine sorting,<br />
including <strong>handling</strong> fragile specimens.<br />
3. So-called ‘Iris <strong>for</strong>ceps’. These very soft <strong>for</strong>ceps have a<br />
rather broad tip (<strong>for</strong> example, the MORIA MC-32 or<br />
32B has a tip of ca 0.8 mm), which can be either<br />
smooth or serrated. These <strong>for</strong>ceps are excellent <strong>for</strong><br />
<strong>handling</strong> specimens 5–10 mm and smaller. The shape of<br />
the tip can be easily modified with a file or sharpening<br />
stone. They are almost as soft as entomology <strong>for</strong>ceps,<br />
but less flimsy.<br />
4. Stub <strong>handling</strong> <strong>for</strong>ceps. There are two basic types <strong>for</strong><br />
<strong>handling</strong> SEM stubs; one made <strong>for</strong> <strong>handling</strong> Cambridge<br />
stubs, by holding it in a track in the edge and another<br />
designed <strong>for</strong> gripping the pin of all 1/8” pin stubs.<br />
Grind the tips of the <strong>for</strong>mer so they become more<br />
slender <strong>for</strong> a less tight fit in the groove and of the latter<br />
to a finer point so they can be more easily inserted<br />
under the stub. The Cambridge stub <strong>for</strong>ceps can be<br />
modified to have narrower and less curved tips.<br />
5. Bamboo <strong>for</strong>ceps (Fig. 4D). One of us (TS) makes<br />
<strong>for</strong>ceps from two pieces of bamboo. The tips of the<br />
bamboo pieces are shaped with a knife and sand paper,<br />
which can be accomplished in a relatively short time.<br />
Bamboo is softer than steel and is suitable <strong>for</strong><br />
manipulation of fragile specimens and anatomical<br />
manipulations.<br />
Microscissors<br />
Microscissors come in a variety of models and a wide<br />
price range. Spring loaded scissors are suitable in many<br />
instances, which can be complemented with a couple of<br />
cheap, slightly larger ones <strong>for</strong> standard work. For particularly<br />
delicate work, a pair of extra fine ones (e.g., MORIA extra<br />
fine) can be useful. They come with various tip<br />
configurations (pointed, blunt, angled) and are rather delicate<br />
and expensive.<br />
Scalpels<br />
Scalpels with a fixed blade are not recommended as<br />
they need re-sharpening, are expensive and corrode easily.<br />
The common types with a flat metal handle and disposable<br />
blades are suitable <strong>for</strong> most purposes. There are many<br />
different blades available; microsurgery scalpels (e.g., FST<br />
10315-12) are excellent <strong>for</strong> opening very small bivalves and<br />
any other work where regular scalpels are too large. A cheap<br />
and very good alternative is to use a needle holder to hold a<br />
broken piece of razor blade (see below). Different brands of<br />
razor blades break in different ways.<br />
Pin and needle holders<br />
These come in different sizes and materials, some<br />
having a small chuck that will hold the finest needles. The<br />
handles vary (diameter, shape and texture) to suit different<br />
preferences and can be colour coded <strong>for</strong> easy identification<br />
of the various needles. Dismantle and clean the needle holder
8<br />
after it has been immersed in corrosive chemicals. Needles,<br />
pins or razor blade fragments can be glued or otherwise<br />
attached to tooth picks or other wooden sticks. Heated<br />
needles can be pushed into thin wooden strips or perspex/<br />
plexiglass rods, but the heating makes the metal more<br />
sensitive to corrosion.<br />
Surgical needle holders are useful <strong>for</strong> holding small<br />
needles, pieces of a razor blade (or anything else thin or flat).<br />
There are also special ‘blade holders’ available <strong>for</strong> this<br />
purpose.<br />
Pins and needles<br />
Needles are probably the most important piece of<br />
equipment <strong>for</strong> radular and many other micromollusc<br />
applications. The finest and most expensive needles are<br />
made from electrolytically etched tungsten wire (USD/Euro<br />
5–10 each) with a 1 µm point (Fig. 4C). These can also be<br />
made using tungsten wire and suitable equipment (Hubel<br />
1957). Their points can easily be de<strong>for</strong>med, which is<br />
sometimes an advantage <strong>for</strong> certain types of manipulation.<br />
Micro-pins used to pin small insects come in black or<br />
stainless steel and in diameters from 0.1 to 0.2 mm. The<br />
stainless steel needles are less prone to rust and the thicker<br />
ones are stiffer but less pointed, with much variation in the<br />
shape and quality of the point. The black steel pins are<br />
sensitive to rust (Fig. 4B) although their life is prolonged by<br />
rinsing and drying after use. Household pins are much<br />
blunter and thicker but are often made of chromium plated<br />
brass and are less sensitive to chemicals. Sewing needles are<br />
made of chromium plated steel, available in many sizes and<br />
can be useful <strong>for</strong> work on larger specimens (Fig. 4A). Most<br />
of the ready-made needles <strong>for</strong> surgical use are inferior to<br />
micro-pins and much more expensive.<br />
All metal needles or pins can be bent by holding the<br />
very tip with a pair of watchmaker’s <strong>for</strong>ceps and bending the<br />
outermost fraction of a mm to a suitable angle. This tool is<br />
useful <strong>for</strong> moving radulae from one rinse to the next (see<br />
below). Such needles, including those with a minute hooklike<br />
end, are also valuable <strong>for</strong> dissecting. A needle with its<br />
point bent at 45° is excellent <strong>for</strong> picking small single valves<br />
of small bivalves; turn the shell so the concavity is up and<br />
‘hook’ the valve under the hinge. Needles with a 60° bent<br />
point are good <strong>for</strong> pulling the animal out of coiled shells. The<br />
needle point is inserted along the wall of the shell, then the<br />
point rotated to hook the animal.<br />
Hairs<br />
For cleaning dust particles from mounted radulae it is<br />
often better to use hairs (rather than a pin) glued to a small<br />
handle of wood or inserted into a holder. Eyebrow hairs (if<br />
straight) and eyelashes are commonly used but some animal<br />
hairs such as the pointed and stiff whiskers of a cat make<br />
very good tools. The stiffness of hairs decreases with<br />
increasing length of the hair.<br />
Brushes<br />
One centimetre wide brushes are useful <strong>for</strong><br />
manipulating dry samples while the finest brushes can be<br />
GEIGER ET AL. (2007) MOLLUSCAN RESEARCH, VOL. 27<br />
used <strong>for</strong> manipulating individual specimens. The diameters<br />
of brushes are graded, with ‘0000’ being the finest, and may<br />
be made of either synthetic fibre or natural hair. Synthetic<br />
fibre is chemically more resistant, can be used with bleach<br />
and hydroxides used in radular extraction and are usually a<br />
little stiffer. Natural hairs are often better <strong>for</strong> picking up<br />
small shells but are more expensive. It may be necessary to<br />
shape the tip, or to increase the stiffness of the brush by<br />
shortening the hairs. Many fine paintbrushes have one or a<br />
few much thicker and stiffer hairs to act as a support <strong>for</strong> the<br />
others. These can be cut off to avoid the risk of specimen<br />
damage if the brush is used <strong>for</strong> cleaning.<br />
Pliers<br />
The smallest sizes of regular tool pliers are useful <strong>for</strong><br />
cracking and opening small shells. Locking vice grip pliers<br />
will prevent the specimens being crushed. For most<br />
microshells, dissolving the shell is a better method (see<br />
below). Wire cutters <strong>for</strong> electronic use come with a variety of<br />
cutting edges, pointed, blunt, straight, angled, etc. and some<br />
are made of stainless steel. These are good <strong>for</strong> opening<br />
medium-sized (>5 mm) shells from the aperture, by breaking<br />
the outer lip. For cutting steel needles, use wire cutters with<br />
tungsten carbide edges. Watchmakers <strong>for</strong>ceps can be used <strong>for</strong><br />
cracking very small shells (see below <strong>for</strong> details).<br />
Drills<br />
Some power tools resembling a dentist’s drill have a<br />
flex-shaft attachment and a variety of rotary tool bits,<br />
engraving cutters and high-speed cutters that can be used to<br />
open shells with minimal damage. Drill bits are available<br />
down to about 0.7 mm diameter and can be used <strong>for</strong> grinding<br />
a hole of >0.7 mm diameter in the back of the shell. A hole<br />
can be made in thin-shelled species simply by scratching the<br />
shell with a needle.<br />
Tool sharpening<br />
A few different types of very small files <strong>for</strong> jewellery<br />
work are useful, both <strong>for</strong> keeping other tools in shape and <strong>for</strong><br />
filing holes in 3–5 mm (or larger) shells. Files rust easily so,<br />
if in contact with seawater, they need to be rinsed with hot<br />
fresh-water and wiped dry.<br />
For the rough shaping of coarser tools, a bench grinder<br />
with as fine a wheel as possible can be used. For more<br />
detailed work use fine sand- or carborundum paper or<br />
sharpening stones. For the final sharpening of <strong>for</strong>ceps and<br />
needles, use a fine-grained stone such as ‘Arkansas Stone’<br />
(see also http://www.antiquetools.com/sharp/sharphistory.<br />
html). With some practice, a good point can be achieved <strong>for</strong><br />
watchmakers and some other <strong>for</strong>ceps. Start with (if<br />
necessary) roughly bending the tips so they are parallel, then<br />
grind them off to the same length and start sharpening on a<br />
fine carborundum stone. The final grinding is done on an<br />
Arkansas stone, by moving it back and <strong>for</strong>th in the direction<br />
of the points. The finishing should be done under a<br />
stereomicroscope <strong>for</strong> better control.
TECHNIQUES FOR STUDYING SMALL MOLLUSCAN SPECIMENS 9<br />
Bowls<br />
There are two types of bowls that we find particularly<br />
useful <strong>for</strong> working on microscopic animals. Square, solid<br />
glass bowls (‘embryo-bowls’), ca 40 x 40 x 15–17 mm are<br />
ideal. Use a square piece of glass cut to the same size as a lid.<br />
The sides of the ‘bowl’ slant at an angle, so nothing is<br />
concealed by a meniscus. They are easy to handle since the<br />
outer sides are straight and allow a good grip, as opposed to<br />
watch glasses. The lid usually stops evaporation, but some<br />
can have irregularities that prevent a tight closure.<br />
Depression slides (concavity slides) are available with<br />
different sized depressions. Those with a depression about<br />
18 mm diameter and 2.5 mm depth are good <strong>for</strong> cleaning<br />
smaller radulae. As a lid, another depression slide with a<br />
larger diameter depression can be used upside down. If a<br />
regular flat glass slide or coverslip is used as a lid when<br />
heating KOH in radular preparation, condensation will <strong>for</strong>m<br />
on the glass of the lid above the fluid, which will finally<br />
connect with the fluid in the depression and may draw it and<br />
the radula into the capillary space between the slides. The<br />
larger ‘dome’ above solves this problem.<br />
Larger dishes useful <strong>for</strong> sorting are discussed below.<br />
Collecting<br />
Field collection of micromolluscs requires some specialised<br />
techniques. Most micromolluscs are difficult to see with the<br />
unaided eye and usually cannot be identified in the field<br />
without magnification, making targeted <strong>collecting</strong> <strong>for</strong> a<br />
particular species difficult. Thus the likely habitats of the<br />
target organisms, or a range of microhabitats in the case of<br />
surveys, usually need to be sampled.<br />
The <strong>collecting</strong> methods covered below are simple<br />
techniques that require minimal equipment and can be<br />
undertaken by hand in intertidal and other shallow-water<br />
aquatic systems. The process of obtaining small specimens is<br />
not limited to intertidal and SCUBA as the same or similar<br />
methods can be used on a larger scale as, <strong>for</strong> example, with<br />
samples collected by various remote-sampling devices such<br />
as dredges, trawls, epibenthic sledges or grabs. In such cases,<br />
equipment (such as sieves and containers) needs to be<br />
scaled-up. In order to obtain a representative collection, a<br />
range of techniques should be employed.<br />
The choice of the final volume of the sample, and the<br />
number of samples, depends on the question to be answered.<br />
Small samples of 50–100 ml will reveal the dominant species<br />
whereas samples of 10 litres and more may still miss rare<br />
species (rarefaction effect).<br />
All <strong>collecting</strong>, domestic or <strong>for</strong>eign, should be<br />
conducted under appropriate and applicable permits.<br />
However, because microscopic species cannot usually be<br />
collected in a targeted fashion and substrate sampling is<br />
essential, this needs to be appropriately covered. Some<br />
authorities do not provide the option <strong>for</strong> substrate collection<br />
and require a priori list of species and numbers of specimens<br />
to be collected. These issues are best dealt with on a case by<br />
case basis.<br />
Hand <strong>collecting</strong> methods<br />
Shell grit. Sediments are usually distributed nonuni<strong>for</strong>mly.<br />
Some areas accumulate organic material and<br />
biogenic carbonates. These shell-rich portions of the<br />
sediment are often referred to as shell grit or shell sand. They<br />
can simply be scooped up and processed like any other<br />
sediment samples. They usually have mainly empty shells<br />
and sometimes can be the only source of certain species.<br />
The fine sand can be removed from these samples in<br />
situ by washing it in a sieve or moderately fine mesh bag<br />
(Fig. 4F). While the bag method works well <strong>for</strong> the larger<br />
micromolluscs, it will lose many of the smaller species.<br />
Algal samples. Algae are a habitat of many molluscs,<br />
those with large fronds usually having fewer (but often<br />
different) individuals and taxa than the heavily branched or<br />
foliose species, such as many of the turfing algae. Kelp<br />
holdfasts can also harbour different species. Certain molluscs<br />
are found only on particular algae; <strong>for</strong> instance, sacoglossans<br />
are generally found on green algae (Chlorophyta). In (ant-)<br />
arctic waters, larger algal species harbour many<br />
micromolluscs, particularly in holdfasts. Large algae such as<br />
Laminaria sp. may lose their blades seasonally, thus at most<br />
a single season of micromolluscs can be encountered on the<br />
blade, while the holdfast may contain several seasons’ worth<br />
of fauna. Algae can be processed on site or collected <strong>for</strong> later<br />
processing; larger algal species can be placed in a bucket,<br />
smaller species may fit into a ‘zip-lock’ bag. The most<br />
durable freezer zip lock bags with slider closure mechanism<br />
are also suitable <strong>for</strong> SCUBA <strong>collecting</strong>. One litre of algal<br />
volume <strong>for</strong> turfing species usually produces a representative<br />
sample.<br />
The method of extraction of the molluscs from algal<br />
samples removed from the habitat depends in part on the<br />
intended use of the specimens. They can be extracted alive<br />
(using a binocular microscope) <strong>for</strong> observations on living<br />
material or to extract specimens <strong>for</strong> special fixation.<br />
For bulk collection, the simplest technique is to<br />
vigorously wash algae on the shore in a bucket or bowl filled<br />
with seawater. The algal material is then removed and the<br />
sample allowed to settle briefly. The water can then be gently<br />
decanted, being run through a sieve to catch any floating<br />
molluscs (e.g., opisthobranchs). Such samples are ideal <strong>for</strong><br />
<strong>collecting</strong> living specimens <strong>for</strong> later examination. More<br />
thorough washing can be carried out by vigorously shaking<br />
algae in a 0.5–1 litre jar half filled with water from the<br />
environment and with a tightly fitting lid. Samples may also<br />
be pre-treated with an irritant or narcotic (see below) to<br />
ensure that tenacious specimens are released from their<br />
substrate.<br />
Leaves and other litter. Rich organic material provides<br />
molluscan habitats particularly in mangrove and other upper<br />
littoral and supralittoral habitats as well as terrestrial<br />
habitats. Mangrove litter can be washed as <strong>for</strong> algae and is<br />
ideal <strong>for</strong> <strong>collecting</strong> e.g., small ellobiids, truncatellids and<br />
assimineids.<br />
Rock washing. Smooth rocks may be hand-washed<br />
with bare hands in a bucket. Byssally attached bivalves,<br />
limpets, chitons and opisthobranch may be tenacious and
10<br />
require some assistance to dislodge. The upper and<br />
undersides of rocks are very different environments; algal<br />
films or turf usually cover the upper sides, while colonial<br />
animals such as sponges, tunicates and bryozoans usually<br />
live beneath the rocks along with their specialised<br />
carnivores.<br />
Sculptured rocks or large pieces of dead coral can be<br />
scrubbed with a brush (e.g., 9 x 25 cm oval brushes or a<br />
round brush about 5 cm in diameter are effective). When the<br />
rocks are lifted out of the water, they can be brushed in a<br />
bucket. The residue in the bucket, particularly from coral<br />
washings, may harbour potentially dangerous animals so<br />
care is required.<br />
Rocks buried in sediment often have an anoxic,<br />
blackish or rusty underside; certain molluscs occur almost<br />
exclusively just at the oxic – anoxic border (e.g.,<br />
phenacolepadids, some rissooideans, marine valvatoideans<br />
and galeommatoideans).<br />
Rock brushing while using SCUBA is best<br />
accomplished within a cloth bag—a pillowcase is ideal—or<br />
in a plastic laundry basket with a plankton net lining. The<br />
rock is placed into the container and brushed within it from<br />
above with the specimens mostly falling into the container—<br />
although opinions differ as to how many specimens float off<br />
rather than sink into the tub. Alternatively, the rocks can be<br />
collected underwater and placed, with as little disturbance as<br />
possible, into a large bucket or cloth bag attached to a buoyline.<br />
The container can then be hauled slowly to the surface<br />
by the boat crew and the rocks can then be scrubbed as<br />
described above, minimising the risk of losing specimens.<br />
Other methods<br />
Hasegawa (2004) and Hickman and Porter (2007)<br />
recently reported the collection of samples of Scissurellidae<br />
using floating light traps. The use of attractants (light, bait)<br />
may be worth exploring, particularly <strong>for</strong> micro scavengers<br />
and predators.<br />
Small grab samplers (e.g., Petite-Ponar, Wildco, NY,<br />
USA: www.wildco.com), have been used <strong>for</strong> the collection<br />
of micromolluscs (Geiger 2006a). At 14 kg weight it is<br />
transportable as luggage on commercial airplanes and can be<br />
deployed and recovered by hand from a small boat by a<br />
single person. Sampling beyond normal SCUBA depth to<br />
220 m has been achieved (B. Raines, pers. comm.) and,<br />
unlike a dredge or benthic sledge, it requires line only as long<br />
as the sampling depth, and recovers even the smallest species.<br />
However, the sampling area is very small (15 x 15 cm).<br />
Air-lift pumps can be used as a very effective way of<br />
sampling both hard surfaces and substrate and are also a<br />
means of obtaining, with careful and targeted use, large<br />
quantities of living specimens (e.g., Bouchet et al. 2002).<br />
Dredging and benthic sledge can provide significant<br />
amounts of material and sample a larger area than either grab<br />
or air-lift pump. The benthic sledge is advantageous as it<br />
only skims the top surface where most micromolluscs are<br />
found, but infaunal taxa will largely be missed.<br />
Some taxa are commensals or parasites and their hosts<br />
GEIGER ET AL. (2007) MOLLUSCAN RESEARCH, VOL. 27<br />
need to be examined—<strong>for</strong> example Eulimidae on and in<br />
echinoderms, pyramidellids on other molluscs, Epitoniidae<br />
on Actinaria, Aeolidioidea and Solenogastres on Hydrozoa,<br />
and Doridoidea on sponges and bryozoans.<br />
Methods of <strong>collecting</strong> terrestrial micromolluscs include<br />
sorting leaf litter and soil samples, beating foliage and<br />
carefully examining specific habitats—bark, rocks, crevices,<br />
logs etc.<br />
Narcotisation and relaxation<br />
The procedures and concentrations <strong>for</strong> narcotising<br />
animals vary greatly, except <strong>for</strong> magnesium salts, where an<br />
isotonic solution (7.5% in freshwater) must be used in order<br />
not to disturb the osmotic balance of the animals. It is<br />
recommended that as few narcotising agents as possible<br />
(including water, cold and heat) be used and users should<br />
aim to get to know them well.<br />
There are two main reasons <strong>for</strong> narcotising animals:<br />
• To facilitate and improve the yield of shake samples.<br />
• To relax animals <strong>for</strong> detailed studies.<br />
The first is somewhat simpler, as it is acceptable if the<br />
animal retracts into the shell or curls up. An irritant such as a<br />
small quantity of <strong>for</strong>malin, a small amount of detergent, or<br />
some freshwater <strong>for</strong> marine and estuarine species can be<br />
added to the sample. Many molluscs will retract into their<br />
shells but remain alive. Limpets and chitons may not<br />
necessarily fall off unless such a method is employed, but<br />
non-shelled molluscs may be adversely affected. If<br />
specimens are intended <strong>for</strong> histology, non-isosmotic<br />
treatment is best avoided. A secondary shake in water with<br />
the irritant after an initial shake in habitat water may produce<br />
additional species in a sample. Note that byssally attached or<br />
cemented bivalves (e.g., Mytilidae, oysters) and some<br />
limpets can usually not be reliably collected other than by<br />
physically removing them.<br />
The whole sample may be pre-treated with magnesium<br />
chloride to anaesthetise the animals (75 g MgCl 2 per 1 litre<br />
of freshwater).<br />
The algae may also be placed in a closed bag in full<br />
sunlight so that heat stress will kill the animals, or <strong>for</strong><br />
tropical samples, cooling in the fridge or freezer will have<br />
the same effect. In these cases, a single shake per subsample<br />
will be sufficient to extract the vast majority of the<br />
specimens.<br />
Relaxation of animals <strong>for</strong> soft-part studies needs to be<br />
more controlled and depends on the particular species in<br />
question. The most common method is by gradual addition<br />
of a 7.5% MgCl 2 solution in freshwater to the holding<br />
container. Various molluscs respond differently to<br />
magnesium chloride; some will hardly be affected while<br />
others may immediately retract into the shell. Gradual<br />
addition of the narcotic produces the most satisfactory<br />
results. Introduce the solution away from the animal and<br />
gently stir the water. Wait a few minutes and watch how the<br />
animal reacts. Once the extended animal has stopped
TECHNIQUES FOR STUDYING SMALL MOLLUSCAN SPECIMENS 11<br />
moving, wait a little longer, possibly add a little more salt<br />
solution as an overdose and then gently touch the animal<br />
with a brush. Watch carefully <strong>for</strong> even the slightest<br />
movement (especially on the tentacles if a gastropod). Once<br />
the animal has completely ceased to move, transfer it to the<br />
fixative of choice.<br />
The second most common narcotic is low temperature.<br />
Place the specimens in the fridge and wait till the animals<br />
have completely stopped any movement.<br />
Sea slugs are often difficult to narcotise as they will<br />
frequently autotomise cerata and evert their genitalia. Both<br />
MgCl 2 as well as low temperature work sometimes either<br />
alone or combined, but with a significant failure rate.<br />
Experimentation with other invertebrate narcotics such as<br />
drop-wise addition of ethanol, sprinkling of menthol crystals,<br />
diethyl ether, lithium salts, de-oxygenated (boiled) water,<br />
carbon dioxide, tobacco, MS222 and various barbiturates<br />
may prove advantageous (see Appendix 1).<br />
Wet micromolluscs<br />
Wet specimens <strong>for</strong> anatomical study may be stored in a<br />
variety of preservatives, whereas <strong>for</strong> molecular work strong<br />
(>95%) ethanol or freezing in liquid nitrogen at -190ºC are<br />
the best preservatives. The particular fluid medium (e.g.,<br />
water, ethanol, <strong>for</strong>malin, glutaraldehyde) has little effect on<br />
the mechanics of the <strong>handling</strong> techniques. However, the<br />
different media present various health and safety concerns<br />
(see Appendix 1). Live sorting (following sieving in<br />
seawater) enables observation of living specimens,<br />
microphotography (Fig. 4) and/or the use of special<br />
relaxation and/or fixation methods <strong>for</strong> individual taxa.<br />
Sorting from bulk samples<br />
Wet bulk samples containing significant amounts of<br />
plant or algal material will turn acidic very quickly so require<br />
extra buffering (see below) and should be sorted as quickly<br />
as possible. Proper preparation of a sample can significantly<br />
increase the efficiency of sorting. Preparation falls into two<br />
main categories, separation by elutriation and sieving.<br />
• Elutriation—carefully floating off lighter matter such as<br />
plant material and silt while the shelled molluscs<br />
remain in the bottom of the container. As a more<br />
sophisticated alternative, flush water with a hose or<br />
pipe from the bottom end of a tall transparent cylinder<br />
holding the sediment. The water flow, which must be<br />
carefully regulated, will start carrying off all debris.<br />
When the water flow is increased, initially soft animals<br />
and light shells are carried away and collected in a sieve<br />
and, finally, only mineral particles remain. Elutriation<br />
and flotation always give better results if the size range<br />
of the particles is narrow, e.g., 0.4–1 mm or 2–5 mm.<br />
• Sieving—necessary because it is easiest to sort samples<br />
that contain significant quantities of sediment if the<br />
particle size is homogeneous. Sieving through a series<br />
of screens (see Tools section above) can achieve this.<br />
The finest fraction, which may contain larval shells and<br />
juveniles and occasionally very small-sized adults,<br />
should be checked using a microscope be<strong>for</strong>e being<br />
discarded.<br />
All but the largest fractions of micromollusc samples<br />
should be sorted under a stereomicroscope. Sorting<br />
techniques vary considerably and we describe here a few<br />
methods that have proven reliable. In general, when sorting<br />
specimens, it is better to work with too small a subsample<br />
than one that is too large. Dishes made of any material<br />
chemically resistant to the medium are suitable, including<br />
those made of plastic. Petri dishes (glass or plastic) are ideal;<br />
lids of rectangular polystyrene boxes are even better since it<br />
is easier to keep track of what has been sorted, particularly<br />
those with slanting sides, where it is easier to both see and<br />
grab specimens close to the side. As a high-end option, black<br />
metal sorting trays, with or without rulings, used to sort<br />
<strong>for</strong>aminiferans are available from a few suppliers (e.g.,<br />
Green Geological Supplies: http://www.geocities.com/<br />
greengeology). Even cheaper, small tartlet or pie pans are<br />
available in specialty kitchen stores. The viewing<br />
background should be in a contrasting colour, black being<br />
suitable in most instances.<br />
In one approach, a sorting dish is covered with a single<br />
layer of particles. Round dishes make the even distribution of<br />
particles easy, whereas square dishes are more easily<br />
searched systematically. Swirling motion concentrates the<br />
particles in the centre of the dish, whereas back and <strong>for</strong>th<br />
motion moves material towards the periphery.<br />
Alternatively, a small amount of either wet or dry<br />
material is placed in the centre of a round glass Petri dish and<br />
spread into an elongate pile approximately 5 cm long.<br />
Starting at a face of the pile, spread small amounts at a time.<br />
<strong>Techniques</strong> <strong>for</strong> picking up specimens depend on the<br />
type of specimens and personal preference/experience. Three<br />
types of <strong>for</strong>ceps are commonly used: watchmaker’s <strong>for</strong>ceps,<br />
fine-tipped ‘soft’ stainless steel entomological goose-neck<br />
<strong>for</strong>ceps and iris <strong>for</strong>ceps (see Tools section above).<br />
Older fluid-stored specimens may become soft or brittle<br />
requiring extra care. Forceps with de<strong>for</strong>med tips are useful<br />
<strong>for</strong> smooth and slippery specimens. Very delicate specimens<br />
can be sucked up with a pipette or, if dry, with a damp fine<br />
brush. After transferring the specimen, check the wall of the<br />
pipette to make sure that the specimen is not stuck inside.<br />
Some like to use Irwin loops, particularly <strong>for</strong> live<br />
sorting (K. Barwick pers. comm.), which have been used <strong>for</strong><br />
other meiofauna work (e.g., Kristensen and Funch 2000). A<br />
small brush can also be used to move wet specimens in a<br />
dish.<br />
When working with ethanol-water mixtures, the<br />
concentration in the sorting solution and the specimen vial<br />
should be the same, otherwise turbulence will be induced by<br />
the fluid from the other container adhering to the tool.<br />
Similarly, small volumes of fixed samples can be examined<br />
in 30% ethanol to reduce thermal circulation of the fluid, but<br />
should be avoided if tissue swelling is of concern (see<br />
subsection Storage below).
12<br />
Fixation<br />
The intended use of the specimens should determine the<br />
fixation and storage fluid. For fixation and storage <strong>for</strong><br />
specialised needs we recommend the following:<br />
• Molecular work—95–100% ethanol. See also ‘boiling<br />
method’ below.<br />
• Histology—<strong>for</strong>malin, bichromate or mercury-based<br />
fixatives, Bouin’s fluid or other histological fixatives.<br />
• TEM—ideally glutaraldehyde fixation. Formalin can<br />
also be used but with inferior results.<br />
Detailed and complicated descriptions and recipes <strong>for</strong><br />
fixation and preservation are available but are mostly<br />
unnecessary <strong>for</strong> standard work. Also, most methods work<br />
well within a wide range of concentrations and often one<br />
kind of buffer can be replaced by another as long as they do<br />
not interfere. For example, recipes often specify that 3.7%<br />
<strong>for</strong>malin is to be used. That is simply because they used<br />
<strong>for</strong>malin : water, 1:9, but good fixation with <strong>for</strong>malin can be<br />
achieved as long as it is stronger than ca 2%.<br />
For more general in<strong>for</strong>mation regarding fixation and<br />
preservation see Gohar (1937), Romeis (1948, 1989),<br />
Mahoney (1973), Presnell and Schreibman (1997) and<br />
Glauert and Lewis (1998).<br />
When fixing shelled molluscs, the fixative must have<br />
access to the tissues; a light cracking of the shell is usually<br />
needed, except in limpets, chitons and gastropods with a<br />
short, broad spire, small operculum and large aperture. To<br />
crack small specimens may be difficult without crushing<br />
them. A small pair of wire cutters <strong>for</strong> electronics is usually<br />
good; some models are made of stainless steel. Also, <strong>for</strong><br />
larger specimens, a bench vice, locking vice pliers, or any<br />
other tool where you can control the cracking is better, to<br />
avoid crushing the shell. Power pliers with an extra joint <strong>for</strong><br />
increased power are usually good <strong>for</strong> larger specimens with<br />
thick shells. Watchmaker’s <strong>for</strong>ceps can also be used like a<br />
nut-cracker. Insert the specimen about a quarter of the length<br />
of the handle from the join, with one face of the <strong>for</strong>ceps on<br />
the table, and gently press the other arm of the <strong>for</strong>ceps until<br />
the specimen cracks. However, this method requires practice<br />
as it is liable to crush the shell unless carefully controlled.<br />
More drastic measures (e.g., a small hammer) may break the<br />
shell into many pieces and reduce the animal to pulp.<br />
Drilling a hole in the back of the shell (see above) and<br />
injecting 95–99% ethanol is an alternative <strong>for</strong> larger species<br />
(>3–10 mm), but is not as safe as cracking.<br />
For most studies involving micromolluscs, the shell is<br />
one of the most important sources of taxonomic in<strong>for</strong>mation.<br />
For this reason, if shells are cracked or removed prior to<br />
fixation, it is important to keep an undamaged specimen <strong>for</strong><br />
reference purposes—even an empty shell will often suffice.<br />
Because micromolluscs often have little shell material,<br />
they are particularly prone to adverse effects by preservation<br />
fluids. Acidic <strong>for</strong>malin or ethanol can quickly damage or<br />
completely destroy shells. However, <strong>for</strong>malin is a good<br />
general fixative <strong>for</strong> tissue preservation and samples can be<br />
used <strong>for</strong> TEM, SEM etc. Its biggest downsides are that the<br />
GEIGER ET AL. (2007) MOLLUSCAN RESEARCH, VOL. 27<br />
material cannot be used <strong>for</strong> molecular studies with current<br />
techniques and it is carcinogenic. Marine samples may be<br />
fixed in 5–10% <strong>for</strong>malin-seawater, which is sufficiently<br />
buffered <strong>for</strong> short time fixation (1 day) at a pH of<br />
approximately 7 (Anonymous 2006a). It is important with<br />
any fixative to have an appreciably larger volume (factor of<br />
at least 5–10) of fixative than the specimen. For <strong>for</strong>malin<br />
fixation, a quick approach is to fill a container with molluscs,<br />
add 1/10 of the jar volume in 40% <strong>for</strong>malin and top off with<br />
water (seawater is preferred as it provides a more nearly<br />
isotonic solution). Mix the solution well by inverting the jar<br />
several times until there are no more streaks in the fluid. The<br />
bodies of the animals will provide the remainder of the water<br />
to make an approximately 5% <strong>for</strong>malin solution. To properly<br />
buffer <strong>for</strong>malin, 1 g of borax per litre seawater <strong>for</strong>malin<br />
gives a pH of 7.5–8.5 and is good <strong>for</strong> several years.<br />
However, borax may clear tissue during prolonged storage<br />
(>10 years: Anonymous 2006a) and may be considered<br />
unsuitable, although some of us have not noticed any<br />
detrimental effects. Excess sodium bicarbonate mixed with<br />
<strong>for</strong>malin (allow it to settle <strong>for</strong> several hours) made up with<br />
fresh or seawater gives a pH of approximately 8. If instead<br />
sodium carbonate is used, the pH becomes approximately 10,<br />
which is much too basic, it becomes histolytic and the skin<br />
peels off within a few years. Other buffering agents include<br />
powdered aragonite, which is more soluble than calcite, but<br />
may recrystallise and interfere with shell material, and<br />
household ammonia, which reacts strongly exothermically<br />
with <strong>for</strong>malin to <strong>for</strong>m hexamine (= hexamethylenetetramine,<br />
methenamine) to pH 8.2 (Clark 1998). Hexamine decays and<br />
has to be adjusted after one and six months, and then every<br />
two years (Hemleben et al. 1988). This labour-intensive<br />
procedure will be prohibitive <strong>for</strong> larger collections (See<br />
Appendix 1 <strong>for</strong> safety notes). Recently several ‘<strong>for</strong>malin<br />
free’ fixatives and preservatives have appeared on the<br />
market. Some are based on phenoxetol, which does not<br />
replace fixation <strong>for</strong> histology or SEM purposes.<br />
Storage<br />
The most commonly used storage medium is 70–80%<br />
ethanol. Borax, powdered aragonite, or powdered calcite/<br />
shells may be added to ethanol solutions to safeguard against<br />
shell damage. Precise amounts have not been specified,<br />
though some have expressed concern that borax and<br />
aragonite may pose problems with recrystallisation; this area<br />
needs further investigation. To reduce the problem with<br />
dissolution of shells in water-ethanol mixtures, the<br />
concentration of the alcohol can be increased. For histology,<br />
tissue shrinkage is of concern and it is customarily advised to<br />
use a graduated series (30%, 50%, 60%, 70% ethanol) when<br />
transferring specimens from aqueous to alcoholic solutions<br />
to minimise shrinkage. Glauert and Lewis (1998) question<br />
this approach, because
TECHNIQUES FOR STUDYING SMALL MOLLUSCAN SPECIMENS 13<br />
The alcohol concentration can be kept stable in wellsealed<br />
containers. Specimens in tubes with polyethylene<br />
(never polycarbonate, which will disintegrate) closures or<br />
cotton plugs should be immersed closed end down in ethanol<br />
in larger, secondary containers of proven durability. Because<br />
ethanol vapours consist of approximately 95.5% ethanol,<br />
evaporation reduces the alcohol concentration in the medium<br />
and evaporated liquid should be replaced with 95.5%<br />
ethanol. Calcium carbonate is quite soluble in water, hence<br />
shells may easily be dissolved in an ethanol-water mixture.<br />
For example, scissurellids can become fully decalcified in as<br />
little as 18 months in ethanol at less than 80% concentration<br />
(DLG, pers. observ.). As it is impractical to monitor alcohol<br />
concentrations in small vials every six months, it is advisable<br />
to store some shells dry as vouchers. Storage of<br />
micromollusc samples with large amounts of organic<br />
material should be avoided. Ideally use high quality ethanol<br />
free of impurities, although this is much more expensive.<br />
Long-term storage in <strong>for</strong>malin is generally avoided<br />
since <strong>for</strong>malin is on the list of suspected carcinogens and is a<br />
well-known allergene. However, it has been successfully<br />
achieved in at least one major collection (AMS), where 5%<br />
seawater <strong>for</strong>malin buffered with NaHCO 3 is used. Problems<br />
with ethanol include evaporation and flammability, with<br />
collections requiring regular maintenance and special<br />
fireproof housing. For any preservative, the pH needs to be<br />
kept below pH 8.5 to avoid tissue dissolution and above pH 7<br />
to prevent shells and other exoskeleton parts from dissolving.<br />
Such narrow tolerances require regular testing and<br />
adjustments. The pH of ethanol-water solutions is difficult to<br />
measure, though some specialty pH electrodes are available.<br />
For field storage, unbreakable plastic containers, ideally<br />
with screw tops, should be used. Eppendorf tubes (1.5 ml)<br />
and Falcon tubes (10 or 50 ml) seal fairly well, as long as the<br />
seal is free of dirt. Heat-sealed bags can leak when filled with<br />
wet sediment samples, but are useful as secondary<br />
containers. Although cheap, scintillation vials should be<br />
avoided, because ethanol evaporates quickly from them.<br />
Scintillation tubes are also potentially dangerous during air<br />
transportation, since they do not close well and are not<br />
intended <strong>for</strong> such use.<br />
Switching storage media<br />
When switching specimens from one solution (e.g., 5%<br />
<strong>for</strong>malin) to another (e.g., 70–80% ethanol), the tissue<br />
volume and other water filled spaces need to be taken into<br />
account, as water they contain will dilute the preservative.<br />
As an example, a jar half-filled with specimens and filled up<br />
with 95% ethanol will eventually result in about a 50–75%<br />
ethanol solution. Hence, <strong>for</strong> samples intended <strong>for</strong> molecular<br />
work, it is important to replace the solution with 95–100%<br />
ethanol within the first two days.<br />
Boiling method<br />
Dr H. Fukuda has kindly provided details of a method<br />
that he has successfully employed <strong>for</strong> microgastropods<br />
which is a modification of a method used by a number of<br />
Japanese malacologists <strong>for</strong> large species and is known as<br />
‘niku-nuki’ (e.g., Habe and Kosuge 1967). It has proved to<br />
be particularly useful <strong>for</strong> instances where only one or two<br />
individuals are available and intact shells and animals are<br />
required.<br />
A living individual is placed in a small beaker in<br />
enough water (seawater if a marine species) to enable it to<br />
extend and crawl. Add hot (70–100ºC) water, which will<br />
immediately kill the animal with the head-foot extended.<br />
After a few seconds (1–2 <strong>for</strong> minute species) in the hot<br />
water, move the specimen to a smaller dish of cool water<br />
under a stereomicroscope. The animal can be carefully<br />
removed from the shell by gently pulling on the head-foot<br />
with <strong>for</strong>ceps, holding the shell with a second pair of <strong>for</strong>ceps<br />
and rotating in opposite directions. The animal removal can<br />
be facilitated by squirting water into the aperture using a fine<br />
syringe. The water temperature and the length of immersion<br />
in the hot water vary according to the size of the specimen<br />
and the thickness of the shell, with larger, thick-shelled<br />
species requiring hotter water and longer times. The visceral<br />
mass (digestive gland and gonad) becomes hard and loses<br />
flexibility in high temperature and sometimes cannot be<br />
removed from the upper whorls of the shell. Thus, the water<br />
needs to be hot enough to separate the columella muscle<br />
from the shell and cool enough to keep the visceral coil<br />
pliable. More details on this method will be provided<br />
elsewhere (Fukuda, Haga and Tatara in prep.). As DNA is<br />
not broken down in 80 to 100ºC, tissue can be placed in 99–<br />
100% ethanol <strong>for</strong> molecular work (Ueshima 2002).<br />
Dry micromollusc shells<br />
Two ‘diseases’, or more correctly, chemical processes, that<br />
ultimately result in the destruction of shells, have affected<br />
many type specimens in museum collections including AMS,<br />
BMNH, NMNZ, NSMT, NHMB, USNM and ZMO among<br />
others (Fig. 5C). Some collections are more affected than<br />
others, with no clear pattern emerging. The collections in<br />
GNM, SMNH and ZMUC have largely escaped it,<br />
presumably by using different types of glass. Typical<br />
instances are illustrated by Higo et al. (2001) in<br />
micromolluscs such as triphorids and turrids. Two different<br />
kinds of ‘disease’ are recognised, Byne’s and glass, but it is<br />
sometimes difficult to decide which particular ‘disease’ is<br />
responsible (e.g., Kilburn 1996). The manifestation of both<br />
diseases is identical in that they first produce white<br />
efflorescence on the shell, which eventually crumbles to<br />
dust, but they differ in the cause.<br />
Species described prior to 1960, and many thereafter,<br />
were illustrated without the benefit of the SEM. Much<br />
needed detail <strong>for</strong> species level identification (e.g.,<br />
protoconch microsculpture) cannot be observed using light<br />
microscopy. There<strong>for</strong>e, many species cannot be positively<br />
identified from the original descriptions or illustrations and<br />
type material is the sole recourse to settle uncertainties.<br />
Accordingly, it is a high curatorial priority to upgrade storage<br />
systems of micromollusc material, particularly types, and to
14<br />
engage in effective damage control. Proper initial specimen<br />
preparation can avoid many problems later on.<br />
Initial drying<br />
Prior to dry storage, all specimens should first be<br />
washed in fresh water to remove dirt, soften mucus and<br />
dissolve salts, which are hardened and/or precipitated by<br />
ethanol. It is very important to remove any salt because<br />
NaCl 2 is hydroscopic. To remove excess water, to dehydrate<br />
animal remains within the shells and to speed up drying, the<br />
material may additionally be washed with 80–100% ethanol.<br />
If the dry specimens or total samples were not previously<br />
washed, soak the material thoroughly so that mucous, dirt<br />
and salt crystals dissolve. Specimens can then be air dried on<br />
absorbent paper.<br />
Insufficient drying will negatively affect long-term<br />
storage of the specimens. Specimens washed with 100%<br />
ethanol dry fastest and with the least possibility of retaining<br />
any liquid. In diluted ethanol, the ethanol will evaporate<br />
faster and may leave water behind. This water may soften<br />
gelatine capsules, may smudge labels and may contribute to<br />
mould growth. In dry climates, air drying is adequate but in<br />
more humid environments, a drying chamber set to 40–50°C<br />
may be advantageous. Simple drying chambers can be<br />
constructed using incandescent light bulbs in a simple box<br />
with some openings to allow <strong>for</strong> air circulation. Blow-dry<br />
systems are unsuitable because the specimens are too easily<br />
blown away once dry.<br />
Handling<br />
Dry specimens may be kept in glass vials, gelatine<br />
capsules, or cardboard slides, with or without cushioning<br />
cotton. Specimens prepared <strong>for</strong> scanning electron<br />
microscopy (SEM) may either be stored mounted on the<br />
SEM stub (see below <strong>for</strong> storage conditions), or may be<br />
dismounted (see below) and placed in a standard container.<br />
To properly view specimens, they usually need to be<br />
removed from their glass vial or gelatine capsule, whereas<br />
the glass window of a cardboard slide usually allows<br />
adequate viewing. Specimens are best placed onto a metal,<br />
glass, or paper surface of contrasting colour. Avoid plastic as<br />
the static charge can make it difficult to move dry specimens.<br />
To move individual specimens into separate containers,<br />
a moist (but not wet) artist’s brush is safest, but <strong>for</strong>ceps can<br />
also be used with care (see Tools section above). Dip the<br />
brush into clean or, preferably, distilled water or ethanol and<br />
squeeze the bristles between two fingers or touch a piece of<br />
paper. Some people use saliva but, apart from hygiene issues,<br />
it can leave residues on the shell that are obvious under the<br />
SEM. The specimens will adhere to the tip of the moist<br />
brush. Deposit the specimen in the new container on the<br />
inner lip or wall of the container; rotating the axis of the<br />
brush while keeping the specimen touching the container<br />
helps to transfer the specimen from the brush to the<br />
container. When transferring specimens into gelatine<br />
capsules, make sure that the brush contains as little moisture<br />
as possible (gelatine is soluble in water) as specimens may<br />
GEIGER ET AL. (2007) MOLLUSCAN RESEARCH, VOL. 27<br />
become glued to the wall of the capsule.<br />
A dry, soft artist’s brush may also be used <strong>for</strong> the most<br />
fragile specimens, particularly if the brush is somewhat<br />
frayed. Specimens can be gently ‘speared’ so that they are<br />
held between the bristles of the brush.<br />
Multiple specimens can be poured into the storage<br />
container from the sorting tray. If a square dish is used, the<br />
corner may be suitable to concentrate and spout the<br />
specimens into a container. Alternatively, pour or brush the<br />
specimens onto a tightly folded piece of paper, then pour<br />
them into the container using the angulation as a guide.<br />
Gently tapping the paper may help move stubborn<br />
specimens. Other techniques include making a funnel out of<br />
paper or using a small glass or metal funnel (avoid plastic).<br />
Storage<br />
Specimen containers<br />
First, the specimens, even those collected as empty<br />
shells, must be properly cleaned and free of salt (see above).<br />
This can be done by soaking them in clean (preferably<br />
distilled) water <strong>for</strong> a few hours and then drying thoroughly.<br />
The dried specimens are best kept in small containers:<br />
ideally gelatine capsules within larger high sodium glass<br />
vials, or cardboard mounts made from acid free, archival<br />
quality board. None of the storage media is superior <strong>for</strong> all<br />
storage conditions; each has its advantages and<br />
disadvantages. The following discussion of the materials<br />
assumes that the specimens are in direct contact with that<br />
material. In many collections, specimens are contained in<br />
gelatine capsules or glass microvials and placed within glass<br />
vials that hold the label.<br />
Glass vials are the most durable solution, but are also<br />
costly.<br />
Gelatine capsules do not degrade shells, but should only<br />
be used in conditions with < 60% average relative humidity.<br />
Shorter periods of 60–80% relative humidity do not seem to<br />
have a negative impact. Gelatine is hygroscopic, thus, in<br />
conditions of high humidity, and with insufficiently dried<br />
specimens, the gelatine softens and may glue the specimens<br />
to the wall of the capsules. Usually, a gentle push with the<br />
stiff bristle of a fine artist’s brush will free the specimen.<br />
Otherwise, the gelatine can be fully dissolved in water.<br />
Specimens do not seem to be damaged by sticking to<br />
gelatine. Insects can also eat the gelatine capsules if they are<br />
left loose, leaving holes <strong>for</strong> shells to fall out.<br />
Cardboard slides, also called geology micromounts or<br />
microfossil slides, are very space efficient. However, they<br />
are usually made from acidic paper and may negatively<br />
affect specimen preservation, particularly in humid areas.<br />
They release nitric acid from the celluloid, which is known to<br />
dissolve <strong>for</strong>aminiferans (Barbero and Toffoletto 1996).<br />
Cardboard slides may be custom made using archival quality<br />
material (see below). Another drawback is that sliding the<br />
glass window usually generates a static charge and<br />
specimens become stuck to the glass. Fragile specimens may<br />
become damaged when the glass window is pulled through<br />
the slit in the cardboard. For sources and types of microfossil<br />
slides see http://www.pangeauk.com and http://
TECHNIQUES FOR STUDYING SMALL MOLLUSCAN SPECIMENS 15<br />
www.ukge.co.uk.<br />
Chlorine bleaching (Clapp 1987) of natural cotton wool<br />
can release acid and may negatively affect the specimens,<br />
there<strong>for</strong>e, artificial cotton is more suitable. Some of us use<br />
medical grade cotton wool with glass tubes and have not<br />
observed any shell degradation. Avoid any polyvinylchloride<br />
(PVC) products, as they release hydrochloric acid from the<br />
plasticiser. Most micromolluscs do not have sufficient mass<br />
to damage one another and cushioning is not necessary.<br />
Small plastic boxes are sometimes used and some<br />
consider them superior to gelatine capsules (Kurtz 2005). We<br />
are cautious about plastics because of the plasticisers used in<br />
the material and different types of plastic are not easily<br />
distinguishable. Transparent Polystyrene boxes seem<br />
acceptable. Mylar is the only clear plastic film known to us<br />
to be of fully archival quality—it is also widely used in the<br />
fine arts business.<br />
Plastic foam has been and, to a certain extent, still is<br />
today, popular with shell collectors to hold specimens in<br />
place within a plastic box. Plastic foam is the worst possible<br />
storage <strong>for</strong> any shells and is particularly insidious <strong>for</strong><br />
micromolluscs. All foam disintegrates in one way or another<br />
over a relatively short period of time (10–20 years). At best<br />
foam crumbles and specimens have to picked out of the<br />
material but usually it partially liquefies and becomes sticky.<br />
It can be rubbed off larger shells, but micromolluscs can<br />
usually not be adequately cleaned. The plasticisers in the<br />
foam or the foam matrix itself can also be acidic and cause<br />
an efflorescence akin to Byne’s or glass disease.<br />
Some shell collectors use commercial plastic clays,<br />
often referred to as mineral micromount, or tackless picture<br />
mountants. These are supposed to not release any grease,<br />
although they eventually do, leaving wet-looking patches on<br />
shells. Their long-term stability is quite variable. Over a 15<br />
year period in a collection of approximately 2000 lots, some<br />
80% of the material seemed to be unaffected by the plastic<br />
clay, although long-term contact left residues in the grooves<br />
and lamellae of finely sculptured specimens: 10% of the<br />
material became tacky and stringy and some 10% crumbled.<br />
The cause <strong>for</strong> the material’s decay is uncertain; oiled shells,<br />
and those containing animal remains, seem to be more<br />
frequently associated with the tacky or crumbled clay<br />
(Geiger 2004). As many micromolluscs are finely sculptured<br />
and as the clay may change dramatically over relatively short<br />
periods of time, this mounting medium is unsuitable <strong>for</strong><br />
microspecimen storage (Geiger 2004).<br />
Specimens are sometimes stored on SEM stubs, though<br />
most shells can be removed from them without problems<br />
(see below). Usually, recommended storage of SEM stubs is<br />
in sealed containers with silica gel to remove moisture and, if<br />
possible, in an evacuated bell jar. These measures ensure that<br />
the specimens will not outgas when placed in the high<br />
vacuum of the SEM chamber, particularly those with field<br />
emission and LaB 6 guns, which require a vacuum at least an<br />
order of magnitude greater than <strong>for</strong> tungsten filaments.<br />
Hence, these storage requirements rather address operational<br />
issues of the SEM and do not relate to specimen<br />
preservation. Whether such storage conditions actually make<br />
a difference will depend on local environmental conditions<br />
and on the particular SEM used. The re-emergence of<br />
tungsten guns, especially on variable pressure SEMs, makes<br />
the above storage requirements unnecessary; protection from<br />
dust and storage in a normal collection environment is<br />
sufficient.<br />
Labels<br />
Ideally, the full-data specimen label should not be in<br />
direct contact with the specimens, but contained in a<br />
secondary container (usually a glass vial) housing the<br />
gelatine capsule or glass microvial housing the specimen(s)<br />
or on the backside of a geology micromount (as in the<br />
LACM). In some collections, a tiny label showing only the<br />
registration number is added to the specimen vial. Such<br />
labels offer added protection against switching data between<br />
lots. However, even small paper labels in direct contact with<br />
microspecimens should be made from acid-free paper. We<br />
are unaware of any issues relating to writing medium; pencil,<br />
pigment ink and laser writer labels; all seem to work well.<br />
There is anecdotal evidence that photocopied labels are more<br />
durable than that of laser writers because the temperature at<br />
which the toner is fused with the paper is higher in<br />
photocopiers than in laser writers (H. Chaney, pers. comm.).<br />
Heating labels in a direct heat oven improves the durability<br />
of laser print; the toner changes from a powder-like<br />
appearance to a shiny surface when examined under a<br />
microscope; ‘cooking’ labels with microwaves does not<br />
affect the durability of laser labels (Zala et al. 2005).<br />
Elevated humidity has an adverse effect on laser printing,<br />
because the temperature is lowered by the residual water in<br />
the paper. As a safety measure, the catalogue number can be<br />
written in pencil on the back of the label.<br />
Paper as a material should be carefully considered in all<br />
applications: labels, geology mounts, cardboard boxes. The<br />
term ‘archival’ can be misleading, as a number of paper<br />
products of variable long-term stability are issued with such<br />
a descriptor (Clapp 1987; Turner 1998). Acid free paper<br />
products are made from 100% cotton rags, not from wood<br />
pulp, are usually not bleached and will not release any acids.<br />
Buffered or pH-balanced products are made from wood pulp<br />
and contain a pH-buffering substance, usually calcium<br />
carbonate powder. The wood pulp will continuously release<br />
acids, which at first is neutralised by the calcium carbonate<br />
in the paper, but eventually the buffer capacity is exhausted<br />
and acids will be released from the paper product. Synthetic/<br />
plastic papers have not been available <strong>for</strong> a sufficiently long<br />
period of time in order to assess their suitability as data<br />
labels. A good start <strong>for</strong> internet searches is http://<br />
www.universityproducts.com, http://www.archivalsuppliers.<br />
com, http://www.archivescanada.ca/english/index.html and<br />
http://library.amnh.org/conservation/suppliers.html.<br />
The strongest paper we have found is ‘laundry tag<br />
manila’. Coated papers in particular are unsuitable because<br />
of the chemical coatings and filler materials, which will<br />
eventually deteriorate.
16<br />
Chemical deterioration<br />
Byne’s ‘disease’<br />
Micromolluscs are often fragile and prone to adverse<br />
reaction with acids and salts. A serious destructive effect on<br />
calcium carbonate shells is known as ‘Byne’s disease’,<br />
named <strong>for</strong> L. St. G. Byne (1872–1947) a British amateur<br />
shell collector who first described the phenomenon (Byne<br />
1899a, b). Its manifestation is a white efflorescence covering<br />
the shell, which eventually destroys the specimen<br />
completely. Byne’s explanation that it was caused by butyric<br />
and acetic acid was partly correct. It seems not to be caused<br />
by shells with remaining animal tissue since the old<br />
collections where it occurs often contain empty shells only<br />
(pers. obs. by the authors). Tennent and Baird (1985)<br />
identified the crystalline substance as a mixture of calcium<br />
acetate and <strong>for</strong>miate and considered that the acetic and<br />
<strong>for</strong>mic acid originated from the oak-wood frequently used in<br />
cabinets. The reaction can also be accelerated by low air<br />
circulation and by high humidity, where the water molecules<br />
act as an extractor and carrier <strong>for</strong> the acids. The necessity <strong>for</strong><br />
well aerated cabinets was pointed out as a precaution by<br />
Byne (1899a, b). Some other organic substances are also<br />
likely culprits and include cork, natural cotton, fibre-wood or<br />
particle board, where <strong>for</strong>maldehyde-based glues are used, as<br />
well as any surface treatment evaporating <strong>for</strong>malin as<br />
applied <strong>for</strong> instance to some metal cabinets. All of these<br />
substances should be avoided. A number of articles have<br />
been written on various aspects of Byne’s disease (Kenyon<br />
1909; Lamy 1933; Nicholls 1934; Nockert and Wadsten<br />
1978; Padfield et al. 1982; Grosjean and Fung 1984;<br />
Hatchfield and Carpenter 1985; Kolff 1988; Kamath et al.<br />
1985; Davies 1987; Davies 1988; Hertz 1990; Pinto de<br />
Oliveria and de Cassia da Silveira e Sa 1996; Stamol 1998;<br />
Callomon 2000, 2003; de Prins 2005).<br />
Glass ‘disease’<br />
As in Byne’s disease, the so called ‘glass disease’<br />
produces an efflorescence of calcium salts and, unless halted,<br />
will lead to complete destruction of specimens in as little as<br />
5–10 years (Fig. 5). It starts with the surface of previously<br />
shiny specimens becoming dull, then powdery, then crystals<br />
start <strong>for</strong>ming. The shells start disintegrating and finally<br />
crumble with only a whitish crystalline powder remaining. It<br />
can occur in specimens that were originally perfectly dry and<br />
repeatedly washed in fresh water and ethanol, including fatsolvents<br />
such as perchlorethylene and carbon tetrachloride,<br />
stored in metal cabinets in tubes with plastic closures (no<br />
cork or cotton) and acid free archival labels. The glass<br />
disease has hardly been mentioned in the literature (except<br />
Kilburn 1996). Glass can release sodium hydroxide when<br />
interacting with moisture in the air and this NaOH and any<br />
other leaching minerals interact with the calcium carbonate<br />
of the shell leading to the <strong>for</strong>mation of sodium carbonate<br />
powder (see Birch 2000).<br />
Our observations indicate that the worst offenders are<br />
high quality, high silica, heat-resistant glasses, especially cut<br />
sections of narrow bore tubing, although the extent to which<br />
specimen preparation and environmental parameters play a<br />
GEIGER ET AL. (2007) MOLLUSCAN RESEARCH, VOL. 27<br />
role in development of glass disease is an open question.<br />
Cheap, high sodium carbonate glasses, such as disposable<br />
culture tubes or blood test tubes are by far the better choice.<br />
Although glass disease can be arrested in tubes containing<br />
moisture absorbent silica gel sealed with plastic closures, by<br />
far the simplest remedy is to avoid contact with glass by the<br />
use of gelatine capsules if environmental conditions are<br />
appropriate (see also above).<br />
FIGURE 5. A. Six specimens of Skeneopsis planorbis (Fabricius,<br />
1780) from the same lot and in the same vial from SMNH. The four<br />
peripheral specimens are glued to paper, so the specimens were not<br />
in direct contact with glass. The two central specimens are free,<br />
they were in contact with the glass vial and show the white<br />
efflorescence produced by the glass disease. Photograph AW. B.<br />
SEM micrograph of shell affected by glass disease. Scale bar = 500<br />
µm. Micrograph AW. C. Last surviving syntype of Anatoma<br />
aedonia (Watson, 1886) (BMNH 1887.2.9.398); the remainder had<br />
crumbled to dust. Uncoated specimen in variable pressure SEM.<br />
Scale bar = 1 mm. Micrograph DLG. D. Detail of efflorescence<br />
from specimen shown in B. Scale bar = 30 µm. Images AW.<br />
Preparation of micromollusc shells <strong>for</strong> SEM<br />
Cleaning<br />
Whenever possible, select the cleanest shells available<br />
<strong>for</strong> SEM. Delicate specimens can be cleaned with a fine-
TECHNIQUES FOR STUDYING SMALL MOLLUSCAN SPECIMENS 17<br />
tipped artist’s brush. Two main methods are outlined below<br />
that can be used to remove stubborn dirt.<br />
Cleaning with bleach. Specimens can be immersed <strong>for</strong><br />
one to two minutes in strong commercial bleach and/or 10–<br />
20% hydrogen peroxide in order to remove the periostracum<br />
or to remove tissue remnants from the inside surface of<br />
bivalves. Excessive treatment <strong>for</strong> more than a few days<br />
should be avoided, because minute crystals cover the shell<br />
surface and become difficult to remove. Commercial bleach<br />
contains meta-silicates that are added to stabilise dirt in<br />
suspension so it does not precipitate on the surfaces<br />
supposed to be cleaned. These silicates may precipitate in an<br />
irreversible reaction when water evaporates and the pH<br />
changes as a result of <strong>for</strong>mation of NaOH, which then reacts<br />
with air to produce sodium carbonate. Shells must be washed<br />
in water repeatedly, especially in spirally coiled gastropods<br />
in which bleach is trapped within the inside of whorls. As<br />
these treatments dissolve tissue and tanned proteins, the<br />
conchiolin matrix within the shell will also be weakened,<br />
rendering the shells more brittle, although breakage rarely<br />
occurs. More diluted bleach or hydrogen peroxide is less<br />
destructive and may save the periostracum and nacre, so start<br />
with weak solutions until you gain experience of your kind<br />
of material.<br />
Ultrasonic cleaning. Sturdy specimens can be cleaned<br />
using ultrasound. Heavily incrusted dry specimens should be<br />
soaked first overnight or even longer to loosen the dirt.<br />
Additional soaking steps between sonication treatments may<br />
be necessary. Cleaning of dry or wet stored shells is best<br />
accomplished in a mild detergent solution; a few drops of<br />
dishwashing liquid or a pinch of trisodium phosphate powder<br />
in 100 ml of water. The detergent should be neutral or<br />
slightly alkaline, some are too acidic. Shells can be first<br />
wetted with ethanol to break the surface tension, which helps<br />
to avoid trapped air bubbles, and then immersed in the<br />
cleaning solution in a glass specimen tube, embryo bowl, or<br />
watch glass and left to soak <strong>for</strong> a few hours or overnight. The<br />
container is then put in the water bath of an ultrasonic<br />
cleaner. The duration of sonication depends both on the<br />
power of the sonicator, the water level in the bath and the<br />
specimen itself. In some instances, even one second<br />
sonication can break a delicate specimen, yet with some<br />
specimens 60 second sonications are harmless and necessary.<br />
Because thin-shelled specimens may break during<br />
sonication, particularly if air bubbles are lodged within the<br />
shell, the sonicator should be tested using similar,<br />
expendable specimens. Air bubbles can be removed by<br />
putting the submerged specimen under moderate vacuum but<br />
avoid the water boiling (boiling point of water ~0.01 bar at<br />
25°C). Some consider the use of a sonicator too<br />
unpredictable and too often damaging to the specimens.<br />
Thus, it is advisable to not use ultrasonic cleaning on rare or<br />
unique specimens.<br />
After sonication, shells should be washed in distilled<br />
water—preferably two or three times. It is safer to change the<br />
fluid in the glass container than to handle the specimen. After<br />
the last wash, remove the larger water drops with a paper<br />
tissue or paper towel and air-dry the specimen. Alternatively,<br />
the specimens can be stored in ethanol and then placed on<br />
blotting paper just prior to mounting; the remainder of the<br />
ethanol will quickly evaporate. The dried specimens are now<br />
ready <strong>for</strong> mounting.<br />
Mounting<br />
Multiple specimens can be mounted on one stub but it<br />
is imperative to make a ‘stub map’ to keep track of the<br />
specimens. A sculptured orientation marker (e.g., a dab of<br />
colloidal graphite, some silver paint or a groove in a double<br />
sided carbon tab, that is easily visible in the SEM) is needed<br />
because coating will obscure pencil or pen marks. Different<br />
sets can be separated by marks and/or numbered separately.<br />
It is advantageous to mount specimens that may be confused<br />
mixed with easily identified ones, which serve as landmarks.<br />
Mounting of specimens can be achieved in a variety of<br />
ways. Ideally, multiple standardised views should be<br />
obtained with minimal remounting, because any <strong>handling</strong> of<br />
specimens increases the risk of damage or loss. Typical<br />
standardised views <strong>for</strong> coiled gastropods are apertural,<br />
apical, umbilical. Mounting the specimen on the periphery of<br />
the last whorl opposite the aperture serves this purpose with<br />
a typical SEM stage that usually allows approximately 90°<br />
unidirectional tilt and 360° rotation. Un<strong>for</strong>tunately, it is also<br />
one of the least stable orientations. For bivalves, interior and<br />
exterior views, with the shell outline in the image plane and,<br />
possibly, enlargements of the hinge and an umbonal view<br />
showing the prodissoconch, are typically obtained. Most of<br />
us remount specimens at least once to obtain all views<br />
necessary from the same specimen.<br />
At least four main mounting media are available<br />
depending on the object being mounted and each has its<br />
advantages and disadvantages. Consideration of the<br />
electrical conductivity of the mounting medium is essential<br />
to reduce or eliminate ‘charging’ (see below).<br />
Colloidal graphite. A small dot is applied to the stub. If<br />
a specimen is placed into fresh colloidal graphite, capillary<br />
<strong>for</strong>ces will pull the mounting medium into the sculpture of<br />
the shell. In order to avoid this problem, either use a more<br />
viscous suspension of colloidal graphite, or wait <strong>for</strong> the<br />
surface of the colloidal graphite to become silvery. The<br />
specimen can then be placed with a moist artist’s brush and<br />
held until the medium has sufficiently dried to hold the<br />
specimen. Colloidal graphite is mostly used with relatively<br />
large and heavy specimens, which are not sufficiently held in<br />
place by double-sided carbon tape or stickers (see below).<br />
Silver paste. This is normally more viscous and avoids<br />
the problems associated with capillary <strong>for</strong>ces. However,<br />
silver paste also dries more slowly, making secure<br />
orientation of the specimen more difficult. It is mostly used<br />
<strong>for</strong> larger specimens to paint conductive wires on specimens<br />
(see below).<br />
Double-sided tape and double-sided carbon stickers.<br />
These are less adhesive than colloidal graphite and silver<br />
paste but can be used to mount smaller (< 2 mm) coiled<br />
gastropods on the periphery of the last whorl opposite the<br />
aperture. For other, more stable specimen positions, there is<br />
effectively no size limit. Carbon tabs can be shaped with a
18<br />
blunt-ended tool to make a ridge or a mound against which<br />
the specimen can rest, or can be deposited in such a fashion<br />
that the material will <strong>for</strong>m waves or wrinkles. These<br />
sculptural elements of the mounting medium offer additional<br />
bonding surface to the shell (and opportunities <strong>for</strong> specimen<br />
identification; Fig. 6). However, part of the specimen will be<br />
obscured and 90° tilts of the SEM stage show less of the<br />
apical and basal surface, making re-mounting necessary if all<br />
views need to be achieved with a single specimen. The<br />
mounting with carbon tabs is somewhat flexible; after an<br />
initial placement the orientation can be adjusted a little by<br />
pushing the specimen gently in the desired direction.<br />
FIGURE 6. A gold coated atlantid heteropod mounted <strong>for</strong> SEM.<br />
Due to the keel of the atlantid shell, it can not be mounted on its<br />
periphery. The double sided carbon tab material was shaped into a<br />
mound with old <strong>for</strong>ceps and the specimen leaned against the<br />
material. The aperture was put horizontally by a combination of<br />
stage rotation and tilt, and the image of the specimen was kept<br />
horizontal using digital image rotation; note the slope of the stub<br />
from lower left to upper right corner. For publication, the specimen<br />
can easily be cut out from the background. SEM operated in<br />
variable pressure mode at 30 Pa, 20 kV, 200 pA, at 10 mm working<br />
distance. Specimen courtesy Roger Seapy. Scale bar = 1 mm. Image<br />
by DLG.<br />
Carbon stickers and tape are supposed to be electrical<br />
conductors, but some brands are only conductive along the<br />
surface, not through the cross section of the material (R.<br />
Burns, pers. comm.). Some, such as NEM tape (Nisshin EM<br />
Co. Ltd., Tokyo) is conductive through its cross section.<br />
Clear, double sided office tape can also be utilised, although<br />
it is not conductive. Other double-sided tapes (copper,<br />
aluminium, nickel) available from SEM supply vendors offer<br />
various adhesive properties with which one can experiment.<br />
Glues. Non-permanent spray glue (e.g., 3M) is<br />
possibly the most flexible mounting medium. The spray is<br />
designed <strong>for</strong> temporary attachment and remains plastic <strong>for</strong> a<br />
prolonged time. It is applied by spraying a thin layer of glue<br />
onto the stub. The thickness of the layer can be varied<br />
depending on the specimens. The glue surface is less even<br />
than that of the carbon tabs. While it is most useful <strong>for</strong><br />
specimens of more than 1 mm in size, it can be used even <strong>for</strong><br />
larval shells. Attempts to use spray glue with 1 mm<br />
specimens by placing them on top of glue-covered pin heads<br />
were unsatisfactory because the surface of the glue was too<br />
sculptured. The spray glue is stable in high vacuum (10 -4 bar)<br />
and in the electron beam. The major advantage of the spray<br />
glue is its flexibility, even after coating. The glue itself is<br />
GEIGER ET AL. (2007) MOLLUSCAN RESEARCH, VOL. 27<br />
non-conductive and charging can be more pronounced than<br />
with carbon tabs. Pre-sputter coating the glue makes the<br />
surface non-sticky. Letting the glue dry overnight, or putting<br />
it under vacuum, will make the glue more viscous prior to<br />
mounting. This can be advantageous with very fragile<br />
specimens as they will adhere with less surface to the glue.<br />
For large specimens, the glue can be shaped into mounds as<br />
detailed above <strong>for</strong> carbon stickers.<br />
Polyvinyl acetate based (e.g. Elmer’s) glue is good <strong>for</strong><br />
mounting radulae and opercula, but should be avoided <strong>for</strong><br />
shells since its acidity will quickly (within hours) corrode the<br />
shell. It is, however, suitable <strong>for</strong> grounding CPD specimens<br />
and can easily be drawn out to <strong>for</strong>m small conductors.<br />
Preventing charging<br />
Stub mounted specimens undercut all around relative to<br />
the stub (e.g., a gastropod mounted on its periphery, or a<br />
bivalve valve mounted concave side uppermost) will not<br />
receive conductive metal coating on the side in ‘shadow’ and<br />
will commonly ‘charge’ under the SEM. Once mounted,<br />
such specimens can be coated by tilting the stub at a suitable<br />
angle or may additionally require careful painting of a ‘wire’<br />
of conductive material between the stub and the periphery of<br />
the specimen. This is most easily achieved by placing a small<br />
blob of carbon paint on a narrow wedge of paper and<br />
inserting it between the specimen and the stub, being careful<br />
to ensure that the material does not run up onto the surface to<br />
be viewed.<br />
Some of us consider the use of conductive glue such as<br />
colloidal graphite or silver paste more hazardous than worth<br />
while, because of the difficulty in applying the material at<br />
small scales and capillary <strong>for</strong>ces which can pull the glue over<br />
the surface to be viewed. The often tricky painting of a<br />
conductive wire onto the shell can be avoided with more<br />
modern SEMs, low accelerating voltage (0.5–2 kV), variable<br />
pressure operation, reduced probe current/spot size and using<br />
frame integration as opposed to line integration as noise<br />
reduction technique <strong>for</strong> imaging. Specimens may also be<br />
sputtered multiple times <strong>for</strong> short periods of time at different<br />
angles to coat the under surface, or a sputter coater with a<br />
slanted and rotating specimen holder can be employed (e.g.,<br />
Cressington 108SE with rotary/planetary/tilting sample<br />
stage; Quorum Technologies SC7640 with RotaCota stage<br />
RC7606). The thickness of the metal coating is 1–10 nm and<br />
even excessive coating will not interfere with the detail in<br />
normal shell and radular work.<br />
SEM parameters<br />
Most SEMs allow a multitude of imaging techniques,<br />
with modern designs adding additional features. We<br />
encourage the users to explore the parameter space to obtain<br />
the best images possible. Figure 7 shows some options<br />
applied to a rather difficult specimen. Charging effects are<br />
accentuated, because the specimen is partly corroded, which<br />
by itself usually makes charging worse. Additionally,<br />
because the specimen is corroded, it is also more fragile and,<br />
consequently, could not be thoroughly cleaned without<br />
risking breakage. The remaining dirt also increases charging
TECHNIQUES FOR STUDYING SMALL MOLLUSCAN SPECIMENS 19<br />
problems. Last but not least, the specimen is globular with a<br />
single, small attachment point to the stub. Three different<br />
detectors were utilized: the usual secondary electron detector<br />
(Fig. 7A,C) and the backscatter detector (Fig. 7B–D) both in<br />
high vacuum and, in a variable pressure environment, the<br />
variable pressure secondary electron detector. Figure 7C<br />
shows the effect of signal mixing, where the signal from two<br />
backscatter detector quadrants is used to balance the<br />
directional lighting effect of the secondary electron detector.<br />
Probe current can also have a significant effect on charging<br />
(Fig. 7E: 100 pA. Fig. 7F: 200 pA).<br />
SEM imaging of uncoated material is usually carried<br />
out in either low voltage (10’000 x). As the SEM parameter-space is<br />
multidimensional, changes in one parameter show various<br />
effects depending on the sample and the particular<br />
instrument used. Additional constraints may be imposed by<br />
detectors other than the usual secondary electron detector<br />
used, as many require a 15–20 kV minimum accelerating<br />
voltage. It is beyond the scope of this contribution to provide<br />
optimum conditions <strong>for</strong> all specimens and all instruments;<br />
the investigator is encouraged to explore the parameter<br />
space, or to provide some indication to an operator not<br />
familiar with the type of specimen. Table 1 gives some<br />
indications on the various factors and some of the common<br />
effects.<br />
While most of the effects do not require further<br />
explanation (resolution, charging, depth of field), sample<br />
penetration requires consideration. Secondary electrons are<br />
generated due to the interaction of the electrons of the<br />
electron beam with electrons from the electron shells in the<br />
atoms of the specimen. This interaction does not only occur<br />
at the surface of the specimen, but with increasing<br />
accelerating voltage, the penetration depth increases. Thin<br />
materials such as thin opercula and radular teeth may be<br />
completely penetrated by the electron beam. The materials<br />
appear translucent and occasionally, the irregularity of the<br />
underlying mounting medium may be visible. A reduced<br />
accelerating voltage will remedy the problem, at higher<br />
magnification (>~3000x) at the expense of resolution.<br />
TABLE 1. Effect of changing SEM parameter. Only the most<br />
common factors are listed and only the major effects are noted.<br />
SEM<br />
parameter<br />
Accelerating<br />
voltage<br />
Spot size/<br />
probe current<br />
Working<br />
distance<br />
Chamber<br />
pressure<br />
high value<br />
higher resolution<br />
more charging<br />
more sample<br />
penetration<br />
narrower field of view<br />
more signal<br />
lower resolution<br />
more depth of field<br />
less resolution<br />
wider field of view<br />
less charging<br />
less resolution<br />
low value<br />
lower resolution<br />
less charging<br />
less sample<br />
penetration<br />
wider field of view<br />
less signal<br />
higher resolution<br />
less depth of field<br />
more resolution<br />
narrower field of<br />
view<br />
more charging<br />
more resolution<br />
Note that the commonly cited parameter of<br />
“magnification” depends on the size of the output (35 mm<br />
and 4x5 inches as common settings in SEM preferences),<br />
whereas the field of view (e.g., 100 µm) provides a constant<br />
reference point. A field of view of 100 µm is magnified 350x<br />
on 35 mm, but 1250x on 4x5 inches. Given the wide variety<br />
of instrument types and possible operating conditions, the<br />
familiar magnification ranges used here are adequate.<br />
A special technique to enhance surface sculpture is<br />
demonstrated in Figure 8. Most SEM images are taken using<br />
the secondary electrons. The usual side mounted secondary<br />
electron detector (in contrast to semi-in-lens designs) is<br />
usually at an angle of approximately 45°, producing an<br />
apparent illumination angle of 45°. Specimens with very<br />
subtle surface sculpture may not show it sufficiently. In<br />
photography, flat lighting just grazing the surface of the<br />
specimen may be employed, however, the vertical position of<br />
the SEM detectors is fixed.<br />
The electron beam—specimen interaction produces a<br />
number of different electrons, the two most important ones<br />
being the secondary and the backscatter electrons. The two<br />
differ in their electron energy; secondary electrons have up to<br />
-50 V, whereas backscatter electrons have between -50 V and<br />
up to slightly less than the accelerating voltage (usually -<br />
10,000–20,000 V). The more energetic backscatter electrons<br />
produce straighter trajectories than the low energy secondary<br />
detectors. As a result, slight surface irregularities can be<br />
better visualized with the higher energy backscatter<br />
electrons. As the regular backscatter electron detector is<br />
usually mounted near-coaxial with the electron beam and<br />
parallel to the specimen, it does not aid in this situation.
20<br />
GEIGER ET AL. (2007) MOLLUSCAN RESEARCH, VOL. 27
TECHNIQUES FOR STUDYING SMALL MOLLUSCAN SPECIMENS 21<br />
FIGURE 7. Illustration of different SEM imaging techniques applied to the same specimen sputter coated with gold. The shell is somewhat<br />
eroded, which often leads to greater problems with charging. As eroded specimens are often also more fragile, the specimen could only be<br />
superficially cleaned, with the remaining debris further enhancing charging problems. All images taken with Zeiss EVO40XVP at 20 kV,<br />
10 mm working distance, and 100 pA probe current (except F). A–D. High vacuum; integration of 25 frames, total imaging time 1.5<br />
minutes; line integration produced heavy charging artefacts (not shown). A. 100% secondary electron detector. Notice uneven illumination<br />
in upper right portion of shell. B. Two lower left-hand quadrants of backscatter detector. C. Signal mixing of 75% secondary electron<br />
detector from A and 25% backscatter detector from B. Notice the more even overall illumination as the backscatter signal is used to<br />
brighten up the dark portion of the shell. D. 100% backscatter detector with all four quadrants active. E, F. Variable pressure mode with<br />
chamber pressure at 30 Pa, line integration <strong>for</strong> 1.5 minutes. E. Variable pressure secondary electron detector (VPSE) with 100 pA probe<br />
current. F. VPSE with 200 pA probe current. Notice greater charging effects at suture. Anatoma proxima (Dall, 1927) (USNM 449418),<br />
Scale bar = 1 mm. Images DLG.<br />
The secondary electron detector attracts the negatively<br />
charged secondary electrons with a bias voltage of around<br />
+300 V (Fig. 8A). If the bias voltage is set to –50 V (Fig.<br />
8C), the secondary electrons are repelled, while the highenergy<br />
backscatter electrons with straight trajectories can<br />
overcome the slight bias barrier. With more negative bias<br />
voltage the effect can be further enhanced (Fig. 8D). As the<br />
electron yield is smaller, a higher probe current is usually<br />
necessary. The contribution of secondary and backscatter<br />
electrons can be varied continuously, by adjusting the bias<br />
voltage between 0 and –50 V.<br />
Specimen removal from stubs<br />
Specimens can be removed from carbon tabs and<br />
double-sided tape in dry condition if necessary, but the bond,<br />
particularly between carbon tabs and shells, is rather strong<br />
and specimens may break when attempting to remove them<br />
from the tab. This tendency becomes more pronounced once<br />
the carbon tab has been exposed to high vacuum. Specimens<br />
can be removed from the carbon tabs using 95–100%<br />
ethanol, either to remount specimens <strong>for</strong> additional views, or<br />
to be returned to the specimen vial. Cleaning colloidal<br />
graphite from a shell requires multiple washes in isopropanol<br />
or 80% ethanol. Uncoated carbon tabs can be reused a few<br />
times (e.g., when imaging type specimens). Repeated exposure<br />
to ethanol makes the glue less sticky. Specimens can be<br />
remounted on coated tabs if the mounting spot is rubbed with<br />
a blunt pin to remove the gold coat on its surface.<br />
Spray-glued specimens can easily be removed from the<br />
stub and returned to the original lot. The glue can be<br />
dissolved in butyl acetate or acetone (neither of which are<br />
very toxic nor do they evaporate too quickly), or chloro<strong>for</strong>m.<br />
These solvents are also used <strong>for</strong> cleaning used stubs.<br />
Separating the valves of minute bivalves<br />
Small wet or dry bivalves may be difficult to open since<br />
they are firmly stuck together. Avoid trying to open these<br />
when dry. The specimens, with or without the animal, should<br />
be initially passed through ethanol to break surface tension,<br />
then soaked <strong>for</strong> several hours or even a day or two in water<br />
containing a little detergent. Some additional techniques are<br />
outlined below, the choice depending on the degree of<br />
overlap at the valve margins and whether or not a little<br />
damage to the ventral margin of the valves can be accepted.<br />
• Do in a vacuum, where enclosed air may exert<br />
sufficient pressure to push the valves open slightly.<br />
• If there is little or no valve overlap, view under a stereomicroscope<br />
(and moisten periodically), while placing<br />
the specimen with one end against the thumb and the<br />
other against the <strong>for</strong>efinger (right handers) of the left<br />
hand, with the anterior or posterior end uppermost and<br />
the ventral margin facing right. In this way the valves<br />
may separate slightly, making it easier to insert the<br />
point of a scalpel or mounted razor blade fragment (a<br />
blade spreads <strong>for</strong>ces over a wide area, unlike needles or<br />
<strong>for</strong>ceps which are more liable to break or damage the<br />
valves). As soon as the tip is inserted, the bivalve can<br />
be held with the blade and cautiously pushed with its<br />
back against the finger and, if a preserved specimen, the<br />
adductor muscles cut.<br />
• Cutting the adductor muscles can also be achieved by<br />
carefully moving the specimen towards a fresh blade<br />
held vertically between the thumb and two <strong>for</strong>efingers<br />
of the right hand, the objective being to place the<br />
ventral meeting point of the valve margins squarely<br />
against the blade.<br />
• Soaked specimens can be placed in a specimen tube<br />
half filled with water and connected by a tube passing<br />
through a closure to a standard, water-driven,<br />
laboratory vacuum pump, repeatedly applying vacuum<br />
via a valve or hose clamp, with the aim of parting the<br />
valves sufficiently <strong>for</strong> them to be opened with a blade.<br />
• Very small or very fragile bivalves can be soaked in<br />
warm, diluted bleach so that a bubble of chlorine will<br />
push the valves open. Use a paint brush (with artificial<br />
hair!) or a fine pipette <strong>for</strong> <strong>handling</strong> the specimens. This<br />
method is unsuitable <strong>for</strong> highly nacreous shells, which<br />
are sensitive to bleach. Instead use weak hydrogen<br />
peroxide with a trace of KOH added to make it basic.<br />
Note that sodium lauryl sulphate is not suitable as it<br />
takes longer and does not open the valves, it only<br />
dissolves the soft tissues, not the ligament composed of<br />
tanned proteins.<br />
SEM imaging<br />
Specimens should be illustrated in standardised views.<br />
For gastropods, the coiling axis of the shell should be parallel<br />
or at a right angle to the image plane. In apertural view,<br />
showing a little of the outside of the outer lip allows better
22<br />
determination of the position of the shell, facilitating<br />
comparison. Protoconchs should be shown in apical view, at<br />
right angles to the coiling axis or parallel to the coiling axis<br />
with the transition proto- to teleoconch in the centre.<br />
Bivalves should be shown with the outline of the shell<br />
parallel to the image plane and the prodissoconch (with at<br />
least long axis parallel to image plane) should be shown in<br />
umbonal view.<br />
SEM preparation of animals<br />
External anatomy can provide many useful features. The<br />
animal should be preserved in as natural a state as possible,<br />
ideally following relaxation. In general, <strong>for</strong>malin or<br />
glutaraldehyde fixed animals dry better than those fixed in<br />
ethanol only. Additional post-fixation may be carried out<br />
with osmium tetroxide (OsO 4 ), particularly if specimens are<br />
viewed in older SEMs that necessitate high accelerating<br />
voltages as OsO 4 will add conductivity to the specimen (see<br />
Appendix 1). Post-fixation is not necessary <strong>for</strong> more modern,<br />
low voltage or variable pressure/environmental SEMs.<br />
Whether low voltage operation (< 1 kV), possibly with<br />
increased spot size, or variable pressure/environmental mode<br />
gives better results depends on the particular model of SEM<br />
and the particular specimen and it is worthwhile<br />
experimenting with various settings (see also above). Much<br />
in<strong>for</strong>mation can be obtained (Fig. 9), even using older SEMs<br />
and crudely preserved (‘vodka’) specimens, with the results<br />
usually surpassing visual examination under a<br />
stereomicroscope.<br />
Preliminary inspection<br />
Wet specimens preserved in glass tubes do not need to<br />
be removed from the tube <strong>for</strong> a quick assessment. The glass<br />
tube can be immersed completely in the same preservative<br />
and the distortion caused by the glass will disappear. An air<br />
bubble in the container will also greatly reduce the distortion.<br />
For quick approaches suitable <strong>for</strong> common and<br />
abundant species, see ‘Removing the shell the fast way’. If<br />
the specimen is rare or unique as much in<strong>for</strong>mation as<br />
possible should be obtained from it, including SEM of the<br />
GEIGER ET AL. (2007) MOLLUSCAN RESEARCH, VOL. 27<br />
shell, in<strong>for</strong>mation on external animal morphology etc.,<br />
be<strong>for</strong>e removing the radula or other relevant internal<br />
structures. The following techniques require some<br />
experience and practice with common species is<br />
recommended.<br />
It is generally easier to extract bodies from dried<br />
gastropod and bivalve specimens that have been rehydrated<br />
as opposed to continuously fluid preserved specimens. In the<br />
latter, the body is more firmly attached to the shell and it may<br />
even be useful to dry the specimen and then soak it if other<br />
methods are unsuccessful.<br />
Limpets<br />
Bodies can usually be separated from the shell, or dried<br />
in the shell (see below: Tissue preparation <strong>for</strong> SEM), which<br />
will protect the body from any damage when physically<br />
removing the body from the shell. The shell with body can be<br />
scanned or the body can be separated from the shell when it<br />
has been dried. To separate the body from the shell with<br />
minimal damage use a micro-scalpel or a piece of razor<br />
blade, not a needle. After SEM documentation, the body can<br />
be rehydrated in water <strong>for</strong> radula extraction.<br />
Coiled gastropods<br />
Because dried bodies are difficult to remove, the shell<br />
should be photographed (SEM or standard<br />
macrophotography) be<strong>for</strong>e trying to remove the body in case<br />
the shell is damaged. Tightly coiled species are more difficult<br />
than those with few whorls and a large aperture. From those<br />
with a large aperture, the body can usually be extracted with<br />
a fine needle with a small hook by inserting it at the<br />
columellar side after rehydration in weak buffered <strong>for</strong>malin<br />
and traces of a neutral detergent. Rehydration may take an<br />
hour to a couple of days depending on the condition of the<br />
body and the size. To speed up rehydration, evacuate the air<br />
with a vacuum pump; use a small container to avoid<br />
implosion by the glass breaking. The water may suddenly<br />
start boiling when the pressure drops. A regular 20 ml glass<br />
jar with a rubber stopper, connected to a water-jet pump with<br />
a transparent polyethylene hose works well. In this way airbubbles<br />
trapped inside the shell are replaced with water.<br />
FIGURE 8. Different approaches to visualize surface texture using SEM as shown on a fossil micromollusc kindly made available by Mike<br />
Vendrasco and Christine Fernandez (phosphatic internal mold of Mellopegma sp., Middle Cambrian, Georgina Basin, Australia). All images<br />
were taken on a Zeiss EVO40XVP with an accelerating voltage of 20 kV and rather high probe current of 300 pA at a working distance of<br />
10 mm. Scale bar = 100 µm. A. Secondary electron detector (SED) with bias of +300 V. This is the usual operating condition of the SED. B.<br />
SED with bias of ±0 V. C. Secondary electron detector with bias of -50 V. All secondary electrons are repelled, and the SED operates as a<br />
backscatter detector. D. SED with bias of -250 V. SED operating as a backscatter detector, excluding the secondary electrons as well as the<br />
lower energy backscatter electrons. E. All four quadrants of QBSD. Macroscopic relief is completely obscured, and only microscopic<br />
irregularities are visible. F. Single quadrant of four quadrant scintillating backscatter detector (QBSD). It shows slightly more macroscopic<br />
contrast than G, but also has a slightly lower signal to noise ratio as shown by the somewhat more granular image. G. Two adjacent quadrants<br />
of QBSD with normal polarity producing positive image. H. Two adjacent quadrants (opposite ones from G) of QBSD with inverted polarity<br />
producing negative image. I. G and H combined. Notice fine detail of surface is best visible in A and E. The macroscopic undulations of the<br />
shell are best seen with the SED used as a backscatter detector (C and D), The combination of normal polarity and inverted polarity signals<br />
from the QBSD highlights the macroscopic undulations, while smoothing the minor surface irregularities. Images DLG.
TECHNIQUES FOR STUDYING SMALL MOLLUSCAN SPECIMENS 23<br />
Usually the body cannot simply be pulled out straight,<br />
but is ‘unscrewed’ while removing. Often the body is<br />
retracted too far to be extracted as described above. Make a<br />
small hole in the shell about 1.25 whorls up the spire from<br />
the outer lip (see under Tools: Drills <strong>for</strong> methods). Carefully<br />
drilling the hole will not destroy the shell and good SEM
24<br />
pictures can still be obtained. Then cut the body, particularly<br />
as much of the columellar muscle as possible, using a needle.<br />
The lower body can then be pushed out either directly, or<br />
indirectly by inserting small pieces of wet tissue paper or<br />
cotton wool through the hole with fine <strong>for</strong>ceps or a needle.<br />
Some of the visceral coil will be probably be left in the shell,<br />
but the head-foot is usually rather easily removed.<br />
Species with a very tightly coiled shell may be difficult<br />
to process without severe damage to the shell. Such<br />
specimens can be broken in two at mid-height, soaked and<br />
the soft parts flushed out by inserting the apical part of the<br />
lower half into a fine pipette. Let the water drain into a fine<br />
mesh that can be examined under the stereo-microscope if<br />
the body is fragmented. Sometimes the radula can be<br />
obtained even from almost completely decayed and<br />
fragmented remains of a poorly preserved or rotten<br />
specimen. The two remaining pieces of the shell can usually<br />
be glued together. Dilute the glue if it dries too fast.<br />
The easiest way to manipulate the specimens is to hold<br />
the specimen between index finger and thumb of your hand<br />
with less dexterity (usually left) and moisten the specimens<br />
and the fingertips with the immersing fluid using a fine<br />
brush; use gloves if necessary (or work with harmless<br />
chemicals) and a stereo-microscope as needed. With your<br />
right hand, apply the appropriate tools (pins, <strong>for</strong>ceps) to<br />
remove the body. This technique is generally superior to<br />
manipulating the specimen fully immersed in a suitable dish<br />
with two instruments (needles, brush, <strong>for</strong>ceps). Attempts to<br />
construct specimen cradles with pins in a wax tray are<br />
disappointing. The finger-method works with specimens<br />
down to less than 1 mm in size.<br />
Opercula<br />
Many microgastropods produce opercula of a variety of<br />
<strong>for</strong>ms and sturdiness: from strong calcified ones to wafer<br />
thin varieties. It is usually still attached to the foot and may<br />
be retracted into the aperture of the shell. To avoid damage to<br />
the operculum when extracting the body, try removing the<br />
operculum by inserting under it either a micro-scalpel, a pair<br />
of fine watchmakers <strong>for</strong>ceps, or a fine needle. If the<br />
operculum falls off at the first touch, the specimen is<br />
probably more or less decayed; there may be little detail<br />
available in the soft parts and the radula may need extra care.<br />
During the process of extraction, hold the shell under the<br />
microscope between thumb and index finger (as described<br />
above). Opercula are easily imaged by SEM when still in<br />
position in the aperture if the animal is not too far retracted<br />
and very thin opercula are often better imaged in this way.<br />
Contrast of structural details such as growth rings may be<br />
indistinct when mounting thin corneous opercula on doublesided<br />
carbon adhesives. If separate mounting of thin opercula<br />
is desirable, mount them only with part of the operculum<br />
touching the carbon adhesive, or place the moist operculum<br />
on dry PVA glue.<br />
Removing the shell the fast way<br />
As an alternative to the above methods, the shell can be<br />
decalcified in dilute hydrochloric acid (HCl: 2–5%), which<br />
GEIGER ET AL. (2007) MOLLUSCAN RESEARCH, VOL. 27<br />
should only take a few minutes. However, some bubbles will<br />
<strong>for</strong>m and the procedure may rupture the tissues when there<br />
are internal deposits of carbonates. An alcoholic solution of<br />
HCl is less damaging to the soft parts as less carbon dioxide<br />
is generated and the bubbles are smaller due to the lower<br />
surface tension of the ethanol. Decalcification with ethylene<br />
diamino-tetraacetic acid (EDTA) is possible in aqueous<br />
solutions (5–20%, pH 7.0 adjusted with 1N NaOH), and is<br />
favoured by some <strong>for</strong> animal preparation <strong>for</strong> histology (not<br />
further covered here), but is very slow. A mixture of <strong>for</strong>mic<br />
or acetic acid and <strong>for</strong>malin can be used to fix and decalcify in<br />
a single step (as in Bouin’s fluid). Cracking the shell is<br />
another simple option to get access to the animal (see section<br />
Storage above).<br />
Once the shell is removed from the body, several<br />
options are available: investigation of external morphology<br />
by light microscopy or SEM (see Tissue preparation <strong>for</strong> SEM<br />
below); investigation of internal anatomy by dissection or<br />
histology or radula extraction.<br />
Tissue preparation <strong>for</strong> SEM<br />
Once the animal has been removed from the shell, it<br />
must be dried prior to further inspection using the SEM. In<br />
some instances, it is advisable to dry the body inside the shell<br />
and examine the exposed head-foot characters visible on the<br />
relaxed and nicely extended animal. Drying of tissue from<br />
aqueous or alcoholic solutions directly leads to severe tissue<br />
shrinkage and makes detailed inspection of the external<br />
morphology impossible.<br />
Proper drying of animals can be carried out by three<br />
methods: critical point drying (CPD: Fig. 9);<br />
hexamethyldisilizane (HMDS); and freeze drying (Sasaki<br />
1998). CPD and freeze drying require specialised equipment.<br />
HMDS, on the other hand, can be used at room temperature,<br />
although a fume hood is necessary <strong>for</strong> safe <strong>handling</strong> of the<br />
liquid. Both CPD and HMDS often give suitable results<br />
although there are sometimes unexplainable failures. In both<br />
cases, the specimen has to be taken through a graded ethanol<br />
series to pure, undiluted electron microscopy grade ethanol.<br />
‘Pure’ ethanol used <strong>for</strong> storage of specimens is actually only<br />
approximately 95% and is unsuitable <strong>for</strong> tissue dehydration,<br />
and most problems arise due to insufficient dehydration.<br />
From pure ethanol, the ethanol has to be replaced by either<br />
CO 2 in the case of CPD, or HMDS, through several fluid<br />
changes. For HMDS, better results are obtained if the liquid<br />
is evaporated more slowly in a covered dish overnight, as<br />
opposed to an open one in a few minutes. For freeze drying,<br />
the specimen is placed in t-butyl alcohol and the freeze<br />
drying machine automatically applies a vacuum to the cooled<br />
specimen vessel. The advantage over CPD is that typically<br />
the equipment is all automatic, not requiring the operator to<br />
fill and empty the specimen reservoir with liquid CO 2 . There<br />
are some semiautomatic CPD. The results of CPD and freeze<br />
drying are comparable (see also Goldstein et al. 1992:<br />
chapter 12.5.4, fig. 12.9). Specimens from historical<br />
collections are often suitable <strong>for</strong> SEM tissue preparation<br />
(Fig. 9).
TECHNIQUES FOR STUDYING SMALL MOLLUSCAN SPECIMENS 25<br />
FIGURE 9. Comparison of critical point dried historical specimen with recently collected material. A, B. Old specimen: Puncturella<br />
noachina (Linnaeus, 1758), SMNH old catalogue #116, Pröven, Greenland, 29–73 m, Leg O. Torell. A. Entire animal. Scale bar = 2 mm. B.<br />
Part of gill enlarged. Scale bar = 200 µm. C, D. Specimen collected two weeks be<strong>for</strong>e CPD, May, 1996. Emarginula crassa Sowerby I, 1813,<br />
Koster Area, Sweden, approximately 50 m. C. Entire animal. Scale bar = 2 mm. D. Part of gill enlarged. Scale bar = 200 µm. Images AW.
26<br />
Extraction of radulae from micromolluscs<br />
The radulae of micromolluscs can be very small, often<br />
making manipulation daunting. However, with some practice<br />
and patience, radulae a fraction of a millimetre long can<br />
routinely be successfully mounted. If possible, use an adult<br />
specimen unless an ontogenetic study is specifically carried<br />
out, as the radulae of many species change morphology with<br />
age (Warén 1990). In some cases so-called generic characters<br />
are obtainable only from adult radulae.<br />
It is recommended that specimens used <strong>for</strong> radular<br />
preparation should be photographed prior to radular<br />
extraction, especially if there is any doubt as to identity. The<br />
shell may be destroyed when attempting to remove the body<br />
and, if chemical treatment is used, tissue-dissolving agents<br />
contribute to the deterioration of the shell. In some cases,<br />
species-level identification requires the observation of<br />
minute details such as protoconch microsculpture that cannot<br />
be observed with a light microscope and necessitates the use<br />
of SEM.<br />
While the radula can be dissected from larger<br />
microgastropods, there is a danger of damaging it. A safer<br />
method is to dissolve the buccal mass or even the entire<br />
animal.<br />
There are a number of methods used <strong>for</strong> dissolving the<br />
tissue surrounding the radula. The simplest and quickest<br />
methods can be used <strong>for</strong> most gastropods. Gentler, more time<br />
consuming and more complicated methods may be necessary<br />
<strong>for</strong> some of the groups with delicate radulae or radular<br />
membranes. The latter include:<br />
• Patellogastropoda. Damaged by strongly alkaline<br />
agents; mineralised cusps fall off and the remaining<br />
parts are partly dissolved.<br />
• Monoplacophora. Teeth damaged by strong alkali.<br />
GEIGER ET AL. (2007) MOLLUSCAN RESEARCH, VOL. 27<br />
• Lepetelloidea. Teeth may get distorted and crack in<br />
strong KOH.<br />
• Vetigastropoda.<br />
o In some with thin and slender teeth (e.g.,<br />
calliostomatids, trochaclids), the teeth become<br />
softer and tend to stick together. These should,<br />
after rinsing and cleaning, be soaked in 50%<br />
ethanol and mounted in at least 80% ethanol, to<br />
reduce the risk of the teeth sticking together. In<br />
ethanol the teeth become stiffer and there is less<br />
surface tension.<br />
o In some fissurellids (Cosmetalepas) the teeth fall<br />
off the radular membrane when treated with strong<br />
alkali.<br />
We advise against trying to dissolve the animal inside<br />
the shell. Strong NaOH or KOH will damage the organic<br />
matrix in the shell (Strasoldo 1991) and the remaining<br />
hydroxide will react with aerial carbon dioxide, to <strong>for</strong>m a<br />
crystalline or powdery coating that cannot be removed (Fig.<br />
10). However, with some sturdy gastropods, such as<br />
marginellids, no adverse effects have been reported (Coovert<br />
and Coovert 1987) and short periods of maceration of tissue<br />
inside the shell can be tried. Shells of more fragile<br />
gastropods, such as scissurellids, will break when sonicated<br />
after such treatment, whereas they are stable be<strong>for</strong>e radular<br />
extraction. Shells exposed to tissue dissolving agents also<br />
deteriorate over time and can be completely broken down in<br />
as little as 10 years, while enzymes in detergents can destroy<br />
a shell in a few hours, due to the low pH. Proteinase K,<br />
commonly used in DNA extraction from tissues, is most<br />
destructive to the shell. Whereas hydroxide treatment usually<br />
leaves a recognisable shell behind, proteinase K will<br />
fragment shells.<br />
FIGURE 10. A. Protoconch of shell (Scissurellidae) after sodium hydroxide treatment. B. Similar protoconch without hydroxide<br />
treatment. Note the tunnelling and recrystallisation in A. Scale bars = 100 µm. Images DLG.<br />
Standard method<br />
The tissue of the body can be dissolved in 5–40%<br />
NaOH, KOH, bleach, or by using proteinase K as part of<br />
DNA extraction. Sodium dodecyl sulphate (SDS = sodium<br />
lauryl sulphate) provides a further alternative. The hydroxide<br />
concentration indicated in the literature is quite variable;<br />
higher concentrations are advocated by those who like to<br />
speed up the dissolution of the tissue (e.g., Coovert and
TECHNIQUES FOR STUDYING SMALL MOLLUSCAN SPECIMENS 27<br />
Coovert 1987), which can be additionally accelerated by<br />
heating specimens up to 100°C. Such drastic methods are<br />
usually not necessary <strong>for</strong> micromolluscs and usually lower<br />
hydroxide concentrations (5–10%) and no or low heat (30–<br />
50°C) are suitable. Lindberg (1977) noted adverse effects of<br />
heating on patellogastropod radulae, particularly the<br />
contraction of the radular membrane and also the separation<br />
of teeth from the radular membrane.<br />
Bleach offers a low cost option but dissolving power<br />
varies from brand to brand. Test treatments should be carried<br />
out be<strong>for</strong>e risking rare material. Some brands of bleach<br />
dissolve soft tissue in a shorter time and cause fewer<br />
artefacts on radular teeth than KOH. Some of us consider<br />
bleach too aggressive and favour the inexpensive SDS, while<br />
others (AW, WFP) prefer KOH, as the specimen can be left<br />
in the solution <strong>for</strong> several days if necessary. With dissected<br />
patellogastropod radulae, to avoid destruction TS and AW<br />
add bleach drop by drop until maceration is visible.<br />
Never place paper identifying tags in the extraction<br />
solution, because crystal deposits will <strong>for</strong>m on the radula<br />
(e.g., Geiger 1999: figs. 11, 12). It is not clear what the<br />
chemical composition of the deposit is, but it may be <strong>for</strong>med<br />
as a precipitate from the hydroxide and the filler substance<br />
used in most papers. Always label the containers on the<br />
outside.<br />
Manipulation of the radula and the body can be<br />
achieved by a variety of implements; <strong>for</strong>ceps and needles,<br />
paint brushes, Pasteur and Eppendorf pipettes (see Tools<br />
above).<br />
Gentle methods. Patellogastropod radulae can be<br />
extracted by dissolving the head or body in a large quantity<br />
of very weak (ca 0.1%) KOH at room temperature. A small<br />
body requires several days, but the radula is not damaged.<br />
The body will not dissolve completely, but after a few days<br />
the buccal mass with the radula can usually be dissected out<br />
with no great risk of damage. After removal, the radula<br />
should be soaked even longer in a new bath of the same<br />
solution to remove most of the soft tissue, although usually<br />
some remains. If necessary, the remainder can be removed<br />
by quickly dipping the radula in lukewarm, diluted (1:3–1:5)<br />
commercial bleach <strong>for</strong> a few seconds and then vigorously<br />
rinsing it. Make sure that the radula can be retrieved quickly<br />
if accidentally dropped into the bleach.<br />
A strong solution of sodium lauryl sulphate is very<br />
gentle but takes a few days. It is difficult to get the radula<br />
completely clean but rinses in hot water or diluted bleach as<br />
above can be used. For larger radulae a fine paint brush can<br />
be used as a starter.<br />
Risso-Domingue (1961) discussed other amines useful<br />
<strong>for</strong> radular extraction, particularly in cases where the radular<br />
membrane is weak and hydroxide treatment results in teeth<br />
becoming isolated, rather than remaining attached to the<br />
radular membrane.<br />
Maceration<br />
For the maceration process, three different types of<br />
vessels can be used. All dishes should be made of glass;<br />
plastic charges statically and metal surfaces produce<br />
precipitates with hydroxide solutions.<br />
• Medium specimens (2–6 mm). Covered square embryo<br />
bowl is suitable, filled to about half its depth. When<br />
moving, be careful to avoid the fluid entering between<br />
the bowl and the lid.<br />
• Small (< 2 mm). Use a depression slide, 5–6 mm thick,<br />
with a depression as deep as possible and<br />
approximately 15 mm diameter. As a lid use a<br />
depression slide with a wider depression of any depth<br />
(as described above). Never use a regular, flat slide or<br />
cover slip because condensation will enter the space<br />
between the lid and bottom and the two slides will stick<br />
together and sometimes also contact the fluid in the<br />
bowl. Avoid jerky movements (and hence slop) when<br />
transporting the slide sandwich, or when removing the<br />
lid.<br />
Eppendorf tubes are not recommended, despite the<br />
advantages of a tight fitting lid and the possibility of<br />
spinning down the solids (i.e., radula and shell), because it is<br />
very difficult to remove the radula from the narrow tube.<br />
Heat incubation is best accomplished in a small<br />
incubator that allows <strong>for</strong> precise (within 2–3°C) temperature<br />
control. Cabinet incubators, slide warmer plates and dry bath<br />
incubators are suitable. The incubator should be situated<br />
close to the microscope preparation area to minimise risks<br />
associated with transport.<br />
It is important to cover the container during maceration,<br />
particularly if heating the specimen, because crystals of<br />
sodium carbonate (flocculent material of Mikkelsen 1985)<br />
may otherwise <strong>for</strong>m due to absorption of carbon dioxide<br />
from the air. These do not redissolve when adding small<br />
amounts of water and make it very difficult to find a tiny<br />
radula. The <strong>for</strong>mation of insoluble crystals has been<br />
observed particularly when macerating the animal within the<br />
shell, but here a calcium compound may be involved.<br />
Sometimes different water-soluble crystals are <strong>for</strong>med after<br />
heating.<br />
A number of chemicals can be used <strong>for</strong> maceration.<br />
Among the hydroxides, KOH is better than NaOH since it is<br />
less hygroscopic and reacts less quickly with aerial carbon<br />
dioxide. Always use analytic grade and preferably the kind<br />
that comes as small spheres or half-spheres because the<br />
powdered <strong>for</strong>m reacts faster with aerial carbon dioxide. Do<br />
not use a stock solution but prepare it fresh in situ with<br />
distilled water, to avoid unnecessary precipitates. The KOH<br />
tablets should be semitransparent-porcellanous; they become<br />
white and dull with age because they react with aerial carbon<br />
dioxide. Thus, keep the KOH in an airtight container.<br />
Proteinase K is a safe cleaning agent of radulae from<br />
fresh, frozen, or alcohol fixed material and will not result in<br />
any damage to the radula (cf., prolonged exposure to<br />
hydroxides). Radula and operculum can be collected from<br />
the filter of spin columns (Fig. 11). Cut the spin column just<br />
above the plastic ring retaining the filter and carefully<br />
examine the filter as well as the plastic wall holding the filter<br />
under a stereomicroscope. If the pieces cannot be found,
28<br />
slowly rotate the column bottom while carefully pulling the<br />
filter from underneath the retention ring from one segment<br />
after the other. Wash the radula in water and mount. Retrieval<br />
GEIGER ET AL. (2007) MOLLUSCAN RESEARCH, VOL. 27<br />
rate is approximately 80–90%. Proteinase K, though, does<br />
not work well on <strong>for</strong>malin fixed material, in which proteins<br />
of the tissue have been cross-linked (Holznagel 1998).<br />
FIGURE 11. Recovery of the radula from a spin column used <strong>for</strong> DNA extraction. A. Cut the column above the retainer ring <strong>for</strong> the filter.<br />
B. Oblique view of the cut column. The arrow highlights the radula. C. Enlargement of B with the radula visible near the edge of the filter<br />
retainer ring. D. The radula has been removed with fine <strong>for</strong>ceps and is placed into a gelatine capsule <strong>for</strong> temporary storage. Images DLG.<br />
Cleaning the radula<br />
To find the radula after maceration, examine the<br />
container under the stereo-microscope, using the substage<br />
illuminator. Incident light may make particles shine and hide<br />
the radula. Horizontal illumination through the sides of the<br />
glass vessel may be employed if a substage illuminator is not<br />
available (pseudo dark field), but will only be effective if the<br />
fluid is clear.<br />
The radula has to be washed in water and then possibly<br />
in ethanol. Two methods are outlined below.<br />
In the first, fluid is exchanged, minimising <strong>handling</strong> of<br />
the radula. The fluid can be removed with a Pasteur pipette<br />
or a pipettor and discarded into a separate container in case<br />
the radula is inadvertently removed with the fluid. The<br />
remaining fluid film can be blotted with a fragment of folded<br />
paper tissue, keeping it a safe distance from the radula. A<br />
small radula that is stuck to the paper will usually be lost<br />
because it is difficult to distinguish the radula from the paper<br />
fibres. It is easiest to move the radula when dry by touching<br />
it with a moist tungsten needle, or very fine, moist insect pin.<br />
Eyelashes or other hairs are too flexible <strong>for</strong> radular<br />
manipulations.<br />
In the second method, the radula is transferred in a<br />
succession of fluids, which prevents it from drying. The<br />
radula is picked up with fine entomological <strong>for</strong>ceps, a bent<br />
needle, or with a pipettor and transferred into a series of<br />
washing solutions. Do not use a paintbrush to transfer a<br />
radula, as it can easily get entangled in the bristles and lost.<br />
Minute radulae can be washed in drops of water on a glass<br />
histology slide. Clean radulae can be stored in tubes in 80%<br />
ethanol.<br />
Sometimes the maceration solution is very dirty and it<br />
may help to dilute it with distilled water or more KOH<br />
solution. Heat may also help if nothing else does. As a final<br />
resort, the contents of the container can be poured through a<br />
very fine sieve with low edges. The mesh should be a
TECHNIQUES FOR STUDYING SMALL MOLLUSCAN SPECIMENS 29<br />
maximum of 1/10 of the estimated length of the radula (as a<br />
general guideline, the radula is approximately one tenth to<br />
one third the length of the shell/body). Rinse with hot water,<br />
which will usually dissolve the remaining grease, tissues and<br />
particles.<br />
Medium size radulae may be brushed with a very fine<br />
paint brush (#00 or #000, preferably artificial hair), while<br />
holding the end of the radula with a needle pressed against<br />
the glass.<br />
With very small radulae there are few possibilities <strong>for</strong><br />
further cleaning; they can be moved in the water or scratched<br />
with a fine needle against the glass so it makes small<br />
vibrating jerks. Use a needle with its tip bent close to 90° and<br />
scratch with the tip at right angle to the glass. If the radula<br />
still looks dirty, try a new KOH bath. If nothing else helps,<br />
try diluted, warm bleach (rather than cold, more concentrated<br />
bleach, as less hypochlorite is carried over to the rinse).<br />
Neogastropod radulae have a sheath of thin, transparent<br />
cuticle surrounding the part not in use. This should be<br />
removed by a quick dip in commercial bleach and<br />
subsequently rinsed, or with a fine needle when it has been<br />
glued and is drying. Do this at the same time as the lateral<br />
teeth are unfolded. Do not be concerned about the radular<br />
membrane extensions that under-lie the anterior part of the<br />
radula in vetigastropods and taenioglossate caenogastropods.<br />
They may even facilitate mounting.<br />
In general, do not use an ultrasonic cleaner, unless there<br />
are spare radulae. It is a good method <strong>for</strong> cleaning many<br />
taenioglossate radulae, but in some cases teeth may fall off,<br />
get entangled, or the radula may disintegrate entirely. Not<br />
even experienced practitioners can predict the result.<br />
SEM mounting of micromollusc radulae<br />
Mounting can be achieved by a variety of techniques, the<br />
choice mostly depending upon size and the type of radula<br />
(Fig. 12). <strong>Techniques</strong> <strong>for</strong> light microscopy are not discussed<br />
here as they are detailed elsewhere (e.g., Mikkelsen 1985;<br />
Coovert and Coovert 1987; Bradner and Kay 1995).<br />
Hickman (1977) discussed the types of in<strong>for</strong>mation to be<br />
gained from both light and electron microscopy of radulae<br />
and stressed the complimentary nature of both techniques.<br />
Large radulae (>1 mm long) can be mounted on doublesided<br />
sticky tape, or double-sided carbon tabs. Medium sized<br />
radulae can be mounted on double-sided sticky tape and<br />
manipulated in a drop of water or ethanol (Fig. 12D). Some<br />
workers also like to roll the radula onto pins or conical<br />
mounts as the in<strong>for</strong>mation gained increases the more the<br />
radula is folded or twisted (Bradner and Kay, 1995). The<br />
slow evaporation method of Moretzsohn (2004) seems to<br />
work well <strong>for</strong> larger radulae, however it is not clear whether<br />
it would work as well if applied to the preparation of small<br />
radulae. Minute radulae can be dried directly onto a piece of<br />
coverslip (see below). Consideration of storage options and<br />
times should also be taken into account when determining<br />
the mounting method used.<br />
Orientation<br />
Identifying the orientation of the radula can be difficult.<br />
Use the highest magnification of the dissecting microscope.<br />
If the radula is too small to see individual teeth, rely upon the<br />
appearance. The anterior margin of the radula with<br />
completely <strong>for</strong>med teeth has two flaps. The teeth there are<br />
facing outwards from the curve. The posterior end of the<br />
radula is tapered and thinner than the anterior part.<br />
The upper and lower surface of the radula can be<br />
difficult to distinguish but they reflect light differently; the<br />
underside has a more glassy appearance, whereas the top is<br />
more sparkling. The long axis of the radula tends to curl with<br />
the base inside; the curling of the radula along its long axis is<br />
often impossible to see. It is easy to distinguish which way<br />
up a radula is lying by transferring a wet radula to a fragment<br />
of a cover slip on a slide and examining it under low-power<br />
using a compound microscope. The radula can then be<br />
mounted directly on the cover slip. For very small radulae, it<br />
may be difficult to judge whether it has been properly<br />
mounted. To ensure suitable results, several radulae can be<br />
mounted, or the radula can be folded in a L or V shape so<br />
that both sides are facing upwards (this method is especially<br />
useful <strong>for</strong> elongate radulae and <strong>for</strong> species with short teeth).<br />
Tilting the stub towards the light will usually show the<br />
reflection pattern better.<br />
Special techniques <strong>for</strong> small radulae<br />
Several of techniques have been successfully used to<br />
mount very small radulae. These include the use of different<br />
surfaces such as:<br />
• Double-sided sticky carbon tabs (Fig. 12C). Other<br />
sticky substances include double-sided tape and wet,<br />
blackened, photographic paper. Place a small drop—the<br />
amount of water that sticks to the head of a fine pin—<br />
on one of these surfaces mounted on a metal stub. Place<br />
the wet radula into this drop and orient it.<br />
• Radulae of species with many teeth per row (e.g.,<br />
rhipidoglossate, ptenoglossate, many pulmonates) can<br />
be placed directly on a glass cover-slip glued onto a<br />
stub. Orientate the radula in a small drop of water and<br />
let the water evaporate. Excess water can be removed<br />
with great care with a fine strip of filter paper (see<br />
above). Alternatively, pull the radula out of a drop of<br />
water and let it dry in place. The radula will adhere to<br />
the glass without any need <strong>for</strong> adhesive. Some narrow,<br />
taenioglossate radulae may tend to spring off the glass<br />
and may need to be mounted on carbon tape. Radulae<br />
mounted on cover glass can, with some practice, be<br />
removed with water even after viewing in the SEM.<br />
• Glue a histology cover-slip (round, 12 mm diameter) to<br />
the mid-point of the histo-slide with a very small<br />
amount of saliva. Let it dry well in an incubator. Cover<br />
part of the cover-slip with a thin layer of
30<br />
thoroughly, preferably overnight in an incubator. When<br />
transferring radulae onto the cover slip, be careful to<br />
prevent water getting under the cover slip as it will<br />
unstick it.<br />
The glass cover slip is released from the histo-slide base<br />
by applying some water to the edge of the cover slip.<br />
Capillary <strong>for</strong>ces will pull the water under the cover slip<br />
and dissolve the glue. The loose cover slip is then<br />
mounted on a SEM stub with new glue.<br />
• Rhipidoglossate (Vetigastropoda) and docoglossate<br />
(Patellogastropoda, Polyplacophora) radulae have<br />
overlapping lateral and marginal teeth, which obscure<br />
other teeth. To mount these types of radulae, glue some<br />
thin pieces of wire, or hair, or needles of a diameter<br />
close to the width of the radula and cover them with<br />
glue (Fig. 12A, B). Cover slips may also be prepared<br />
with a series of wires etc. of different widths. Radulae<br />
can then be mounted longitudinally, on top of these<br />
wires with the marginal teeth bent outwards and<br />
downwards. This af<strong>for</strong>ds a better view than mounting<br />
radulae across the wire (e.g., Strasoldo 1991), but<br />
requires some practice. Breaking up a flat-mounted<br />
radula will also give the necessary data.<br />
The orientation of a mounted radula can be doublechecked<br />
under a light microscope with a 25 or 40x objective<br />
although care is needed as the working distance is only 1–0.2<br />
mm, depending on the lens. For radulae mounted on glass<br />
slides, commonly available transmitted light microscopes<br />
can be employed. Stub mounted radulae can be checked with<br />
compound microscopes equipped <strong>for</strong> (or improvised) epiillumination<br />
or with high power stereomicroscopes.<br />
A radula that has been accidentally improperly mounted<br />
can often be released from the mounting surface.<br />
• For PVA glue, add water with a paint brush or a fine<br />
pipette, soak the radula, remove and remount it. Do not<br />
disturb the glue excessively, as it may invade the radula.<br />
• If mounted on double-sided carbon tabs or tape, a<br />
radula can be released by soaking it in a large drop of<br />
water <strong>for</strong> a minute and peeling it off the carbon tab from<br />
one end. Then, the radula may be remounted and dried<br />
again. Once the radula has been sputter coated and<br />
viewed in the SEM, the radula is more firmly stuck to<br />
the carbon tab. Water will usually not be sufficient to<br />
release the radula, but ethanol usually works. Coated<br />
GEIGER ET AL. (2007) MOLLUSCAN RESEARCH, VOL. 27<br />
radulae are usually stiffer and more brittle than fresh<br />
ones.<br />
Very small specimens<br />
The following variation of the method above has been<br />
used <strong>for</strong> very small radulae (e.g., those of cimids with a<br />
length of ca 60 µm) or post-larval gastropods. Soak the<br />
specimen in a small quantity of distilled water: 1–6 drops<br />
with a fine pipette in the depression slide or 1/3 or less of the<br />
depth of the solid watch glass. Dissolve 1/4 of a tablet of<br />
KOH to 50 µl (= 1–2 drops) of water. The tablets can be<br />
readily split using a small stainless wire cutter. Heat the<br />
solution in the incubator at 50°C <strong>for</strong> 15 minutes or a little<br />
more. Usually the specimen will not dissolve but remain in a<br />
lump of clarified tissues. Transfer the lump with a needle<br />
(bent 90°), or a pair of <strong>for</strong>ceps (an inferior method because<br />
more fluid is transferred) to a drop of distilled water on a<br />
cover-slip. Usually the lump of tissue will dissolve in a<br />
fraction of a second. Add a drop of distilled water, close to,<br />
but separated from, the point where the specimen was<br />
dissolved and pull the radula over to this without allowing<br />
the two drops to merge. Remove the dirty water with a small<br />
piece of lint free tissue curled around the tips of a pair of<br />
<strong>for</strong>ceps and pinched in position by a little rubber band<br />
around the upper part of the <strong>for</strong>ceps. Wash the radula a<br />
couple of times more—the radula should now be in very<br />
clean water.<br />
Manipulation of radula<br />
Manipulation techniques vary with the mounting<br />
surface chosen. Mark the position of the radulae, because<br />
they are often easier to spot with a light microscope than in<br />
the SEM.<br />
For carbon tabs, the radula can be manipulated in a<br />
small (preferably distilled) water drop using a pair of fine<br />
tungsten needles. The water will evaporate at room<br />
temperature in one to two minutes (ethanol evaporates too<br />
fast <strong>for</strong> many small radulae, although it works very well with<br />
larger radulae and has less surface tension than water [but see<br />
remarks on some vetigastropod radulae above]). The surface<br />
tension of the water will help in flattening the radula along<br />
its long axis. At the point when the radula is still moist,<br />
but when there is no free water around the radula (a period of<br />
about two to three seconds), gently spread the radula out with<br />
the needles. The outer rows of radular teeth tend to fold<br />
over the central field when they dry, there<strong>for</strong>e it is important<br />
FIGURE 12. A, B. Radulae mounted on long axis of pins. Scale bar = 2 mm. B, enlarged view of A. Scale bar = 200 µm. C. Assorted radulae<br />
mounted on double sticky tape/carbon tab. Scale bar = 2 mm. D. Radula of Scissurella mirifica (A. Adams, 1862) showing tear in centre. Scale<br />
bar = 200 µm. E. Enlargement of D showing full exposure of base of lateral and marginal teeth. Scale bar = 20 µm. F. Same radula as D. in<br />
area not torn; note less exposure of the base of the teeth. Scale bar = 20 µm. G. Dikoleps nitens (Philippi, 1844) [Skeneidae] juvenile. Scale bar<br />
= 10 µm. H. Dikoleps nitens adult, approximately 1 mm shell diameter. Scale bar = 10 µm. I-K. Haliotis discus hannai Ino, 1953 seven days<br />
old larvae from a culture in Japan. I. Entire radula. Scale bar = 10 µm. J. Full width of row enlarged. Scale bar = 10 µm. K. Larval shell of<br />
animal from which radula was obtained. Scale bar = 100 µm. Images: A–C, G–K: AW; D–F: DLG.
TECHNIQUES FOR STUDYING SMALL MOLLUSCAN SPECIMENS 31
32<br />
to physically spread the radula open. If the spreading does<br />
not succeed, place a drop of (distilled) water on the radula<br />
and try again. Only one part of the radula needs to be in a<br />
good orientation without too much damage. Breaking up the<br />
radula into segments and separating some teeth will increase<br />
the in<strong>for</strong>mation available (Figs 12D, E, G). For this fine<br />
manipulation holding one’s breath helps, because ribcage<br />
movement induces movement in the arms and hands. Mark<br />
the radulae by drawing a circle around them with an old<br />
needle or pair of <strong>for</strong>ceps.<br />
On glass slides, start by straightening out the radula. If<br />
it is long, you may cut it to get a better view of tooth bases.<br />
Small radula may be cut with two needles, crossing them to<br />
imitate a pair of scissors. Start with the front of the radula,<br />
because the posterior part of the radula is usually easier to<br />
work with, as the teeth are normally not fully <strong>for</strong>med. Pull<br />
out the front half with a needle to the edge of the water,<br />
preferably tooth side up and at a right angle to the edge.<br />
Quickly pull it out from the water with the needle, across the<br />
glass and up on the glue bed. This requires some practice.<br />
The intention is that the wet radula will soak the dry glue<br />
enough to make it stick and firmly attach the radula. Wet<br />
glue would invade the radula due to capillary <strong>for</strong>ces.<br />
While the radula is drying, after it has started sticking to<br />
the substrate but be<strong>for</strong>e it is dry, spread out the lateral teeth,<br />
preferably so they laterally stick to the glue. Use a needle<br />
bent like an ice-hockey stick. You can also use a moist triple<br />
zero paint brush, or a cat’s whisker in a holder works well <strong>for</strong><br />
smaller radulae. Small radulae usually stick without glue.<br />
The position of the radula can be marked with a fine tipped<br />
pen or dots of PVA glue.<br />
A dry, flat-mounted radula can either be torn in the<br />
outer part of the central field, approximately in the middle of<br />
the ribbon, or a few rows of the radula can be cut with a<br />
scalpel (Figs 12D, E, G) or torn with needles. Tearing a<br />
radula can provide a better view of the basal plates of the<br />
teeth and the teeth in the central field of Patellogastropoda.<br />
In vetigastropods, it will often also show diagnostic teeth at<br />
the boundary of the lateral and marginal tooth fields (lateromarginal<br />
plate), which are typically obscured one behind the<br />
other. Although the result of such destructive approaches is<br />
often unpredictable, it is recommended. Curving of the<br />
radula (e.g., by using wire mounting) will also provide good<br />
visual access to the base of the teeth, but a physical<br />
separation of rows by tearing the radula is usually superior.<br />
The merits and problems of wire mounting and tearing are a<br />
trade-off. Bradner and Kay (1995) suggested removing a few<br />
rows at the end of the radula <strong>for</strong> a better view of the teeth but<br />
we suggest that a tear in a more central to slightly anterior<br />
portion is more desirable, because of wear at the very<br />
anterior end of the radula. Manipulation of the radula other<br />
than standard mounting is not necessary <strong>for</strong> most<br />
neogastropods, because there is little overlap of the teeth.<br />
Transfer the radula from the last cleaning step to a drop<br />
of water on the chosen mounting substrate with a hooked<br />
needle. This has to be done fast, so the radula hanging on the<br />
needle does not dry. It dries faster in pure water than in<br />
KOH. A very small radula may dry in two to three seconds,<br />
GEIGER ET AL. (2007) MOLLUSCAN RESEARCH, VOL. 27<br />
depending on aerial humidity. If it dries, the radula will stick<br />
to the needle and may be difficult to remove, or it may<br />
crumble more or less irreversibly.<br />
Keep radular mounts in progress covered by an upsidedown<br />
glass bowl to avoid dust. To handle SEM subs, use<br />
designated stub <strong>for</strong>ceps; <strong>for</strong> stubs with a peg (e.g.,<br />
Cambridge), rather use the model <strong>for</strong> grabbing the peg, as<br />
opposed to the rim of the stub.<br />
Radula, histology and X-ray computer tomography<br />
In cases where the maximum in<strong>for</strong>mation should be<br />
obtained from a single specimen, a conscientious choice<br />
must be made as to which data is most important. External<br />
morphology can be obtained from histological sections<br />
through three dimensional reconstruction (e.g., Amira 3.1®),<br />
but radular structures are too fine to be accurately<br />
reconstructed; at most the major radula types (e.g.,<br />
docoglossage, rhipidoglossate, stenoglossate) can be<br />
identified.<br />
The most promising method <strong>for</strong> future radular studies<br />
seems to be X-ray computer tomography (e.g., Hagadorn et<br />
al. 2006), but so far the resolution (ca 1 µm: http://<br />
www.microphotonics.com/skymto.html) is too coarse <strong>for</strong><br />
micromolluscs. Regardless, it requires the most sophisticated<br />
instrument of its kind plus a cyclotron and involves much<br />
work on reconstruction.<br />
Three-dimensional reconstruction of animals is an<br />
exciting new avenue. Given that even basic anatomical<br />
features are difficult to observe in dissected micromolluscs,<br />
the only alternatives are histological serial sections with<br />
subsequent computer assisted reconstruction. Some of us<br />
have begun to apply these techniques to some specimens<br />
with 1 mm shells, the animals being half that size. We show<br />
here (Fig. 13) a section through the head region of Sinezona<br />
rimuloides (Carpenter, 1865) and the reconstructed pairs of<br />
odontophore cartilages, the pedal ganglia and the partially<br />
embedded statocysts (Fig. 12). The procedures are very<br />
labour intensive and require appropriate computer hardware,<br />
including a graphics tablet. However, it is possible to take<br />
cross-sections and to view the anatomy in any orientation. A<br />
dorsal view is shown in Figure 12. We expect software<br />
developments to make the techniques easier in their<br />
application as well as more reasonably priced.<br />
Optical photography<br />
Some specimens may not be placed in the high vacuum<br />
environment of the SEM and also, if colour is required, light<br />
optical imaging must be employed. Two main approaches<br />
can be pursued.<br />
SLR camera (film or digital)<br />
A general review on shell photography has recently<br />
been provided elsewhere (Geiger 2006b); Häuser et al.<br />
(2005) provided an overview on digital imaging of biological<br />
type specimens. Marco lenses usually provide 1:1<br />
magnification (occasionally only 0.5:1), which covers an
TECHNIQUES FOR STUDYING SMALL MOLLUSCAN SPECIMENS 33<br />
area of 24 x 36 mm of film, or with 2/3 digital sensors an<br />
area of 16 x 24 mm; hence, micromolluscs cannot be<br />
photographed full frame with regular macro lenses.<br />
Magnifications of at least 3:1 (5 mm specimen on 2/3 digital<br />
sensor) to 24:1 (1 mm shell on 35 mm film) are required.<br />
With standard photographic equipment (bellows, normal<br />
50 mm lens reversed) magnifications of approximately 5:1<br />
can be obtained (Fig. 3D–F). Some lenses (e.g., Canon 65<br />
mm macro) can provide magnifications from 1:1 up to 6:1<br />
without extension rings or bellows. With short focal length<br />
macro head lenses (e.g., Zeiss Luminar series) on long<br />
bellows units, magnifications of up to 12–20:1 can be<br />
reached, although procedures are quite tedious. Dedicated<br />
microphotography systems are available (e.g., Microptics<br />
Inc.: www.microptics-usa.com). Mirror lock-up is advisable<br />
to minimize the effect of shutter and mirror vibrations.<br />
FIGURE 13. An example of histology and three-dimensional reconstruction from Sinezona rimuloides (Carpenter, 1865). The body axes in<br />
the plane of the image are labelled. A. A histological semithin cross section in the head region. The anterior-posterior body axis is at right<br />
angle to the image plane. Plastic embedded specimen sectioned at 2 µm and stained with multiple stain (Polysciences). B. Threedimensional<br />
reconstruction of select organs in anterior portion of body. The model was rotated in the computer by 90°: the dorsal-ventral<br />
axis is at right angle to the image plane. Images DLG.<br />
With most digital cameras, images of equivalent quality<br />
to those taken with film can be obtained. However, the<br />
optical principles still need to be observed. Avoid zoom<br />
lenses, macroconverters, teleextenders and diopter lenses.<br />
With digital cameras, it is usually more difficult to reverse<br />
lenses and program automatisation may not take in to<br />
account the special considerations of extreme macrophotography.<br />
The problems are not the digital capture<br />
mechanism per se, however, modern cameras have many<br />
automatic functions that are transmitted through electrical<br />
contacts on the lens. Once the lens is reversed, the<br />
in<strong>for</strong>mation flow is interrupted and the automatic closure of<br />
the f-stop when the shutter is pressed is often no longer<br />
available. In that case, the f-stop has to be closed up front,<br />
darkening the image significantly, which makes focusing and<br />
composition much more daunting.<br />
The current tendency to focus on the number of<br />
megapixels (MP) of digital cameras is exaggerated. With the<br />
vast majority of intermediate cameras, publication-quality<br />
images can be produced. A single specimen is at most shown<br />
at 1/4 page size, approximately 7 x 10 cm. At the usual<br />
printing resolution of 300 dpi, a file size of 3.3 MP is<br />
required and it is only <strong>for</strong> special large <strong>for</strong>mat images that<br />
larger file sizes will be necessary. Dynamic range (Dmax),<br />
bit depth of output file (preferably 16 bit per channel) and<br />
file <strong>for</strong>mats (tif, RAW, ProPhoto; not jpeg) are more<br />
significant imaging attributes.<br />
Focusing aids such as microprisms and split image on<br />
the focusing screen are darkened at higher effective f-stops,<br />
i.e., also at higher magnifications on bellows and fully open<br />
diaphragm, because the f-stop increases due to the spreading<br />
of the light beam in the bellows unit. Camera systems with<br />
interchangeable focusing screens are there<strong>for</strong>e advantageous<br />
to allow fine matt or even clear screens to be employed.<br />
However, clear screens often used on autofocus cameras<br />
make accurate focusing in the low magnification close-up<br />
range more difficult and autofocus rarely focuses where<br />
intended. As a consequence, manual focus adjustments in<br />
these situations is more difficult than with traditional matt<br />
focusing screens with microprisms and split image. Make<br />
sure that the viewfinder is optical (i.e., made of a glass<br />
prism) and not a LCD screen. LCD screens built into<br />
cameras do not show sufficient detail <strong>for</strong> critical focus.<br />
Accordingly, manual focus override is equally important.
34<br />
Most digital SLR cameras can be connected to a computer<br />
and the monitor image provides adequate resolution to verify<br />
focus after the image has been taken.<br />
Intermediately priced compact digital cameras with<br />
supposed macro capability generally produce inferior results.<br />
As an example, the Nikon Coolpix 8000 has a<br />
macrofunction, flash and adjustable f-stop. However, the<br />
maximum f-stop is f/8 (as opposed to f/22 on all dedicated<br />
macrolenses), making the depth of field very shallow; at<br />
closest focus, the flash does not illuminate the image area,<br />
because the lens barrel produces a shadow; and the LCD<br />
screens on the camera as well as in the view finder do not<br />
permit accurate focus adjustments.<br />
Improper file manipulation (e.g., working on .jpeg<br />
rather than .tif/psd files, or in CMYK rather than RGB/Lab<br />
colour space, or in 8 bit rather then 16 bit per channel, if<br />
available) will produce inferior results. Please consult<br />
appropriate works on digital imaging <strong>for</strong> further in<strong>for</strong>mation<br />
(e.g., Davies and Fennessy 2001; Sedgewick and Sedgewick<br />
2002). The little known Lab colour space offers particular<br />
advantages <strong>for</strong> un-sharp masking of colour images. In the L-<br />
channel, the sharpening will only have effects on the<br />
brightness value of the pixels, while not affecting their<br />
colour value stored in the a and b channels (see Margulis<br />
2005). In RGB, the brightness and colour values are a joint<br />
value in each of the R, G and B channels and sharpening can<br />
lead to colour artifacts.<br />
Furthermore, particularly in flash-photography, the<br />
exposure meter assumes 18% reflection, hence, exposure<br />
compensation is often required. For instance, when<br />
photographing a white shell against bright background, the<br />
automatic exposure will assume that 18% of light is reflected<br />
and produce a dull-grey image. Thus the photographer has to<br />
instruct the camera to overexpose the image to obtain the<br />
true white of the shell (see Geiger 2006b <strong>for</strong> step-by-step<br />
instructions). The black box of matrix metering may increase<br />
the percentage of acceptable images, but will inevitably lead<br />
to failures. A thorough understanding of exposure and<br />
exposure compensation is imperative. Many of these<br />
adjustments can also be accomplished afterwards with digital<br />
image manipulation, but the final result will be affected by<br />
the quality of the source files.<br />
The Bayer pattern of most digital cameras (CCD,<br />
CMOS sensors) is a significant issue <strong>for</strong> digital colour<br />
photography, as 2/3 of the colour in<strong>for</strong>mation in each image<br />
is interpolated. Three layer photo-sensors such as the Foveon<br />
X3, currently only available in Sigma cameras, and co-site<br />
sampling technique as implemented in the Zeiss microscope<br />
camera Axiocam HRc, have overcome this limitation. The<br />
opinions on the Foveon X3 chip are divided, as it has a lower<br />
resolution compared to current CCDs and CMOS sensors,<br />
while on the other hand, the larger pixels have a better<br />
signal-to-noise ratio and capture all three colours at each site.<br />
The signal-to-noise question also applies to the issue of 2/3<br />
vs full-size digital sensors; at the same number of pixels, a<br />
larger chip has larger pixels and a better signal-to-noise ratio.<br />
Three chip cameras also avoid the Bayer pattern problem,<br />
but light intensity reaching each sensor is only one third of<br />
GEIGER ET AL. (2007) MOLLUSCAN RESEARCH, VOL. 27<br />
the original intensity because of the beam-splitter. The lower<br />
light levels will cause somewhat elevated signal-to-noise<br />
ratios. The latter can be improved by cooling of the imaging<br />
chip. The two main cooling methods are fan and Peltier<br />
stage. Because Peltier devices have no moving parts, they<br />
cannot produce any vibrations, in contrast to a fan.<br />
Stereo-microscope<br />
For magnifications above 5x, a stereo-microscope with<br />
photo attachment is advisable. Models with trinocular heads<br />
or a dedicated photo-tube are preferable over ocular-mounted<br />
systems. All photo-ports of modern stereo-microscopes use<br />
only one of the light paths and, as the two light paths are at<br />
an angle <strong>for</strong> stereoscopic viewing, lateral image shifts occur<br />
when changing focus regardless of whether the<br />
stereomicroscope is of Greenough or Telescope design.<br />
Some instruments can counteract this image shift with<br />
special attachments (e.g., Zeiss Discovery V8, V12 with<br />
objective slider), which moves the objective so that the lightpath<br />
is in line with the photo-tube.<br />
There are some older models designed <strong>for</strong> photography<br />
(e.g., Wild M400 series, Zeiss Tessovar system). These<br />
microscopes look like a stereomicroscope, although they<br />
only have a single light path, hence true stereoscopic viewing<br />
of specimens is impossible. As they are primarily intended<br />
<strong>for</strong> imaging, this design feature should rather be viewed as an<br />
asset than a deficiency.<br />
Lenses <strong>for</strong> stereo-microscopes come in many different<br />
quality ranges. Plan-apochromatic lenses produce flat images<br />
and are fully colour corrected, but are also expensive. Plan<br />
lenses are corrected to produce a flat imaging plane, but may<br />
show pronounced colour fringes (= lateral colour, e.g., Leica<br />
Plan 1x with yellow/blue fringes). In some cases, the image<br />
plane is distinctly curved, resulting also in apparent<br />
distortion of the object. One can test the image flatness and<br />
distortion by photographing graph paper with 1 mm ruling;<br />
ideally the image is sharp from the center to each corner and<br />
the lines are exactly parallel to the edge of the image.<br />
Lighting<br />
Some of us prefer continuous light (incandescent,<br />
fluorescent, LED) with long exposure times. The lighting is<br />
more predictable, because the effect of any changes can be<br />
observed in real time. Issues with colour temperature of the<br />
light can either be addressed with colour filters or with a<br />
custom white-balance in digital systems. Some of us prefer<br />
flash photography because the ultra short exposure time<br />
eliminates any possibility of vibrations (shutter and mirror in<br />
SLR cameras, fan of fiber optics illuminators, person moving<br />
in room) which may deteriorate the image sharpness and the<br />
colour temperature is a well-defined. With some experience,<br />
the results are equally predictable and, with digital capture,<br />
rapid assessment of the results is possible. Use a high-power<br />
flash unit, as the flash duration is proportional to the<br />
discharge proportion: at 10% discharge, the flash duration is<br />
around 1/10,000 s, whereas a full discharge will take<br />
approximately 1/200 s. Some portable flashes have built-in<br />
focusing lights and studio strobe systems generally have both
TECHNIQUES FOR STUDYING SMALL MOLLUSCAN SPECIMENS 35<br />
modeling lights and strobe tubes along with available<br />
lighting modifiers (tubes, gabos, diffusers). Studio strobes<br />
are bulky and fine adjustments are difficult to execute.<br />
Depth of field<br />
Light-optical systems are limited in the depth of field<br />
that can be obtained. Depth-of-field should not be enlarged<br />
excessively by closing a diaphragm because diffraction will<br />
blur the image. Diffraction affects the diameter of the Airydiscs<br />
of two adjacent image points; when the Airy-discs of<br />
two points separated by the circle of confusion (usually<br />
0.3 mm) touch, then the two image points are no longer<br />
distinct and the image appears blurry. The maximum<br />
advantageous f-stop (f max ) under normal circumstances<br />
(circle of confusion = 0.3 mm, 8 x 10” = 20 x 25 cm image at<br />
reading distance) is 32/(magnification + 1). At 5:1, f max =<br />
32/(5+1) = 32/6 = f/6.3, at 9:1, f max = f/3.2 (<strong>for</strong> details see<br />
Geiger 2006b and references therein). On camera lenses, the<br />
f/stop units are indicated, however on stereomicroscopes<br />
with diaphragms, these values are not available and<br />
resolution data are given <strong>for</strong> a fully open diaphragm.<br />
Occasionally, f max , is confused with the f-stop<br />
producing the most highly resolved image. Whereas f max<br />
balances depth of field against loss of sharpness, the latter<br />
only concerns the maximum sharpness as measured by the<br />
modulation transfer functions (see Geiger 2006b <strong>for</strong> details).<br />
Maximum sharpness is usually attained when any<br />
photographic lens is stopped down two to three f-stops from<br />
fully open.<br />
The available depth of field decreases with<br />
magnification. With high-resolution digital cameras, it is<br />
possible to take an image at a low magnification using only a<br />
part of the sensor and crop the image. Currently the largest<br />
digital sensors are 16.7 MP in size. 35 mm film can be<br />
scanned at 5400 dpi producing a 41.7 MP file. The<br />
in<strong>for</strong>mation content in fine grain film is still un-surpassed,<br />
although the highest-resolution film (Kodak Tech-Pan) has<br />
been discontinued. These theoretical calculations also omit<br />
the resolution ability of the lenses, which are at<br />
approximately 80 lines/mm.<br />
Computer image processing (e.g., Automontage, Fig. 2)<br />
allows the generation of an image with great depth of field<br />
from a stack of images in a through-focal series, a so-called<br />
z-stack. Although the programs can compensate <strong>for</strong> some<br />
lateral image movement, best results are obtained if all<br />
images in a z-stack are aligned. Specimens with many welldefined<br />
edges produce better results than those that are<br />
featureless. Some programs are more susceptible to uneven<br />
vertical intervals in the z-stack; motorized focus can be<br />
helpful under certain conditions, but is usually not critical.<br />
Usually a stack of five to nine images is sufficient to produce<br />
a good quality combined image regardless of specimen size<br />
and ten-20 will produce excellent results. Some of us have<br />
had difficulties with specimens 1 mm and smaller and SEM<br />
has been more successful in those cases. Automontage-like<br />
programs have become routine applications to generate high<br />
quality images. Good results are obtained in many situations<br />
(e.g., Fig. 2; NMNZ type-collection on-line: http://<br />
collections.tepapa.govt.nz/).<br />
Positioning<br />
To position dry specimens, they are usually mounted<br />
with a slightly tacky substance (e.g., plasticine, malleable<br />
silicone, beeswax). For transparent specimens the SEM<br />
mounting medium Leit-C plast (Neubauer Chemikalien) is<br />
suitable. Check that the specimen can be easily removed<br />
from the mounting medium and that no residue is left on the<br />
shell. For fluid immersed specimens, wax cradles, glass<br />
slides, stainless steel nuts and pins inserted into a wax base<br />
can be used.<br />
Chemicals<br />
A list of some chemicals regularly used <strong>for</strong> narcotisation,<br />
fixation, preservation, preparation and cleaning of<br />
micromolluscs is provided in Appendix 1. Many more<br />
fixatives were used be<strong>for</strong>e biologists started using <strong>for</strong>malin<br />
routinely (see, e.g., Romeis 1948).<br />
The <strong>handling</strong> of chemicals requires knowledge and<br />
experience. Clean equipment and chemicals of good quality<br />
should always be used. For most chemicals, the CAS<br />
(Chemical Abstracts Service numbers, http://www.cas.org)<br />
number is provided to facilitate Internet search <strong>for</strong> further<br />
in<strong>for</strong>mation. Some chemicals mentioned below are regulated<br />
by local authorities; rules and regulations vary from country<br />
to country. Transport and importation regulations should be<br />
carefully followed when travelling.<br />
Acknowledgements<br />
We thank the various technicians and lab directors at SEM<br />
facilities, including Alicia Thompson (University of<br />
Southern Cali<strong>for</strong>nia, Los Angles, Cali<strong>for</strong>nia, USA) and Sue<br />
Lindsey, Ian Loch and Alison Miller (Australian Museum,<br />
Sydney, Australia). Rüdiger Bieler (Field Museum of<br />
Natural History) provided some in<strong>for</strong>mation on<br />
macrophotography. AW wants to thank Olle Israelsson and<br />
Ylva Lilliemarck <strong>for</strong> in<strong>for</strong>mation on chemistry and histology.<br />
Mike Vendarasco and Christine Fernandez (University of<br />
Cali<strong>for</strong>nia, Santa Barbara) kindly made some of their fossil<br />
micromolluscs available. The constructive criticism of James<br />
McLean (Los Angeles County Museum of Natural History),<br />
an anonymous reviewer and Jean-Claude Stahl (NMNZ)<br />
helped to further improve this contribution. This study was in<br />
part supported by NSF grant MRI 0402726.<br />
Literature Cited<br />
Amira 3.1. TGS, San Diego, USA.<br />
Anonymous (2006a) Museum collection management terms<br />
and invertebrate specimen processing procedures:<br />
methods of fixation and preservation. http://
36<br />
www.nmnh.si.edu/iz/usap/usapspec.html [accessed May,<br />
10, 2006].<br />
Anonymous (2006b) Formaldehyde, 2-Butoxyethanol and 1-<br />
tert-Butoxypropan-2-ol. Summary of data reported and<br />
evaluation. IARC Monographs on the Evaluation of<br />
Carcinogenic Risks to Humans 88, 16 pp. [available from<br />
monographs.iarc.fr/ENG/Monographs/vol88/<br />
volume88.pdf, accessed 4/2007].<br />
Barbero, R. S. & Toffoletto, D. (1996) Dissolution of<br />
calcareous Foraminfera in microfossil slides.<br />
Micropaleontology 42, 412–414.<br />
Birch, W. R. (2000) Coatings: an introduction to the cleaning<br />
procedures. http://www.solgel.com/articles/June00/Birch/<br />
cleaning.htm [accessed March 5, 2006].<br />
Boase, N.A. & Waller, R.R. (1994) The effect of propylene<br />
glycol on ethanol concentrations determined by density<br />
measurements. Collection Forum 10, 41–49.<br />
Bouchet, P., Lozouet, P. Maestrati, P. & Héros, V. (2002)<br />
Assessing the magnitude of species richness in tropical<br />
marine environments: exceptionally high numbers of<br />
molluscs at a New Caledonia site. Biological Journal of<br />
the Linnean Society 75, 421–436.<br />
Boyle, R. (1666) A way of preserving birds taken out of the<br />
eggs, and other small foetuses. Philosophical<br />
Transactions of the Royal Society of London 12, 199–201.<br />
Bradner, H. & Kay, E.A. (1995) <strong>Techniques</strong> <strong>for</strong> <strong>preparing</strong><br />
and photographing Cypraea radulae. The Festivus 27,<br />
96–103.<br />
Brusca, R.C. & Brusca, G.J. (2003) Invertebrates, Second<br />
Edition. Sinauer, Sunderland, MA.<br />
Byne, L.St.G. (1899a–b) The corrosion of shells in cabinets.<br />
Journal of Conchology 9, 172–178, 253–4.<br />
Callomon, P. (2000) ‘Byne’s Disease’: identification and<br />
treatment strategies. Venus 59, 62–63.<br />
Callomon, P. (2003) Byne’s Disease—questions and<br />
answers. American Conchologist 30, 10–11.<br />
Carter, J. (1997) An investigation of pH changes in a<br />
selection of <strong>for</strong>maldehyde buffering agents used on a fish<br />
parasitology research collection. Collection Forum 13, 1–<br />
10.<br />
Carter, J. (2002) DNA preservation in fluid preserved<br />
collections. SPNHC Newsletter March 2002, 14–15.<br />
Clapp, A.F. (1987) Curatorial Care of Works of Art on<br />
Paper. Lyons Press, New York. 191 pp.<br />
Clark, K. B. (1998) MOLLUSCA listserver Sept. 24, 1998.<br />
Coovert, G.A. & Coovert, H.K. (1987) Preparation of<br />
marginellid radulae. Marginella Marginalia 2, 20–27.<br />
Davies, A. & Fennessy, P. (2001) Digital Imaging <strong>for</strong><br />
Photographers, 4th Edition. Focal Press. 167 pp.<br />
Davies, F.R.E. (1988) Still more on Byne’s disease. Shells<br />
and Sea Life 20(6), 13.<br />
Davies, T. (1987) Fighting Byne’s disease. Conchologists of<br />
America Bulletin 15, 15.<br />
De Prins, R. (2005) Deterioration of shell collections.<br />
Causes, consequence and treatment. Gloria Maris 43(5–<br />
6), 1–75.<br />
Dudich, E. & Kesselyák, A. (ca. 1925–41) Die Anwendung<br />
des Urethans in der Konservierungstechnik. Aus<br />
GEIGER ET AL. (2007) MOLLUSCAN RESEARCH, VOL. 27<br />
deutschen Museen 69–71.<br />
Geiger, D.L. (1999). Description of Haliotis fatui new<br />
species (Gastropoda: Vetigastropoda) <strong>for</strong>m the tropical<br />
western Pacific. The Nautilus 113, 73–77.<br />
Geiger, D.L. (2004) Warning! Micromount clay is NOT<br />
suitable <strong>for</strong> usage in shell collections! Club Conchylia<br />
In<strong>for</strong>mationen 35, 110–111.<br />
Geiger, D. L. (2006a) Schaufelbaggern für Grosse: Mit dem<br />
Petite-Ponar Greiffer in Neu Britannien unterwegs. Club<br />
Conchylia Mitteilungen 5, 31–33.<br />
Geiger, D. L. (2006b). Applied photography in systematic<br />
malacology. In: The Mollusks, A Guide to their Study,<br />
Collection, and Preservation. C.F. Sturm, T.A. Pearce<br />
and A. Valdés (eds.). Universal Publishers, Inc., Boca<br />
Raton, Florida, pp. 73–100.<br />
Glauert, A.M. & Lewis, P.R. (1998) Biological Specimen<br />
Preparation <strong>for</strong> Transmission Electron Microscopy.<br />
Princeton University Press, Princeton, NJ.<br />
Gohar, H.A.F. (1937) The preservation of contractile marine<br />
animals in expanded condition. Journal of the Marine<br />
Biological Association 22, 295–299.<br />
Goldstein, J.I., Newbury, D.E., Echlin, P., Joy, D.C., Roming<br />
Jr., A. D., Lyman, C.E., Fiori, C. & Lifshin, E. (1992)<br />
Scanning Electron Microscopy and X-Ray Microanalysis.<br />
A Text <strong>for</strong> Biologists, Material Scientists, and Geologists.<br />
Plenum Press, New York. 820 pp.<br />
Grosjean, D. & Fung, K. (1984) Hydrocarbons and carbonyls<br />
in Los Angeles air. Journal of the Air Pollution Control<br />
Association 34, 537–543.<br />
Habe T. and S. Kosuge (1967). The Standard Book of<br />
Japanese Shells in Color. Hoikusha, Osaka (In Japanese).<br />
Hagadorn, J.W., Xiao, S., Donoghue, P.C.J., Bengtson, S.,<br />
Gostling, N.J., Pawlowska, M., Raff, E.C., Raff, R.R.,<br />
Turner, R.F., Chongyu, Y., Zhou, C., Yuan, X., McFeely,<br />
M.B., Stampanoni, M. & Nealson, K.H. (2006) Cellular<br />
and subcellular structure of Neoproterozoic animal<br />
embryos. Science 314, 291–294.<br />
Hasegawa, K. (2004) Swimming behaviour of scissurellids<br />
(Gastropoda: Scissurellidae) and its taxonomic<br />
significance. In: <strong>Molluscan</strong> Megadiversity: Sea, Land<br />
and Freshwater. World Congress of Malacology Perth,<br />
Western Australia 11–16 July 2004. F. E. Wells (ed.).<br />
Western Australian Museum, Perth, p. 62.<br />
Hatchfield, P. & Carpenter, J. (1985) Formaldehyde: How<br />
Great a Danger to Museum Collections? Center <strong>for</strong><br />
Conservation and Technical Studies; Harvard University<br />
Art Museum, Cambridge, MASS.<br />
Häuser, C.L., Steiner, A., Holstein, J. & Scoble, M.J. (eds.)<br />
(2005) Digital Imaging of Biological Type Specimens.<br />
Staatliches Museum für Naturkunde, Stuttgart,<br />
Hemleben, C., Spindler, M. & Anderson, O.R. (1988)<br />
Modern Planktonic Foraminifera. Springer, New York.<br />
Hertz, C.M. (1990) What is Byne’s disease? The Festivus 22,<br />
10–11.<br />
Hickman, C.S. (1977) Integration of electron scan and light<br />
imagery in study of molluscan radulae. The Veliger 20, 1–<br />
8.<br />
Hickman, C.S. & Porter, S.S. (2007). Nocturnal swimming,
TECHNIQUES FOR STUDYING SMALL MOLLUSCAN SPECIMENS 37<br />
aggregation at light traps, and mass spawning of<br />
scissurellid gastropods (Mollusca: Vetigastropoda).<br />
Invertebrate Biology, 126, 10–17.<br />
Higo, S., Callomon, P. & Goto, Y. (2001) Catalogue and<br />
Bibliography of the Marine Shell Bearing Mollusca of<br />
Japan. Type Figures. Elle Scientific Publications, Osaka,<br />
Japan.<br />
Holznagel, W.E. (1998) A nondestructive method <strong>for</strong><br />
cleaning gastropod radulae from frozen, alcohol-fixed, or<br />
dried material. American Malacological Bulletin 14,<br />
181–183.<br />
Horie, C.V. (1989) Conservation of Natural History<br />
Specimens SpiritCollections. University of Manchester,<br />
Manchester..<br />
Hubel, D. H. (1957) Tungsten microelectrodes. Science 135,<br />
549.<br />
Jones, E.M. & Owen, R.D. (1987) Fluid preservation of<br />
specimens. In: Genoways, H.H., Jones, C. & Rossolimo,<br />
O.L. (Eds.) Mammal Collection Management. Texas Tech<br />
University Press, Lubbock, pp. 51–64.<br />
Kamath, Y.K., Hornby, S.B. & Weigmann, H.D. (1985)<br />
Irreversible chemisorption of <strong>for</strong>maldehyde on cotton<br />
cellulose. Textile <strong>Research</strong> Journal 55, 663–666.<br />
Kenyon, A.F. (1909) On the deterioration of shells in<br />
cabinets. Journal of Conchology 12, 266–268.<br />
Kilburn, R.N. (1996) Notes on the benthic stations sampled<br />
by the Deutsche Tiefsee-Expedition (1898–1899) in<br />
Southern African waters. South African Journal of<br />
Marine Sciences 17, 325–328.<br />
Kolff, W.J. (1988) More on Byne’s disease. Shells and Sea<br />
Life 20(5), 19.<br />
Kristensen, R.M. & Funch, P. (2000) Micrognathozoa: A<br />
new class with complicated jaws like those of Rotifera<br />
and Gnathostomulida. Journal of Morphology 246, 1–49 .<br />
Kurtz, I. (2005) Kleine Schnecken und Muscheln – einen<br />
Blick wert. Club Conchylia In<strong>for</strong>mationen 37, 35–39.<br />
Lamy, E. (1933) Sur la corrosion des coquilles dans les<br />
collections. Journal de Conchyliologie, Paris 77, 481–<br />
482.<br />
Levi, H.W. (1966) The care of alcoholic collections of small<br />
invertebrates. Systematic Zoology 15, 183–188.<br />
Lide, D.R. (1997) Handbook of Chemistry and Physics. CRC<br />
Press, Boca Raton, New York.<br />
Lincoln, J.R. & Sheals, J.G. (1979) Invertebrate Animals,<br />
Collection & Preservation. BM(NH) & Cambridge<br />
University Press; Cambridge,.<br />
Lindberg, D.R. (1977) Artefacts incurred by treatment of<br />
acmaeid radulae with alkalines. The Veliger 19, 453–454.<br />
Mahoney, R. (1973) Laboratory <strong>Techniques</strong> in Zoology. 2 nd .<br />
ed. Butterworths, London.<br />
McKay, C.R. & Hartzband, D.J. (1970) Propylene<br />
phenoxetol: narcotic agent <strong>for</strong> unsorted benthic<br />
invertebrates. Transactions of the American<br />
Microscopical Society 89, 53–54.<br />
McLean, J. H. (1984). The world of marine micromollusks.<br />
Terra 22, 26–30.<br />
Margulis, D. (2005) Photoshop Lab Color: The Canyon<br />
Conundrum and Other Adventures in the Most Powerful<br />
Colorspace. Peachpit Press, Berkeley.<br />
Mikkelsen, P. (1985) A rapid method <strong>for</strong> slide mounting of<br />
minute radulae with a bibliography of radula mounting<br />
techniques. Nautilus 99, 62–65 (includes extensive<br />
bibliography).<br />
Moretzsohn, F. (2004) Method <strong>for</strong> mounting radulae <strong>for</strong><br />
SEM using an adhesive tape desiccation chamber.<br />
American Malacological Bulletin 19, 145–146.<br />
Nicholls, J.R. (1934) Deterioration of shells when stored in<br />
oak cabinets. Journal of the Society Chemical Industry<br />
53, 1077–1078.<br />
Nockert, M. & Wadsten, T. (1978) Storage of archaeological<br />
textile finds in sealed boxes. Studies in Conservation 23,<br />
38–41.<br />
Padfield, T., Erhardt, D. & Hopwood, W. (1982) Trouble in<br />
store. Science and Technology in the Service of<br />
Conservation, Preprints of the 9th International IIC<br />
Congress, Washington D.C. IIC, London. pp. 24–27.<br />
Pearse, A.G.E. (1960) Histochemistry, Theoretical and<br />
Applied. J. & A. Churchill, Ltd, London.<br />
Pinto de Oliveira, M. & de Cassia da Silveira e Sa, R. (1996)<br />
Contribution to shell collection preservation from Byne’s<br />
disease or efflorescence. Publicacoes Ocasionais<br />
Conquiliologistas do Brasil 13, 1–3.<br />
Presnell, J.K. & Schreibman, M.P. (1997) Humason’s Animal<br />
Tissue <strong>Techniques</strong>. 5 th Ed. The John Hopkins University<br />
Press, Baltimore & London.<br />
Pritchard, M.H. & G.O.W. Kruse (1982) The Collection and<br />
Preservation of Animal Parasites. University of Nebraska<br />
Press, Lincoln & London.<br />
Quay, W.B. (1974) Bird and mammal specimens in fluid –<br />
objectives and methods. Curator 17, 91–104.<br />
Reimer, L. (1998) Scanning Electron Microscopy, Physics of<br />
Image Formation and Microanalysis. Springer, Berlin.<br />
Risso-Dominguez, C.J. (1961) The use of alkylene<br />
polyamines to isolate radulae I. Relations between<br />
effectiveness and chemical structure. Stain Technology<br />
36, 151–157.<br />
Robertson, R. (1961). Collecting minute molluscs from<br />
marine algae. In How to Collect shells: 2 nd edition, (M. K.<br />
Jacobsen, ed.). x American Malacological Union, pp. 10–<br />
11.<br />
Romeis, B. (1948) Mikroskopische Technik. 15 th Ed. Leibniz<br />
Verlag, München.<br />
Romeis, B. (1989) Mikroskopische Technik. 17 th Ed. Urban<br />
& Schwartzenberg Verlag, München.<br />
Sasaki, T. (1998) Comparative anatomy and phylogeny of<br />
the Recent Archaeogastropoda (Mollusca: Gastropoda).<br />
The University Museum, University of Tokyo, Bulletin 38,<br />
1–224.<br />
Schroll, F. (1968) Souvenirs aus dem Meer. Sammeln<br />
Präparieren und Konservieren von Meerestieren.<br />
Kosmos, Stuttgart.<br />
Sedgewick, J. & Sedgewick, G. (2002) Quick Photoshop <strong>for</strong><br />
<strong>Research</strong>: A Guide to Digital Imaging <strong>for</strong> Photoshop 4X,<br />
5X, 6X, 7X. Plenum Press.
38<br />
Simmons, J.E. (1991) Conservation problems of fluidpreserved<br />
specimens. In: Cato, P.S. & Jones, C. (eds.)<br />
Natural History Museums: Directions <strong>for</strong> Growth. Texas<br />
Tech University Press, Lubbock, pp 69–89.<br />
Smaldon, G. & Lee, E.W. (1979) A synopsis of methods <strong>for</strong><br />
the narcotisation of marine invertebrates. Royal Scottish<br />
Museum, In<strong>for</strong>mation Series Natural History 6, 1–96.<br />
(Describes methods from literature, taxon by taxon.<br />
Numerous further references)<br />
Stamol, V. (1998) The main collection of Recent molluscs in<br />
the Croatian Natural History Museum. Natura Croatica<br />
7, 159–167.<br />
Steedman, H.F. (Ed.) (1976) Zooplankton Fixation and<br />
Preservation. The UNESCO Press. 350 pp.<br />
Steinmann, W., Ebeling, R. & Goepel, U. (1975) Die<br />
Konservierung medizinischer und zoologischer Präparate<br />
in Phenoxetol. Der Präparator 21, 8–11.<br />
Steitz, E. & Stengel, G. (1984) Die Stämme und Klassen des<br />
Tierreichs. Verlag Chemie, Weinheim, Germany.<br />
Strasoldo, M. (1991) Anatomie und Ontogenie von<br />
Scissurella jucunda (Smith, 1890) und Anatomie von<br />
Anatoma sp. Dissertation University of Vienna, Austria,<br />
Vienna. 145 pp, 37 pls.<br />
Tennent, M. & Baird, T. (1985) The deterioration of<br />
Mollusca collections. Identification of shell<br />
efflorescence. Studies in Conservation 30, 75–83.<br />
Turner, S. (1998) The Book of Fine Paper. Thames &<br />
GEIGER ET AL. (2007) MOLLUSCAN RESEARCH, VOL. 27<br />
Hudson, London.<br />
Travis, J. (2001) Alcohol on your breath needs not be that<br />
bad. Science News Sept. 22 nd . http://<br />
www.sciencenews.org/<br />
Tullberg, T. (1891) Über Konservierung von Evertebraten in<br />
ausgedehntem Zustand. Privately published, Stockholm.<br />
Ueshima, R. (2002) Simple methods <strong>for</strong> DNA preservation<br />
in molluscan specimens. Venus 61, 91–94.<br />
USI Chemicals. (1981) Ethyl alcohol handbook, 5 th Ed.<br />
National Distilleries and Chemical Corporation. Replaced<br />
by Equistar’s “Ethyl alcohol handbook”. Available at:<br />
http://www.lyondell.com/Lyondell/Products/ByMarket/<br />
AdhesivesAndSealants/Solvents/Ethanol/<br />
TechnicalIn<strong>for</strong>mation/index.htm [accessed 10/IV/2007]<br />
Wagstaffe, R. & Fidler, J.H. (1955) The Preservation of<br />
Natural History Specimens. Vol. 1. Invertebrates. H.F. &<br />
G. Witherby, London.<br />
Waller, R. & Strang, T.J.K. (1996) Physical chemical<br />
properties of preservative solutions. –1. Ethanol – water<br />
solutions. Collection Forum 12, 70–82.<br />
Warén, A. (1990). Ontogenetic changes in the trochoidean<br />
(Archaeogastropoda) radula, with some phylogenetic<br />
interpretations. Zoologica Scripta 19, 179–187.<br />
Zala, K., Pentcheff, N.D. & Wetzer, R. (2005) Laser-printed<br />
labels in wet collections: will they hold up? Collection<br />
Forum 19, 49–56.
TECHNIQUES FOR STUDYING SMALL MOLLUSCAN SPECIMENS 39<br />
Appendix 1.<br />
Alphabetical list of chemicals used <strong>for</strong> work on<br />
micromolluscs. CAS numbers (Chemical Abstracts Service<br />
numbers, http://www.cas.org) are provided to facilitate<br />
further inquiries. List compiled by AW.<br />
Acetic acid, CAS no 64-19-7. Acetic acid is one of the oldest<br />
fixatives on record: in the eighteenth century vinegar<br />
(4–10% acetic acid content) was used to preserve<br />
hydras. It does not harden tissue; actually, it prevents<br />
some of the hardening that, without it, might be induced<br />
by subsequent alcohol treatment. In some techniques,<br />
however, acetic acid must be avoided because it<br />
dissolves certain cell inclusions, such as Golgi and<br />
mitochondria and calcareous material. Many lipids are<br />
miscible with acetic acid or are soluble in it. It neither<br />
fixes nor destroys carbohydrates. Acetic acid is used as<br />
a component of many fixatives, e.g., Bouin’s fluid. Its<br />
usefulness lies within its fixation of nucleoproteins, i.e.,<br />
good nuclear fixation. Acetic acid (5–50%) can be used<br />
<strong>for</strong> decalcification.<br />
Acetone. CAS no 67-64-1. Water-free acetone causes strong<br />
shrinkage and is there<strong>for</strong>e not often used. It can be used<br />
<strong>for</strong> fixation of smears and unfixed sections. For<br />
histology, acetone is only used in combination with<br />
other fixatives, such as <strong>for</strong>malin and sublimate.<br />
Acetone is often used as a medium <strong>for</strong> critical point<br />
drying, but should be avoided because of its shrinking<br />
effect. Dry specimens directly from 100% ethanol,<br />
which is also soluble in carbon dioxide (drying<br />
medium). Acetone is useful <strong>for</strong> cleaning fat and<br />
remains of glue from shells , since it is a comparatively<br />
harmless chemical.<br />
Amylocaine hydrochloride (Stovaine). CAS no 532-59-2.<br />
Used <strong>for</strong> narcotisation. Slowly add 1% solution in<br />
water, drop by drop, to 100 ml of water with animals.<br />
For each drop give the chemical time to disperse and<br />
animals time to react.<br />
Benzamine compounds. Used <strong>for</strong> narcotisation. A 1–2%<br />
solution in water is slowly added, drop by drop, to<br />
100 ml of water with animals. For each drop give the<br />
chemical time to disperse and the animals time to react.<br />
Bichromate. See chromic acid.<br />
Bleach. See sodium hypochlorite.<br />
Borax (disodium tetraborate). CAS no 1330-96-4. (Na 2 B 4 O 7<br />
MW 201.2 and Na 2 B 4 O 7 , 10 H 2 O MW 381.4) is easily<br />
soluble in water, non toxic and its aqueous solutions are<br />
basic. Used <strong>for</strong> buffering <strong>for</strong>malin.<br />
The solubility of borax in 37% and 3.7% <strong>for</strong>malin<br />
is slightly more than 50 g /1000 ml, but varies ± 5 gram<br />
depending on the quality of the <strong>for</strong>malin (mainly due to<br />
concentration of methanol in the <strong>for</strong>malin).<br />
When buffering <strong>for</strong>malin, the variety with crystal<br />
water should be used because it dissolves much more<br />
easily. If too high concentrations of borax are used, it<br />
may recrystallise due to changed conditions in the<br />
solution, <strong>for</strong> example temperature or concentration of<br />
other substances. Such precipitations may be difficult to<br />
dissolve, but warm water usually helps. One gram per<br />
10 litres of 37% <strong>for</strong>malin will raise the pH to 7.5–7.8<br />
and is enough <strong>for</strong> several months; do not use more than<br />
10 gram/litre. Dilution of 37% <strong>for</strong>malin buffered in this<br />
way to 3.7% will raise the pH about 0.9–1.0 units. For<br />
field work it may be useful to know that one teaspoon<br />
of borax contains 4.2 gram, one tablespoon, 11.5 gram.<br />
Concentrated solutions of borax interfere with carbon<br />
dioxide from the air and boric acid (H 3 BO 3 ) may<br />
precipitate, as milky clouds of very fine needles (easily<br />
visible at 12x) in the solution. This is a result of the<br />
equilibrium Na 2 B 4 O 7 + CO 2 + 6H 2 O 4H 3 BO 3 +<br />
2Na + 2-<br />
+ CO 3 . Such precipitations can be avoided by<br />
not adding more borax than necessary.<br />
Bouin’s Fluid. A common fixative used in histology. It is a<br />
mixture of 375 ml saturated aqueous picric acid, 125 ml<br />
stock <strong>for</strong>maldehyde (37% w/w), 25 ml glacial acetic<br />
acid. See under individual ingredients <strong>for</strong> hazards and<br />
safety precautions.<br />
Butyl acetate. CAS no 123-86-4. A good substitute <strong>for</strong><br />
benzene and many other unpleasant non-polar organic<br />
solvents since it is less harmful. Hygienic limit <strong>for</strong> short<br />
term allowable air concentration is 150 ppm =<br />
0.11 g/m 3 . It has a strong smell so you are certain not to<br />
stay anywhere with too much of it in the air. It can be<br />
used to dissolve various organic glues (not based on<br />
polyvinyl acetate) as well as <strong>for</strong> air-drying animals with<br />
some dermal skeleton, such as echinoderms and insects,<br />
with much less shrinkage. Transfer animals to butyl<br />
acetate via 95% and 100% ethanol. Even critical point<br />
dried specimens of soft-bodied animals can be cleaned<br />
or removed from a stub by dissolving the glue in butyl<br />
acetate, usually with little or no damage to the<br />
specimen, thanks to its low surface tension.<br />
Calcium carbonate. CAS no 471-34-1. Has a solubility<br />
constant of 3.36 x 10 -9 . This means that a saturated<br />
aqueous solution contains 5.8 mg/l, but due to<br />
<strong>for</strong>mation of hydrocarbonate ions with aerial carbon<br />
dioxide, the solubility becomes higher with time.<br />
Calcium carbonate (as dolomite) is used <strong>for</strong> buffering<br />
commercial concentrated <strong>for</strong>malin, providing so-called<br />
neutral or histology quality. These attributes, however,<br />
cannot be stored <strong>for</strong> more than a couple of years<br />
because of the low solubility of dolomite. After that<br />
time the neutralizing capacity is exhausted. Calcium<br />
and magnesium salts are not good as buffers <strong>for</strong><br />
specimens intended <strong>for</strong> histology because insoluble<br />
salts have a tendency to recrystallise in tissues (Quay<br />
1974).<br />
Calcium phosphate. CAS no 7758-87-4. Has a solubility<br />
constant of 2.07 x 10 -33 and there<strong>for</strong>e<br />
sodiumphosphates are, not very good as buffers when<br />
fixing molluscs, since phosphate may replace carbonate<br />
in the shells.<br />
Carbowax. See Polyethylene glycol.
40<br />
Carbon dioxide, CO 2 . CAS no 124-28-9. Used <strong>for</strong><br />
narcotising, by bubbling the gas through the water with<br />
specimens or by placing animals in water saturated<br />
with it; mainly <strong>for</strong> fresh-water organisms.<br />
Chloral hydrate (= chloretone). CAS no 302-17-0. Soluble<br />
in water and alcohol. Used <strong>for</strong> narcotising by slowly<br />
adding a 0.1% solution to the animals. Chloral hydrate<br />
is a scheduled prescription drug in some countries.<br />
Schroll (1968) indicates that nicotine may be used as a<br />
substitute.<br />
Chloretone. See Chloralhydrate.<br />
Chloro<strong>for</strong>m. CAS no 67-66-3. Used <strong>for</strong> narcotising, by<br />
sprinkling a small quantity on the surface of container<br />
with animals. Repeat if necessary. Note that chloro<strong>for</strong>m<br />
is poisonous and flammable and is a restricted<br />
substance in some countries.<br />
Chromic acid (chromium trioxide). CAS no 1333-82-0.<br />
Chromic acid and its salts, chromates or dichromates<br />
are valuable fixatives, but the acid is considered<br />
carcinogenic and the salts are allergenic.<br />
Cocaine hydrochloride. CAS no 53-21-4. Used <strong>for</strong><br />
narcotising. Excellent <strong>for</strong> chitons and heterobranch<br />
gastropods. Slowly add a few crystals to the container<br />
with animals. The possession of the chemical is<br />
generally illegal and it is difficult to obtain permits <strong>for</strong><br />
its use.<br />
Cold. Many animals, especially tropical species, will die<br />
when the temperature approaches freezing point.<br />
Usually they do not retract to cooling so it can be<br />
combined with the addition of some narcotising agent.<br />
Do not allow the animals to freeze, which will destroy<br />
most histology (unless quick frozen, e.g. in liquid<br />
nitrogen). Freezing is suitable <strong>for</strong> DNA sequencing<br />
work.<br />
Cyanoacrylate, methyl. CAS 187-05-3, super glue. Can be<br />
used <strong>for</strong> repairing small, broken shells, but only in<br />
cases where two pieces need to be glued together and<br />
you can do it without much adjustment, since you only<br />
have a second <strong>for</strong> this. If using it on a scale larger than<br />
milligram, consult safety in<strong>for</strong>mation since it is highly<br />
toxic, much more than <strong>for</strong>maldehyde, but also more<br />
treacherous since its smell is less deterring. It glues by<br />
polymerisation induced by moisture, and sticks to skin<br />
and any other tissue.<br />
Dichromates. Fixatives. See chromic acid.<br />
Diethyl ether. CAS no 60-29-7. Used <strong>for</strong> narcotising, by<br />
sprinkling a small quantity on the surface of container<br />
with animals. Repeat if necessary. A good solvent <strong>for</strong><br />
many organic compounds but due to the tendency to<br />
<strong>for</strong>m explosive peroxides it should be stored in a dark<br />
bottle, preferably cold. It is highly flammable.<br />
EDTA (Ethylene diamine tetra acetic acid). CAS no 60-00-4.<br />
A 0.1 M (MW = 292.24) solution has been used <strong>for</strong><br />
narcotising purposes. Also used <strong>for</strong> decalcifying when<br />
development of carbon dioxide may rupture tissues.<br />
The process is very slow, up to several weeks. For<br />
molluscan shells use 1–5% hydrochloric acid in 80%<br />
GEIGER ET AL. (2007) MOLLUSCAN RESEARCH, VOL. 27<br />
ethanol instead. It takes a few minutes to a day only and<br />
leaves the tissues in very good condition. EDTA is a<br />
permitted food additive in small quantities, and not very<br />
poisonous.<br />
Ethanol. CAS 67-17-5. Has been used <strong>for</strong> storage of<br />
biological material <strong>for</strong> more than 300 years (Boyle<br />
1666; Waller and Strang 1996). It is by far the best<br />
storage medium <strong>for</strong> material <strong>for</strong> general use and the<br />
only one <strong>for</strong> long term use (Jones and Owen 1987: 60;<br />
Levi 1966).<br />
Avoid denatured ethanol <strong>for</strong> museum storage; the<br />
denaturants will accumulate as the ethanol evaporates<br />
and the jars are refilled. Many denaturants have severe<br />
side effects on the stored material, ketones and<br />
aldehydes react with the tissues; finally the poor human<br />
that has to work with the denatured ethanol is affected<br />
as is the intention with the denaturation. Some<br />
denaturants (methanol, glycerol, isopropanol,<br />
aldehydes) contribute to dissolution of micro shells by<br />
<strong>for</strong>ming complex ions with calcium. Most governments<br />
accept use of tax-free ethanol <strong>for</strong> museum purposes<br />
although the bureaucracy may be intimidating. Ethanol<br />
is only sold as >99.5% solution and no manufacturer<br />
guarantees 100% concentration because ethanol is<br />
hygroscopic. When we refer here to 100% ethanol, we<br />
indicate the purest <strong>for</strong>m available. Hygroscopic beads<br />
may be added to ultrapure ethanol, which will bind<br />
excess water in the ethanol.<br />
Micro shells may be affected by storage in<br />
ethanol. This is not caused by acidity and buffering<br />
does not help. (Actually you cannot even properly<br />
measure the pH in alcohol since the ion product of [H + ]<br />
x [OH - ] is no longer 10 -14 .) The reason <strong>for</strong> the<br />
dissolving power is <strong>for</strong>mation of a complex ion. A<br />
calcium ion surrounded by five ethanol molecules is<br />
slightly water soluble and the calcium no longer stays<br />
precipitated as calcium carbonate. Since the complex<br />
ion is water soluble, this effect can be reduced by<br />
storing in 80% ethanol instead of the usual 70%. When<br />
stored in 95% the effect is not noticeable (an advantage<br />
with saving specimens <strong>for</strong> DNA (Carter 2002)), but<br />
regrettably the specimens become brittle and less useful<br />
<strong>for</strong> anatomy. At SMNH 80% ethanol is used as standard<br />
<strong>for</strong> this reason. Presence of other organic compounds<br />
like fat can give the same result, which is why tubes<br />
with micromolluscs should not be stored with large<br />
specimens.<br />
Ethanol may be used <strong>for</strong> narcotising animal by<br />
slowly adding it to the animals.<br />
Ethanol is flammable and ignites at 363°C. Its<br />
flash point is 13°C and it <strong>for</strong>ms explosive mixtures with<br />
air. The density of ethanol vapour is 2.1 g/l, 1.6 times<br />
that of air, which means that you can walk in explosive<br />
concentrations without smelling it, since it is<br />
accumulated along the floor. The upper hygienic limit is<br />
usually given as 1000–5000 ppm (1.9–3.8 g/m 3 ). It can<br />
be smelled already at 10 ppm (0.02 g/m 3 ). Even
TECHNIQUES FOR STUDYING SMALL MOLLUSCAN SPECIMENS 41<br />
working in the highest allowed concentration does not,<br />
contrary to common belief, cause intoxication by<br />
absorption of ethanol via the lungs (Travis 2001). The<br />
minimum lethal dose known <strong>for</strong> an adult human<br />
corresponds to 100 grams of pure ethanol. See USI<br />
Chemicals (1981) <strong>for</strong> details.<br />
Be sure to know the difference in concentration<br />
between percent by volume and percent by weight;<br />
normally when biologists talk about 95% or 70%<br />
ethanol, it is by volume. Tables <strong>for</strong> preparation of<br />
different concentrations can be found in most histology<br />
text books, e.g., Romeis (1989) but <strong>for</strong> simplicity see<br />
Tables 1 and 2.<br />
TABLE 1. Dilution of 1000 ml water to produce a certain strength of ethanol (Lide 1997). Based on Romeis (1989) and Lide (1997).<br />
Required<br />
strength vol %<br />
Ml 95%<br />
ethanol<br />
Corresponds to<br />
weight %<br />
.<br />
Add ml water<br />
(Romeis 1989)<br />
Density<br />
(Lide 1997)<br />
95% 1000 0.808<br />
Total<br />
volume<br />
90% 1000 86% 64.1 0.8284 1047<br />
85% 1000 80% 133.3 0.8436 1107<br />
80% 1000 74% 209.5 0.8581 1179<br />
75% 1000 68% 295.2 0.8724 1265<br />
70% 1000 62% 381.5 0.8865 1342<br />
65% 1000 58% 502.2 0.8958 1460<br />
60% 1000 52% 630 0.9095 1584<br />
55% 1000 47% 779.9 0.9205 1730<br />
50% 1000 42% 958.9 0.9311 1906<br />
TABLE 2. Dilution of ethanol to produce 1000 ml solution of a desired strength.<br />
Required vol Required strength ml 95% ethanol ml water<br />
1000 by volume<br />
1000 90% 955 61.2<br />
1000 85% 903 120.4<br />
1000 80% 848 177<br />
1000 75% 790 233<br />
1000 70% 744 284<br />
1000 65% 684 344<br />
1000 60% 631 398<br />
1000 55% 578 451<br />
1000 50% 521 507<br />
Ethylene glycol. CAS no 107-21-1. A 50% water solution is<br />
sometimes used <strong>for</strong> storage (Lincoln and Sheals 1979:<br />
136), but should be avoided <strong>for</strong> sensitive molluscs,<br />
because it speeds up dissolution of shells.<br />
Eucaine. See Benzamine compounds.<br />
Formaldehyde. CAS no 50-00-0. A water-soluble (max.<br />
52%) gas, commercially sold as a 35–50% water<br />
solution called <strong>for</strong>malin. For general in<strong>for</strong>mation see<br />
Anonymous (2006b). It is strongly recommended to<br />
abandon the poorly founded practice to call the<br />
commercial solution ‘100% <strong>for</strong>malin’ and the 3.5–4%<br />
solution normally used <strong>for</strong> fixation ‘10% <strong>for</strong>malin’<br />
(e.g., Pritchard and Kruse 1982; Simmons 1991). The<br />
reasons <strong>for</strong> this are the variation in strength of the<br />
commercial solution, and the fact that this is against all<br />
normal practice <strong>for</strong> other chemicals.<br />
Since the late 1800s <strong>for</strong>malin has been routinely<br />
used in zoology <strong>for</strong> fixation of animal tissues. Fixation<br />
takes place by chemically <strong>for</strong>ming links between nearby<br />
protein chains. The optimal pH range <strong>for</strong> this reaction is<br />
7.5–8.0. Formalin should never be used unbuffered<br />
(Presnell and Schreibman 1997: 21).<br />
Formaldehyde and its aqueous solutions are<br />
poisonous and highly irritating to the eyes, nose and
42<br />
GEIGER ET AL. (2007) MOLLUSCAN RESEARCH, VOL. 27<br />
throat, even at very low concentrations. It is<br />
carcinogenic and regular <strong>handling</strong> frequently causes<br />
allergy (short term exposure maximum concentration<br />
1 ppm). For some people allergic reactions may appear<br />
after only a short time, <strong>for</strong> others it never happens, but<br />
great caution should always be taken to avoid contact<br />
with the fluid or inhaling the vapour. Preserved material<br />
and the solution should always be stored in ventilated<br />
cabinets or a fume hood, never in a closed cabinet. If<br />
stored enclosed, <strong>for</strong>maldehyde vapour will accumulate<br />
and the concentration may rise to dangerous levels due<br />
to evaporation.<br />
It is fairly cheap and simple to test laboratories<br />
and storage space <strong>for</strong> presence of <strong>for</strong>maldehyde in the<br />
air and the test has sensitivity of less than one<br />
thousandth of the maximum allowed concentration. Test<br />
badges (GMD systems 570 series), available at http://<br />
www.scottinstruments.com/products/product_list.cfm<br />
or their local representative are placed at various<br />
locations, a protective cap is removed, the badge is left<br />
in place <strong>for</strong> 24 hours then resealed and sent to a certified<br />
laboratory <strong>for</strong> analysis. Quantities down to less than<br />
0.001 ppm are registered. Few (or none) of people in<br />
charge of <strong>collecting</strong> or collections seem to have<br />
accepted the warnings of Simmons (1991) about the use<br />
of <strong>for</strong>maldehyde, although many of his statements<br />
about <strong>for</strong>maldehyde are obviously wrong or<br />
exaggerations.<br />
Addition of a small quantity of ammonia to<br />
<strong>for</strong>malin fixed specimens has been used to remove the<br />
smell, but the procedure is based on the <strong>for</strong>mation of<br />
<strong>for</strong>mamide (HCONH 2, CAS number 75-12-7) and<br />
hexamethylene tetramine (CAS number 100-97-0)<br />
which are odourless, but the practice is deceptive since<br />
the <strong>for</strong>malin smell is a good warning to improve<br />
ventilation or do the work in a more suitable place. For<br />
similar reasons, decalcification of large specimens in<br />
<strong>for</strong>malin with hydrochloric acid must be done in a fume<br />
hood because of the <strong>for</strong>mation of phosgene (carbonyl<br />
chloride, COCl 2 CAS no 75-44-5), also highly<br />
poisonous (threshold limit <strong>for</strong> allowable air<br />
concentration 0.05 ppm.). There<strong>for</strong>e, <strong>for</strong>malin fixed<br />
specimens must be well rinsed be<strong>for</strong>e they are<br />
processed.<br />
Many different qualities of <strong>for</strong>malin are available<br />
on the market. The cheap qualities are fully functional<br />
<strong>for</strong> normal fixation if used only <strong>for</strong> a short time and<br />
adequately buffered. Even so-called acid-free qualities<br />
which are buffered by addition of dolomite (calcium<br />
carbonate) change their pH after one or two years<br />
because the solution cannot dissolve enough dolomite<br />
to buffer <strong>for</strong> a long time.<br />
Formation of Paraldehyde and<br />
Para<strong>for</strong>maldehyde [(CH2O)n (n = 6–50)] takes place<br />
when <strong>for</strong>malin is stored at temperatures below +5–<br />
10°C; the conversion is faster at lower temperature,<br />
high concentration of <strong>for</strong>maldehyde and high pH. The<br />
polymer is insoluble in water, ethanol, xylene, acetone,<br />
but can be destroyed by treatment with bleach. If such<br />
deposits have precipitated on shells, it is usually<br />
possible to get rid of them by soaking them in warm<br />
water and brushing off the deposits. It is said that the<br />
polymerised <strong>for</strong>m can be dissolved by autoclaving.<br />
Polymerisation may also occur directly if <strong>for</strong>malin is<br />
allowed to evaporate, so it is important to rinse <strong>for</strong>malin<br />
preserved specimens intended to be dried.<br />
One advantage with <strong>for</strong>maldehyde fixation of<br />
specimens intended <strong>for</strong> dry collections is that they are<br />
much less likely to be eaten by insects. Specimens<br />
preserved only in alcohol are as likely to be attacked by<br />
insect as those simply dried without any fixation<br />
(common with land snails).<br />
The commercial solution of <strong>for</strong>maldehyde usually<br />
contains 5–20% methanol, to prevent generation of<br />
<strong>for</strong>mic acid by the so-called ‘Cannizzaro reaction’,<br />
where an aldehyde produces equal amounts of the<br />
corresponding alcohol and acid. This lowers the pH<br />
towards 3 in old, low grade <strong>for</strong>malin. This can lead to<br />
destruction of sensitive shells in less than a day. To<br />
avoid this the <strong>for</strong>malin should be buffered, preferably<br />
with sodium tetraborate, which is a nontoxic, cheap and<br />
stable substance. This neutralizes the <strong>for</strong>mic acid and<br />
raises the pH to ca 7.5–8.0 in 40% and to 8.0–9.2 in 4%<br />
<strong>for</strong>malin.<br />
The solubility of borax in <strong>for</strong>malin (37% and<br />
3.7%) is slightly more than 50 g/litre at room<br />
temperature (lower at lower temperatures). Addition of<br />
this much borax, however, will increase the risk of<br />
<strong>for</strong>mation of paraldehyde and (1 tablespoon) 10 g / litre<br />
37% <strong>for</strong>malin is more than enough to ensure a stable pH<br />
above 7.5 <strong>for</strong> two years.<br />
Prolonged storage of organic tissues in borax<br />
buffered <strong>for</strong>malin must be avoided because of the onset<br />
of histolysis at this high pH, but this need not be<br />
considered <strong>for</strong> several months.<br />
To measure pH in <strong>for</strong>malin is simple and may be<br />
done with indicator paper (preferably special types <strong>for</strong> a<br />
narrow range, of which several are available, <strong>for</strong><br />
example pH 6.0–10.0) or with an electric pH meter.<br />
A general conclusion of this and existing literature<br />
is that it is not advisable to store, only to fix, molluscs or<br />
any animals with a calcareous skeleton in <strong>for</strong>malin. The<br />
<strong>for</strong>malin needs buffering, at least to a pH of 7.5–8.0 to<br />
prevent damage of calcium carbonate. At this high pH<br />
there is a risk of polymerisation. For tissue samples a<br />
storage at the isoelectric point of proteins, pH 6–7, is<br />
considered advantageous (Steedman 1976) because at<br />
this level they have the minimum of solubility. At this<br />
low pH, however, the protein chains are believed to<br />
become more brittle and anatomical details, from cilia<br />
to legs, break off more easily (Steedman 1976). More<br />
in<strong>for</strong>mation on <strong>for</strong>malin can be found in Carter (1997).<br />
Formic acid. CAS no 64–18-6. Formic acid is often added to<br />
fixatives <strong>for</strong> combined fixation and decalcification.<br />
Gooding and Stewart's fluid is an aqueous mixture of
TECHNIQUES FOR STUDYING SMALL MOLLUSCAN SPECIMENS 43<br />
<strong>for</strong>mic acid and <strong>for</strong>malin used <strong>for</strong> decalcification. It is<br />
quite a bit slower than nitric and hydrochloric acid, but<br />
tissues can be left in it <strong>for</strong> much longer. After 5 or 6<br />
days, good nuclear staining with alum hematoxylin can<br />
still be obtained.<br />
Glycerol. CAS no 56-81-5. Used <strong>for</strong> storage at a<br />
concentration of 50%, mainly of histological specimens<br />
(Horie 1989:24; Presnell and Schreibman 1997: 331).<br />
However it is sticky and difficult to clean. Addition of a<br />
small amount (ca 5%) to ethanol preserved specimens<br />
has been used and is said to reduce the hardening effects<br />
of ethanol, at the same time it may save the specimens if<br />
the jar should dry out. The reason <strong>for</strong> this is that<br />
glycerol evaporates much more slowly and will keep<br />
the specimens moist <strong>for</strong> a long time after the ethanol is<br />
gone. There is, however, a risk that mould may start<br />
growing on the remains be<strong>for</strong>e the alcohol is totally<br />
gone (Jones and Owen 1987). Naticid egg collars can be<br />
immersed in glycerol and then ‘dry’-stored without<br />
becoming brittle. Glycerol speeds up dissolution of<br />
calcareous material and must be avoided <strong>for</strong> storage of<br />
small molluscs. Since it is a complex <strong>for</strong>mation this is<br />
true also <strong>for</strong> small quantities. (Threshold limit <strong>for</strong><br />
allowable air concentration 50 ppm; MW 92.09, boiling<br />
point 290 °C, vapour pressure
44<br />
based.<br />
Magnesium sulphate (Epsom salts). CAS no 10034-99-8.<br />
(MgSO 4 x 7H 2 O, MW = 246.48). Sometimes used<br />
instead of magnesium chloride. The chloride is easier to<br />
handle since it is less hygroscopic and requires smaller<br />
amounts (131.5 g/litre of the sulphate). The<br />
physiological mechanism, blocking synapses, is the<br />
same, as is the procedure. Smaldon and Lee (1979)<br />
presented 12 variations <strong>for</strong> the use of magnesium<br />
sulphate and chloride, <strong>for</strong> use with marine invertebrates,<br />
concentration between 0.1% and 20%.<br />
Menthol. CAS no 2216-51-5. Used <strong>for</strong> narcotising mainly<br />
fresh-water molluscs, by slowly adding a solution in<br />
ethanol or a few crystals to the surface of the water.<br />
May be irritating <strong>for</strong> skin, eyes, or respiratory organs,<br />
but is not considered very dangerous. Smells of<br />
peppermint.<br />
Mercury chloride. CAS no 7487-94-7 (sublimate). A<br />
component in many good fixatives, e.g., sublimate<br />
alcohol (Romeis 1989). Due to mercury being a severe<br />
pollutant and its toxicity, even at skin contact, these<br />
fixatives are less in use nowadays. Residues must not be<br />
discarded, but saved and labelled <strong>for</strong> special treatment<br />
according to local laws.<br />
Methanol. CAS no 67-56-1. Used <strong>for</strong> denaturing (5–20%)<br />
ethanol, stabilizing <strong>for</strong>malin (1–20%, by the reaction 2<br />
CH 2 O + H 2 O ⇔ CHOOH + CH 3 OH) and storage of<br />
biological specimens (Horie 1989: 21). Its other<br />
drawbacks are that it is poisonous (threshold limit <strong>for</strong><br />
allowable air concentration 200 ppm) and speeds up<br />
dissolution of calcareous material.<br />
MS 222 TM (Tricaine methanesulphonate). CAS no 896-6-2.<br />
Used <strong>for</strong> narcotising, usually fish, but also<br />
invertebrates.<br />
http://www.argent-labs.com/<br />
argentwebsite/ms-222.htm. Has the advantage of giving<br />
reversible narcotisation and may be used on fish<br />
intended <strong>for</strong> later consumption (FDA approved). For<br />
invertebrates, slowly add some crystals to a few ml of<br />
water.<br />
Nembutal (= sodium pentobarbitone). CAS no 57-33-0.<br />
Used <strong>for</strong> narcotising by slowly and repeatedly adding a<br />
5% solution. Test 1 ml solution per 100 ml sea water.<br />
Osmium tetroxide. CAS no 20816-12-0. Used <strong>for</strong><br />
stabilising and contrasting tissues to be used <strong>for</strong> TEM<br />
and SEM of critical point dried specimens, when very<br />
high resolution is needed. It has not been found<br />
necessary <strong>for</strong> SEM of critical-point dried specimens,<br />
even at 10.000 times magnification.<br />
Osmium tetroxide should always be handled with<br />
utmost care, used in a well-ventilated area (under a<br />
fume hood) and special care should be taken to avoid<br />
eye and nasal contact. Osmium tetroxide vapours will<br />
react with any proteins, including the cornea of the<br />
human eye, where black deposits may be <strong>for</strong>med. The<br />
solution penetrates poorly (maximum 1 mm) and leaves<br />
the tissue soft and difficult to use <strong>for</strong> wax sectioning.<br />
When fixation is complete, excess osmium tetroxide<br />
GEIGER ET AL. (2007) MOLLUSCAN RESEARCH, VOL. 27<br />
must be washed out of the tissue or it will reduce to an<br />
insoluble precipitation of metallic osmium during<br />
treatment in ethanol.<br />
Para<strong>for</strong>maldehyde. CAS no 30525-89-4. See<br />
Formaldehyde.<br />
Phenoxetol® (propylene phenoxetol = phenoxy isopropanol<br />
= ‘nipa ester’ = B-phenoxyethylalcohol = propylene<br />
glycol monophenyl ether). CAS no 122-99-6. Used as<br />
1–2% solution, often with 2–5% propylene glycol to<br />
dissolve it more easily, <strong>for</strong> storage of zoological<br />
specimens (Lincoln and Sheals 1979: 136; McKay and<br />
Hartzband 1970; Mahoney 1973; Steinmann et al.<br />
1975). Phenoxetol requires heavy fixation a priori.<br />
Phenoxetol is commercially used in disinfectants,<br />
preservatives and cosmetics. It is not considered<br />
harmful. More in<strong>for</strong>mation at www.clariant.com.<br />
After having poured out several squids so stored<br />
30 years ago (after proper fixation), I am not fond of the<br />
method. Propylene phenoxetol seems more promising<br />
as a tranquilliser and has been used by slowly adding a<br />
0.5–2% solution to sea-water.<br />
Picric acid. CAS no 88-89-1. Picric acid is an excellent<br />
protein coagulant, <strong>for</strong>ming protein picrates that have<br />
strong affinity <strong>for</strong> acid dyes. However, it penetrates<br />
slowly, causes extreme shrinkage and offers no<br />
protection against subsequent shrinkage. It is used in<br />
Bouin’s fluid (see above).<br />
Picric acid crystals are explosive, but need a heavy<br />
shock to explode. However, salts with heavy metals,<br />
e.g., iron, are shock sensitive and heavy metals must not<br />
come in contact with picric acid. To store it more safely,<br />
it is commercially handled in water. Be sure your<br />
supply has not dried and top it up with water if<br />
necessary.<br />
Polyvinyl acetate. CAS no 9003-20-7. Together with<br />
polyvinyl alcohol CAS no 9002-89-5 this <strong>for</strong>ms the<br />
basis <strong>for</strong> many brands of glues used <strong>for</strong> wood and paper.<br />
They are usually white and may be thinned with water.<br />
A dry surface of such glue is good <strong>for</strong> mounting wet<br />
radulae and other small wet objects, where the moisture<br />
will soak the surface enough to make it sticky. Do not<br />
try to mount small objects in an excess of glue; the glue<br />
will use every possible crack to soak your specimen by<br />
capillary <strong>for</strong>ces. Small dots of glue are good <strong>for</strong><br />
opercula on a SEM stub, but will corrode small shells.<br />
For the same reason, an organic based glue should be<br />
used <strong>for</strong> repairing shells, not PVA glues which are too<br />
acidic and will cause damage. Use glues based on<br />
nitrocellulose or other polymer dissolved in acetone,<br />
ethyl acetate, butyl acetate or similar solvents.<br />
Potassium hydroxide. CAS no 1310-58-3. Used <strong>for</strong> radular<br />
preparation and maceration of tissues. Be sure to use<br />
analytical grade to avoid unwanted precipitations of<br />
impurities. Potassium hydroxide is said to be less<br />
hygroscopic than sodium hydroxide, which is an<br />
advantage, as only small quantities are needed and a jar<br />
lasts <strong>for</strong> a long time. The quality with pellets is<br />
preferable since it has a smaller surface and there<strong>for</strong>e
TECHNIQUES FOR STUDYING SMALL MOLLUSCAN SPECIMENS 45<br />
reacts more slowly with carbon dioxide from the air.<br />
Prepare the solution directly in the vessel to be used by<br />
adding a few pellets or a quarter of a pellet when small<br />
quantities of water, e.g. 2–6 droplets, are used.<br />
Potassium- and sodium hydroxide are highly<br />
corrosive and all tools that have been in contact with<br />
them should be cleaned as soon as possible. Even in<br />
small quantities it is harmful on the skin, starting with<br />
redness and a burning sensation. It destroys clothing.<br />
Rinse with lots of luke-warm water, even with 1–2%<br />
acetic acid or vinegar, then further washing. A splash in<br />
the eye should be rinsed immediately with lukewarm<br />
water <strong>for</strong> several minutes; then obtain medical<br />
attention. Strong hydroxides quickly dissolve fat, which<br />
is the main reason why strong hydroxides are at least as<br />
dangerous as strong acids. It is a good preventive<br />
measure to apply hand lotion be<strong>for</strong>e <strong>preparing</strong> radulae,<br />
to reduce the effect of small splashes.<br />
Dissolution of potassium and sodium hydroxide in<br />
water develops enough heat to cause explosive boiling<br />
if large quantities are dissolved in a narrow vessel.<br />
Never dissolve it in warm water!<br />
Propylene phenoxyethanol. See phenoxetol®.<br />
Propylene glycol. CAS no 107-21-1. Can generally be used<br />
instead of ethylene glycol (Presnell and Schreibman<br />
1997: 9), but is much more expensive. Propylene glycol<br />
is sometimes added (2–5%) to ethanol preserved<br />
specimens because it is assumed to reduce brittleness<br />
(Boase and Waller 1994). It contributes to rapid<br />
dissolution of micromolluscs.<br />
Sodium hydroxide. CAS no 1310-73-2. See potassium<br />
hydroxide, which is used <strong>for</strong> similar purposes and<br />
presents the same hazards.<br />
Sodium hypochlorite. CAS no 7681-52-9, commercial<br />
bleach. Commercial bleach is a solution of sodium<br />
hypochlorite in water, usually with some silicates added<br />
<strong>for</strong> preventing suspended particles sinking to the<br />
bottom. Often perfume is added to conceal the smell of<br />
chlorine. Due to the presence of the silicates, all<br />
equipment, shells and radulae must be thoroughly<br />
rinsed; otherwise the silicates will <strong>for</strong>m insoluble<br />
precipitations.<br />
Commercial bleach, diluted with 1–5 times as<br />
much water, is a good oxidant <strong>for</strong> destroying organic<br />
dirt. Weak heating (30–50°C) speeds up the process. At<br />
the same time the high pH facilitates removal of the<br />
dirt. During the process chlorine (gas) is produced,<br />
causing a distinctive, unpleasant smell. Working with<br />
millilitres of the solution this does not present a danger.<br />
Be careful not to get splashes in your eyes; if this<br />
happens thoroughly rinse with lukewarm water; get<br />
medical attention if problems remain. Read instructions<br />
on bottle.<br />
Sodium lauryl sulphate. CAS no 151-21-3 (=sodium<br />
dodecyl sulphate). Used as a 5–50% solution <strong>for</strong><br />
dissolving tissues and cleaning inorganic material. Can<br />
be used <strong>for</strong> radular preparation when potassium<br />
hydroxide disintegrates the radula, e.g.,<br />
patellogastropods and chitons. This is a longer<br />
procedure and takes up to a week at 30–50°C. Much<br />
tissue remains afterwards and cleaning with a fine<br />
paintbrush in warm water and a short (a few seconds)<br />
rinse with bleach be<strong>for</strong>e the final rinsing is<br />
recommended. Due to the dissolution of fat and cell<br />
walls it should be handled with care.<br />
Sodium salts. Sodium phosphates are not good <strong>for</strong> buffer<br />
use in combination with sea water or calcareous<br />
material since the calcium in sea water will precipitate<br />
as phosphate, or recrystallisation of calcareous tissues<br />
may take place. Sodium salts of organic acids seem<br />
poor as buffers <strong>for</strong> protection of calcareous elements<br />
since the organic ions often <strong>for</strong>m complex ions (even<br />
chelates) with calcium ions. The carbonates seem<br />
acceptable (see below), but the resulting pH of sodium<br />
bicarbonate alone is high enough to precipitate<br />
paraldehyde in <strong>for</strong>malin.<br />
Sodium carbonate. CAS no 497-19-8. MW 105.989 (also<br />
deca- and monohydrates exist) and sodium hydrogen<br />
carbonate, CAS no 144-55-8, sodium bicarbonate,<br />
(MW 84.007) have been used extensively <strong>for</strong> buffering<br />
<strong>for</strong>maldehyde and give a pH of 8 and 11 respectively in<br />
a 0.25M solution over a rather wide range of<br />
concentrations.<br />
In an aqueous solution 21 g/l (= 0.25 M) NaHCO 3<br />
has a pH of 8.0; 26 g/l (= 0.25 M) Na 2 CO 3 gives a pH of<br />
11.4. In <strong>for</strong>malin, however, a range of mixtures<br />
carbonate:bicarbonate 1:10–1:1 produce a pH of 9–10,<br />
which soon starts precipitation of para<strong>for</strong>mldehyde and<br />
means that sodium carbonate – hydrogen carbonate<br />
buffers should be avoided <strong>for</strong> buffering <strong>for</strong>malin.<br />
Sublimate. See mercury chloride.<br />
Superglue. See cyanoacrylate.<br />
Urethane (ethyl urethane, ethyl carbamate). CAS no 51-79-<br />
6. Used <strong>for</strong> narcotisation by adding 1% solution of<br />
urethane in sea water. (Urethane is actually the name of<br />
the whole group of carbamates. For use as narcotising<br />
agent, the ethyl ester is usually employed: Dudich and<br />
Kesselyák n.d.). Not recommended since it is classified<br />
as a carcinogen and easily replaced by less dangerous<br />
compounds.<br />
Water. Freshwater is often recommended <strong>for</strong> narcotising<br />
marine animals, especially <strong>for</strong> echinoderms. Slowly<br />
(1/10 per minute) add it to animals in sea water until<br />
they stop reacting. Leave them <strong>for</strong> 5–10 minutes and<br />
fix. This method destroys all epithelia and is suitable <strong>for</strong><br />
animals saved <strong>for</strong> identification only. Water used <strong>for</strong><br />
washing material <strong>for</strong> use with the SEM should<br />
preferably be distilled.
46<br />
Index Micromollusks<br />
Pages in bold refer to illustrations.<br />
3D, see three dimensional<br />
Acetic acid .........................................................................16, 24, 39<br />
Acetone ........................................................................21, 39, 42, 44<br />
Acid........................................................................ 11–12, 15–16, 18<br />
Acid free paper, see Paper, types of Adhesive, see Carbon tab,<br />
Colloidal graphite, Glue, Leit-C plast, Silver paste<br />
Air bubble ......................................................................................17<br />
Air dry................................................................................14, 17, 43<br />
Air-lift pump ..................................................................................10<br />
Aldehyde, see also glutaraldehyde...........................................40, 42<br />
Algae .......................................................................................... 9, 11<br />
Allergene............................................................................13, 40, 42<br />
Amines ...........................................................................................27<br />
Amira .......................................................................................32, 33<br />
Ammonia........................................................................................12<br />
Amylocaine hydrochloride.............................................................39<br />
Anatomy, external ..............................................................22, 24, 32<br />
Animals, see SEM, animals; live animals<br />
Anoxic............................................................................................10<br />
Aragonite........................................................................................12<br />
Archival paper, see Paper, types of<br />
Arkanas Stone ..................................................................................8<br />
Automontage..............................................................................4, 35<br />
Bag, cloth .......................................................................................10<br />
Bag, heat seal .................................................................................13<br />
Bag, zip lock ....................................................................................9<br />
Bait.................................................................................................10<br />
Barbiturates .................................................................................... 11<br />
Basket.............................................................................................10<br />
Beeswax .........................................................................................35<br />
Bench grinder...................................................................................8<br />
Bench vice......................................................................................12<br />
Benzamine......................................................................................39<br />
Bichromate, see Chromic acid<br />
Biodiversity..............................................................................2, 3–5<br />
Bivalve .......................................................................7–8, 17, 21–22<br />
Bivalve, opening ............................................................................21<br />
Bleach ........................................................17, 21, 26–27, 29, 43, 45<br />
Blow dry.........................................................................................14<br />
B-phenoxyethylalcohol, see Phenoxetol<br />
Boiling method................................................................... 11, 13, 43<br />
Borax............................................................................12, 39, 42–43<br />
Bouin’s fixative............................................................12, 24, 39, 44<br />
Bowls, see also Embryo bowls ........................................................9<br />
Box, plastic ....................................................................................15<br />
Box, polystyrene ............................................................................15<br />
Brush....................................................5, 6, 8, 10, 17, 21, 28–30, 32<br />
Brush, dry.......................................................................................14<br />
Brush, moist ............................................................................. 11, 14<br />
Buccal mass ...................................................................................16<br />
Buffer, see Paper, types of; Formalin, buffered<br />
Butric acid......................................................................................16<br />
Butyl acetate.......................................................................21, 39, 44<br />
Byne’s disease....................................................................13, 15, 16<br />
GEIGER ET AL. (2007) MOLLUSCAN RESEARCH, VOL. 27<br />
Byssus.........................................................................................9–10<br />
Caenogastropoda ............................................................................29<br />
Calcium acetate ..............................................................................16<br />
Calcium carbonate, calcite .........................12–13, 15–16, 39–40, 42<br />
Calcium phosophate .......................................................................39<br />
Capillary <strong>for</strong>ces ........................................................9, 17–18, 30, 32<br />
Carbonate, biogenic..........................................................................9<br />
Carbon dioxide .......................................................24, 26–27, 39–40<br />
Carbon tab/tape, double-sided..............17, 18, 20, 21, 24, 29–30, 31<br />
Carbon tetrachloride .......................................................................16<br />
Carbonyl chloride ...........................................................................42<br />
Carborundum paper..........................................................................8<br />
Carbowax, see Polyethylene glycol<br />
Carcinogen..............................................................12–13, 40, 42, 45<br />
Cardboard slide, see geology micromounts<br />
Celluloid .........................................................................................14<br />
Charging, see SEM, charging<br />
Chemicals, see also under particular compound ................35, 39–45<br />
Chiton, see Polyplacophora<br />
Chloral hydrate, chloretone ............................................................40<br />
Chlorine gas....................................................................................45<br />
Chloro<strong>for</strong>m ...............................................................................21, 40<br />
Chromic acid, .....................................................................12, 40, 43<br />
Clam, see bivalve<br />
Clay, plastic ....................................................................................15<br />
Cleaning....................................................................................16–17<br />
Cocaine hydrochloride ...................................................................40<br />
Cold, see also Freezer, freezing..........................................10–11, 40<br />
Collecting ...................................................................................9–10<br />
Colloidal graphite ...............................................................17–18, 21<br />
Concavity slide, see depression slide<br />
Conchiolin ................................................................................17, 26<br />
Conductive wire .............................................................................18<br />
Conductivity, electrical.............................................................17–18<br />
Container <strong>for</strong> specimens...........................................................14–15<br />
Cork................................................................................................16<br />
Cotton wool ........................................................................13–16, 24<br />
Cover slip ...........................................................................29–30, 32<br />
Critical point drying, CPD......................................18, 24, 25, 39, 44<br />
Cyanoacrylate.................................................................................40<br />
Decalcification........................................................24, 39–40, 42–43<br />
Dehydration..............................................................................24, 43<br />
Depression slide ...................................................................9, 27, 30<br />
Detergent ......................................................................10, 17, 21–22<br />
Diethyl ether .............................................................................11, 40<br />
Digital imaging.........................................................................32–35<br />
Dirt......................................................................................14, 17–18<br />
Dish ................................................................................................11<br />
Disodium tetraborate, see Borax<br />
Dissecting microscope, see stereomicroscope<br />
Dissection .........................................................................2, 8, 24, 26<br />
Distortion..................................................................................22, 34<br />
DNA extraction ..................................................................26–27, 28<br />
Docoglossate ............................................................................30, 32<br />
Dolomite...................................................................................39, 42<br />
Dredge ........................................................................................9–10<br />
Drill ......................................................................................8, 12, 23<br />
Dry bath incubator..........................................................................27
TECHNIQUES FOR STUDYING SMALL MOLLUSCAN SPECIMENS 47<br />
Drying ............................................................................................14<br />
Drying chamber .............................................................................14<br />
Efflorescence......................................................................13, 15–16<br />
Elutriation ...................................................................................... 11<br />
Embryo bowl........................................................................9, 17, 27<br />
Epibenthic sledge .......................................................................9–10<br />
Eppendorf tubes .......................................................................13, 27<br />
Epsom salt, see Magnesium sulphate<br />
Ethanol ....................................................... 11, 17, 28–30, 40–43, 45<br />
Ethanol 30%............................................................................. 11–12<br />
Ethanol 50–60%.......................................................................12–13<br />
Ethanol 75–80%............................................... 11–14, 21, 28, 40, 43<br />
Ethanol 95%........................................................... 11–14, 21, 40, 43<br />
Ethanol 100%............................................. 11–14, 21, 24, 39–40, 43<br />
Ethanol vapour.........................................................................12, 43<br />
Ethanol, vodka ...............................................................................22<br />
Ethyl acetate...................................................................................44<br />
Ethyl carbamate/urethane, see Urethane<br />
Ethylene diamino-tetraacetic acid, EDTA ...............................24, 40<br />
Ethylene glycol ........................................................................41, 45<br />
Eucaine...........................................................................................41<br />
Falcon tubes ...................................................................................13<br />
Files..................................................................................................8<br />
Fixation, fixative .............................................. 11–12, 39, 41, 43–44<br />
Floating off..................................................................................... 11<br />
Flocculent material.........................................................................27<br />
Foam, plastic ..................................................................................15<br />
Forceps........................................ 6, 7, 11–12, 14, 21, 24, 27–28, 30<br />
Formaldehyde ..........................................................................41–42<br />
Formalin.....................................................10–13, 22, 24, 27, 41–45<br />
Formalin, 37–40%..............................................................12, 39, 41<br />
Formalin, buffered ...........................................12–13, 22, 39, 41–43<br />
Formalin – seawater.................................................................12–13<br />
Formamide .....................................................................................42<br />
Formiate .........................................................................................16<br />
Formic acid ........................................................................24, 42–43<br />
Freshwater............................................................................2, 10, 45<br />
Fridge, see also Cold................................................................ 10–11<br />
Freeze drying .................................................................................24<br />
Freezer, freezing, see also Cold ...............................................10–12<br />
Funnel ............................................................................................14<br />
Gastropod.........................................................17, 21–22, 26, 29, 40<br />
Gelatine capsule .............................................................................14<br />
Geology micromounts....................................................................14<br />
Glass disease ......................................................................13, 15, 16<br />
Glass, types ........................................................................13–14, 16<br />
Glue................................................................................................24<br />
Glue, polyvinyl acetate ....................................18, 24, 29–30, 32, 44<br />
Glue, spray ...............................................................................18, 21<br />
Glue, super see Cyanoacrylate<br />
Glutaraldehyde................................................................... 11–12, 22<br />
Glycerol....................................................................................40, 43<br />
Gooding and Stewart’s fluid ..........................................................42<br />
Grab sampler..............................................................................9–10<br />
Habitat....................................................................................2, 9–10<br />
Hairs.....................................................................................8, 30, 32<br />
Hammer..........................................................................................12<br />
Handling, see Specimen manipulation<br />
Hazards.........................................................2, 11, 13, 24, 35, 39–45<br />
Heat ..................................................................10, 13, 26–28, 30, 43<br />
Hetrobranchia .................................................................................40<br />
Hexamethyldisilizane, HMDS..................................................24, 43<br />
Hexamine, hexamethylene tetramine .................................12, 42–43<br />
Histology ....................................2, 10, 12, 24, 32, 33, 39–40, 43–44<br />
Histolysis ..................................................................................12, 42<br />
Holotype, see Specimen, types<br />
Humidity.............................................................................14–16, 32<br />
Hydrochloric acid ...................................................15, 24, 40, 42–43<br />
Hydrogen peroxide .............................................................17, 21, 43<br />
Hypochlorite, see Bleach<br />
Illumination, see Lighting<br />
Incubator, see also Dry bath incubator ...............................27, 29–30<br />
Insects.............................................................................................42<br />
Irritant...............................................................................................9<br />
Irwin loop .......................................................................................11<br />
Isopropanol.........................................................................21, 40, 43<br />
Ketone ............................................................................................40<br />
KOH, see potassium hydroxide<br />
Labels, see also paper...............................................................14–15<br />
Land snail, see Pulmonate<br />
Laser writer.....................................................................................15<br />
Lateromarginal plate.......................................................................32<br />
Leaf litter ....................................................................................9–10<br />
Leit-C plast.....................................................................................35<br />
Lens, photographic ...................................................................32–33<br />
Lens, microscope............................................................................34<br />
Lepetelloidea ..................................................................................26<br />
Light sources ..............................................................................7, 28<br />
Lighting ........................................................................28, 30, 34–35<br />
Light microscope......................................................................29–30<br />
Light trap ........................................................................................10<br />
Limpet, see Patellogastropoda<br />
Lithium .....................................................................................11, 43<br />
Live animals ...............................................................................9, 11<br />
Maceration......................................................................................27<br />
Magnesium chloride .....................................................10–11, 43–44<br />
Magnesium sulphate.......................................................................44<br />
Mangrove..........................................................................................9<br />
Manipulation, see Specimen manipulation<br />
Marine ..............................................................................................2<br />
Menthol ....................................................................................11, 44<br />
Mercury ..........................................................................................12<br />
Mercury chloride ......................................................................39, 44<br />
Metal.........................................................................................14, 27<br />
Methanol.............................................................................40, 42, 44<br />
Methenamine, see hexamine<br />
Methods, failed.............................................2, 12–13, 18, 24, 26–27<br />
Method, best .....................................................................................2<br />
Microfossil slides, see geology micromounts<br />
Micromount, mineral......................................................................15<br />
Microscissors....................................................................................7<br />
Microscope, see stereomicroscope<br />
Microscope, light, see Light microscope<br />
Microwave......................................................................................15<br />
Molecular work ......................................................12–13, 26, 40, 43<br />
Monoplacophora.............................................................................26
48<br />
GEIGER ET AL. (2007) MOLLUSCAN RESEARCH, VOL. 27<br />
Mother of pearl, see nacre<br />
Mould.......................................................................................14, 43<br />
Mountants, tackless picture............................................................15<br />
MS222...................................................................................... 11, 44<br />
MSDS...............................................................................................2<br />
Mucus.......................................................................................14, 43<br />
Mylar..............................................................................................15<br />
Nacre ........................................................................................17, 21<br />
NaOH, see sodium hydroxide<br />
Narcotisation.................................................. 2, 9–11, 39–40, 43–45<br />
Needle holder ...............................................................................7–8<br />
Needle, see also Pin .....................................8, 21–22, 24, 27–30, 32<br />
Needle, tungsten.........................................................................8, 30<br />
Nembutal........................................................................................44<br />
NEM tape .......................................................................................18<br />
Neogastropoda .........................................................................29, 32<br />
Nicotine, see also Tobacco.............................................................40<br />
Nipa ester, see Phenoxetol<br />
Niku-nuki .......................................................................................13<br />
Nitric acid.................................................................................14, 43<br />
Nitrocellulose.................................................................................44<br />
Nitrogen, liquid.............................................................................. 11<br />
Ontogeny..................................................................................26, 31<br />
Operculum..............................................................12, 19, 24, 27, 44<br />
Opisthobranch............................................................................9–10<br />
Optics .......................................................................................33–35<br />
Organic material................................................................. 11, 13, 26<br />
Osmium tetroxide.....................................................................22, 44<br />
Osmotic balance.............................................................................10<br />
Paper, bleaching .............................................................................15<br />
Paper, filter.....................................................................................29<br />
Paper, heating.................................................................................15<br />
Paper, label, see Labels<br />
Paper, surface .................................................................................14<br />
Paper towel.........................................................................27, 29–30<br />
Paper, types of..........................................................................14–15<br />
Paraldehyde, para<strong>for</strong>maldehyde...............................................42, 45<br />
Patellogastropoda.......................................10, 12, 22, 26–27, 32, 45<br />
Pencil........................................................................................15, 17<br />
Perchlorethylene ............................................................................16<br />
Periostracum ............................................................................16, 43<br />
Permits .......................................................................................9, 35<br />
Personal preference..........................................................................2<br />
Petri dish ........................................................................................ 11<br />
pH.........................................................12–13, 17, 24, 26, 39–42, 45<br />
Phenoxetol, phenoxy isopropanol..................................................44<br />
Phosgene ........................................................................................42<br />
Photographic paper, blackened ......................................................29<br />
Photography .............................................................. 4, 5, 11, 32–35<br />
Photography, optics, see Optics<br />
Picric acid.................................................................................39, 44<br />
Pie pan............................................................................................ 11<br />
Pigment ink ....................................................................................15<br />
Pin, see also Needle .................................................. 6, 8, 29, 31, 35<br />
Pin holder, see Needle holder<br />
Pipette ........................................................... 6, 7, 11, 21, 27–28, 30<br />
Plankton net ...................................................................................10<br />
Plastic box, see Box, plastic<br />
Plastic foam, see Foam, plastic<br />
Plastic, surface..........................................................................14, 27<br />
Plasticine ........................................................................................35<br />
Plasticiser........................................................................................15<br />
Pliers...........................................................................................8, 12<br />
Polycarbon......................................................................................12<br />
Polyethylene ...................................................................................12<br />
Polyplacophora.......................................................10, 12, 30, 40, 45<br />
Polystyrene .....................................................................................15<br />
Polyvinyl acetate, PVA see Glue, polyvinyl acetate<br />
Polyvinyl alcohol............................................................................44<br />
Polyvinylchloride, PVC..................................................................15<br />
Positioning......................................................................................35<br />
Posture ........................................................................................6, 32<br />
Potassium hydroxide ........................................21, 26–30, 32, 44–45<br />
Preservation....................................................................................11<br />
Prodissoconch.................................................................................22<br />
Propylene glycol.......................................................................44–45<br />
Propylene glycol monophenyl ether, Propylene phenoxetol, see<br />
Phenoxetol<br />
Protein, tanned..........................................................................17, 21<br />
Proteinase K .............................................................................26–28<br />
Protoconch....................................................................13, 22, 26, 31<br />
Ptenoglossate ..................................................................................29<br />
Pulmonata.................................................................................29, 42<br />
Radula.................................................................................19, 22, 24<br />
Radula extraction....................................................24, 26–29, 44–45<br />
Radula mounting ................................................................29–32, 31<br />
Rarefaction .......................................................................................9<br />
Razor blade.............................................................................7–8, 21<br />
Recrystallisation ...........................................................12, 26, 39, 45<br />
Reference specimen, see Voucher<br />
Rehydration ....................................................................................22<br />
Relaxation...........................................................................10–11, 22<br />
Rhipidoglossate ..................................................................29–30, 32<br />
Rock washing .............................................................................9–10<br />
Saliva ........................................................................................14, 29<br />
Salts ..........................................................................................14, 16<br />
Sampling...........................................................................................9<br />
Sand paper ........................................................................................8<br />
Scalpel ..................................................................................7, 21, 24<br />
Scintillation vial .............................................................................13<br />
Scissors.......................................................................................7, 32<br />
SCUBA.......................................................................................9–10<br />
Sediment...........................................................................................9<br />
SEM, animals .....................................................................22–24, 25<br />
SEM, charging..........................................................................17–19<br />
SEM, detectors .............................................................19, 20, 21, 22<br />
SEM, environmental.......................................................................19<br />
SEM, gun types ........................................................................15, 19<br />
SEM, images ................................................................... 3, 5, 20, 23<br />
SEM, mounting .............................................................17, 29–32 35<br />
SEM, parameters ................................................................18, 20, 23<br />
SEM, radula, see Radula<br />
SEM, sample penetration ...............................................................19<br />
SEM, signal mixing............................................................19, 20, 22<br />
SEM, stub ...................................................14–15, 17, 21, 30, 32, 44<br />
SEM, stub map ...............................................................................17
TECHNIQUES FOR STUDYING SMALL MOLLUSCAN SPECIMENS 49<br />
SEM, technique......................................................12, 14, 16–25, 20<br />
SEM, variable pressure ................................................15, 18, 20, 22<br />
SEM, uncoated materials ........................................................ 16, 19<br />
Separation ...................................................................................... 11<br />
Sharpening .......................................................................................8<br />
Shell ...........................................................................................2, 12<br />
Shell, coiled....................................................................8, 17, 21–24<br />
Shell, cracking..........................................................................12, 24<br />
Shell, crushing................................................................................12<br />
Shell damage........................................12–17, 24, 26, 40–41, 43–44<br />
Shell dissolution...........................................8, 12–14, 17, 26, 43–45<br />
Shell drying....................................................................................14<br />
Shell grit...........................................................................................9<br />
Shell-less ..........................................................................................2<br />
Shell manipulation, see specimen manipulation<br />
Sieve............................................................................. 6, 6, 9, 11, 28<br />
Silica gel.........................................................................................15<br />
Silicone ..........................................................................................35<br />
Silver paint...............................................................................17–18<br />
Size, specific .................................................................... 2, 6, 11–12<br />
Slide, histology ..................................................................28–30, 35<br />
Slide warmer ..................................................................................27<br />
Snail, see gastropod<br />
Sodium bicarbonate ...........................................................12–13, 45<br />
Sodium carbonate...................................................12, 16–17, 27, 45<br />
Sodium dodecyl suphate, SDS.....................................21, 26–27, 45<br />
Sodium hydrogen carbonate ..........................................................45<br />
Sodium hydroxide............................................16–17, 24, 26, 43, 45<br />
Sodium hypochloride, see Bleach<br />
Sodium lauryl sulphate, see Sodium dodecyl sulphate<br />
Sodium pentobarbitone, see Nembutal<br />
Sodium phosphate..........................................................................45<br />
Sodium tetraborate, see Borax<br />
Sonication, see ultrasound<br />
Sorting............................................................................................ 11<br />
Sorting tray..................................................................................... 11<br />
Specimen, drying ...........................................................................14<br />
Specimen manipulation............................................................ 11, 14<br />
Specimen, types ................................................ 2, 13, 16, 21, 32, 35<br />
Species, number of...........................................................................2<br />
Spin column .............................................................................27, 28<br />
Sputter coating .........................................................................18, 30<br />
Static charge.............................................................................14, 27<br />
Stenoglossate..................................................................................32<br />
Stereomicroscope............................... 6–7, 11, 22, 24, 27–30, 34–35<br />
Storage .....................................................................................12, 29<br />
Storage, field ..................................................................................13<br />
Storage, medium ................................................................13, 43–44<br />
Stovaine..........................................................................................39<br />
Streaks ............................................................................................12<br />
Stub, see SEM, stub<br />
Sublimate, see Mercury chloride<br />
Sunlight ..........................................................................................10<br />
Surface tension ...................................................................17, 21, 30<br />
Swelling..........................................................................................11<br />
t-butyl alcohol.................................................................................24<br />
Taenioglossate ................................................................................29<br />
Tape, office, copper, aluminum, nickel ..........................................18<br />
Terrestrial................................................................................2, 9–10<br />
TEM......................................................................................2, 12, 44<br />
Thermal circulation ........................................................................11<br />
Three dimensional reconstruction ............................................32, 33<br />
Timing ..............................................................................................2<br />
Tissue clearing................................................................................12<br />
Tissue desiccation.....................................................................24, 43<br />
Tissue dissolution .................................17, 21, 26–27, 29–30, 44–45<br />
Tissue hardening.......................................................................43, 45<br />
Tissue shrinkage ..........................................................12, 24, 43–44<br />
Tissue swelling .........................................................................11–12<br />
Tobacco, see also Nicotine .............................................................11<br />
Tools .........................................................................................2, 5–9<br />
Tooth pick.........................................................................................8<br />
Transmission electron microscope, see TEM<br />
Trap.................................................................................................10<br />
Tricaine methanesulphonate, see MS 222<br />
Trisodium phosphate ......................................................................17<br />
Tungsten needle, see Needle, tungsten<br />
Turbulence................................................................................11–12<br />
Type material, see Specimen, types<br />
Ultrasound ..........................................................................17, 26, 29<br />
Urethane .........................................................................................45<br />
Vetigastropoda ....................................................................26, 30, 32<br />
Vial, glass ...........................................................................13–14, 22<br />
Vice.................................................................................................12<br />
Voucher...............................................................................12–13, 26<br />
Wash, shell................................................................................13, 17<br />
Wash, radula .......................................................................27–28, 30<br />
Water...................................................................................11, 28, 45<br />
Water, distilled............................................14, 17, 27–28, 30, 32, 45<br />
Water, hot..................................................................................13, 29<br />
Wax tray....................................................................................24, 35<br />
Wire ..........................................................................................30, 32<br />
Wire cutter ................................................................................12, 30<br />
Wood.........................................................................................15–16<br />
Workspace ..........................................................................2, 5–6, 27<br />
X-ray tomography ..........................................................................32<br />
Xylene ............................................................................................42<br />
Zip lock bag......................................................................................9
50<br />
About the authors<br />
Daniel L. Geiger is <strong>Research</strong> Curator of Electron<br />
Microscopy at the Santa Barbara Museum of Natural<br />
History. His award-winning dissertation from 1999 on<br />
abalone systematics and evolution was overseen by coadvisors<br />
Dr. Russel Zimmer and Dr. James H. McLean at the<br />
University of Southern Cali<strong>for</strong>nia (USC) in Los Angeles,<br />
Cali<strong>for</strong>nia. Following a post-doctoral fellowship in<br />
molecular systematics at the Los Angeles County Museum<br />
of Natural History and teaching appointments at USC, he<br />
moved to his current position. He is working on systematics<br />
and evolution of Vetigastropoda, currently focusing on the<br />
exclusively minute Scissurellidae, Anatomidae and<br />
associated families, using light and electron microscopy on<br />
shells and radulae, 3D reconstruction of histological<br />
sections, as well as molecular phylogenetics. His field<br />
experience ranges from the Irish Sea to Papua New Guinea;<br />
photography and digital imaging are keen interests. He is<br />
associate editor with <strong>Molluscan</strong> <strong>Research</strong> and the senior<br />
editor <strong>for</strong> Mollusca with Zootaxa. He is the organizer of the<br />
symposium on micromolluscs at the Unitas Malacologia<br />
2007 conference in Antwerp, Belgium.<br />
Bruce Marshall is Malacologist and collection manager of<br />
Mollusca at Museum of New Zealand Te Papa Tongarewa,<br />
Wellington, which he joined in 1975. He specialises in the<br />
fauna of New Zealand and surrounding areas and has<br />
published extensively on various groups of small gastropods<br />
and monoplacophorans. He is an associate editor with<br />
<strong>Molluscan</strong> <strong>Research</strong>.<br />
Winston Ponder retired in 2005 after many years as a<br />
Principal <strong>Research</strong> Scientist at the Australian Museum,<br />
Sydney. He carried out a major study of rissooidean<br />
microgastropods in New Zealand <strong>for</strong> his Master of Science<br />
degree. After finishing his PhD on neogastropods he moved<br />
GEIGER ET AL. (2007) MOLLUSCAN RESEARCH, VOL. 27<br />
to the Australian Museum in 1968 after briefly taking up a<br />
position in the National Museum of New Zealand. He was<br />
awarded a DSc in 1992 and is the author of over 200<br />
publications on molluscs, many of them on micromolluscs,<br />
particularly marine and freshwater Rissooidea. His current<br />
primary interests include the taxonomy, distribution and<br />
conservation of freshwater and estuarine molluscs, higher<br />
systematics of gastropods and building interactive keys. He<br />
is also writing a book on molluscan biology and evolution<br />
together with Prof. David Lindberg and is the Managing<br />
Editor of <strong>Molluscan</strong> <strong>Research</strong>.<br />
Takenori Sasaki is a curator of paleontology and zoology at<br />
The University Museum, The University of Tokyo. He<br />
received his master’s degree in Prof. Okutani’s laboratory at<br />
the Tokyo University of Fisheries with work on<br />
patellogastropod systematics and a Ph. D. degree in the<br />
paleobiological laboratory at The University of Tokyo<br />
carrying out cladistic analyses of ‘archaeogastropods’. After<br />
a post-doctoral fellowship at The University of Tokyo, he has<br />
been in the current position since 1999. His main interests<br />
are: comparative anatomy and phylogeny of whole<br />
molluscan groups, serial sectioning of soft parts, larval shell<br />
morphology and shell microstructure, biodiversity studies of<br />
Japanese molluscs, taxonomic revision of patellogastropods,<br />
and faunal research on deep-sea chemosynthesis-based<br />
biological communities (hydrothermal vents and seeps).<br />
Since 2002 he has especially worked on deep-sea molluscs<br />
as a visiting scientist of JAMSTEC (Japan Agency <strong>for</strong><br />
Marine-Earth Science and Technology).<br />
Anders Warén is senior curator at the Swedish Museum of<br />
Natural History in Stockholm. He undertook his doctoral<br />
studies at Göteborg University and has worked extensively<br />
on eulimid gastropods. He has recently worked on deep sea<br />
molluscs of the North-Eastern Atlantic and the Arctic as well<br />
as hydrothermal vent taxa.