Programming the Receiver - Radix
Programming the Receiver - Radix
Programming the Receiver - Radix

Create successful ePaper yourself
Turn your PDF publications into a flip-book with our unique Google optimized e-Paper software.
5 Installing <strong>the</strong> <strong>Receiver</strong><br />
ATTENTION:<br />
Installing <strong>the</strong> receiver<br />
Never place <strong>the</strong> device close to heat sources or in a place where <strong>the</strong>re is strong radiation<br />
from <strong>the</strong> sun.<br />
Lay all <strong>the</strong> cables so that <strong>the</strong>y cannot be damaged, e.g. on sharp edges.<br />
Only connect <strong>the</strong> device to a mains with 95 V – 264 V~, 50/60 Hz supply.<br />
ATTENTION:<br />
Only connect <strong>the</strong> device to <strong>the</strong> mains after correctly linking it to <strong>the</strong> video recorder,<br />
television and any o<strong>the</strong>r additional receiver (analogue).<br />
• Use a double-shielded coaxial cable for <strong>the</strong> coaxial connection cable from <strong>the</strong> LNB to <strong>the</strong><br />
receiver.<br />
ATTENTION:<br />
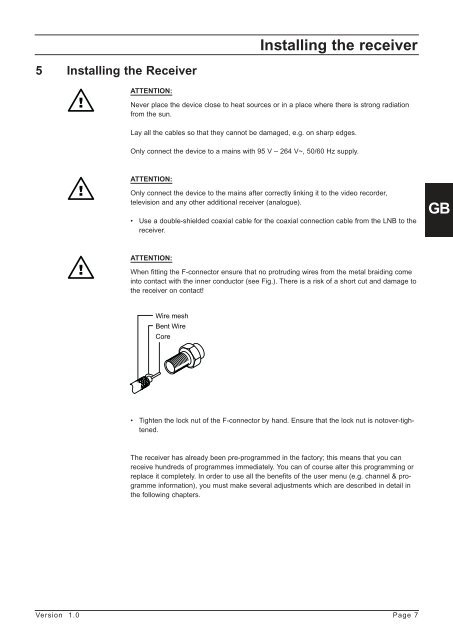
When fitting <strong>the</strong> F-connector ensure that no protruding wires from <strong>the</strong> metal braiding come<br />
into contact with <strong>the</strong> inner conductor (see Fig.). There is a risk of a short cut and damage to<br />
<strong>the</strong> receiver on contact!<br />
Wire mesh<br />
Bent Wire<br />
Core<br />
• Tighten <strong>the</strong> lock nut of <strong>the</strong> F-connector by hand. Ensure that <strong>the</strong> lock nut is notover-tightened.<br />
The receiver has already been pre-programmed in <strong>the</strong> factory; this means that you can<br />
receive hundreds of programmes immediately. You can of course alter this programming or<br />
replace it completely. In order to use all <strong>the</strong> benefits of <strong>the</strong> user menu (e.g. channel & programme<br />
information), you must make several adjustments which are described in detail in<br />
<strong>the</strong> following chapters.<br />
Version 1.0 Page 7<br />
GB