EvitaXL
EvitaXL
EvitaXL

You also want an ePaper? Increase the reach of your titles
YUMPU automatically turns print PDFs into web optimized ePapers that Google loves.
<strong>EvitaXL</strong><br />
Intensive Care Ventilator<br />
Software 6.n<br />
Instructions for Use<br />
Emergency Care · OR/Anesthesia · Critical Care · Perinatal Care · Home Care Because you care
Working with these Instructions for Use<br />
Header line – the title...<br />
of the main chapter.<br />
The title of the specific sub-section is printed underneath the<br />
main header – to help you find your way quickly from subject to<br />
subject.<br />
Page body...<br />
the Instructions for Use<br />
in combined text/illustrations. The information is expressed in<br />
the form of practical actions, giving the user direct hands-on<br />
experience in learning how to use the machine.<br />
Left-hand column – the text...<br />
provides explanations and instructs the user step-by-step in the<br />
practical use of the product, with short, clear instructions in<br />
easy-to-follow sequence.<br />
Bullet points indicate separate actions. Where several actions<br />
are described, numbers are used both to refer to the relevant<br />
details in the illustrations and to specify the sequence of<br />
actions.<br />
Right-hand column – the illustrations...<br />
provide the visual reference for the text and make it easier to<br />
locate the various parts of the equipment. Elements mentioned<br />
in the text are highlighted. Unnecessary details are avoided.<br />
Screen displays prompt the user to proceed and confirm correct<br />
actions.<br />
These Instructions for Use also apply to <strong>EvitaXL</strong> as well as<br />
Evita 4 and Evita 2 dura with the <strong>EvitaXL</strong> option.<br />
Preparing for use<br />
Positioning the control unit<br />
Preparing for use<br />
● Always use properly prepared parts, see "Preparing",<br />
page 155.<br />
● Hospital infection control regulations must be observed.<br />
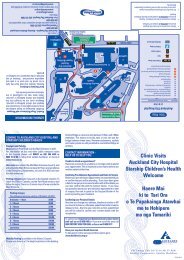
Positioning the control unit<br />
2 Instructions for Use <strong>EvitaXL</strong><br />
●<br />
22<br />
The control unit must not be stood up or leant against anything,<br />
nor may it be laid face downwards! It must always be<br />
laid on its back when changing over.<br />
Positioning on the unit<br />
● Hook the control unit into the mount on <strong>EvitaXL</strong><br />
until it<br />
engages.<br />
To adjust the position:<br />
1 Press and hold the segments on the right and left, at the<br />
same time tilting the control unit into the required position.<br />
Positioning on the wall rail<br />
2 Press and hold the segments on the right and left, tilting the<br />
control unit down completely at the same time.<br />
3 Press and hold the unlocking buttons on the right and left,<br />
lifting the control unit out of the mount on <strong>EvitaXL</strong><br />
at the<br />
same time.<br />
● Unwind the required length of cable.<br />
● Hook the control unit into the wall rail and<br />
1<br />
2<br />
3<br />
170<br />
091<br />
092<br />
Instructions for Use <strong>EvitaXL</strong><br />
208
Contents<br />
Contents<br />
For Your Safety and that of Your Patients 5<br />
Intended Medical Application 7<br />
Operating concept 11<br />
Preparing for use 21<br />
Operation 43<br />
Configuration 125<br />
Fault — Cause — Remedy 143<br />
Preparing 155<br />
Maintenance/Disposal 165<br />
Mains power/DC power operation 169<br />
Evita 4 Link (optional) 177<br />
What's what 183<br />
Technical Data 187<br />
Description 207<br />
Index 247<br />
Instructions for Use <strong>EvitaXL</strong> 3
4 Instructions for Use <strong>EvitaXL</strong>
For Your Safety and that of Your<br />
Patients<br />
Strictly follow the Instructions for Use<br />
Any use of the apparatus requires full understanding and strict<br />
observation of these instructions. The apparatus is only to be<br />
used for purposes specified here.<br />
Maintenance<br />
The apparatus must be inspected and serviced regularly<br />
by trained service personnel at six monthly intervals.<br />
Repair and general overhaul of the apparatus may only<br />
be carried out by trained service personnel.<br />
We recommend that a service contract be obtained with<br />
DrägerService and that all repairs also be carried out by them.<br />
Only authentic Dräger spare parts may be used for<br />
maintenance.<br />
Observe chapter "Maintenance Intervals".<br />
Accessories<br />
Do not use accessory parts other than those in the order list.<br />
Even reusable accessories (e.g. after being prepared) have a<br />
limited service life. Wear may be increased and the service life<br />
reduced considerably by various factors when handling and<br />
preparing them (e.g. disinfectant residues corroding the<br />
material when autoclaving them). These parts must be<br />
replaced if signs of wear become visible, such as cracks,<br />
deformation, discoloration, peeling, etc.<br />
Not for use in areas of explosion hazard<br />
This apparatus is neither approved nor certified for use in<br />
areas where combustible or explosive gas mixtures are likely<br />
to occur.<br />
Safe connection with other electrical equipment<br />
Electrical connections to equipment which is not listed in<br />
these Instructions for Use should only be made following<br />
consultations with the respective manufacturers or an expert.<br />
Liability for proper function or damage<br />
The liability for the proper function of the apparatus is<br />
irrevocably transferred to the owner or operator to the extent<br />
that the apparatus is serviced or repaired by personnel not<br />
employed or authorized by DrägerService or if the apparatus<br />
is used in a manner not conforming to its intended use.<br />
Dräger cannot be held responsible for damage caused by<br />
non-compliance with the recommendations given above.<br />
The warranty and liability provisions of the terms of sale<br />
and delivery of Dräger are likewise not modified by the<br />
recommendations given above.<br />
Dräger Medical AG & Co. KGaA<br />
Safe use of the equipment<br />
For Your Safety and that of Your Patients<br />
Safe use of the equipment<br />
This equipment must only be used under the supervision<br />
of qualified medical staff, so that help is available<br />
immediately if malfunctions occur.<br />
This equipment must not be used with flammable gases<br />
or anaesthetic agents. Danger of fire!<br />
The equipment must not be used for nuclear resonance<br />
tomography (MRT, NMR, NMI)!<br />
This may impair correct functioning of the equipment and<br />
endanger the patient.<br />
The equipment must not be used in hyperbaric chambers!<br />
This may impair correct functioning of the equipment and<br />
endanger the patient.<br />
Correct functioning of the equipment may be impaired<br />
by operation of high-frequency electrosurgery units,<br />
defibrillators or short-wave therapy equipment and<br />
endanger the patient.<br />
To ensure that <strong>EvitaXL</strong> cannot topple over, <strong>EvitaXL</strong> must<br />
not be tilted more than 5 o !<br />
The following must be observed during transportation of<br />
the ventilated patient.<br />
● <strong>EvitaXL</strong> must not be placed on the bed while transferring<br />
a patient.<br />
● <strong>EvitaXL</strong> must be secured so that it cannot topple over/<br />
fall down.<br />
● Secure the accessories, see page 41.<br />
When using <strong>EvitaXL</strong> in combination with other products<br />
and during patient transfers, the equipment's owner must<br />
ensure that it is adequately secured in accordance with<br />
the relevant fundamental requirements of Directive<br />
93/42/EEC.<br />
Medicaments and other substances based on<br />
inflammable solvents, such as alcohol, must not be used<br />
in the patient system. Danger of fire!<br />
Adequate ventilation must be ensured when using inflammable<br />
substances for disinfection.<br />
Instructions for Use <strong>EvitaXL</strong> 5
For Your Safety and that of Your Patients<br />
Safe use of the equipment<br />
Do not use mobile telephones within 10 metres of<br />
ventilators!<br />
Mobile telephones may impair the functionality of electromedical<br />
equipment and endanger the patient * .<br />
General information on electromagnetic compatibility<br />
(EMC) according to the international EMC standard<br />
IEC 60601-1-2: 2001<br />
Medical electrical equipment needs special precautions<br />
regarding electromagnetic compatibility (EMC) and needs to<br />
be installed and put into service according to the EMC information<br />
provided in the technical documentation available<br />
from DrägerService upon request.<br />
Portable and mobile RF communications equipment can<br />
affect medical electrical equipment.<br />
Pins of connectors identified with the ESD warning<br />
symbol shall not be touched and not be connected<br />
unless ESD precautionary procedures are<br />
used. Such precautionary procedures may<br />
include antistatic clothing and shoes, the touch of a ground<br />
stud before and during connecting the pins or the use of<br />
electrically isolating and antistatic gloves. All staff involved in<br />
the above shall receive instruction in these procedures.<br />
* Dräger medical equipment meets the requirements for immunity to<br />
interference in accordance with the specific product standards and<br />
EN 60601-1-2 (IEC 60601-1-2).<br />
Depending on the type of mobile telephone used and on the application<br />
situation, however, field strengths exceeding the values<br />
specified in the applicable standards may develop in the immediate<br />
vicinity of the mobile telephone and therefore lead to faults and malfunctions.<br />
Adequate ventilation monitoring<br />
The following parameters are monitored by the built-in monitoring<br />
facilities of <strong>EvitaXL</strong>:<br />
— Airway pressure PAW<br />
— Expiratory minute volume MV<br />
— Inspiratory tidal volume, VTi<br />
— Inspiratory O2 concentration FiO2<br />
— Inspiratory breathing gas temperature T<br />
— Expiratory CO2 concentration, etCO2 (optional)<br />
— Apnoea time<br />
— Tachypnoea<br />
Changes in these parameters may be caused by:<br />
— Acute changes in the patient's condition<br />
— Incorrect settings and faulty handling<br />
— Equipment malfunctions<br />
— Failure of power and gas supplies<br />
If a fault occurs in this equipment, separate measuring instruments<br />
should be used.<br />
During the O2 Therapy, the monitoring functions of <strong>EvitaXL</strong> are<br />
restricted. Monitoring of SpO2 and the pulse is only available<br />
with the appropriate option.<br />
Back-up ventilation with an independent manual<br />
ventilation device<br />
If a fault is detected in <strong>EvitaXL</strong> so that its life-support functions<br />
are no longer assured, ventilation using an independent ventilation<br />
device must be started without delay – if necessary with<br />
PEEP and/or an increased inspiratory O2 concentration<br />
(e.g. with the Resutator MR 100).<br />
6 Instructions for Use <strong>EvitaXL</strong>
Intended Medical Application<br />
Intended Medical Application . . . . . . . . . . . . . . . . . . . . . . . . . . . . . . . . . . . . . . . . . . . . 8<br />
Instructions for Use <strong>EvitaXL</strong> 7
Intended Medical Application<br />
Intended Medical Application<br />
<strong>EvitaXL</strong> – long-term ventilator for intensive care.<br />
For adults, children and neonates.<br />
For premature babies with the "NeoFlow" option.<br />
With the following ventilation modes<br />
IPPV (Intermittent Positive Pressure Ventilation)<br />
Volume-controlled ventilation with fixed mandatory minute volume.<br />
With the options:<br />
— CPPV (Continuous Positive Pressure Ventilation)<br />
Controlled ventilation with continuous positive airway pressure<br />
— PLV (Pressure Limited Ventilation)<br />
Pressure limited constant-volume ventilation<br />
— AutoFlow ®<br />
for automatic regulation of "Insp. Flow" and "Pinsp"<br />
— IRV (Inversed Ratio Ventilation)<br />
Ventilation with inversed inspiration/expiration ratio.<br />
SIMV (Synchronized Intermittent Mandatory Ventilation)<br />
Combines mechanical (volume-controlled) ventilation with<br />
spontaneous breathing.<br />
With the options:<br />
— PLV (Pressure Limited Ventilation)<br />
Pressure limited constant-volume ventilation<br />
— AutoFlow ®<br />
for automatic regulation of "Insp. Flow" and "Pinsp".<br />
MMV (Mandatory Minute Volume Ventilation)<br />
Spontaneous breathing with automatic adjustment of mandatory<br />
ventilation to the patient's minute volume requirement.<br />
With the options:<br />
— PLV (Pressure Limited Ventilation)<br />
Pressure limited constant-volume ventilation<br />
— AutoFlow ®<br />
for automatic regulation of "Insp. Flow" and "Pinsp".<br />
SB (Spontaneous Breathing)<br />
Spontaneous breathing at ambient pressure.<br />
CPAP (Continuous Positive Airway Pressure)<br />
Spontaneous breathing with positive airway pressure.<br />
ASB (Assisted Spontaneous Breathing)<br />
Pressure-assisted spontaneous breathing.<br />
BIPAP* (Biphasic Positive Airway Pressure)<br />
Pressure-controlled ventilation combined with free spontaneous<br />
breathing during the complete breathing cycle, and adjustable<br />
pressure increase to CPAP level.<br />
BIPAPAssist (Biphasic Positive Airway Pressure Assisted)<br />
Pressure-controlled assisted ventilation.<br />
APRV (Airway Pressure Release Ventilation)<br />
Spontaneous breathing on two pressure levels with long time<br />
ranges – independently adjustable.<br />
PPS – Proportional Pressure Support (optional)<br />
For differentiated proportional support of spontaneous breathing<br />
with pathological compliance and/or resistance.<br />
ILV<br />
Independent Lung Ventilation,<br />
Separate, differentiated, synchronised ventilation with two<br />
Evita units, independently ventilating each lung.<br />
Supplements<br />
Automatic Tube Compensation ATC (optional)<br />
Can be used with all ventilation modes.<br />
ATC Compensates for the resistance of the ETT or<br />
Tracheal Tube.<br />
Apnoea Ventilation<br />
For switching over automatically to volume-controlled mandatory<br />
ventilation, if breathing stops.<br />
If apnoea occurs, <strong>EvitaXL</strong> emits an alarm after the preset alarm<br />
period (TApnoea >) and starts volume-controlled ventilation.<br />
NIV mask ventilation (optional)<br />
Non-invasive ventilation<br />
For ventilation with a nasal or facial mask to support non-invasive<br />
ventilation of patients with spontaneous breathing.<br />
Choice between mask ventilation and ordinary ventilation of<br />
intubated patients.<br />
* Licensed trademark<br />
8 Instructions for Use <strong>EvitaXL</strong>
Lung Protection Package (optional)<br />
— QuickSet<br />
Direct adjustment of setting,<br />
— PressureLink<br />
Linking of the PEEP/Pinsp settings,<br />
— Recruitment trends and<br />
— Low Flow PV-Loop<br />
Aid for performing Recruitment procedure and for the optimisation<br />
of Ventilator settings.<br />
Diagnostic functions<br />
Intrinsic PEEP-measurement<br />
For determining intrinsic PEEP and measuring trapped<br />
volume.<br />
Occlusion pressure measurement<br />
For evaluating breathing drive during spontaneous breathing.<br />
Negative Inspiratory Force NIF<br />
For measuring the patient's maximum inspiratory effort following<br />
expiration.<br />
Monitoring:<br />
Airway pressure PAW<br />
Expiratory minute volume MV<br />
Inspiratory tidal volume VTi<br />
Inspiratory O2 concentration FiO2<br />
Inspiratory breathing gas temperature T<br />
Apnoea time<br />
Tachypnoea<br />
Expiratory CO2 concentration etCO2 (optional)<br />
Intended Medical Application<br />
DC power supply<br />
Integrated DC power supply supplying <strong>EvitaXL</strong> with power<br />
from two DC sources:<br />
— Via two 12 V lead-gel batteries integrated in the DC power<br />
supply,<br />
and<br />
— optionally via additional external 12 V or 24 V lead-gel<br />
batteries.<br />
For uninterrupted operation following failure of the mains<br />
power supply, by automatically switching over to the external or<br />
integrated battery.<br />
For supplying power from the integrated batteries or additionally<br />
from external batteries during transport within the hospital.<br />
Evita 4 Link (optional)<br />
Interface card<br />
For output of measured values, status messages and alarm<br />
messages to on-line equipment for monitoring, documentation<br />
or processing.<br />
O2 Therapy (optional)<br />
Continuous flow application with adjustable O2 concentration<br />
and adjustable flow for the O2 Therapy function for patients<br />
with independent breathing and using oxygen masks.<br />
SmartCare/PS (optional)<br />
Knowledge-based system for automating clinical guidelines.<br />
Automatic gas switch-over<br />
In the event of a gas failure, the <strong>EvitaXL</strong> automatically switches<br />
over to the remaining gas supply available.<br />
Uses<br />
On the intensive-care ward or in the recovery room.<br />
While transferring ventilated patients within the hospital.<br />
Instructions for Use <strong>EvitaXL</strong> 9
10 Instructions for Use <strong>EvitaXL</strong>
Operating concept<br />
Operating concept . . . . . . . . . . . . . . . . . . . . . . . . . . . . . . . . . . . . . . . . . . . . . . . . . . . . 12<br />
Control unit . . . . . . . . . . . . . . . . . . . . . . . . . . . . . . . . . . . . . . . . . . . . . . . . . . . . . . . . 12<br />
The screen... . . . . . . . . . . . . . . . . . . . . . . . . . . . . . . . . . . . . . . . . . . . . . . . . . . . . . . . 13<br />
Fixed function keys... . . . . . . . . . . . . . . . . . . . . . . . . . . . . . . . . . . . . . . . . . . . . . . . . 14<br />
On-screen controls . . . . . . . . . . . . . . . . . . . . . . . . . . . . . . . . . . . . . . . . . . . . . . . . . . 14<br />
Optional operating concept . . . . . . . . . . . . . . . . . . . . . . . . . . . . . . . . . . . . . . . . . . . . 18<br />
QuickSet . . . . . . . . . . . . . . . . . . . . . . . . . . . . . . . . . . . . . . . . . . . . . . . . . . . . . . . . . . 18<br />
PressureLink . . . . . . . . . . . . . . . . . . . . . . . . . . . . . . . . . . . . . . . . . . . . . . . . . . . . . . . 19<br />
QuickSet + PressureLink . . . . . . . . . . . . . . . . . . . . . . . . . . . . . . . . . . . . . . . . . . . . 20<br />
Instructions for Use <strong>EvitaXL</strong> 11
Operating concept<br />
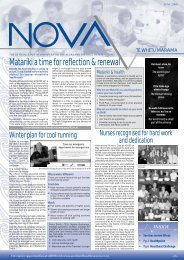
Control unit<br />
Operating concept<br />
Control unit<br />
The control unit is characterised by the<br />
small number of operating elements, its<br />
clear layout and easy operation.<br />
Its main elements are:<br />
1 Large screen with all the information<br />
and controls needed for ventilation.<br />
2 Fixed function keys beside the<br />
screen – for rapid access to major<br />
functions.<br />
3 Central rotary knob for selecting and<br />
confirming settings on the screen.<br />
D<br />
12 Instructions for Use <strong>EvitaXL</strong><br />
1<br />
<strong>EvitaXL</strong><br />
3<br />
2<br />
002
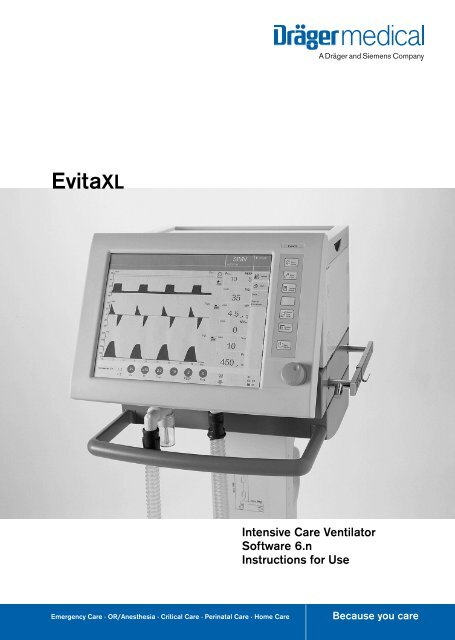
The screen...<br />
displays all the most important ventilation<br />
data at a glance.<br />
The various screen pages have the same<br />
layout with specific data always presented<br />
in the same place.<br />
1 Alarm messages<br />
2 Operator prompts<br />
3 Therapy status with ventilation mode,<br />
e.g. SIMV, ventilation mode supplements,<br />
e.g. AutoFlow ® , patient mode,<br />
e.g. Adult for adults<br />
4 Curves, loops and trends visualizing<br />
the ventilation, e.g. the real-time<br />
curves PAW (t), Flow (t), VT (t) (can be<br />
configured)<br />
5 Presentation of ventilation parameters<br />
for the active ventilation mode<br />
and its supplements<br />
6 Essential, measured ventilation values<br />
(can be configured)<br />
7 Humidification type and status<br />
8 Touch-sensitive screen keys for the<br />
specific screen pages (can be<br />
configured)<br />
9 Power supply indication<br />
To select a screen page:<br />
● Touch the relevant screen key:<br />
— » ? Main« to select the main<br />
screen.<br />
— » Values« to select a different<br />
group of measured values in the field<br />
for numerical values.<br />
— »Data...« to display all measured values,<br />
the logbook or trends on an<br />
additional card.<br />
— »Special Procedure...« to select<br />
additional functions, e.g. medicament<br />
nebulisation and oxygenation for<br />
bronchial suctioning.<br />
Other screen keys can be configured<br />
individually, see Configuration,<br />
page 125.<br />
Operating concept<br />
The screen...<br />
Instructions for Use <strong>EvitaXL</strong> 13<br />
➀<br />
➃<br />
➄<br />
➁<br />
➅<br />
➆<br />
➂<br />
➇<br />
➈<br />
096
Operating concept<br />
Fixed function keys...<br />
On-screen controls<br />
Fixed function keys...<br />
are provided for rapid access to major<br />
on-screen functions, such as selection<br />
of the ventilation mode, setting the ventilation<br />
parameters or adjusting the alarm<br />
limits:<br />
1 »g Alarm Silence« for suppressing<br />
the acoustic alarm tone for two minutes.<br />
2 »_ Alarm Limits« for adjusting the<br />
alarm limits.<br />
3 » Ventilator Settings« for setting<br />
the ventilation mode and ventilation<br />
parameters.<br />
4 Unassigned key for future functions<br />
5 » Sensor Parameter« for calibrating<br />
the sensors and for activating/<br />
deactivating the monitoring functions.<br />
6 » System Setup« for configuring<br />
system functions.<br />
7 »O Start/Standby« for selecting<br />
standby mode or normal operation.<br />
On-screen controls<br />
8 The ventilation parameters required<br />
for the active ventilation mode are displayed<br />
by <strong>EvitaXL</strong> in a separate field<br />
at the bottom of the main screen in<br />
the form of virtual screen knobs with<br />
the respective settings.<br />
➇<br />
D<br />
14 Instructions for Use <strong>EvitaXL</strong><br />
<strong>EvitaXL</strong><br />
1<br />
2<br />
3<br />
4<br />
5<br />
6<br />
7<br />
030<br />
096
To set the ventilation mode and ventilation<br />
parameters:<br />
1 Press » Ventilator Settings«<br />
or<br />
● touch one of the virtual screen knobs<br />
at the bottom of the screen.<br />
<strong>EvitaXL</strong> displays the menu<br />
»Ventilator Settings« in the bottom part<br />
of the screen (example):<br />
the screen knobs and screen keys are<br />
displayed in the form of horizontal and<br />
vertical tabs as on a file card.<br />
— Horizontal screen keys for selecting<br />
the ventilation mode.<br />
— Vertical screen keys for selecting<br />
additional settings.<br />
D<br />
Operating concept<br />
On-screen controls<br />
Instructions for Use <strong>EvitaXL</strong> 15<br />
<strong>EvitaXL</strong><br />
1<br />
001<br />
097
Operating concept<br />
On-screen controls<br />
The touch-sensitive screen controls are used in the same way<br />
as real keys and knobs:<br />
Touching these controls with a fingertip is equivalent to pressing<br />
a key or taking hold of a knob.<br />
Settings are made and confirmed by turning and pressing the<br />
central rotary knob.<br />
The status of the screen controls is indicated by colours:<br />
grey = not available<br />
yellow = available<br />
pale green = available but not active<br />
dark green = available and active<br />
Screen keys:<br />
1 select = touch,<br />
2 screen key turns yellow,<br />
3 confirm = press rotary knob,<br />
4 screen key turns pale/dark green.<br />
Screen knobs:<br />
1 select = touch,<br />
2 screen knob turns yellow,<br />
3 set = turn rotary knob,<br />
4 confirm = press rotary knob,<br />
5 screen knob turns pale/dark green.<br />
1 2 4<br />
1 2 5<br />
16 Instructions for Use <strong>EvitaXL</strong><br />
3<br />
3<br />
4<br />
033<br />
067
To set ventilation parameters directly:<br />
On the main screen (example):<br />
● Touch the required screen knob in<br />
the row of screen knobs and settings<br />
displayed.<br />
— The menu »Ventilator Settings« is<br />
displayed by <strong>EvitaXL</strong>. The selected<br />
screen knob is already yellow and<br />
can be adjusted directly.<br />
Display (example):<br />
● Set = turn central rotary knob, confirm<br />
= press central rotary knob.<br />
The colour of the screen knob changes<br />
to dark green – the setting is now effective.<br />
To view additional text information:<br />
● Touch the screen key »? q «.<br />
To quit the menu:<br />
● Press the screen key »X«.<br />
Operating concept<br />
On-screen controls<br />
Arrows ( +) beside the scales on the<br />
screen knobs indicate the initial values<br />
valid when the equipment is switched<br />
on. These values can be adjusted specifically<br />
as required by the hospital, see<br />
Configuration, page 125. 098<br />
Instructions for Use <strong>EvitaXL</strong> 17
Optional operating concept<br />
QuickSet<br />
Optional operating<br />
concept<br />
QuickSet*<br />
Direct adjustment of PEEP or Pinsp<br />
Direct adjustment of PEEP is possible in<br />
all ventilation modes.<br />
Direct adjustment of Pinsp is possible in<br />
BIPAP and BIPAPAssist.<br />
● Touch the screen key »PEEP« or<br />
»Pinsp« in the respective ventilation<br />
mode.<br />
● Depress rotary knob and hold down<br />
for 3 secs.<br />
The adjuster changes to green with a yellow<br />
edge. Direct adjustment is active.<br />
● Keep rotary knob depressed and turn<br />
it. Set »PEEP« or »Pinsp«.<br />
The set value is now effective.<br />
On releasing the rotary knob, »PEEP« or<br />
»Pinsp« can still be set directly:<br />
● Depress again the rotary knob and<br />
turn it.<br />
Exceeding the standard setting range:<br />
● Release rotary knob for a short<br />
moment; the standard setting range<br />
can be exceeded.<br />
Set »PEEP« or »Pinsp«:<br />
● Depress again the rotary knob and<br />
turn it.<br />
* Lung Protection Package option<br />
18 Instructions for Use <strong>EvitaXL</strong><br />
222
PressureLink*<br />
Linked adjustment of PEEP and Pinsp<br />
● Touch screen key »PEEP« or »Pinsp«.<br />
● Touch screen key »Link PEEP/<br />
Pinsp«.<br />
● Set »PEEP« and »Pinsp« = turn rotary<br />
knob. The values are adjusted simultaneously.<br />
The difference remains<br />
constant.<br />
● Confirm new settings = press rotary<br />
knob.<br />
* Lung Protection Package option<br />
Optional operating concept<br />
PressureLink<br />
Instructions for Use <strong>EvitaXL</strong> 19<br />
225
Optional operating concept<br />
QuickSet + PressureLink<br />
QuickSet + PressureLink*<br />
Setting PEEP and Pinsp directly and<br />
linked:<br />
● Touch screen key »PEEP« or »Pinsp«.<br />
● Touch screen key »Link PEEP/<br />
Pinsp«.<br />
● Depress rotary knob and hold down<br />
for 3 secs.<br />
The adjusters change to green with a<br />
yellow edge. Direct adjustment is active.<br />
● Keep rotary knob depressed and turn<br />
it. Set »PEEP« and »Pinsp«.<br />
The values are set simultaneously and<br />
are immediately effective.<br />
On releasing the rotary knob, »PEEP«<br />
and »Pinsp« can still be set directly:<br />
● Depress again the rotary knob and<br />
turn it.<br />
Exceeding the standard setting range:<br />
● Release rotary knob for a short<br />
moment; the standard setting range<br />
can be exceeded.<br />
Set »PEEP« and »Pinsp«:<br />
● Depress again the rotary knob and<br />
turn it.<br />
* Lung Protection Package option<br />
20 Instructions for Use <strong>EvitaXL</strong><br />
226
Preparing for use<br />
Preparing for use . . . . . . . . . . . . . . . . . . . . . . . . . . . . . . . . . . . . . . . . . . . . . . . . . . . . . . 22<br />
Positioning the control unit . . . . . . . . . . . . . . . . . . . . . . . . . . . . . . . . . . . . . . . . . . . 22<br />
Fitting the expiration valve . . . . . . . . . . . . . . . . . . . . . . . . . . . . . . . . . . . . . . . . . . . . 23<br />
Fitting the flow sensor. . . . . . . . . . . . . . . . . . . . . . . . . . . . . . . . . . . . . . . . . . . . . . . . 23<br />
Fitting O2 sensor capsule. . . . . . . . . . . . . . . . . . . . . . . . . . . . . . . . . . . . . . . . . . . . . 24<br />
Using HME, bacterial filters and hose systems . . . . . . . . . . . . . . . . . . . . . . . . . . . 25<br />
Ventilating adults and children. . . . . . . . . . . . . . . . . . . . . . . . . . . . . . . . . . . . . . . . . 26<br />
Ventilating infants . . . . . . . . . . . . . . . . . . . . . . . . . . . . . . . . . . . . . . . . . . . . . . . . . . . 28<br />
Fitting CO2 cuvette and CO2 sensor (optional) . . . . . . . . . . . . . . . . . . . . . . . . . . 29<br />
Power supply and connections . . . . . . . . . . . . . . . . . . . . . . . . . . . . . . . . . . . . . . . . 30<br />
Gas supply . . . . . . . . . . . . . . . . . . . . . . . . . . . . . . . . . . . . . . . . . . . . . . . . . . . . . . . . . 31<br />
Connecting Evita Remote (optional) . . . . . . . . . . . . . . . . . . . . . . . . . . . . . . . . . . . . 31<br />
Connecting the nurse call (optional). . . . . . . . . . . . . . . . . . . . . . . . . . . . . . . . . . . . 33<br />
Device Check. . . . . . . . . . . . . . . . . . . . . . . . . . . . . . . . . . . . . . . . . . . . . . . . . . . . . . . 34<br />
Leak test . . . . . . . . . . . . . . . . . . . . . . . . . . . . . . . . . . . . . . . . . . . . . . . . . . . . . . . . . . . 39<br />
Entering the humidifier type . . . . . . . . . . . . . . . . . . . . . . . . . . . . . . . . . . . . . . . . . . . 40<br />
Application mode Tube/Mask (optional) . . . . . . . . . . . . . . . . . . . . . . . . . . . . . . . . 40<br />
Ventilation while transferring a patient within the hospital . . . . . . . . . . . . . . . . . . 41<br />
Instructions for Use <strong>EvitaXL</strong> 21
Preparing for use<br />
Positioning the control unit<br />
Preparing for use<br />
● Always use properly prepared parts, see "Preparing",<br />
page 155.<br />
● Hospital infection control regulations must be observed.<br />
Positioning the control unit<br />
● The control unit must not be stood up or leant against anything,<br />
nor may it be laid face downwards! It must always be<br />
laid on its back when changing over.<br />
Positioning on the <strong>EvitaXL</strong><br />
● Hook the control unit into the mount on <strong>EvitaXL</strong> until it<br />
engages.<br />
To adjust the position:<br />
1 Press and hold the segments on the right and left, at the<br />
same time tilting the control unit into the required position.<br />
Positioning on the wall rail<br />
2 Press and hold the segments on the right and left, tilting the<br />
control unit down completely at the same time.<br />
3 Press and hold the unlocking buttons on the right and left,<br />
lifting the control unit out of the mount on <strong>EvitaXL</strong> at the<br />
same time.<br />
● Unwind the required length of cable.<br />
● Hook the control unit into the wall rail and<br />
22 Instructions for Use <strong>EvitaXL</strong><br />
1<br />
2<br />
3<br />
170<br />
091<br />
092
1 lock it in position = pull tab under the holder down and turn<br />
it towards the wall rail.<br />
Fitting the expiration valve<br />
2 Tilt the control unit upwards, pressing the segments on the<br />
right and left at the same time.<br />
3 Push the expiration valve as far as it will go into the mounting.<br />
Check that it is properly secured by gently pulling<br />
the port.<br />
Fitting the flow sensor<br />
4 Push socket to left as far as it will go.<br />
5 Fit flow sensor – with the connector facing towards the ventilator<br />
– into the mounting and push it into the socket as far<br />
as it will go.<br />
Then:<br />
6 Push flow sensor to the right as far as it will go into the rubber<br />
lip of the expiration valve.<br />
Preparing for use<br />
Fitting the expiration valve<br />
Fitting the flow sensor<br />
Instructions for Use <strong>EvitaXL</strong> 23<br />
4<br />
1<br />
6<br />
2<br />
5<br />
3<br />
093<br />
068<br />
069<br />
070
Preparing for use<br />
Fitting O2 sensor capsule<br />
Fitting O2 sensor capsule<br />
— when using the system for the first time<br />
— when the display reads:<br />
O2 measurement inop<br />
— when calibration can no longer be performed<br />
● Ensure device is in standby or ventilator is switched off.<br />
● Tilt the control unit upwards, pressing the segments on the<br />
right and left at the same time.<br />
1 Turn the inspiratory port to the left.<br />
2 Use coin to loosen screw, and remove protective cover.<br />
3 Loosen the two knurled screws and open the sensor<br />
housing.<br />
4 Remove old sensor capsule and fit a new capsule. The end<br />
with the circular tracks remains visible.<br />
3 Close the sensor housing securely with the two knurled<br />
screws.<br />
2 Screw protective cover back in place.<br />
● Dispose of the used O2 sensor capsule, page 168.<br />
24 Instructions for Use <strong>EvitaXL</strong><br />
1<br />
4<br />
3<br />
2<br />
071
Using HME, bacterial filters and hose systems*<br />
Additional components in the breathing system or components<br />
which diverge from the standard hose system can considerably<br />
increase the inspiratory and expiratory breathing<br />
resistance and exceed standard requirements.<br />
Examples: Insp./exp. filters, HME**, coaxial hoses<br />
In general, the <strong>EvitaXL</strong> is designed to minimise the breathing<br />
effort made by the patient and is therefore not intended for the<br />
use of insp./exp bacterial filters.<br />
The use of bacterial filters or HMEs therefore requires particular<br />
care and monitoring by the user. Especially during medicament<br />
nebulisation and humidifying, the resistance of the<br />
expiratory filter may increase gradually.<br />
A higher breathing resistance leads to a greater breathing and<br />
trigger effort during assisted ventilation. Under unfavourable<br />
conditions, this can lead to an undesirable intrinsic PEEP. This<br />
can be recognised by the fact that the expiratory flow does not<br />
return to "0" at the end of expiration. If the PEEP is unacceptably<br />
high, it is indicated by the alarm »PEEP high !!!«. The current<br />
PEEP is then approx. 8 mbar above the set PEEP. Check<br />
and replace the bacterial filter or HME if they are the cause of<br />
the PEEP alarm.<br />
A breathing resistance in the patient connection cannot be<br />
monitored directly by the ventilator. For this reason:<br />
● Determine inspiratory and expiratory breathing resistance<br />
in the patient system before ventilation in standby by means<br />
of the device check.<br />
● Check the condition of the patient and the ventilator's measured<br />
values for volume and resistance frequently.<br />
● Observe the Instructions for Use for the HME, filter and<br />
coaxial hose systems in use.<br />
● Do not use an HME together with a medicament nebuliser<br />
or breathing gas humidifier. This can lead to a greater<br />
breathing resistance.<br />
* Only applies to hose systems which are not described in these<br />
Instructions for Use.<br />
** Heat moisture exchanger<br />
Preparing for use<br />
Using HME, bacterial filters and hose systems<br />
Instructions for Use <strong>EvitaXL</strong> 25
Preparing for use<br />
Ventilating adults and children<br />
Ventilating adults and children<br />
● Set the ventilator to breathing gas humidifier, see page 40.<br />
From 100 mL tidal volume VT upwards:<br />
Patient mode: »Adults«<br />
● Do not use a heat and moisture exchanger at the same<br />
time as a humidifier! Risk of increased breathing<br />
resistance because of condensation.<br />
Connecting Aquapor EL humidifier<br />
Prepare Aquapor EL by following the relevant Instructions for<br />
Use.<br />
1 Hang Aquapor EL onto the rail and tighten the screws.<br />
2 Insert elbow connector into Aquapor EL.<br />
3 Insert the double connector into the elbow connector.<br />
4 Fill the Aquapor EL bowl up to the upper filling mark with<br />
sterile Aquadest.<br />
Connecting ventilation hoses<br />
● Do not use antistatic or conductive hoses*.<br />
Depending on the desired position of the ventilator in relation<br />
to the bed, the hinged arm can be fitted to either side of the<br />
machine.<br />
Attachment on left-hand side:<br />
5 Turn both ports to the left.<br />
6 Turn Aquapor EL to the left.<br />
The following description applies when the ventilation hoses<br />
have been attached on the left-hand side.<br />
Whenever the ventilation hoses or humidifier have been<br />
changed:<br />
● Perform a leak test, page 39.<br />
* DIN VDE 0750 section 215:<br />
The use of anti-static or electrically conductive material in the<br />
breathing system of the lung ventilator is not considered conducive<br />
to greater safety. On the contrary, the use of these materials<br />
increases the danger of electric shock to the patient and of fire due<br />
to the presence of oxygen.<br />
26 Instructions for Use <strong>EvitaXL</strong><br />
6<br />
1<br />
5<br />
2<br />
5<br />
4<br />
3<br />
077<br />
078
1 Hang the hinged arm from the rail on the left-hand side and<br />
tighten screws.<br />
● Fit the ventilation hoses. Check the hose lengths (metres).<br />
2 Turn ports in direction of hoses.<br />
3 Install water traps in vertical position.<br />
4 Connect the Y-piece, with the rubber sleeve of the Y-piece<br />
on the inspiratory side.<br />
5 Insert the Y-piece in the opening of the hinged arm.<br />
Fitting temperature sensor<br />
6 Push sensor as far as it will go into the rubber sleeve on the<br />
inspiratory side of the Y-piece. Align the Y-piece so that the<br />
sensor is at the top in order to avoid condensation in the<br />
sensor.<br />
7 Attach the sensor cable with hose clips.<br />
8 Insert the connector for the temperature sensor into the<br />
socket »Temp « at the rear of <strong>EvitaXL</strong>.<br />
Preparing for use<br />
Ventilating adults and children<br />
Instructions for Use <strong>EvitaXL</strong> 27<br />
5<br />
4<br />
6<br />
0.6m<br />
0.6m<br />
3<br />
0.6m<br />
0.4m<br />
1<br />
7<br />
D<br />
0.4m<br />
8<br />
2<br />
Evita XL<br />
079<br />
072<br />
080
Preparing for use<br />
Ventilating infants<br />
Ventilating infants<br />
● Set the ventilator to breathing gas humidifier, see page 40.<br />
Up to 300 mL tidal volume VT:<br />
Patient mode: »Paediatric«<br />
● Do not use a heat and moisture exchanger at the same<br />
time as a humidifier! Risk of increased breathing<br />
resistance because of condensation.<br />
Fitting humidifier and ventilation hoses<br />
● Prepare the "Fisher & Paykel MR 850" humidifier in accordance<br />
with the separate Instructions for Use.<br />
1 Clamp the humidifier to the stand under the apparatus and<br />
screw firmly into place.<br />
2 Clamp the articulated arm to the left-hand rail and screw<br />
firmly into place.<br />
● Fit the ventilation hoses. Check the hose lengths (metres).<br />
3 Fit the water trap in the vertical position.<br />
● Do not place any containers with liquid on or above the<br />
ventilator!<br />
Any leaking or spilled liquid could cause malfunctions!<br />
Whenever the ventilation hoses or humidifier have been<br />
changed:<br />
● Perform a leak test, page 39.<br />
28 Instructions for Use <strong>EvitaXL</strong><br />
0.6m<br />
1.1m<br />
2<br />
3<br />
D<br />
0.6m<br />
0.4m<br />
1<br />
<strong>EvitaXL</strong><br />
083
Fitting CO2 cuvette and CO2 sensor (optional)<br />
1 Fit the cuvette to the patient connection of the Y-piece, with<br />
the cuvette windows facing the side.<br />
2 Push the CO2 sensor on to the cuvette, with the cable trailing<br />
towards <strong>EvitaXL</strong>.<br />
3 Insert the connector for the CO2 sensor in the »CO2 «<br />
socket on the rear of the ventilator.<br />
Preparing for use<br />
Fitting CO2 cuvette and CO2 sensor (optional)<br />
Instructions for Use <strong>EvitaXL</strong> 29<br />
2<br />
1<br />
3<br />
073<br />
081
Preparing for use<br />
Power supply and connections<br />
Power supply and connections<br />
Electrical power supply<br />
Either : 220 V to 240 V<br />
or : 100 V to 127 V<br />
● Insert the plug in the mains socket, the yellow indicator<br />
lights up.<br />
For operation with DC power supply and external battery<br />
(optional)<br />
● Connect optional external battery via cable, see "DC power<br />
operation", page 170.<br />
Note on the use of a socket strip for ancillary equipment<br />
Connecting other equipment to the extension socket strip may<br />
cause the patient leakage current to rise above the permitted<br />
values if a protective earth conductor should fail. The risk of<br />
electric shock cannot be excluded in such cases.<br />
Temporary interruption of power supply<br />
e.g. if hospital reserve power supply is activated.<br />
Without optional Evita DC power supply:<br />
During an interruption of the power supply, <strong>EvitaXL</strong> outputs a<br />
continuous alarm tone for max. 2 minutes. The duration of this<br />
alarm tone may be shorter if <strong>EvitaXL</strong> was switched on for less<br />
than 15 minutes.<br />
<strong>EvitaXL</strong> tolerates power interrupts lasting less than<br />
10 milliseconds – without influencing ventilation.<br />
In the case of power interrupts lasting longer than<br />
10 milliseconds, the machine restarts with a short self-test lasting<br />
about 8 seconds – ventilation is continued with the same<br />
values that were set before the power interruption. If a lower<br />
alarm limit has been set for the minute volume, the »MV low !!!«<br />
alarm is activated until the measured value has risen above the<br />
lower alarm limit.<br />
With optional Evita DC power supply:<br />
See chapter "DC power operation", page 170.<br />
Other equipment, e.g. printers, may only be connected to<br />
the COM port if <strong>EvitaXL</strong> is connected to the mains power<br />
supply via a mains power cable or if it has been earthed<br />
via the earth connection on the back of <strong>EvitaXL</strong>.<br />
Electric power may pose a hazard in all other cases.<br />
30 Instructions for Use <strong>EvitaXL</strong>
Gas supply<br />
● Screw the connecting hoses for medical air (air) and<br />
oxygen (O2) from the piped supply into the back panel of<br />
<strong>EvitaXL</strong> and plug their connectors into the terminal units.<br />
The compressed gases must be dry and free from dust<br />
and oil. Gas pressure must be 3 to 6 bar.<br />
Connecting Evita Remote (optional)<br />
● The plug-in card for Evita Remote may only be installed and<br />
programmed by specialists.<br />
For remote control of <strong>EvitaXL</strong> via the Remote Pad for parallel,<br />
remote operation of the following LED and key functions:<br />
1 red LED – to indicate warning messages<br />
2 yellow LED – to indicate caution and advisory messages<br />
3 »g Alarm Silence« key – to suppress the alarm tone for<br />
approx. 2 minutes<br />
4 »Alarm Reset« key – to acknowledge alarm messages<br />
5 » Neb.« key – to start and end medicament<br />
nebulisation<br />
6 »O2 Y suction« key – for oxygenation for bronchial<br />
suctioning<br />
7 »Insp. hold« key – for sustained, manually induced inspiration<br />
8 »Exp. hold« key – for extended and sustained expiration<br />
The function of the respective LEDs and keys is the same as<br />
on <strong>EvitaXL</strong> and is described in the application chapters of<br />
these Instructions for Use.<br />
Preparing for use<br />
Gas supply<br />
Connecting Evita Remote (optional)<br />
Air O2<br />
Instructions for Use <strong>EvitaXL</strong> 31<br />
1<br />
2<br />
3<br />
4<br />
5<br />
6<br />
7<br />
8<br />
085<br />
074
Preparing for use<br />
Connecting Evita Remote (optional)<br />
Connection<br />
1 Plug the lead of the Remote Pad into the socket »<br />
the rear of <strong>EvitaXL</strong>.<br />
« on<br />
The connector can be plugged in or unplugged at any time.<br />
This does not influence the operation of <strong>EvitaXL</strong>.<br />
● Hook holder onto a standard rail and clamp into place.<br />
● Hang Remote Pad into holder from above.<br />
Note automatic self-test<br />
— when connecting the Remote Pad while <strong>EvitaXL</strong> is<br />
switched on<br />
or<br />
— when switching <strong>EvitaXL</strong> on after connecting the<br />
Remote Pad.<br />
● Do not press any keys on the Remote Pad.<br />
● All LEDs on the Remote Pad light up for 5 seconds:<br />
2 red LED<br />
3 yellow LED<br />
4 yellow LEDs in the keys<br />
● The Remote Pad is tested by <strong>EvitaXL</strong>. An advisory message<br />
is output if a fault is detected, see "Fault – Cause –<br />
Remedy", page 144.<br />
32 Instructions for Use <strong>EvitaXL</strong><br />
1<br />
2<br />
3<br />
4<br />
086<br />
075<br />
076
Connecting the nurse call (optional)<br />
Socket on the rear of <strong>EvitaXL</strong> for connecting alarm signals to a<br />
central alarm station in the hospital.<br />
● The kit may only be installed by specialists.<br />
For details of the characteristics, refer to the technical data,<br />
page 197.<br />
● The 6-pin round DIN plug (female connector) must be connected<br />
to the lead for the central alarm station in the hospital<br />
by a specialist.<br />
Connection 3 to 5 makes and the nurse call is activated as<br />
soon as <strong>EvitaXL</strong> signals an alarm.<br />
The central hospital alarm system may only be connected<br />
to the nurse call if <strong>EvitaXL</strong> is connected to the mains<br />
power supply via a mains power cable or if it has been<br />
earthed via the earth connection on the back of <strong>EvitaXL</strong>.<br />
Electric power may pose a hazard in all other cases.<br />
1 Plug the connector into the » « socket on the rear and<br />
screw into place.<br />
Only alarm messages of the highest priority (see<br />
page 80) are transmitted via nurse call.<br />
Alarm messages are displayed in the top line of the screen in<br />
red and with three exclamation marks, see page 80.<br />
Caution and advisory messages are not transmitted.<br />
The nurse call is also activated when the internal acoustic generator<br />
in the ventilator is defective.<br />
● Check correct operation of connected nurse call system.<br />
Connection of a nurse call does not relieve staff of their<br />
duty to check the monitoring on the <strong>EvitaXL</strong> screen at regular<br />
intervals.<br />
● Screen displays must be checked regularly.<br />
A fault in any of the components in the link between<br />
nurse call and central hospital alarm system (e.g. in the<br />
electronics for nurse call in <strong>EvitaXL</strong>, in the <strong>EvitaXL</strong> power<br />
supply or in the alarm generator of the central hospital<br />
alarm system, etc.) may result in failure of the nurse call.<br />
The hospital connections to the central alarm typically use only<br />
one channel. The electronics for nurse call consequently also<br />
uses only one channel.<br />
Preparing for use<br />
Connecting the nurse call (optional)<br />
1 5<br />
3<br />
Instructions for Use <strong>EvitaXL</strong> 33<br />
1<br />
087
Preparing for use<br />
Device Check<br />
Device Check<br />
Must be carried out immediately before use on the patient in<br />
order to confirm that the ventilator is operating correctly.<br />
The following functions are performed during this device<br />
check:<br />
— Checking that the machine assembly is complete<br />
— Testing the alarm tone<br />
— Testing the expiratory valve<br />
— Testing of the air-O2 changeover valve<br />
— Testing the safety valve<br />
— Calibration of the flow sensor<br />
— Calibration of the O2 sensor<br />
— Calibration of the CO2 sensor<br />
— Testing the leakproofing of the hose system<br />
— Determination of the compliance and resistance of the<br />
hose system<br />
The test results obtained from this device check and the calibration<br />
and zero-checking values of the sensors remain stored<br />
until the next calibration – even if the device is switched off.<br />
If the hose system, type of humidification or patient mode is<br />
changed after performing the device check, the leak test must<br />
be repeated before starting operation.<br />
Preparing the adult test lung 84 03 201<br />
for the adult hose system<br />
The test lung consists of an elbow connector for connection to<br />
the Y-piece, a 7 mm diameter catheter connection for simulating<br />
the resistance of the airways and a 2 L breathing bag to<br />
simulate compliance.<br />
● Overextended breathing bags or test lungs with low<br />
compliance must not be used as they may cause artefacts<br />
during the device check!<br />
● The elbow connector must not be plugged into the patient<br />
connection of the Y-piece until requested by <strong>EvitaXL</strong>.<br />
34 Instructions for Use <strong>EvitaXL</strong><br />
094
Preparing the child test lung 84 09 742<br />
for the paediatric hose set<br />
The test lung consists of a tracheal tube CH 12 to simulate the<br />
resistance of the airways and a small bellows to simulate compliance.<br />
● The elbow connector must not be plugged into the patient<br />
connection of the Y-piece until requested by <strong>EvitaXL</strong>.<br />
● Switch on unit = pivot flap* upwards and press power<br />
switch until it clicks into position. The flap falls over the<br />
button to protect against inadvertent switching off.<br />
* Flaps may differ, depending on the power supply used,<br />
see "Switching on", page 45.<br />
Preparing for use<br />
Device Check<br />
Instructions for Use <strong>EvitaXL</strong> 35<br />
095<br />
090
Preparing for use<br />
Device Check<br />
The self-test screen with version No.,<br />
date and part No. of the software used is<br />
displayed on the screen.<br />
The self-test is performed automatically.<br />
● Wait for the test phase to be completed.<br />
The bargraph on <strong>EvitaXL</strong> indicates the<br />
time elapsed for the self-test. The start<br />
screen is then displayed.<br />
● <strong>EvitaXL</strong> starts ventilation with the preconfigured<br />
settings unless values are<br />
changed or standby mode is activated<br />
within 30 seconds.<br />
On the start screen (example):<br />
● Touch the screen key »Standby«<br />
within 30 seconds and confirm =<br />
press the rotary knob.<br />
The line for alarm messages reads:<br />
Standby activated !!!<br />
To reset this message:<br />
● Touch the screen key »Alarm Reset«<br />
after the message, confirm = press<br />
the rotary knob.<br />
36 Instructions for Use <strong>EvitaXL</strong><br />
099<br />
104
● Touch the screen key »Check«.<br />
● Touch the screen key »Device<br />
Check«: <strong>EvitaXL</strong> displays the date of<br />
the last device check and a list of the<br />
individual checks. The scope of this<br />
list depends on the options available.<br />
A device check cannot be performed<br />
during automatic calibration of the flow<br />
sensor or O2 sensor:<br />
● Wait until calibration is complete and<br />
start the device check again.<br />
Preparing for use<br />
Device Check<br />
Instructions for Use <strong>EvitaXL</strong> 37<br />
101<br />
102
Preparing for use<br />
Device Check<br />
The following tests are performed during the device check:<br />
System<br />
— Seating and clear passage of the expiratory valve<br />
— Seating of the flow sensor<br />
— Seating of the neonate flow sensor (if "NeoFlow" option is<br />
installed)<br />
— Type of humidifier<br />
— Completeness of hose system<br />
— Seating of the temperature sensor<br />
Function<br />
— Function of the air-O2 changeover valve<br />
— Function of the safety valve<br />
— Gas supply<br />
— Function of the auxiliary alarm and power failure alarm<br />
Sensors<br />
— Calibration of the flow sensor<br />
— Calibration of the neonate flow sensor (if "NeoFlow" option<br />
is installed)<br />
— Calibration of the O2 sensor<br />
— Zero alignment of the CO2 sensor<br />
— Calibration of the CO2 sensor<br />
— Hose system leak test<br />
The user is guided through each check in a dialogue with<br />
<strong>EvitaXL</strong>. Questions are displayed in the information line below<br />
the Alarms field and must be answered by touching the screen<br />
key »Yes« or »No«. Instructions for carrying out the check may<br />
also be displayed instead.<br />
A correct result is indicated by the ventilator with a tick (n).<br />
Faulty results are marked F. Two dashes (– –) appear if a<br />
check is not performed.<br />
If faulty results are obtained (F):<br />
● Remedy the cause of the fault<br />
and<br />
● Touch the screen key »Repeat«.<br />
Checks may also be skipped by touching the screen key »next<br />
test« if this is acceptable.<br />
To start the device check:<br />
● Touch the screen key »Check« in the checklist.<br />
The ventilator carries out each check, line by line.<br />
The results obtained in this device check and the calibration<br />
values for the sensors are saved until the next calibration run,<br />
even when the ventilator is switched off.<br />
After the device check:<br />
● Perform a leak test, see page 39.<br />
38 Instructions for Use <strong>EvitaXL</strong>
Leak test<br />
This test must be performed:<br />
— after the device check,<br />
— after changing the hose system,<br />
— after changing the humidifier.<br />
In the checklist:<br />
● Touch the screen key »Airtight<br />
Check«.<br />
The result of the last leak test is displayed<br />
together with the following values:<br />
— Leakage<br />
— Compliance<br />
— Insp. Resistance<br />
— Exp. Resistance<br />
To start the leak test:<br />
● Touch the screen key »Check«.<br />
The actual leakage flow is displayed continuously<br />
throughout the test. A leakage<br />
flow of 300 mL/min at a pressure of<br />
60 mbar is permissible.<br />
After the leak test, the ventilator determines<br />
the compliance and the inspiratory<br />
and expiratory resistance of the<br />
hose system.<br />
The established compliance of the hose<br />
system is used by the ventilator for automatic<br />
correction of the volume-controlled<br />
ventilation strokes, as well as of the<br />
measured values for flow monitoring,<br />
see page 218.<br />
When changing the patient mode or<br />
type of humidifier, the ventilator automatically<br />
resets the values for hose compliance<br />
and hose resistance to the default<br />
values.<br />
To return to the start screen:<br />
● Touch the screen key »Start/<br />
Standby« in the »Start/Standby«<br />
menu.<br />
Preparing for use<br />
Leak test<br />
Instructions for Use <strong>EvitaXL</strong> 39<br />
040<br />
103
Preparing for use<br />
Entering the humidifier type<br />
Application mode Tube/Mask (optional)<br />
Entering the humidifier type<br />
In standby mode:<br />
● Touch the screen key »Humidifier«.<br />
The menu for entering the humidifier<br />
used is now displayed:<br />
Active Humid. =<br />
Breathing gas humidifier<br />
HME/Filter =<br />
Heat moisture exchanger<br />
● Touch the screen key corresponding<br />
to the type of humidifier used. The<br />
key turns yellow.<br />
● Confirm = press the rotary knob, the<br />
key turns green.<br />
The selected humidifier is included<br />
in the compliance calculation by<br />
<strong>EvitaXL</strong>.<br />
The yellow LED in front of the symbol<br />
for the selected humidifier lights up<br />
in the status field.<br />
Active humidifier<br />
HME/Filter<br />
After changing the humidifier:<br />
● Perform a leak test, page 39.<br />
Application mode Tube/Mask<br />
(optional)<br />
In standby mode:<br />
● Touch the screen key »Tube/Mask«.<br />
The menu for selecting tube or mask<br />
is displayed (NIV – non-invasive ventilation).<br />
● Touch the corresponding screen key;<br />
it turns yellow.<br />
● Confirm = press the rotary knob, the<br />
key turns green.<br />
The corresponding application mode<br />
is now active.<br />
If » Mask (NIV)« has been<br />
selected:<br />
= Mask Ventilation is displayed.<br />
For details on using NIV, see page 76.<br />
40 Instructions for Use <strong>EvitaXL</strong><br />
197<br />
198
Ventilation while transferring a patient within<br />
the hospital<br />
To ensure that <strong>EvitaXL</strong> cannot topple over, <strong>EvitaXL</strong> must<br />
not be tilted more than 5 o !<br />
<strong>EvitaXL</strong> must not be placed on the bed while transferring<br />
a patient.<br />
<strong>EvitaXL</strong> must be secured so it cannot topple over/fall<br />
down.<br />
To ensure that the equipment cannot topple over, the accessories<br />
must be moved to the most advantageous position:<br />
● Hinged arm set to minimum deflection.<br />
● Drawers pushed in fully.<br />
● Hoses and cables hooked as close as possible to the<br />
trolley.<br />
● Humidifier secured to the trolley, not to <strong>EvitaXL</strong> itself.<br />
Preparing for use<br />
Ventilation while transferring a patient within the hospital<br />
Instructions for Use <strong>EvitaXL</strong> 41
42 Instructions for Use <strong>EvitaXL</strong>
Operation<br />
Starting up . . . . . . . . . . . . . . . . . . . . . . . . . . . . . . . . . . . . . . . . . . . . . . . . . . . . . . . . . . . 45<br />
Switching on . . . . . . . . . . . . . . . . . . . . . . . . . . . . . . . . . . . . . . . . . . . . . . . . . . . . . . . 45<br />
Setting new ventilation parameters . . . . . . . . . . . . . . . . . . . . . . . . . . . . . . . . . . . . 47<br />
Setting Ventilation Modes . . . . . . . . . . . . . . . . . . . . . . . . . . . . . . . . . . . . . . . . . . . . . . 48<br />
IPPV . . . . . . . . . . . . . . . . . . . . . . . . . . . . . . . . . . . . . . . . . . . . . . . . . . . . . . . . . . . . . . 49<br />
SIMV, SIMV/ASB . . . . . . . . . . . . . . . . . . . . . . . . . . . . . . . . . . . . . . . . . . . . . . . . . . . 50<br />
MMV, MMV/ASB . . . . . . . . . . . . . . . . . . . . . . . . . . . . . . . . . . . . . . . . . . . . . . . . . . . 52<br />
ILV . . . . . . . . . . . . . . . . . . . . . . . . . . . . . . . . . . . . . . . . . . . . . . . . . . . . . . . . . . . . . . . . 53<br />
BIPAP, BIPAP/ASB . . . . . . . . . . . . . . . . . . . . . . . . . . . . . . . . . . . . . . . . . . . . . . . . . 59<br />
BIPAPAssist . . . . . . . . . . . . . . . . . . . . . . . . . . . . . . . . . . . . . . . . . . . . . . . . . . . . . . . . 61<br />
APRV . . . . . . . . . . . . . . . . . . . . . . . . . . . . . . . . . . . . . . . . . . . . . . . . . . . . . . . . . . . . . 62<br />
CPAP-ASB . . . . . . . . . . . . . . . . . . . . . . . . . . . . . . . . . . . . . . . . . . . . . . . . . . . . . . . . 63<br />
PPS (optional) . . . . . . . . . . . . . . . . . . . . . . . . . . . . . . . . . . . . . . . . . . . . . . . . . . . . . . 64<br />
Setting special functions . . . . . . . . . . . . . . . . . . . . . . . . . . . . . . . . . . . . . . . . . . . . . . . 66<br />
Flowtrigger . . . . . . . . . . . . . . . . . . . . . . . . . . . . . . . . . . . . . . . . . . . . . . . . . . . . . . . . . 68<br />
Apnoea Ventilation . . . . . . . . . . . . . . . . . . . . . . . . . . . . . . . . . . . . . . . . . . . . . . . . . . 69<br />
AutoFlow . . . . . . . . . . . . . . . . . . . . . . . . . . . . . . . . . . . . . . . . . . . . . . . . . . . . . . . . . . 71<br />
ATC . . . . . . . . . . . . . . . . . . . . . . . . . . . . . . . . . . . . . . . . . . . . . . . . . . . . . . . . . . . . . . 72<br />
Sigh . . . . . . . . . . . . . . . . . . . . . . . . . . . . . . . . . . . . . . . . . . . . . . . . . . . . . . . . . . . . . . 74<br />
PLV . . . . . . . . . . . . . . . . . . . . . . . . . . . . . . . . . . . . . . . . . . . . . . . . . . . . . . . . . . . . . . . 75<br />
NIV mask ventilation (optional) . . . . . . . . . . . . . . . . . . . . . . . . . . . . . . . . . . . . . . . . . . 76<br />
Using NIV . . . . . . . . . . . . . . . . . . . . . . . . . . . . . . . . . . . . . . . . . . . . . . . . . . . . . . . . . . 76<br />
Selecting application mode »Mask« . . . . . . . . . . . . . . . . . . . . . . . . . . . . . . . . . . . . 77<br />
Setting ventilation parameters for NIV . . . . . . . . . . . . . . . . . . . . . . . . . . . . . . . . . . 77<br />
Monitoring in »Mask« mode . . . . . . . . . . . . . . . . . . . . . . . . . . . . . . . . . . . . . . . . . . . 78<br />
Leakage compensation in »Mask« mode . . . . . . . . . . . . . . . . . . . . . . . . . . . . . . . . 78<br />
Setting alarm limits . . . . . . . . . . . . . . . . . . . . . . . . . . . . . . . . . . . . . . . . . . . . . . . . . . . . 79<br />
In the event of an alarm . . . . . . . . . . . . . . . . . . . . . . . . . . . . . . . . . . . . . . . . . . . . . . 80<br />
Suppress alarm tone . . . . . . . . . . . . . . . . . . . . . . . . . . . . . . . . . . . . . . . . . . . . . . . . 82<br />
Power failure alarm . . . . . . . . . . . . . . . . . . . . . . . . . . . . . . . . . . . . . . . . . . . . . . . . . . 82<br />
Instructions for Use <strong>EvitaXL</strong> 43
Displaying graphics . . . . . . . . . . . . . . . . . . . . . . . . . . . . . . . . . . . . . . . . . . . . . . . . . . . 83<br />
Freeze . . . . . . . . . . . . . . . . . . . . . . . . . . . . . . . . . . . . . . . . . . . . . . . . . . . . . . . . . . . . 85<br />
Loop display . . . . . . . . . . . . . . . . . . . . . . . . . . . . . . . . . . . . . . . . . . . . . . . . . . . . . . . 85<br />
Display 1 hr trend . . . . . . . . . . . . . . . . . . . . . . . . . . . . . . . . . . . . . . . . . . . . . . . . . . 87<br />
Display measured values . . . . . . . . . . . . . . . . . . . . . . . . . . . . . . . . . . . . . . . . . . . . . . 88<br />
Display all measured values and settings . . . . . . . . . . . . . . . . . . . . . . . . . . . . . . 88<br />
Display logbook . . . . . . . . . . . . . . . . . . . . . . . . . . . . . . . . . . . . . . . . . . . . . . . . . . . . 89<br />
Display trends (1 to 24 hr) . . . . . . . . . . . . . . . . . . . . . . . . . . . . . . . . . . . . . . . . . . . 90<br />
Additional functions . . . . . . . . . . . . . . . . . . . . . . . . . . . . . . . . . . . . . . . . . . . . . . . . . . . 91<br />
Medicament nebulisation . . . . . . . . . . . . . . . . . . . . . . . . . . . . . . . . . . . . . . . . . . . . 91<br />
Oxygen enrichment for bronchial suction . . . . . . . . . . . . . . . . . . . . . . . . . . . . . . 94<br />
Manual inspiration . . . . . . . . . . . . . . . . . . . . . . . . . . . . . . . . . . . . . . . . . . . . . . . . . . 96<br />
Expiration Hold . . . . . . . . . . . . . . . . . . . . . . . . . . . . . . . . . . . . . . . . . . . . . . . . . . . . 97<br />
Diagnostic functions . . . . . . . . . . . . . . . . . . . . . . . . . . . . . . . . . . . . . . . . . . . . . . . . . . 98<br />
Occlusion pressure P 0.1 . . . . . . . . . . . . . . . . . . . . . . . . . . . . . . . . . . . . . . . . . . . 98<br />
Intrinsic PEEP – PEEPi . . . . . . . . . . . . . . . . . . . . . . . . . . . . . . . . . . . . . . . . . . . . 100<br />
Negative Inspiratory Force NIF . . . . . . . . . . . . . . . . . . . . . . . . . . . . . . . . . . . . . . 101<br />
Low Flow PV-Loop (optional) . . . . . . . . . . . . . . . . . . . . . . . . . . . . . . . . . . . . . . . . 102<br />
Sensors . . . . . . . . . . . . . . . . . . . . . . . . . . . . . . . . . . . . . . . . . . . . . . . . . . . . . . . . . . . . 106<br />
Flow sensor calibration . . . . . . . . . . . . . . . . . . . . . . . . . . . . . . . . . . . . . . . . . . . . . 106<br />
External flow compensation . . . . . . . . . . . . . . . . . . . . . . . . . . . . . . . . . . . . . . . . . 107<br />
O2 sensor calibration . . . . . . . . . . . . . . . . . . . . . . . . . . . . . . . . . . . . . . . . . . . . . . 109<br />
Zero/check/calibrate CO2 sensor . . . . . . . . . . . . . . . . . . . . . . . . . . . . . . . . . . . 110<br />
Switching off the monitor functions . . . . . . . . . . . . . . . . . . . . . . . . . . . . . . . . . . . . 118<br />
Selecting Standby Mode . . . . . . . . . . . . . . . . . . . . . . . . . . . . . . . . . . . . . . . . . . . . . 119<br />
Terminating Standby Mode . . . . . . . . . . . . . . . . . . . . . . . . . . . . . . . . . . . . . . . . . 120<br />
O2 Therapy (optional) . . . . . . . . . . . . . . . . . . . . . . . . . . . . . . . . . . . . . . . . . . . . . . . . . 121<br />
O2 Therapy preparation . . . . . . . . . . . . . . . . . . . . . . . . . . . . . . . . . . . . . . . . . . . . 121<br />
Switching on O2 Therapy . . . . . . . . . . . . . . . . . . . . . . . . . . . . . . . . . . . . . . . . . . . 123<br />
Switching off O2 Therapy . . . . . . . . . . . . . . . . . . . . . . . . . . . . . . . . . . . . . . . . . . . 123<br />
44 Instructions for Use <strong>EvitaXL</strong>
Starting up<br />
Switching on<br />
● Switch on unit = press power switch until it engages.<br />
The flap falls over the button to protect against inadvertent<br />
switching off.<br />
To switch off, pivot the flap upwards and press the button<br />
in fully.<br />
Units with DC power supply MB:<br />
● Switch on unit = pivot flap upwards and press power switch<br />
until it engages.<br />
The flap falls over the button to protect against inadvertent<br />
switching off.<br />
To switch off, pivot the flap upwards and press the button<br />
in fully.<br />
Starting up<br />
Switching on<br />
Instructions for Use <strong>EvitaXL</strong> 45<br />
090<br />
216
Starting up<br />
Switching on<br />
The self-test screen is displayed. The<br />
self-test is performed automatically.<br />
● Wait for the test phase to be completed.<br />
The bargraph indicates the time<br />
elapsed for the self-test.<br />
The Start screen is then displayed.<br />
(Example: Previous Patient)<br />
The last settings configured for the<br />
patient, including alarm limits, application<br />
status and equipment status, can be<br />
restored with <strong>EvitaXL</strong>. Monitoring is<br />
always active after switching on.<br />
To restore the previous settings:<br />
● Touch the screen key<br />
»Previous Patient«, confirm<br />
= press rotary knob.<br />
The previous ventilation settings are now<br />
effective again.<br />
The key »Previous Patient« is not displayed<br />
by <strong>EvitaXL</strong> or cannot be selected<br />
following a loss of data or removal of a<br />
previously used option, thus preventing<br />
restoration of the previous setting. Restoration<br />
of the previous setting is similarly<br />
prevented by <strong>EvitaXL</strong> if it was<br />
configured in such a way before switching<br />
off that the former patient mode is no<br />
longer available.<br />
46 Instructions for Use <strong>EvitaXL</strong><br />
099<br />
211
Setting new ventilation<br />
parameters<br />
The patient mode can be selected in two<br />
ways with <strong>EvitaXL</strong>:<br />
— Select »m Adult« or » Paed.«,<br />
— Set an ideal body weight.<br />
These two possibilities can be configured,<br />
see "Configuration", page 125.<br />
<strong>EvitaXL</strong> is configured by the manufacturer<br />
for selection of an ideal body<br />
weight.<br />
The further procedure is described with<br />
the configuration.<br />
Depending on the required patient<br />
mode, touch either:<br />
● the screen key<br />
»m Adult«<br />
or<br />
» Paed.«<br />
● Touch the screen knob »Ideal Body<br />
Weight«.<br />
● Enter the ideal body weight [kg] =<br />
turn rotary knob, confirm = press<br />
rotary knob.<br />
<strong>EvitaXL</strong> determines the tidal volume VT<br />
and ventilation frequency f on the basis<br />
of the ideal body weight and displays<br />
these values in the lower part of the<br />
menu.<br />
The other ventilation parameters displayed<br />
in the lower part of the menu are<br />
initial values.<br />
They are effective when the ventilator is<br />
switched on and when a new ventilation<br />
mode is selected (New Patient).<br />
Start ventilation<br />
● Touch the screen key »Start«, confirm<br />
= press rotary knob.<br />
The ventilator starts with these initial<br />
values.<br />
● Check the settings.<br />
Starting up<br />
Setting new ventilation parameters<br />
Instructions for Use <strong>EvitaXL</strong> 47<br />
199<br />
104
Setting new ventilation parameters<br />
Setting Ventilation Modes<br />
To set ventilation parameters<br />
● Press the key » Ventilator<br />
Settings«.<br />
● Touch the ventilation parameters<br />
in the menu »Ventilator Settings«,<br />
set = turn rotary knob,<br />
confirm = press rotary knob.<br />
Arrows ( j) beside the scales on the<br />
screen knobs in the menu »Ventilator<br />
Settings« indicate the initial values.<br />
These initial values can be configured as<br />
required, see "Configuration", page 125.<br />
Setting<br />
Ventilation Modes<br />
The following ventilation modes are configured<br />
by the manufacturer:<br />
— SIMV<br />
— IPPV<br />
— BIPAP<br />
— CPAP-ASB<br />
Other ventilation modes can be selected<br />
via the screen key »more«:<br />
— MMV<br />
— BIPAPAssist<br />
— APRV<br />
— PPS (optional)<br />
The ventilation modes can also be supplemented,<br />
see "Setting special functions",<br />
page 66.<br />
48 Instructions for Use <strong>EvitaXL</strong><br />
097
IPPV<br />
Intermittent Positive Pressure Ventilation<br />
Volume-controlled ventilation with fixed,<br />
mandatory minute volume MV, set with<br />
tidal volume VT and frequency f.<br />
Set the pattern of ventilation for IPPV<br />
with the ventilation parameters:<br />
Tidal volume »VT«<br />
Insp. Flow »Flow«<br />
Frequency »f«<br />
Inspiration time »Tinsp«<br />
O2 concentration »O2«<br />
Positive end-expiratory pressure »PEEP«<br />
--------------------------------------------------------------------------------<br />
To set:<br />
● Touch the appropriate screen knob.<br />
● Adjust to the desired value<br />
= turn rotary knob.<br />
● Confirm setting = press rotary knob.<br />
--------------------------------------------------------------------------------<br />
To view additional text information on<br />
IPPV:<br />
● Touch the screen key »? q «.<br />
IPPV can be supplemented to include<br />
the following special functions:<br />
— Flowtrigger, page 68.<br />
— AutoFlow ® , page 71.<br />
— ATC, page 72.<br />
— Sigh, page 74.<br />
— PLV, page 75.<br />
These functions can be enabled in »Add.<br />
settings«.<br />
Setting alarm limits, see page 79.<br />
PAW<br />
Flow<br />
Insp.<br />
pause<br />
Tinsp Te<br />
Setting Ventilation Modes<br />
IPPV<br />
Instructions for Use <strong>EvitaXL</strong> 49<br />
PPlat<br />
1<br />
f<br />
Insp. flow<br />
Pmax<br />
(configurable)<br />
t<br />
PEEP<br />
t<br />
005<br />
107
Setting Ventilation Modes<br />
SIMV, SIMV/ASB<br />
SIMV, SIMV/ASB<br />
Synchronized Intermittent Mandatory<br />
Ventilation*<br />
Assisted Spontaneous Breathing**<br />
Combines mechanical (volume-controlled)<br />
ventilation with spontaneous breathing.<br />
The patient can breathe<br />
spontaneously between the mandatory<br />
ventilation strokes, contributing to the<br />
total minute volume. The spontaneous<br />
breaths can be supported with ASB.<br />
Mandatory ventilation strokes ensure a<br />
minimum level of ventilation in the times<br />
in between. This minimum ventilation is<br />
determined via the two set parameters<br />
tidal volume »VT« and frequency »f« and<br />
is the product of VT x f.<br />
The frequency can be reduced to zero<br />
during the weaning process. The device<br />
automatically changes to the ventilation<br />
mode CPAP or CPAP/ASB. This ventilation<br />
mode is also indicated on the<br />
screen. The screen key »SIMV« and the<br />
screen knobs for setting the SIMV<br />
parameters remain on display.<br />
Set the pattern of ventilation for SIMV<br />
and SIMV/ASB with the ventilation<br />
parameters:<br />
Tidal volume »VT«<br />
Insp. Flow »Flow«<br />
Frequency »f«<br />
Inspiration time »Tinsp«<br />
O2 concentration »O2«<br />
Positive end-expiratory pressure »PEEP«<br />
Pressure support »PASB«<br />
Pressure rise time »Ramp«<br />
--------------------------------------------------------------------------------<br />
To set:<br />
● Touch the appropriate screen knob.<br />
● Adjust to the desired value<br />
= turn rotary knob.<br />
● Confirm setting = press rotary knob.<br />
--------------------------------------------------------------------------------<br />
* For a detailed description of SIMV, please<br />
refer to page 211.<br />
** For a detailed description of ASB, please<br />
refer to page 216.<br />
PAW<br />
Flow<br />
Tinsp<br />
Pmax<br />
(configurable)<br />
50 Instructions for Use <strong>EvitaXL</strong><br />
PEEP<br />
1<br />
f<br />
Insp. flow<br />
fast<br />
rise time<br />
ASB pressure<br />
assist<br />
Trigger window<br />
slow<br />
rise time<br />
t<br />
t<br />
006<br />
108
To view additional text information on<br />
SIMV, SIMV/ASB:<br />
● Touch the screen key »? q «.<br />
SIMV, SIMV/ASB can be supplemented<br />
to include the following special<br />
functions:<br />
— Flowtrigger, page 68.<br />
— Apnoea Ventilation, page 69.<br />
— AutoFlow ® , page 71.<br />
— ATC, page 72.<br />
— PLV, page 75.<br />
These functions can be enabled in »Add.<br />
settings«.<br />
Setting alarm limits, see page 79.<br />
Setting Ventilation Modes<br />
SIMV, SIMV/ASB<br />
Instructions for Use <strong>EvitaXL</strong> 51
Setting Ventilation Modes<br />
MMV, MMV/ASB<br />
MMV, MMV/ASB<br />
Mandatory Minute Volume Ventilation*<br />
Assisted Spontaneous Breathing<br />
The overall minute volume is preset to a<br />
mandatory level, which can be adjusted<br />
by means of the tidal volume VT and frequency<br />
f.<br />
The patient can breathe spontaneously,<br />
thereby contributing a portion of the<br />
overall minute volume.<br />
The difference between the spontaneously<br />
breathed minute volume and the<br />
set minute volume is covered by the<br />
mandatory ventilation strokes. Spontaneous<br />
breathing can be assisted with additional<br />
pressure by ASB.<br />
Set the pattern of ventilation for MMV<br />
and MMV/ASB with the ventilation<br />
parameters:<br />
Tidal volume »VT«<br />
Insp. Flow »Flow«<br />
Frequency »f«<br />
Inspiration time »Tinsp«<br />
O2 concentration »O2«<br />
Positive end-expiratory pressure »PEEP«<br />
Pressure support »PASB«<br />
Pressure rise time »Ramp«<br />
--------------------------------------------------------------------------------<br />
To set:<br />
● Touch the appropriate screen knob.<br />
● Adjust to the desired value<br />
= turn rotary knob.<br />
● Confirm setting = press rotary knob.<br />
--------------------------------------------------------------------------------<br />
To view additional text information on<br />
MMV, MMV/ASB:<br />
● Touch the screen key »? q «.<br />
MMV, MMV/ASB can be supplemented<br />
to include the following special functions:<br />
— Flowtrigger, page 68.<br />
— AutoFlow ® , page 71.<br />
— ATC, page 72.<br />
— PLV, page 75.<br />
These functions can be enabled in »Add.<br />
settings«.<br />
Setting alarm limits, see page 79.<br />
* For a detailed description of MMV, please<br />
refer to page 212.<br />
PAW<br />
Flow<br />
set<br />
MV<br />
MV<br />
Tinsp<br />
VT<br />
PEEP<br />
Insp. flow<br />
Pmax<br />
(configurable)<br />
short<br />
rise time<br />
trigger phase<br />
long<br />
rise time<br />
52 Instructions for Use <strong>EvitaXL</strong><br />
1<br />
f<br />
mandatory MV<br />
no spontaneous<br />
breathing<br />
ASB pressure<br />
support<br />
beginning spontaneous<br />
breathing<br />
spontaneously<br />
breathed MV<br />
t<br />
sufficient spontaneous<br />
breathing<br />
t<br />
t<br />
011<br />
012<br />
110
ILV<br />
ILV = Independent Lung Ventilation<br />
Separate, differentiated, synchronised<br />
ventilation with two Evita units, to ventilate<br />
the lung independently from each<br />
other. The two Evita units are connected<br />
by analogue interfaces.<br />
The two devices operate together in<br />
master/slave mode. The master device<br />
controls the operation.<br />
Preparation<br />
If a protective cap is fitted:<br />
● Remove cap from ILV connection.<br />
The following device combinations are<br />
possible:<br />
— <strong>EvitaXL</strong> with <strong>EvitaXL</strong><br />
— <strong>EvitaXL</strong> with Evita 4<br />
— <strong>EvitaXL</strong> with Evita 2 dura<br />
— <strong>EvitaXL</strong> with Evita 2<br />
— <strong>EvitaXL</strong> with Evita.<br />
Requirements for combinations:<br />
— Evita 2 and Evita have analogue Evita-<br />
Bus interfaces (optional).<br />
— Connecting cable 84 11 794 must<br />
be used to connect <strong>EvitaXL</strong> to<br />
another <strong>EvitaXL</strong> or to an Evita 4 or an<br />
Evita 2 dura.<br />
— Connecting cable 84 11 793 must<br />
be used to connect <strong>EvitaXL</strong> to an<br />
Evita 2 or an Evita.<br />
The ILV cable should only be connected<br />
when <strong>EvitaXL</strong> is switched off!<br />
For the combination:<br />
<strong>EvitaXL</strong> with Evita 2 dura<br />
and<br />
<strong>EvitaXL</strong> with <strong>EvitaXL</strong><br />
and<br />
<strong>EvitaXL</strong> with Evita 4:<br />
● Connect the ILV ports of the two<br />
Evita units using connecting cable<br />
84 11 794.<br />
Setting Ventilation Modes<br />
ILV<br />
Instructions for Use <strong>EvitaXL</strong> 53<br />
117
Setting Ventilation Modes<br />
ILV<br />
For the combination:<br />
<strong>EvitaXL</strong> with Evita 2<br />
and<br />
<strong>EvitaXL</strong> with Evita:<br />
● Connect both Evitas via the ILV port<br />
and the analogue interface using the<br />
connecting cable 84 11 793.<br />
54 Instructions for Use <strong>EvitaXL</strong><br />
118
Setting the Master and Slave devices<br />
To perform independent lung ventilation:<br />
● Set up one device for ILV/Master<br />
mode and<br />
● the other device for ILV/Slave mode.<br />
● Set the parameters, see page 58.<br />
● Do not activate ILV mode until all<br />
the parameters for the ILV/Master<br />
and ILV/Slave are fully set.<br />
Setting ILV/Master<br />
Volume-controlled ventilation with fixed,<br />
mandatory minute volume MV, set with<br />
tidal volume VT and frequency f.<br />
For independent lung ventilation of<br />
patients with no spontaneous breathing.<br />
Set the ILV ventilation pattern with the<br />
parameters:<br />
Tidal volume »VT«<br />
Insp. Flow »Flow«<br />
Frequency »f«<br />
Inspiration time »Tinsp«<br />
O2 concentration »O2«<br />
Positive end-expiratory pressure »PEEP«<br />
--------------------------------------------------------------------------------<br />
To set:<br />
● Touch the appropriate screen knob.<br />
● Adjust to the desired value<br />
= turn rotary knob.<br />
● Confirm setting = press rotary knob.<br />
--------------------------------------------------------------------------------<br />
ILV/Master can be supplemented to<br />
include the following special functions:<br />
— Flowtrigger, page 68.<br />
— ATC, page 72.<br />
— Sigh, page 74.<br />
— PLV, page 75.<br />
These functions can be enabled in »Add.<br />
settings«.<br />
PAW<br />
Flow<br />
Insp.<br />
pause<br />
Tinsp Te<br />
Setting Ventilation Modes<br />
ILV<br />
Instructions for Use <strong>EvitaXL</strong> 55<br />
PPlat<br />
1<br />
f<br />
Insp. flow<br />
Pmax<br />
(configurable)<br />
t<br />
PEEP<br />
t<br />
005<br />
183
Setting Ventilation Modes<br />
ILV<br />
Setting ILV/Slave<br />
Volume-controlled ventilation with fixed,<br />
mandatory minute volume MV, set with<br />
the tidal volume VT and frequency f of<br />
the ILV Master device and selectable<br />
Slave mode.<br />
For independent lung ventilation of<br />
patients with no spontaneous breathing.<br />
--------------------------------------------------------------------------------<br />
To set Slave mode:<br />
● Touch the »Add. settings«<br />
screen key.<br />
● Touch the »Slave Mode...«<br />
screen key.<br />
To select the desired slave mode<br />
(e.g. »Asynchron«):<br />
● Touch the appropriate screen key<br />
and press the rotary knob.<br />
--------------------------------------------------------------------------------<br />
PAW<br />
Flow<br />
Insp.<br />
pause<br />
Tinsp Te<br />
56 Instructions for Use <strong>EvitaXL</strong><br />
PPlat<br />
1<br />
f<br />
Insp. flow<br />
Pmax<br />
(configurable)<br />
t<br />
PEEP<br />
t<br />
005<br />
184
ILV: Master and Slave Synchronisation<br />
Master device<br />
I:E ratio<br />
Slave device:<br />
Sync. – The I:E ratio of the slave device<br />
is determined by the I:E ratio of the master<br />
device. The start of inspiration is synchronised<br />
with the inspiration of the<br />
master device.<br />
Slave device:<br />
Async. – The start of inspiration is synchronised<br />
with the inspiration of the<br />
master device. The end of inspiration<br />
(incl. pause time) is determined by the<br />
»Tinsp« setting. The I:E ratio of the slave<br />
device is freely selectable.<br />
Slave device:<br />
Inverse – The start of inspiration is synchronised<br />
with the start of expiration of<br />
the master device and vice versa. The I:E<br />
ratio of the slave device is the inverse of<br />
the I:E ratio of the master device.<br />
PAW<br />
PAW<br />
PAW<br />
PAW<br />
Tinsp Te<br />
Tinsp Te<br />
Tinsp Te<br />
Te<br />
Master<br />
Slave Sync.<br />
Slave Async.<br />
Slave Inverse<br />
Setting Ventilation Modes<br />
ILV<br />
Instructions for Use <strong>EvitaXL</strong> 57<br />
Tinsp<br />
t<br />
t<br />
t<br />
t<br />
028
Setting Ventilation Modes<br />
ILV<br />
Set the ventilation pattern for ILV/<br />
Slave with the following ventilation<br />
parameters:<br />
Tidal volume »VT«<br />
Insp. Flow »Flow«<br />
Frequency »f«<br />
Inspiration time »Tinsp«<br />
O2 concentration »O2«<br />
Positive end-expiratory pressure »PEEP«<br />
--------------------------------------------------------------------------------<br />
To set:<br />
● Touch the appropriate screen knob.<br />
● Adjust to the desired value<br />
= turn rotary knob.<br />
● Confirm setting = press rotary knob.<br />
--------------------------------------------------------------------------------<br />
The »f« setting is not immediately effective.<br />
Nevertheless, to make sure that the two<br />
lung compartments are not ventilated<br />
with different frequencies in the event of<br />
inadvertent separation of the two<br />
devices:<br />
»Set »f« on the slave device to the same<br />
value as on the master = safety setting.<br />
In Async. slave mode, the »Tinsp« setting<br />
is immediately effective. In "Synchronised"<br />
and "Inverse" modes, "Tinsp" is<br />
only effective if the devices are inadvertently<br />
separated.<br />
ILV/Slave can be supplemented to<br />
include the following special functions:<br />
— Flowtrigger, page 68.<br />
— ATC, page 72.<br />
— Sigh, page 74.<br />
— PLV, page 75.<br />
These functions can be enabled in »Add.<br />
settings«.<br />
To view additional text information<br />
on ILV:<br />
● Touch the screen key »? q «.<br />
58 Instructions for Use <strong>EvitaXL</strong><br />
185
BIPAP, BIPAP/ASB<br />
Biphasic Positive Airway Pressure*<br />
Assisted Spontaneous Breathing<br />
Pressure-controlled ventilation combined<br />
with free spontaneous breathing<br />
during the complete breathing cycle,<br />
and adjustable pressure support at<br />
CPAP level. The mandatory proportion<br />
of the total minute volume MV is set with<br />
inspiratory pressure Pinsp above PEEP<br />
and Frequency f.<br />
The frequency can be reduced to 0 during<br />
the weaning process. The device<br />
automatically changes to the ventilation<br />
mode CPAP or CPAP/ASB. This ventilation<br />
mode is also indicated on the<br />
screen. The screen key »BIPAP« and the<br />
screen knobs for setting the BIPAP<br />
parameters remain on display.<br />
Set the pattern of ventilation for BIPAP<br />
and BIPAP/ASB with the ventilation<br />
parameters:<br />
Inspiratory pressure »Pinsp«<br />
Frequency »f«<br />
Inspiration time »Tinsp«<br />
O2 concentration »O2«<br />
Positive end-expiratory pressure »PEEP«<br />
Pressure support »PASB«<br />
Pressure rise time »Ramp«<br />
The inspiration pressure »Pinsp« can be<br />
reduced to the PEEP level, in which<br />
case the ventilation pattern corresponds<br />
to CPAP or CPAP/ASB.<br />
The inspiration pressure »Pinsp« is set as<br />
an absolute value. Pressure support<br />
»PASB« is set relative to the PEEP level.<br />
* For a detailed description of BIPAP,<br />
please refer to page 213.<br />
PEEP<br />
PAW<br />
Flow<br />
fast<br />
rise time<br />
Tinsp<br />
Setting Ventilation Modes<br />
BIPAP, BIPAP/ASB<br />
Instructions for Use <strong>EvitaXL</strong> 59<br />
1<br />
f<br />
Pinsp<br />
without<br />
spontaneous breathing<br />
slow<br />
rise time<br />
fast<br />
rise time<br />
ASB pressure<br />
assist<br />
Trigger window for<br />
insp. and exp. synchronisation<br />
with<br />
spontaneous breathing<br />
slow<br />
rise time<br />
t<br />
t<br />
008<br />
109
Setting Ventilation Modes<br />
BIPAP, BIPAP/ASB<br />
--------------------------------------------------------------------------------<br />
To set:<br />
● Touch the appropriate screen knob.<br />
● Adjust to the desired value<br />
= turn rotary knob.<br />
● Confirm setting = press rotary knob.<br />
--------------------------------------------------------------------------------<br />
To view additional text information on<br />
BIPAP, BIPAP/ASB:<br />
● Touch the screen key »? q «.<br />
BIPAP, BIPAP/ASB can be supplemented<br />
to include the following special<br />
functions:<br />
— Flowtrigger, page 68.<br />
— Apnoea Ventilation, page 69.<br />
— ATC, page 72.<br />
These functions can be enabled in »Add.<br />
settings«.<br />
Setting alarm limits, see page 79.<br />
60 Instructions for Use <strong>EvitaXL</strong>
BIPAPAssist<br />
Biphasic Positive Airway Pressure<br />
Assisted*<br />
Pressure-controlled, assisted ventilation<br />
The inspiratory strokes are the same as<br />
for BIPAP, but the changeover from Pinsp<br />
to PEEP is not synchronised with expiration<br />
by the patient. The patient can<br />
breathe spontaneously at PEEP level<br />
through the entire ventilation process.<br />
Every spontaneous breathing activity by<br />
the patient triggers a synchronised<br />
inspiratory stroke.<br />
A non-synchronised inspiratory stroke is<br />
started by the device at the latest upon<br />
expiry of the time »f«.<br />
Set ventilation pattern for BIPAPAssist<br />
with the following parameters:<br />
Inspiratory pressure »Pinsp«<br />
Frequency »f«<br />
Inspiration time »Tinsp«<br />
O2 concentration »O2«<br />
Positive end-expiratory pressure »PEEP«<br />
Pressure rise time »Ramp«<br />
Flowtrigger »Flowtrig.«<br />
The inspiratory pressure »Pinsp« is set as<br />
an absolute value.<br />
--------------------------------------------------------------------------------<br />
To set:<br />
● Touch the appropriate screen knob.<br />
● Adjust to the desired value<br />
= turn rotary knob.<br />
● Confirm setting = press rotary knob.<br />
--------------------------------------------------------------------------------<br />
To view additional text information on<br />
BIPAPAssist:<br />
● Touch the screen key »? q «.<br />
BIPAPAssist can be supplemented to<br />
include the following special functions:<br />
— Flowtrigger, page 68.<br />
— ATC, page 72.<br />
These functions can be enabled in »Add.<br />
settings«.<br />
Setting alarm limits, see page 79.<br />
* For a detailed description of BIPAPAssist,<br />
please refer to page 215.<br />
PEEP<br />
PAW<br />
Flow<br />
fast<br />
rise time<br />
Setting Ventilation Modes<br />
BIPAPAssist<br />
Instructions for Use <strong>EvitaXL</strong> 61<br />
Tinsp<br />
1<br />
f<br />
Pinsp<br />
without spontaneous<br />
breathing<br />
slow<br />
rise time<br />
Trigger window<br />
for synchronisation<br />
with spontaneous<br />
breathing<br />
t<br />
t<br />
009<br />
209
Setting Ventilation Modes<br />
APRV<br />
APRV<br />
Airway Pressure Release Ventilation*<br />
Free spontaneous breathing at a raised<br />
CPAP pressure level together with a<br />
short period of low pressure (Release).<br />
Set the pattern of ventilation for APRV<br />
with the ventilation parameters:<br />
Inspiration time »Thigh«<br />
Expiration time »Tlow«<br />
Inspiration pressure »Phigh«<br />
Positive end-expiratory pressure »Plow«<br />
O2 concentration »O2«<br />
Pressure rise time »Ramp«<br />
--------------------------------------------------------------------------------<br />
To set:<br />
● Touch the appropriate screen knob.<br />
● Adjust to the desired value<br />
= turn rotary knob.<br />
● Confirm setting = press rotary knob.<br />
--------------------------------------------------------------------------------<br />
To view additional text information on<br />
APRV:<br />
● Touch the screen key »? q «.<br />
APRV can be supplemented to include<br />
the following special functions:<br />
— Apnoea ventilation, page 69.<br />
— ATC, page 72.<br />
These functions can be enabled in »Add.<br />
settings«.<br />
Setting alarm limits, see page 79.<br />
* For a detailed description of APRV, please<br />
refer to page 215.<br />
PAW<br />
Flow<br />
62 Instructions for Use <strong>EvitaXL</strong><br />
Thigh<br />
Tlow<br />
Plow<br />
Phigh<br />
t<br />
t<br />
013<br />
206
CPAP-ASB<br />
Continuous Positive Airway Pressure<br />
Assisted Spontaneous Breathing*<br />
Spontaneous breathing at a raised pressure<br />
level in order to increase the functional<br />
residual capacity (FRC).<br />
Spontaneous breathing can be assisted<br />
with additional pressure by ASB.<br />
Set the pattern of ventilation for CPAP<br />
and CPAP/ASB with the following ventilation<br />
parameters:<br />
O2 concentration »O2«<br />
Positive end-expiratory pressure »PEEP«<br />
Pressure support »PASB«<br />
Pressure rise time »Ramp«<br />
--------------------------------------------------------------------------------<br />
To set:<br />
● Touch the appropriate screen knob.<br />
● Adjust to the desired value<br />
= turn rotary knob.<br />
● Confirm setting = press rotary knob.<br />
--------------------------------------------------------------------------------<br />
To view additional text information on<br />
CPAP, CPAP/ASB:<br />
● Touch the screen key »? q «.<br />
CPAP, CPAP/ASB can be supplemented<br />
to include the following special<br />
functions:<br />
— Apnoea ventilation, page 69.<br />
— ATC, page 72.<br />
— Flowtrigger, page 68.<br />
These functions can be enabled in »Add.<br />
settings«.<br />
Setting alarm limits, see page 79.<br />
* For a detailed description of CPAP/ASB,<br />
please refer to page 216.<br />
PAW<br />
Flow<br />
fast<br />
rise time<br />
Spontaneous breathing<br />
with ASB pressure support<br />
slow<br />
rise time<br />
Setting Ventilation Modes<br />
CPAP-ASB<br />
Instructions for Use <strong>EvitaXL</strong> 63<br />
PEEP<br />
t<br />
t<br />
010<br />
115
Setting Ventilation Modes<br />
PPS (optional)<br />
PPS (optional)<br />
Propotional Pressure Support*<br />
For differentiated proportional support<br />
of spontaneous breathing with pathological<br />
compliance and/or resistance.<br />
Volume-proportional elastance compensation<br />
(elastance = reciprocal of compliance)<br />
(»Vol.Assist«) and flowproportional<br />
resistance compensation<br />
(»FlowAssist«) are effective during<br />
inspiration.<br />
Set PPS with the following ventilation<br />
parameters:<br />
Resistance compensation »FlowAssist«<br />
Positive end-expiratory pressure »PEEP«<br />
Elastance compensation »Vol.Assist«<br />
O2 concentration »O2«<br />
--------------------------------------------------------------------------------<br />
To set:<br />
● Touch the appropriate screen knob.<br />
● Adjust to the desired value<br />
= turn rotary knob.<br />
● Confirm setting = press rotary knob.<br />
--------------------------------------------------------------------------------<br />
To activate PPS:<br />
● Set the alarm limits PAW > and VT ><br />
to protect the patient against pressure<br />
and volume trauma.<br />
* For a detailed description of PPS, please<br />
refer to page 217.<br />
PAW<br />
Flow<br />
Insp. pressure rise in keeping<br />
with patient's needs<br />
64 Instructions for Use <strong>EvitaXL</strong><br />
PEEP<br />
t<br />
t<br />
014<br />
116
No initial values for PPS<br />
To protect the patient, the parameters<br />
»FlowAssist« and »Vol.Assist« are set<br />
to 0<br />
— after switching on,<br />
— when the patient weight is entered<br />
again or<br />
— after changing the patient mode<br />
in ventilation mode PPS.<br />
To view additional text information<br />
on PPS:<br />
● Touch the screen key »? q «.<br />
PPS can be supplemented to include<br />
the following special functions:<br />
— Flowtrigger, page 68.<br />
— Apnoea Ventilation, page 69.<br />
— ATC, page 72.<br />
These functions can be enabled in »Add.<br />
settings«.<br />
Setting alarm limits, see page 79.<br />
Setting Ventilation Modes<br />
PPS (optional)<br />
Instructions for Use <strong>EvitaXL</strong> 65
Setting special functions<br />
Setting special<br />
functions<br />
The ventilation modes can be combined<br />
with the following special functions to<br />
optimise ventilation:<br />
— Flowtrigger<br />
— Apnoea Ventilation<br />
— AutoFlow<br />
— ATC<br />
— Sigh<br />
— PLV<br />
Special functions are accessed through<br />
»Add. settings«.<br />
To view additional text information:<br />
● Touch the screen key »? q «.<br />
Supplements<br />
Ventilation mode Flowtrigger Apnoea<br />
ventilation<br />
AutoFlow ATC Sigh PLV<br />
IPPV X X X X X<br />
SIMV X X X X X<br />
MMV X X X X<br />
ILV Master X X X X<br />
ILV Slave X X X<br />
BIPAP X X X<br />
BIPAPAssist X X<br />
APRV X X<br />
CPAP/ASB X X X<br />
PPS (optional) X X X<br />
66 Instructions for Use <strong>EvitaXL</strong>
To review, activate or set:<br />
In the menu »Ventilator Settings«<br />
● Touch the screen key<br />
»Add. settings«.<br />
<strong>EvitaXL</strong> displays the menu with the overview<br />
of additional settings available for<br />
the accessed or active mode.<br />
Example:<br />
Additional settings for IPPV<br />
● Touch the corresponding screen key,<br />
e.g. »Flowtrigger...«<br />
<strong>EvitaXL</strong> displays the menu for setting<br />
values and for activation/deactivation.<br />
● Touch the screen knob,<br />
set = turn rotary knob,<br />
confirm = press rotary knob.<br />
To activate/deactivate:<br />
● Touch the screen key »On« or »Off«,<br />
confirm = press rotary knob.<br />
Setting special functions<br />
Instructions for Use <strong>EvitaXL</strong> 67<br />
105<br />
106
Setting special functions<br />
Flowtrigger<br />
Flowtrigger<br />
for synchronisation with spontaneous<br />
breathing efforts.<br />
The mandatory strokes are synchronised<br />
with the patient's spontaneous breathing<br />
efforts when the flowtrigger is activated<br />
and a trigger level is set. Spontaneous<br />
breathing activity by the patient is indicated<br />
by the brief appearance of a lung<br />
symbol instead of the symbol for patient<br />
mode.<br />
The flowtrigger is set with the<br />
»Flowtrigger« parameter.<br />
--------------------------------------------------------------------------------<br />
To set:<br />
● Touch the screen key<br />
»Add. settings« in the required ventilation<br />
mode.The possible additional<br />
settings are displayed by<br />
<strong>EvitaXL</strong>.<br />
● Touch the screen key<br />
»Flowtrigger...«. <strong>EvitaXL</strong> displays the<br />
menu for setting the flowtrigger.<br />
● Touch the screen knob<br />
»Trigg. [L/min]«,<br />
set = turn rotary knob,<br />
confirm = press rotary knob.<br />
To activate / deactivate:<br />
● Touch the screen key »On« or »Off«,<br />
confirm = press rotary knob.<br />
--------------------------------------------------------------------------------<br />
The flowtrigger can only be disabled in<br />
the IPPV mode of ventilation.<br />
68 Instructions for Use <strong>EvitaXL</strong><br />
191
Apnoea Ventilation<br />
For automatic switch-over to volume-controlled<br />
mandatory ventilation if the<br />
patient stops breathing.<br />
It can be switched on in the ventilation<br />
modes SIMV, BIPAP, CPAP, APRV.<br />
<strong>EvitaXL</strong> outputs an apnoea alarm if no<br />
expiration flow is measured or insufficient<br />
inspiratory gas is delivered during<br />
the set apnoea time TApnoea > (adjustable,<br />
see "Setting alarm limits", page 79).<br />
<strong>EvitaXL</strong> will then start volume-controlled<br />
ventilation with the set ventilation parameters:<br />
Frequency »f«<br />
Tidal volume »VT«<br />
The ventilation parameters »O2« and<br />
»PEEP« correspond to the settings<br />
effective at the time. The inspiration time<br />
for apnoea ventilation is determined<br />
from the set frequency »f« and a fixed<br />
I:E ratio of 1:2.<br />
As in SIMV, the patient can breathe<br />
spontaneously during apnoea ventilation,<br />
and the mandatory ventilation<br />
strokes will be synchronised with the<br />
patient's spontaneous breathing.<br />
The apnoea ventilation frequency<br />
remains constant.<br />
--------------------------------------------------------------------------------<br />
To set:<br />
● Touch the screen key<br />
»Add. settings« in the required ventilation<br />
mode. The possible additional<br />
settings are displayed by<br />
<strong>EvitaXL</strong>.<br />
● Touch the screen key<br />
»Apnoea ventilation...«. <strong>EvitaXL</strong> displays<br />
the menu for setting the apnoea<br />
ventilation.<br />
● Touch the screen knobs »VT« and »f«,<br />
set = turn rotary knob,<br />
confirm = press rotary knob.<br />
To activate/deactivate:<br />
● Touch the screen key »On« or »Off«,<br />
confirm = press rotary knob.<br />
--------------------------------------------------------------------------------<br />
The status of apnoea ventilation is displayed<br />
by <strong>EvitaXL</strong> on the main screen.<br />
PAW<br />
Flow<br />
Spontaneous breathing<br />
with ASB pressure support<br />
apnoea alarm time<br />
TApnoea ><br />
Start of<br />
apnoea ventilation<br />
Setting special functions<br />
Apnoea Ventilation<br />
Instructions for Use <strong>EvitaXL</strong> 69<br />
PEEP<br />
1<br />
fApnoea<br />
t<br />
t<br />
029<br />
192
Setting special functions<br />
Apnoea Ventilation<br />
To terminate Apnoea Ventilation:<br />
● Touch the screen key »Alarm Reset«,<br />
confirm = press rotary knob.<br />
<strong>EvitaXL</strong> returns to the previously set ventilation<br />
mode or<br />
● select a different ventilation mode.<br />
70 Instructions for Use <strong>EvitaXL</strong>
AutoFlow<br />
for automatic regulation of "Insp. Flow"<br />
and "Pinsp".<br />
<strong>EvitaXL</strong> uses AutoFlow to decelerate and<br />
regulate the inspiratory flow by providing<br />
a constant pressure throughout the<br />
inspiration phase. The ventilator determines<br />
the lowest peak pressure for the<br />
selected VT and the patient compliance,<br />
thereby avoiding pressure peaks.<br />
<strong>EvitaXL</strong> delivers an additional inspiration<br />
flow when the patient breathes in – this<br />
flow is limited by the alarm limit VTi >.<br />
The patient can also breathe out during<br />
the inspiratory plateau phase. The inspiratory<br />
pressure is limited by the alarm<br />
limit PAW >.<br />
● The alarm limit for VTi > must be set<br />
with care in order to prevent overinflation<br />
of the lung following rapid<br />
changes in compliance, for example.<br />
--------------------------------------------------------------------------------<br />
To set:<br />
● Touch the screen key<br />
»Add. settings« in the required ventilation<br />
mode. The possible additional<br />
settings are displayed by<br />
<strong>EvitaXL</strong>.<br />
● Touch the screen key »AutoFlow...«.<br />
To activate/deactivate:<br />
● Touch the screen key »On« or »Off«,<br />
confirm = press rotary knob.<br />
--------------------------------------------------------------------------------<br />
The AutoFlow status is displayed by<br />
<strong>EvitaXL</strong> on the main screen.<br />
PEEP<br />
PAW<br />
Flow<br />
Tinsp Te<br />
without spontaneous<br />
breathing<br />
Setting special functions<br />
AutoFlow<br />
with spontaneous breathing<br />
Instructions for Use <strong>EvitaXL</strong> 71<br />
VT<br />
Pinsp = f (VT,C)<br />
1<br />
f<br />
PAW ><br />
t<br />
t<br />
017<br />
193
Setting special functions<br />
ATC<br />
ATC*<br />
Automatic Tube Compensation**<br />
Automatic compensation of the tube<br />
resistance<br />
Supplementary function allowing the<br />
ventilation pressure in the hose system<br />
to be increased during inspiration and<br />
decreased during expiration. The airway<br />
pressure is adjusted to the tracheal level<br />
if 100 % compensation of the tube<br />
resistance has been selected.<br />
Automatic tube compensation is active<br />
in:<br />
— spontaneous breathing phases<br />
— pressure-supported breathing<br />
phases<br />
— pressure-controlled mechanical ventilation<br />
phases<br />
— volume-controlled mechanical ventilation<br />
phases with activated supplementary<br />
"AutoFlow".<br />
Expiratory tube compensation can be<br />
deactivated.<br />
In volume-controlled ventilation modes<br />
with constant inspiratory flow (IPPV,<br />
IPPVAssist, SIMV, MMV), automatic tube<br />
compensation is only active during<br />
mechanical expiration and the spontaneous<br />
breathing phases.<br />
Setting parameters for ATC:<br />
Tube mode »ET« (endotracheal tube) or<br />
»Trach.« (tracheotomy tube)<br />
Inside diameter of the tube »ID Ø« in mm<br />
Degree of tube compensation »Comp.«<br />
in %<br />
Tube compensation »On«/»Off«<br />
* An Evita 4 or Evita 2 dura unit which has<br />
been upgraded with the <strong>EvitaXL</strong> option<br />
can also be operated without ATC option.<br />
** For a detailed description, please refer to<br />
page 221.<br />
Example: SIMV<br />
Tube comp.<br />
deactivated<br />
PAW<br />
Pinsp<br />
PEEP<br />
Flow<br />
Tube comp.<br />
activated<br />
inactive active<br />
72 Instructions for Use <strong>EvitaXL</strong><br />
Mand.<br />
insp.<br />
Mand.<br />
exp.<br />
Example: BIPAP<br />
Tube comp.<br />
deactivated<br />
PAW<br />
Pinsp<br />
PEEP<br />
Flow<br />
Mand.<br />
insp.<br />
Spontaneous<br />
breathing<br />
Spontaneous<br />
breathing<br />
Mand.<br />
exp.<br />
Spontan.<br />
breathing<br />
Mand.<br />
insp.<br />
Mand.<br />
insp.<br />
Mand.<br />
exp.<br />
Tube comp.<br />
activated<br />
active<br />
Spontan.<br />
breathing<br />
Mand.<br />
exp.<br />
Spontaneous<br />
breathing<br />
Spontaneous<br />
breathing<br />
t<br />
t<br />
t<br />
t<br />
015
--------------------------------------------------------------------------------<br />
To set:<br />
● Touch the screen key<br />
»Add. settings« in the required ventilation<br />
mode. The possible additional<br />
settings are displayed by<br />
<strong>EvitaXL</strong>.<br />
● Touch the screen key »ATC...«.<br />
<strong>EvitaXL</strong> displays the menu for setting<br />
the ATC.<br />
Select tube:<br />
● Touch the screen key »ET«<br />
or »Trach.«.<br />
● Touch the screen knob »ID Ø«,<br />
set value = turn rotary knob,<br />
confirm = press rotary knob.<br />
● Touch the screen knob »Comp.«,<br />
set value = turn rotary knob,<br />
confirm = press rotary knob.<br />
To activate/deactivate:<br />
● Touch the screen key »On« or »Off«,<br />
confirm = press rotary knob.<br />
--------------------------------------------------------------------------------<br />
Activated tube compensation is indicated<br />
by <strong>EvitaXL</strong> by the tube symbol<br />
and tube diameter in the status line.<br />
When tube compensation is activated,<br />
<strong>EvitaXL</strong> calculates the tracheal pressure<br />
on the basis of the selected tube<br />
(regardless of the selected degree of<br />
compensation) and displays the value in<br />
the pressure curve together with the<br />
pressure at the Y-piece as a green line.<br />
PAW,<br />
PTrachea<br />
PEEP<br />
Flow<br />
Pressure at Y-piece<br />
Tracheal pressure<br />
Setting special functions<br />
ATC<br />
Instructions for Use <strong>EvitaXL</strong> 73<br />
t<br />
t<br />
194<br />
016
Setting special functions<br />
Sigh<br />
Sigh<br />
Atelectasis can be prevented by activating<br />
the Sigh function* and setting the<br />
sigh in the form of an intermittent PEEP.<br />
When the Sigh function is activated, the<br />
end-expiratory pressure increases by the<br />
set value of the intermittent PEEP for<br />
two ventilation strokes every 3 minutes.<br />
Sigh is set with the parameter: intermittent<br />
PEEP »int.PEEP«.<br />
--------------------------------------------------------------------------------<br />
To set:<br />
● Touch the screen key<br />
»Add. settings« in the required ventilation<br />
mode. The possible additional<br />
settings are displayed by<br />
<strong>EvitaXL</strong>.<br />
● Touch the screen key »Sigh...«.<br />
<strong>EvitaXL</strong> displays the menu for setting<br />
the Sigh function.<br />
● Touch the screen knob »int.PEEP«,<br />
set = turn rotary knob,<br />
confirm = press rotary knob.<br />
To activate/deactivate:<br />
● Touch the screen key »On« or »Off«,<br />
confirm = press rotary knob.<br />
--------------------------------------------------------------------------------<br />
* For a detailed description of the Sigh<br />
function, please refer to page 210.<br />
Pmax<br />
PAW<br />
interm.<br />
PEEP<br />
PEEP<br />
Sigh phase<br />
74 Instructions for Use <strong>EvitaXL</strong><br />
t<br />
119<br />
201
PLV*<br />
Pressure Limited Ventilation<br />
Supplementary function for variable limitation<br />
of pressure peaks using the Pmax<br />
pressure limit in ventilation modes IPPV<br />
and SIMV.<br />
The tidal volume remains constant as<br />
long as the pressure curve shows a plateau<br />
and the flow curve shows a brief<br />
flow pause between inspiration and<br />
expiration.<br />
● Activate/deactivate pressure limitation<br />
Pmax, see "Configuration, Set<br />
initial values for O2, I:E...", page 140.<br />
1 When pressure limitation is active,<br />
the value for Pmax is shown in the realtime<br />
curve PAW (t) as a blue line.<br />
2 The screen knob »Pmax« is additionally<br />
displayed in the menu »Ventilator<br />
Settings«.<br />
Volume monitoring is active. The alarm<br />
"Vol. not constant, pressure limited!!" is<br />
automatically triggered if the tidal volume<br />
VT can no longer be applied. This<br />
visual and acoustic alarm can be reset<br />
via the screen key »Alarm Reset« at the<br />
top of the screen until the cause of the<br />
alarm is remedied.<br />
Set PLV with »Pmax«.<br />
* For a detailed description of PLV, please<br />
refer to page 208.<br />
PAW<br />
Flow<br />
Insp.<br />
pause<br />
Tinsp Te<br />
Setting special functions<br />
PLV<br />
Instructions for Use <strong>EvitaXL</strong> 75<br />
PPlat<br />
1<br />
f<br />
Insp. flow<br />
➁<br />
➀<br />
Pmax<br />
(configurable)<br />
t<br />
PEEP<br />
t<br />
005<br />
195
NIV mask ventilation (optional)<br />
Using NIV<br />
NIV mask ventilation (optional)<br />
Non-Invasive Ventilation<br />
Application mode »Mask« for ventilation with a nasal or facial<br />
mask to support non-invasive ventilation of patients with spontaneous<br />
breathing.<br />
Choice between mask ventilation and ordinary ventilation of<br />
intubated patients.<br />
● NIV option may only be installed by specialists in accordance<br />
with the corresponding documentation.<br />
Using NIV<br />
Use of masks increases the dead space.<br />
● Note the mask manufacturer's directions!<br />
Apnoea cannot always be detected reliably.<br />
SpO2 monitoring must be used if available.<br />
● Application mode »Mask« must not be activated with<br />
intubated patients!<br />
● Alarm limits and ventilation settings must be checked<br />
or restored in order to ensure complete monitoring of<br />
ventilation after changing from »Mask« mode to »Tube«<br />
mode.<br />
● High airway pressures must be avoided, risk of<br />
aspiration!<br />
All ventilation modes except »ILV« can be selected in »Mask«<br />
mode.<br />
The automatic tube compensation (ATC option) activated in<br />
»Tube« mode is ineffective in »Mask« mode.<br />
76 Instructions for Use <strong>EvitaXL</strong>
Selecting application mode<br />
»Mask«<br />
Mode can be selected when switching<br />
on or during operation.<br />
● Press key »O Start/Standby«.<br />
In the menu »Start/Standby«:<br />
● Touch the screen key »Standby«, it<br />
turns yellow.<br />
● Confirm = press rotary knob, the key<br />
turns green and the ventilator is now<br />
in standby mode.<br />
● Touch the screen key »Tube/Mask«<br />
and<br />
● touch the screen key » Mask<br />
(NIV)«, the key turns yellow.<br />
● Confirm = press rotary knob, the key<br />
turns green and the ventilator is now<br />
in »Mask« mode.<br />
Setting ventilation parameters<br />
for NIV<br />
● As described for »Tube« mode.<br />
An additional screen knob is displayed<br />
for CPAP/ASB: »Tinsp«<br />
The maximum duration of an ASB stroke<br />
is limited by <strong>EvitaXL</strong> to 4 seconds in<br />
patient mode »Adult« and to<br />
1.5 seconds in patient mode<br />
»Paediatric«.<br />
● The maximum duration of an ASB<br />
stroke can be limited via the screen<br />
knob »Tinsp«.<br />
»Tinsp« also limits the duration of the<br />
ASB stroke in the other ventilation<br />
modes which can be combined<br />
with ASB.<br />
NIV mask ventilation (optional)<br />
Selecting application mode »Mask«<br />
Setting ventilation parameters for NIV<br />
Instructions for Use <strong>EvitaXL</strong> 77<br />
196<br />
200
NIV mask ventilation (optional)<br />
Monitoring in »Mask« mode<br />
Leakage compensation in »Mask« mode<br />
Monitoring in »Mask« mode<br />
The measured values for MV and VTe are not leakagecompensated<br />
and are therefore lower than the actual minute<br />
or tidal volume applied to the patient if a leak occurs. <strong>EvitaXL</strong><br />
compensates leaks of up to 30 L/min for adults and up to<br />
15 L/min for children. Pressure-controlled ventilation is recommended<br />
in the case of larger leaks.<br />
In order to avoid false alarms and ensure monitoring:<br />
● Adjust both alarm limits for MV in line with the actual value.<br />
● Use additional monitoring, e.g. SpO2, if necessary.<br />
The following alarms may be deactivated in order to avoid artefacts:<br />
— MV < , lower alarm limit, minute volume<br />
— VTi > , upper alarm limit, inspiratory tidal volume<br />
— TApnoea > , upper alarm limit, apnoea monitoring<br />
● See "Setting alarm limits", page 79.<br />
● Alarms should only be deactivated if the safety of the<br />
patient is not jeopardized by the absence of an alarm!<br />
An advisory message is constantly displayed in the alarm field<br />
if an alarm limit has been deactivated.<br />
<strong>EvitaXL</strong> automatically selects the configured default alarm limits<br />
when changing over to »Tube« mode.<br />
A time-lag »TDisconnect« between 0 and 60 seconds can be set<br />
for the alarm limit PAW < (airway pressure low).<br />
The following alarms are not displayed by <strong>EvitaXL</strong> in »Mask«<br />
mode:<br />
— ASB > 4 s<br />
— ASB > 1.5 s<br />
— ASB > Tinsp<br />
— Leakage<br />
● Alarm limits and ventilation settings must be checked<br />
or restored in order to ensure complete monitoring of<br />
ventilation after changing from »Mask« mode to »Tube«<br />
mode.<br />
Leakage compensation in »Mask« mode<br />
Depending on the set patient mode, <strong>EvitaXL</strong> compensates<br />
leakages up to the following values in order to detect a patient<br />
trigger:<br />
Adult mode: 30 L/min<br />
Paediatric mode: 15 L/min<br />
Calculated leakages are compensated by <strong>EvitaXL</strong> up to 200 %<br />
of the set tidal volume, but not more than max. 2 L (regardless<br />
of the patient mode).<br />
78 Instructions for Use <strong>EvitaXL</strong>
Setting alarm limits<br />
● Press key » _ Alarm Limits«.<br />
<strong>EvitaXL</strong> opens the menu »Alarm Limits«.<br />
> = upper alarm limit<br />
< = lower alarm limit<br />
The values for the upper and lower alarm<br />
limit shown in the screen keys are initial<br />
values which are effective whenever the<br />
ventilator is switched on. However, they<br />
can also be configured specifically as<br />
required by the hospital, see "Configuration",<br />
page 126.<br />
The actual measured value is displayed<br />
between the upper and lower alarm limits.<br />
To set:<br />
● Touch the required screen key,<br />
it turns yellow,<br />
set = turn rotary knob,<br />
confirm = press rotary knob.<br />
The alarm limits for the optional measured<br />
value etCO2 can be viewed by<br />
touching "Limits 2".<br />
● Touch the screen key »Limits 2«.<br />
To deactivate (MV < for example):<br />
● »Reduce »MV < « until the following<br />
advisory message is displayed:<br />
»MV < off? Press and turn<br />
rotary knob«<br />
● Confirm advisory message<br />
= press rotary knob.<br />
● Continue turning rotary knob until<br />
dashes (––) appear on the display.<br />
● Confirm = press rotary knob.<br />
Setting alarm limits<br />
Instructions for Use <strong>EvitaXL</strong> 79<br />
111<br />
167
Setting alarm limits<br />
In the event of an alarm<br />
In the event of an alarm<br />
1 The corresponding message is displayed<br />
in the top left-hand line of the<br />
screen.<br />
Example:<br />
Tidal volume high !!!<br />
The <strong>EvitaXL</strong> assesses the alarm message<br />
with corresponding priority, marks<br />
the text with exclamation marks and different<br />
coloured backgrounds and generates<br />
the various alarm tone sequences.<br />
Alarm = top priority message<br />
Alarm messages are identified by three<br />
exclamation marks and appear against a<br />
red background.<br />
Example: Tidal volume high !!!<br />
<strong>EvitaXL</strong> generates a 5-tone sequence<br />
that is sounded twice and repeated<br />
every 7 seconds.<br />
Caution = medium priority message<br />
Cautions are identified by two exclamation<br />
marks and appear against a yellow<br />
background.<br />
Example:<br />
O2 supply pressure high !!<br />
<strong>EvitaXL</strong> generates a 3-tone sequence<br />
which is repeated every 20 seconds.<br />
Advisory = low priority message<br />
Advisory messages are identified by one<br />
exclamation mark and appear against a<br />
yellow background.<br />
Example:<br />
Fan malfunction !<br />
<strong>EvitaXL</strong> generates a 2-tone sequence<br />
which is sounded only once.<br />
➀<br />
80 Instructions for Use <strong>EvitaXL</strong><br />
210
Remedy the fault<br />
● Refer to the list "Fault – Cause –<br />
Remedy" on page 144<br />
or<br />
1 Touch screen key »Alarm Info«. All<br />
momentarily active messages are displayed.<br />
● Select message with rotary knob.<br />
● Touch the screen key »? q «.<br />
The message is displayed on the<br />
screen with cause and remedy.<br />
The alarm tone ceases automatically<br />
when the fault has been remedied. Cautions<br />
and advisory messages disappear<br />
automatically.<br />
Alarm messages (!!!) appear in the colour<br />
of the status line and must be<br />
acknowledged:<br />
● Touch the screen key »Alarm Reset«,<br />
confirm = press rotary knob.<br />
The message is deleted from the screen.<br />
However, it is saved in <strong>EvitaXL</strong> and can<br />
be displayed in the logbook on the<br />
»Data« screen via the logbook function,<br />
see page 89.<br />
The caution message<br />
Apnoea ventilation !!<br />
may be overlaid by messages or alarms<br />
with higher priority. For this reason, the<br />
message can also be reset via the<br />
screen key »Apnoea Reset«:<br />
● Touch screen key »Alarm Info«.<br />
2 Touch screen key »Apnoea Reset«,<br />
confirm = press rotary knob.<br />
<strong>EvitaXL</strong> continues ventilation with the<br />
previously set ventilation mode.<br />
Setting alarm limits<br />
In the event of an alarm<br />
Instructions for Use <strong>EvitaXL</strong> 81<br />
➁<br />
➀<br />
215<br />
031
Setting alarm limits<br />
Suppress alarm tone<br />
Power failure alarm<br />
Suppress alarm tone<br />
for max. 2 minutes:<br />
1 Press key »g Alarm Silence«, its yellow<br />
LED lights up.<br />
The acoustic alarm is suppressed for<br />
two minutes.<br />
2 The remaining time is displayed on<br />
the screen.<br />
If the fault triggering the alarm has not<br />
been remedied after 2 minutes, the<br />
acoustic alarm sounds again.<br />
If the acoustic alarm is to be re-activated<br />
prematurely:<br />
1 Press key »g Alarm Silence« again,<br />
its LED goes out.<br />
Acknowledge:<br />
See "Fault – Cause – Remedy",<br />
page 143, for alarms which can be reset<br />
via the Alarm Reset key.<br />
● Touch the screen key »Alarm Reset«,<br />
confirm = press rotary knob.<br />
Power failure alarm<br />
If the loudspeaker for acoustic alarm signalling<br />
fails on account of a defect, a<br />
continuous tone will be generated by an<br />
auxiliary alarm. This continuous tone also<br />
draws attention to a power failure (see<br />
page 30, in the event of an interruption<br />
in the power supply).<br />
➁<br />
D<br />
82 Instructions for Use <strong>EvitaXL</strong><br />
<strong>EvitaXL</strong><br />
1<br />
032<br />
214
Displaying graphics<br />
The following real-time curves can be<br />
displayed:<br />
— PAW (t)<br />
— Flow (t)<br />
— Volume (t)<br />
— etCO2 (t) (optional)<br />
— Pleth (optional)<br />
— a real-time curve combined with a<br />
short trend or a Recruitment Trend<br />
(breath-based trend) (optional).<br />
● Touch the function key » ? Main«.<br />
To select other real-time curves:<br />
● Touch the relevant screen key » «<br />
and <strong>EvitaXL</strong> opens the menu<br />
»Curves«.<br />
● Touch the screen key »Curve only«.<br />
● Touch the screen key for the required<br />
parameter of the real-time curve.<br />
● The <strong>EvitaXL</strong> displays the real-time<br />
curve of the parameter. The menu disappears<br />
automatically.<br />
● To freeze real-time curves, see<br />
"Freeze" on page 85.<br />
To display the real-time curve in combination<br />
with a short trend:<br />
In the menu »Curves«<br />
● Touch the screen key<br />
»Curve + Shorttrend«.<br />
The required real-time curve can be combined<br />
with the short trend for any chosen<br />
parameter.<br />
The relevant real-time curve is displayed<br />
in the menu and the screen key of the<br />
corresponding short-trend parameter<br />
appears in dark green.<br />
● Touch the screen key of the required<br />
parameter for the corresponding<br />
short trend.<br />
Displaying graphics<br />
Instructions for Use <strong>EvitaXL</strong> 83<br />
120
Displaying graphics<br />
<strong>EvitaXL</strong> displays the short trend of the<br />
associated parameter over the last<br />
20 minutes on the left, beside the realtime<br />
curve.<br />
The other two real-time curves are also<br />
automatically combined with a short<br />
trend.<br />
If parameters have not been selected for<br />
the short trends, <strong>EvitaXL</strong> displays the<br />
parameters previously selected for the<br />
short trend.<br />
Display real-time curve combined with<br />
Recruitment Trend*:<br />
In the menu »Curves«<br />
● Touch the screen key<br />
»Curve + RecrTrend«.<br />
The respective real-time curve can be<br />
combined with the breath-based trend of<br />
the selectable parameters »EIP/PEEP«,<br />
»VTe« and »C«.<br />
● Touch the screen key of the required<br />
parameter for the corresponding<br />
Recruitment Trend.<br />
To view a point on the curve at a certain<br />
moment in time:<br />
● Turn the rotary knob to position the<br />
cross-hair cursor over the required<br />
point and the corresponding measured<br />
value is displayed above the<br />
curve.<br />
If the cross-hair cursor is moved out of<br />
the displayed segment, the displayed<br />
time segment is automatically shifted.<br />
— to the right – new time segment,<br />
— to the left – old time segment.<br />
* Lung Protection Package option<br />
84 Instructions for Use <strong>EvitaXL</strong><br />
146<br />
223
Freeze<br />
To freeze the current real-time curve or<br />
loop.<br />
● Touch the screen key » Freeze« –<br />
it turns dark green with a red symbol.<br />
The momentary curves and loops are<br />
recorded and then stop.<br />
To view a point on the curve at a certain<br />
time or a pair of values in a loop:<br />
● Turn the rotary knob to position the<br />
cross-hair cursor over the required<br />
point and the corresponding measured<br />
value or pair of values will be displayed<br />
above or beside the curve.<br />
Freeze mode is automatically ended by<br />
<strong>EvitaXL</strong> three minutes after touching the<br />
screen key or three minutes after the<br />
rotary knob was last turned.<br />
To view new curves/loops:<br />
● Press the screen key » Freeze«<br />
again – the current curves or loops<br />
are once again recorded.<br />
Loop display<br />
This mode is used to display two measured<br />
values which appear in the ventilation<br />
cycle as a loop, such as the PAW-V<br />
loop or the V-Flow loop.<br />
● Touch the function key » ? Main«.<br />
● Touch the required screen key<br />
» «.<br />
● Touch the screen key »Loops«.<br />
The menu »Loops« is displayed by<br />
<strong>EvitaXL</strong>.<br />
Loops can be displayed in different<br />
forms:<br />
— Two small loops, one on the left, the<br />
other on the right<br />
or:<br />
— an enlarged loop on the left.<br />
Displaying graphics<br />
Freeze<br />
Loop display<br />
Instructions for Use <strong>EvitaXL</strong> 85<br />
132<br />
122
Displaying graphics<br />
Loop display<br />
To display small loops:<br />
● Press the screen key »Small«.<br />
To display a large loop:<br />
● Press the screen key »Large«.<br />
Select the required parameter combination:<br />
● Touch the screen key for the required<br />
parameter combination.<br />
A list of possible parameter combinations<br />
is displayed on the screen.<br />
● Select and confirm the parameter<br />
combination via the rotary knob.<br />
All the loops for a ventilation cycle are<br />
recorded by the ventilator, such as the<br />
loop for the mandatory ventilation stroke<br />
in SIMV mode and the loop for a spontaneous<br />
breath stroke, if any.<br />
To obtain a single loop:<br />
● Touch the screen key »Single<br />
breath« – every single loop is<br />
recorded afresh by <strong>EvitaXL</strong>.<br />
To obtain a reference loop:<br />
● Touch the screen key »Ref.« at the<br />
required time to record a reference<br />
loop.<br />
The reference loop is drawn in blue and<br />
appears constantly in the current loop<br />
displayed. The time at which the reference<br />
loop was recorded appears on the<br />
left beside the »Ref.« key.<br />
● To freeze loops, see "Freeze",<br />
page 85.<br />
The screen key »Ref.« is ineffective<br />
when the loop has been frozen via the<br />
screen key » Freeze«.<br />
86 Instructions for Use <strong>EvitaXL</strong><br />
123
Display 1 hr trend<br />
● Touch the function key » ? Main«.<br />
● Touch the required screen key<br />
» «.<br />
● Touch the screen key »Trends«.<br />
<strong>EvitaXL</strong> displays the menu for selecting<br />
the parameters for trend display.<br />
● Touch the required parameter key<br />
and <strong>EvitaXL</strong> displays the trend<br />
during the last hour for the<br />
selected parameter.<br />
To view a value in the trend at a certain<br />
moment in time:<br />
● Turn the rotary knob to position the<br />
cross-hair cursor over the required<br />
point.<br />
The value is displayed in the trend display<br />
at the top.<br />
The cross-hair cursor cannot be moved if<br />
the trend has been frozen via the screen<br />
key » Freeze«.<br />
Displaying graphics<br />
Display 1 hr trend<br />
Instructions for Use <strong>EvitaXL</strong> 87<br />
126<br />
125
Display measured values<br />
Display all measured values and settings<br />
Display measured<br />
values<br />
● Touch the function key » Values«.<br />
The bar in the key representing the<br />
main numerical values and active<br />
alarm limits shown on the right of the<br />
screen turns black.<br />
Two further options can be selected on<br />
<strong>EvitaXL</strong>:<br />
● Touch the function key » Values«<br />
again. The bar in the key representing<br />
the next selection turns black and the<br />
corresponding values are displayed<br />
by <strong>EvitaXL</strong>.<br />
● Proceed accordingly to view the third<br />
option.<br />
The three options have been defined by<br />
the manufacturer, however can also be<br />
configured specifically as required by<br />
the hospital, see "Configuration",<br />
page 126.<br />
Display all measured values<br />
and settings<br />
<strong>EvitaXL</strong> displays all measured values and<br />
settings in two tables for documentation.<br />
The values and settings specific to the<br />
hospital can be compiled in a third table,<br />
see "Configuration", page 126.<br />
● Touch the function key »Data...«.<br />
<strong>EvitaXL</strong> displays the menu »Data«,<br />
with the submenu »Values«.<br />
The table of specific hospital values and<br />
settings is displayed as default and the<br />
screen key »Custom. Table« is white.<br />
Select table 1 or table 2:<br />
● Touch the screen key »Table 1« or<br />
»Table 2«.<br />
● Touch the screen key »x« to close<br />
the table.<br />
88 Instructions for Use <strong>EvitaXL</strong><br />
127<br />
128
Display logbook<br />
Changes, events and alarms are registered<br />
by <strong>EvitaXL</strong> and listed in chronological<br />
order with the date and time of<br />
occurrence.<br />
Changes are displayed with the former<br />
and new settings (example: 5 mbar – ><br />
7 mbar).<br />
Events include, for instance, use of a<br />
medicament nebuliser, Flow calibration,<br />
etc.<br />
Alarms are registered in the form displayed<br />
by <strong>EvitaXL</strong> at the time of occurrence.<br />
Other alarms which are triggered<br />
with the displayed alarm but are not<br />
themselves displayed in the field for<br />
alarm messages are identified by an<br />
asterisk (*) preceding the entry in the<br />
logbook.<br />
To display the logbook:<br />
● Touch the function key »Data...«,<br />
the »Data« menu is displayed.<br />
● Touch the screen key »Logbook« and<br />
<strong>EvitaXL</strong> displays the logbook.<br />
When a time is highlighted in the trend<br />
display (page 90), the line corresponding<br />
to that time is also marked in the logbook.<br />
For the highlighted line, <strong>EvitaXL</strong> displays<br />
the complete list of new settings for<br />
every registered change in parameters<br />
for the ventilation mode effective at that<br />
time.<br />
To view all the settings for another line:<br />
● Turn the rotary knob to select the<br />
required line.<br />
● Touch the screen key »x« to close the<br />
logbook.<br />
Display measured values<br />
Display logbook<br />
Instructions for Use <strong>EvitaXL</strong> 89<br />
129
Display measured values<br />
Display trends (1 to 24 hr)<br />
Display trends (1 to 24 hr)<br />
● Touch the function key »Data...«.<br />
● Touch the screen key »Trends«.<br />
<strong>EvitaXL</strong> displays three trends with<br />
a common time scale one below<br />
the other.<br />
Select the parameter or parameter combination<br />
required for the trend display:<br />
● Touch the relevant screen key » «.<br />
<strong>EvitaXL</strong> opens the menu for trends.<br />
● Touch the required screen key for the<br />
parameter/parameter combination.<br />
The trend is displayed and the menu<br />
disappears.<br />
Select the common time scale in increments<br />
of 1, 3, 6, 12, 24 hr:<br />
● Touch the screen key for the required<br />
time scale. The key turns green and<br />
the selected time scale is effective.<br />
Display a value in the trend for a certain<br />
time:<br />
● Turn the rotary knob to position the<br />
cross-hair cursor over the required<br />
point in time. The value is displayed<br />
on the left, beside the screen<br />
key » «.<br />
● Touch the screen key »x« to close the<br />
trend display.<br />
90 Instructions for Use <strong>EvitaXL</strong><br />
130<br />
131
Additional functions<br />
Medicament nebulisation<br />
Inflammable agents must not be nebulised!<br />
They may be ignited by the glowing flow sensor.<br />
During adult ventilation<br />
Applicable in every ventilation mode. <strong>EvitaXL</strong> applies the medicament<br />
aerosol in synchronisation with the inspiratory flow<br />
phase and maintains the minute volume constant.<br />
The medicament nebuliser is supplied by the ventilator with<br />
medical air, O2 or a mixture of medical air and O2 according to<br />
the set O2 concentration. Deviations in the O2 concentration<br />
are thus kept to a minimum.<br />
In extreme cases (with a minimum inspiration flow of<br />
15 L/min), the deviations can be up to ±4 % by volume*.<br />
To avoid greater deviations, medicament nebulisation is automatically<br />
switched off at inspiratory flows below 15 L/min.<br />
During paediatric ventilation<br />
Medicament nebulisation is possible in the pressure-controlled<br />
paediatric ventilation modes.<br />
In volume-controlled ventilation modes, medicament nebulisation<br />
is only possible with the supplementary AutoFlow ®<br />
function.<br />
Unlike in adult ventilation, the medicament nebuliser nebulises<br />
continuously in paediatric ventilation, but the aerosol generated<br />
during expiration does not reach the lungs.<br />
Depending on the set O2 concentration, the medicament nebuliser<br />
is supplied with medical air or O2 or a mixture of medical<br />
air and O2 by the ventilator. Deviations in the O2 concentration<br />
are thus minimised.<br />
For breathing rates above 12 bpm, please refer to the graph<br />
on page 228.<br />
The maximum possible deviations in the O2 concentration are<br />
±4 % by volume.<br />
* For a detailed description of the insp. O2 concentration during<br />
medicament nebulisation, refer to page 228.<br />
Additional functions<br />
Medicament nebulisation<br />
We recommend that you do not use the medicament nebuliser<br />
at breathing rates of less than 12 bpm.<br />
For breathing rates of less than 12 bpm, the deviations in<br />
the O2 concentration may be much greater in extreme<br />
cases.<br />
These deviations cannot be detected by the device's internal<br />
O2- concentration monitor.<br />
The minute and tidal volumes displayed may be considerably<br />
higher or lower than those actually applied to the patient on<br />
account of tolerances in the nebuliser flow. Pressure-controlled<br />
ventilation is therefore recommended during nebulisation.<br />
The measured values prevailing before nebulisation<br />
must be taken into account if necessary.<br />
If the VT and MV values diverge strongly, the ventilation pressure<br />
can be used for assessment of the ventilation. VT and MV<br />
values can be compared by comparing the difference between<br />
PEEP and plateau pressure before and during nebulisation.<br />
In order to avoid false alarms and ensure monitoring:<br />
● Adjust both alarm limits for MV in line with the actual value.<br />
● Use additional monitoring, e.g. SpO2, if necessary.<br />
Only the medicament nebuliser 84 12 935 (with white<br />
middle part) may be used.<br />
If other pneumatic medicament nebulisers are used,<br />
there may be major deviations in tidal volume and inspiratory<br />
O2 concentration!<br />
Instructions for Use <strong>EvitaXL</strong> 91
Additional functions<br />
Medicament nebulisation<br />
● Prepare the medicament nebuliser in accordance with its<br />
Instructions for Use.<br />
For use during adult ventilation<br />
1 Connect the nebuliser to the inspiratory side (temperature<br />
sensor side) of the Y-piece.<br />
2 Connect the inspiration hose to the medicament nebuliser.<br />
● Place the medicament nebuliser in the vertical position.<br />
● Using clamps, route the nebuliser hose back to the ventilator<br />
along the expiratory hose.<br />
For use during paediatric ventilation<br />
3 Insert the catheter connector (ISO cone Ø15/Ø11) in the<br />
inlet of the medicament nebuliser.<br />
4 Insert the adapter (ISO cone Ø 22/Ø11) in the outlet.<br />
5 Fit the corrugated hose (0.13 m long) to the outlet adapter.<br />
6 Remove the corrugated hose of the hose set from the<br />
inspiratory adapter of the Y-piece and connect it to the inlet<br />
adapter of the medicament nebuliser.<br />
● Connect the free end of the corrugated hose at the outlet<br />
of the medicament nebuliser to the inspiratory adapter of<br />
the Y-piece.<br />
7 Connect the nebuliser hose to the port on the front panel of<br />
the <strong>EvitaXL</strong>.<br />
● Fill the medicament nebuliser in accordance with the specific<br />
Instructions for Use.<br />
The effect of aerosols on sensors, filters and heat and<br />
moisture exchangers (HME) must be taken into account!<br />
Do not place a microbial filter on the nebuliser outlet during<br />
nebulisation!<br />
The measuring function of the flow sensor may be impaired.<br />
The flow resistance of filters is liable to increase and may<br />
impair ventilation.<br />
During medicament nebulisation, do not use a heat and<br />
moisture exchanger (HME) at the Y-piece. Risk of<br />
increased breathing resistance!<br />
92 Instructions for Use <strong>EvitaXL</strong><br />
5<br />
D<br />
6<br />
4<br />
1<br />
2<br />
1<br />
1<br />
1<br />
1<br />
1<br />
7<br />
2<br />
2<br />
2<br />
2<br />
2<br />
2<br />
3<br />
<strong>EvitaXL</strong><br />
037<br />
038<br />
039
Switch on the medicament nebuliser:<br />
● Touch the function key »Special Procedure...«.<br />
<strong>EvitaXL</strong> displays the menu<br />
»Additional Function«.<br />
● Touch the screen key »<br />
Nebuliser«, the key turns yellow.<br />
● Confirm = press rotary knob. The key<br />
turns green and the nebuliser is operational.<br />
The message Nebuliser On !<br />
appears on the screen.<br />
Switch off the nebuliser:<br />
● Touch the screen key »<br />
Nebuliser«.<br />
The nebuliser is switched off automatically<br />
by the ventilator after 30 minutes.<br />
The flow sensor is automatically cleaned<br />
and calibrated after nebulisation.<br />
Screen display: Flow calibration<br />
● Remove remaining medicament.<br />
Follow the Instructions for Use of the<br />
medicament nebuliser.<br />
To view additional text information:<br />
● Touch the screen key »? q «.<br />
Additional functions<br />
Medicament nebulisation<br />
Instructions for Use <strong>EvitaXL</strong> 93<br />
134
Additional functions<br />
Oxygen enrichment for bronchial suction<br />
Oxygen enrichment for<br />
bronchial suction<br />
To avoid any risk of hypoxia during bronchial<br />
suction, <strong>EvitaXL</strong> offers a procedure<br />
for oxygen enrichment during the<br />
removal of secretions.<br />
After the program is started, <strong>EvitaXL</strong> ventilates<br />
the patient in the selected ventilation<br />
mode for an initial oxygen<br />
enrichment phase of 180 seconds.<br />
— In adult mode, the ventilator supplies<br />
100 % by volume O2, and in paediatric<br />
mode it delivers the set<br />
O2 concentration plus 25 % (for<br />
example: 60 % by vol. set; administered:<br />
75 % by vol.)<br />
When the ventilator is disconnected for<br />
suction, <strong>EvitaXL</strong> interrupts ventilation.<br />
During the suction phase, the audible<br />
alarms are suppressed so that the suction<br />
routine is not disturbed.<br />
After suction and automatically recognised<br />
reconnection, <strong>EvitaXL</strong> delivers an<br />
increased O2 concentration for the final<br />
oxygen enrichment phase of 120 seconds:<br />
— In adult mode, the O2 concentration<br />
is 100 % by volume. In paediatric<br />
mode, the enriched concentration is<br />
25 % higher than the set O2 concentration.<br />
During suction and for 2 minutes afterwards,<br />
the lower alarm limit for the<br />
minute volume is switched off. Other<br />
alarms are switched off during suction<br />
and for 15 seconds afterwards.<br />
Oxygen enrichment is only possible<br />
with a fully functioning flow sensor<br />
and if flow monitoring is switched on!<br />
Before suction<br />
● Touch the function key »Special Procedure...«.<br />
<strong>EvitaXL</strong> displays the menu<br />
»Additional Function«.<br />
● Touch the screen key »O2 Y suction«,<br />
the key turns yellow.<br />
● Confirm = press rotary knob. The key<br />
turns green and the oxygen enrichment<br />
program is started.<br />
94 Instructions for Use <strong>EvitaXL</strong><br />
134
<strong>EvitaXL</strong> ventilates the patient in the set ventilation mode with<br />
increased O2 concentrations: In adult mode, the O2 concentration<br />
is 100 % by volume. In paediatric mode, the enriched<br />
concentration is 25 % higher than the set O2 concentration.<br />
If PEEP is not set to more than 4 mbar, PEEP will be applied<br />
automatically at 4 mbar. This PEEP allows <strong>EvitaXL</strong> to detect<br />
any subsequent disconnection.<br />
The other ventilation parameters remain unaffected.<br />
Screen display:<br />
Initial oxygen enrichment 180 s<br />
The remaining time is counted down continuously.<br />
This initial oxygen enrichment lasts for a maximum of 180 seconds.<br />
During this time <strong>EvitaXL</strong> waits for a disconnection for suction.<br />
The oxygen enrichment program is terminated by <strong>EvitaXL</strong> if<br />
there is no disconnection after the 180 seconds have elapsed.<br />
After disconnection for suction<br />
<strong>EvitaXL</strong> delivers a minimal flow for the duration of suction in<br />
order to detect automatically the end of the disconnection<br />
phase. The time available for suction is displayed on the<br />
screen continuously in seconds (example):<br />
Execute suction and reconnect 120 s<br />
If suction is ended and the system is reconnected within the<br />
displayed time, <strong>EvitaXL</strong> terminates the disconnection phase.<br />
Automatic interruption of oxygen enrichment<br />
If there is still no reconnection after 120 seconds, the oxygen<br />
enrichment program is interrupted. All alarms are immediately<br />
reactivated. <strong>EvitaXL</strong> continues ventilating in the set ventilation<br />
mode.<br />
After reconnection<br />
After reconnection, <strong>EvitaXL</strong> continues ventilating in the set ventilation<br />
mode, except that for 120 seconds an O2 concentration<br />
of 100 % by volume for adults or 25 % above the set<br />
O2 concentration for paediatric ventilation will continue to<br />
be delivered for final oxygen enrichment.<br />
Screen display:<br />
Final oxygen enrichment 120 s<br />
The remaining time is counted down continuously.<br />
If oxygen enrichment is to be interrupted:<br />
● Touch the screen key »O2 Y suction«.<br />
To view additional text information on oxygen enrichment:<br />
● Touch the screen key »? q «.<br />
To quit the menu:<br />
● Touch the screen key »x«.<br />
Additional functions<br />
Oxygen enrichment for bronchial suction<br />
Instructions for Use <strong>EvitaXL</strong> 95
Additional functions<br />
Manual inspiration<br />
Manual inspiration<br />
This function may be used in all modes<br />
except for spontaneous breathing CPAP.<br />
Regardless of the start time, an automatic<br />
ventilation stroke can be prolonged<br />
for up to 15 seconds.<br />
Or:<br />
Between two automatic ventilation<br />
strokes, a ventilation stroke can be manually<br />
started and held for max.<br />
15 seconds.<br />
The pattern of the manually started ventilation<br />
stroke corresponds to the ventilation<br />
pattern of the currently active<br />
automatic ventilation mode.<br />
In CPAP/ASB:<br />
a pressure-assisted ventilation stroke<br />
(defined by the PASB setting) is triggered.<br />
● Touch the function key »Special Procedure...«.<br />
<strong>EvitaXL</strong> displays the menu<br />
»Additional Function«.<br />
● Touch and hold the screen key<br />
»Insp. hold« for the required inspiration<br />
time. Inspiration is ended by the<br />
ventilator after max. 15 seconds.<br />
To view additional text information:<br />
● Touch the screen key »? q «.<br />
To quit the menu:<br />
● Touch the screen key »x«.<br />
96 Instructions for Use <strong>EvitaXL</strong><br />
204
Expiration Hold<br />
This function may be used in all ventilation<br />
modes.<br />
For determining the measured NIF*<br />
value for weaning.<br />
● Touch the function key »Special Procedure...«.<br />
<strong>EvitaXL</strong> displays the menu<br />
»Additional Function«.<br />
● Touch and hold the screen key »Exp.<br />
Hold« for the required expiration<br />
time. Expiration is ended by the ventilator<br />
after max. 15 seconds.<br />
To view additional text information:<br />
● Touch the screen key »? q «.<br />
To quit the menu:<br />
● Touch the screen key »x«.<br />
* Display NIF, see page 101.<br />
For a detailed description of NIF, see<br />
page 225.<br />
Additional functions<br />
Expiration Hold<br />
Instructions for Use <strong>EvitaXL</strong> 97<br />
205
Diagnostic functions<br />
Occlusion pressure P 0.1<br />
Diagnostic functions<br />
Occlusion pressure P 0.1<br />
The occlusion pressure P 0.1 characterises<br />
the negative pressure during a short<br />
occlusion (0.1 s) at the start of spontaneous<br />
inspiration.<br />
It is a direct measure of the neuro-muscular<br />
breathing drive.<br />
<strong>EvitaXL</strong> displays the value for the measured<br />
pressure difference without a negative<br />
sign.<br />
For patients with healthy lungs and<br />
regular breathing P 0.1 is 3 to 4 mbar.<br />
A higher P 0.1 signifies a high breathing<br />
drive, which can only be maintained for a<br />
brief period. Values below 6 mbar for a<br />
patient with chronic obstructive pulmonary<br />
disease indicate impending<br />
exhaustion.<br />
This special measuring procedure can<br />
be used in all ventilation modes at regular<br />
intervals in order to check the breathing<br />
drive of a spontaneously breathing<br />
patient or to assess the amount of spontaneous<br />
breathing during controlled ventilation.<br />
● Touch the function key »Special Procedure...«.<br />
<strong>EvitaXL</strong> displays the menu<br />
»Additional Function«.<br />
● Touch the screen key »Diagnostics«<br />
and the special procedure P 0.1 is<br />
preselected.<br />
<strong>EvitaXL</strong> displays the P 0.1 value for the<br />
previous measurement and – in large<br />
numerals – the value for the last measurement.<br />
● Touch the screen key »Start«, the key<br />
turns yellow.<br />
● Confirm = press rotary knob, the<br />
screen key turns green and <strong>EvitaXL</strong><br />
starts the P 0.1 measuring<br />
procedure.<br />
98 Instructions for Use <strong>EvitaXL</strong><br />
135
Set the interval<br />
● Touch the screen key »Interval«;<br />
the key turns yellow.<br />
Set = turn rotary knob,<br />
confirm = press rotary knob.<br />
The remaining time until the next measurement<br />
is displayed.<br />
To view additional text information:<br />
● Touch the screen key »? q «.<br />
To quit the menu:<br />
● Touch the screen key »x«.<br />
It is advisable to record the measured<br />
P 0.1 value as a trend so that the<br />
progress made can be monitored, see<br />
"Display 1 hr trend", page 87.<br />
Diagnostic functions<br />
Occlusion pressure P 0.1<br />
Instructions for Use <strong>EvitaXL</strong> 99<br />
135
Diagnostic functions<br />
Intrinsic PEEP – PEEPi<br />
Intrinsic PEEP – PEEPi<br />
Intrinsic PEEP* is the actual end-expiratory<br />
pressure in the lung.<br />
Due to the dynamics of lung mechanics<br />
(resistance, compliance and closing volume)<br />
and the ventilation setting parameters,<br />
the intrinsic PEEP differs from the<br />
PEEP in the upper airways.<br />
The Intrinsic PEEP measurement procedure<br />
also measures the trapped volume<br />
resulting from the different PEEP values,<br />
i.e. the amount of air trapped in the<br />
lungs and not taking part in the gas<br />
exchange process.<br />
This special procedure can be performed<br />
in all ventilation modes.<br />
Activity by the patient during this<br />
procedure can distort the measured<br />
values.<br />
● Touch the function key »Special Procedure...«.<br />
<strong>EvitaXL</strong> displays the menu<br />
»Additional Function«.<br />
● Touch the screen key »Diagnostics«.<br />
● Touch the screen key »PEEPi«.<br />
<strong>EvitaXL</strong> displays the last measured<br />
PEEPi value in larger characters with<br />
time/date in the left-hand column. The<br />
value for the previous measurement is in<br />
the right-hand column.<br />
The set PEEP is shown with the measured<br />
values.<br />
To start PEEPi:<br />
● Touch the screen key »Start«, the key<br />
turns yellow.<br />
● Confirm = press rotary knob, the<br />
screen key turns green and <strong>EvitaXL</strong><br />
starts measurement of the PEEPi<br />
value.<br />
To view additional text information:<br />
● Touch the screen key »? q «.<br />
To quit the menu:<br />
● Touch the screen key »x«.<br />
* For a detailed description of<br />
Intrinsic PEEP, see page 226.<br />
100 Instructions for Use <strong>EvitaXL</strong><br />
136
Negative Inspiratory Force NIF<br />
The Negative Inspiratory Force index<br />
(NIF)* measures the patient's maximum<br />
inhalation effort after exhaling. The<br />
patient system is closed during measurement<br />
of the NIF. This value is also known<br />
as the Maximum Inspiratory Pressure<br />
(MIP). As a result of the inhalation effort<br />
during manually extended expiration, the<br />
patient generates a negative pressure in<br />
relation to PEEP.<br />
The probability that the patient can be<br />
weaned successfully increases with the<br />
magnitude of this negative pressure.<br />
Patients with a NIF of less than<br />
–30 mbar can in all probability be extubated<br />
successfully, while those with a<br />
NIF of up to –20 mbar will most probably<br />
prove unsuccessful.<br />
<strong>EvitaXL</strong> determines the NIF value during<br />
manually extended expiration.<br />
● Touch the function key »Special Procedure...«.<br />
<strong>EvitaXL</strong> displays the menu<br />
»Additional Function«.<br />
● Touch the screen key »Diagnostics«.<br />
● Touch the screen key »NIF«.<br />
<strong>EvitaXL</strong> displays the last measured NIF<br />
value in larger characters with time/date<br />
in the left-hand column. The value for the<br />
previous measurement is in the righthand<br />
column.<br />
To measure the NIF value:<br />
● Touch and hold the screen key »Exp.<br />
Hold« for the required expiration<br />
time. Expiration is ended by the ventilator<br />
after max. 15 seconds.<br />
Measurement is ended automatically by<br />
<strong>EvitaXL</strong> after max. 15 seconds.<br />
To view additional text information:<br />
● Touch the screen key »? q «.<br />
To quit the menu:<br />
● Touch the screen key »x«.<br />
* For a detailed description of NIF, see<br />
page 225.<br />
Bibliography [17], [18], page 235<br />
Diagnostic functions<br />
Negative Inspiratory Force NIF<br />
Instructions for Use <strong>EvitaXL</strong> 101<br />
137
Diagnostic functions<br />
Low Flow PV-Loop (optional)<br />
Low Flow PV-Loop (optional)<br />
<strong>EvitaXL</strong> determines the Low Flow<br />
PV-Loop* during an extended inspiration<br />
or an inspiration and expiration.<br />
The measuring procedure can only be<br />
carried out in the »Adult« patient mode.<br />
The measuring procedure should only<br />
be carried out on patients with no spontaneous<br />
breathing.<br />
● Touch the function key »Special Procedure...«.<br />
<strong>EvitaXL</strong> displays the menu<br />
»Additional Function«.<br />
● Touch the screen key<br />
»Low Flow PV-Loop«.<br />
<strong>EvitaXL</strong> opens the information screen.<br />
Observe the information before carrying<br />
out the measurement!<br />
For additional information, see page 227.<br />
* Lung Protection Package option<br />
For a detailed description, please refer to<br />
page 227.<br />
The application of a low flow manoeuvre may decrease the patient's systemic circulatory<br />
pressure and could cause a pneumothorax, for example. Carefully assess the<br />
patients's condition for settings.<br />
— Applied pressure / volume must be adequate for the patient.<br />
— The patient must be haemodynamically stable.<br />
— Closely monitor arterial blood pressure during the manoeuvre.<br />
— The sudden release of high airway pressure may overload the heart and impair<br />
cardiac functions.<br />
— The calculated maximum manoeuvre time must be adequate for the patient.<br />
— These measurements are only valid with no spontaneous breathing.<br />
— These measurements are only valid with no leakage. Volume and derived<br />
compliance values are not leakage compensated (VTi, VTe and Cstat).<br />
— This manoeuvre cannot be restarted within 60 seconds.<br />
— This manoeuvre cannot be started until 60 seconds after nebulisation or<br />
suctioning.<br />
102 Instructions for Use <strong>EvitaXL</strong><br />
219
Measuring procedure<br />
● Touch the screen key »Procedure«.<br />
● Touch the screen key »Pstart«,<br />
»Plimit«, »Flow« and »Vlimit«,<br />
set = turn rotary knob,<br />
confirm = press rotary knob.<br />
»Pstart« can be set between 0 and<br />
PEEP.<br />
»Plimit« and »Vlimit« are limited by the<br />
alarm limits.<br />
● Adjust the alarm limits, if necessary,<br />
see page 79.<br />
1 The maximum duration of the measuring<br />
procedure »Tmax« is displayed.<br />
To record both inspiration and expiration:<br />
● Touch the screen key<br />
»Start Insp+Exp«,<br />
confirm = press rotary knob.<br />
To record inspiration only:<br />
● Touch the screen key<br />
»Start Insp only«,<br />
confirm = press rotary knob.<br />
Diagnostic functions<br />
Low Flow PV-Loop (optional)<br />
Instructions for Use <strong>EvitaXL</strong> 103<br />
➀<br />
220
Diagnostic functions<br />
Low Flow PV-Loop (optional)<br />
End inspiration<br />
During the measurement »Insp+Exp«:<br />
● Touch the screen key »Stop Insp«.<br />
<strong>EvitaXL</strong> ends inspiration, expiration takes<br />
place at the set flow.<br />
During the measurement »Insp only«:<br />
● Touch the screen key »Stop Insp«.<br />
<strong>EvitaXL</strong> ends inspiration, expiration<br />
takes place at a pressure drop of max.<br />
5 mbar/s.<br />
Quick abortion of the measurement<br />
● Touch the screen key »Abort«,<br />
confirm = press rotary knob.<br />
<strong>EvitaXL</strong> ends the measurement, the pressure<br />
immediately drops to the set PEEP.<br />
The current measurement is not interrupted<br />
by calling up another screen.<br />
Return to the screen for the measurement:<br />
● Touch the function key »Special<br />
Procedure...«.<br />
● Terminate the measurement with the<br />
»Stop Insp« or »Abort« keys.<br />
104 Instructions for Use <strong>EvitaXL</strong><br />
227
Measurement analysis<br />
After the measurement, <strong>EvitaXL</strong> opens<br />
the »Analysis« screen.<br />
To display a point on the curve:<br />
● Touch the screen key »Cursor 1« or<br />
»Cursor 2«.<br />
● Turn the rotary knob to position the<br />
cross-hair cursor over the required<br />
point; the measured values are displayed.<br />
The light grey connecting line of the two<br />
measuring points on the inspiratory or<br />
expiratory section of the curve represents<br />
the static compliance. The values<br />
for the inspiratory and expiratory static<br />
compliance (Cstat), which are calculated<br />
from this, are displayed.<br />
The measured values are not leakage<br />
compensated.<br />
A new measurement can only be started<br />
after 60 seconds. During this time the<br />
start keys are grey and cannot be<br />
activated.<br />
To view additional text information:<br />
● Touch the screen key »? q «.<br />
To quit the menu:<br />
● Touch the screen key »x«.<br />
Diagnostic functions<br />
Low Flow PV-Loop (optional)<br />
Instructions for Use <strong>EvitaXL</strong> 105<br />
221
Sensors<br />
Flow sensor calibration<br />
Sensors<br />
<strong>EvitaXL</strong> uses the following sensors for measuring and<br />
monitoring:<br />
— Flow sensor<br />
— Pressure sensors<br />
— O2 sensor<br />
— CO2 sensor (optional)<br />
The last sensor calibration values obtained are saved until the<br />
sensors are calibrated again, even if the ventilator is switched<br />
off in the meantime.<br />
The pressure sensors for measuring the airway pressure are<br />
calibrated automatically.<br />
The flow sensor and O2 sensor are calibrated automatically<br />
once per day.<br />
The flow sensor can be calibrated at any time, even during<br />
ventilation.<br />
The O2 sensor can be calibrated at any time, even during ventilation.<br />
This does not influence the applied O2 concentration.<br />
Calibration of the CO2 sensor (optional) can be checked during<br />
ventilation.<br />
Flow sensor calibration<br />
— After replacing the flow sensor.<br />
The flow sensor is automatically cleaned by <strong>EvitaXL</strong> before it is<br />
calibrated.<br />
It is automatically cleaned and calibrated by <strong>EvitaXL</strong> after use<br />
of the medicament nebuliser.<br />
● Flammable gases (e.g. alcohol vapours after disinfection)<br />
must be avoided.<br />
● Flow sensors which have been disinfected in ethanol<br />
must be allowed to dry in air for at least 30 minutes.<br />
106 Instructions for Use <strong>EvitaXL</strong>
● Press the key » Sensor Parameter«.<br />
The menu »Sensor Parameter«<br />
is displayed with the »Flow« menu.<br />
Flow monitoring is active.<br />
Start calibration:<br />
● Touch the »Start« screen key. The<br />
key turns green and <strong>EvitaXL</strong> calibrates<br />
the flow sensor.<br />
<strong>EvitaXL</strong> uses the next inspiration phase<br />
for the calibration process. Short inspiration<br />
times are extended to approx.<br />
1 second.<br />
Screen display:<br />
Flow calibration<br />
The screen key »Start« turns pale green<br />
when calibration is completed.<br />
External flow compensation<br />
When a constant external flow of up to<br />
12 L/min is supplied (e.g. during medicament<br />
nebulisation with separate gas<br />
supply or during separate tracheal gas<br />
insufflation TGI), this flow can be calculated<br />
by <strong>EvitaXL</strong> and the tolerance<br />
increased for the monitoring parameters<br />
of the flow sensor in order to avoid generation<br />
of the alarm "Flow measurement<br />
inop." during these applications. The<br />
originally measured expiratory volume is<br />
maintained: <strong>EvitaXL</strong> measures a correspondingly<br />
higher value for VTe and MV.<br />
The value shown for VTi is too low. The<br />
tidal volume actually applied to the<br />
patient during volume-controlled ventilation<br />
is higher than that set. Pressure-controlled<br />
ventilation is therefore<br />
recommended in combination with an<br />
external flow.<br />
In order to avoid false alarms and ensure<br />
monitoring:<br />
● Adjust both alarm limits for MV in line<br />
with the actual value.<br />
● Use additional monitoring, e.g. SpO2,<br />
if necessary.<br />
For initial calculation of the external flow:<br />
● Start external flow.<br />
Sensors<br />
External flow compensation<br />
Instructions for Use <strong>EvitaXL</strong> 107<br />
138
Sensors<br />
External flow compensation<br />
In the »Flow« menu:<br />
● Touch screen key »measure«, the<br />
key turns yellow. <strong>EvitaXL</strong> measures<br />
the external flow and displays it in the<br />
menu with the date and time.<br />
The following message is displayed<br />
while measurement is in progress:<br />
Measuring external flow<br />
Calculation of the external flow is interrupted<br />
by <strong>EvitaXL</strong> if it exceeds 12 L/min<br />
or if the flow measurement function is<br />
defective.<br />
When the external flow has been calculated<br />
successfully, it is taken into<br />
account automatically and the screen<br />
key »On« appears in green.<br />
If an external flow is not applied:<br />
● Touch the screen key »Off«, the key<br />
turns yellow.<br />
● Confirm = press rotary knob, the key<br />
turns pale green.<br />
Once the external flow has been calculated<br />
by <strong>EvitaXL</strong>, it can be taken into<br />
account at any time:<br />
● Touch the screen key »On« in the<br />
»Flow« menu, the key turns yellow.<br />
● Confirm = press the rotary knob, the<br />
key turns green.<br />
If the external flow changes:<br />
● Touch the screen key »measure«<br />
again and the new external flow is calculated<br />
by <strong>EvitaXL</strong>.<br />
108 Instructions for Use <strong>EvitaXL</strong><br />
138
O2 sensor calibration<br />
— After replacing the O2 sensor (wait<br />
15 minutes for the O2 sensor to<br />
warm up).<br />
— When the measured and set values<br />
diverge by more than 2 % by volume.<br />
The O2 sensor can be calibrated during<br />
ventilation.<br />
● Press the key » Sensor<br />
Parameter«.<br />
● Touch the screen key »O2«. <strong>EvitaXL</strong><br />
displays the menu »O2«.<br />
Start O2 calibration:<br />
● Touch the »Start« screen key. The<br />
key turns green and <strong>EvitaXL</strong> calibrates<br />
the O2 sensor.<br />
Screen display:<br />
O2 calibration active<br />
The screen key »Start« turns pale green<br />
when calibration is complete.<br />
Sensors<br />
O2 sensor calibration<br />
Instructions for Use <strong>EvitaXL</strong> 109<br />
139
Sensors<br />
Zero/check/calibrate CO2 sensor<br />
Zero/check/calibrate CO2 sensor<br />
(if Capno Plus option is installed)<br />
The CO2 sensor is works-calibrated and can be used without<br />
further calibration on any <strong>EvitaXL</strong> unit.<br />
Before measurement and when transferring the sensor to<br />
another <strong>EvitaXL</strong> unit, the zero indication should be checked<br />
with the sensor on a clean park bracket and zero calibration<br />
performed if necessary.<br />
CO2 zero calibration is performed as part of the device check.<br />
However, zero calibration can also be performed manually at<br />
any time.<br />
There must not be any increased CO2 concentration between<br />
the windows of the park bracket when checking the zero indication<br />
or performing zero calibration. In other words only the<br />
background concentration of approx. 0.4 Torr or 0.05 % by volume<br />
normally present in rooms may be present.<br />
For this reason:<br />
● Do not breathe onto the park bracket when checking the<br />
zero indication or performing zero calibration.<br />
The calibration (sensitivity) of the sensor can be roughly<br />
checked with the test filter attached to the sensor lead; it can<br />
be checked more precisely with calibration gas.<br />
Calibration must be checked with calibration gas:<br />
— if the result of testing with the test filter is unsatisfactory,<br />
— but at least every six months in conjunction with the device<br />
inspection.<br />
Recalibration of the sensor is only required if the specified calibration<br />
values are not met when testing calibration with the<br />
calibration gas.<br />
Zero calibration on the park bracket, testing of the calibration<br />
with test filter or calibration gas and recalibration of the sensor<br />
can all be performed during ventilation.<br />
Error messages relating to CO2 measurement can be found in<br />
the chapter "Fault – Cause – Remedy" on page 144.<br />
Notes concerning the alarm »CO2-Sensor? !!!«:<br />
If the alarm »CO2-Sensor? !!!« is displayed although the sensor<br />
is connected and the cuvette is fitted, the windows on the<br />
park bracket or sensor may be soiled:<br />
● Perform zero calibration with a cleaned park bracket and<br />
cleaned sensor.<br />
If the dirt on the park bracket cannot be removed:<br />
● Perform zero calibration with a clean cuvette – particularly<br />
with clean windows – in room air, taking care not to breathe<br />
in the direction of the cuvette.<br />
Notes concerning the alarm »CO2 zero? !!!«:<br />
If the alarm »CO2 zero? !!!« is displayed during measurement<br />
or if incorrect measured values are suspected, e.g. etCO2 values<br />
too low or inspiratory values too high:<br />
● Check whether the cuvette windows are soiled: clean the<br />
cuvette if necessary or use a different, clean cuvette.<br />
Despite design measures to minimise the zero shift, major soiling<br />
of the cuvette windows, e.g. with deposits due to medicament<br />
nebulisation, may result in a zero shift with incorrect CO2<br />
measured values long before the alarm »Clean CO2<br />
cuvette !!!« appears due to excessively low intensity of the<br />
measuring light.<br />
If the alarm »CO2 zero? !!!« does not subsequently disappear<br />
or if the measured values remain suspect:<br />
● Perform zero calibration on the park bracket.<br />
If the measured values are still suspect:<br />
● Perform zero calibration on a clean cuvette in room air, taking<br />
care not to breathe in the direction of the cuvette, and<br />
continue measurement with the cuvette used for zero calibration.<br />
Notes concerning the message »CO2-cal./-zero/-check<br />
impossible«:<br />
If the message »CO2-cal./-zero/-check impossible« appears<br />
after pressing the screen key »Start«, »Filter Check«,<br />
»Gas Check« or »Calibration« either:<br />
— the CO2 sensor has not been plugged in,<br />
● connect CO2 sensor<br />
or<br />
— the CO2 sensor is defective,<br />
● replace CO2 sensor<br />
or<br />
— the CO2 electronics in <strong>EvitaXL</strong> are defective,<br />
● call DrägerService.<br />
110 Instructions for Use <strong>EvitaXL</strong>
CO2 zero calibration<br />
Only possible with a clean park bracket<br />
and clean sensor!<br />
● Switch on <strong>EvitaXL</strong> and wait at least<br />
3 minutes for the CO2 sensor to complete<br />
its warm-up phase.<br />
After at least three minutes, the measured<br />
values will be inside the specified<br />
tolerance range.<br />
● Press the key » Sensor<br />
Parameter«.<br />
● Touch the screen key »CO2«.<br />
<strong>EvitaXL</strong> displays the menu for »CO2«.<br />
Start zero calibration:<br />
● Touch screen key »Start«, it turns<br />
dark green.<br />
Screen display:<br />
Park CO2 sensor<br />
1 Remove CO2 sensor from the<br />
cuvette and<br />
2 place the sensor on its park bracket;<br />
do not breathe onto the park bracket.<br />
● Confirm with rotary knob.<br />
CO2 zero calibration is now performed<br />
by <strong>EvitaXL</strong>.<br />
Display:<br />
CO2 zero calibration<br />
After approx. 5 seconds, <strong>EvitaXL</strong> confirms<br />
with the message:<br />
CO2 zero ok<br />
1 Fit the sensor back on the cuvette.<br />
D<br />
Sensors<br />
Zero/check/calibrate CO2 sensor<br />
Instructions for Use <strong>EvitaXL</strong> 111<br />
1<br />
<strong>EvitaXL</strong><br />
2<br />
142<br />
043<br />
044
Sensors<br />
Zero/check/calibrate CO2 sensor<br />
Incorrect zero calibration is indicated by<br />
the <strong>EvitaXL</strong> with the following message:<br />
CO2 zero?<br />
● Repeat CO2 zero calibration.<br />
If zero calibration is still impossible:<br />
● Check whether the park bracket or<br />
sensor is soiled and clean it if necessary.<br />
If the sensor is defective:<br />
● Replace sensor and repeat zero<br />
calibration.<br />
Checking CO2 calibration with test<br />
filter<br />
Use the test filter on the cable of the<br />
CO2 sensor.<br />
● Switch on <strong>EvitaXL</strong> and wait at least<br />
3 minutes for the CO2 sensor to complete<br />
its warm-up phase.<br />
● First perform CO2 zero calibration,<br />
page 111, then:<br />
in the menu »CO2«:<br />
● Touch the screen key »Check<br />
sensor«.<br />
● Touch the screen key »Filter Check«.<br />
112 Instructions for Use <strong>EvitaXL</strong><br />
045<br />
141
● Place the test filter in the<br />
CO2 sensor.<br />
<strong>EvitaXL</strong> displays the test value of the<br />
CO2 concentration FCO2 in the menu,<br />
example:<br />
FCO2 4.0 Vol.%<br />
This value must agree to within<br />
±0.3 Vol.% with the specification on the<br />
test filter.<br />
Example: 4.1 Vol.% on the filter:<br />
permitted value range: 3.8 to 4.4 Vol.%<br />
If the test value is outside the permitted<br />
tolerance, the test gas must be checked<br />
or calibrated.<br />
● Push CO2 sensor back on the<br />
cuvette.<br />
Checking CO2 calibration with calibration<br />
gas<br />
— if the specified calibration value<br />
was not met when testing with the<br />
test filter<br />
— at least once per half-year.<br />
Calibration gas containing N2O must<br />
not be used!<br />
● Switch on <strong>EvitaXL</strong> and wait at least<br />
3 minutes for the CO2 sensor to complete<br />
its warm-up phase.<br />
● First perform CO2 zero calibration,<br />
page 111, then:<br />
in the menu »CO2«:<br />
● Touch the screen key »Check<br />
sensor«.<br />
Sensors<br />
Zero/check/calibrate CO2 sensor<br />
Instructions for Use <strong>EvitaXL</strong> 113<br />
4,1 Vol%<br />
046<br />
047<br />
141
Sensors<br />
Zero/check/calibrate CO2 sensor<br />
● Connect the calibration gas supply.<br />
Use the cuvette from the calibration<br />
set!<br />
1 Connect the calibration gas cylinder<br />
and the cuvette of the calibration set<br />
to the hose.<br />
2 Remove the CO2 sensor from its<br />
park bracket and fit it to the cuvette of<br />
the calibration set.<br />
3 Read the CO2 and O2 concentration<br />
(if applicable) of the calibration gas<br />
from the calibration gas cylinder.<br />
Enter these concentration values with<br />
the screen knobs.<br />
● Touch the screen knob.<br />
Enter the concentration<br />
= turn rotary knob,<br />
confirm = press rotary knob.<br />
If the calibration gas comprises CO2, O2<br />
and N2:<br />
● Enter the O2 concentration read off.<br />
If the calibration gas only comprises<br />
CO2 und N2:<br />
● Set the O2 concentration to »0«.<br />
● Touch the screen key »Gas Check«.<br />
<strong>EvitaXL</strong> displays the CO2 concentration<br />
FCO2 in the menu.<br />
Example: FCO2 5.0 Vol.%.<br />
After about 10 seconds, the value of<br />
FCO2 must match to within ±0.2 Vol.%<br />
the CO2 content of the calibration gas.<br />
If the calibration value is outside the permitted<br />
tolerance, the CO2 sensor must<br />
be recalibrated with test gas.<br />
● Push CO2 sensor back on the<br />
cuvette.<br />
114 Instructions for Use <strong>EvitaXL</strong><br />
2<br />
1<br />
3<br />
048<br />
141
Calibrating the CO2 sensor<br />
— If the check values are not met on<br />
checking the calibration using calibration<br />
gas.<br />
Calibration gas containing N2O must<br />
not be used!<br />
● Switch on <strong>EvitaXL</strong> and wait at least<br />
3 minutes for the CO2 sensor to complete<br />
its warm-up phase.<br />
● First perform CO2 zero calibration,<br />
page 111, then:<br />
In the menu »CO2«:<br />
● Touch the screen key »Calibration«.<br />
<strong>EvitaXL</strong> displays the »Calibration« menu.<br />
● Connect the calibration gas supply.<br />
Use the cuvette from the calibration<br />
set!<br />
1 Connect the calibration gas cylinder<br />
and the cuvette of the calibration set<br />
to the hose.<br />
2 Remove the CO2 sensor from its<br />
park bracket and fit it to the cuvette of<br />
the calibration set.<br />
3 Read the CO2 and O2 concentration<br />
(if applicable) of the calibration gas<br />
from the calibration gas cylinder.<br />
Enter these concentration values with<br />
the screen knobs.<br />
Sensors<br />
Zero/check/calibrate CO2 sensor<br />
Instructions for Use <strong>EvitaXL</strong> 115<br />
2<br />
1<br />
3<br />
140<br />
048
Sensors<br />
Zero/check/calibrate CO2 sensor<br />
● Touch the screen knob.<br />
● Enter the<br />
concentration = turn rotary knob,<br />
confirm = press rotary knob.<br />
When using the standard calibration gas<br />
(5 Vol.% CO2 and 95 Vol.% N2):<br />
● Set O2 concentration to »0«,<br />
CO2 concentration to »5«.<br />
● Touch the »Start« screen key.<br />
During calibration, the following message<br />
is displayed on the screen:<br />
CO2 calibration. Please wait<br />
<strong>EvitaXL</strong> carries out calibration and<br />
confirms with the message:<br />
CO2 calibration ok<br />
Failed calibration is indicated by the ventilator<br />
with the message:<br />
CO2 calibration interrupted<br />
or<br />
CO2 calibration not ok<br />
● Repeat the calibration of the CO2<br />
sensor.<br />
If calibration still proves impossible, the<br />
CO2 concentration value entered may<br />
not be the same as that in the cylinder:<br />
● Check CO2 value entered,<br />
or<br />
calibration gas cylinder is empty:<br />
● Use a new calibration gas cylinder<br />
or<br />
sensor is defective:<br />
● Replace sensor.<br />
116 Instructions for Use <strong>EvitaXL</strong><br />
140
Resetting CO2 calibration<br />
— If calibration was not successful or if<br />
there were problems during calibration,<br />
the sensor can be reset to the<br />
factory reset values.<br />
In the menu »CO2«:<br />
● Touch the screen key »Calibration«.<br />
● Touch the screen key »Reset Cal.«.<br />
The calibration is reset by <strong>EvitaXL</strong> after<br />
approx. 5 seconds and the factory-set<br />
calibration value is now effective again.<br />
● Recover the correct calibration as<br />
soon as possible!<br />
Sensors<br />
Zero/check/calibrate CO2 sensor<br />
Instructions for Use <strong>EvitaXL</strong> 117<br />
140
Switching off the monitor functions<br />
Switching off the<br />
monitor functions<br />
For example, if a spent sensor cannot be<br />
replaced.<br />
● Ensure appropriate replacement<br />
monitoring function without delay<br />
and replace spent sensor!<br />
The O2 monitoring function can be<br />
replaced by an adequate replacement<br />
monitoring function. The O2 alarm limits<br />
of the replacement monitoring function<br />
must be set in accordance with the FiO2<br />
setting:<br />
FiO2 O2 ±4 Vol.%<br />
FiO2 ≥60 Vol.% –> O2 ±6 Vol.%<br />
The expiratory flow monitoring function<br />
cannot be fully replaced by a replacement<br />
monitoring function. The MV alarm<br />
limits of the replacement monitoring<br />
function must be set accordingly.<br />
The ventilation functions and ventilation<br />
monitoring are only possible to a limited<br />
extent without the expiratory flow sensor.<br />
A spent or disconnected expiratory flow<br />
sensor can lead to deviations in the<br />
minute and tidal volumes or cause selftriggers.<br />
● Press the key » Sensor<br />
Parameter«.<br />
<strong>EvitaXL</strong> displays the menu »Sensor<br />
Parameter«.<br />
● Touch the screen key for the sensor<br />
to be switched off, e.g. »CO2«.<br />
● Touch the screen key »Off«, the key<br />
turns yellow.<br />
● Confirm = press the rotary knob, the<br />
key turns green.<br />
The values measured by the sensor<br />
concerned disappear.<br />
The corresponding alarm function is<br />
deactivated.<br />
After replacing the sensor:<br />
● Switch the monitor function back on.<br />
118 Instructions for Use <strong>EvitaXL</strong><br />
207
Selecting Standby Mode<br />
— To perform the device check.<br />
— To keep <strong>EvitaXL</strong> ready for operation<br />
while the patient is absent.<br />
— To change the patient mode.<br />
— For the O2 therapy (optional).<br />
Ventilation does not take place in<br />
standby mode!<br />
● Press the key »O Start/Standby«<br />
and keep it depressed for 3 seconds.<br />
The ventilator is now in standby mode.<br />
Or<br />
● Press the key »O Start/Standby«.<br />
<strong>EvitaXL</strong> displays the menu »Start/<br />
Standby«.<br />
● Touch screen key »Standby«.<br />
● Confirm = press the rotary knob, the<br />
key turns green.<br />
1 Touch the screen key »Alarm Reset«<br />
in the field for alarm messages at the<br />
top of the screen.<br />
● Confirm = press the rotary knob, the<br />
key turns green.<br />
The ventilator is now in standby mode.<br />
If the patient mode or ideal body weight<br />
is changed in standby mode, new values<br />
will be calculated by <strong>EvitaXL</strong> for starting<br />
ventilation, see page 47.<br />
Selecting Standby Mode<br />
Instructions for Use <strong>EvitaXL</strong> 119<br />
➀<br />
202
Selecting Standby Mode<br />
Terminating Standby Mode<br />
Terminating Standby Mode<br />
— To continue ventilation.<br />
● Press the key »O Start/Standby«.<br />
<strong>EvitaXL</strong> starts ventilation.<br />
Or<br />
● Touch the screen key »Start«, the key<br />
turns yellow.<br />
● Check the settings.<br />
● Confirm = press rotary knob, the<br />
menu disappears and is replaced<br />
by the main screen. <strong>EvitaXL</strong> starts<br />
ventilation.<br />
120 Instructions for Use <strong>EvitaXL</strong><br />
145
O2 Therapy (optional)<br />
During the O2 Therapy, the monitoring functions of <strong>EvitaXL</strong> are<br />
restricted. Monitoring of SpO2 and the pulse frequency is only<br />
available with the appropriate option.<br />
Only use oxygen masks for the O2 Therapy. Do not use<br />
masks for non-invasive ventilation (NIV).<br />
FiO2, SpO2 and the pulse frequency are monitored during<br />
the O2 Therapy.<br />
The airway pressure and expiration-dependent parameters<br />
such as flow, minute volume or apnoea are not<br />
monitored.<br />
Use SpO2 monitoring for patients who are dependent on<br />
an increased defined O2 concentration.<br />
O2 Therapy preparation<br />
The software is installed ready for use by specialists before initial<br />
operation.<br />
Connecting ventilation hoses<br />
Do not use antistatic or conductive hoses*.<br />
Depending on the desired position of the ventilator in relation<br />
to the bed, the hinged arm can be fitted to either side of the<br />
machine.<br />
For adults with Aquapor EL breathing gas humidifier<br />
1 Hang the hinged arm on the rail and tighten the screws.<br />
2 Fit the ventilation hoses for inspiration. Check the hose<br />
lengths (metres).<br />
3 The expiration ports on <strong>EvitaXL</strong> and on the Y-piece<br />
remain open!<br />
4 Fit the water trap in the vertical position.<br />
* DIN VDE 0750 section 215:<br />
The use of anti-static or electrically conductive material in the<br />
breathing system of the lung ventilator is not considered conducive<br />
to greater safety. On the contrary, the use of these materials<br />
increases the danger of electric shock to the patient and of fire due<br />
to the presence of oxygen.<br />
O2 Therapy (optional)<br />
O2 Therapy preparation<br />
Instructions for Use <strong>EvitaXL</strong> 121<br />
3<br />
0.6m<br />
4<br />
0.4m<br />
1<br />
D<br />
0.4m<br />
3<br />
2<br />
<strong>EvitaXL</strong><br />
231
O2 Therapy (optional)<br />
O2 Therapy preparation<br />
For adults or infants with Fisher & Paykel MR 850 breathing<br />
gas humidifier<br />
1 Hang the hinged arm on the rail and tighten the screws.<br />
2 Fit the ventilation hoses for inspiration. Check the hose<br />
lengths (metres).<br />
3 The expiration ports on <strong>EvitaXL</strong> and on the Y-piece<br />
remain open!<br />
● Fit the temperature sensor, see page 27.<br />
● Switch on <strong>EvitaXL</strong>, see page 45.<br />
● Switch <strong>EvitaXL</strong> to standby, see page 119.<br />
● Switch on monitor function, see page 118.<br />
● Set alarm limits, see page 79.<br />
Parameter Setting range<br />
> SpO2 (optional) 51 to 100 %<br />
< SpO2 (optional) 50 to 99 %<br />
> Pulse frequency (optional) 21 to 250 bpm<br />
< Pulse frequency (optional) 20 to 249 bpm<br />
The inspiratory breathing gas temperature has a fixed upper<br />
alarm limit of 40 o C.<br />
The alarm limits for MV, fspn, VTi, PAW, TApnoea are not active.<br />
122 Instructions for Use <strong>EvitaXL</strong><br />
3<br />
1.1m<br />
1<br />
D<br />
3<br />
2<br />
0.4m<br />
<strong>EvitaXL</strong><br />
232
Switching on O2 Therapy<br />
● Touch the screen key »Oxygen<br />
Therapy«.<br />
Set O2 and flow<br />
● Touch the appropriate screen knob.<br />
● Adjust to the desired value<br />
= turn rotary knob.<br />
● Confirm setting = press rotary knob.<br />
● Touch screen key »On«,<br />
confirm = press rotary knob.<br />
O2 Therapy is switched on.<br />
<strong>EvitaXL</strong> must only be used under<br />
the supervision of qualified medical<br />
staff, so that help is immediately<br />
available if malfunctions occur or the<br />
patient has insufficient spontaneous<br />
breathing.<br />
Switching off O2 Therapy<br />
● Touch the screen key »Oxygen<br />
Therapy«.<br />
● Touch the screen key »Off«,<br />
confirm = press rotary knob.<br />
O2 Therapy is switched off.<br />
O2 Therapy (optional)<br />
Switching on O2 Therapy<br />
Switching off O2 Therapy<br />
Instructions for Use <strong>EvitaXL</strong> 123<br />
233
124 Instructions for Use <strong>EvitaXL</strong>
Configuration<br />
Configuration . . . . . . . . . . . . . . . . . . . . . . . . . . . . . . . . . . . . . . . . . . . . . . . . . . . . . . . . 126<br />
Specific system settings . . . . . . . . . . . . . . . . . . . . . . . . . . . . . . . . . . . . . . . . . . . . 126<br />
Specific initial therapy values . . . . . . . . . . . . . . . . . . . . . . . . . . . . . . . . . . . . . . . . 137<br />
Instructions for Use <strong>EvitaXL</strong> 125
Configuration<br />
Specific system settings<br />
Configuration<br />
For setting specific parameters for the<br />
system or therapy. These initial (default)<br />
values are effective when the ventilator is<br />
switched on.<br />
Specific system settings<br />
● Press the key » System Setup«.<br />
<strong>EvitaXL</strong> displays the menu »System<br />
Setup«.<br />
The »System« menu is displayed<br />
automatically with an overview of the<br />
parameters which can be set as initial<br />
values.<br />
Adjust the alarm volume<br />
● Press the key » System Setup«.<br />
● Touch the screen key »Sound, Day/<br />
Night«.<br />
The <strong>EvitaXL</strong> displays the menu for<br />
adjusting the volume and the day/<br />
night screen brightness.<br />
● Touch the screen key on the »Alarm<br />
Volume« line.<br />
● Set the volume = turn rotary knob,<br />
confirm = press rotary knob.<br />
Adjust volume of the acoustic alarm<br />
so that an alarm cannot be overheard!<br />
126 Instructions for Use <strong>EvitaXL</strong><br />
147<br />
148
Day/night function for screen<br />
brightness<br />
● Press the key » System Setup«.<br />
● Touch the screen key »Sound, Day/<br />
Night«.<br />
Two options are available: »Day« for<br />
good contrast and bright colours and<br />
»Night« for reduced screen brightness.<br />
● Touch the screen key »Day« or<br />
»Night«, the selected key turns green<br />
and the corresponding option is<br />
effective.<br />
Display curves, loops, trends<br />
● Press the key » System Setup«.<br />
● Touch the screen key »Screen«.<br />
<strong>EvitaXL</strong> displays the menu »System<br />
Setup«.<br />
● Touch the screen key »Graphics...«.<br />
To select graph 1, 2 or 3:<br />
● Touch the corresponding key in line<br />
»Graphic 1«, »Graphic 2« or<br />
»Graphic 3«. The key turns yellow<br />
and the selection list is displayed.<br />
● Select and confirm the parameter<br />
with the rotary knob.<br />
Configuration<br />
Specific system settings<br />
Instructions for Use <strong>EvitaXL</strong> 127<br />
148<br />
149
Configuration<br />
Specific system settings<br />
Define initial measured values<br />
● Press the key » System Setup«.<br />
● Touch the screen key »Screen«.<br />
● Touch the screen key »Values...«.<br />
<strong>EvitaXL</strong> displays the menu for compiling<br />
the selection of essential measured values<br />
and their effective alarm limits.<br />
The screen keys are arranged in the<br />
same order as the numerical values on<br />
the main screen.<br />
Three sets with six values each can be<br />
combined.<br />
For specific selection of the three sets:<br />
● Touch the screen key for the line concerned<br />
in the relevant option<br />
( Group 1, Group 2 or<br />
Group 3). The key turns yellow.<br />
An additional menu is displayed:<br />
— For selecting one or two parameters.<br />
— For selecting any parameter.<br />
● Select one or two parameters per line<br />
= touch screen key »1 Value« or<br />
»2 Values«.<br />
● Select parameter from the list<br />
= turn rotary knob, confirm = press<br />
rotary knob.<br />
128 Instructions for Use <strong>EvitaXL</strong><br />
151<br />
181
Define the trends to be recorded<br />
● Press the key » System Setup«.<br />
● Touch the screen key »Screen«.<br />
● Touch the screen key »Trends...«.<br />
<strong>EvitaXL</strong> displays the menu for selecting<br />
the measured values for the trend display.<br />
Up to eight measured values can<br />
be selected, depending on the options<br />
available. Only the selected measured<br />
values are saved as a trend.<br />
Touch the screen key for the first measured<br />
value. The key turns yellow and the<br />
selection list is displayed.<br />
● Select and confirm with the<br />
rotary knob.<br />
Configuration<br />
Specific system settings<br />
Instructions for Use <strong>EvitaXL</strong> 129<br />
152
Configuration<br />
Specific system settings<br />
Screen function key assignment<br />
Seven additional on-screen function<br />
keys can be defined for accessing a<br />
function directly instead of via a menu.<br />
● Press the key » System Setup«.<br />
● Touch the screen key »Screen«.<br />
● Touch the screen key »Function<br />
Keys ...«.<br />
<strong>EvitaXL</strong> displays the menu for defining<br />
seven additional function keys.<br />
● Touch the new key to be defined,<br />
it turns yellow. A selection list is<br />
displayed alongside the keys.<br />
● Select and confirm with the<br />
rotary knob.<br />
130 Instructions for Use <strong>EvitaXL</strong><br />
153<br />
182
Define customised values and<br />
settings<br />
● Press the key » System Setup«.<br />
● Touch the screen key »Screen«.<br />
● Touch the screen key »Custom.<br />
Data…«.<br />
● Touch the screen key »Measured<br />
Values«.<br />
<strong>EvitaXL</strong> first displays the menu for compiling<br />
the customised table of measured<br />
values.<br />
Up to 18 measured values can be compiled.<br />
The screen keys reflect the position<br />
and order of the measured values in<br />
the customised table.<br />
● Touch each successive screen key.<br />
It turns yellow and a selection list<br />
appears beside the keys.<br />
● Select and confirm with the<br />
rotary knob.<br />
To configure the settings:<br />
● Touch the screen key »Settings«.<br />
The unit displays a table with max.<br />
15 settings.<br />
● Configure the settings as described<br />
above for the measured values.<br />
Configuration<br />
Specific system settings<br />
Instructions for Use <strong>EvitaXL</strong> 131<br />
154<br />
155
Configuration<br />
Specific system settings<br />
Screen configurations<br />
The following areas of the screen configuration<br />
are stored:<br />
— Curves, loops, trends or short trends<br />
displayed on the main screen<br />
— 3 sets of measured values<br />
— Function keys<br />
— Customised data table<br />
Changes in the configuration of the<br />
trends have an effect on the trends<br />
stored in the screen configuration.<br />
6 different screen configurations are<br />
available.<br />
Works setting for the screen configuration,<br />
see page 229.<br />
Display screen configuration<br />
On the main screen:<br />
● Touch the screen key » 1 « until the<br />
required screen configuration is displayed.<br />
Fast changeover to the required screen<br />
configuration:<br />
● Touch the screen key » 1 « several<br />
times until the required screen configuration<br />
is displayed.<br />
Set screen configuration<br />
● Press the key » System Setup«.<br />
● Touch the screen key »Screen«.<br />
● Touch the screen key »View...«.<br />
Save the current screen configuration<br />
● Touch the screen key » «.<br />
● Confirm = press rotary knob.<br />
Or on the main screen:<br />
● Keep the screen key » 1<br />
«<br />
●<br />
depressed for 3 seconds, the key<br />
turns yellow.<br />
Select and confirm a memory location<br />
with the rotary knob.<br />
132 Instructions for Use <strong>EvitaXL</strong><br />
230
Lock the screen configuration against<br />
overwriting<br />
● Touch the screen key » «.<br />
1 The symbol » « appears next to the<br />
display of the locked screen configuration.<br />
● To deactivate the lock = touch the<br />
screen key » «.<br />
Masking out the screen configuration<br />
● Touch the screen key » «.<br />
The screen configuration which has<br />
been masked out is not displayed in the<br />
selection.<br />
If the screen configuration set at the<br />
works is to be displayed:<br />
● Touch the screen key<br />
»Dräger Default«.<br />
Configuration<br />
Specific system settings<br />
● Confirm = press rotary knob. 230<br />
Instructions for Use <strong>EvitaXL</strong> 133<br />
➀
Configuration<br />
Specific system settings<br />
Lock direct access to settings<br />
This function is used to prevent parameter<br />
settings being changed directly via<br />
the row of screen knobs.<br />
They can still be adjusted via the key<br />
» Ventilator Settings«.<br />
● Press the key » System Setup«.<br />
● Touch the screen key »Screen«.<br />
● Touch the screen key »Lock...«.<br />
● Touch the screen key » «.<br />
The symbol » « appears at the bottom<br />
of the main screen in the row of<br />
screen knobs.<br />
● To deactivate the lock = touch the<br />
screen key » «.<br />
Select display language<br />
The following languages can be<br />
selected:<br />
German Italian<br />
English Swedish<br />
US English Dutch<br />
French Russian<br />
Spanish Chinese<br />
Portuguese<br />
<strong>EvitaXL</strong> is factory set to the customer's<br />
own language.<br />
To select a different language:<br />
● Press the key » System Setup«.<br />
● Touch the screen key » Country«.<br />
The current language is displayed in the<br />
field »Language«.<br />
● Touch the screen key »l« and a<br />
selection list is displayed.<br />
● Select and confirm the new language<br />
with the rotary knob.<br />
134 Instructions for Use <strong>EvitaXL</strong><br />
156<br />
157
Select units<br />
Specific national units can be selected<br />
for the physical parameters pressure,<br />
temperature and CO2.<br />
● Press the key » System Setup«.<br />
● Touch the screen key » Country«.<br />
The current units are displayed in the<br />
field »Units«.<br />
● Touch the screen key for the corresponding<br />
unit.<br />
● Select and confirm the unit with the<br />
rotary knob.<br />
Select date and time<br />
● Press the key » System Setup«.<br />
● Touch the screen key » Country«.<br />
The current date and time are displayed<br />
in the fields »Date« and »Time«.<br />
● Touch the screen key.<br />
● Set and confirm with the rotary knob.<br />
Configuration<br />
Specific system settings<br />
Instructions for Use <strong>EvitaXL</strong> 135<br />
158<br />
158
Configuration<br />
Specific system settings<br />
Set interface<br />
● Press the key » System Setup«.<br />
● Touch the screen key »Interface«.<br />
The interface parameters are displayed<br />
in the field »COM 1«.<br />
● Touch the screen key for the required<br />
interface parameter.<br />
● Set and confirm with the rotary knob.<br />
Service Diagnosis<br />
To display the operating status of the<br />
internal function elements.<br />
Only available to authorised personnel<br />
with corresponding password.<br />
136 Instructions for Use <strong>EvitaXL</strong><br />
159
Specific initial therapy values<br />
● Press the key » System Setup«.<br />
● Touch the screen key »Therapy«.<br />
<strong>EvitaXL</strong> displays the menu »System<br />
Setup« with an overview of the specific<br />
therapy parameters which can<br />
be set as initial values.<br />
Set patient range<br />
In the menu »System Setup«,<br />
»Therapy«.<br />
● Touch the screen key »Patient<br />
Range« and enter the<br />
access code 3032.<br />
● The numerals must be touched in the<br />
correct order.<br />
<strong>EvitaXL</strong> displays the menu for setting the<br />
patient mode effective when the ventilator<br />
is switched on.<br />
<strong>EvitaXL</strong> displays the last patient<br />
mode set.<br />
"Adults or Pediatrics" is set as default.<br />
● Touch the screen key »l« and a<br />
selection list is displayed.<br />
● Select and confirm a patient mode<br />
with the rotary knob.<br />
Configuration<br />
Specific initial therapy values<br />
Instructions for Use <strong>EvitaXL</strong> 137<br />
160<br />
161
Configuration<br />
Specific initial therapy values<br />
Select start-up value for ventilation<br />
mode<br />
● Press the key » System Setup«.<br />
● Touch the screen key »Therapy«.<br />
● Touch the screen key<br />
»Mode & Settings« and enter the<br />
access code 3032.<br />
<strong>EvitaXL</strong> first displays an overview of<br />
the configurable parameters.<br />
● Touch the screen key »Modes...«.<br />
Four ventilation modes are displayed in<br />
the line »Modes«.<br />
The "Startup" key on the left shows the<br />
mode effective on starting and is followed<br />
by three keys for other ventilation<br />
modes.<br />
To select the initial ventilation mode:<br />
● Touch the screen key marked<br />
"Startup".<br />
<strong>EvitaXL</strong> displays a list of possible<br />
ventilation modes.<br />
● Select and confirm with the rotary<br />
knob.<br />
Other ventilation modes can be defined<br />
for the remaining three screen keys in<br />
the same way.<br />
138 Instructions for Use <strong>EvitaXL</strong><br />
162
Set initial values for VT and f…<br />
These are set in accordance with the<br />
— patient mode<br />
(adult or paediatric)<br />
— weight.<br />
● Press the key » System Setup«.<br />
● Touch the screen key »Therapy«.<br />
● Touch the screen key<br />
»Mode & Settings« and enter the<br />
access code 3032.<br />
● Touch the screen key »VT, f...«.<br />
VT, f dependent on the weight:<br />
● Touch the screen key »By Weight«.<br />
<strong>EvitaXL</strong> displays the VT, f and Flowtrigger<br />
values for different weights.<br />
In the line »Start-up by weight«:<br />
● Touch the screen key »On« and confirm<br />
with the rotary knob.<br />
Set values:<br />
● Touch the corresponding screen<br />
keys for VT, f and Flowtrigger.<br />
● Set and confirm with the rotary knob.<br />
VT, f dependent on the patient mode:<br />
● Touch the screen key »By Patient«.<br />
<strong>EvitaXL</strong> displays the VT, f and Flowtrigger<br />
values for adults and children.<br />
In the line »Start-up by patient«:<br />
● Touch the screen key »On« and confirm<br />
with the rotary knob.<br />
Set values:<br />
● Touch the corresponding screen<br />
keys for VT, f and Flowtrigger.<br />
● Set and confirm with the rotary knob.<br />
To restore the manufacturer's default<br />
settings:<br />
● Touch the screen key<br />
»Dräger Default«.<br />
● Confirm = press rotary knob.<br />
Configuration<br />
Specific initial therapy values<br />
Instructions for Use <strong>EvitaXL</strong> 139<br />
163<br />
229
Configuration<br />
Specific initial therapy values<br />
Set initial values for O2, I:E, pressure…<br />
● Press the key » System Setup«.<br />
● Touch the screen key »Therapy«.<br />
● Touch the screen key »Mode &<br />
Settings« and enter the access<br />
code 3032.<br />
● Touch the screen key »O2, I:E,<br />
pressure...«<br />
<strong>EvitaXL</strong> displays the values used for<br />
pressure, O2 and I:E.<br />
In the respective lines:<br />
● Touch the corresponding screen key.<br />
● Set and confirm with the rotary knob.<br />
In addition to the ventilation parameters<br />
VT and f, <strong>EvitaXL</strong> also displays a table<br />
with the parameters inspiration time Ti<br />
and Flow derived from the ratio of inspiration<br />
to expiration time I:E.<br />
To restore the manufacturer's default<br />
settings:<br />
● Touch the screen key<br />
»Dräger Default«.<br />
● Confirm = press rotary knob.<br />
140 Instructions for Use <strong>EvitaXL</strong><br />
164
Define start-up values for special functions<br />
To define the following start-up values:<br />
— AutoFlow on/off<br />
— Apnoea ventilation on/off<br />
— Leakage compensation on/off<br />
● Press the key » System Setup«.<br />
● Touch the screen key »Therapy«.<br />
● Touch the screen key<br />
»Mode & Settings« and enter the<br />
access code 3032.<br />
● Touch the screen key »Add.<br />
settings…«.<br />
● Touch the corresponding screen key<br />
to activate or deactivate the respective<br />
special functions.<br />
● Confirm = press rotary knob.<br />
To define the following start-up values:<br />
— Tube compensation (ATC) on/off<br />
— Tube compensation parameters<br />
● Press the key » System Setup«.<br />
● Touch the screen key »Therapy«.<br />
● Touch the screen key<br />
»Mode & Settings« and enter the<br />
access code 3032.<br />
● Touch the screen key »ATC…«.<br />
● Touch the corresponding screen key<br />
to activate or deactivate the respective<br />
special functions.<br />
● Confirm = press rotary knob.<br />
● Touch the corresponding screen key<br />
to set the parameters for automatic<br />
tube compensation.<br />
● Adjust and confirm with the<br />
rotary knob.<br />
Configuration<br />
Specific initial therapy values<br />
Instructions for Use <strong>EvitaXL</strong> 141<br />
165<br />
228
Configuration<br />
Specific initial therapy values<br />
Set start-up alarm limits<br />
● Press the key » System Setup«.<br />
● Touch the screen key »Therapy«.<br />
● Touch the screen key »Alarm Limits«<br />
and enter the access code 3032.<br />
The current start-up alarm limits are displayed.<br />
> = upper alarm limit<br />
< = lower alarm limit<br />
● Touch the corresponding screen key.<br />
● Set and confirm with the rotary knob.<br />
Parameter Setting range Start-up value set by manufacturer<br />
(Dräger Default)<br />
The set values can be entered in the column<br />
"Customised start-up value".<br />
To restore the manufacturer's default settings:<br />
● Touch the screen key<br />
»Dräger Default«.<br />
● Confirm = press rotary knob.<br />
Customised<br />
start-up value<br />
> MV 0.5 to 41 L/min (VT . f) +50 % ....................<br />
PAW 10 to 100 mbar 50 mbar ....................<br />
> VTi 0.03 to 4 L VTi +100 % ....................<br />
> fspn 5 to 120 bpm 50 bpm ....................<br />
> TApnoea 5 to 60 seconds 15 seconds ....................<br />
> etCO2 (optional) 0 to 100 mmHg (0.1 to 15 kPa) 60 mmHg ....................<br />
< etCO2 (optional) 0 to 99 mmHg (0 to 14.9 kPa) 30 mmHg ....................<br />
142 Instructions for Use <strong>EvitaXL</strong><br />
166
Fault — Cause — Remedy<br />
Fault – Cause – Remedy . . . . . . . . . . . . . . . . . . . . . . . . . . . . . . . . . . . . . . . . . . . . . . 144<br />
Instructions for Use <strong>EvitaXL</strong> 143
Fault – Cause – Remedy<br />
Fault – Cause – Remedy<br />
<strong>EvitaXL</strong> shows alarm messages in hierarchical order in the<br />
alarm display field.<br />
If two faults are detected at the same time, for example, the<br />
more critical of the two will be displayed.<br />
The priority of the alarm messages is indicated by exclamation<br />
marks:<br />
!!! = Alarm: Top priority message<br />
!! = Caution: Medium priority message<br />
! = Advisory: Low priority message<br />
Messages are listed in alphabetical order in the following<br />
table. The table should help to identify and remedy the cause<br />
of an alarm more quickly. The various causes and remedies<br />
should be worked through in the order listed until the problem<br />
has been remedied.<br />
Message Cause Remedy<br />
Air supply down !!! Air supply pressure too low. Make sure supply pressure is greater than<br />
3 bar.<br />
Air supply down ! Air supply pressure too low.<br />
Air supply pressure not required when<br />
FiO2 = 100 Vol. %.<br />
Make sure supply pressure is greater than<br />
3 bar.<br />
Air supply pressure high !! Air supply pressure too high. Make sure supply pressure is less than<br />
6 bar.<br />
Air supply pressure high ! Air supply pressure too high.<br />
Air supply not required for<br />
FiO2 = 100 Vol.%.<br />
Airway obstructed? !!! The ventilator applies only a very small<br />
volume with each mechanical stroke,<br />
e.g. because the tube is blocked.<br />
Patient "fights" against the mechanical<br />
strokes in pressure-controlled ventilation,<br />
with the result that the set inspiratory<br />
pressure is reached with only a very small<br />
volume.<br />
Airway pressure high !!! The upper alarm limit for the airway<br />
pressure has been exceeded. The patient<br />
is "fighting" the ventilator or coughing.<br />
Make sure supply pressure is less than<br />
6 bar.<br />
Check condition of patient, check tube.<br />
Check condition of patient,<br />
check ventilator settings.<br />
Check patient condition.<br />
Check ventilation pattern.<br />
Correct alarm limits if necessary.<br />
Ventilation hose buckled. Check hose system and tube.<br />
Airway pressure low !!! Leaking cuff? Inflate cuff and check for leaks.<br />
Leak or disconnection. Check hose system for tight connections.<br />
Check that the expiration valve is properly<br />
engaged.<br />
Ambient pressure sensor? !! Ambient pressure sensor faulty. Note: The ventilator functions are not<br />
affected. Device can not be used in<br />
helicopters or aircraft.<br />
Call DrägerService.<br />
144 Instructions for Use <strong>EvitaXL</strong>
Message Cause Remedy<br />
Apnoea !!! Patient´s spontaneous breathing has<br />
stopped.<br />
Fault – Cause – Remedy<br />
Check condition of patient, if necessary<br />
apply controlled ventilation.<br />
Stenosis Check condition of patient.<br />
Check tube.<br />
Check hose system.<br />
Flow sensor not calibrated or faulty. Calibrate flow sensor.<br />
Replace if necessary.<br />
Apnoea alarm off ! Apnoea monitoring has been switched<br />
off in application mode NIV.<br />
Apnoea monitoring is not active when<br />
nebulising without flow monitoring.<br />
Apnoea ventilation !! Due to detected apnoea, the system has<br />
automatically switched over to mandatory<br />
ventilation.<br />
ASB > 4 s<br />
Not displayed in application<br />
mode »Mask/NIV«<br />
!!! The ASB phase was terminated<br />
3 consecutive times after 4 seconds.<br />
Set the upper alarm limit for apnoea<br />
monitoring to the required value again.<br />
Use external monitoring or switch on flow<br />
monitoring or stop nebulising.<br />
Check ventilation procedure. Return to the<br />
original ventilation mode by pressing the<br />
»Alarm Reset« key and confirm.<br />
Check condition of patient. Check tube.<br />
Test ventilation system for leaks.<br />
ASB > 1.5 s ! The ASB phase was terminated<br />
3 consecutive times after 1.5 seconds.<br />
Test ventilation system for leaks.<br />
ASB > Tinsp ! The ASB phase was terminated by a time<br />
limitation.<br />
Test ventilation system for leaks.<br />
Back-up ventilation !!! Tube blocked. Check tube.<br />
Breathing cycle not detected !!! The device does not deliver any gas. Set Pmax higher than PEEP setting.<br />
Extend alarm time TApnoea > or increase<br />
IPPV frequency.<br />
Device faulty. Disconnect patient from the device and<br />
continue ventilation without delay, using<br />
another independent ventilator.<br />
Call DrägerService.<br />
Check frequency ILV Slave<br />
Message on slave device<br />
! The frequency (breathing rate) of the<br />
master and slave device differs by more<br />
than 12 %.<br />
Check settings !! Power interruption while setting ventilation<br />
pattern or the alarm limits.<br />
Adjust the frequency of the slave device to<br />
that of the master device.<br />
Check pattern of ventilation and alarm<br />
limits. Acknowledge message by pressing<br />
»Alarm Reset« key and confirm.<br />
Clean CO2 cuvette !!! Cuvette window for the CO2 measurement<br />
is dirty.<br />
Use clean cuvette.<br />
Sensor window for the CO2 measurement<br />
is dirty.<br />
Clean CO2 sensor.<br />
CO2 measurement inop. !!! CO2 sensor faulty. Replace faulty CO2 sensor.<br />
CO2 measurement incorrect. The ventilator functions are not affected.<br />
Ensure adequate external monitoring<br />
without delay. Deactivate the internal<br />
CO2 monitoring.<br />
Call DrägerService.<br />
Instructions for Use <strong>EvitaXL</strong> 145
Fault – Cause – Remedy<br />
Message Cause Remedy<br />
CO2 monitoring off ! CO2 monitoring is switched off. Switch CO2 monitoring on again<br />
(page 118) or use adequate external<br />
monitoring if necessary.<br />
CO2 sensor? !!! Probe of CO2 sensor for the<br />
CO2 measurement was removed during<br />
operation.<br />
Reinsert probe.<br />
CO2 sensor for the CO2 measurement not<br />
positioned on cuvette.<br />
Place CO2 sensor on cuvette.<br />
CO2 sensor for the CO2 measurement<br />
defective.<br />
Replace defective CO2 sensor.<br />
CO2 zero? !!! Zero point for the CO2 measurement is<br />
outside the permissible tolerance.<br />
Perform zero calibration, page 111.<br />
Zero calibration for the CO2 measurement<br />
unsuccessful.<br />
Perform zero calibration correctly.<br />
Device failure !!! Device faulty. Ventilation can be continued if the<br />
message disappears when the<br />
»Alarm Reset« key is pressed.<br />
If it does not: disconnect the patient from<br />
the device and continue ventilation<br />
immediately with another independent<br />
ventilator.<br />
Call DrägerService.<br />
etCO2 high !!! Upper alarm limit for end-expiratory<br />
CO2 concentration in CO2 measurement<br />
has been exceeded.<br />
etCO2 low !!! Lower alarm limit for end-expiratory<br />
CO2 concentration in CO2 measurement<br />
has been exceeded.<br />
Evita Remote? ! The remote control pad was not<br />
recognised by the device.<br />
Evita Remote inop. ! Key pressed on "Remote Pad" during<br />
selftest.<br />
Check condition of patient,<br />
check ventilation pattern,<br />
correct alarm limit if neccessary.<br />
Perform CO2 zero if applicable.<br />
Check condition of patient,<br />
check ventilation pattern,<br />
correct alarm limit if neccessary.<br />
Perform CO2 zero if applicable.<br />
Remove Remote Pad.<br />
Acknowledge message by pressing<br />
»Alarm Reset« key and confirm. Note: The<br />
ventilator functions of the device are not<br />
affected.<br />
Call DrägerService.<br />
Acknowledge message by pressing<br />
»Alarm Reset« key and confirm. Remove<br />
Remote Pad and reconnect. Ensure that<br />
no key is pressed on the Remote Pad<br />
during self-test.<br />
Remote control pad faulty. Acknowledge message by pressing<br />
»Alarm Reset« key and confirm. Remove<br />
Remote Pad. The ventilator functions of<br />
the device are not affected.<br />
Call DrägerService.<br />
Execute device check !! Device check not performed. Perform equipment check, page 34.<br />
Acknowledge message by pressing<br />
»Alarm Reset« key and confirm.<br />
146 Instructions for Use <strong>EvitaXL</strong>
Message Cause Remedy<br />
Exp. hold interrupted ! The »Exp. hold« key was activated for<br />
longer than 15 seconds.<br />
Exp. valve faulty !!! Expiration valve not properly connected to<br />
socket.<br />
Ext. battery –<br />
Voltage high<br />
Release »Exp. hold« key.<br />
Fault – Cause – Remedy<br />
Push expiration valve firmly into socket<br />
until it clicks into place.<br />
Flow sensor not calibrated or defective. Calibrate flow sensor, (page 106)<br />
replace if necessary.<br />
Expiration valve faulty. Replace expiration valve.<br />
! External battery has been connected with<br />
excessively high voltage when using DC.<br />
Ext. battery polarity reversed ! External battery has been connected with<br />
wrong polarity when using DC.<br />
External Flow ! <strong>EvitaXL</strong> monitors the externally supplied<br />
flow when external flow measurement is<br />
activated.<br />
Fan failure? !!! Temperature in machine is too high.<br />
Fan failure?<br />
Connect a 12 V or 24 V battery.<br />
Connect the external battery correctly,<br />
see page 173.<br />
Deactivate calculation of external flow,<br />
see page 107.<br />
Check fan function, clean or replace<br />
cooling air filter. Check ambient air<br />
temperature.<br />
Disconnect patient from the device and<br />
continue ventilation immediately with<br />
another independent ventilator.<br />
Call DrägerService.<br />
Fan malfunction ! Temperature in machine is too high. Check fan function, clean or replace<br />
cooling air filter. Check ambient air<br />
temperature. Ventilation with the device<br />
can be continued.<br />
Call DrägerService.<br />
FiO2 high !!! O2 sensor not calibrated. Calibrate O2 sensor, page 109.<br />
Faulty mixer function. The ventilation functions are not affected.<br />
If ventilation shall be continued:<br />
use external O2 monitoring and switch off<br />
the built-in O2 monitoring.<br />
Call DrägerService.<br />
FiO2 low !!! O2 sensors not calibrated. Calibrate O2 sensor, page 109.<br />
Faulty mixer function. The ventilation functions are not affected.<br />
If ventilation shall be continued:<br />
use external O2 monitoring and switch off<br />
the built-in O2 monitoring.<br />
Call DrägerService.<br />
Flow measurement inop. !!! Water in flow sensor. Dry flow sensor.<br />
Flow sensor or flow measurement faulty. Calibrate flow sensor (page 106),<br />
replace if necessary.<br />
Flow measurement malfunction. The ventilator functions are not affected.<br />
If ventilation shall be continued:<br />
use external flow monitoring and<br />
deactivate the integrated flow monitoring.<br />
Call DrägerService.<br />
Flow monitoring off ! Flow monitoring is switched off. Switch flow monitoring on again page 118<br />
or immediately ensure an adequate<br />
external monitor function.<br />
Instructions for Use <strong>EvitaXL</strong> 147
Fault – Cause – Remedy<br />
Message Cause Remedy<br />
Flow Sensor? !!! Flow sensor not fully inserted in rubber lip<br />
of expiration valve.<br />
Hose kinked !! The pressure at the inspiratory port is<br />
greater than 30 mbar, e.g. due to a kinked<br />
or blocked hose, or a blocked patient<br />
mask.<br />
High frequency !!! Patient is breathing at a high spontaneous<br />
frequency.<br />
ILV sync. inop.<br />
Message on both devices<br />
Insert flow sensor correctly.<br />
Check patient hoses, check patient mask.<br />
Check condition of patient.<br />
Check pattern of ventilation or<br />
spontaneous breathing frequency.<br />
Check hose system for water (auto<br />
triggering).<br />
Correct alarm limit if neccessary.<br />
!!! Frequency on master device less than<br />
4 breaths per minute.<br />
Set a higher frequency.<br />
Fault in communication between the units. The ventilator functions are not affected,<br />
but there is no communication between<br />
the two units. Replace ventilator to<br />
continue use of ILV.<br />
Call DrägerService.<br />
Insp. hold interrupted ! The »Insp. hold« key was operated for<br />
longer than 15 seconds.<br />
Int. battery discharged !!! The ventilator is being powered by DC<br />
integrated battery due to the absence of<br />
mains power and an external battery. The<br />
time for operation with power from the<br />
integrated battery has expired.<br />
Int. battery in operation ! The ventilator is being powered by DC<br />
integrated battery due to the absence of<br />
mains power and an external battery.<br />
The maximum remaining time from the<br />
integrated battery is 10 minutes.<br />
Int. battery only 2 minutes<br />
left<br />
!! The ventilator is being powered by DC<br />
integrated battery due to the absence of<br />
mains power and an external battery. The<br />
maximum remaining time from the<br />
integrated battery is 2 minutes.<br />
Key O2 Y suction overused? !! Key has been pressed frequently in a short<br />
period of time.<br />
Key overused? !! Due to frequent key use, the screen<br />
contents of the display are repeatedly<br />
redrawn.<br />
Brief communication failure between<br />
display processor and main processor.<br />
Release »Insp. hold« key.<br />
Connect ventilator immediately to mains<br />
power supply or to a fully charged external<br />
battery.<br />
Connect ventilator to the mains power<br />
supply or to a fully charged battery within<br />
10 minutes.<br />
Connect ventilator to the mains power<br />
supply or to a fully charged battery within<br />
2 minutes.<br />
Acknowledge message by pressing<br />
»Alarm Reset« key and confirm. If this<br />
message appears repeatedly:<br />
Disconnect patient from the device and<br />
continue ventilation immediately with<br />
another independent ventilator.<br />
Call DrägerService.<br />
Acknowledge message by pressing<br />
»Alarm Reset« key and confirm.<br />
Acknowledge message by pressing<br />
»Alarm Reset« key and confirm. If this<br />
message appears repeatedly:<br />
Disconnect patient from the device and<br />
continue ventilation immediately with<br />
another independent ventilator.<br />
Call DrägerService<br />
148 Instructions for Use <strong>EvitaXL</strong>
Message Cause Remedy<br />
Leakage<br />
Not displayed in application<br />
mode »Mask/NIV«<br />
! The measured minute volume leak MVleak<br />
is 20 % higher than the minute volume<br />
measured on the expiration side.<br />
Fault – Cause – Remedy<br />
Check that the patient hose connection<br />
has no leaks.<br />
Check that the tube is correctly fitted.<br />
Loss of data !!! Lithium battery discharged. The ventilator functions are not affected.<br />
Ventilation can be continued.<br />
Check settings.<br />
Call DrägerService.<br />
MEDIBUS COM. inop. ! The MEDIBUS cable has been unplugged<br />
during operation when using EvitaLink.<br />
Mixer inop. !!! Mixer malfunction.<br />
FiO2 can deviate considerably.<br />
Plug the connector in again and secure it<br />
against disconnection with the two<br />
screws.<br />
MEDIBUS cable defective. Use a new MEDIBUS cable.<br />
Interface defective. Ventilation can be continued.<br />
Call DrägerService.<br />
Multi functional board inop. !! The multi-functional board for operating<br />
the nurse call is faulty.<br />
Multi functional board inop. ! The multi-functional board for operating<br />
the nurse call is faulty.<br />
MV high !!! The expired minute volume has exceeded<br />
the upper alarm limit.<br />
Immediately disconnect the patient from<br />
the device and continue ventilation without<br />
delay using another independent<br />
ventilator.<br />
Call DrägerService.<br />
Acknowledge message by pressing<br />
»Alarm Reset« key and confirm. The<br />
ventilator functions are not affected.<br />
However, correct operation of the nurse<br />
call cannot be guaranteed.<br />
Disconnect nurse call from multi-function<br />
board.<br />
Call DrägerService.<br />
Acknowledge message by pressing<br />
»Alarm Reset« key and confirm. The<br />
ventilator functions are not affected.<br />
However, correct operation of the nurse<br />
call cannot be guaranteed.<br />
Disconnect nurse call from multi-function<br />
board.<br />
Call DrägerService.<br />
Check condition of patient,<br />
check pattern of ventilation,<br />
adjust MV alarm limit if necessary.<br />
Flow sensor not calibrated or faulty. Calibrate flow sensor, page 106 and<br />
replace if necessary.<br />
Water in flow sensor. Drain water trap in hose system.<br />
Dry flow sensor.<br />
Machine malfunction. Disconnect patient from the device and<br />
continue ventilation without delay using<br />
another independent ventilator.<br />
Call DrägerService.<br />
Instructions for Use <strong>EvitaXL</strong> 149
Fault – Cause – Remedy<br />
Message Cause Remedy<br />
MV low !!! The minute volume has fallen below the<br />
lower alarm limit.<br />
Check condition of patient,<br />
check pattern of ventilation,<br />
adjust alarm limit if neccessary.<br />
Stenosis Check condition of patient. Check tube.<br />
Check hose system.<br />
Leak in breathing system Establish leak-free breathing system.<br />
Flow sensor not calibrated or faulty. Calibrate flow sensor (page 106),<br />
replace if necessary.<br />
Machine malfunction. Disconnect patient from the device and<br />
continue ventilation without delay using<br />
another independent ventilator.<br />
Call DrägerService.<br />
MV low alarm off ! Monitoring of the lower alarm limit for<br />
minute volume has been deactivated in<br />
application mode NIV.<br />
Nebuliser on ! The medicament nebuliser is switched on,<br />
page 91.<br />
Nebulisation interrupted !! Nebulisation is only possible in pressurecontrolled<br />
ventilation or with AutoFlow.<br />
Set alarm limit MV < to the required<br />
value again.<br />
Switch off the medicament nebuliser if<br />
necessary, page 91.<br />
Select the patient mode.<br />
Restart neb ulisation.<br />
Acknowledge the alarm with<br />
»Alarm Reset« key and confirm.<br />
Flow sensor not ready for measurement. Switch on flow monitoring or calibrate<br />
sensor or replace flow sensor or change<br />
mode of ventilation.<br />
Restart nebulisation.<br />
Acknowledge the alarm with<br />
»Alarm Reset« key and confirm.<br />
No pulse signal !!! The SpO2 sensor has become displaced. Check that the SpO2 sensor is correctly<br />
fitted.<br />
O2 calibration overused ? !! Key has been pressed frequently in a short<br />
period of time.<br />
Acknowledge message by pressing<br />
»Alarm Reset« key and confirm. If this<br />
message appears repeatedly: Disconnect<br />
patient from the device and continue<br />
ventilation with another independent<br />
ventilator. Call DrägerService.<br />
O2 measurement inop. !!! O2 sensor provides invalid measured Calibrate O2 sensor (page 115),<br />
values.<br />
replace if necessary.<br />
O2 measurement malfunction. Ventilation can be continued:<br />
use external O2 monitoring and deactivate<br />
integrated O2 monitoring.<br />
Call DrägerService.<br />
O2 monitoring off ! O2 monitoring switched off. Switch internal O2 monitoring on again<br />
(page 118) or immediately ensure an<br />
adequate external monitor function.<br />
O2 supply down !!! O2 supply pressure too low. Make sure supply pressure is greater than<br />
3 bar.<br />
O2 supply down ! O2 supply pressure too low.<br />
O2 supply is not required for<br />
FiO2 = 21 Vol.%.<br />
Make sure supply pressure is greater than<br />
3 bar.<br />
150 Instructions for Use <strong>EvitaXL</strong>
Message Cause Remedy<br />
Fault – Cause – Remedy<br />
O2 supply pressure high !! O2 supply pressure too high. Make sure supply pressure is less than<br />
6 bar.<br />
O2 supply pressure high ! O2 supply pressure too high.<br />
O2 supply is not required for<br />
FiO2 = 21 Vol.%.<br />
Make sure supply pressure is less than<br />
6 bar.<br />
O2 Therapy active ! O2 therapy is activated. Switch off O2 therapy. Exit Standby.<br />
PEEP high !!! Expiratory system obstructed. Check hose system and expiration valve.<br />
Check also for condensate.<br />
Expiratory resistance is increasing. Check bacterial filter.<br />
Replace if necessary.<br />
Machine faulty. Disconnect patient from the device and<br />
continue ventilation without delay using<br />
another independent ventilator.<br />
Call DrägerService.<br />
PEEP valve inop. !!! Internal PEEP valve faulty. Disconnect patient from the device and<br />
continue ventilation without delay using<br />
another independent ventilator.<br />
Call DrägerService.<br />
PPS-Insp. > 4 s !!! The inspiration phase during PPS was<br />
terminated 3 consecutive times after<br />
4 seconds.<br />
Check the ventilation system for leaks.<br />
PPS-Insp. > 1,5 s ! The inspiration phase during PPS was<br />
terminated 3 consecutive times after<br />
1.5 seconds.<br />
Check the ventilation system for leaks.<br />
Pressure limited ! Pmax pressure limit is active. Check the condition of the patient.<br />
Check pattern of ventilation.<br />
Correct setting if necessary.<br />
Pressure meas. inop. !!! Fluid in expiration valve. Replace expiration valve (page 158)<br />
then clean and dry.<br />
Pressure measurement malfunction. Disconnect patient from the device and<br />
continue ventilation immediately with<br />
another independent ventilator.<br />
Call DrägerService.<br />
Procedure overused ? !! Total time of procedures has exceeded<br />
15 minutes within the last hour.<br />
Pulse rate high !!! The pulse rate exceeds the upper alarm<br />
limit.<br />
Pulse rate high ! The pulse rate exceeds the upper alarm<br />
limit.<br />
Pulse rate low !!! The pulse rate has fallen below the lower<br />
alarm limit.<br />
Acknowledge message by pressing<br />
»Alarm Reset« key and confirm. If this<br />
message appears repeatedly: Disconnect<br />
patient from the device and continue<br />
ventilation immediately with another<br />
independent ventilator. Call<br />
DrägerService.<br />
Check the condition of the patient.<br />
Check the ventilation pattern.<br />
If necessary, adjust the alarm limit.<br />
Check the condition of the patient.<br />
Check the ventilation pattern.<br />
If necessary, adjust the alarm limit.<br />
Check the condition of the patient.<br />
Check the ventilation pattern.<br />
If necessary, adjust the alarm limit.<br />
Instructions for Use <strong>EvitaXL</strong> 151
Fault – Cause – Remedy<br />
Message Cause Remedy<br />
Pulse rate low ! The pulse rate has fallen below the lower<br />
alarm limit.<br />
Remote Computer Control ! This message is displayed to inform the<br />
user that Evita is being controlled via PC.<br />
Check the condition of the patient.<br />
Check the ventilation pattern.<br />
If necessary, adjust the alarm limit.<br />
Remote control can be interrupted at<br />
any time by pressing the function key<br />
»Remote«.<br />
Rotary knob xx failed !! Key xx can no longer be operated. Disconnect patient from device and<br />
continue ventilation immediately with<br />
another independent ventilator.<br />
Call DrägerService.<br />
Rotary knob xx overused? !! Key has been pressed frequently in a short<br />
period of time.<br />
SpO2 high !!! The SpO2 value exceeds the upper alarm<br />
limit.<br />
SpO2 high ! The SpO2 value exceeds the upper alarm<br />
limit.<br />
SpO2 low !!! The SpO2 value is below the lower alarm<br />
limit.<br />
SpO2 low ! The SpO2 value is below the lower alarm<br />
limit.<br />
Acknowledge message by pressing<br />
»Alarm Reset« key and confirm. If this<br />
message appears repeatedly:<br />
Disconnect patient from the device and<br />
continue ventilation immediately with<br />
another independent ventilator.<br />
Call DrägerService.<br />
Check the condition of the patient.<br />
Check the ventilation pattern.<br />
If necessary, adjust the alarm limit.<br />
Check the condition of the patient.<br />
Check the ventilation pattern.<br />
If necessary, adjust the alarm limit.<br />
Check the condition of the patient.<br />
Check the ventilation pattern.<br />
If necessary, adjust the alarm limit.<br />
Check the condition of the patient.<br />
Check the ventilation pattern.<br />
If necessary, adjust the alarm limit.<br />
SpO2 meas. inop. !!! SpO2 sensor defective. Change sensor.<br />
SpO2 measurement defective. In order to continue ventilating with the<br />
device:<br />
Use external SpO2 monitoring and switch<br />
off the built-in SpO2 monitoring.<br />
Call DrägerService<br />
SpO2 monitoring off ! SpO2 monitoring switched off. Switch SpO2 monitoring on or ensure<br />
adequate external SpO2 monitoring.<br />
SpO2 sensor? !!! The SpO2 sensor was disconnected while<br />
in operation.<br />
Reconnect the sensor.<br />
Test.<br />
Sensor defective. Use a new sensor.<br />
Standby activated !!! <strong>EvitaXL</strong> has been switched to standby. Acknowledge standby with »Alarm Reset«<br />
key and confirm.<br />
Temperature high !!! Breathing gas temperature higher than<br />
40 oC. Switch off humidifier.<br />
Temperature meas. inop. !!! Temperature sensor faulty. Fit new temperature sensor,<br />
see page 27.<br />
Temperature sensor? !!! Temperature sensor probe has been<br />
disconnected during operation.<br />
Reconnect probe.<br />
Sensor cable broken. Fit new temperature sensor.<br />
152 Instructions for Use <strong>EvitaXL</strong>
Message Cause Remedy<br />
Tidal volume high !!! The upper alarm limit of the applied<br />
inspiratory tidal volume VTi has been<br />
exceeded during three consecutive<br />
ventilation strokes.<br />
Tidal volume high ! The upper alarm limit of the applied<br />
inspiratory tidal volume VTi has been<br />
exceeded.<br />
Vol. not const.,<br />
pressure limited<br />
Fault – Cause – Remedy<br />
Check condition of patient.<br />
Check pattern of ventilation.<br />
Correct alarm limit if neccessary.<br />
Leak or disconnection. Check hose system connections for<br />
leakages.<br />
Check condition of patient.<br />
Check pattern of ventilation.<br />
Correct alarm limit if neccessary.<br />
Leak or disconnection. Check hose system connections for<br />
leakages.<br />
!! Due to pressure limit or time limit, the set<br />
tidal volume VT has not been applied.<br />
VTi high alarm off ! The upper alarm limit for the inspiratory<br />
tidal volume VTi > has been deactivated<br />
in application mode NIV.<br />
Prolong inspiratory time »Tinsp«,<br />
increase inspiratory flow »Flow«,<br />
increase pressure limit »Pmax«.<br />
Press the »Alarm Reset« key and confirm<br />
to suppress the visual and acoustic alarms<br />
until the cause of the alarm is remedied.<br />
Set alarm limit VTi > to the required value.<br />
Instructions for Use <strong>EvitaXL</strong> 153
154 Instructions for Use <strong>EvitaXL</strong>
Preparing<br />
Preparing . . . . . . . . . . . . . . . . . . . . . . . . . . . . . . . . . . . . . . . . . . . . . . . . . . . . . . . . . . . . 156<br />
Dismantling . . . . . . . . . . . . . . . . . . . . . . . . . . . . . . . . . . . . . . . . . . . . . . . . . . . . . . . 156<br />
Disinfecting and Cleaning . . . . . . . . . . . . . . . . . . . . . . . . . . . . . . . . . . . . . . . . . . . 159<br />
Care list for the intensive-care ventilator <strong>EvitaXL</strong> . . . . . . . . . . . . . . . . . . . . . . . . 162<br />
Assembling . . . . . . . . . . . . . . . . . . . . . . . . . . . . . . . . . . . . . . . . . . . . . . . . . . . . . . . 163<br />
Before Reusing on Patient . . . . . . . . . . . . . . . . . . . . . . . . . . . . . . . . . . . . . . . . . . 163<br />
Instructions for Use <strong>EvitaXL</strong> 155
Preparing<br />
Dismantling<br />
Preparing<br />
● Note the hospital hygiene regulations!<br />
The ventilator must be cleaned and conditioned after every<br />
patient.<br />
To avoid all risk of infection by hospital staff and other<br />
patients, the ventilator must be disinfected and cleaned<br />
whenever it has been used (protective clothing, eye protection,<br />
etc.).<br />
Dismantling<br />
● Switch off the ventilator and humidifier, and remove their<br />
power plugs.<br />
● Drain the water traps and ventilation hoses.<br />
● Drain the water container of the humidifier.<br />
CO2 sensor (optional)<br />
1 Remove from the cuvette. Unplug the connector from the<br />
back of <strong>EvitaXL</strong>.<br />
2 Remove the cuvette of the CO2 sensor from the Y-piece.<br />
3 Remove the catheter cone from the cuvette.<br />
● Wipe-disinfect the CO2 sensor, see page 160.<br />
● Condition the cuvette in a cleaning and disinfection<br />
machine, see page 161.<br />
Temperature sensor<br />
4 Remove from the Y-piece or from the mounting of hose<br />
set K. Do not pull the cable.<br />
● Unplug the connector from the back of <strong>EvitaXL</strong>.<br />
● Wipe-disinfect the temperature sensor, see page 160.<br />
● The temperature sensor must not be conditioned in a<br />
cleaning and disinfection machine, nor placed in a disinfectant<br />
bath.<br />
Liquid may seep inside the sensor and impair its<br />
functioning!<br />
156 Instructions for Use <strong>EvitaXL</strong><br />
3<br />
4<br />
2<br />
1<br />
049<br />
050
Medicament nebuliser (optional)<br />
1 Remove the nebuliser hose from the nebuliser and from the<br />
port on the device.<br />
2 Remove the medicament nebuliser from the adult hose<br />
system or<br />
2 dismantle the medicament nebuliser from the paediatric<br />
hose system.<br />
3 Remove the catheter connector (ISO cone Ø15/ Ø11)<br />
from the inlet.<br />
4 Remove adapter (ISO cone Ø22/ Ø11) from the outlet.<br />
5 Remove corrugated hose from the adapter.<br />
● Dismantle the medicament nebuliser in accordance with its<br />
specific Instructions for Use.<br />
● The individual parts of the medicament nebuliser and the<br />
adapter parts are conditioned in a cleaning and disinfection<br />
machine, see page 161.<br />
Ventilation hoses<br />
● Remove from the adapters and ports.<br />
● Remove the water traps from the ventilation hoses. Remove<br />
the collecting jars from the water traps.<br />
● Ventilation hoses, water traps and their collecting jars and<br />
the Y-piece are conditioned in a cleaning and disinfection<br />
machine, see page 161.<br />
● Always hold the hoses by the connection sleeve and<br />
not by the spiral ribbing when removing and connecting<br />
the ventilation hoses,<br />
otherwise the spiral ribbing or the hose may be torn off the<br />
sleeve.<br />
Preparing<br />
Dismantling<br />
Instructions for Use <strong>EvitaXL</strong> 157<br />
2<br />
5 4<br />
0.6m<br />
0.6m<br />
0.6m<br />
0.4m<br />
1<br />
2 1<br />
D<br />
0.4m<br />
3<br />
Evita XL<br />
051<br />
052<br />
175<br />
176
Preparing<br />
Dismantling<br />
Flow sensor<br />
● Tilt the control unit upwards, pressing the segments on the<br />
right and left down and at the same time tilting the control<br />
unit into the required position.<br />
1 Push the flow sensor as far as possible to the left and<br />
2 remove it.<br />
● The flow sensor cannot be disinfected/cleaned in a<br />
cleaning and disinfection machine.<br />
● The Spirolog flow sensor must not be sterilised in hot<br />
steam.<br />
It is not resistant to high temperatures and may be<br />
destroyed.<br />
● Disinfect the flow sensor in 70 % ethanol solution for<br />
approx. 1 hour.<br />
● Let the sensor dry in air for at least 30 minutes,<br />
otherwise residual alcohol may damage the sensor during<br />
calibration.<br />
● Sterilise the SpiroLife flow sensor in hot steam at 134 o C.<br />
● The flow sensor can be reused as long as automatic calibration<br />
is possible.<br />
Expiration valve<br />
3 Push the catch to the right<br />
4 while at the same time pulling out the expiration valve.<br />
If the expiration valve has an optional water trap:<br />
● Pull off the collecting jar.<br />
158 Instructions for Use <strong>EvitaXL</strong><br />
1<br />
4<br />
3<br />
2<br />
053<br />
054<br />
055
The expiration valve is only dismantled if severely soiled:<br />
● Unscrew the stopper by hand and remove together with the<br />
diaphragm.<br />
● Do not disassemble the expiration valve any further.<br />
● The expiration valve is conditioned in a cleaning and disinfection<br />
machine, see page 161,<br />
and<br />
● prepare the expiration valve for hot steam sterilisation.<br />
● Place the open expiration valve in the basket so that it cannot<br />
be damaged by other parts.<br />
● Dispose of disposable expiration valves with normal domestic<br />
waste.<br />
Breathing gas humidifier<br />
● Dismantle in accordance with the specific Instructions for<br />
Use and prepare for disinfecting/sterilising.<br />
Disinfecting and Cleaning<br />
Use surface disinfectants. For surface compatibility, use disinfectants<br />
based on:<br />
— aldehydes,<br />
— quaternary ammonium compounds.<br />
To avoid the possibility of damage to material, do not use any<br />
disinfectants based on:<br />
— alkylamine-based compounds,<br />
— phenol-based compounds,<br />
— halogen-releasing compounds,<br />
— strong organic acids,<br />
— oxygen-releasing compounds.<br />
For users in the Federal Republic of Germany, we recommend<br />
that only disinfectants on the current DGHM list are used<br />
(DGHM: German Society for Hygiene and Microbiology).<br />
The DGHM list (published by mhp-Verlag, Wiesbaden, Germany)<br />
also classifies each disinfectant by its active agents.<br />
For countries where the DGHM list is not available, we recommend<br />
the types of disinfectant given above.<br />
Disinfectants often contain – besides their main active agents<br />
– additives that can also damage materials. See page 197 for<br />
a list of the materials used.<br />
● If in doubt, contact the supplier/manufacturer of the disinfectant/cleaning<br />
agent.<br />
● Note the manufacturer's directions for use.<br />
Preparing<br />
Disinfecting and Cleaning<br />
Instructions for Use <strong>EvitaXL</strong> 159<br />
056
Preparing<br />
Disinfecting and Cleaning<br />
To avoid all risk of infection by hospital staff and other<br />
patients, the ventilator must be disinfected and cleaned<br />
whenever it has been used (protective clothing, eye protection,<br />
etc.).<br />
● Do not sterilise parts in ethylene oxide!<br />
Ethylene oxide may diffuse into the parts and cause<br />
damage to health!<br />
The screen is made of Plexiglas.<br />
● Do not treat with alcohol or agents containing alcohol.<br />
Danger of cracking.<br />
Basic device without ventilation hoses, gas connection<br />
hoses<br />
Wipe disinfect<br />
● e.g. with Buraton 10 F or Terralin (Schülke & Mayr,<br />
Norderstedt).<br />
Comply with the manufacturer's instructions.<br />
Temperature sensor<br />
● Wipe disinfect<br />
CO2 sensor and test filter (optional)<br />
● Wipe off dirt with cotton buds, in particular on the windows<br />
of the CO2- sensor.<br />
● Disinfect by wiping, e.g. with 70 % ethanol.<br />
CO2 Cuvette (optional)<br />
Wipe off dirt, particularly inside and outside the windows:<br />
● with disposable tissue and cotton buds, under running<br />
water if necessary.<br />
Then:<br />
● Disinfect with moist heat (93 o C/10 minutes) in a cleaning<br />
and disinfecting machine. Only use cleaning agent.<br />
Or:<br />
● Disinfect in bath of disinfectant based on the listed active<br />
substances, e.g. Cidex, Johnson & Johnson, Norderstedt.<br />
Or:<br />
● Steam-sterilise at 134 o C.<br />
160 Instructions for Use <strong>EvitaXL</strong>
As for ventilation hoses, water traps and associated jars,<br />
Y-piece, expiration valve (or, in the event of severe soiling,<br />
their individual parts), individual parts of the medicament<br />
nebuliser and adapter parts<br />
● Disinfect with moist heat (93 oC/10 minutes) in cleaning<br />
and disinfecting machine. Only use cleaning agent.<br />
If a cleaning and disinfection machine is not available:<br />
● Immerse the parts in a disinfectant bath, e.g. with Sekusept<br />
made by Messrs. Henkel.<br />
Comply with the manufacturer's instructions.<br />
● Then rinse with clean water, preferably from a soft water<br />
supply.<br />
● Shake water out thoroughly, and leave the products to dry.<br />
Expiration valve and its individual parts after disinfection<br />
● Rinse thoroughly with clear water, preferably from a soft<br />
water supply. Shake water out thoroughly.<br />
● After rinsing thoroughly, dry expiration valve.<br />
● After drying, sterilise in hot steam at 134 o C, otherwise liquid<br />
may remain in the pressure measuring line and impair<br />
correct functioning.<br />
Ventilation hoses, water traps and associated water jars,<br />
Y-piece, temperature sensor<br />
● These parts can be sterilised in hot steam at 134 o C.<br />
Bacterial filter<br />
● Must be conditioned in accordance with the separate<br />
Instructions for Use.<br />
Humidifier<br />
● Must be conditioned in accordance with the separate<br />
Instructions for Use.<br />
Preparing<br />
Disinfecting and Cleaning<br />
Instructions for Use <strong>EvitaXL</strong> 161<br />
057
Preparing<br />
Care list for the intensive-care ventilator <strong>EvitaXL</strong><br />
Care list for the intensive-care ventilator<br />
<strong>EvitaXL</strong><br />
The following list applies to non-infectious patients.<br />
If the ventilator is used with infectious patients, all parts in<br />
contact with breathing gas must be sterilised in addition to<br />
disinfection and cleaning.<br />
The parts in contact with breathing gas and listed below can<br />
be sterilised in hot steam at 134 o C. Refer to the column<br />
"Sterilise".<br />
The table is merely intended as a approximate guide. The<br />
instructions of the hospital's hygiene officer shall prevail!<br />
What How often How<br />
Components which<br />
can be conditioned<br />
<strong>EvitaXL</strong><br />
basic unit<br />
Trolley<br />
Hinged arm<br />
Compressed gas<br />
hose<br />
Ventilation hoses<br />
Y piece<br />
Water traps<br />
Collecting jars<br />
Recommended<br />
conditioning<br />
intervals<br />
Cleaning and disinfection<br />
machine,<br />
93 o C, 10 minutes<br />
Disinfect and clean Sterilise<br />
Wipe Immerse Hot steam<br />
134 o C,<br />
10 minutes<br />
Per patient no Outside no no<br />
Per patient no Outside no no<br />
Per patient/<br />
weekly<br />
yes no Possible yes<br />
Expiration valve Per patient/<br />
weekly *<br />
yes no Possible yes<br />
Spirolog flow sensor daily no **<br />
Outside Possible **<br />
no<br />
SpiroLife flow sensor daily no **<br />
Outside Possible **<br />
yes<br />
Temperature sensor daily no yes no yes<br />
CO2 sensor (optional) daily no yes ***<br />
no no<br />
Cuvette of the CO2<br />
sensor (optional)<br />
daily yes no yes yes<br />
Test filter for CO2<br />
sensor (optional)<br />
daily no yes *** no no<br />
Humidifier Per patient/weekly In accordance with separate Instructions for Use<br />
Medicament nebuliser<br />
(optional)<br />
Per patient/weekly In accordance with separate Instructions for Use<br />
Bacterial filter In accordance with separate Instructions for Use<br />
* Nebulisation may lead to formation of more extensive deposits necessitating more frequent replacement.<br />
** Special treatment, immerse in a disinfectant bath with 70 % ethanol, see page 158.<br />
*** Wipe-disinfect, e.g. with 70 % ethanol, see page 160.<br />
162 Instructions for Use <strong>EvitaXL</strong>
Assembling<br />
Mounting the expiration valve<br />
● The parts must be entirely dry to prevent malfunctioning.<br />
● Hold stopper by the flange and place diaphragm on the collar<br />
of the stopper. Be careful to fit the diaphragm properly.<br />
● Insert stopper with diaphragm on top into the housing from<br />
below and screw in tightly.<br />
If the expiration valve has an optional water trap:<br />
● Fit the collecting jar.<br />
Medicament nebuliser<br />
● Assemble in accordance with separate Instructions for Use,<br />
see page 92.<br />
Breathing gas humidifier<br />
● Assemble in accordance with separate Instructions for Use.<br />
Installation, see page 26 and page 28.<br />
Before Reusing on Patient<br />
● Assemble machine as described under "Preparing for use"<br />
on page 22.<br />
● Carry out checks to ensure readiness for operation, see<br />
"Device Check" on page 34.<br />
Preparing<br />
Assembling<br />
Before Reusing on Patient<br />
Instructions for Use <strong>EvitaXL</strong> 163<br />
058<br />
059<br />
060
164 Instructions for Use <strong>EvitaXL</strong>
Maintenance/Disposal<br />
Maintenance/Disposal . . . . . . . . . . . . . . . . . . . . . . . . . . . . . . . . . . . . . . . . . . . . . . 166<br />
Replace cooling air filter . . . . . . . . . . . . . . . . . . . . . . . . . . . . . . . . . . . . . . . . . . . . 167<br />
Removing and reinserting ambient air filter . . . . . . . . . . . . . . . . . . . . . . . . . . . . 167<br />
Clean covering grid for heating patient part . . . . . . . . . . . . . . . . . . . . . . . . . . . . 168<br />
Disposal . . . . . . . . . . . . . . . . . . . . . . . . . . . . . . . . . . . . . . . . . . . . . . . . . . . . . . . . . . 168<br />
Instructions for Use <strong>EvitaXL</strong> 165
Maintenance/Disposal<br />
Maintenance/Disposal<br />
Clean and disinfect equipment and/or components before<br />
any maintenance procedures – and before returning for<br />
repair!<br />
O2 sensor Replace sensor capsule in event of display<br />
message:<br />
O2 measurement inop<br />
and if calibration is no longer possible.<br />
Disposal, see page 168.<br />
Ambient air filter and<br />
Cooling air filter<br />
Clean or replace after 4 weeks, see page 167.<br />
Replace after 1 year.<br />
Dispose of with normal domestic waste.<br />
Filters in the compressed gas inlets To be replaced by trained service personnel<br />
every 2 years.<br />
Covering grid for heating patient part Clean after 4 weeks.<br />
Dirt blocks the air inlet and reduces the heating<br />
output.<br />
Lithium battery for data protection To be replaced by trained service personnel<br />
every 2 years.<br />
Disposal, see page 168.<br />
Integrated battery of DC power<br />
supply<br />
Must be serviced in conjunction with halfyearly<br />
inspections. To be replaced by trained<br />
service personnel every two years at the latest.<br />
Check capacity every six months!<br />
Replace battery if necessary.<br />
External battery (optional) Must be serviced in conjunction with halfyearly<br />
inspections.<br />
Check capacity every six months!<br />
Replace battery if necessary.<br />
Clock module To be replaced by trained service personnel<br />
after 6 years.<br />
Pressure reducer To be replaced every 6 years by<br />
DrägerService.<br />
Equipment inspection and service Every 6 months by trained service personnel.<br />
Safety checks (only applies to the<br />
Federal Republic of Germany)<br />
Every 6 months in accordance with Art. 6<br />
MPBetreibV (see "Safety checks" sheet)<br />
166 Instructions for Use <strong>EvitaXL</strong>
Replace cooling air filter<br />
— Clean if soiled or after 4 weeks at the latest.<br />
Replace after 1 year at the latest.<br />
1 Remove cooling air filter from its slot on the back of <strong>EvitaXL</strong>.<br />
● Fit a new cooling air filter or clean the installed filter in warm<br />
soapy water and dry thoroughly.<br />
● Insert the cooling air filter in the mount without creasing.<br />
● The old cooling air filter can be disposed with domestic<br />
waste.<br />
DC power supply MB:<br />
● On the back of <strong>EvitaXL</strong>, undo the two knurled screws securing<br />
the grating over the power supply fan and remove the<br />
grating.<br />
● Remove cooling air filter from its slot.<br />
● Fit a new cooling air filter or clean the installed filter in warm<br />
soapy water and dry thoroughly.<br />
● Insert the cooling air filter in the mount without creasing.<br />
● Refit the grating over the cooling air filter and tighten the<br />
knurled screws by hand.<br />
● The old cooling air filter can be disposed with domestic<br />
waste.<br />
Removing and reinserting ambient air filter<br />
— Clean after 4 weeks.<br />
Replace after 1 year at the latest.<br />
2 If necessary, swivel port to the left.<br />
3 Use coin to loosen screw, and remove protective cover.<br />
4 Remove the ambient air filter from the protective cover.<br />
● Slide the cleaned or new ambient air filter under the tabs.<br />
● Replace protective cover, and tighten screw with a coin.<br />
● Dispose of used ambient air filter with domestic waste.<br />
Replace cooling air filter<br />
Removing and reinserting ambient air filter<br />
Instructions for Use <strong>EvitaXL</strong> 167<br />
2<br />
4<br />
3<br />
1<br />
089<br />
217<br />
061<br />
062
Clean covering grid for heating patient part<br />
Disposal<br />
Clean covering grid for heating patient part<br />
— Clean if soiled or after 4 weeks.<br />
● Remove dirt on the covering grid using a disposable tissue.<br />
Do not let any moisture get into <strong>EvitaXL</strong>!<br />
Disposal<br />
Correct disposal of batteries and O2 sensors<br />
Batteries and O2 sensors:<br />
● do not throw in a fire; risk of explosion!<br />
● do not open using force; risk of corrosion!<br />
● do not re-charge batteries.<br />
The <strong>EvitaXL</strong> battery contains pollutant substances.<br />
In the Federal Republic of Germany:<br />
The user is obliged by the Ordinance governing correct disposal<br />
of batteries to return batteries which contain pollutant<br />
substances either to the manufacturer/sales outlet or to a collection<br />
centre operated by public waste disposal corporations.<br />
The battery installed in <strong>EvitaXL</strong> must therefore be removed by<br />
DrägerService before the apparatus can be disposed of.<br />
The applicable national regulations must be observed in all<br />
other countries.<br />
O2 sensors must be disposed of as special waste:<br />
● Disposal must conform to local waste disposal regulations.<br />
Information may be obtained from the local environmental<br />
and public health authorities and from approved waste disposal<br />
companies.<br />
Correct disposal of <strong>EvitaXL</strong><br />
— at the end of its useful life<br />
● After consulting the relevant waste disposal company, hand<br />
over <strong>EvitaXL</strong> for appropriate disposal.<br />
● Note the applicable statutory regulations.<br />
168 Instructions for Use <strong>EvitaXL</strong>
Mains power/DC power operation<br />
Mains power/DC power operation . . . . . . . . . . . . . . . . . . . . . . . . . . . . . . . . . . . . . 170<br />
Components and definitions . . . . . . . . . . . . . . . . . . . . . . . . . . . . . . . . . . . . . . . . . 170<br />
Use of the power supplies . . . . . . . . . . . . . . . . . . . . . . . . . . . . . . . . . . . . . . . . . . . 171<br />
Operating periods . . . . . . . . . . . . . . . . . . . . . . . . . . . . . . . . . . . . . . . . . . . . . . . . . 171<br />
Charging the batteries . . . . . . . . . . . . . . . . . . . . . . . . . . . . . . . . . . . . . . . . . . . . . . 171<br />
Charging times . . . . . . . . . . . . . . . . . . . . . . . . . . . . . . . . . . . . . . . . . . . . . . . . . . . . 172<br />
Charge indication and battery charge state . . . . . . . . . . . . . . . . . . . . . . . . . . . . 172<br />
Battery maintenance . . . . . . . . . . . . . . . . . . . . . . . . . . . . . . . . . . . . . . . . . . . . . . . . 172<br />
Connecting an external battery . . . . . . . . . . . . . . . . . . . . . . . . . . . . . . . . . . . . . . . 173<br />
Installing external batteries in trolley (EvitaMobil) . . . . . . . . . . . . . . . . . . . . . . . 173<br />
Power supply displays . . . . . . . . . . . . . . . . . . . . . . . . . . . . . . . . . . . . . . . . . . . . . 174<br />
Operation with mains power . . . . . . . . . . . . . . . . . . . . . . . . . . . . . . . . . . . . . . . . . 175<br />
Operation with integrated battery . . . . . . . . . . . . . . . . . . . . . . . . . . . . . . . . . . . . . 175<br />
Operation with external battery (optional) . . . . . . . . . . . . . . . . . . . . . . . . . . . . . . 176<br />
Instructions for Use <strong>EvitaXL</strong> 169
Mains power/DC power operation<br />
Components and definitions<br />
Mains power/DC power operation*<br />
<strong>EvitaXL</strong> contains a DC power supply with integrated battery to<br />
ensure that operation of the ventilator can continue for at least<br />
10 minutes following a power failure (provided that the battery<br />
is fully charged).<br />
The ventilator can be powered from an external battery via this<br />
DC power supply.<br />
Components and definitions<br />
DC power supply FB and DC power supply MB<br />
The DC power supply in <strong>EvitaXL</strong> is available in two versions,<br />
both of which operate in a similar manner:<br />
— DC power supply FB (Fixed Batteries): in this version, the<br />
batteries are located inside the power supply and are only<br />
accessible after removing the power supply.<br />
— DC power supply MB (Movable Batteries): the batteries for<br />
this version are located in a drawer. A filter is installed in<br />
front of the power supply fan.<br />
Whenever reference is made in these Instructions for Use to<br />
the "DC power supply", the information applies equally to both<br />
versions. If the information applies to only one version, the version<br />
concerned is specified by reference to either the "DC<br />
power supply FB" or "DC power supply MB".<br />
Integrated battery<br />
The two 12 V lead-gel batteries integrated into the DC power<br />
supply are always supplied with the DC power supply.<br />
The integrated battery in the DC power supply is only fully<br />
charged after charging for 24 hours.<br />
● The integrated battery in <strong>EvitaXL</strong> must be charged for at<br />
least 24 hours, see "Charging the batteries", page 171.<br />
The integrated battery is intended exclusively for emergency<br />
use and not for normal operation!<br />
It is therefore essential to operate the ventilator with external<br />
battery power or mains power again as soon as possible<br />
after switching over to operation with integrated battery.<br />
* An Evita 4 oder Evita 2 dura unit which has been upgraded with the<br />
<strong>EvitaXL</strong> option can also be operated without the DC option.<br />
External batteries (optional)<br />
Additional rechargeable 12 V or 24 V lead-gel batteries which<br />
are connected to <strong>EvitaXL</strong> via the DC socket. The external batteries<br />
are not supplied with the DC power supply.<br />
It is advisable to use 24 V lead-gel batteries (or two 12 V leadgel<br />
batteries connected in series) with a minimum capacity of<br />
15 Ah. The efficiency of the DC power supply and the associated<br />
duty period is significantly higher when using these batteries<br />
than when using 12 V batteries with comparable<br />
capacity.<br />
The external battery may also take the form of two 12 V leadgel<br />
batteries accommodated in the base of the trolley. Refer to<br />
the Order List for details for purchasing these batteries and<br />
the required connecting lead.<br />
Commercially available rechargeable lead-gel batteries can<br />
also be used. For requirements to be met by the external batteries,<br />
see "Technical data", page 200.<br />
Only use rechargeable batteries!<br />
Disposable batteries may explode during operation with<br />
mains power on account of the charging function of the DC<br />
power supply!<br />
DC socket<br />
Socket on the back of the DC power supply for connecting an<br />
external battery.<br />
This socket is identified as follows:<br />
DC power supply FB: 12 V; 24 V; VDC<br />
DC power supply MB: 12 V/24 V; F200; F30A 80V.<br />
Only use rechargeable batteries!<br />
Disposable batteries may explode during operation with<br />
mains power on account of the charging function of the DC<br />
power supply!<br />
Only external batteries (see page 170) may be connected<br />
to the DC socket and only using the connecting leads<br />
specified in the Order List.<br />
Mains-powered equipment must not be connected to the<br />
DC socket!<br />
Mains power supply (mains power)<br />
AC power supply (= mains power supply) for the ventilator via<br />
the mains connecting cable.<br />
For voltage ranges/characteristics of the mains power, see<br />
"Operating data", page 196.<br />
170 Instructions for Use <strong>EvitaXL</strong>
Use of the power supplies<br />
Operation is possible with either of the following<br />
configurations:<br />
— Integrated battery only, with and without mains<br />
power supply,<br />
— integrated battery and external battery, with and without<br />
mains power supply.<br />
<strong>EvitaXL</strong> draws its electric power from one of the following<br />
sources, in the order of priority listed:<br />
1. Mains power supply<br />
2. External battery<br />
3. Integrated battery<br />
The changeover between these supplies is effected according<br />
to the following rules, without interrupting operation:<br />
— If sufficient mains power is available, this source is always<br />
used.<br />
— If sufficient mains power is not available and a sufficient<br />
voltage is present at the DC socket, <strong>EvitaXL</strong> is powered by<br />
the external battery.<br />
The changeover to external battery power is effected without<br />
an alarm message.<br />
— If sufficient mains power is not available and there is no DC<br />
power available at the DC socket (e.g. external battery discharged<br />
or not connected), <strong>EvitaXL</strong> is powered by the integrated<br />
battery.<br />
In order to make use of as much power as possible, the ventilator<br />
switches back from the integrated battery to the external<br />
battery if it is has been recharged. This function is only<br />
intended for use in emergencies and may lead to total exhaustion<br />
of the battery.<br />
Without delay:<br />
● The switched-on ventilator must be operated with mains<br />
power or a fully charged external battery again.<br />
The integrated battery is not re-charged when operating<br />
with external battery power. The trickle charge merely prevents<br />
the battery from discharging completely!<br />
Operating periods<br />
The periods of operation with integrated or external battery<br />
power depend on the charge and type of batteries connected,<br />
see "Technical Data" on page 200.<br />
Charging the batteries<br />
Mains power/DC power operation<br />
Use of the power supplies<br />
Charging the batteries<br />
When the ventilator is switched on and operated with mains<br />
power, the integrated batteries will be re-charged first and then<br />
the external batteries.<br />
The ventilator may only remain connected to the mains<br />
supply in well ventilated rooms.<br />
Oxyhydrogen gas is generated when charging batteries<br />
and may explode when a sufficient concentration has<br />
accumulated.<br />
Ensure that <strong>EvitaXL</strong> is switched on!<br />
Neither the integrated battery nor the external battery will be<br />
charged if <strong>EvitaXL</strong> is connected to mains power but not<br />
switched on!<br />
Integrated battery<br />
The integrated battery is only recharged when<br />
● the ventilator is being powered by mains power<br />
and<br />
● <strong>EvitaXL</strong> is switched on, see "Switching on", page 45.<br />
It is sufficient when the ventilator is in Standby mode.<br />
The integrated battery is only fully charged after 24 hours.<br />
<strong>EvitaXL</strong> must therefore be switched on and remain connected<br />
to the mains power supply in Standby mode for at<br />
least 24 hours so that the integrated battery can be<br />
charged.<br />
<strong>EvitaXL</strong> switches over to trickle charge when the end of charge<br />
is reached.<br />
External battery<br />
The external battery is only charged when<br />
● the ventilator is being powered by mains power<br />
and<br />
● <strong>EvitaXL</strong> is switched on, see "Switching on", page 45.<br />
and<br />
● the integrated battery has been fully charged.<br />
It is sufficient when the ventilator is in Standby mode.<br />
The voltage of the on-line external battery (12 V or 24 V) is<br />
detected automatically by the DC power supply.<br />
Instructions for Use <strong>EvitaXL</strong> 171
Mains power/DC power operation<br />
Charging times<br />
Battery maintenance<br />
Charging times<br />
The specified charging times apply when batteries are<br />
recharged immediately after a full discharge.<br />
The charging time may be significantly longer if the batteries<br />
have discharged several times in succession without being<br />
fully recharged on mains power in the meantime.<br />
The batteries must be fully operational.<br />
Charge indication and battery charge state<br />
Charging of the integrated and external batteries is interrupted<br />
when the charging current drops to a very low value upon<br />
reaching the end of charge. The battery is considered to be<br />
fully charged and this is indicated by a green battery symbol.<br />
The battery capacity actually available at the end of the charging<br />
process depends, among other things, on the condition of<br />
the battery and on the ambient temperature. The battery<br />
capacity and condition of the battery cannot be determined by<br />
the DC power supply.<br />
The green battery symbol indicates that the battery is fully<br />
charged. Even though the green symbol lights up, the capacity<br />
of old or defective batteries may be so small as to permit operation<br />
of <strong>EvitaXL</strong> for no more than a few minutes.<br />
Sufficient battery capacity is always required.<br />
See "Battery maintenance"!<br />
Battery maintenance<br />
To ensure maximum battery life:<br />
● The battery should always be fully charged and where possible<br />
never left uncharged.<br />
If the DC power supply is not used:<br />
● Connect <strong>EvitaXL</strong> to mains power after not more than one<br />
month and switch it on for at least two hours in order to<br />
recharge the integrated battery.<br />
● Then fully recharge any external batteries which may be<br />
connected.<br />
If the battery is left uncharged for more than one month:<br />
● The integrated and external batteries should be disconnected<br />
from <strong>EvitaXL</strong> by experts in order to reduce spontaneous<br />
discharge by the batteries.<br />
Before reconnecting the integrated and external batteries,<br />
check that their capacity is still adequate. They may have<br />
become exhausted or damaged as a result of prolonged<br />
storage.<br />
Batteries are wear parts. They must be replaced in accordance<br />
with the extent to which they are used.<br />
● Exhaustive discharges should be avoided, as they lead<br />
to premature wear!<br />
Batteries are wear parts. Their capacity must be checked<br />
regularly and the batteries replaced if necessary.<br />
172 Instructions for Use <strong>EvitaXL</strong>
Connecting an external battery<br />
Note requirements to be met by the external battery, see<br />
page 170.<br />
● Connect the external battery using the battery cable in the<br />
battery cable kit (84 11 822).<br />
● Ensure that the battery is connected with correct polarity:<br />
black to –, red to +.<br />
● Plug the connector into the DC socket on the rear of unit.<br />
Mains-powered equipment must not be connected to the<br />
DC socket!<br />
The voltage of the external battery (12 V or 24 V) is detected<br />
automatically by <strong>EvitaXL</strong>.<br />
Installing external batteries in trolley<br />
(EvitaMobil)<br />
Two batteries (18 43 303) and a battery cable from the battery<br />
cable kit (84 11 822) are required for this purpose.<br />
● Note the installation instructions enclosed with the battery<br />
cable kit!<br />
DC power pack FB<br />
Red mark<br />
Mains power/DC power operation<br />
Connecting an external battery<br />
Instructions for Use <strong>EvitaXL</strong> 173<br />
+ –<br />
DC power pack MB<br />
Red mark<br />
+ –<br />
088<br />
218
Mains power/DC power operation<br />
Power supply displays<br />
Power supply displays<br />
The type of power supply is indicated by<br />
<strong>EvitaXL</strong> in the equipment status field at<br />
the bottom right of the screen via symbols<br />
and coloured LEDs.<br />
Display (example):<br />
❍ s : Mains power<br />
❍ J Ext. : External battery<br />
❍ J Int. : Integrated battery<br />
A yellow LED lights up next to the relevant<br />
symbol to indicate the source from<br />
which <strong>EvitaXL</strong> is being powered.<br />
Green LEDs next to the battery symbols<br />
indicate that the battery/batteries is/are<br />
fully charged.<br />
Note the important information in<br />
the section "Charge indication and<br />
battery charge state" on page 172.<br />
174 Instructions for Use <strong>EvitaXL</strong><br />
034
Operation with mains power<br />
The ventilator switches to operation with mains power when<br />
connected to the mains power supply. The integrated battery is<br />
recharged during mains power operation. The external battery<br />
is recharged once the integrated battery is fully charged.<br />
The LED next to the plug symbol s lights up yellow.<br />
If the mains power supply fails, the ventilator automatically<br />
switches over to the external battery.<br />
If an external battery is not available in the event of a power failure,<br />
the ventilator switches over to the integrated battery and<br />
continues operation for at least 10 minutes (provided that the<br />
integrated battery was fully charged).<br />
● The mains power supply must be restored without delay.<br />
To ensure that the battery is always fully charged:<br />
● Connect the ventilator to the mains power supply and<br />
switch it on.<br />
The ventilator may only remain connected to the mains<br />
supply in well ventilated rooms.<br />
Oxyhydrogen gas is generated when charging batteries<br />
and may explode when a sufficient concentration has<br />
accumulated.<br />
● Leave the ventilator in standby mode or start ventilation.<br />
Operation with integrated battery<br />
Mains power/DC power operation<br />
Operation with mains power<br />
Operation with integrated battery<br />
The ventilator immediately switches over to operation with the<br />
integrated battery if the mains power supply fails without an<br />
external battery being connected or if the external battery is<br />
exhausted.<br />
The integrated battery is merely intended for emergency<br />
use and not for normal operation.<br />
The LED next to the symbol for the integrated battery lights up<br />
yellow.<br />
The green LED next to the symbol for the integrated battery<br />
goes out, as it is no longer fully charged.<br />
When <strong>EvitaXL</strong> switches over to the integrated battery, the following<br />
advisory message is displayed:<br />
Int. battery in operation !<br />
The time available for operation with the integrated battery<br />
depends on its charge state. If the battery is fully charged,<br />
operation can continue for at least 10 minutes.<br />
A caution message is displayed after 8 minutes of operation:<br />
Int. battery only 2 minutes left !!<br />
● The ventilator must be reconnected to the mains power supply<br />
within 2 minutes<br />
or<br />
● it must be connected to a fully charged external battery!<br />
After an operating time of 10 minutes has elapsed, the following<br />
alarm message is displayed:<br />
Int. battery discharged !!!<br />
● The power supply must be restored immediately, either<br />
from the mains supply or from a fully charged external battery,<br />
otherwise ventilation will be interrupted.<br />
After being powered by the integrated battery:<br />
● Recharge the integrated and external batteries as soon as<br />
possible, see "Charging the batteries", page 171.<br />
Instructions for Use <strong>EvitaXL</strong> 175
Mains power/DC power operation<br />
Operation with external battery (optional)<br />
Operation with external battery (optional)<br />
Connecting an external battery<br />
If the mains power supply fails, <strong>EvitaXL</strong> immediately switches<br />
over to the on-line external battery.<br />
The LED next to the symbol for external battery lights up<br />
yellow.<br />
The green LED next to the symbol for external battery goes<br />
out, as it is no longer fully charged.<br />
The changeover to external battery power is effected without<br />
an alarm message.<br />
The time available for operation with external battery depends<br />
on the battery charge state and the type of battery connected.<br />
If the external battery is exhausted, <strong>EvitaXL</strong> automatically<br />
switches over to the integrated battery and generates an<br />
alarm.<br />
When the mains power is restored, <strong>EvitaXL</strong> automatically<br />
switches back to operation with mains power.<br />
The integrated battery is not recharged while the ventilator<br />
is being powered by an external battery!<br />
For this reason:<br />
● Recharge the integrated and external batteries as soon as<br />
possible, see "Charging the batteries", page 171.<br />
Mains-powered equipment must not be connected to the<br />
DC socket!<br />
176 Instructions for Use <strong>EvitaXL</strong>
Evita 4 Link (optional)<br />
Evita 4 Link (optional) . . . . . . . . . . . . . . . . . . . . . . . . . . . . . . . . . . . . . . . . . . . . . . . . . 178<br />
Preparation . . . . . . . . . . . . . . . . . . . . . . . . . . . . . . . . . . . . . . . . . . . . . . . . . . . . . . . 179<br />
Instructions for Use <strong>EvitaXL</strong> 177
Evita 4 Link (optional)<br />
Evita 4 Link (optional)<br />
In addition to the standard RS 232 interface COM 1, <strong>EvitaXL</strong><br />
also has two serial RS 232 interfaces, COM 2 and COM 3,<br />
two CAN interfaces and an analogue interface with two<br />
channels.<br />
On both serial interfaces<br />
COM 2 and COM 3, the following can be output (optional):<br />
— The LUST protocol*,<br />
— the MEDIBUS protocol,<br />
— a printer protocol.<br />
The LUST protocol and printer protocol can only be output on<br />
one serial interface, while the MEDIBUS protocol can be output<br />
simultaneously on both serial interfaces.<br />
Other equipment, e.g. printers, may only be connected to<br />
the COM interfaces if <strong>EvitaXL</strong> is connected to the mains<br />
power supply via a mains power cable or if it has been<br />
earthed via the earth connection on the back of <strong>EvitaXL</strong>.<br />
Electric power may pose a hazard in all other cases.<br />
For output of measured values, status messages and alarm<br />
messages to on-line equipment for monitoring, documentation<br />
or processing.<br />
The on-line equipment may be a Dräger device or a device<br />
made by any other manufacturer.<br />
All data transmitted in this way are intended for information<br />
only and must not be used as the sole basis for deciding on a<br />
particular therapy.<br />
The RS 232 interfaces meet the requirements of the standards<br />
"EIA Standard RS 232 C" and "CCITT V.24".<br />
* For a detailed description of the LUST protocol, see "Technical<br />
data, LUST protocol" on page 201.<br />
178 Instructions for Use <strong>EvitaXL</strong>
Preparation<br />
The interface board may only be installed by specialists.<br />
Connect the RS 232 interface<br />
using<br />
MEDIBUS cable 83 06 488 for PC<br />
or<br />
printer cable 83 06 489 – for printer only<br />
or<br />
Monitor cable 57 22 410 – for monitor<br />
1 Plug the connector into the socket »COM 2« or »COM 3« on<br />
the back of <strong>EvitaXL</strong>.<br />
● Plug the other connector into the on-line equipment.<br />
● Secure the connector = tighten the knurled screws.<br />
● Prepare, connect and switch on the on-line device in<br />
accordance with the separate Instructions for Use.<br />
Connect analogue interface<br />
with Evita analogue cable 84 11 759.<br />
2 Plug the connector into the back of <strong>EvitaXL</strong> – »Analogue«<br />
socket.<br />
● Prepare, connect and switch on the on-line device in<br />
accordance with the separate Instructions for Use.<br />
The connected devices must use the same protocol and the<br />
same data transfer format.<br />
<strong>EvitaXL</strong> can use the following interface protocols:<br />
— MEDIBUS (Dräger communication protocol for medical<br />
equipment, high-speed data, e.g. curves)<br />
— LUST (List-controlled universal interface driver program,<br />
only for slow data, e.g. measured values)<br />
— Printers<br />
1 1<br />
Evita 4 Link (optional)<br />
Preparation<br />
Instructions for Use <strong>EvitaXL</strong> 179<br />
2<br />
177<br />
178
Evita 4 Link (optional)<br />
Preparation<br />
Select MEDIBUS protocol<br />
For use of a PC with EvitaView software<br />
or for connecting a MEDIBUS-compatible<br />
monitor.<br />
Refer to the Instructions for Use for<br />
"MEDIBUS for <strong>EvitaXL</strong>"<br />
and<br />
"Dräger RS 232 MEDIBUS protocol definition"<br />
90 28 258 for a detailed description<br />
of the interface protocol.<br />
● Press the key » System Setup«.<br />
● In the menu »System Setup« touch<br />
the screen key »Interface«.<br />
To select COM 1, COM 2 or COM 3 in<br />
the protocol field:<br />
● Touch the screen key.<br />
● Select the Medibus protocol = turn<br />
rotary knob,<br />
confirm = press rotary knob.<br />
● Set the associated parameters Baud<br />
rate, Parity, Stopbit, Interval in the<br />
same way.<br />
Select LUST protocol<br />
For use of a monitor without real-time<br />
curves.<br />
For a detailed description of the interface<br />
protocol, see "Technical data, LUST<br />
protocol" on page 201.<br />
The LUST protocol cannot be configured<br />
simultaneously for COM 2 and<br />
COM 3.<br />
To select COM 2 or COM 3 in the protocol<br />
field:<br />
● Touch the screen key.<br />
● Select the LUST protocol<br />
= turn rotary knob,<br />
confirm = press rotary knob.<br />
● Set the associated parameters Baud<br />
rate, Parity, Stopbit, Interval in the<br />
same way.<br />
180 Instructions for Use <strong>EvitaXL</strong><br />
159<br />
159
Select printer protocol<br />
● See "Set interface" on page 136.<br />
In addition to automatically triggered printouts at predetermined<br />
intervals, printing can also be started manually via the<br />
on-screen function key »Print«, see "Configuration", "Define<br />
function keys", page 130.<br />
Analogue interface<br />
The analogue interface on <strong>EvitaXL</strong> has two channels to which<br />
measured value signals can be assigned as desired.<br />
Characteristics and PIN assignment<br />
See "Technical data", page 198.<br />
External voltages must not be applied here!<br />
Assign channels:<br />
● See "Set interface" on page 136.<br />
Measured<br />
value<br />
signal<br />
Designation Range/voltage<br />
level<br />
PAW Airway pressure –10 to 100 mbar<br />
0 to 4.095 V<br />
Flow Expiratory and inspiratory<br />
flow<br />
V Expiratory and inspiratory<br />
volume<br />
–196 to 196 L/min<br />
0 to 4.095 V<br />
0 to 2 L<br />
0 to 4.095 V<br />
MV Minute volume 0 to 41 L/min<br />
0 to 4.095 V<br />
f Ventilation frequency 0 to 150 bpm<br />
0 to 4.095 V<br />
FiO2 Inspiratory O2 concentration 0 to 100 Vol.%<br />
0 to 4.095 V<br />
R Resistance 0 to 100 mbar/L/s<br />
0 to 4.095 V<br />
C Compliance 0 to 250 mL/mbar<br />
0 to 4.095 V<br />
CO2 Expiratory O2 concentration 0 to 15 kPa<br />
0 to 4.095 V<br />
etCO2 End-expiratory CO2<br />
concentration<br />
0 to 15 kPa<br />
0 to 4.095 V<br />
NO Inspiratory flow for NOdomo 0 to 125 L/min<br />
0 to 4.095 V<br />
Evita 4 Link (optional)<br />
Preparation<br />
Instructions for Use <strong>EvitaXL</strong> 181
182 Instructions for Use <strong>EvitaXL</strong>
What's what<br />
What's what . . . . . . . . . . . . . . . . . . . . . . . . . . . . . . . . . . . . . . . . . . . . . . . . . . . . . . . . . . 184<br />
Control unit . . . . . . . . . . . . . . . . . . . . . . . . . . . . . . . . . . . . . . . . . . . . . . . . . . . . . . . 184<br />
Front connections . . . . . . . . . . . . . . . . . . . . . . . . . . . . . . . . . . . . . . . . . . . . . . . . . . 185<br />
Back panel . . . . . . . . . . . . . . . . . . . . . . . . . . . . . . . . . . . . . . . . . . . . . . . . . . . . . . . . 186<br />
Instructions for Use <strong>EvitaXL</strong> 183
What's what<br />
Control unit<br />
What's what<br />
Control unit<br />
1 »g Alarm Silence« key for suppressing the alarm tone for<br />
2 minutes<br />
2 »_ Alarm Limits« key for setting the alarm limits<br />
3 » Ventilator Settings« key for setting the ventilation<br />
mode and ventilation parameters<br />
4 Unassigned key for future functions<br />
5 » Sensor Parameter« key for calibrating the sensors<br />
and for activating/deactivating monitoring<br />
6 » System Setup« key for configuring the equipment<br />
functions<br />
7 »O Start/Standby« key for changing back and forth<br />
between operation and standby mode<br />
8 Central rotary knob for selecting and confirming settings<br />
9 Touch-sensitive screen for displaying screen setups specific<br />
to the application<br />
9<br />
184 Instructions for Use <strong>EvitaXL</strong><br />
1<br />
2<br />
3<br />
4<br />
5<br />
6<br />
7<br />
8<br />
<strong>EvitaXL</strong>_de_sw.tif
Front connections<br />
1 » « Gas outlet<br />
(EXHAUST – NOT FOR SPIROMETERS)<br />
2 Flow sensor<br />
3 Expiration valve with expiration port (GAS RETURN)<br />
4 Latch for expiration valve<br />
5 Nebuliser connection<br />
6 Inspiration port (GAS OUTPUT)<br />
7 Locking screw for protective cover<br />
(behind it: O2 sensor and ambient air filter)<br />
1 2 3 4 5 6 7<br />
What's what<br />
Front connections<br />
Instructions for Use <strong>EvitaXL</strong> 185<br />
MT1082002.tif
What's what<br />
Back panel<br />
Back panel<br />
17<br />
16<br />
15<br />
14<br />
13<br />
1 Power switch with protective flap<br />
2 »COM 2«, »COM 3« sockets for RS 232,<br />
two CAN interfaces and analogue interface (optional)<br />
3 Connection » « for Remote Pad (optional)<br />
4 Connection » « for nurse call (optional)<br />
5 Cooling air filter<br />
6 »ILV« socket for the connecting cable for<br />
independent lung ventilation with two units<br />
7 Connection for O2<br />
8 Connection for medical air<br />
9 »Temp « socket for temperature sensor<br />
10 »CO2 « socket for CO2 sensor (optional)<br />
1 2 3 4 5<br />
12 11 10 9 8 7<br />
11 »Sync.« socket for C-Lock-ECG synchronisation for<br />
optional SpO2 measurement (optional)<br />
12 »COM 1 RS 232C« socket for RS 232 interface,<br />
e.g. for printer<br />
13 Rating plate (not visible) on the left-hand side panel<br />
14 Mains fuses<br />
15 Connector for power cord<br />
16 DC socket<br />
17 Fan<br />
186 Instructions for Use <strong>EvitaXL</strong><br />
6<br />
Back panel_<strong>EvitaXL</strong>.tif
Technical Data<br />
Technical Data . . . . . . . . . . . . . . . . . . . . . . . . . . . . . . . . . . . . . . . . . . . . . . . . . . . . . . . 188<br />
Ambient conditions . . . . . . . . . . . . . . . . . . . . . . . . . . . . . . . . . . . . . . . . . . . . . . . . . 188<br />
Settings . . . . . . . . . . . . . . . . . . . . . . . . . . . . . . . . . . . . . . . . . . . . . . . . . . . . . . . . . . 188<br />
APRV Airway Pressure Release Ventilation . . . . . . . . . . . . . . . . . . . . . . . . . . . . 189<br />
ATC Automatic Tube Compensation . . . . . . . . . . . . . . . . . . . . . . . . . . . . . . . . . . 189<br />
Breathing Support Package (optional) . . . . . . . . . . . . . . . . . . . . . . . . . . . . . . . . 190<br />
O2 Therapy (optional) . . . . . . . . . . . . . . . . . . . . . . . . . . . . . . . . . . . . . . . . . . . . . . 190<br />
Performance characteristics . . . . . . . . . . . . . . . . . . . . . . . . . . . . . . . . . . . . . . . . . 191<br />
Measured value displays . . . . . . . . . . . . . . . . . . . . . . . . . . . . . . . . . . . . . . . . . . . . 192<br />
Computed value displays . . . . . . . . . . . . . . . . . . . . . . . . . . . . . . . . . . . . . . . . . . . 194<br />
Monitoring . . . . . . . . . . . . . . . . . . . . . . . . . . . . . . . . . . . . . . . . . . . . . . . . . . . . . . . . 195<br />
Operating data . . . . . . . . . . . . . . . . . . . . . . . . . . . . . . . . . . . . . . . . . . . . . . . . . . . . 196<br />
Equipment outputs . . . . . . . . . . . . . . . . . . . . . . . . . . . . . . . . . . . . . . . . . . . . . . . . . 198<br />
DC power supply . . . . . . . . . . . . . . . . . . . . . . . . . . . . . . . . . . . . . . . . . . . . . . . . . . 200<br />
LUST protocol . . . . . . . . . . . . . . . . . . . . . . . . . . . . . . . . . . . . . . . . . . . . . . . . . . . . . 201<br />
Instructions for Use <strong>EvitaXL</strong> 187
Technical Data<br />
Ambient conditions<br />
Settings<br />
Technical Data<br />
Ambient conditions<br />
During operation<br />
Temperature 10 to 40 o C<br />
Atmospheric pressure 700 to 1060 hPa<br />
Rel. humidity 5 to 90 %, without condensation<br />
During storage and transportation<br />
Temperature –20 to 60 o C<br />
Atmospheric pressure 500 to 1060 hPa<br />
Rel. humidity 5 to 95 %, without condensation<br />
Settings<br />
Ventilation frequency f 0 to 100/min<br />
Inspiration time Tinsp<br />
Tidal volume VT<br />
0.1 to 10 s<br />
Paediatrics 0.02 to 0.3 L, BTPS *<br />
Accuracy ±10 % of set value, or ±10 mL,<br />
whichever is greater.<br />
Adults 0.1 to 2.0 L, BTPS*<br />
Accuracy<br />
Inspiratory Flow<br />
±10 % of set value, or ±25 mL,<br />
whichever is greater.<br />
Paediatrics 6 to 30 L/min<br />
Adults 6 to 120 L/min<br />
Inspiratory pressure Pinsp 0 to 95 mbar<br />
Inspiratory pressure limit Pmax 0 to 100 mbar<br />
O2 concentration 21 to 100 Vol.%<br />
Accuracy<br />
Positive end-expiratory pressure PEEP or<br />
±5 % of set value, or ±2 Vol.%,<br />
whichever is greater.<br />
interm. PEEP 0 to 50 mbar<br />
Trigger sensitivity 0.3 to 15 L/min<br />
Pressure assist PASB 0 to 95 mbar<br />
Rise time for pressure assist<br />
Independent lung ventilation ILV<br />
0 to 2 s<br />
Master with trigger/without trigger<br />
Slave synchr./asynchr./inverse I: E<br />
* BTPS<br />
Body Temperature, Pressure, Saturated.<br />
Measured values based on the conditions of the patient's lung:<br />
body temperature 37 o C, steam-saturated gas, ambient pressure.<br />
188 Instructions for Use <strong>EvitaXL</strong>
APRV Airway Pressure Release Ventilation<br />
Inspiration time Thigh<br />
Range 0.1 to 10 s 10 to 30 s<br />
Resolution 0.1 s 1 s<br />
Expiration time Tlow<br />
Range 0.1 to 10 s 10 to 30 s<br />
Resolution 0.05 s 1 s<br />
Inspiration pressure Phigh<br />
Range 0 to 95 mbar<br />
Resolution 1 mbar<br />
Expiration pressure Plow<br />
Range 0 to 50 mbar<br />
Resolution 1 mbar<br />
ATC Automatic Tube Compensation<br />
Adult mode<br />
Inside tube diameter (ID Ø)<br />
Range 5 to 12 mm<br />
Resolution 0.5 mm<br />
Degree of compensation (Comp.)<br />
Range 0 to 100 %<br />
Resolution 1 %<br />
Paediatric mode<br />
Inside tube diameter (ID Ø)<br />
Range 2.5 to 8 mm<br />
Resolution 0.5 mm<br />
Degree of compensation (Comp.)<br />
Range 0 to 100 %<br />
Resolution 1 %<br />
Technical Data<br />
APRV Airway Pressure Release Ventilation<br />
ATC Automatic Tube Compensation<br />
Instructions for Use <strong>EvitaXL</strong> 189
Technical Data<br />
Breathing Support Package (optional)<br />
O2 Therapy (optional)<br />
Breathing Support Package (optional)<br />
Adult mode<br />
Settings for PPS:<br />
Flow Assist (FlowAssist)<br />
Range 0 to 30 mbar/L/s<br />
Resolution 0.5 mbar/L/s<br />
Corresponds to resistance compensation 0 to 30 mbar/L/s<br />
Volume Assist (Vol.Assist)<br />
Range 0 to 25 mbar/L<br />
Resolution 0.1 mbar/L<br />
Range 25 to 100 mbar/L<br />
Resolution 0.5 mbar/L<br />
Corresponds to compliance compensation 10000 to 10 mL/mbar<br />
Paediatric mode<br />
Settings for PPS:<br />
Flow Assist (FlowAssist)<br />
Range 0 to 30 mbar/L/s<br />
Resolution 0.5 mbar/(L/s)<br />
Range 30 to 100 mbar/L/s<br />
Resolution 5 mbar/L/s<br />
Corresponds to resistance compensation 0 to 100 mbar/L/s<br />
Volume Assist (Vol.Assist)<br />
Range 0 to 100 mbar/L<br />
Resolution 1 mbar/L<br />
Range 100 to 1000 mbar/L<br />
Resolution 10 mbar/L<br />
Corresponds to compliance compensation 1000 to 1 mL/mbar<br />
O2 Therapy (optional)<br />
Settings<br />
Continuous Flow 2 to 50 L/min<br />
O2 concentration 21 to 100 Vol.%<br />
Accuracy ±5 % of set value, or ±2 Vol.%,<br />
whichever is greater.<br />
190 Instructions for Use <strong>EvitaXL</strong>
Performance characteristics<br />
Control principle time-cycled, volume-constant, pressure-controlled<br />
Intermittent PEEP frequency 2 cycles every 3 minutes<br />
Medicament nebulisation for 30 minutes<br />
Bronchial suction<br />
Disconnection detection automatic<br />
Reconnection detection automatic<br />
Oxygen enrichment max. 3 minutes<br />
Active suction phase max. 2 minutes<br />
Final oxygen enrichment 2 minutes<br />
Supply system for spontaneous breathing and ASB adaptive CPAP system with high initial flow<br />
max. inspiratory flow 180 L/min<br />
Equipment compliance<br />
— with Aquapor EL humidifier and patient tubing<br />
system for adults
Technical Data<br />
Measured value displays<br />
Measured value displays<br />
Airway pressure measurement<br />
Max. airway pressure Ppeak<br />
Plateau pressure PPlat<br />
Pos. end-exp. pressure PEEP<br />
Mean airway pressure Pmean<br />
Min. airway pressure Pmin<br />
Range –45 to 110 mbar<br />
Resolution 1 mbar<br />
Accuracy 2 % (4 % when displayed in cmH2O)<br />
O2 measurement in main flow (inspiratory side)<br />
Inspiratory O2 concentration FiO2<br />
Range 15 to 100 Vol.%<br />
Resolution 1 Vol.%<br />
Accuracy ±3 Vol.%<br />
Flow Measurement<br />
Minute Volume MV<br />
Spontaneously breathed minute volume MVspn<br />
Range 0 to 120 L/min, BTPS *<br />
Resolution 0.1 L/min, or for values less than 1 L/min: 0.01 L/min<br />
Accuracy ±8 % of measured value<br />
T10...90 approx. 35 s<br />
Tidal volume VTe<br />
Spontaneously breathed tidal volume VTspn<br />
Range 0 to 10 L, BTPS*<br />
Resolution 1 mL<br />
Accuracy ±8 % of measured value<br />
Tidal volume VTASB<br />
Inspiratory tidal volume during an ASB stroke<br />
Range 0 to 10 L, BTPS*<br />
Resolution 1 mL<br />
Accuracy ±8 % of measured value<br />
* BTPS<br />
Body Temperature, Pressure, Saturated.<br />
Measured values based on the conditions of the patient's lung:<br />
body temperature 37 o C, steam-saturated gas, ambient pressure.<br />
192 Instructions for Use <strong>EvitaXL</strong>
Frequency Measurement<br />
Breathing frequency ftotal<br />
Spontaneous breathing frequency fspn<br />
Range 0 to 300/min<br />
Resolution 1/min<br />
Accuracy ±1/min<br />
T10...90 approx. 35 s<br />
Breathing gas temperature measurement<br />
Range 18 to 51 o C<br />
Resolution 1 o C<br />
Accuracy ±1 o C<br />
CO2 measurement in main flow (optional)<br />
End-expiratory CO2 concentration etCO2<br />
Range 0 to 100 mmHg or<br />
0 to 13.3 Vol.% or<br />
0 to 13.3 kPa<br />
Resolution 1 mmHg or<br />
0.1 Vol.% or<br />
0.1 kPa<br />
Accuracy<br />
for 0 to 40 mmHg ±2 mmHg<br />
for 40 to 100 mmHg ±5 % of measured value<br />
T10...90 ≤25 ms<br />
Warm-up time max. 3 minutes<br />
CO2 production *CO2<br />
Range 0 to 999 mL/min, STPD *<br />
Resolution 1 mL/min<br />
Accuracy ±9 % of measured value<br />
T10...90 12 minutes<br />
Serial dead space Vds<br />
Range 0 to 999 mL, BTPS<br />
Resolution 0.1 mL<br />
Accuracy ±10 % of measured value, or ±10 mL,<br />
whichever is greater.<br />
Dead space ventilation Vds/VT<br />
Range 0 to 99 %<br />
Resolution 1 %<br />
Accuracy ±10 % of measured value<br />
* STPD<br />
Standard Temperature, Pressure, Dry.<br />
Measured values based on normal physical conditions: 0 o C, 1013 hPa, dry<br />
Technical Data<br />
Measured value displays<br />
Instructions for Use <strong>EvitaXL</strong> 193
Technical Data<br />
Computed value displays<br />
Computed value displays<br />
Compliance C<br />
Range 0 to 300 mL/mbar<br />
Resolution<br />
Range 0 to 99.9 mL/mbar 0.1 mL/mbar<br />
Range 100 to 300 mL/mbar 1 mL/mbar<br />
Accuracy ±20 % of measured value*<br />
Resistance R<br />
Range 0 to 600 mbar/L/s<br />
Resolution<br />
Range 0 to 99.9 mbar/L/s 0.1 mbar/L/s<br />
Range 100 to 600 mbar/L/s 1 mbar/L/s<br />
Accuracy ±20 % of measured value**<br />
Leakage minute volume MVleak<br />
Range 0 to 99 L/min, BTPS<br />
Resolution 0.1 L/min or for values less than 0.1 L/min: 0.01 L/min<br />
Accuracy ±18 % of measured value<br />
T10...90 approx. 35 s<br />
Rapid Shallow Breathing RSB<br />
Range 0 to 9999 1/(min x L)<br />
Resolution 1/(min x L)<br />
Accuracy see measurement of VT and f<br />
Negative Inspiratory Force NIF<br />
Range –45 to 0 mbar<br />
Resolution 1 mbar<br />
Accuracy ±2 mbar<br />
Curve displays:<br />
Airway pressure PAW (t) –10 to 100 mbar<br />
Flow (t) –200 to 200 L/min<br />
Volume V (t) 0 to 2000 mL<br />
Exp. CO2 concentration FCO2 0 to 100 mmHg or<br />
0 to 14 kPa or<br />
0 to 15 Vol.%<br />
Occlusion pressure P 0.1 0 to 25 mbar<br />
* C-values may be considerably falsified as spontaneous breathing increases;<br />
compliance with the measuring accuracy therefore cannot be guaranteed for spontaneous breathing.<br />
** R-values may be considerably falsified as spontaneous breathing increases;<br />
compliance with the measuring accuracy therefore cannot be guaranteed for spontaneous breathing.<br />
194 Instructions for Use <strong>EvitaXL</strong>
Monitoring<br />
Expiratory minute volume MV<br />
Upper alarm limit alarm if the upper alarm limit has been exceeded<br />
Setting range 41 to 0.1 L/min, in 0.1 L/min steps<br />
Lower alarm limit alarm if the value has fallen below the lower alarm limit<br />
Setting range 0.01 to 40 L/min, in 0.1 L/min steps<br />
Technical Data<br />
Monitoring<br />
Airway pressure PAW<br />
Upper alarm limit alarm if the "PAW high" value is exceeded<br />
Setting range 10 to 100 mbar<br />
Lower alarm limit alarm if the value "PEEP +5 mbar" (coupled with the PEEP set value) is not<br />
exceeded for at least 96 ms in 2 successive ventilation strokes.<br />
Insp. O2 concentration FiO2<br />
Upper alarm limit alarm if the upper alarm limit is exceeded for at least 20 seconds<br />
Lower alarm limit alarm if the value falls below the lower alarm limit for at least 20 seconds<br />
Range both alarm limits are automatically allocated to the set value:<br />
under 60 Vol.% at ±4 Vol.%<br />
over 60 Vol.% at ±6 Vol.%<br />
End-expiratory CO2 concentration<br />
etCO2 (optional)<br />
Upper alarm limit alarm if the upper alarm limit has been exceeded<br />
Setting range 0 to 100 mmHg<br />
or<br />
0 to 15 kPa<br />
Lower alarm limit alarm if the value has fallen below the lower alarm limit<br />
Setting range 0 to 99 mmHg<br />
or<br />
0 to 14 kPa<br />
Insp. breathing gas temperature<br />
Upper alarm limit alarm on reaching 40 o C<br />
(<strong>EvitaXL</strong> can also be used without a temperature sensor, if it is not connected<br />
when <strong>EvitaXL</strong> is switched on)<br />
Tachypnoea monitoring fspn<br />
Alarm during spontaneous breathing, when the spontaneous breathing frequency<br />
has been exceeded<br />
Setting range 5 to 120/min<br />
Volume monitoring<br />
Lower alarm limit alarm if the set tidal volume VT (coupled with the set value VT) has not been<br />
supplied<br />
Upper alarm limit alarm if the applied tidal volume exceeds the value of the alarm limit, inspiration<br />
is interrupted and the expiration valve is opened<br />
Setting range 21 to 4000 mL<br />
Apnoea alarm time<br />
Alarm if no breathing activity is detected<br />
Setting range 5 to 60 seconds, can be set in 1 second increments<br />
Instructions for Use <strong>EvitaXL</strong> 195
Technical Data<br />
Operating data<br />
Operating data<br />
Mains power connection 100 V –10 % to 240 V +10 %<br />
50/60 Hz<br />
Current consumption<br />
at 230 V max. 1.3 A<br />
at 100 V max. 3.2 A<br />
Power consumption typically approx. 125 W<br />
Machine fuses<br />
Range 100 V to 240 V F 5 H 250 V IEC 127–2 (2x) (FB)<br />
F 6.3 H 250 V IEC 127–2 (2x) (MB)<br />
Protection class<br />
Unit Class I<br />
CO2 sensor (sensor connected) Type BF<br />
Temperature sensor (sensor connected) Type BF<br />
Gas supply<br />
O2 gauge pressure 3 bar –10 % to 5.5 bar +10 %<br />
at 60 L/min (peak flow 200 L/min)<br />
O2 connection thread M 12 x 1, female<br />
Air gauge pressure 3 bar –10 % to 5.5 bar +10 %<br />
at 60 L/min (peak flow 200 L/min)<br />
Air connection thread M 20 x 1.5, male<br />
Dew point 5 o C below ambient temperature<br />
Oil concentration
Materials used<br />
Part Appearance Material<br />
Ventilation hose milky, transparent silicone rubber<br />
Water trap yellow, transparent polysulphone<br />
Y piece yellow, transparent polysulphone<br />
Connector for temperature<br />
measurement<br />
Expiration valve<br />
milky, transparent silicone rubber<br />
Housing, closure white polyamide<br />
Diaphragm whitish and grey silicone rubber and aluminium<br />
CO2 cuvette yellow, transparent polysulphone with glass windows<br />
Temperature sensor/cable milky/green or blue silicone rubber<br />
CO2 sensor/cable grey/grey polyurethane<br />
For Nurse call (optional)<br />
Pin assignment<br />
6-pin round DIN socket<br />
Floating DC contact<br />
Input voltage max. 40 V DC<br />
Input current max. 500 mA<br />
Switching capacity max. 15 W<br />
Technical Data<br />
Operating data<br />
Instructions for Use <strong>EvitaXL</strong> 197<br />
5<br />
3<br />
1
Technical Data<br />
Equipment outputs<br />
Equipment outputs<br />
Digital outputs<br />
COM 1<br />
as well as<br />
COM 2 and COM 3 (optional)<br />
configurable for: LUST protocol<br />
Baud rate: 1200, 2400, 4800, 9600, 19200 Baud<br />
Data bits: 7<br />
Parity: even<br />
Stop bits: 1<br />
Pin assignment of the MEDIBUS cable<br />
Pin assignment of the printer cable<br />
MEDIBUS protocol<br />
Baud rate: 1200, 2400, 4800, 9600, 19200 Baud<br />
Data bits: 8<br />
Parity: even, odd, no<br />
Stop bits: 1 or 2<br />
(19200 baud are required for transmitting high-speed data, e.g. for the<br />
flow curve)<br />
Printer protocol HP Deskjet series 500<br />
Baud rate: 1200, 2400, 4800, 9600, 19200 Baud<br />
Data bits: 8<br />
Parity: no<br />
Stop bits: 1<br />
<strong>EvitaXL</strong><br />
Cable length up to 15 m<br />
Load impedance 3000 to 7000 Ω<br />
5<br />
3<br />
2<br />
9-pin sub-D<br />
connector<br />
<strong>EvitaXL</strong><br />
5<br />
3<br />
2<br />
9-pin sub-D<br />
connector<br />
GND GND<br />
TxD RxD<br />
RxD TxD<br />
Connector housing<br />
GND GND<br />
TxD RxD<br />
RxD TxD<br />
Connector housing<br />
Signal level (for load impedance from<br />
3000 to 7000 Ω)<br />
Low between 3 and 15 V<br />
High between –3 and –15 V<br />
Electrical isolation Ports COM 1, COM 2 and COM 3 (optional)<br />
are electrically isolated from the equipment electronics.<br />
The test voltage for electrical isolation is 1500 V.<br />
Ports COM 2 and COM 3 are not electrically isolated from one another.<br />
Digital output for Independent Lung Ventilation (ILV)<br />
198 Instructions for Use <strong>EvitaXL</strong><br />
5<br />
2<br />
3<br />
9-pin sub-D<br />
socket<br />
7<br />
3<br />
2<br />
25-pin sub-D<br />
socket
Technical Data<br />
Equipment outputs<br />
Analogue interface<br />
Voltage level 0 to 4.095 V<br />
Impedance of analogue channels The output impedance is 200 Ω.<br />
The input impedance of on-line equipment should be not less than 1 MΩ<br />
otherwise the output signal will be distorted.<br />
Accuracy 0 V : 0 V to 0.005 V<br />
4.095 V : 4.075 V to 4.115 V<br />
Electrical isolation The connecting socket is electrically isolated from the equipment electronics.<br />
The test voltage for electrical isolation is 1500 V. The analogue<br />
channels are not electrically isolated from one another.<br />
Pin assignment<br />
Pin 3<br />
Pin 1<br />
3<br />
Pin 2<br />
Medical appliance connector<br />
Instructions for Use <strong>EvitaXL</strong> 199<br />
<strong>EvitaXL</strong><br />
1<br />
2<br />
Connector housing<br />
GND<br />
Channel 1<br />
Channel 2
Technical Data<br />
DC power supply<br />
DC power supply<br />
Electrical ratings for the DC socket<br />
DC input voltage 12 or 24 V battery<br />
Input current<br />
12 V battery typically 13 A, max. 30 A<br />
24 V battery typically 6 A, max. 15 A<br />
Performance characteristics<br />
Time bridged following a mains power failure<br />
(with fully operational batteries * )<br />
— Fully charged integrated battery typically 14 minutes; at least 10 minutes<br />
— Two fully charged external 12 V lead-gel batteries<br />
(18 43 303) with a capacity of 17 Ah each typically 2 hours<br />
External batteries **<br />
Type Lead-gel batteries, sealed maintenance-free<br />
Minimum capacity<br />
12 V battery 30 Ah (note battery charging current)<br />
24 V battery 15 Ah (note battery charging current)<br />
Max. charging current through the DC power supply (the<br />
battery used must be rated for at least this charging current)<br />
12 V battery approx. 8 A<br />
24 V battery approx. 4.5 A<br />
Charging time *** (for 18 43 303),<br />
2 batteries connected in series<br />
24 V lead-gel battery typically 8 to 12 hours<br />
Integrated batteries<br />
Type Lead-gel batteries, sealed maintenance-free<br />
Charging time ***<br />
DC power supply FB typically 1.5 to 2.5 hours<br />
DC power supply MB typically 2.5 to 4 hours<br />
Protection class I<br />
* see "Charge indication and battery charge state", page 172.<br />
** see "Mains power/DC power operation", page 170.<br />
*** see "Charging times", page 172.<br />
200 Instructions for Use <strong>EvitaXL</strong>
LUST protocol<br />
LUST:<br />
List-controlled universal interface driver program compatible<br />
with the RS 232 interface in Evita from software version 7.n<br />
upwards.<br />
The LUST protocol comprises four different transmission<br />
telegrams:<br />
— Identification telegram<br />
— Status telegram<br />
— Data telegram<br />
— Alarm telegram<br />
The first three telegrams are only sent in reply to a request<br />
from the external unit. The alarm telegram is sent automatically<br />
when an alarm occurs or disappears.<br />
Telegram control<br />
The following ASCII* characters are used to request the individual<br />
telegrams:<br />
"ACK" Request for an identification telegram<br />
"NAK" Request for a status telegram<br />
"ENQ" Request for a data telegram<br />
Output of all telegrams can be controlled via certain characters:<br />
"DC1" (x-on) Enables telegram output<br />
"DC3" (x-off) Halts output at any time<br />
Following an enable ("DC1"), the interrupted telegram is output<br />
again without being adjusted to the actual status.<br />
The effect of "DC3" is cancelled by a request for a telegram;<br />
the telegram interrupted by "DC1" is lost and the requested<br />
telegram is sent.<br />
Output of an alarm telegram can also be controlled:<br />
"DC2" Enables output of the alarm telegrams<br />
"DC4" Halts the output of alarm telegrams<br />
Ongoing transmissions are not interrupted by "DC4". This is<br />
only possible with "DC3" (x-off).<br />
A telegram request ("ACK", "ENQ" or "NAK") does not re-enable<br />
the output of alarm telegrams.<br />
Following a "DC2", the last event is transmitted by the alarms<br />
in each case. If alarm events have not occurred, an alarm telegram<br />
with all active alarms is requested with each "DC2".<br />
Unknown control characters are ignored.<br />
* For a list of special ASCII characters used, see page 237.<br />
Technical Data<br />
LUST protocol<br />
Instructions for Use <strong>EvitaXL</strong> 201
Technical Data<br />
LUST protocol<br />
Identification telegram<br />
The identification telegram contains the device designation<br />
and a list of all measured values sent in the data telegram.<br />
It has the following structure:<br />
Telegram header<br />
"STX" Start character<br />
050 Identification number<br />
0 Channel number<br />
Telegram body<br />
The body of the telegram first contains the device name:<br />
"ESC <strong>EvitaXL</strong>"<br />
This is then followed by any number of blocks, each separated<br />
by "ESC". Each block contains all the data pertaining to a<br />
measured value, each separated by "RS".<br />
Each block has the following structure:<br />
"ESC" (signal No.) "RS" (signal name, long form)<br />
"RS" (signal name, short form) "RS" (unit)<br />
"RS" (minimum) "RS" (maximum)<br />
The following table lists the complete identification telegram:<br />
Signal Signal name<br />
Short Unit Minimum Maximum<br />
No. long form<br />
form<br />
value value<br />
00 Time t h:min ,0.00 23.59<br />
01 Exp. tidal volume VTe L 0.000 2.000<br />
02 Breathing Frequency f 1/min ,,0 240<br />
03 Minute Volume MV L/min ,0.00 99.99<br />
04 Peak-pressure Peak mbar ,,0 120<br />
05 Plateau-pressure Plat mbar ,0 99<br />
06 PEEP-pressure PEEP mbar ,0 99<br />
07 Minimum-pressure Pmin mbar –20 99<br />
08 Mean-pressure Mean mbar ,0 99<br />
09 Insp. O2-concentration FiO2 % 15 99<br />
10 Compliance C mL/mbar ,,0.0 255<br />
11 Resistance R mbar/(L/s) ,,0.0 200<br />
12 Spont. minute volume MVs L/min ,0.00 99.99<br />
13 Spont. frequency f s 1/min ,,0 240<br />
14 Airway temperature Temp deg C 18 45<br />
15 Intrinsic PEEP Pintr L/min ,0.0 99.99<br />
16 Trapped Volume Vtrap mL ,,,0 9999<br />
17 Occlusion Pressure P01 mbar ,0.0 99.9<br />
18 End tidal CO2 in mmHg CO2E1 mmHg ,0 99<br />
19 End tidal CO2 in kPa CO2E2 kPa ,0.0 99.9<br />
20 End tidal CO2 in % CO2E3 % ,0.0 99.9<br />
21 CO2 Production CO2P mL/min ,,0 999<br />
22 Dead Space Vds mL ,,0 999<br />
23 Rel. Dead Space Vds ,,0 999<br />
24 SpO2 SpO2 % ,,0 100<br />
25 Pulse Pulse bpm ,,0 999<br />
26 Tidal volume ASB VT ASB mL ,,,0 9999<br />
27 Negative Inspiratory Force NIF mbar –45 ,0<br />
28 Rapid Shallow Breathing RSB 1/L*min ,,,0 9999<br />
Leading zeroes (identified by "0.0" or ",,0" in the table) are<br />
replaced by one or two blanks.<br />
202 Instructions for Use <strong>EvitaXL</strong>
End of telegram<br />
"EOT"<br />
Status telegram<br />
The status telegram contains all settings, alarm limits, ventilation<br />
modes and status messages.<br />
It has the following structure:<br />
Telegram header<br />
"SOH" Start character<br />
050 Identification number<br />
0 Channel number<br />
Telegram body<br />
The body of the telegram contains any number of status messages,<br />
each separated by "GS". Each status message comprises<br />
a number and a name.<br />
"GS" (number of the status message) (message text)<br />
Data, such as settings and alarm limits, are enclosed between<br />
"FS" in the status message.<br />
All status messages are listed in the following tables.<br />
Settings<br />
00 date : "FS"dd"FS"-"FS"mm"FS"-"FS"yy"FS"<br />
01 O2 setting-value = "FS"nnn"FS" %<br />
02 Max. inspiratory flow = "FS"nnn"FS" L/min<br />
03 Insp. tidal volume = "FS"n,nnn"FS" L<br />
06 I : E = "FS"nn,n"FS" : "FS"1.0"FS"<br />
06 I : E = "FS"1.0"FS" : "FS"nn,n"FS<br />
07 Max. breathing pressure = "FS"nnn"FS" mbar<br />
08 Frequency = "FS"nnn,n"FS" 1/min<br />
09 PEEP = "FS"nn"FS" mbar<br />
10 ASB = "FS"nn"FS" mbar<br />
11 Interm. PEEP = "FS"nn"FS" mbar<br />
12 APRV P-low = "FS"nn"FS" mbar<br />
13 APRV P-high = "FS"nn"FS" mbar<br />
14 APRV T-low = "FS"nn,n"FS" s<br />
15 APRV T-high = "FS"nn,n"FS" s<br />
16 Apnoea Time = "FS"nn"FS" s<br />
17 Tachypnoea warning = "FS"nnn"FS" bpm<br />
18 Flow Trigger = "FS"nn,n"FS" L/min<br />
19 Pressure increase rate = "FS"n,nn"FS" s<br />
28 Pinsp = "FS"nnn"FS" mbar<br />
84 Ti = "FS"nn,nn"FS" s<br />
87 Flow Assist = "FS"nnn,n"FS" mbar*s/L<br />
88 Volume Assist = "FS"nnnn,n"FS" mbar/L<br />
Alarm limits<br />
20 MV low limit = "FS"nn,nn"FS" L/min<br />
21 MV high limit = "FS"nn,nn"FS" L/min<br />
25 CO2 upper limit = "FS"nnn"FS"mmHg<br />
25 CO2 upper limit = "FS"nn.n"FS"%<br />
25 CO2 upper limit = "FS"nn.n"FS"kPa<br />
26 CO2 lower limit = "FS"nnn"FS"mmHg<br />
26 CO2 lower limit = "FS"nn.n"FS"%<br />
26 CO2 lower limit = "FS"nn.n"FS"kPa<br />
27 PAWLimit = "FS"nnn"FS" mbar<br />
29 Insp. tidal volume high limit = "FS"n,nnn"FS" L<br />
71 Tdisconnect = "FS"nn"FS" s<br />
80 Puls high limit = "FS"nnn"FS" bpm<br />
81 Puls low limit = "FS"nnn"FS" bpm<br />
82 Saturation O2 high limit = "FS"nnn"FS" %<br />
83 Saturation O2 low limit = "FS"nnn"FS" %<br />
Ventilation Modes<br />
30 Mode IPPV<br />
31 Mode IPPV/ASSIST<br />
34 Mode SIMV<br />
35 Mode SIMV/ASB<br />
38 Mode CPAP<br />
39 Mode CPAP/ASB<br />
40 Mode MMV<br />
41 Mode MMV/ASB<br />
42 Mode APRV<br />
43 Mode SYNCHRON MASTER<br />
44 Mode SYNCHRON SLAVE<br />
45 Mode Apnoea Ventilation<br />
48 Mode BIPAP<br />
49 Mode BIPAP/ASB<br />
60 Mode SIMV/AutoFlow<br />
61 Mode SIMV/ASB/AutoFlow<br />
62 Mode IPPV/AutoFlow<br />
63 Mode IPPV/ASSIST/AutoFlow<br />
64 Mode MMV/AutoFlow<br />
65 Mode MMV/ASB/AutoFlow<br />
66 Mode ASYNCHRON MASTER<br />
67 Mode CPAP/PPS<br />
68 Mode BIPAP/ASSIST<br />
69 IV – Invasive ventilation<br />
70 NIV – Non-invasive ventilation<br />
Technical Data<br />
LUST protocol<br />
Instructions for Use <strong>EvitaXL</strong> 203
Technical Data<br />
LUST protocol<br />
Status messages<br />
24 Flow monitoring on<br />
24 Flow monitoring off<br />
50 Audio alarm inactive on<br />
50 Audio alarm inactive off<br />
51 Nebuliser on<br />
51 Nebuliser off<br />
53 O2 calibration on<br />
53 O2 calibration off<br />
54 O2 monitoring on<br />
54 O2 monitoring off<br />
55 Suction on<br />
55 Suction off<br />
56 Flow calibration on<br />
56 Flow calibration off<br />
57 CO2 calibration on<br />
57 CO2 calibration off<br />
58 CO2 monitoring on<br />
58 CO2 monitoring off<br />
85 SpO2 monitoring on<br />
85 SpO2 monitoring off<br />
97 Neonates<br />
98 Adult<br />
99 Paediatric<br />
End of telegram<br />
"EOT"<br />
Data telegram<br />
The actual measured values defined by the identification telegram<br />
are transmitted in the data telegram. Invalid measured<br />
values contain dashes instead of numerical values. In addition,<br />
the data telegram also contains all the messages in the status<br />
telegram which have changed since the last status or data<br />
telegram.<br />
The telegram has the following structure:<br />
Telegram header<br />
"SOH" Start character<br />
050 Identification number<br />
0 Channel number<br />
Telegram body<br />
The body of the telegram contains all the measured values<br />
defined in the identification telegram and any number of status<br />
messages. The number of digits for the measured values is<br />
defined in the identification telegram and does not exceed five.<br />
Commas are also transmitted, leading zeroes are replaced by<br />
blanks.<br />
"ESC" (signal number) (measured value)<br />
"GS" (number of the status message) (message text)<br />
Alarm telegram<br />
Alarm telegrams cannot be requested. They are transmitted<br />
automatically as soon as the alarm status changes. Automatic<br />
transmission of alarms can, however, be activated and deactivated,<br />
see Telegram control on page 201.<br />
The individual messages are output<br />
— when an alarm occurs,<br />
— when the alarm status is cancelled.<br />
The alarm telegram has the following structure:<br />
Telegram header<br />
"BEL" Start character<br />
050 Identification number<br />
0 Channel number<br />
Telegram body<br />
"ESC" (alarm/warning/advisory) (status)<br />
(alarm number) (alarm text)<br />
The significance of the individual fields is as follows:<br />
01 Device failure<br />
02 Air supply down<br />
03 O2 supply down<br />
04 pressure meas. inop<br />
05 O2 measurement inop<br />
06 flow measurement inop<br />
07 mixer inop<br />
08 exp. valve inop<br />
09 fan 1 defect<br />
10 temperature meas. inop<br />
12 temperature high<br />
13 flow sensor ?<br />
14 PEEP high<br />
15 CO2 measurement inop<br />
16 CO2 sensor ?<br />
17 clean CO2 cuvette<br />
18 CO2 zero ?<br />
22 apnoea<br />
204 Instructions for Use <strong>EvitaXL</strong>
23 FiO2 high<br />
24 FiO2 low<br />
25 MV low<br />
26 MV high<br />
27 airway pressure low<br />
28 airway pressure high<br />
29 fail to cycle<br />
30 high frequency<br />
32 volume not constant<br />
33 ASB > 4 s<br />
34 etCO2 high<br />
35 etCO2 low<br />
36 air supply pressure high<br />
37 air supply high<br />
38 apnoea ventilation<br />
39 Insp. hold interrupted<br />
40 loss of data<br />
41 Flow monitoring off<br />
42 Monitoring FiO2 off<br />
43 Monitoring CO2 off<br />
44 Monitoring SpO2 off<br />
45 O2 supply high<br />
46 fan 2 defect<br />
47 malfunction fan 2<br />
48 malfunction fan 1<br />
49 SpO2 low<br />
50 SpO2 high<br />
51 pulse low<br />
52 pulse high<br />
53 no pulse<br />
54 SpO2 sensor ?<br />
55 SpO2 meas. inop<br />
57 battery not loaded<br />
58 battery only for 2 min.<br />
59 int. battery activated<br />
60 ext. battery wrong<br />
61 PEEP valve inop<br />
62 neo. flow meas. inop<br />
63 standby activated<br />
64 nebuliser on<br />
65 tidal volume high<br />
67 check evita<br />
68 frequency ILV Slave ?<br />
69 pressure limited<br />
70 ILV sync. inop<br />
71 MEDIBUS inop<br />
73 ASB > 1.5 s<br />
74 Leakage<br />
75 neo.flow monitoring off<br />
76 neo.flowsensor unsuitable<br />
77 nebuliser off<br />
78 PPS-insp. >1.5 s<br />
79 PPS-insp. >4 s<br />
80 ASB > Tinsp<br />
81 backup ventilation<br />
82 Exsp. hold interrupted<br />
83 neo. flow?<br />
84 Apnoea alarm off<br />
85 MV low alarm off<br />
86 VT high alarm off<br />
87 Evita Remote error<br />
88 Tube obstructed<br />
89 Ext. Flow compensated<br />
90 Error multi functional board<br />
91 Ambient pressure sensor?<br />
End of telegram<br />
"EOT"<br />
Technical Data<br />
LUST protocol<br />
Instructions for Use <strong>EvitaXL</strong> 205
206 Instructions for Use <strong>EvitaXL</strong>
Description<br />
Ventilation Modes . . . . . . . . . . . . . . . . . . . . . . . . . . . . . . . . . . . . . . . . . . . . . . . . . . . . 208<br />
Volume-controlled ventilation with PLV and AutoFlow ® . . . . . . . . . . . . . . . . . . 208<br />
Sigh . . . . . . . . . . . . . . . . . . . . . . . . . . . . . . . . . . . . . . . . . . . . . . . . . . . . . . . . . . . . . 210<br />
SIMV . . . . . . . . . . . . . . . . . . . . . . . . . . . . . . . . . . . . . . . . . . . . . . . . . . . . . . . . . . . . . 211<br />
MMV . . . . . . . . . . . . . . . . . . . . . . . . . . . . . . . . . . . . . . . . . . . . . . . . . . . . . . . . . . . . . 212<br />
BIPAP . . . . . . . . . . . . . . . . . . . . . . . . . . . . . . . . . . . . . . . . . . . . . . . . . . . . . . . . . . . . 213<br />
BIPAPAssist . . . . . . . . . . . . . . . . . . . . . . . . . . . . . . . . . . . . . . . . . . . . . . . . . . . . . . 215<br />
APRV . . . . . . . . . . . . . . . . . . . . . . . . . . . . . . . . . . . . . . . . . . . . . . . . . . . . . . . . . . . . 215<br />
ASB . . . . . . . . . . . . . . . . . . . . . . . . . . . . . . . . . . . . . . . . . . . . . . . . . . . . . . . . . . . . . 216<br />
PPS (optional) . . . . . . . . . . . . . . . . . . . . . . . . . . . . . . . . . . . . . . . . . . . . . . . . . . . . . 217<br />
Measurements . . . . . . . . . . . . . . . . . . . . . . . . . . . . . . . . . . . . . . . . . . . . . . . . . . . . . . . 218<br />
Flow measurement . . . . . . . . . . . . . . . . . . . . . . . . . . . . . . . . . . . . . . . . . . . . . . . . . 218<br />
Measurement principles . . . . . . . . . . . . . . . . . . . . . . . . . . . . . . . . . . . . . . . . . . . . 219<br />
Automatic leakage compensation . . . . . . . . . . . . . . . . . . . . . . . . . . . . . . . . . . . . 220<br />
Tube compensation ATC . . . . . . . . . . . . . . . . . . . . . . . . . . . . . . . . . . . . . . . . . . . . 221<br />
Weaning parameters . . . . . . . . . . . . . . . . . . . . . . . . . . . . . . . . . . . . . . . . . . . . . . . 224<br />
Intrinsic PEEP – PEEPi . . . . . . . . . . . . . . . . . . . . . . . . . . . . . . . . . . . . . . . . . . . . . 226<br />
Low Flow PV-Loop . . . . . . . . . . . . . . . . . . . . . . . . . . . . . . . . . . . . . . . . . . . . . . . . . 227<br />
Insp. O2 concentration during medicament nebulisation . . . . . . . . . . . . . . . . . 228<br />
Screen configurations . . . . . . . . . . . . . . . . . . . . . . . . . . . . . . . . . . . . . . . . . . . . . . . . 229<br />
Abbreviations . . . . . . . . . . . . . . . . . . . . . . . . . . . . . . . . . . . . . . . . . . . . . . . . . . . . . . . . 232<br />
Symbols . . . . . . . . . . . . . . . . . . . . . . . . . . . . . . . . . . . . . . . . . . . . . . . . . . . . . . . . . . . . . 234<br />
Bibliography . . . . . . . . . . . . . . . . . . . . . . . . . . . . . . . . . . . . . . . . . . . . . . . . . . . . . . . . . 235<br />
Special ASCII characters used . . . . . . . . . . . . . . . . . . . . . . . . . . . . . . . . . . . . . . . . . 237<br />
Instructions for Use <strong>EvitaXL</strong> 207
Ventilation Modes<br />
Volume-controlled ventilation with PLV and AutoFlow ®<br />
Ventilation Modes<br />
Volume-controlled ventilation with PLV and<br />
AutoFlow ®<br />
AutoFlow is a new additional function that regulates inspiratory<br />
flow during the mandatory ventilation stroke in the constant-volume<br />
ventilation modes IPPV, SIMV and MMV. To explain the<br />
improvement achieved by this function, the conventional methods<br />
are explained first:<br />
Classic constant-volume mandatory ventilation stroke<br />
In mandatory ventilation strokes without AutoFlow, the<br />
»Insp.Flow« parameter restricts the inspiration flow.<br />
If the inspiration flow is so high that the set tidal volume VT is<br />
attained before the inspiration time Tinsp has fully elapsed, the<br />
inspiration valve closes, and the breathing gas supply stops.<br />
The expiration valve also remains closed until the end of the<br />
inspiration time Tinsp. This phase, the inspiratory pause, can be<br />
identified in the curve PAW (t) as the plateau PPlat.<br />
This type of mandatory ventilation stroke, which for technical<br />
reasons is found in the same form in almost all intensive care<br />
ventilators, has two serious drawbacks:<br />
— If the lungs are extremely non-homogeneous, the pressure<br />
peaks can lead to the overdistension of specific lung areas,<br />
and<br />
— the limited inspiration flow and closed inspiration and expiration<br />
valves during the inspiratory pause can cause the<br />
patient to "fight" the machine.<br />
Manual pressure limitation Pmax<br />
<strong>EvitaXL</strong> can prevent pressure peaks, while maintaining the set<br />
tidal volume VT, by means of the pressure limit Pmax. The tidal<br />
volume VT remains constant as long as a pressure plateau<br />
PPlat is still detectable and the flow curve shows a brief zero<br />
flow between inspiration and expiration.<br />
<strong>EvitaXL</strong> performs this function by reducing the Insp. Flow on<br />
reaching the set Pmax value. If the tidal volume VT can no<br />
longer be attained with the selected pressure Pmax, due to<br />
reduced compliance, the alarm "Volume not constant" is automatically<br />
generated.<br />
208 Instructions for Use <strong>EvitaXL</strong><br />
PAW<br />
Flow<br />
Insp.<br />
pause<br />
PPlat<br />
Tinsp Te<br />
1<br />
f<br />
Insp. flow<br />
Pmax<br />
(configurable)<br />
t<br />
PEEP<br />
t<br />
005
AutoFlow ®<br />
The AutoFlow function can be activated in the »Add. settings«<br />
menu. AutoFlow takes over the task of setting both »Insp.<br />
Flow« and »Pmax«. Once AutoFlow has been activated, Pmax<br />
and Insp. Flow can no longer be set.<br />
With AutoFlow, the inspiration flow is automatically adjusted to<br />
changes in lung conditions (C, R) and to the spontaneous<br />
breathing demand of the patient.<br />
Always set the alarm limit »PAW W« in order to generate an<br />
alarm in the event of an increase in airway pressure with<br />
reduced compliance.<br />
The maximum applied pressure is limited to 5 mbar below<br />
the upper pressure limit.<br />
Typically, the selected inspiration time Tinsp is much longer<br />
than the lung filling time. The inspiration pressure Pinsp corresponds<br />
to the minimum value calculated from the tidal volume<br />
VT and compliance C of the lung.<br />
The inspiration flow is automatically controlled so that there is<br />
no pressure peak caused by the resistances of the tube and<br />
the airways. The plateau pressure PPlat varies with changes in<br />
compliance C, as is normal in all constant-volume ventilation<br />
strokes. With AutoFlow these variations occur in maximum<br />
steps of 3 mbar between ventilation strokes.<br />
If the tidal volume VT is reached (inspiration flow = 0) before<br />
the inspiration time Tinsp has fully elapsed, the control system<br />
for the inspiration and expiration valves ensures that the<br />
patient can breathe in and out during the remaining inspiration<br />
time, even during a constant pressure plateau PPlat.<br />
If the patient breathes in or out during mandatory inspiration,<br />
the plateau pressure PPlat is not changed for this ventilation<br />
stroke: only the inspiration and expiration flow are adapted to<br />
the patient's demand. The individually applied tidal volume VT<br />
may differ from the set tidal volume VT in specific ventilation<br />
strokes, but on average over time a constant tidal volume VT is<br />
supplied.<br />
Any overstepping of the tidal volume VT can be limited by the<br />
alarm limit »VTi W«. If the set alarm limit is exceeded once,<br />
<strong>EvitaXL</strong> generates an advisory message(!); if the alarm limit is<br />
exceeded three times in a row, it generates an alarm (!!!). In the<br />
above examples the volume is actively limited to the alarm limit<br />
value »VTi W« by switching over to the PEEP level.<br />
● Set the alarm limits MV < and MV > adequately in<br />
order to avoid excessive or insufficient flow following<br />
rapid changes in compliance.<br />
A set inspiration time Tinsp shorter than the lung filling time can<br />
be recognised from the flow curve: the flow at the end of the<br />
inspiration time has not dropped to zero. In this case, it must<br />
be decided whether the current condition of the patient permits<br />
prolongation of the inspiration time Tinsp in order to<br />
reduce the peak pressure even further.<br />
Ventilation Modes<br />
Volume-controlled ventilation with PLV and AutoFlow ®<br />
Instructions for Use <strong>EvitaXL</strong> 209<br />
PEEP<br />
PAW<br />
Flow<br />
Tinsp Te<br />
1<br />
f<br />
VT<br />
Pinsp = f (VT,C)<br />
without spontaneous<br />
breathing<br />
with spontaneous breathing<br />
PAW ><br />
t<br />
t<br />
017
Ventilation Modes<br />
Volume-controlled ventilation with PLV and AutoFlow®<br />
Sigh<br />
This effect can also be caused during ventilation, e.g. due to a<br />
build-up of secretion. In this situation, the pressure is limited<br />
by the alarm limit »PAW W«. The pressure rise stops 5 mbar<br />
below the alarm limit »PAW W«, and the alarm »Volume not<br />
constant« is only given when the set tidal volume VT is not<br />
longer applied.<br />
The start of mandatory inspiration can be synchronised with<br />
the patient's own efforts with the aid of the variable Flowtrigger.<br />
Only in IPPV mode can Flowtrigger be fully switched off<br />
(IPPVAssist -> IPPV).<br />
The steepness of the pressure rise from the PEEP level to the<br />
inspiration level can be even more closely adapted to the<br />
needs of the patient in SIMV and MMV modes by means of the<br />
pressure rise time »Ramp«.<br />
Start-up procedure with AutoFlow<br />
On switching on the AutoFlow function, <strong>EvitaXL</strong> applies the set<br />
tidal volume VT through a volume-controlled ventilation stroke<br />
with minimum inspiration flow and subsequent inspiratory<br />
pause.<br />
The plateau pressure PPlat calculated for this ventilation<br />
stroke serves as start-up inspiration pressure for the AutoFlow<br />
function.<br />
Sigh<br />
"Sigh" is effective in the form of intermittent PEEP in the IPPV,<br />
IPPVAssist and ILV modes.<br />
The purpose of expiratory sigh during ventilation is to open collapsed<br />
areas of the lung, or to keep open "slow" areas of the<br />
lung.<br />
Since atelectatic alveoli have a longer time constant – also<br />
caused by obstructed bronchioles – increased airway pressure<br />
maintained over a longer period is required to open them.<br />
In <strong>EvitaXL</strong> the activated sigh has an expiratory effect with an<br />
intermittent PEEP for two ventilation strokes every 3 minutes.<br />
The average airway pressure is higher, and a longer filling time<br />
is normally available.<br />
To avoid overinflation of the lung, the pressure peaks during<br />
the sigh phase can be limited by pressure limitation Pmax, without<br />
impairing the sigh function.<br />
During the sigh phase, the "Volume not constant" alarm is<br />
disabled.<br />
210 Instructions for Use <strong>EvitaXL</strong><br />
PEEP<br />
Pmax<br />
PAW<br />
Flow<br />
PAW<br />
interm.<br />
PEEP<br />
PEEP<br />
Tinsp Te<br />
1<br />
f<br />
VT<br />
Pinsp = f (VT,C)<br />
without spontaneous<br />
breathing<br />
with spontaneous<br />
breathing<br />
Sigh phase<br />
PAW ><br />
t<br />
t<br />
t<br />
018<br />
019
SIMV<br />
Synchronised Intermittent Mandatory Ventilation<br />
Combination of machine ventilation and spontaneous<br />
breathing.<br />
SIMV enables the patient to breathe spontaneously in regular<br />
prescribed cycles, with the mechanical mandatory ventilation<br />
strokes providing a minimum ventilation during the remaining<br />
cycles. The minimum ventilation is controlled by the two set values<br />
tidal volume (VT) and ventilation frequency (f) and is determined<br />
from the product of VT x f.<br />
The ventilation pattern results from the set values tidal<br />
volume VT, insp. flow, frequency f and inspiration time Tinsp.<br />
To prevent the mandatory ventilation stroke being applied during<br />
spontaneous expiration, the Flowtrigger of the machine<br />
ensures that the ventilation stroke is triggered in synchrony<br />
with the patient's spontaneous inspiratory effort within a<br />
"trigger window".<br />
The "trigger window" is 5 seconds long in adult mode and<br />
1.5 seconds long in paediatric mode. For expiration times<br />
shorter than 5 seconds or 1.5 seconds, the "trigger window"<br />
covers the entire expiration time.<br />
Since the synchronisation of the mandatory ventilation stroke<br />
reduces the effective SIMV time, which would result in an<br />
undesirable increase in effective IMV frequency, <strong>EvitaXL</strong> prolongs<br />
the subsequent breathing time by the missing time difference<br />
∆T – thus preventing an increase in SIMV frequency.<br />
The frequency parameter f remains constant. This parameter,<br />
in combination with the tidal volume VT, sets the minimum ventilation.<br />
If the inspiratory volume of the patient is considerable<br />
at the beginning of the "trigger window", the machine reduces<br />
the subsequent mandatory ventilation stroke by shortening the<br />
time for the inspiratory flow phase and the inspiration time. In<br />
this way, the tidal volume VT remains constant, and overinflation<br />
of the lungs is avoided.<br />
During the spontaneous breathing phases, the patient can be<br />
assisted with pressure by ASB pressure support.<br />
In the further weaning process, the frequency f on the ventilation<br />
unit is further reduced, thereby prolonging the spontaneous<br />
breathing time, until finally the required minute volume is<br />
entirely covered by spontaneous breathing.<br />
Ventilation Modes<br />
SIMV<br />
Instructions for Use <strong>EvitaXL</strong> 211<br />
PAW<br />
PEEP<br />
trigger<br />
window<br />
mandatory<br />
ventilation<br />
Tinsp<br />
spontaneous<br />
breathing<br />
spontaneous<br />
breathing time<br />
synchronised<br />
mandatory<br />
stroke<br />
spontaneous breathing<br />
time + T<br />
set IMV time set IMV time<br />
1<br />
1<br />
f<br />
f<br />
t<br />
020
Ventilation Modes<br />
MMV<br />
MMV<br />
Mandatory Minute Volume Ventilation<br />
In contrast to SIMV, the MMV ventilation mode gives mandatory<br />
ventilation only if spontaneous breathing is not yet sufficient<br />
and has fallen below a pre-selected minimum ventilation.<br />
This minimum ventilation is controlled by the two set values<br />
tidal volume VT and frequency f, and results from the<br />
product VT x f.<br />
Unlike SIMV, the mandatory strokes are not given regularly but<br />
only in cases of insufficient ventilation.<br />
The frequency of mandatory strokes is determined by the level<br />
of spontaneous breathing:<br />
if spontaneous breathing is sufficient, mandatory strokes are<br />
not used. If spontaneous breathing is not sufficient, intermittent<br />
mandatory strokes of the set tidal volume VT are applied.<br />
If there is no spontaneous breathing at all, the mandatory<br />
strokes are applied at the set frequency f.<br />
<strong>EvitaXL</strong> continuously balances the difference between spontaneous<br />
breathing and the set minimum ventilation. As soon as<br />
the balance becomes negative, because spontaneous breathing<br />
is no longer sufficient, <strong>EvitaXL</strong> applies a mandatory ventilation<br />
stroke at the set tidal volume VT, so that the balance is<br />
positive again.<br />
Experience shows patients breathe very irregularly.<br />
Phases of shallow breathing alternate with phases of tachypnoea<br />
and large respiratory effort. In order to allow for these<br />
individual fluctuations, the balancing process also takes<br />
account of the extent by which the set minimum ventilation has<br />
been exceeded.<br />
This value is progressively reduced to zero by <strong>EvitaXL</strong> within<br />
a maximum time of 7.5 seconds after apnoea.<br />
In this way, the response time of <strong>EvitaXL</strong> is automatically<br />
adapted to the preceding cycle of spontaneous breathing<br />
before activating mandatory ventilation:<br />
If this spontaneous breathing was close to the minimum ventilation,<br />
<strong>EvitaXL</strong> responds rapidly within the cycle time (1/f).<br />
However, if the patient's spontaneous breathing was much<br />
higher than the set minimum ventilation, <strong>EvitaXL</strong> tolerates a<br />
longer breathing pause. In extreme cases of sudden apnoea<br />
after a phase of heavy spontaneous breathing, the response<br />
time will be 7.5 seconds plus the trigger time, with a minimum<br />
of one cycle time (1/f).<br />
212 Instructions for Use <strong>EvitaXL</strong><br />
PAW<br />
Flow<br />
set<br />
MV<br />
MV<br />
Tinsp<br />
VT<br />
PEEP<br />
1<br />
f<br />
Insp. flow<br />
mandatory MV<br />
no spontaneous<br />
breathing<br />
Pmax<br />
(configurable)<br />
ASB pressure<br />
support<br />
short<br />
rise time<br />
trigger phase<br />
beginning spontaneous<br />
breathing<br />
long<br />
rise time<br />
spontaneously<br />
breathed MV<br />
t<br />
sufficient spontaneous<br />
breathing<br />
t<br />
t<br />
011<br />
012
Response times longer than 15 seconds may only occur if the<br />
minimum ventilation with a very low frequency f is set to correspondingly<br />
low values.<br />
In this case, <strong>EvitaXL</strong> triggers an apnoea alarm, which is cancelled<br />
again as soon as the mandatory ventilation strokes have<br />
been applied. If the set cycle time (1/f) is longer than the<br />
TApnoea W alarm limit and if there is no spontaneous breathing<br />
between the mandatory ventilation strokes, the apnoea alarm<br />
will be triggered regularly.<br />
Example: f = 3/min = cycle time (1/f) = 20 seconds<br />
TApnoea W = 15 seconds<br />
This system is designed to prevent mandatory ventilation being<br />
prematurely triggered in the event of irregular spontaneous<br />
breathing, whilst at the same time giving an alarm for any long<br />
period of minimal ventilation.<br />
BIPAP<br />
Biphasic Positive Airway Pressure<br />
The BIPAP ventilation mode is a pressure/time-cycled ventilation<br />
mode in which the patient can always breathe spontaneously.<br />
BIPAP is therefore often described as a time-cycled<br />
alternation between two CPAP levels.*<br />
The time-cycled change of pressure gives controlled ventilation,<br />
which corresponds to pressure-controlled ventilation<br />
PCV. However, the constant option of spontaneous breathing<br />
allows the transition from controlled breathing to independent<br />
spontaneous breathing to take place smoothly via the weaning<br />
phase, without requiring any change the ventilation mode. To<br />
adapt easily to the patient's spontaneous breathing pattern,<br />
the change-over from expiratory pressure level to inspiratory<br />
pressure level, and also the change-over from inspiratory pressure<br />
level to expiratory pressure level, are synchronised with<br />
the patient's spontaneous breathing.<br />
The frequency of the change-over is kept constant, even when<br />
synchronisation occurs via a "trigger window" with fixed time<br />
constant.<br />
The "trigger window" is 5 seconds long in adult mode and<br />
1.5 seconds long in paediatric mode. For expiration times<br />
shorter than 5 seconds or 1.5 seconds, the "trigger window"<br />
covers the entire expiration time. At Pinsp level, the "trigger window"<br />
is 1/4 ·Tinsp seconds long.<br />
As recent clinical research** has shown, this smooth adaptation<br />
to the patient's spontaneous breathing requires less sedation,<br />
so that the patient returns to spontaneous breathing more<br />
rapidly.<br />
* Bibliography [3], [4], [7], [11], [12], page 235<br />
** Bibliography [8], page 235<br />
Ventilation Modes<br />
MMV<br />
BIPAP<br />
Instructions for Use <strong>EvitaXL</strong> 213
Ventilation Modes<br />
BIPAP<br />
As in all pressure-controlled ventilation modes, the patient is<br />
not prescribed a fixed tidal volume (VT).<br />
The tidal volume results principally from the pressure difference<br />
between the settings for PEEP and Pinsp.<br />
Changes in lung compliance and airways, as well as active<br />
breathing by the patient can lead to changes in tidal volume.<br />
This is a desired effect in this ventilation mode.<br />
With the knowledge that the tidal volume, and therefore the<br />
minute volume, are not constant, the alarm limits for minute volume<br />
must be adjusted with care.<br />
The display of the expiratory measured tidal volume VTe must<br />
be used to set the required difference between the two pressure<br />
levels.<br />
As with SIMV, the time pattern is set using the basic setting<br />
parameters of frequency f and inspiration time Tinsp. The<br />
resultant inspiration and expiration times are calculated by<br />
<strong>EvitaXL</strong> and displayed in the lower half of the screen below the<br />
curve setting. The lower pressure level is set with the PEEP<br />
parameter, while the upper level is set with Pinsp.<br />
When switching over from SIMV to BIPAP mode, and retaining<br />
the time pattern, only the Pinsp setting needs to be changed.<br />
The steepness of the increase from the lower pressure level to<br />
the upper pressure level is controlled by the »Ramp« setting.<br />
The effective time for the increase in pressure cannot become<br />
greater than the set inspiratory time Tinsp.<br />
This precaution ensures that the upper pressure level Pinsp is<br />
reached safely during inspiration. The transition from controlled<br />
ventilation via the weaning phase to fully spontaneous<br />
breathing is achieved by a gradual reduction of inspiratory<br />
pressure Pinsp and/or frequency f.<br />
214 Instructions for Use <strong>EvitaXL</strong><br />
Pinsp<br />
PEEP<br />
Paw<br />
trigger<br />
window<br />
mandatory<br />
BIPAP stroke<br />
Pinsp<br />
Tinsp<br />
spontaneous<br />
breathing<br />
spontaneous<br />
breathing time<br />
1<br />
f<br />
synchronisesd<br />
BIPAP stroke<br />
t<br />
022
BIPAPAssist<br />
Biphasic Positive Airway Pressure Assisted<br />
Pressure-controlled, assisted ventilation<br />
For all patients, from those unable to breathe spontaneously to<br />
those breathing spontaneously before being weaned off the<br />
ventilator.<br />
The inspiratory strokes are the same as for BIPAP, except that<br />
the change from Pinsp to PEEP is not synchronised with expiration<br />
by the patient.<br />
The duration of Pinsp depends on Tinsp. The patient can<br />
breathe spontaneously throughout the ventilation process.<br />
Every spontaneous breathing activity by the patient at the<br />
lower pressure level triggers a synchronised inspiratory stroke.<br />
A non-synchronised inspiratory stroke is triggered by the<br />
machine at the latest upon expiry of the inspiration time<br />
defined by »f« and »Tinsp«.<br />
APRV<br />
Airway Pressure Release Ventilation<br />
Spontaneous breathing under continuous positive airway pressure<br />
with brief pressure release. The patient breathes spontaneously<br />
at a high pressure level Phigh for an adjustable length<br />
of time Thigh. For very short expiration times Tlow, <strong>EvitaXL</strong><br />
switches to a low pressure level Plow. The normal lung areas<br />
are emptied, but the "slow" lung areas only change volume to a<br />
lesser extent.*<br />
In this way, the ventilation/perfusion ratio can be improved for<br />
patients with a poor gas exchange.<br />
The steepness of the increase from the lower pressure level to<br />
the upper pressure level is controlled by the »Ramp« setting.<br />
The effective time for the increase in pressure cannot become<br />
greater than the set time Thigh.<br />
* Bibliography [6], [7], [8], [9], page 235<br />
Ventilation Modes<br />
BIPAPAssist<br />
APRV<br />
Instructions for Use <strong>EvitaXL</strong> 215<br />
PEEP<br />
PAW<br />
Flow<br />
Phigh<br />
Plow<br />
fast<br />
rise time<br />
PAW<br />
Tinsp<br />
1<br />
f<br />
Pinsp<br />
without spontaneous<br />
breathing<br />
slow<br />
rise time<br />
Thigh Tlow<br />
Trigger window<br />
for synchronisation<br />
with spontaneous<br />
breathing<br />
t<br />
t<br />
t<br />
009<br />
186
Ventilation Modes<br />
ASB<br />
ASB<br />
Assisted Spontaneous Breathing<br />
Pressure support for insufficient spontaneous breathing.<br />
The function of the machine in assisting insufficient spontaneous<br />
breathing is similar to that of the anaesthetist who manually<br />
assists and monitors the patient's spontaneous breathing<br />
by feeling the breathing bag.<br />
The machine takes over part of the inhalation function, with the<br />
patient maintaining control of spontaneous breathing.<br />
The CPAP system supplies the spontaneously breathing<br />
patient with the breathing gas, even if the inspiration effort<br />
is weak.<br />
The pressure support of the ASB system is started:<br />
— when the spontaneous inspiration flow reaches the set<br />
value of the Flowtrigger,<br />
or at the latest<br />
— when the spontaneous inspired volume exceeds 25 mL<br />
(12 mL in paediatric mode).<br />
The machine then produces an increase in pressure up to the<br />
preselected ASB pressure PASB, which is adjustable to the<br />
breathing requirement of the patient.<br />
The time for this pressure increase is adjustable from<br />
64 milliseconds to 2 seconds.<br />
With a rapid increase in pressure, <strong>EvitaXL</strong> supports the<br />
patient's insufficient spontaneous breathing with a high peak<br />
flow.<br />
With a slow increase in pressure, <strong>EvitaXL</strong> begins gently with a<br />
low inspiratory flow. The patient must increase his/her breathing<br />
effort.<br />
With the patient adjusted pressure increase and ASB pressure<br />
PASB the patient defines via his/her breathing activity the<br />
required inspiration flow, which can rise in 8 ms to 2 L/s.<br />
ASB is terminated:<br />
— when the inspiration flow returns to zero during phase I, i.e.<br />
when the patient exhales or fights the ventilator, or<br />
— when the inspiration flow in phase II falls below a certain<br />
ratio of the maximum value previously supplied:for adult<br />
ventilation: 25 % Insp. Flow<br />
for paediatric ventilation: 25 % Insp. Flow<br />
or<br />
— at the latest after 4 seconds (1.5 seconds in paediatric ventilation)<br />
if the two other criteria have not come into operation.<br />
If this time criterion occurs three times in succession,<br />
<strong>EvitaXL</strong> gives an alarm and warns of a possible leak in the<br />
ventilation system.<br />
216 Instructions for Use <strong>EvitaXL</strong><br />
PAW<br />
Insp.<br />
Flow<br />
PASB<br />
CPAP<br />
Start of inspiration<br />
Phase<br />
I II<br />
max. 4 s<br />
End of inspiration<br />
Prescribed ideal<br />
airway pressure<br />
t<br />
25 % Insp. Flow for adults<br />
25 % Insp. Flow for paediatrics<br />
t<br />
021
PPS (optional)<br />
In ventilation mode »PPS«, <strong>EvitaXL</strong> supports the patient's spontaneous<br />
breathing proportionally to the breathing effort. If the<br />
patient breathes strongly, <strong>EvitaXL</strong> supports this effort with high<br />
pressure; shallow breathing is supported with low pressure.<br />
Mechanical support is omitted altogether if there is no spontaneous<br />
breathing. Monitoring of apnoea and minute volume<br />
must therefore be set appropriately.<br />
Ventilation in PPS mode can be compared to power-assisted<br />
steering in a motor car: every turn of the steering wheel is supported<br />
by a servo-amplifier so that less effort is required by the<br />
driver than when driving without power-assisted steering. On<br />
the other hand, there is no response from the power-assisted<br />
steering if the steering wheel is not turned at all.<br />
The degree of support in PPS mode can be set separately<br />
according to the resistive and elastic components.<br />
The amount of resistive breathing effort to be undertaken by<br />
<strong>EvitaXL</strong> is determined by the user through the resistive<br />
FlowAssist component.<br />
<strong>EvitaXL</strong> increases the ventilation pressure as the patient<br />
breathes in.<br />
For a detailed description of PPS in the literature, refer to "Proportional<br />
Assist Ventilation", page 235 [20].<br />
Example:<br />
If FlowAssist is set to 5 mbar/L/s, a resistance of 5 mbar/L/s<br />
will be compensated. The resistive support pressure is calculated<br />
by <strong>EvitaXL</strong> as follows:<br />
∆PAW = FlowAssist * Flow<br />
With the help of the elastic component Vol.Assist, the user can<br />
determine the amount of elastic breathing effort to be undertaken<br />
by <strong>EvitaXL</strong>. This support is only effective during<br />
inspiration.<br />
Example:<br />
If Vol.Assist is set to 10 mbar/L, the elastic breathing effort will<br />
be compensated for a compliance of 100 mL/mbar. The elastic<br />
support pressure is calculated by <strong>EvitaXL</strong> as follows:<br />
∆PAW = Vol.Assist* VTi<br />
The actual ventilation pressure is equal to the sum of the resistive<br />
and elastic components.<br />
The airway pressure PAW, tidal volume VT and the inspiration<br />
time are monitored by <strong>EvitaXL</strong> during inspiration.<br />
The maximum airway pressure is limited to PAW > –5 mbar.<br />
The advisory message "Pressure limited !" is displayed.<br />
The maximum inspiratory tidal volume is limited to the upper<br />
alarm limit »VTi > «.<br />
Inspiration is interrupted if the alarm limit is exceeded and the<br />
alarm message "Tidal volume high !!!" is displayed.<br />
The maximum inspiration time is limited to 4 s (1.5 s in paediatric<br />
or neonatal mode). If the time is exceeded, inspiration will<br />
be interrupted and the alarm message "PPS-Insp. > 4 s !!!" (or<br />
the advisory message "PPS-Insp. > 1.5 s !") is displayed.<br />
Ventilation Modes<br />
PPS (optional)<br />
Instructions for Use <strong>EvitaXL</strong> 217<br />
Flow<br />
VT<br />
PAW<br />
∆PAW<br />
Inspiration Expiration<br />
FlowAssist: Pressure curve proportional to Flow<br />
Flow<br />
VT<br />
PAW<br />
t<br />
t<br />
PEEP<br />
∆PAW PEEP<br />
Inspiration Expiration<br />
Vol.Assist: Inspiratory pressure curve proportional to tidal volume VT<br />
t<br />
t<br />
t<br />
t<br />
023<br />
024
Measurements<br />
Flow measurement<br />
Measurements<br />
Flow measurement<br />
Regardless of whether ventilation is volume-controlled or pressure-controlled,<br />
positive pressures are generated in both the<br />
breathing system and patient lung during the inspiration<br />
phase.<br />
Depending on the ratio of lung compliance to hose system<br />
compliance, the volume delivered by the ventilator is distributed<br />
to the patient's lung and to the hose system installed<br />
between the ventilator and patient.<br />
Deviations in the measured expiration flow and derived values,<br />
such as the minute volume and breath volume, are low for<br />
adult patients, due to their relatively high lung compliance in<br />
relation to the much lower compliance of the ventilation hoses.<br />
However, since only the volume attained and surrendered by<br />
the lung is relevant to the efficiency of ventilation, and since<br />
larger differences are possible during paediatric ventilation,<br />
<strong>EvitaXL</strong> provides basic compensation for hose compliance during<br />
ventilation.<br />
Compensation of the effect of hose system compliance<br />
During the device check before ventilation, <strong>EvitaXL</strong> determines<br />
the compliance of the ventilation hoses and then compensates<br />
for the effect of compliance on volumetric flow measurement<br />
during ventilation.<br />
Depending on the airway pressure, <strong>EvitaXL</strong> increases the tidal<br />
volume by the amount that remains in the ventilation hoses.<br />
In addition to hose system compliance, flow/volume measurement<br />
is also influenced by the ambient factors of temperature<br />
and humidity, as well as by leaks in the hose system. These factors<br />
are taken into account by <strong>EvitaXL</strong> and the settings and<br />
measured values are corrected accordingly.<br />
Conversion according to ambient conditions<br />
The volume occupied by a gas depends on the ambient conditions<br />
of temperature, pressure and humidity. In lung physiology,<br />
the minute volume and tidal volume are related to the<br />
ambient conditions in the lung: 37 oC body temperature, pressure<br />
in the lung, 100 % relative humidity.<br />
The flow and volume values measured under these conditions<br />
are marked with BTPS*. Medical gases from cylinders or from<br />
the central supply are dry (approx. 0 % rel. humidity) and are<br />
delivered at 20 o C by the ventilator. The flow and volume<br />
values measured under these conditions are marked with<br />
NTPD**.<br />
* BTPS = Body Temperature, Pressure, Saturated.<br />
** NTPD = Normal Temperature Pressure Dry.<br />
218 Instructions for Use <strong>EvitaXL</strong>
The difference between measured values under NTPD and<br />
BTPS conditions is typically approx. 12 %.<br />
Example: heating up 500 mL tidal volume NTPD to 37 o C and<br />
moistening it to 100 % rel. humidity produces 564 mL BTPS.<br />
<strong>EvitaXL</strong> doses the tidal volume so that the set tidal volume<br />
under BTPS is effective in the lung.<br />
The expiratory measurement is performed on the basis of saturated<br />
gases at 30 o C.<br />
Measurement principles<br />
Flow Measurement<br />
The expiratory flow is measured with a hot-wire anemometer.<br />
The energy needed to keep the hot wire at a temperature of<br />
180 oC represents the flow flowing through the sensor and<br />
cooling the hot wire.<br />
O2 measurement<br />
The oxygen measurement is based on the principle of a galvanic<br />
cell. The monitored gas diffuses through a membrane<br />
into the electrolyte in the sensor. The electrolyte contains a<br />
working electrode and a reference electrode. The oxygen is<br />
reduced electrochemically and the resultant current is proportional<br />
to the O2 partial pressure in the gas.<br />
CO2 measurement<br />
CO2 is measured in the main stream and is based on an<br />
absorption measurement. A spectrum is output by a light<br />
source while two detectors register the characteristic absorption<br />
spectrum and generate electrical signals as a function of<br />
the CO2 concentration. These signals are evaluated and displayed.<br />
Condensation is prevented by heating the CO2<br />
measuring unit.<br />
Measurements<br />
Flow Measurement<br />
Measurement principles<br />
Instructions for Use <strong>EvitaXL</strong> 219
Measurements<br />
Automatic leakage compensation<br />
Automatic leakage compensation<br />
<strong>EvitaXL</strong> determines the difference between the delivered flow<br />
on the inspiration side and the measured flow on the expiration<br />
side. This difference provides a measure of the amount of<br />
leakage and is displayed by <strong>EvitaXL</strong> as the leakage minute<br />
volume MVleak.<br />
<strong>EvitaXL</strong> can compensate for this leakage in volume-controlled<br />
ventilation.<br />
Example:<br />
Tidal volume setting VT = 500 mL, 10 % leakage in tube.<br />
Leakage compensation Off<br />
<strong>EvitaXL</strong> delivers 500 mL. This value is indicated as VTi. 50 mL<br />
escape as leakage during inspiration, and 450 mL reach the<br />
lung. 450 mL are expired, and 45 mL again escape as leakage.<br />
A tidal volume of 405 mL is measured on the expiration side<br />
and indicated as VTe.<br />
With a ventilation rate of 10 strokes per minute, a minute volume<br />
of 5.0 L/min is delivered on the inspiration side and a<br />
minute volume of 4.05 L/min is measured on the expiration<br />
side. The lung is ventilated with an MV of 4.5 L/min.<br />
Without leakage compensation, the set VT determines the<br />
volume delivered by <strong>EvitaXL</strong>.<br />
Leakage compensation On<br />
With automatic leakage compensation, <strong>EvitaXL</strong> delivers<br />
550mL tidal volume on the basis of the measured leakage<br />
minute volume, instead of the 500mL set. 500 mL reach the<br />
lung and the inspiratory tidal volume is 500 mL. This value is<br />
indicated as VT.<br />
The volume of 450 mL measured on the expiration side is displayed<br />
without compensation, even when leakage compensation<br />
is activated. The minute volume measured on the<br />
expiration side is 4.5 L/min and is also uncompensated.<br />
If this were not so, the alarm for a low minute volume could be<br />
inhibited by the expiratory leakage compensation. <strong>EvitaXL</strong> must<br />
always emit an alarm if the minute volume is too low.<br />
With leakage compensation, the set VT determines the<br />
volume to be delivered to the patient.<br />
This example has been simplified:<br />
In fact, the calculated leakage correction takes into account<br />
the pressures in the hose system. A higher percentage volume<br />
is lost on the inspiration side than on the expiration side<br />
because the pressure during inspiration is higher.<br />
The displayed leakage minute volume MVleak is based on the<br />
mean pressure Pmean.<br />
The leakage minute volume MVleak also takes the inspiratory<br />
leaks into account. The sum of the minute volume MV + the<br />
leakage minute volume MVleak is consequently greater than<br />
the inspiratory minute volume delivered to the patient.<br />
220 Instructions for Use <strong>EvitaXL</strong>
Unlimited volume compensation is inappropriate. <strong>EvitaXL</strong><br />
compensates for losses of up to 100 % of the set tidal<br />
volume VT.<br />
Due to technical tolerances, a small leakage minute volume<br />
may be displayed even if the hose system is leakproof.<br />
Leakage compensation in application mode »Mask« (NIV)<br />
Depending on the set patient mode, <strong>EvitaXL</strong> compensates<br />
leakages up to the following values in order to detect a patient<br />
trigger:<br />
Adult mode: 30 L/min<br />
Paediatric mode: 15 L/min<br />
Calculated leakages are compensated by <strong>EvitaXL</strong> up to 200 %<br />
of the set tidal volume, but not more than max. 2 L (regardless<br />
of the patient mode).<br />
Tube compensation ATC<br />
The special function »Tube compensation« regulates the airway<br />
pressure to the tracheal level. This function calculates and<br />
displays the tracheal pressure on the basis of a mathematical<br />
tube model, the set tube type and the inside diameter of the<br />
tube.<br />
The selected tube type and the inside diameter of the tube<br />
must correspond with the real tube for correct calculation of<br />
the tracheal pressure. <strong>EvitaXL</strong> calculates the tracheal pressure<br />
on the basis of a square function of tube resistance and<br />
patient flow:<br />
PTrachea = PAW – KTube x Flow 2<br />
PTrachea: Pressure in the trachea<br />
PAW: Pressure at the Y-piece of the hose system<br />
KTube: Tube coefficient (see table)<br />
Flow: Patient flow<br />
(inspiration: flow >0; expiration: flow and reduced to<br />
not less than 0 mbar.<br />
The maximum airway pressure is limited to PAW > – 5 mbar.<br />
The advisory message "Pressure limited !" is displayed.<br />
Measurements<br />
Automatic leakage compensation<br />
Tube compensation ATC<br />
Instructions for Use <strong>EvitaXL</strong> 221
Measurements<br />
Tube compensation ATC<br />
Pressure support is calculated on the basis of a square function<br />
of tube resistance and patient flow:<br />
∆PAW = Comp.* KTube * Flow2 ∆PAW: Pressure support on the tube<br />
Comp.: Degree of compensation 0 to 100 %<br />
KTube: Tube coefficient (see table)<br />
Flow: Patient flow<br />
The tube coefficient KTube is largely determined on the basis<br />
of the results obtained by Guttmann et al. Guttmann, Wolf et<br />
al, see literature reference [19] on page 235.<br />
The tube coefficient KTube for the full-length tube is always<br />
taken as the basis. The effect of the shortened length is<br />
negligible.<br />
Tube type Inside diameter of<br />
tube (mm)<br />
Endotracheal<br />
tube<br />
Tube coefficient<br />
KTube (mbar/L 2 /s 2 )<br />
2.50..............................480.00<br />
3.00..............................250.00<br />
3.50..............................140.00<br />
4.00.............................. 80.00<br />
4.50.............................. 50.00<br />
5.00.............................. 34.40<br />
5.50.............................. 23.70<br />
6.00.............................. 17.21<br />
6.50.............................. 13.05<br />
7.00.............................. 10.56<br />
7.50.............................. 8.41<br />
8.00.............................. 6.57<br />
8.50.............................. 5.17<br />
9.00.............................. 4.29<br />
9.50.............................. 3.80<br />
10.00.............................. 3.50<br />
10.50.............................. 3.00<br />
11.00.............................. 2.50<br />
11.50.............................. 2.00<br />
12.00.............................. 1.50<br />
222 Instructions for Use <strong>EvitaXL</strong>
Tube type Inside diameter of<br />
tube (mm)<br />
Tracheotomy<br />
tube<br />
Tube coefficient<br />
KTube (mbar/L 2 /s 2 )<br />
2.50..............................480.00<br />
3.00..............................250.00<br />
3.50..............................140.00<br />
4.00.............................. 80.00<br />
4.50.............................. 50.00<br />
5.00.............................. 30.96<br />
5.50.............................. 15.40<br />
6.00.............................. 10.00<br />
6.50.............................. 7.90<br />
7.00.............................. 6.38<br />
7.50.............................. 5.20<br />
8.00.............................. 4.50<br />
8.50.............................. 3.70<br />
9.00.............................. 2.95<br />
9.50.............................. 2.65<br />
10.00.............................. 2.50<br />
10.50.............................. 2.05<br />
11.00.............................. 1.65<br />
11.50.............................. 1.35<br />
12.00.............................. 1.10<br />
Measurements<br />
Tube compensation ATC<br />
Instructions for Use <strong>EvitaXL</strong> 223
Measurements<br />
Weaning parameters<br />
Weaning parameters<br />
P 0.1, RSB, NIF:<br />
A number of criteria must be taken into account by the doctor<br />
when deciding whether or not a patient is ready to be weaned<br />
off the ventilator. In addition to the results of examinations and<br />
laboratory analyses, ventilation parameters can also be used to<br />
judge whether the patient can be weaned successfully.<br />
The following weaning parameters are measured/calculated<br />
by <strong>EvitaXL</strong>:<br />
— Occlusion pressure P 0.1<br />
— Rapid Shallow Breathing RSB<br />
— Negative Inspiratory Force NIF<br />
Occlusion pressure P 0.1<br />
Breathing drive can be measured at the start of inspiration by<br />
measuring the mouth pressure during a short-term occlusion:<br />
within 100 ms, the pressure is not influenced by physiological<br />
compensation reaction (e.g. reflected breathing stop or<br />
increased breathing drive). This pressure is always dependent<br />
on the muscle strength of the diaphragm. Therefore, the negative<br />
mouth pressure P 0.1 after 0.1 seconds is a direct measure<br />
of neuro-muscular breathing drive*.<br />
<strong>EvitaXL</strong> displays the value for the measured pressure difference<br />
without a negative sign.<br />
For patients with healthy lungs and regular breathing, P 0.1 will<br />
be about 3 to 4 mbar. A higher P 0.1 signifies a high breathing<br />
drive which can only be maintained for a limited period.<br />
P 0.1 values above 6 mbar, e.g. for a COPD** patient, indicate<br />
impending exhaustion (RMF – respiratory muscle fatigue).<br />
<strong>EvitaXL</strong> keeps the inspiratory valve closed after an expiration<br />
and measures the airway pressure produced by the inspiratory<br />
effort during 100 ms.<br />
The 100 ms time interval starts when a negative pressure<br />
of –0.5 mbar below PEEP/CPAP is measured as a result<br />
of the inspiratory effort.<br />
The second pressure value is determined after 100 ms. The<br />
inspiratory valve is opened simultaneously; the patient can<br />
breathe normally again.<br />
The occlusion pressure P 0.1 is the difference between the<br />
pressure values P2 – P1.<br />
* Bibliography [10], [15], page 235<br />
** COPD = Chronic Obstructive Pulmonary Disease<br />
224 Instructions for Use <strong>EvitaXL</strong><br />
PAW<br />
CPAP<br />
–0.5 mbar<br />
P1<br />
Insp. valve closed<br />
100 ms<br />
P2<br />
Insp. valve opens<br />
P 0.1<br />
t<br />
025
Rapid-Shallow-Breathing RSB<br />
The Rapid Shallow Breathing index (RSB) is the quotient of<br />
the spontaneous breathing frequency (spontaneously<br />
breathed breaths per minute) and the tidal volume:<br />
fspn [1/min]<br />
RSB [1/(min x L)] =<br />
VT [L]<br />
The lower the RSB index for a patient with spontaneous<br />
breathing, the more probably he or she can be weaned successfully.<br />
The significance of the RSB index is due to the fact<br />
that patients who can be weaned successfully tend to have a<br />
lower spontaneous breathing frequency and a higher tidal volume<br />
than those who are not yet ready to be weaned.<br />
In their 1991 study* Yang and Tobin showed that the RSB<br />
index is an effective instrument for predicting the success of<br />
an attempt to wean the patient. Patients with an RSB index of<br />
100 1/(min x L) were not<br />
yet ready to be weaned. <strong>EvitaXL</strong> indicates the RSB index in<br />
CPAP/ASB and PPS modes.<br />
Negative Inspiratory Force NIF<br />
The Negative Inspiratory Force Index (NIF)** measures the<br />
patient's maximum inhalation effort after exhaling. The patient<br />
system is closed during measurement of the NIF. This value is<br />
also known as the Maximum Inspiratory Pressure (MIP). As a<br />
result of the inhalation effort during manually extended expiration,<br />
the patient generates a negative pressure in relation to<br />
PEEP. The probability that the patient can be weaned successfully<br />
increases with the magnitude of this negative pressure.<br />
Patients with a NIF of
Measurements<br />
Intrinsic PEEP – PEEPi<br />
Intrinsic PEEP – PEEPi<br />
Intrinsic PEEP is measured in two phases: <strong>EvitaXL</strong> keeps the<br />
inspiration and expiration valves closed during measuring<br />
phase 1, so that it is impossible for gas to flow into the ventilation<br />
system from inspiration and to escape from it. During this<br />
closed phase, pressure is equalized between the lungs and<br />
the ventilation system. <strong>EvitaXL</strong> measures the pressure curve.<br />
Measuring phase 1 is ended:<br />
— when there is no further change in the pressure curve but at<br />
the earliest after 0.5 seconds,<br />
— at the latest after 3 seconds in adult mode or after<br />
1.5 seconds in paediatric mode.<br />
The start value corresponds to PEEP, and the value at the end<br />
of the closed phase is the Intrinsic PEEP.<br />
At the end of measuring phase 1, <strong>EvitaXL</strong> opens the expiration<br />
valve and measures the expiratory flow generated by intrinsic<br />
PEEP during measuring phase 2. During this period, the lung<br />
is depressurised to PEEP. Measuring phase 2 is ended:<br />
— when the expiration flow has returned to 0 but at the earliest<br />
after 0.5 seconds.<br />
— at the latest after 7 seconds in adult mode or after<br />
3.5 seconds in paediatric mode.<br />
The integrated flow corresponds to the air volume trapped in<br />
the lungs Vtrap by Intrinsic PEEP.<br />
Measuring times of measuring phase 1 for Intrinsic PEEP:<br />
For adult ventilation max. 3 seconds<br />
For paediatric ventilation max. 1.5 seconds<br />
Measuring times of measuring phase 2 for Vtrap:<br />
For adult ventilation max. 7 seconds<br />
For paediatric ventilation max. 3.5 seconds<br />
226 Instructions for Use <strong>EvitaXL</strong><br />
PAW<br />
PEEP<br />
Flow<br />
insp. and exp.<br />
valves closed exp. valve opens<br />
Measuring<br />
time 1<br />
Intrinsic PEEP<br />
Measuring<br />
time 2<br />
Vtrap<br />
t<br />
t<br />
026
Low Flow PV-Loop<br />
The Low Flow PV-Loop* measuring procedure records a static<br />
pressure-volume curve, which can be used to assess the<br />
mechanical properties of the lung.<br />
By slowly filling the lung with a small, constant flow, only the<br />
elastistic properties are determined in the PV-Loop. This<br />
almost static process shows a good correlation with the static<br />
Super-Syringe or Occlusion Method [27 to 29]**, as long as<br />
the flow is small [22 to 26]**.<br />
There are various approaches for optimising ventilation settings<br />
based on measurements of the lung mechanics. All<br />
approaches aim at avoiding a recurrent collapsing and reopening<br />
of alveoli and a possible over-inflation of the lung.<br />
A suggestion is made to set the positive end-expiratory pressure<br />
(PEEP) on the basis of the lower inflection point (LIP) and<br />
to limit the tidal volume or plateau pressure on the basis of the<br />
upper inflection point (UIP) [30 to 33]**. Other research recommends<br />
taking into account the expiratory limb of the PV-<br />
Loop when determining the positive end-expiratory pressure<br />
(PEEP) required to maintain an alveolar recruitment.<br />
Characteristic points on the expiratory limb are described in<br />
this context as the critical closure pressure (CCP) or the point<br />
of maximum curvature (PMC) [22, 24, 27, 30, 34 to 40]**.<br />
To determine these points on the inspiratory/expiratory limb,<br />
two cursors can be moved over the PV-Loop. In addition, the<br />
static compliance (Cstat) can also be calculated.<br />
* Lung Protection Package option<br />
** Bibliography, see page 235<br />
Measurements<br />
Low Flow PV-Loop<br />
Performing a low flow procedure may decrease the patient's<br />
systemic circulatory pressure and could cause a pneumothorax,<br />
for example. The condition of the patient must therefore be<br />
taken into account when making the settings.<br />
The applied pressures and volumes must be suitable for the<br />
patient. Potentially high intrathoracic pressures can be applied<br />
over a comparatively long period whilst performing the procedure.<br />
The patient must therefore be considered to be haemodynamically<br />
stable before starting the procedure and the vital<br />
data must be closely monitored and documented during the<br />
entire measurement. A significantly higher venous return,<br />
caused by an abrupt relieving of the intrathoracic pressure,<br />
can overstrain the heart under certain conditions. This is why<br />
the procedure is usually terminated, even after only an inspiratory<br />
application, with a pressure ramp of 5 mbar/s.<br />
The procedure is similar to an apnoea with a single slow<br />
breath. An acceptable procedure duration should also be estimated<br />
for the patient. To avoid longer times with a reduced gas<br />
exchange, the procedure can only be restarted after<br />
60 seconds after nebulisation, suction or a previous<br />
Low Flow PV-Loop.<br />
Spontaneous breathing or leaks during the procedure distort<br />
the measured values and should be ruled out before the<br />
application.<br />
Dependent on the duration of the procedure and the metabolic<br />
turnover of the patient, the expiratory limb of a PV-Loop,<br />
in particular, can be easily influenced by the O2 consumption,<br />
which is not offset by a corresponding CO2 production<br />
[41, 42]**.<br />
Instructions for Use <strong>EvitaXL</strong> 227
Measurements<br />
Insp. O2 concentration during medicament nebulisation<br />
Insp. O2 concentration during medicament<br />
nebulisation<br />
Use only medicament nebuliser 84 12 935 (white central<br />
section).<br />
If other medicament nebulisers are used, considerable<br />
deviations may occur in the tidal volume and the inspiratory<br />
O2 concentration!<br />
To minimise the deviation from the set O2 concentration,<br />
<strong>EvitaXL</strong> uses a mixed gas to drive the medicament nebuliser.<br />
In adult ventilation, this mixed gas is generated by switching<br />
over between compressed gases (medical air and oxygen) in<br />
synchronisation with inspiration.<br />
In paediatric ventilation, the nebuliser is operated continuously,<br />
with medical air or oxygen in alternation. The drive gas of<br />
the medicament nebuliser therefore roughly corresponds to<br />
the set FiO2.<br />
The graph shows the possible deviations of the applied O2<br />
concentration as a function of the set FiO2 with a minimal<br />
inspiratory flow (15 L/min) in adult ventilation or at ventilation<br />
frequencies above 12 bpm in paediatric ventilation.<br />
100<br />
90<br />
80<br />
70<br />
60<br />
50<br />
40<br />
30<br />
20<br />
20<br />
set O2 concentration FiO2 Vol.%<br />
228 Instructions for Use <strong>EvitaXL</strong><br />
applied O2 concentration FiO2 Vol.%<br />
30 40 50 60 70 80 90 100<br />
027
Screen configurations<br />
Screen configurations<br />
The table lists the settings with which the six memory locations are pre-assigned at the works. Measured values and curves<br />
which are assigned to a certain option (e. g. CO2) are only available when the option is released.<br />
To store customised screen configurations, see page 132.<br />
Screen configuration<br />
1 2 3 4 5 6<br />
Standard Mandatory<br />
ventilation or<br />
recruitment<br />
SmartCare Spontaneous<br />
breathing<br />
APRV NIV<br />
Curve display<br />
Curve PAW PAW PAW PAW PAW PAW<br />
Flow Flow Flow Flow Flow Flow<br />
Volume Volume Volume Volume Volume Volume<br />
Curve and short<br />
trend<br />
Curve and<br />
RecrTrend<br />
Loops<br />
left / right<br />
PAW–MV PAW–C PAW–f PAW–RSB PAW–C PAW–MV<br />
Flow–VTe Flow–R Flow–Volume Flow–P 0.1 Flow–R Flow–VTe<br />
Volume–f Volume–*CO2 Volume–RSB Volume–*CO2 Volume–*CO2 Volume–f<br />
– PAW–EIP/<br />
PEEP<br />
– – – –<br />
– Flow–VTe – – – –<br />
– Volume–C – – – –<br />
PAW–V /<br />
V–Flow<br />
Flow–PAW /<br />
PAW–V<br />
PAW–V /<br />
V–Flow<br />
PAW–V /<br />
PTrach–V<br />
Flow–PAW /<br />
Flow–PTrach<br />
V–Flow /<br />
V–CO2<br />
PAW–V /<br />
PTrach–V<br />
Flow–PAW /<br />
Flow–PTrach<br />
V–Flow /<br />
V–CO2<br />
PAW–V /<br />
PTrach–V<br />
Flow–PAW /<br />
Flow–PTrach<br />
V–Flow /<br />
V–CO2<br />
PAW–V /<br />
PTrach–V<br />
Flow–PAW /<br />
Flow–PTrach<br />
V–Flow /<br />
V–CO2<br />
PAW–V /<br />
PTrach–V<br />
Flow–PAW /<br />
Flow–PTrach<br />
V–Flow /<br />
V–CO2<br />
Trend MV MV fspn MV MV MV<br />
VTe VTe MV VTe VTe VTe<br />
f *CO2 Diagnosis *CO2 *CO2 f<br />
Trend selection MV MV MV MV MV MV<br />
VTe VTe VTe VTe VTe VTe<br />
f f f f f f<br />
*CO2 *CO2 *CO2 *CO2 *CO2 *CO2<br />
R R R R R R<br />
C C C C C C<br />
P 0.1 P 0.1 P 0.1 P 0.1 P 0.1 P 0.1<br />
RSB RSB RSB RSB RSB RSB<br />
– – SC-Trend – – –<br />
– – SC-Trend – – –<br />
Instructions for Use <strong>EvitaXL</strong> 229
Screen configurations<br />
Screen configuration<br />
1 2 3 4 5 6<br />
Standard Mandatory<br />
ventilation or<br />
recruitment<br />
SmartCare Spontaneous<br />
breathing<br />
APRV NIV<br />
Function keys – O2 suction O2 suction O2 suction O2 suction O2 suction<br />
– PEEPi Diagnosis P 0.1 Nebuliser NeoFlow<br />
Sensor<br />
– Low Flow PV-<br />
Loop<br />
SC overview NIF Values Nebuliser<br />
– Nebuliser SC data Nebuliser Logbook Values<br />
– Values SC logbook Values Day/Night Logbook<br />
– Logbook SC trends Logbook – Diagnosis Fct.<br />
Measured values<br />
– Day/Night Day/Night Day/Night – Day/Night<br />
Set 1 Pmean–PEEP FiO2 FiO2 FiO2 FiO2 FiO2<br />
FiO2 Ppeak–Pmean fspn Ppeak–Pmean Ppeak–Pmean VTi<br />
MV VT–VTe VT-etCO2 VTi–VTe VT–VTe VTe<br />
MVspn ftotal–fspn SC fspn ftotal–fspn ftotal–fspn MV<br />
ftotal MV–MVspn SC-VT MV–MVspn MV–MVspn MVspn<br />
VT R–C SC-etCO2 R–C R–C VTASB<br />
Set 2 Pmean–PEEP Pmean Diagnosis Pmean Pmean Pmean<br />
Ppeak Ppeak Phase Ppeak Ppeak Ppeak<br />
fmand–fspn Pmin Duration Pmin Pmin Pmin<br />
ftotal PPlat SC fspn PPlat PPlat PPlat<br />
VTASB PEEP SC-VT PEEP PEEP PEEP<br />
VT MV SC-etCO2 MV MV MV<br />
Set 3 Pmean–PEEP *CO2 fspn–MV *CO2 *CO2 RSB<br />
– Vds/VTe etCO2–Vds/VTe Vds/VTe Vds/VTe R<br />
etCO2 etCO2 PEEP–Ppeak etCO2 etCO2 C<br />
*CO2 VTe R VTASB – –<br />
R Pmean C NIF – –<br />
C MV – RSB – –<br />
Customised settings Mode Mode Mode Mode Mode Mode<br />
Mode ext. Mode ext. Mode ext. Mode ext. Mode ext. Mode ext.<br />
Flow Patient Patient VT f Patient<br />
Thigh VT ATC state f Pmax VT<br />
Tlow f Tube ID Pmax FiO2 f<br />
O2 Pmax O2 FiO2 Thigh FiO2<br />
VT FiO2 PASB Flow Tlow Flow<br />
f Flow PEEP Tinsp Phigh Tinsp<br />
Tinsp Tinsp Ramp I : E Plow I : E<br />
Pmax I : E – Pinsp PEEP Pinsp<br />
PEEP Pinsp – PEEP ATC state Pmax<br />
PASB PEEP – ATC state Tube ID PASB<br />
Pinsp ATC state – Tube ID – Ramp<br />
Phigh Tube ID – Vol.Assist – PEEP<br />
Plow Ramp – FlowAssist – –<br />
230 Instructions for Use <strong>EvitaXL</strong>
Screen configurations<br />
Screen configuration<br />
1 2 3 4 5 6<br />
Standard Mandatory<br />
ventilation or<br />
recruitment<br />
SmartCare Spontaneous<br />
breathing<br />
APRV NIV<br />
Customised values MV FiO2 MV FiO2 FiO2 FiO2<br />
MVspn Ppeak MVspn Ppeak Ppeak Ppeak<br />
Ppeak PPlat VT PPlat PPlat PPlat<br />
PPlat Pmean VTe Pmean Pmean Pmean<br />
Pmean Pmin R Pmin Pmin Pmin<br />
PEEP PEEP C PEEP PEEP PEEP<br />
ftotal MV ftotal MV MV MV<br />
fspn MVspn fspn MVspn MVspn MVspn<br />
– VTetCO2 VT VTe VT<br />
fspn VTe Vds VTe etCO2 VTe<br />
– etCO2 Vds/VTe etCO2 *CO2 R<br />
– *CO2 *CO2 *CO2 R C<br />
VTe R FiO2R C ftotal<br />
VTASB C PEEP C ftotal fmand<br />
– ftotal Ppeak ftotal fmand fspn<br />
– fmand Pmean fmand fspn RSB<br />
R fspn NIF fspn – –<br />
C RSB P 0.1 RSB – –<br />
Instructions for Use <strong>EvitaXL</strong> 231
Abbreviations<br />
Abbreviations<br />
Abreviation Explanation<br />
Alarm Info Display additional causes of alarms<br />
Alarm Reset Acknowledge alarm message<br />
APRV Airway Pressure Release Ventilation<br />
Spontaneous breathing at continuous positive<br />
airway pressure with short-term pressure<br />
release<br />
ASB Assisted Spontaneous Breathing<br />
Pressure supported spontaneous breathing<br />
ATC Automatic Tube Compensation<br />
AutoFlow Special function for automatic regulation of<br />
the inspiratory flow<br />
BIPAP Biphasic Positive Airway Pressure<br />
Spontaneous breathing at continuous positive<br />
airway pressure with two different pressure<br />
levels<br />
BIPAPAssist Biphasic Positive Airway Pressure Assisted<br />
Assisted ventilation with continuous positive<br />
airway pressure with two different pressure<br />
levels<br />
bpm breath per minute<br />
BTPS Body Temperature, Pressure, Saturated<br />
Measured values based on the condition of<br />
the patient's lungs, with body temperature<br />
37 o C, steam-saturated gas, atmospheric<br />
pressure<br />
C Compliance<br />
CAN Controller Area Network<br />
CCP Critical Closing Pressure<br />
Comp. Degree of tube compensation (setting)<br />
CPAP Continuous Positive Airway Pressure<br />
Breathing with continuous positive pressure in<br />
the airways<br />
CPAP-ASB Pressure-supported breathing with continuous<br />
positive airway pressure<br />
CPPV Continuous Positive Pressure Ventilation<br />
Controlled ventilation with continuous positive<br />
airway pressure<br />
Cstat static compliance<br />
∆PASB Setting for PASB relative to PEEP<br />
EIP End-inspiratory pressure<br />
EMC Electromagnetic compatibility<br />
etCO2 End-expiratory CO2 concentration<br />
Ext. Flow External Flow<br />
f Frequency in bpm<br />
Fail to cycle Machine detects no inspiration<br />
Abreviation Explanation<br />
fApnoea Frequency setting for apnoea ventilation<br />
FeCO2 Expiratory CO2 concentration<br />
FiO2 Inspiratory O2 concentration<br />
Flow Setting for the maximum inspiratory flow<br />
Flowtrig Setting for the flow trigger threshold<br />
fmand Mechanical portion of frequency<br />
fspn Spontaneous breathing portion of frequency<br />
I : E Ratio of inspiration time: expiration time<br />
IBW Ideal body weight<br />
ID Ø Internal tube diameter (set value)<br />
ILV Independent Lung Ventilation<br />
Ventilation with 2 ventilators, 1 for each lung<br />
Insp. Flow Inspiratory flow<br />
IPPV Intermittent Positive Pressure Ventilation<br />
Intermittent ventilation with positive pressure<br />
IPPVAssist Assisted Intermittent Positive Pressure<br />
Ventilation<br />
IRV Inversed Ratio Ventilation<br />
Ventilation with inversed inspiration/expiration<br />
ratio<br />
ISO 5369 International standard for medical ventilators,<br />
lung ventilation<br />
KG Body weight [kg]<br />
KTube Tube coefficient<br />
LIP Lower Inflection Point<br />
LUST List-controlled universal interface driver<br />
program<br />
MEDIBUS Dräger communication protocol for medical<br />
devices<br />
MMV Mandatory Minute Volume Ventilation<br />
Mandatory minute volume ventilation<br />
MV Minute Volume<br />
MVleak Leakage minute volume<br />
MVspn Spontaneous breathing portion of minute<br />
volume<br />
NeoFlow Option for neonatal ventilation<br />
NIF Negative Inspiratory Force<br />
Maximum inhalation effort<br />
NIV Non-invasive ventilation<br />
NTC Negative temperature coefficient<br />
O2 Set value for inspiratory O2 concentration<br />
[Vol.]<br />
O2 Y suction Oxygen enrichment program active<br />
232 Instructions for Use <strong>EvitaXL</strong>
Abreviation Explanation<br />
P 0.1 100 ms occlusion pressure<br />
PASB Set value of ASB pressure support<br />
PAW Airway pressure<br />
PEEP Positive End-Expiratory Pressure<br />
PEEPi Intermittent positive end-expiratory<br />
pressure = exp. Sigh<br />
Phigh Set value of the upper pressure level APRV<br />
Pinsp Set value of the upper pressure level in BIPAP<br />
Pleth Plethysmogram<br />
PLimit<br />
Plow Set value of the lower pressure level in APRV<br />
PLV Pressure Limited Ventilation<br />
Pmax Setting for pressure limited ventilation<br />
PMC Point of Maximum Curvature<br />
Pmean Mean airway pressure<br />
Pmin Minimum airway pressure<br />
Ppeak Peak pressure<br />
PPlat End-inspiratory airway pressure<br />
PPS Proportional Pressure Support<br />
Spontaneous breathing with variable pressure<br />
support proportional to the patient flow<br />
and tidal volume<br />
PS Pressure Support<br />
QRS Intraventricular excitation propagation in<br />
the ECG<br />
R Resistance<br />
RecrTrend Recruitment Trend<br />
Breath-based trend<br />
RSB Rapid Shallow Breathing<br />
Quotient of spontaneous breathing frequency<br />
and tidal volume<br />
SB Spontaneous Breathing<br />
Spontaneous breathing at ambient pressure<br />
SIMV Synchronized Intermittent Mandatory<br />
Ventilation<br />
SpO2 Functional oxygen saturation<br />
T Inspiratory breathing gas temperature<br />
TApnoea Apnoea alarm time<br />
Te expiration time<br />
TGI Tracheale Gas Insuflation<br />
Thigh Time for the upper pressure level in APRV<br />
Tinsp Set value of the inspiratory time<br />
Tlow Time for the lower pressure level in APRV<br />
UIP Upper Inflection Point<br />
Abbreviations<br />
Abreviation Explanation<br />
UMDNS Universal Medical Device Nomenclature<br />
System<br />
Nomenclature for medical devices<br />
*CO2 CO2 production [L/min]<br />
Vds Serial dead space<br />
Instructions for Use <strong>EvitaXL</strong> 233<br />
VLimit<br />
VT Setting for tidal volume<br />
VTApnoea Setting for tidal volume of apnoea ventilation<br />
VTASB Inspiratory tidal volume during an ASB stroke<br />
VTe Exp. tidal volume<br />
VTi Insp. tidal volume<br />
Vtrap Proportion trapped in the lung through the<br />
intrinsic PEEP and not exhaled during the<br />
subsequent expiration
Symbols<br />
Symbols<br />
Symbols Explanation<br />
gAlarm Silence Suppress acoustic alarm for 2 minutes<br />
_ Alarm Limits Set alarm limits<br />
Ventilator<br />
Settings<br />
Settings for ventilation<br />
Sensor<br />
Parameter<br />
Sensor calibration<br />
System Setup Configuration<br />
OStart/Standby Standby/ventilation<br />
?Main screen<br />
s<br />
J ext.<br />
J int.<br />
Freeze<br />
Nebul.<br />
Back to main screen<br />
Select different sets of measured values<br />
Freeze screen<br />
Display alarm limit in trend<br />
Medicament nebuliser active<br />
Real-time curves, loops and trends<br />
Humidifier<br />
HME heat and moisture exchanger<br />
AC mains plug connector<br />
External battery<br />
Integrated battery<br />
< Lower alarm limit<br />
> Upper alarm limit<br />
Fit flow sensor<br />
Ramp<br />
Pressure rise time for ASB<br />
Direct access to settings unlocked/locked<br />
Exp. Exp. Expiration port (GAS RETURN)<br />
Insp. Insp. Inspiration port (GAS OUTPUT) *<br />
Gas output<br />
(EXHAUST – NOT FOR SPIROMETERS)*<br />
m Adult Adult mode<br />
Paed. Paediatric mode<br />
Neo. Neonatal mode<br />
? q<br />
Supplementary information<br />
x Quit menu<br />
Note Instructions for Use!<br />
* additionally required, depending on configuration<br />
Symbols Explanation<br />
Earth<br />
Protection class type B<br />
Protection class type BF<br />
234 Instructions for Use <strong>EvitaXL</strong><br />
⁄<br />
1<br />
Spontaneous breathing activity by<br />
the patient<br />
Evita Remote remote-control unit<br />
Nurse call<br />
Tube compensation activated<br />
Select screen configuration<br />
Save screen configuration<br />
Masking out the screen configuration
Bibliography<br />
[1] Baum, M., Benzer, H., Mutz, N., Pauser, G., Tonczar, L.:<br />
Inversed Ratio Ventilation (IRV)<br />
Die Rolle des Atemzeitverhältnisses in der Beatmung<br />
beim ARDS<br />
Anaesthesist 29 (1980), 592-596<br />
[2] Geyer, A., Goldschmied, W., Koller, W., Winter, G.:<br />
Störung der Gerätefunktion bei Anbringung eines Bakterienfilters<br />
in den Exspirationsschenkeln des Beatmungssystems<br />
Anaesthesist 34 (1985), 129-133<br />
[3] Baum, M., Benzer, H., Putensen, Ch., Koller, W., Putz, G.:<br />
Biphasic Positive Airway Pressure (BIPAP) – eine neue<br />
Form der augmentierenden Beatmung<br />
Anaesthesist 38 (1989), 452-458<br />
[4] Luger, Th.J., Putensen, Ch., Baum, M., Schreithofer, D.,<br />
Morawetz, R.F., Schlager, A.:<br />
Entwöhnung eines Asthmatikers mit Biphasic Positive<br />
Airway Pressure (BIPAP) unter kontinuierlicher Sufentanil<br />
Gabe<br />
Anaesthesist (1990) 39: 557-560<br />
[5] Hensel, I.:<br />
Atemnotsyndrom nach Beinahe-Ertrinken<br />
Rettung durch neuartiges Beatmungsprogramm?<br />
Rettungsdienst 11 (Nov. 1991), 737-739<br />
[6] Meyer, J.:<br />
Neue Beatmungsformen<br />
Anästhesiol. Intensivmed. Notfallmed. Schmerzther.<br />
26 (1991) 337 - 342<br />
[7] Vincent, J.-L.:<br />
Yearbook of Intensive care and Emergency Medicine<br />
Springer-Verlag 1993<br />
[8] Stock MC, Downs JB, Frolicher D (1987):<br />
Airway pressure release ventilation.<br />
Critical Care Medicine 15:462 -466<br />
[9] Räsänen J, Cane R, Downs J, et al. (1991):<br />
Airway pressure release ventilation during acute lung<br />
injury: A prospective multicenter trial.<br />
Critical Care Medicine 19:1234 - 1241<br />
[10] Sassoon CSH, TeTT, Mahutte CK, Light RW:<br />
Airway occlusion pressure. An important indicator for<br />
succesful weaning in patients with chronic obstructive<br />
pulmonary disease.<br />
Am Rev Respir Dis 1987; 135:107-113<br />
[11] E. Voigt:<br />
BIPAP Anwendungshinweise und Kasuistik.<br />
Dräger-Mitteilungen "Medizintechnik aktuell" 1/94<br />
[12] E. Bahns:<br />
BIPAP – Zwei Schritte nach vorn in der Beatmung<br />
Dräger Fibel zur Evita Beatmung<br />
Bibliography<br />
[13] H. Burchardi, J. Rathgeber, M. Sydow:<br />
The Concept of Analgo-Sedation depends on the Concept<br />
of Mechanical Ventilation<br />
Yearbook of Intensive Care and Emergency Medicine,<br />
1995, Springer Verlag<br />
[14] M. Sydow, H. Burchardi, E. Ephraim, S. Zeilmann,<br />
T. Crozier:<br />
Long-term Effects of Two Different Ventilatory Modes on<br />
Oxygenation in Acute Lung Injury<br />
American Journal of Respiratory and Critical Care Medicine,<br />
Vol 149, 1994<br />
[15] R. Kuhlen, S. Hausmann, D. Pappert, K. Slama,<br />
R. Rossaint, K. Falke:<br />
A new method for P0.1 measurement using standard respiratory<br />
equipment<br />
Intensive Care Med (1995) 21<br />
[16] Yang, K.L.; Tobin, M.J.:<br />
A Prospective Study of Indexes Prediction the Qutcome<br />
Of Trials of Weaning from Mechanical Ventilation<br />
The New England Journal of Medicine, 1991, 324, S.<br />
1445-1450<br />
[17] Tobin, Jubran, A.:<br />
Advances in Respirators Monitoring During Mechanical<br />
Ventilation<br />
CHEST 1999, 116, S. 1416-1425<br />
[18] Tobin, M.J., Charles, G.A.:<br />
Discontinuation of Mechanical Ventilation in: Tobin, M.J.<br />
Principles and Practice of Mechanical Ventilation, 1994,<br />
S. 1177-1206<br />
[19] Guttmann, Wolf et al:<br />
Continuous Calculation of Tracheal Pressure in Tracheally<br />
Intubated Patients, Anesthesiology, Vol.79, Sept.<br />
1993. 1993.<br />
[20] Younes, M.:<br />
Proportional Assist Ventilation, Principles and Practice of<br />
Mechanical Ventilation,Tobin, M.J. (Hrsg.), McGraw-Hill,<br />
1994.<br />
[21] Guttmann, Wolf et al:<br />
Continuous Calculation of Tracheal Pressure in Tracheally<br />
Intubated Patients, Anesthesiology, Vol.79, Sept.<br />
1993. 1993.<br />
[22] Gama AM, Meyer EC, Gaudencio AM, Grunauer MA,<br />
Amato MB, de Carvalho CR, Barbas CS:<br />
Different low constant flows can equally determine the<br />
lower inflection point in acute respiratory distress syndrome<br />
patients<br />
Artif Organs. 2001 Nov; 25(11): 882-9.<br />
Instructions for Use <strong>EvitaXL</strong> 235
Bibliography<br />
[23] Blanc Q, Sab JM, Philit F, Langevin B, Thouret JM,<br />
Noel P, Robert D, Guerin C:<br />
Inspiratory pressure-volume curves obtained using automated<br />
low constant flow inflation and automated occlusion<br />
methods in ARDS patients with a new device.<br />
Intensive Care Med. 2002 Jul; 28(7): 990-4. Epub 2002<br />
Jun 12.<br />
[24] Albaiceta GM, Piacentini E, Villagra A, Lopez-Aguilar J,<br />
Taboada F, Blanch L:<br />
Application of continuous positive airway pressure to<br />
trace static pressure-volume curves of the respiratory<br />
system.<br />
Crit Care Med. 2003 Oct; 31(10): 2514-9<br />
[25] Bensenor FE, Vieira JE, Auler JO Jr:<br />
Guidelines for inspiratory flow setting when measuring<br />
the pressure-volume relationship.<br />
Anesth Analg. 2003 Jul; 97(1): 145-50, table of contents.<br />
[26] Rouby J-J.; Vieira S:<br />
Pressure/volume curves and lung computed tomography<br />
in acute respiratory distress syndrome<br />
European Respiratory Journal, 1 August 2003, vol. 22,<br />
no. Supplement 42, pp. 27-36(10)<br />
[27] Mehta S, Stewart TE, MacDonald R, Hallett D, Banayan<br />
D, Lapinsky S, Slutsky A:<br />
Temporal change, reproducibility, and interobserver variability<br />
in pressure-volume curves in adults with acute lung<br />
injury and acute respiratory distress syndrome.<br />
Crit Care Med. 2003 Aug; 31(8): 2118-25.<br />
[28] Servillo G, De Robertis E, Maggiore S, Lemaire F,<br />
Brochard L, Tufano R:<br />
The upper inflection point of the pressure-volume curve.<br />
Influence of methodology and of different modes of ventilation<br />
Intensive Care Med. 2002 Jul; 28(7): 842-9. Epub 2002<br />
May 31.<br />
[29] Servillo G, Svantesson C, Beydon L, Roupie E,<br />
Brochard L, Lemaire F, Jonson B:<br />
Pressure-volume curves in acute respiratory failure: automated<br />
low flow inflation versus occlusion.<br />
Am J Respir Crit Care Med. 1997 May;155(5):1629-36.<br />
[30] Takeuchi M, Goddon S, Dolhnikoff M, Shimaoka M,<br />
Hess D, Amato MB, Kacmarek RM:<br />
Set positive end-expiratory pressure during protective<br />
ventilation affects lung injury.<br />
Anesthesiology. 2002 Sep; 97(3): 682-92.<br />
[31] Matamis D, Lemaire F, Harf A, Brun-Buisson C,<br />
Ansquer JC, Atlan G:<br />
Total respiratory pressure-volume curves in the adult respiratory<br />
distress syndrome.<br />
Chest. 1984 Jul; 86(1): 58-66.<br />
[32] Suter PM, Fairley B, Isenberg MD:<br />
Optimum end-expiratory airway pressure in patients with<br />
acute pulmonary failure.<br />
N Engl J Med. 1975 Feb 6; 292(6): 284-9.<br />
[33] Amato MB, Barbas CS, Medeiros DM, Schettino Gde P,<br />
Lorenzi Filho G, Kairalla RA, Deheinzelin D, Morais C,<br />
Fernandes Ede O, Takagaki TY, et al:<br />
Beneficial effects of the "open lung approach" with low<br />
distending pressures in acute respiratory distress syndrome.<br />
A prospective randomized study on mechanical<br />
ventilation.<br />
Am J Respir Crit Care Med. 1995 Dec; 152(6 Pt 1):<br />
1835-46.<br />
[34] Arnold JH:<br />
To recruit or not derecruit: that is the question.<br />
Crit Care Med. 2002 Aug; 30(8): 1925-7.<br />
[35] Harris RS, Hess DR, Venegas JG:<br />
An objective analysis of the pressure-volume curve in the<br />
acute respiratory distress syndrome.<br />
Am J Respir Crit Care Med. 2000 Feb; 161(2 Pt 1):<br />
432-9.<br />
[36] Hickling KG:<br />
The pressure-volume curve is greatly modified by recruitment.<br />
A mathematical model of ARDS lungs.<br />
Am J Respir Crit Care Med. 1998 Jul; 158(1):194-202.<br />
[37] Kallet RH:<br />
Pressure-volume curves in the management of acute respiratory<br />
distress syndrome.<br />
Respir Care Clin N Am. 2003 Sep; 9(3): 321-41.<br />
[38] Pelosi P, Gattinoni L:<br />
Respiratory mechanics in ARDS: a siren for physicians?<br />
Intensive Care Med. 2000 Jun; 26(6): 653-6.<br />
[39] Rimensberger PC, Cox PN, Frndova H, Bryan AC:<br />
The open lung during small tidal volume ventilation: concepts<br />
of recruitment and "optimal" positive end-expiratory<br />
pressure.<br />
Crit Care Med. 1999 Sep; 27(9): 1946-52<br />
[40] Rimensberger PC, Pristine G, Mullen BM, Cox PN,<br />
Slutsky AS:<br />
Lung recruitment during small tidal volume ventilation<br />
allows minimal positive end-expiratory pressure without<br />
augmenting lung injury.<br />
Crit Care Med. 1999 Sep; 27(9): 1940-5.<br />
[41] Dall'ava-Santucci J, Armaganidis A, Brunet F, Dhainaut JF,<br />
Chelucci GL, Monsallier JF, Lockhart A:<br />
Causes of error of respiratory pressure-volume curves in<br />
paralyzed subjects.<br />
J Appl Physiol. 1988 Jan; 64(1): 42-9.<br />
[42] Gattinoni L, Mascheroni D, Basilico E, Foti G, Pesenti A,<br />
Avalli L:<br />
Volume/pressure curve of total respiratory system in paralysed<br />
patients: artefacts and correction factors.<br />
Intensive Care Med. 1987; 13(1):19-25.<br />
236 Instructions for Use <strong>EvitaXL</strong>
Special ASCII characters used<br />
Characters<br />
Explanation Hexadecimal code Control characters<br />
NUL Null 00 ^@<br />
SOH Start of Heading 01 ^A<br />
STX Start of Text 02 ^B<br />
ETX End of Text 03 ^C<br />
EOT End of Transmission 04 ^D<br />
ENQ Enquiry 05 ^E<br />
ACK Acknowledge 06 ^F<br />
BEL Bell 07 ^G<br />
BS Backspace 08 ^H<br />
HT Horizontal Tabulation 09 ^I<br />
LF Line Feed 0A ^J<br />
VT Vertical Tabulation 0B ^K<br />
FF Form Feed 0C ^L<br />
CR Carriage Return 0D ^M<br />
SO Shift Out 0E ^N<br />
SI Shift In 0F ^O<br />
DLE Data Link Escape 10 ^P<br />
DC1 Device Control 1 11 ^Q<br />
DC2 Device Control 2 12 ^R<br />
DC3 Device Control 3 13 ^S<br />
DC4 Device Control 4 14 ^T<br />
NAK Negative Acknowledge 15 ^U<br />
SYN Synchronous Idle 16 ^V<br />
ETB End of Transmission Block 17 ^W<br />
Special ASCII characters used<br />
Instructions for Use <strong>EvitaXL</strong> 237
Special ASCII characters used<br />
Characters<br />
Explanation Hexadecimal code Control characters<br />
CAN Cancel 18 ^X<br />
EM End of Medium 19 ^Y<br />
SUB Substitute 1A ^Z<br />
ESC Escape 1B ^[<br />
FS File Separator 1C ^\<br />
GS Group Separator 1D ^]<br />
RS Record Separator 1E ^^<br />
US Unit Separator 1F ^_<br />
SP Space 20<br />
DEL Delete 7F<br />
238 Instructions for Use <strong>EvitaXL</strong>
Instructions for Use <strong>EvitaXL</strong> 239
Parts list<br />
For adult ventilation<br />
Parts list<br />
For adult ventilation<br />
Item<br />
No.<br />
Name/Description Order No.<br />
1 <strong>EvitaXL</strong> 84 14 900<br />
2 Instrument tray 84 14 828<br />
3 SpiroLife flow sensor, can be<br />
autoclaved<br />
MK 01 900<br />
or Spirolog flow sensor (set of 5) 84 03 735<br />
4 Expiration valve (patient system) 84 10 580<br />
or Disposable expiration valve (set of 10) 84 14 776<br />
5 Humidifier holder 84 11 956<br />
6 O2 sensor housing 68 50 645<br />
7 Ambient air filter 84 12 384<br />
7a Cooling air filter<br />
(Rear of <strong>EvitaXL</strong> not illust.)<br />
84 12 384<br />
8 "EvitaMobil" trolley (high) 84 11 950<br />
8a "EvitaMobil" trolley (low) 84 11 965<br />
8b "EvitaMobil" cylinder holder set<br />
(not illust.)<br />
84 11 970<br />
8c Breathing air compressor (not illust.) 84 13 890<br />
10 Aquapor EL 84 14 698<br />
10.1 Patient part, Aquapor EL 84 05 029<br />
10.2 Set of spare brackets 84 03 345<br />
11 Temperature sensor 84 05 371<br />
12-23 Hose set, adults<br />
(blue sockets)<br />
84 12 092<br />
12 Spiral hose, adults,<br />
silicone 0.6 m<br />
21 65 627<br />
Item<br />
No.<br />
Name/Description Order No.<br />
13-13.1 Water trap 84 04 985<br />
13.1 Water container 84 03 976<br />
14 Spiral hose, adults,<br />
silicone 0.35 m<br />
21 65 619<br />
15 Connector M 25 647<br />
16 ISO elbow connector M 25 64<br />
17 Y-piece, straight 84 05 435<br />
18 Catheter connector, straight, size 12.5<br />
(set of 10)<br />
M 23 841<br />
19 Hose clamp 84 03 566<br />
20 Corrugated hose 84 02 041<br />
21 Catheter connector, adult<br />
Set of catheter connectors, adult<br />
size 6 to 12 (set of 12)<br />
84 03 685<br />
22 Adaptor, adults 84 03 076<br />
23 Cap (set of 5) 84 02 918<br />
23a Adult test lung (bag) 84 03 201<br />
24-24b Hinged arm 84 09 609<br />
or Quick-fix hinged arm 2 2M 85 706<br />
24a Bracket 84 09 746<br />
24b Hose clamp 84 09 841<br />
25 CO2 main flow sensor 68 70 300<br />
26 Cuvette, adults 68 70 279<br />
27 Holder for parking CO2 sensor 84 12 840<br />
240 Instructions for Use <strong>EvitaXL</strong>
For paediatric ventilation<br />
Item<br />
No.<br />
Name/Description Order No.<br />
1 <strong>EvitaXL</strong> 84 14 900<br />
2 Instrument tray 84 14 828<br />
3 SpiroLife flow sensor, can be<br />
autoclaved<br />
MK 01 900<br />
or Spirolog flow sensor (set of 5) 84 03 735<br />
4 Expiration valve (patient system) 84 10 580<br />
5 Bracket 84 11 956<br />
6 O2 sensor housing 68 50 645<br />
7 Ambient air filter 84 12 384<br />
7a Cooling air filter<br />
(Rear of <strong>EvitaXL</strong> not illust.)<br />
84 12 384<br />
8 "EvitaMobil" trolley (high) 84 11 950<br />
8a "EvitaMobil" trolley (low) 84 11 965<br />
8b "EvitaMobil" cylinder holder set (not<br />
illust.)<br />
84 11 970<br />
8c Breathing air compressor (not illust.) 84 13 890<br />
24-24b Hinged arm 84 09 609<br />
or Quick-fix hinged arm 2 2M 85 706<br />
24a Bracket 84 09 746<br />
24b Hose clamp 84 09 841<br />
27-28 Basic unit humidifier MR 850<br />
German version 220 V<br />
84 14 144<br />
26 Hose heater adapter 84 14 968<br />
27 Mounting set (clamps for rail) 84 11 074<br />
28 Double temperature sensor 84 14 989<br />
29-30 Humidifier chamber MR 340<br />
incl. 100 pcs. absorbent paper<br />
84 11 047<br />
30 Absorbent paper for MR 340<br />
(set of 200, not illust.)<br />
84 11 073<br />
Parts list<br />
For paediatric ventilation<br />
Item<br />
No.<br />
Name/Description Order No.<br />
31 Single-strand wire 1.5 m (not illust.) 84 11 050<br />
32-43 Dräger hose set for Mr 850<br />
inspiratory limb heated,<br />
expiratory limb water trap<br />
84 14 987<br />
32-32a Condensation trap, expiration 84 09 627<br />
32 Water container 84 03 976<br />
33 Double conical connector 84 09 897<br />
34 Temperature sensor mounting 84 11 044<br />
35 Adapter K90 84 03 075<br />
36 Cap 84 01 645<br />
37 Bellows, paediatric, complete 84 09 742<br />
38 Corrugated hose, flex, 0.13 m 84 09 634<br />
39 Catheter connector, size 11 M 19 351<br />
40 Spiral hose, paediatric, silicone 22/10,<br />
0.40 m<br />
21 65 856<br />
41 Spiral hose, paediatric, silicone 22/10,<br />
1.10 m<br />
21 65 651<br />
42 Spiral hose, paediatric, silicone 22/10,<br />
0.60 m<br />
21 65 821<br />
43 Spiral hose, paediatric, silicone 10/10,<br />
0.60 m<br />
21 65 848<br />
44 Hose heater 1.10 m 84 11 045<br />
45 Bacterial filter MX 02 650<br />
46 CO2 main flow sensor 68 70 300<br />
47 Cuvette, paediatrics 68 70 280<br />
48 Holder for parking CO2 sensor 84 12 840<br />
Instructions for Use <strong>EvitaXL</strong> 241
Order list<br />
Order list<br />
Name/Description<br />
Order No.<br />
Basic machine<br />
<strong>EvitaXL</strong> 84 14 999<br />
Modification set – from Evita 4 to <strong>EvitaXL</strong> 84 14 879<br />
Modification set – from Evita 2 dura to <strong>EvitaXL</strong> 84 14 880<br />
Accessories required for operation<br />
Hinged arm 84 09 609<br />
or<br />
Quick-fix hinged arm 2 2M 85 706<br />
O2 connecting hose 3 m, white M 35 490<br />
or<br />
O2 connecting hose 5 m, white M 35 491<br />
or<br />
O2 connecting hose 3 m, neutral colour M 36 005<br />
or<br />
O2 connecting hose 5 m, neutral colour M 36 006<br />
Medical air connecting hose, 3 m,<br />
black/white M 35 496<br />
or<br />
Medical air connecting hose, 5 m,<br />
black/white M 35 497<br />
or<br />
Medical air connecting hose, 3 m, neutral M 36 011<br />
colour<br />
or<br />
Medical air connecting hose, 5 m, neutral M 36 012<br />
colour<br />
Humidifier with F&P MR 850<br />
Basic unit humidifier MR 850<br />
German version 220 V 84 14 720<br />
Dräger hose set for MR 850, adults,<br />
inspiratory limb heated,<br />
expiratory limb water trap 84 14 986<br />
Dräger hose set for MR 850, paediatrics,<br />
inspiratory limb heated,<br />
expiratory limb water trap 84 14 987<br />
Hose heater adapter MR 850 for Dräger hose<br />
sets, adults and paediatrics,<br />
(F&P 900 MR 858) 84 14 968<br />
Hose sets, disposable, for MR 850, adults,<br />
incl. humidifier chamber MR 290<br />
(F&P RT 212), set of 10 84 14 991<br />
Name/Description<br />
Order No.<br />
Hose sets, disposable, for MR 850,<br />
paediatrics, incl. humidifier chamber MR 290<br />
(F&P RT 225), set of 10 84 14 994<br />
Hose heater adapter MR 850<br />
for disposable RT hose sets, adults and<br />
paediatrics (F&P 900 MR 801) 84 14 992<br />
Temperature and flow sensor for MR 850<br />
for disposable and reusable hose sets,<br />
1.1 m (F&P 900 MR 868) 84 14 989<br />
Cover for flow sensor, blue 84 14 714<br />
Accessories for humidifier with F&P<br />
for MR 850<br />
Draw wire 1.5 m for reusable hose sets 84 11 050<br />
Humidifier chamber MR 340<br />
incl. 100 pcs. absorbent paper 84 11 047<br />
Absorbent paper refill pack for<br />
humidifier chamber MR 340 84 11 073<br />
Humidifier chamber MR 370<br />
incl. 100 pcs. absorbent paper 84 12 217<br />
Absorbent paper refill pack for<br />
humidifier chamber MR 370 84 12 218<br />
Disposable humidifier chamber MR 290 set<br />
of 10 84 18 282<br />
Disposable humidifier chamber MR 290 set<br />
of 40 84 18 283<br />
Humidifier holder 84 11 956<br />
Mounting set (rail brackets) 84 11 074<br />
Bacterial filter MX 02 650<br />
Humidifier with Aquapor EL<br />
Aquapor EL humidifier 84 14 698<br />
Temperature sensor 84 05 371<br />
Humidifier holder 84 11 956<br />
Set of spare brackets 84 03 345<br />
Hose set, adults,<br />
consisting of: patient hoses,<br />
water traps, Y-piece, catheter connectors<br />
84 12 092<br />
Patient part Aquapor EL 84 05 029<br />
Replacement set of lids for Aquapor EL 84 06 135<br />
Aquapor EL bowl 84 05 739<br />
Float for Aquapor EL<br />
Humidifier with HME<br />
Dräger hose set for HME, adults, consisting of<br />
84 04 738<br />
patient hoses, Y piece 84 12 860<br />
242 Instructions for Use <strong>EvitaXL</strong>
Name/Description<br />
Order No.<br />
For CO2 measurement (optional)<br />
Test filter 68 70 281<br />
Calibration set 84 12 710<br />
Test gas cylinder 5 Vol.% CO2, 95 Vol.% N2 68 50 435<br />
CO2 main flow sensor CapnoSmart 68 71 500<br />
Holder for parking CO2 sensor 84 12 840<br />
Special accessories<br />
Instrument tray, complete 84 14 828<br />
Wall bracket, module 2000 Type 13<br />
84 08 613<br />
Alternatively to trolley<br />
Pneum. Medicament nebuliser 84 12 935<br />
For manual ventilation:<br />
Resutator 2000 21 20 046<br />
Child Resutator 2000 21 20 984<br />
Baby Resutator 21 20 941<br />
Hook for Resutator M 26 349<br />
Adult test lung 84 03 201<br />
"EvitaMobil" trolley (high) 84 11 950<br />
"EvitaMobil" trolley (low) 84 11 965<br />
For trolley:<br />
Cabinet 8H, 360 mm high (4 drawers) M 31 796<br />
Cabinet 4H (2 drawers) M 31 795<br />
"EvitaMobil" cylinder holder set 84 11 970<br />
Set of cabinet mountings for trolley 84 09 018<br />
Modification set – socket strip 84 11 814<br />
Breathing air compressor<br />
for supplying <strong>EvitaXL</strong> with medical air<br />
84 13 890<br />
MEDIBUS cable 83 06 488<br />
Printer cable 83 06 489<br />
Water trap for expiration valve 84 13 125<br />
ILV cable Evita 4/XL 84 11 794<br />
ILV cable Evita 1/2 84 11 793<br />
DC battery 12 V/17 Ah (one battery)<br />
(2 (two batteries required)<br />
18 43 303<br />
Battery cable set 84 11 822<br />
Battery cable set MB 84 15 582<br />
Name/Description<br />
Order list<br />
Order No.<br />
Options<br />
Modification set – communications 84 11 735<br />
Modification set – NeoFlow 84 15 940<br />
Modification set – SmartCare 84 15 941<br />
Modification set – SmartCare Capno Package 84 15 942<br />
Modification set – Lung Protection Package 84 15 945<br />
Modification set – O2 Therapy 84 15 946<br />
Modification set – Breathing Support<br />
Package<br />
84 13 562<br />
Modification set – Mask ventilation (NIV) 84 14 474<br />
Modification set – Nurse call 84 14 476<br />
Plug for connecting the nurse call 18 46 248<br />
Modification set – Evita Remote 84 14 472<br />
Modification set – Capno Plus 84 13 780<br />
Modification set – PPS 84 14 875<br />
Modification set – DC module 84 13 034<br />
Modification set – DC power supply MB 84 15 581<br />
Spare set for sterilisation<br />
SpiroLife flow sensor MK 01 900<br />
Expiration valve (patient system) 84 10 580<br />
Water trap for expiration valve 84 13 125<br />
Temperature sensor 84 05 371<br />
Pneum. Medicament nebuliser 84 12 935<br />
Cuvette, adults 68 70 279<br />
Cuvette, paediatrics 68 70 280<br />
Replacement parts<br />
For <strong>EvitaXL</strong>:<br />
O2 sensor housing 68 50 645<br />
Spirolog flow sensor (set of 5) 84 03 735<br />
Disposable expiration valve (set of 10) 84 14 776<br />
Set of ambient air filters/cooling air filters<br />
(set of 10)<br />
84 11 724<br />
Cooling air filter DC power supply MB 84 15 572<br />
Lithium battery for data protection<br />
For hinged arm:<br />
18 35 343<br />
Bracket 84 09 746<br />
Hose clamp<br />
For adult ventilation:<br />
84 09 841<br />
Temperature sensor 84 05 371<br />
Spiral hose, adults, silicone 0.6 m 21 65 627<br />
Spiral hose, adults, silicone 0.35 m 21 65 619<br />
Water trap 84 04 985<br />
Water container 84 03 976<br />
Instructions for Use <strong>EvitaXL</strong> 243
Order list<br />
Name/Description<br />
Hose clamp 84 03 566<br />
Connector M 25 647<br />
Y piece<br />
Catheter connector, straight,<br />
84 05 435<br />
size 12.5 (set of 10) M 23 841<br />
Corrugated hose 84 02 041<br />
Adaptor, adults 84 03 076<br />
Set of catheter connectors, adult 84 03 685<br />
Set of caps (set of 5) 84 02 918<br />
ISO elbow connector M 25 649<br />
Cuvette, adults 68 70 279<br />
For paediatric ventilation:<br />
Spiral hose, paediatric, silicone 22/10, 1.10 m 21 65 600<br />
Spiral hose, paediatric, silicone, 22/10,<br />
0.60 m<br />
21 65 821<br />
Spiral hose, paediatric, silicone 10/10, 0.60 m<br />
Spiral hose, paediatric, silicone 22/10,<br />
21 65 848<br />
0.40 m 21 65 856<br />
Corrugated hose, flex, 0.13 m 84 09 634<br />
Catheter connectors, size 11 (set of 10) M 19 490<br />
Cap 84 01 645<br />
Adaptor, paediatric, 90o 84 03 075<br />
Double conical connector 84 09 897<br />
Temperature sensor mounting 84 11 044<br />
Condensation trap, expiration 84 09 727<br />
Water container 84 03 976<br />
Hose heater 1.10 m 84 11 045<br />
Double temperature sensor for MR 850 84 14 989<br />
Hose heater adapter for MR 850 84 14 968<br />
Single-strand wire, 1.5 m 84 11 050<br />
Bacterial filter MX 02 650<br />
Cuvette, paediatrics 68 70 280<br />
Technical documentation available on request<br />
Order No.<br />
Name/Description<br />
Order No.<br />
Evita 4 Link<br />
Modification set – communications 84 13 782<br />
MEDIBUS cable 83 06 488<br />
Monitor cable 57 22 410<br />
Printer cable<br />
Cable for <strong>EvitaXL</strong> / Evita 4/Evita 2 dura or<br />
83 06 489<br />
NOdomo 83 09 007<br />
Analogue cable for <strong>EvitaXL</strong> 84 11 759<br />
VentView SW 2.n<br />
PC software for additional ventilation<br />
monitoring (incl. MEDIBUS cable)<br />
84 15 909<br />
Instructions for Use<br />
MEDIBUS for Intensive Care Devices 90 28 329<br />
Instructions for Use<br />
Dräger RS 232 MEDIBUS protocol<br />
definition 90 28 258<br />
DC connecting cable 84 13 135<br />
Gel battery 12 V/36 Ah 18 28 932<br />
Modification set – "Non-invasive ventilation<br />
NIV"<br />
84 14 474<br />
Mask size 1, disposable MX 22 901<br />
Mask size 2, disposable MX 22 902<br />
Mask size 3, disposable MX 22 903<br />
Mask size 4, disposable MX 22 904<br />
Mask size 5, disposable MX 22 905<br />
Mask size 6, disposable MX 22 906<br />
Mask, round, disposable MX 22 907<br />
244 Instructions for Use <strong>EvitaXL</strong>
New features in <strong>EvitaXL</strong> SW 6.n<br />
Individual screen configuration storage<br />
For storing the configuration of the curves, measured values<br />
and function keys displayed on the main screen in up to six<br />
different memory locations.<br />
Automatic P 0.1 procedure<br />
For performing the procedure automatically in the set interval.<br />
Configurable Flowtrigger<br />
Start setting for the Flowtrigger is configurable for the start<br />
according to patient mode or weight.<br />
Extended setting range for Pinsp, ASB and PEEP<br />
— Pinsp adjustable from 0 to 95 mbar (previously 0 to<br />
80 mbar)<br />
— ASB adjustable from 0 to 95 mbar (previously 0 to 80 mbar)<br />
— PEEP adjustable from 0 to 50 mbar (previously 0 to<br />
35 mbar)<br />
Additional settings for APRV<br />
— Tlow in 0.05 second increments<br />
Conclusive display of PASB<br />
— ∆PASB for settings relative to PEEP<br />
— PASB for absolute settings<br />
Simplified setting for standby<br />
— Press the key »O Start/Standby« and keep it depressed<br />
for 3 seconds.<br />
As for Evita 4 and Evita 2 dura.<br />
ATC for the mandatory phase can be switched off<br />
ATC is only effective during the spontaneous breathing phase<br />
or during the entire breathing cycle.<br />
O2 Therapy (optional)<br />
Continuous flow application with adjustable O2 concentration<br />
and flow for the oxygen therapy.<br />
New features in <strong>EvitaXL</strong> SW 6.n<br />
Lung Protection Package (optional)<br />
Comprises the functions:<br />
— QuickSet<br />
Direct adjustment,<br />
— PressureLink<br />
PEEP/Pinsp connection,<br />
— Recruitment trends and<br />
— Low Flow PV-Loop<br />
Aid for performing Recruitment procedures and for optimising<br />
ventilation settings.<br />
Additions to SmartCare/PS<br />
(optional, separate Instructions for Use)<br />
— Extended area of application<br />
— ATC can be activated<br />
— Web-based application service (WAS)<br />
Instructions for Use <strong>EvitaXL</strong> 245
246 Instructions for Use <strong>EvitaXL</strong>
Index<br />
A<br />
Abbreviations . . . . . . . . . . . . . . . . . . . . . . . . . . . . . . . . . . . . . 232<br />
Accessories . . . . . . . . . . . . . . . . . . . . . . . . . . . . . . . . . . . . . . . . 5<br />
Additional functions . . . . . . . . . . . . . . . . . . . . . . . . . . . . . . . . 91<br />
Adjustment<br />
direct . . . . . . . . . . . . . . . . . . . . . . . . . . . . . . . . . . . . . . . . . 18<br />
directly and linked . . . . . . . . . . . . . . . . . . . . . . . . . . . . . . 20<br />
linked . . . . . . . . . . . . . . . . . . . . . . . . . . . . . . . . . . . . . . . . . 19<br />
Alarm . . . . . . . . . . . . . . . . . . . . . . . . . . . . . . . . . . . . . . . . . . . . . 80<br />
suppression . . . . . . . . . . . . . . . . . . . . . . . . . . . . . . . . . . . 82<br />
volume . . . . . . . . . . . . . . . . . . . . . . . . . . . . . . . . . . . . . . . 126<br />
Alarm limits<br />
define start-up values . . . . . . . . . . . . . . . . . . . . . . . . . . 142<br />
setting . . . . . . . . . . . . . . . . . . . . . . . . . . . . . . . . . . . . . . . . 79<br />
Alarm, power failure alarm . . . . . . . . . . . . . . . . . . . . . . . . . . . 82<br />
Ambient conditions . . . . . . . . . . . . . . . . . . . . . . . . . . . . . . . . 188<br />
Analogue interface . . . . . . . . . . . . . . . . . . . . . . . . . . . . . . . . 181<br />
Apnoea Ventilation setting . . . . . . . . . . . . . . . . . . . . . . . . . . . 69<br />
APRV<br />
Description . . . . . . . . . . . . . . . . . . . . . . . . . . . . . . . . . . . 215<br />
setting . . . . . . . . . . . . . . . . . . . . . . . . . . . . . . . . . . . . . . . . 62<br />
Technical data . . . . . . . . . . . . . . . . . . . . . . . . . . . . . . . . 189<br />
ASB . . . . . . . . . . . . . . . . . . . . . . . . . . . . . . . . . . . . . . . . . . . . . 216<br />
ASCII characters used . . . . . . . . . . . . . . . . . . . . . . . . . . . . . 237<br />
Assembling . . . . . . . . . . . . . . . . . . . . . . . . . . . . . . . . . . . . . . . 163<br />
ATC<br />
Description . . . . . . . . . . . . . . . . . . . . . . . . . . . . . . . . . . . 221<br />
setting . . . . . . . . . . . . . . . . . . . . . . . . . . . . . . . . . . . . . . . . 72<br />
Technical data . . . . . . . . . . . . . . . . . . . . . . . . . . . . . . . . 189<br />
AutoFlow<br />
Description . . . . . . . . . . . . . . . . . . . . . . . . . . . . . . . . . . . 209<br />
setting . . . . . . . . . . . . . . . . . . . . . . . . . . . . . . . . . . . . . . . . 71<br />
B<br />
Back panel, What’s what . . . . . . . . . . . . . . . . . . . . . . . . . . . 186<br />
Bacterial filter . . . . . . . . . . . . . . . . . . . . . . . . . . . . . . . . . . . . . . 25<br />
Battery<br />
charge indication . . . . . . . . . . . . . . . . . . . . . . . . . . . . . . 172<br />
charge state . . . . . . . . . . . . . . . . . . . . . . . . . . . . . . . . . . 172<br />
charging . . . . . . . . . . . . . . . . . . . . . . . . . . . . . . . . . . . . . 171<br />
charging times . . . . . . . . . . . . . . . . . . . . . . . . . . . . . . . . 172<br />
disposal . . . . . . . . . . . . . . . . . . . . . . . . . . . . . . . . . . . . . 168<br />
external . . . . . . . . . . . . . . . . . . . . . . . . . . . . . . . . 173, 176<br />
integrated . . . . . . . . . . . . . . . . . . . . . . . . . . . . . . . . . . . . 175<br />
Service . . . . . . . . . . . . . . . . . . . . . . . . . . . . . . . . . . . . . . 172<br />
Bibliography . . . . . . . . . . . . . . . . . . . . . . . . . . . . . . . . . . . . . . 235<br />
BIPAP<br />
Description . . . . . . . . . . . . . . . . . . . . . . . . . . . . . . . . . . . 213<br />
setting . . . . . . . . . . . . . . . . . . . . . . . . . . . . . . . . . . . . . . . . 59<br />
BIPAPAssist<br />
Description . . . . . . . . . . . . . . . . . . . . . . . . . . . . . . . . . . . 215<br />
setting . . . . . . . . . . . . . . . . . . . . . . . . . . . . . . . . . . . . . . . . 61<br />
Breathing Support Package, Technical Data . . . . . . . . . . 190<br />
BTPS . . . . . . . . . . . . . . . . . . . . . . . . . . . . . . . . . . . . . . . . . . . . 218<br />
Instructions for Use <strong>EvitaXL</strong> 247<br />
Index<br />
C<br />
Calibration . . . . . . . . . . . . . . . . . . . . . . . . . . . . . . . . . . . . . . . 106<br />
Care list . . . . . . . . . . . . . . . . . . . . . . . . . . . . . . . . . . . . . . . . . . 162<br />
Check before Use . . . . . . . . . . . . . . . . . . . . . . . . . . . . . . . . . . 34<br />
Cleaning . . . . . . . . . . . . . . . . . . . . . . . . . . . . . . . . . . . . . . . . . 159<br />
CO2 calibration<br />
resetting . . . . . . . . . . . . . . . . . . . . . . . . . . . . . . . . . . . . . 117<br />
with calibration gas . . . . . . . . . . . . . . . . . . . . . . . . . . . . 113<br />
with test filter . . . . . . . . . . . . . . . . . . . . . . . . . . . . . . . . . 112<br />
CO2 sensor<br />
calibrating . . . . . . . . . . . . . . . . . . . . . . . . . . . . . . 110, 115<br />
disinfect . . . . . . . . . . . . . . . . . . . . . . . . . . . . . . . . . . . . . . 160<br />
fitting . . . . . . . . . . . . . . . . . . . . . . . . . . . . . . . . . . . . . . . . . 29<br />
removal . . . . . . . . . . . . . . . . . . . . . . . . . . . . . . . . . . . . . . 156<br />
CO2 zero calibration . . . . . . . . . . . . . . . . . . . . . . . . . . . . . . . 111<br />
Configuration . . . . . . . . . . . . . . . . . . . . . . . . . . . . . . . . . . . . . 125<br />
Connect the RS 232 interface . . . . . . . . . . . . . . . . . . . . . . . 179<br />
Control unit . . . . . . . . . . . . . . . . . . . . . . . . . . . . . . . . . . . . . . . . 12<br />
positioning . . . . . . . . . . . . . . . . . . . . . . . . . . . . . . . . . . . . 22<br />
What’s what . . . . . . . . . . . . . . . . . . . . . . . . . . . . . . . . . . 184<br />
Covering grid for patient part, heating . . . . . . . . . . . . . . . . 168<br />
CPAP-ASB setting . . . . . . . . . . . . . . . . . . . . . . . . . . . . . . . . . . 63<br />
Curves, configuration . . . . . . . . . . . . . . . . . . . . . . . . . . . . . . 127<br />
D<br />
DC power operation . . . . . . . . . . . . . . . . . . . . . . . . . . . . . . . 170<br />
DC power supply<br />
operation . . . . . . . . . . . . . . . . . . . . . . . . . . . . . . . . . . . . . 170<br />
Technical data . . . . . . . . . . . . . . . . . . . . . . . . . . . . . . . . 200<br />
DC socket . . . . . . . . . . . . . . . . . . . . . . . . . . . . . . . . . . 170, 173<br />
Description . . . . . . . . . . . . . . . . . . . . . . . . . . . . . . . . . . . . . . . 207<br />
Device check . . . . . . . . . . . . . . . . . . . . . . . . . . . . . . . . . . . . . . 34<br />
Diagnostic functions . . . . . . . . . . . . . . . . . . . . . . . . . . . . 9, 98<br />
Direct current<br />
Technical data . . . . . . . . . . . . . . . . . . . . . . . . . . . . . . . . 200<br />
Disinfecting . . . . . . . . . . . . . . . . . . . . . . . . . . . . . . . . . . . . . . . 159<br />
Dismantling . . . . . . . . . . . . . . . . . . . . . . . . . . . . . . . . . . . . . . . 156<br />
Displaying graphics . . . . . . . . . . . . . . . . . . . . . . . . . . . . . . . . . 83<br />
Disposal . . . . . . . . . . . . . . . . . . . . . . . . . . . . . . . . . . . . . . . . . 168<br />
E<br />
Entering the humidifier type . . . . . . . . . . . . . . . . . . . . . . . . . . 40<br />
Equipment outputs . . . . . . . . . . . . . . . . . . . . . . . . . . . . . . . . 198<br />
Evita 4 Link . . . . . . . . . . . . . . . . . . . . . . . . . . . . . . . . . . . . . . . 178<br />
Evita 4 Link (optional) . . . . . . . . . . . . . . . . . . . . . . . . . . . . . . 177<br />
Evita Remote . . . . . . . . . . . . . . . . . . . . . . . . . . . . . . . . . . . . . . 31<br />
Expiration Hold . . . . . . . . . . . . . . . . . . . . . . . . . . . . . . . . . . . . . 97<br />
Expiration valve<br />
disinfect . . . . . . . . . . . . . . . . . . . . . . . . . . . . . . . . . . . . . . 161<br />
dismantling . . . . . . . . . . . . . . . . . . . . . . . . . . . . . . . . . . . 158<br />
fitting . . . . . . . . . . . . . . . . . . . . . . . . . . . . . . . . . . . . . . . . . 23<br />
mounting . . . . . . . . . . . . . . . . . . . . . . . . . . . . . . . . . . . . . 163<br />
Ext. Flow . . . . . . . . . . . . . . . . . . . . . . . . . . . . . . . . . . . . . . . . . 232
Index<br />
F<br />
Fault – Cause – Remedy . . . . . . . . . . . . . . . . . . . . . . . . . . . 144<br />
Fault — Cause — Remedy . . . . . . . . . . . . . . . . . . . . . . . . . . 143<br />
Filter . . . . . . . . . . . . . . . . . . . . . . . . . . . . . . . . . . . . . . . . . . . . 167<br />
Flow compensation, external . . . . . . . . . . . . . . . . . . . . . . . 107<br />
Flow Measurement, description . . . . . . . . . . . . . . . . . . . . . 218<br />
Flow sensor<br />
calibrating . . . . . . . . . . . . . . . . . . . . . . . . . . . . . . . . . . . 106<br />
fitting . . . . . . . . . . . . . . . . . . . . . . . . . . . . . . . . . . . . . . . . 23<br />
removal . . . . . . . . . . . . . . . . . . . . . . . . . . . . . . . . . . . . . 158<br />
Flowtrigger setting . . . . . . . . . . . . . . . . . . . . . . . . . . . . . . . . . 68<br />
Freeze . . . . . . . . . . . . . . . . . . . . . . . . . . . . . . . . . . . . . . . . . . . 85<br />
Front connections, What’s what . . . . . . . . . . . . . . . . . . . . . 185<br />
G<br />
Gas supply . . . . . . . . . . . . . . . . . . . . . . . . . . . . . . . . . . . . . . . 31<br />
Gas switch-over . . . . . . . . . . . . . . . . . . . . . . . . . . . . . . . . . . . . . 9<br />
H<br />
Heat moisture exchanger . . . . . . . . . . . . . . . . . . . . . . . 25, 40<br />
HME . . . . . . . . . . . . . . . . . . . . . . . . . . . . . . . . . . . . . . . . . 25, 40<br />
Hose system . . . . . . . . . . . . . . . . . . . . . . . . . . . . . . . . . . 27, 28<br />
Humidifier<br />
conditioning . . . . . . . . . . . . . . . . . . . . . . . . . . . . . . . . . 159<br />
Connecting AquaporEL . . . . . . . . . . . . . . . . . . . . . . . . . 26<br />
Fisher & Paykel fitting . . . . . . . . . . . . . . . . . . . . . . . . . . 28<br />
I<br />
ILV setting . . . . . . . . . . . . . . . . . . . . . . . . . . . . . . . . . . . . . . . . 53<br />
Insp. O2 concentration during nebulisation . . . . . . . . . . . 228<br />
Inspiration hold . . . . . . . . . . . . . . . . . . . . . . . . . . . . . . . . . . . . 96<br />
Intended Medical Application . . . . . . . . . . . . . . . . . . . . . . 7, 8<br />
Interface<br />
connecting analogue . . . . . . . . . . . . . . . . . . . . . . . . . . 179<br />
RS 232 connection . . . . . . . . . . . . . . . . . . . . . . . . . . . 179<br />
setting . . . . . . . . . . . . . . . . . . . . . . . . . . . . . . . . . . . . . . 136<br />
Interruption of power supply . . . . . . . . . . . . . . . . . . . . . . . . . 30<br />
Intrinsic PEEP<br />
Description . . . . . . . . . . . . . . . . . . . . . . . . . . . . . . . . . . 226<br />
setting . . . . . . . . . . . . . . . . . . . . . . . . . . . . . . . . . . . . . . 100<br />
IPPV setting . . . . . . . . . . . . . . . . . . . . . . . . . . . . . . . . . . . . . . 49<br />
K<br />
Keys . . . . . . . . . . . . . . . . . . . . . . . . . . . . . . . . . . . . . . . . . . . . . 14<br />
Knobs . . . . . . . . . . . . . . . . . . . . . . . . . . . . . . . . . . . . . . . . . . . . 14<br />
L<br />
Leak test . . . . . . . . . . . . . . . . . . . . . . . . . . . . . . . . . . . . . . . . . 39<br />
Leakage compensation, description . . . . . . . . . . . . . . . . . 220<br />
Liability . . . . . . . . . . . . . . . . . . . . . . . . . . . . . . . . . . . . . . . . . . . . . 5<br />
Logbook . . . . . . . . . . . . . . . . . . . . . . . . . . . . . . . . . . . . . . . . . . 89<br />
Loops<br />
configuration . . . . . . . . . . . . . . . . . . . . . . . . . . . . . . . . . 127<br />
display . . . . . . . . . . . . . . . . . . . . . . . . . . . . . . . . . . . . . . . 85<br />
Low Flow PV-Loop . . . . . . . . . . . . . . . . . . . . . . . . . . . . . . . . 102<br />
Description . . . . . . . . . . . . . . . . . . . . . . . . . . . . . . . . . . 227<br />
Lung Protection<br />
Package . . . . . . . . . . . . . 9, 18, 19, 20, 84, 102, 227<br />
LUST protocol . . . . . . . . . . . . . . . . . . . . . . . . . . . . . . . . . . . . 180<br />
Technical data . . . . . . . . . . . . . . . . . . . . . . . . . . . . . . . . 201<br />
M<br />
Mains power . . . . . . . . . . . . . . . . . . . . . . . . . . . . . . . 170, 175<br />
Mains power/DC power operation . . . . . . . . . . . . . . . . . . 169<br />
Maintenance . . . . . . . . . . . . . . . . . . . . . . . . . . . . . . . . . . . . . 166<br />
Maintenance/Disposal . . . . . . . . . . . . . . . . . . . . . . . . . . . . . 165<br />
Manual<br />
Expiration . . . . . . . . . . . . . . . . . . . . . . . . . . . . . . . . . . . . . 97<br />
Inspiration . . . . . . . . . . . . . . . . . . . . . . . . . . . . . . . . . . . . 96<br />
ventilation device . . . . . . . . . . . . . . . . . . . . . . . . . . . . . . . 6<br />
Mask, ventilation . . . . . . . . . . . . . . . . . . . . . . . . . . . . . . . . . . . 76<br />
Materials, used . . . . . . . . . . . . . . . . . . . . . . . . . . . . . . . . . . . 197<br />
Measured values<br />
Customised values . . . . . . . . . . . . . . . . . . . . . . . . . . . . 131<br />
display . . . . . . . . . . . . . . . . . . . . . . . . . . . . . . . . . . . . . . . 88<br />
System-specific values . . . . . . . . . . . . . . . . . . . . . . . . . 128<br />
Technical data . . . . . . . . . . . . . . . . . . . . . . . . . . . . . . . . 192<br />
Measurement principles . . . . . . . . . . . . . . . . . . . . . . . . . . . 219<br />
Medicament nebuliser<br />
disinfect . . . . . . . . . . . . . . . . . . . . . . . . . . . . . . . . . . . . . 161<br />
dismantling . . . . . . . . . . . . . . . . . . . . . . . . . . . . . . . . . . 157<br />
use . . . . . . . . . . . . . . . . . . . . . . . . . . . . . . . . . . . . . . . . . . 91<br />
MMV<br />
Description . . . . . . . . . . . . . . . . . . . . . . . . . . . . . . . . . . 212<br />
setting . . . . . . . . . . . . . . . . . . . . . . . . . . . . . . . . . . . . . . . . 52<br />
Mobile telephone . . . . . . . . . . . . . . . . . . . . . . . . . . . . . . . . . . . 6<br />
Monitoring . . . . . . . . . . . . . . . . . . . . . . . . . . . . . . . . . . . . . . 6, 9<br />
Technical data . . . . . . . . . . . . . . . . . . . . . . . . . . . . . . . . 195<br />
N<br />
Nebulisation . . . . . . . . . . . . . . . . . . . . . . . . . . . . . . . . . . . . . . 91<br />
NIF . . . . . . . . . . . . . . . . . . . . . . . . . . . . . . . . . . . . . . . . . . . . . 101<br />
Description . . . . . . . . . . . . . . . . . . . . . . . . . . . . . . . . . . 225<br />
NIV mask ventilation (optional) . . . . . . . . . . . . . . . . . . . . . . . 76<br />
NTPD . . . . . . . . . . . . . . . . . . . . . . . . . . . . . . . . . . . . . . . . . . . 218<br />
Nurse call<br />
connecting . . . . . . . . . . . . . . . . . . . . . . . . . . . . . . . . . . . . 33<br />
Technical data . . . . . . . . . . . . . . . . . . . . . . . . . . . . . . . . 197<br />
O<br />
O2 sensor<br />
calibrating . . . . . . . . . . . . . . . . . . . . . . . . . . . . . . . . . . . 109<br />
capsule fitting . . . . . . . . . . . . . . . . . . . . . . . . . . . . . . . . . 24<br />
disposal . . . . . . . . . . . . . . . . . . . . . . . . . . . . . . . . . . . . . 168<br />
O2 Therapy . . . . . . . . . . . . . . . . . . . . . . . . . . . . . . . . . . . . . . 121<br />
Technical data . . . . . . . . . . . . . . . . . . . . . . . . . . . . . . . . 190<br />
Occlusion pressure P 0.1 . . . . . . . . . . . . . . . . . . . . . . . . . . . 98<br />
Description . . . . . . . . . . . . . . . . . . . . . . . . . . . . . . . . . . 224<br />
Operating concept . . . . . . . . . . . . . . . . . . . . . . . . . . . . . . . . . 11<br />
Operating concept, optional . . . . . . . . . . . . . . . . . . . . . . . . . 18<br />
Operating data . . . . . . . . . . . . . . . . . . . . . . . . . . . . . . . . . . . 196<br />
Operation . . . . . . . . . . . . . . . . . . . . . . . . . . . . . . . . . . . . . . . . . 43<br />
Order list . . . . . . . . . . . . . . . . . . . . . . . . . . . . . . . . . . . . . . . . 242<br />
Oxygen enrichment for bronchial suction . . . . . . . . . . . . . . 94<br />
P<br />
Paediatric ventilation . . . . . . . . . . . . . . . . . . . . . . . . . . . . . . . 28<br />
Parts list . . . . . . . . . . . . . . . . . . . . . . . . . . . . . . . . . . . . . . . . . 240<br />
Patient range, set start-up value . . . . . . . . . . . . . . . . . . . . . 137<br />
PEEPi<br />
Description . . . . . . . . . . . . . . . . . . . . . . . . . . . . . . . . . . 226<br />
setting . . . . . . . . . . . . . . . . . . . . . . . . . . . . . . . . . . . . . . . 100<br />
248 Instructions for Use <strong>EvitaXL</strong>
Performance characteristics . . . . . . . . . . . . . . . . . . . . . . . . 191<br />
PLV setting . . . . . . . . . . . . . . . . . . . . . . . . . . . . . . . . . . . . . . . . 75<br />
Power failure alarm . . . . . . . . . . . . . . . . . . . . . . . . . . . . . . . . . 82<br />
Power supplies . . . . . . . . . . . . . . . . . . . . . . . . . . . . . . . . . . . 171<br />
Power supply and connections . . . . . . . . . . . . . . . . . . . . . . . 30<br />
Power supply, displays . . . . . . . . . . . . . . . . . . . . . . . . . . . . . 174<br />
Power switch . . . . . . . . . . . . . . . . . . . . . . . . . . . . . . . . . 35, 45<br />
PPS<br />
Description . . . . . . . . . . . . . . . . . . . . . . . . . . . . . . . . . . . 217<br />
setting . . . . . . . . . . . . . . . . . . . . . . . . . . . . . . . . . . . . . . . . 64<br />
Preparing . . . . . . . . . . . . . . . . . . . . . . . . . . . . . . . . . . . . . . . . 155<br />
Preparing for use . . . . . . . . . . . . . . . . . . . . . . . . . . . . . . . . . . . 21<br />
Pressure limitation, manual . . . . . . . . . . . . . . . . . . . . . . . . . 208<br />
Pressure Limited Ventilation . . . . . . . . . . . . . . . . . . . . . . . . . 75<br />
PressureLink . . . . . . . . . . . . . . . . . . . . . . . . . . . . . . . . . . . . . . 19<br />
Q<br />
QuickSet . . . . . . . . . . . . . . . . . . . . . . . . . . . . . . . . . . . . . . . . . . 18<br />
R<br />
Recruitment Trend . . . . . . . . . . . . . . . . . . . . . . . . . . . . . . . . . . 83<br />
Remote Pad . . . . . . . . . . . . . . . . . . . . . . . . . . . . . . . . . . . . . . . 31<br />
Removing and reinserting ambient-air filter . . . . . . . . . . . . 167<br />
Replace cooling air filter . . . . . . . . . . . . . . . . . . . . . . . . . . . 167<br />
RSB, Description . . . . . . . . . . . . . . . . . . . . . . . . . . . . . . . . . . 225<br />
S<br />
Safety . . . . . . . . . . . . . . . . . . . . . . . . . . . . . . . . . . . . . . . . . . . . . 5<br />
Safety checks . . . . . . . . . . . . . . . . . . . . . . . . . . . . . . . . . . . . . 166<br />
Screen . . . . . . . . . . . . . . . . . . . . . . . . . . . . . . . . . . . . . . . . . . . 13<br />
brightness . . . . . . . . . . . . . . . . . . . . . . . . . . . . . . . . . . . . 127<br />
Function key assignment . . . . . . . . . . . . . . . . . . . . . . . 130<br />
keys . . . . . . . . . . . . . . . . . . . . . . . . . . . . . . . . . . . . . . . . . . 16<br />
knobs . . . . . . . . . . . . . . . . . . . . . . . . . . . . . . . . . . . . . . . . 16<br />
Screen configurations . . . . . . . . . . . . . . . . . . . . . . . . . . . . . 132<br />
works settings . . . . . . . . . . . . . . . . . . . . . . . . . . . . . . . . 229<br />
Selcting application mode . . . . . . . . . . . . . . . . . . . . . . . . . . . 40<br />
Select date . . . . . . . . . . . . . . . . . . . . . . . . . . . . . . . . . . . . . . . 135<br />
Select language . . . . . . . . . . . . . . . . . . . . . . . . . . . . . . . . . . . 134<br />
Select MEDIBUS protocol . . . . . . . . . . . . . . . . . . . . . . . . . . 180<br />
Select printer protocol . . . . . . . . . . . . . . . . . . . . . . . . . . . . . 181<br />
Select time . . . . . . . . . . . . . . . . . . . . . . . . . . . . . . . . . . . . . . . 135<br />
Sensors . . . . . . . . . . . . . . . . . . . . . . . . . . . . . . . . . . . . . . . . . . 106<br />
Service . . . . . . . . . . . . . . . . . . . . . . . . . . . . . . . . . . . . . . . . . . 166<br />
Set units . . . . . . . . . . . . . . . . . . . . . . . . . . . . . . . . . . . . . . . . . 135<br />
Settings . . . . . . . . . . . . . . . . . . . . . . . . . . . . . . . . . . . . . . . . . . 188<br />
customised . . . . . . . . . . . . . . . . . . . . . . . . . . . . . . . . . . . 131<br />
lock access . . . . . . . . . . . . . . . . . . . . . . . . . . . . . . . . . . . 134<br />
specific systems . . . . . . . . . . . . . . . . . . . . . . . . . . . . . . 126<br />
Sigh<br />
Description . . . . . . . . . . . . . . . . . . . . . . . . . . . . . . . . . . . 210<br />
setting . . . . . . . . . . . . . . . . . . . . . . . . . . . . . . . . . . . . . . . . 74<br />
SIMV<br />
Description . . . . . . . . . . . . . . . . . . . . . . . . . . . . . . . . . . . 211<br />
setting . . . . . . . . . . . . . . . . . . . . . . . . . . . . . . . . . . . . . . . . 50<br />
Socket strip . . . . . . . . . . . . . . . . . . . . . . . . . . . . . . . . . . . . . . . 30<br />
Standby . . . . . . . . . . . . . . . . . . . . . . . . . . . . . . . . . . . . . . . . . . 119<br />
Start-up<br />
measured values . . . . . . . . . . . . . . . . . . . . . . . . . . . . . . 128<br />
settings, for specific therapy . . . . . . . . . . . . . . . . . . . . 137<br />
values, setting . . . . . . . . . . . . . . . . . . . . . . . . . . . . . . . . 140<br />
Instructions for Use <strong>EvitaXL</strong> 249<br />
Index<br />
Sterilisation . . . . . . . . . . . . . . . . . . . . . . . . . . . . . . . . . . . . . . . 161<br />
Suction . . . . . . . . . . . . . . . . . . . . . . . . . . . . . . . . . . . . . . . . . . . 94<br />
Supplements . . . . . . . . . . . . . . . . . . . . . . . . . . . . . . . . . . . . . . . 8<br />
define start-up values . . . . . . . . . . . . . . . . . . . . . . . . . . 141<br />
setting . . . . . . . . . . . . . . . . . . . . . . . . . . . . . . . . . . . . . . . . 66<br />
Switching off monitor functions . . . . . . . . . . . . . . . . . . . . . . 118<br />
Switching on . . . . . . . . . . . . . . . . . . . . . . . . . . . . . . . . . . . . . . . 45<br />
Symbols . . . . . . . . . . . . . . . . . . . . . . . . . . . . . . . . . . . . . . . . . 234<br />
T<br />
Technical Data . . . . . . . . . . . . . . . . . . . . . . . . . . . . . . . . . . . . 187<br />
Temperature sensor<br />
disinfect . . . . . . . . . . . . . . . . . . . . . . . . . . . . . . . . . . . . . . 160<br />
fitting . . . . . . . . . . . . . . . . . . . . . . . . . . . . . . . . . . . . . . . . . 27<br />
removal . . . . . . . . . . . . . . . . . . . . . . . . . . . . . . . . . . . . . . 156<br />
Test lung . . . . . . . . . . . . . . . . . . . . . . . . . . . . . . . . . . . . . . . . . . 34<br />
Transferring a patient within the hospital . . . . . . . . . . . . . . . 41<br />
Trend<br />
(1 to 24 hr) display . . . . . . . . . . . . . . . . . . . . . . . . . . . . . 90<br />
Display (1 hr) . . . . . . . . . . . . . . . . . . . . . . . . . . . . . . . . . . 87<br />
Graphics configuration . . . . . . . . . . . . . . . . . . . . . . . . . 127<br />
Measured value configuration . . . . . . . . . . . . . . . . . . . 129<br />
Tube compensation . . . . . . . . . . . . . . . . . . . . . . . . . . . 72, 221<br />
U<br />
UMDNS code . . . . . . . . . . . . . . . . . . . . . . . . . . . . . . . . . . . . . 196<br />
Unit<br />
disinfect . . . . . . . . . . . . . . . . . . . . . . . . . . . . . . . . . . . . . . 160<br />
disposal . . . . . . . . . . . . . . . . . . . . . . . . . . . . . . . . . . . . . . 168<br />
V<br />
Ventilating adults<br />
preparing . . . . . . . . . . . . . . . . . . . . . . . . . . . . . . . . . . . . . 26<br />
setting . . . . . . . . . . . . . . . . . . . . . . . . . . . . . . . . . . . . . . . . 47<br />
Ventilating children preparing . . . . . . . . . . . . . . . . . . . . . . . . 26<br />
Ventilating infants<br />
preparing . . . . . . . . . . . . . . . . . . . . . . . . . . . . . . . . . . . . . 28<br />
setting . . . . . . . . . . . . . . . . . . . . . . . . . . . . . . . . . . . . . . . . 47<br />
Ventilation hoses<br />
connecting (adults) . . . . . . . . . . . . . . . . . . . . . . . . . . . . . 26<br />
disinfect . . . . . . . . . . . . . . . . . . . . . . . . . . . . . . . . . . . . . . 161<br />
fittings (infants) . . . . . . . . . . . . . . . . . . . . . . . . . . . . . . . . . 28<br />
removal . . . . . . . . . . . . . . . . . . . . . . . . . . . . . . . . . . . . . . 157<br />
Ventilation Modes . . . . . . . . . . . . . . . . . . . . . . . . . . . . . . . . . . . 8<br />
Description . . . . . . . . . . . . . . . . . . . . . . . . . . . . . . . . . . . 208<br />
setting . . . . . . . . . . . . . . . . . . . . . . . . . . . . . . . . . . . . . . . . 48<br />
setting start-up value . . . . . . . . . . . . . . . . . . . . . . . . . . . 138<br />
Ventilation parameters<br />
new setting . . . . . . . . . . . . . . . . . . . . . . . . . . . . . . . . . . . . 47<br />
setting . . . . . . . . . . . . . . . . . . . . . . . . . . . . . . . . . . . . . . . . 17<br />
Volume . . . . . . . . . . . . . . . . . . . . . . . . . . . . . . . . . . . . . . . . . . 126<br />
W<br />
Weaning parameters, description . . . . . . . . . . . . . . . . . . . . 224<br />
What's what . . . . . . . . . . . . . . . . . . . . . . . . . . . . . . . . . . . . . . 183
These Instructions for Use only apply to<br />
<strong>EvitaXL</strong> SW 6.n<br />
with the Serial No.:<br />
If no Serial No. has been filled in by<br />
Dräger these Instructions for Use are<br />
provided for general information only and<br />
are not intended for use with any specific<br />
machine or device.<br />
ç<br />
Directive 93/42/EEC<br />
concerning Medical Devices<br />
Dräger Medical AG & Co. KGaA<br />
Germany<br />
z Moislinger Allee 53 – 55<br />
D-23542 Lübeck<br />
y +49 451 8 82- 0<br />
FAX +49 451 8 82- 20 80<br />
! http://www.draeger.com<br />
90 38 308 – GA 5664.650 en<br />
© Dräger Medical AG & Co. KGaA<br />
1 st edition – July 2004<br />
Subject to alteration