EvitaXL
EvitaXL
EvitaXL
You also want an ePaper? Increase the reach of your titles
YUMPU automatically turns print PDFs into web optimized ePapers that Google loves.
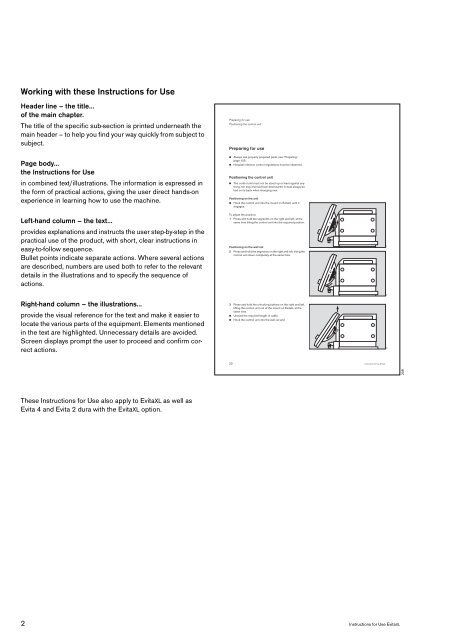
Working with these Instructions for Use<br />
Header line – the title...<br />
of the main chapter.<br />
The title of the specific sub-section is printed underneath the<br />
main header – to help you find your way quickly from subject to<br />
subject.<br />
Page body...<br />
the Instructions for Use<br />
in combined text/illustrations. The information is expressed in<br />
the form of practical actions, giving the user direct hands-on<br />
experience in learning how to use the machine.<br />
Left-hand column – the text...<br />
provides explanations and instructs the user step-by-step in the<br />
practical use of the product, with short, clear instructions in<br />
easy-to-follow sequence.<br />
Bullet points indicate separate actions. Where several actions<br />
are described, numbers are used both to refer to the relevant<br />
details in the illustrations and to specify the sequence of<br />
actions.<br />
Right-hand column – the illustrations...<br />
provide the visual reference for the text and make it easier to<br />
locate the various parts of the equipment. Elements mentioned<br />
in the text are highlighted. Unnecessary details are avoided.<br />
Screen displays prompt the user to proceed and confirm correct<br />
actions.<br />
These Instructions for Use also apply to <strong>EvitaXL</strong> as well as<br />
Evita 4 and Evita 2 dura with the <strong>EvitaXL</strong> option.<br />
Preparing for use<br />
Positioning the control unit<br />
Preparing for use<br />
● Always use properly prepared parts, see "Preparing",<br />
page 155.<br />
● Hospital infection control regulations must be observed.<br />
Positioning the control unit<br />
2 Instructions for Use <strong>EvitaXL</strong><br />
●<br />
22<br />
The control unit must not be stood up or leant against anything,<br />
nor may it be laid face downwards! It must always be<br />
laid on its back when changing over.<br />
Positioning on the unit<br />
● Hook the control unit into the mount on <strong>EvitaXL</strong><br />
until it<br />
engages.<br />
To adjust the position:<br />
1 Press and hold the segments on the right and left, at the<br />
same time tilting the control unit into the required position.<br />
Positioning on the wall rail<br />
2 Press and hold the segments on the right and left, tilting the<br />
control unit down completely at the same time.<br />
3 Press and hold the unlocking buttons on the right and left,<br />
lifting the control unit out of the mount on <strong>EvitaXL</strong><br />
at the<br />
same time.<br />
● Unwind the required length of cable.<br />
● Hook the control unit into the wall rail and<br />
1<br />
2<br />
3<br />
170<br />
091<br />
092<br />
Instructions for Use <strong>EvitaXL</strong><br />
208


