- Page 1 and 2:
EvitaXL Intensive Care Ventilator S
- Page 3 and 4:
Contents Contents For Your Safety a
- Page 5 and 6:
For Your Safety and that of Your Pa
- Page 7 and 8:
Intended Medical Application Intend
- Page 9 and 10:
Lung Protection Package (optional)
- Page 11 and 12:
Operating concept Operating concept
- Page 13 and 14:
The screen... displays all the most
- Page 15 and 16:
To set the ventilation mode and ven
- Page 17 and 18:
To set ventilation parameters direc
- Page 19 and 20:
PressureLink* Linked adjustment of
- Page 21 and 22:
Preparing for use Preparing for use
- Page 23 and 24:
1 lock it in position = pull tab un
- Page 25 and 26:
Using HME, bacterial filters and ho
- Page 27 and 28:
1 Hang the hinged arm from the rail
- Page 29 and 30:
Fitting CO2 cuvette and CO2 sensor
- Page 31 and 32:
Gas supply ● Screw the connecting
- Page 33 and 34:
Connecting the nurse call (optional
- Page 35 and 36:
Preparing the child test lung 84 09
- Page 37 and 38:
● Touch the screen key »Check«.
- Page 39 and 40:
Leak test This test must be perform
- Page 41 and 42:
Ventilation while transferring a pa
- Page 43 and 44:
Operation Starting up . . . . . . .
- Page 45 and 46:
Starting up Switching on ● Switch
- Page 47 and 48:
Setting new ventilation parameters
- Page 49 and 50:
IPPV Intermittent Positive Pressure
- Page 51 and 52:
To view additional text information
- Page 53 and 54:
ILV ILV = Independent Lung Ventilat
- Page 55 and 56:
Setting the Master and Slave device
- Page 57 and 58:
ILV: Master and Slave Synchronisati
- Page 59 and 60: BIPAP, BIPAP/ASB Biphasic Positive
- Page 61 and 62: BIPAPAssist Biphasic Positive Airwa
- Page 63 and 64: CPAP-ASB Continuous Positive Airway
- Page 65 and 66: No initial values for PPS To protec
- Page 67 and 68: To review, activate or set: In the
- Page 69 and 70: Apnoea Ventilation For automatic sw
- Page 71 and 72: AutoFlow for automatic regulation o
- Page 73 and 74: -----------------------------------
- Page 75 and 76: PLV* Pressure Limited Ventilation S
- Page 77 and 78: Selecting application mode »Mask«
- Page 79 and 80: Setting alarm limits ● Press key
- Page 81 and 82: Remedy the fault ● Refer to the l
- Page 83 and 84: Displaying graphics The following r
- Page 85 and 86: Freeze To freeze the current real-t
- Page 87 and 88: Display 1 hr trend ● Touch the fu
- Page 89 and 90: Display logbook Changes, events and
- Page 91 and 92: Additional functions Medicament neb
- Page 93 and 94: Switch on the medicament nebuliser:
- Page 95 and 96: EvitaXL ventilates the patient in t
- Page 97 and 98: Expiration Hold This function may b
- Page 99 and 100: Set the interval ● Touch the scre
- Page 101 and 102: Negative Inspiratory Force NIF The
- Page 103 and 104: Measuring procedure ● Touch the s
- Page 105 and 106: Measurement analysis After the meas
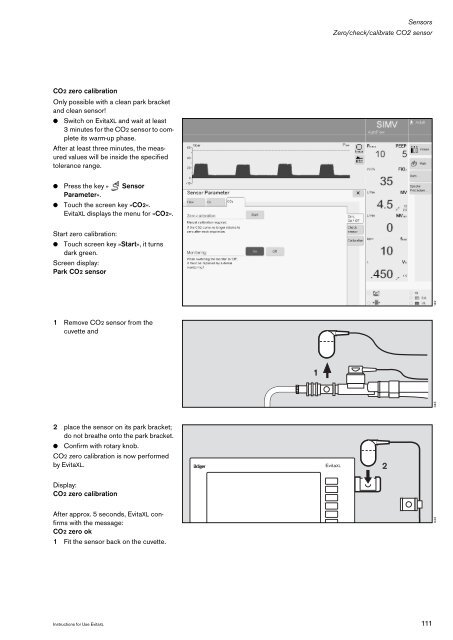
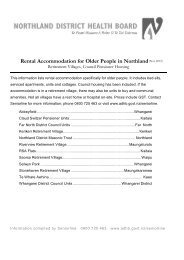
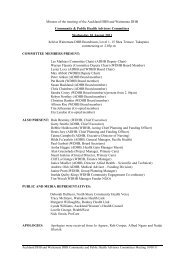
- Page 107 and 108: ● Press the key » Sensor Paramet
- Page 109: O2 sensor calibration — After rep
- Page 113 and 114: ● Place the test filter in the CO
- Page 115 and 116: Calibrating the CO2 sensor — If t
- Page 117 and 118: Resetting CO2 calibration — If ca
- Page 119 and 120: Selecting Standby Mode — To perfo
- Page 121 and 122: O2 Therapy (optional) During the O2
- Page 123 and 124: Switching on O2 Therapy ● Touch t
- Page 125 and 126: Configuration Configuration . . . .
- Page 127 and 128: Day/night function for screen brigh
- Page 129 and 130: Define the trends to be recorded
- Page 131 and 132: Define customised values and settin
- Page 133 and 134: Lock the screen configuration again
- Page 135 and 136: Select units Specific national unit
- Page 137 and 138: Specific initial therapy values ●
- Page 139 and 140: Set initial values for VT and f…
- Page 141 and 142: Define start-up values for special
- Page 143 and 144: Fault — Cause — Remedy Fault -
- Page 145 and 146: Message Cause Remedy Apnoea !!! Pat
- Page 147 and 148: Message Cause Remedy Exp. hold inte
- Page 149 and 150: Message Cause Remedy Leakage Not di
- Page 151 and 152: Message Cause Remedy Fault - Cause
- Page 153 and 154: Message Cause Remedy Tidal volume h
- Page 155 and 156: Preparing Preparing . . . . . . . .
- Page 157 and 158: Medicament nebuliser (optional) 1 R
- Page 159 and 160: The expiration valve is only disman
- Page 161 and 162:
As for ventilation hoses, water tra
- Page 163 and 164:
Assembling Mounting the expiration
- Page 165 and 166:
Maintenance/Disposal Maintenance/Di
- Page 167 and 168:
Replace cooling air filter — Clea
- Page 169 and 170:
Mains power/DC power operation Main
- Page 171 and 172:
Use of the power supplies Operation
- Page 173 and 174:
Connecting an external battery Note
- Page 175 and 176:
Operation with mains power The vent
- Page 177 and 178:
Evita 4 Link (optional) Evita 4 Lin
- Page 179 and 180:
Preparation The interface board may
- Page 181 and 182:
Select printer protocol ● See "Se
- Page 183 and 184:
What's what What's what . . . . . .
- Page 185 and 186:
Front connections 1 » « Gas outle
- Page 187 and 188:
Technical Data Technical Data . . .
- Page 189 and 190:
APRV Airway Pressure Release Ventil
- Page 191 and 192:
Performance characteristics Control
- Page 193 and 194:
Frequency Measurement Breathing fre
- Page 195 and 196:
Monitoring Expiratory minute volume
- Page 197 and 198:
Materials used Part Appearance Mate
- Page 199 and 200:
Technical Data Equipment outputs An
- Page 201 and 202:
LUST protocol LUST: List-controlled
- Page 203 and 204:
End of telegram "EOT" Status telegr
- Page 205 and 206:
23 FiO2 high 24 FiO2 low 25 MV low
- Page 207 and 208:
Description Ventilation Modes . . .
- Page 209 and 210:
AutoFlow ® The AutoFlow function c
- Page 211 and 212:
SIMV Synchronised Intermittent Mand
- Page 213 and 214:
Response times longer than 15 secon
- Page 215 and 216:
BIPAPAssist Biphasic Positive Airwa
- Page 217 and 218:
PPS (optional) In ventilation mode
- Page 219 and 220:
The difference between measured val
- Page 221 and 222:
Unlimited volume compensation is in
- Page 223 and 224:
Tube type Inside diameter of tube (
- Page 225 and 226:
Rapid-Shallow-Breathing RSB The Rap
- Page 227 and 228:
Low Flow PV-Loop The Low Flow PV-Lo
- Page 229 and 230:
Screen configurations Screen config
- Page 231 and 232:
Screen configurations Screen config
- Page 233 and 234:
Abreviation Explanation P 0.1 100 m
- Page 235 and 236:
Bibliography [1] Baum, M., Benzer,
- Page 237 and 238:
Special ASCII characters used Chara
- Page 239 and 240:
Instructions for Use EvitaXL 239
- Page 241 and 242:
For paediatric ventilation Item No.
- Page 243 and 244:
Name/Description Order No. For CO2
- Page 245 and 246:
New features in EvitaXL SW 6.n Indi
- Page 247 and 248:
Index A Abbreviations . . . . . . .
- Page 249 and 250:
Performance characteristics . . . .