Mimaki Guide 2011.pdf - HOME
Mimaki Guide 2011.pdf - HOME
Mimaki Guide 2011.pdf - HOME

You also want an ePaper? Increase the reach of your titles
YUMPU automatically turns print PDFs into web optimized ePapers that Google loves.
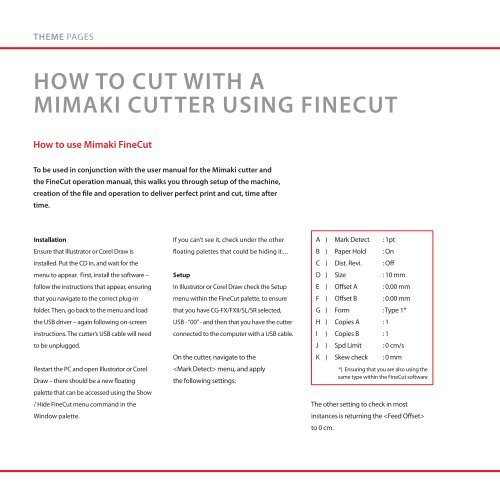
THEME PAGESTHEME PAGESHow to cut with a<strong>Mimaki</strong> cutter using FineCutHow to use <strong>Mimaki</strong> FineCutTo be used in conjunction with the user manual for the <strong>Mimaki</strong> cutter andthe FineCut operation manual, this walks you through setup of the machine,creation of the file and operation to deliver perfect print and cut, time aftertime.This side holderFar side holder This side holder Far side holder Turn the adjusting knob.Turn the adjusting knob.InstallationIf you can’t see it, check under the otherA ) Mark Detect : 1ptMake sure you have “CT1” selected as theto do, and is described in the operationcreate cut lines around the image. You canEnsure that Illustrator or Corel Draw isfloating palettes that could be hiding it…B ) Paper Hold : Ontool - it should be about 80 cm speed,manual.make a path around the edges of the imageinstalled. Put the CD in, and wait for theC ) Dist. Revi. : Offmaybe 50 g pressure and a 0.30 mm offset;in Adobe Photoshop. You can also make anmenu to appear. First, install the software –SetupD ) Size : 10 mmall dependent upon the type of materialOnce satisfied, place the blade holder inoutline path around an image using one offollow the instructions that appear, ensuringIn Illustrator or Corel Draw check the SetupE ) Offset A : 0.00 mmyou wish to cut, the age of blade and thethe rear slot on the carriage - (the diagramtwo tools within FineCut – see the FineCutthat you navigate to the correct plug-inmenu within the FineCut palette, to ensureF ) Offset B : 0.00 mmcomplexity of the job. Take the blade holderon the right end of the platen explains yourmanual for more details.folder. Then, go back to the menu and loadthat you have CG-FX/FXII/SL/SR selected,G ) Form : Type 1*out of the carriage, and by performing achoices). The shoulder of the holder shouldTo create your register marks, use thethe USB driver – again following on-screenUSB - “00” - and then that you have the cutterH ) Copies A : 1test cut (square cut), check the blade for thefit into the groove.rectangle tool to draw a box around theinstructions. The cutter’s USB cable will needconnected to the computer with a USB cable.I ) Copies B : 1correct length / depth. It should cut throughgraphic - just ensure that the whole cut pathto be unplugged.J ) Spd Limit : 0 cm/sthe vinyl, but not the backing (for contourPrepare the fileis inside the box.On the cutter, navigate to theK ) Skew check : 0 mmcutting). To increase / decrease the length,Open your vector graphic (EPS, nativeRestart the PC and open Illustrator or CorelDraw – there should be a new floating menu, and applythe following settings:*) Ensuring that you are also using thesame type within the FineCut softwarewind the top of the blade holder in ½ or ¼turns and check again.AI) file in Adobe Illustrator or Corel DrawDetermine that you have a vector path bypalette that can be accessed using the Showusing your arrow tool to click the edge of/ Hide FineCut menu command in theThe other setting to check in mostThere is also a more formal way of checkingthe image - a line/path should appear. ThisWindow palette.instances is returning the the blade depth that is very quick and easyis important to be able in a later stage toto 0 cm.