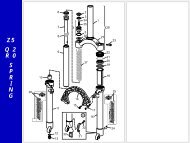
01 Z3 COIL - Enduro Fork Seals
01 Z3 COIL - Enduro Fork Seals
01 Z3 COIL - Enduro Fork Seals

You also want an ePaper? Increase the reach of your titles
YUMPU automatically turns print PDFs into web optimized ePapers that Google loves.
<strong>Z3</strong> CoilRECOMMENDATIONS FORMAINTENANCEMARZOCCHI forks are based on advancedtechnology, supported by year-long experiencein the field of professional mountainbiking. In order to achieve best results,we recommend to check and cleanthe area below the dust seal and thestanchion tube after each use and lubricatewith silicone oil.In general, MARZOCCHI forks can offer topperformance from the start. However, insome cases a short running-in period isrequired (5-10 hours) for inner adjustments.This running-in period will makefork life longer and ensure fork top performanceover time.IMPORTANT: change oil at least every100 working hours.Polished forks should be cleaned withbodywork polish at regular intervals inorder to preserve their original finish.INSTALLATIONInstalling the fork on a bicycle is a verydelicate operation that should be carriedout with extreme care. The installationshould always be checked by one of ourTechnical Service Centers.WARNING: Steer tube/headsetmounting and adjustment must becarried out in compliance with the headsetmanufacturer’s instructions. Improperinstallation may jeopardize the safety ofthe rider.To replace it, contact one of our TechnicalService Centers with the required tools.WARNING: In case of improperinstallation of the steer tube into thecrown, the rider might lose control of his/her bicycle, thus jeopardizing his/hersafety.DISC BRAKE SYSTEM ASSEMBLYWARNING: If a disc brake systemis installed, it is absolutely forbiddento loosen and remove originalbrake supports fixing pins. In fact, apartfrom retaining Cantilever or V-brake levers,they also play an important role insecuring slider bottom to slider-arch monolith.If needed, replace these pins withscrews (part no. 532979QF) availableas spare parts.Tighten the above screws to 15 Nm.IMPORTANT: screw and pin threadingis treated to ensure hydraulic seal. Neverreuse screws and pins which have beenremoved.Assembling the brake caliper onto theslider is a very delicate operation thatshould be carried out with extreme care.Improper assembly might overstress thecaliper supports which might break.When installing the disc brake system, besure to properly follow the instructionsgiven by the manufacturer.