Create successful ePaper yourself
Turn your PDF publications into a flip-book with our unique Google optimized e-Paper software.
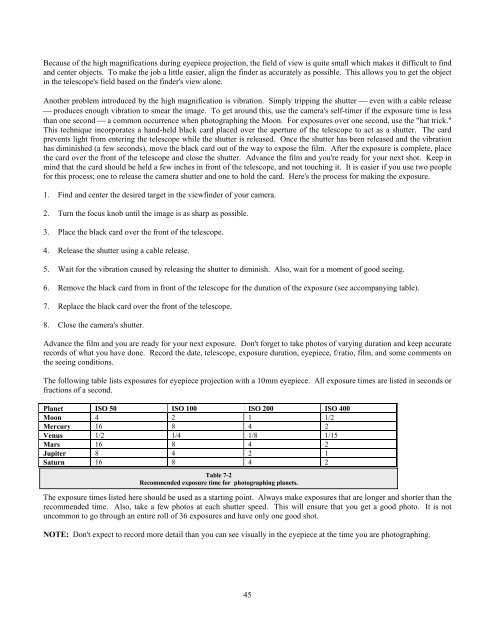
Because of the high magnifications during eyepiece projection, the field of view is quite small which makes it difficult to findand center objects. To make the job a little easier, align the finder as accurately as possible. This allows you to get the objectin the telescope's field based on the finder's view alone.Another problem introduced by the high magnification is vibration. Simply tripping the shutter even with a cable release produces enough vibration to smear the image. To get around this, use the camera's self-timer if the exposure time is lessthan one second a common occurrence when photographing the Moon. For exposures over one second, use the "hat trick."This technique incorporates a hand-held black card placed over the aperture of the telescope to act as a shutter. The cardprevents light from entering the telescope while the shutter is released. Once the shutter has been released and the vibrationhas diminished (a few seconds), move the black card out of the way to expose the film. After the exposure is complete, placethe card over the front of the telescope and close the shutter. Advance the film and you're ready for your next shot. Keep inmind that the card should be held a few inches in front of the telescope, and not touching it. It is easier if you use two peoplefor this process; one to release the camera shutter and one to hold the card. Here's the process for making the exposure.1. Find and center the desired target in the viewfinder of your camera.2. Turn the focus knob until the image is as sharp as possible.3. Place the black card over the front of the telescope.4. Release the shutter using a cable release.5. Wait for the vibration caused by releasing the shutter to diminish. Also, wait for a moment of good seeing.6. Remove the black card from in front of the telescope for the duration of the exposure (see accompanying table).7. Replace the black card over the front of the telescope.8. Close the camera's shutter.Advance the film and you are ready for your next exposure. Don't forget to take photos of varying duration and keep accuraterecords of what you have done. Record the date, telescope, exposure duration, eyepiece, f/ratio, film, and some comments onthe seeing conditions.The following table lists exposures for eyepiece projection with a 10mm eyepiece. All exposure times are listed in seconds orfractions of a second.Planet ISO 50 ISO 100 ISO 200 ISO 400Moon 4 2 1 1/2Mercury 16 8 4 2Venus 1/2 1/4 1/8 1/15Mars 16 8 4 2Jupiter 8 4 2 1Saturn 16 8 4 2Table 7-2Recommended exposure time for photographing planets.The exposure times listed here should be used as a starting point. Always make exposures that are longer and shorter than therecommended time. Also, take a few photos at each shutter speed. This will ensure that you get a good photo. It is notuncommon to go through an entire roll of 36 exposures and have only one good shot.NOTE: Don't expect to record more detail than you can see visually in the eyepiece at the time you are photographing.45


