L50 Injection Lubricator - Parker
L50 Injection Lubricator - Parker
L50 Injection Lubricator - Parker

You also want an ePaper? Increase the reach of your titles
YUMPU automatically turns print PDFs into web optimized ePapers that Google loves.
Installation (cont'd):<br />
Start-Up and Bleed Air Oil Delivery Adjustment<br />
Oil Priming:<br />
The <strong>L50</strong> and P<strong>L50</strong> lubricators are shipped from the<br />
factory essentially free of oil. Therefore, it is imperative,<br />
particularly on installations with long capillary tubing<br />
lengths, that the lubricator be primed after installation<br />
prior to start-up. The reason for priming the lubricators<br />
is to evacuate all air from the oil passages and metering<br />
tubes in the lubricator. Each module in these lubricators<br />
is a small air operated hydraulic pump. Due to the small<br />
displacement of the piston/bore in these modules, it<br />
is imperative that all air be evacuated because each<br />
module must force the oil through an internal check<br />
valve. If air is present, the modules will not build up<br />
enough pressure to overcome the internal check valve<br />
due to the compressibility of air. There are two methods<br />
of priming – using a bucket pump, or manual priming:<br />
Manual Priming:<br />
To manually prime the lubricators, the oil supply should<br />
be connected and/or filled.<br />
With Integral Reservoir:<br />
The reservoir should be filled with oil and the vent<br />
cock should be left open.<br />
With External Reservoir or Oil Supply:<br />
The plug in the “Supply” port, on the plate atop the<br />
injector, should be removed until oil starts to flow<br />
from the hole. The plug should then be replaced.<br />
The red, module adjustment knob should be pulled out<br />
and turned clockwise until it stops. At that point manually<br />
pump the adjustment stem (sticking out of the center of the<br />
adjusting knob) until oil can be seen flowing through either<br />
the sight dome or the capillary tube. It is not necessary for<br />
all air to be evacuated from the sight dome, as long as oil<br />
can be seen flowing through it while pumping.<br />
Bucket Pump Priming:<br />
The easiest method of priming an injection lubricator is<br />
with the use of a Button Head Fill Fitting and a bucket<br />
pump. Models with the “Q” option use an SA606Y107<br />
Button Head Fill Fitting (which can also be purchased<br />
separately). The bucket pump is a small, manually<br />
operated, hydraulic pump with an oil reservoir. It is<br />
equipped with a hose and a fitting that will mate to the<br />
button head fill fitting, and is used to force oil into the oil<br />
passages, through the metering tubes, internal check<br />
valve, and out through the sight dome (if so equipped)<br />
and capillary tubes, purging all of the air from the<br />
injectors. To prime with this method, simply connect the<br />
pump to the button head fill fitting and operate the bucket<br />
pump until oil is forced through the capillary line.<br />
Oil Module Adjustment:<br />
The adjustment knob has two positions. All the way in<br />
is locked, and one stop out is to adjust. For maximum<br />
oil feed adjustment, turn the adjustment knob clockwise<br />
until it stops, and then out two turns (16 clicks). To shut<br />
off oil feed rate, turn the adjustment knob a minimum<br />
of six counter-clockwise turns from the stop. (There is<br />
no stop on counter-clockwise rotation of the adjustment<br />
knob so do not turn it more than ten turns, except when<br />
disassembling the plunger for cleaning or replacement.)<br />
If the unit is equipped with a Cycle Counter, you may turn<br />
the selector to the “Off” position to turn the lubricator off.<br />
See page 4 for detailed setting instructions.<br />
There is an arrow on the adjustment knob to assist in<br />
determining fractional turn settings. Once oil feed is<br />
adjusted to desired level, push the knob in to lock it<br />
in place. Do not remove the knob for operation, as<br />
the adjusting screw will lose its adjustment.<br />
Note: The red indicator piston on the outlet side of the<br />
lubricator is designed to operate in the upper half of the<br />
oil adjustment range i.e., ¼ to ½ drop per cycle. If the<br />
module is adjusted for minimal oil delivery, the indicator<br />
may not show movement.<br />
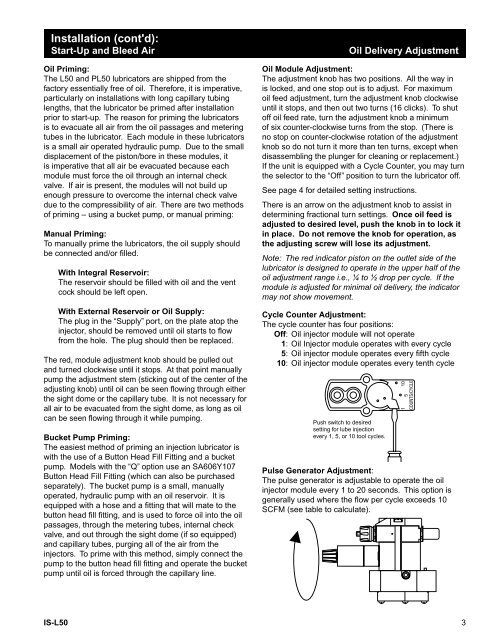
Cycle Counter Adjustment:<br />
The cycle counter has four positions:<br />
Off: Oil injector module will not operate<br />
1: Oil Injector module operates with every cycle<br />
5: Oil injector module operates every fifth cycle<br />
10: Oil injector module operates every tenth cycle<br />
Push switch to desired<br />
setting for lube injection<br />
every 1, 5, or 10 tool cycles.<br />
Pulse Generator Adjustment:<br />
The pulse generator is adjustable to operate the oil<br />
injector module every 1 to 20 seconds. This option is<br />
generally used where the flow per cycle exceeds 10<br />
SCFM (see table to calculate).<br />
IS-<strong>L50</strong> 3<br />
1 10<br />
5<br />
COUNTS/CYCLE