L50 Injection Lubricator - Parker
L50 Injection Lubricator - Parker
L50 Injection Lubricator - Parker

You also want an ePaper? Increase the reach of your titles
YUMPU automatically turns print PDFs into web optimized ePapers that Google loves.
Prep-Air ® I Air Line <strong>Lubricator</strong> 1L105C<br />
CAUTION<br />
!<br />
Polycarbonate bowls, being transparent and tough, are ideal for use<br />
with Filters and <strong>Lubricator</strong>s. They are suitable for use in normal<br />
industrial environments, but should not be located in areas where<br />
they could be subjected to direct sunlight, an impact blow, nor<br />
temperatures outside of the rated range. As with most plastics, some<br />
chemicals can cause damage. Polycarbonate bowls should not be<br />
exposed to chlorinated hydro-carbons, ketones, esters and certain<br />
alcohols. They should not be used in air systems where compressors<br />
are lubricated with fire-resistant fluids, such as phosphate ester and<br />
di-ester types.<br />
Metal bowls are recommended where ambient and/or media<br />
conditions are not compatible with polycarbonate bowls. Metal bowls<br />
resist the action of most such solvents, but should not be used<br />
where strong acids or bases are present or in salt laden atmospheres.<br />
Consult the factory for specific recommendations where these<br />
conditions exist.<br />
TO CLEAN POLYCARBONATE BOWLS, USE MILD SOAP AND<br />
WATER ONLY! DO NOT use cleansing agents such as acetone,<br />
benzene, carbon tetrachloride, gasoline, toluene, etc., which are<br />
damaging to this plastic.<br />
Maintenance:<br />
1. Periodically fill lubricator, do not allow oil level to drop below<br />
end of suction tube.<br />
2. Keep oil and air clean to prevent clogging of oil passages.<br />
A filter installed upstream of the lubricator is recommended.<br />
Cleaning:<br />
1. Depress button on lock ring, turn counterclockwise and remove<br />
along with bowl assembly.<br />
2. Clean the lubricator element and bowl assembly with MILD<br />
SOAP AND WATER ONLY! See CAUTION above.<br />
3. Reinstall the bowl assembly and lock ring. Turn lock ring<br />
clockwise until it clicks into place.<br />
Bowl Replacement:<br />
1. Depress button on lock ring, turn counterclockwise and remove<br />
along with bowl assembly.<br />
2. Install new bowl assembly and lock ring. Turn lock ring clockwise<br />
until it clicks into place.<br />
! WARNING: Conversion or replacement of an old metal bowl<br />
with a new plastic bowl will reduce the product pressure /<br />
temperature rating. Be certain that the circuit and environment<br />
does not exceed the lower ratings; and that rating labels<br />
elsewhere on the product are replaced with one describing the<br />
lower rating. Failure to do so may cause property damage,<br />
injury or death.<br />
Bowl Guard Installation:<br />
1. Depress button on lock ring, turn counterclockwise and remove.<br />
2. Slip guard over bowl.<br />
3. Reinstall the bowl assembly and lock ring. Turn lock ring<br />
clockwise until it clicks into place.<br />
Pressure Fill Adapter Installation:<br />
Remove fill plug (G) and discard. Install pressure fill adapter in its<br />
place.<br />
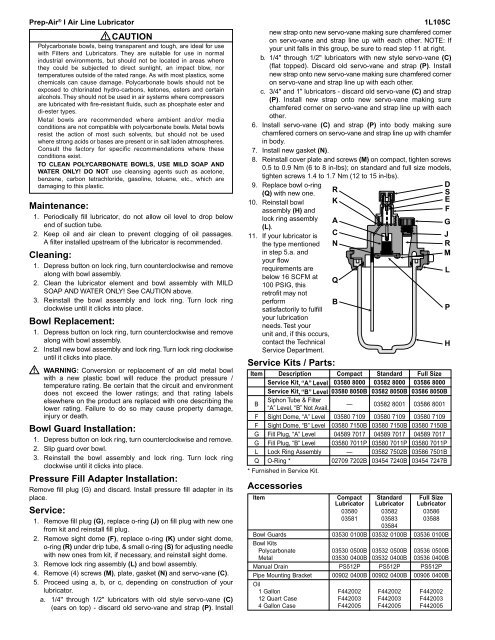
Service:<br />
1. Remove fill plug (G), replace o-ring (J) on fill plug with new one<br />
from kit and reinstall fill plug.<br />
2. Remove sight dome (F), replace o-ring (K) under sight dome,<br />
o-ring (R) under drip tube, & small o-ring (S) for adjusting needle<br />
with new ones from kit, if necessary, and reinstall sight dome.<br />
3. Remove lock ring assembly (L) and bowl assembly.<br />
4. Remove (4) screws (M), plate, gasket (N) and servo-vane (C).<br />
5. Proceed using a, b, or c, depending on construction of your<br />
lubricator.<br />
a. 1/4" through 1/2" lubricators with old style servo-vane (C)<br />
(ears on top) - discard old servo-vane and strap (P). Install<br />
new strap onto new servo-vane making sure chamfered corner<br />
on servo-vane and strap line up with each other. NOTE: If<br />
your unit falls in this group, be sure to read step 11 at right.<br />
b. 1/4" through 1/2" lubricators with new style servo-vane (C)<br />
(flat topped). Discard old servo-vane and strap (P). Install<br />
new strap onto new servo-vane making sure chamfered corner<br />
on servo-vane and strap line up with each other.<br />
c. 3/4" and 1" lubricators - discard old servo-vane (C) and strap<br />
(P). Install new strap onto new servo-vane making sure<br />
chamfered corner on servo-vane and strap line up with each<br />
other.<br />
6. Install servo-vane (C) and strap (P) into body making sure<br />
chamfered corners on servo-vane and strap line up with chamfer<br />
in body.<br />
7. Install new gasket (N).<br />
8. Reinstall cover plate and screws (M) on compact, tighten screws<br />
0.5 to 0.9 Nm (6 to 8 in-lbs); on standard and full size models,<br />
tighten screws 1.4 to 1.7 Nm (12 to 15 in-lbs).<br />
9. Replace bowl o-ring<br />
(Q) with new one.<br />
10. Reinstall bowl<br />
assembly (H) and<br />
R<br />
K<br />
D<br />
S<br />
E<br />
F<br />
lock ring assembly<br />
(L).<br />
11. If your lubricator is<br />
the type mentioned<br />
A<br />
C<br />
N<br />
G<br />
J<br />
R<br />
in step 5.a. and<br />
your flow<br />
M<br />
requirements are<br />
L<br />
below 16 SCFM at<br />
100 PSIG, this<br />
retrofit may not<br />
Q<br />
perform<br />
satisfactorily to fulfill<br />
your lubrication<br />
needs. Test your<br />
unit and, if this occurs,<br />
B<br />
P<br />
contact the Technical<br />
Service Department.<br />
H<br />
Service Kits / Parts:<br />
Item Description Compact Standard Full Size<br />
Service Kit, “A” Level 03580 8000 03582 8000 03586 8000<br />
Service Kit, “B” Level 03580 8050B 03582 8050B 03586 8050B<br />
B<br />
Siphon Tube & Filter<br />
“A” Level, “B” Not Avail.<br />
— 03582 8001 03586 8001<br />
F Sight Dome, “A” Level 03580 7109 03580 7109 03580 7109<br />
F Sight Dome, “B” Level 03580 7150B 03580 7150B 03580 7150B<br />
G Fill Plug, “A” Level 04589 7017 04589 7017 04589 7017<br />
G Fill Plug, “B” Level 03580 7011P 03580 7011P 03580 7011P<br />
L Lock Ring Assembly — 03582 7502B 03586 7501B<br />
Q O-Ring * 02709 7202B 03454 7240B 03454 7247B<br />
* Furnished in Service Kit.<br />
Accessories<br />
Item Compact Standard Full Size<br />
<strong>Lubricator</strong> <strong>Lubricator</strong> <strong>Lubricator</strong><br />
03580 03582 03586<br />
03581 03583 03588<br />
03584<br />
Bowl Guards 03530 0100B 03532 0100B 03536 0100B<br />
Bowl Kits<br />
Polycarbonate 03530 0500B 03532 0500B 03536 0500B<br />
Metal 03530 0400B 03532 0400B 03536 0400B<br />
Manual Drain PS512P PS512P PS512P<br />
Pipe Mounting Bracket 00902 0400B 00902 0400B 00906 0400B<br />
Oil<br />
1 Gallon F442002 F442002 F442002<br />
12 Quart Case F442003 F442003 F442003<br />
4 Gallon Case F442005 F442005 F442005