You also want an ePaper? Increase the reach of your titles
YUMPU automatically turns print PDFs into web optimized ePapers that Google loves.
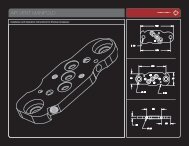
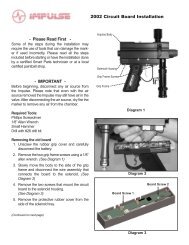
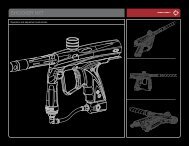
ELECTRONIC ADJUSTMENTIMPORTANTSETTING LIGHT INDICATION MODE FUNCTIONONETWOTHREEFOURFIVESIXELECTRONIC ADJUSTMENTDwell Up [solid yellow]Dwell Down [solid red]ROF Delay Up [shoot slower/blink yellow]ROF Delay Down [shoot faster/blink red]Firing Modes Up [double blink yellow]Firing Modes Down [double blink red]FIG. 11TURNING ON <strong>EPIPHANY</strong>Dwell, Rate of Fire Delay and Mode adjustments are made using the marker’s programming button andpower button. Removing the two grip screws on the left side of the Epiphany’s grip frame and foldingthe grip back provides access to the programming button. The button is small, gray and rectangularin shape. It is mounted on the circuit board facing the left edge for easy access. A notch in the boardhelps to identify the button and make it easier to press.POWERBUTTONYellow and red light emitting diodes (LEDs) are located on the circuit board just above the programmingbutton. The patterns which flash on these buttons indicate the function the power button will performwhen pressed.To enter the programming modes, make sure the Epiphany is completely degassed and unloaded, witha barrel blocker properly in place. Turn the marker on and note that the programming LEDs are not lit orflashing. This indicates that the Epiphany is in operational mode rather than a programming mode. Toselect one of the programming modes, press the programming button and note the sequence of blinkingLEDs to determine which mode you have selected. The yellow LED indicates that you have selectedto increase a setting, and the red LED indicates that you have chosen to decrease a setting. The LEDwill be lit solidly for adjustment of the dwell, single blink for adjustment of the ROFDelay and doubleblink for adjustment of the firing mode.To change a particular setting, choose the appropriate mode, then press the power button. Both LEDswill blink to acknowledge that the adjustment has been made. When only the red LED blinks afterpressing the power button, this indicates that you have reached the lower limit of adjustment. Similarlyonly the yellow LED will blink to indicate that the upper adjustment limit has been reached. Pull the triggerto exit the programming mode and save your new settings.PROGRAMMING EXAMPLETo set a dwell value of 18ms, first pressthe programming button as many times asneeded to light the red programming LEDsolidly. Then press and hold the power buttonuntil the red LED blinks alone, indicatingthat the bottom of the adjustment range(8ms) has been reached. Press the programmingbutton again to cycle through theprogramming modes until the yellow LED islit solidly indicating Dwell Up function. Then,press the upper power button 20 times (20button presses x 0.5ms = 10ms increase or18ms total.) Pull the trigger to exit the programmingmode and save the setting.FIG. 12REMOVE RUBBER GRIP800.922.2147 www.smartparts.com09