Create successful ePaper yourself
Turn your PDF publications into a flip-book with our unique Google optimized e-Paper software.
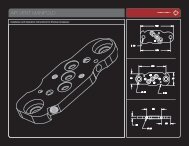
SOLENOID VALVEDISASSEMBLY AND MAINTENANCEFIG. 20SOLENOID EXPLODED VIEW1 BUM006 – Foam Disk2 ION118 – Vision Wiring Harness3 ELB1032X18PTCBNJ – Banjo Fitting4 ELB1032X532PTCBNJ – Banjo Fitting5 HOS4MMBLK4025 – Black Epiphany Hose6 EPY117LOVUSASM – Epiphany Circuit Board7 HOS4MMBLK875 – Black Epiphany Hose8 ELB1032X532PTCBNJ – Banjo Fitting9 Armature10 SOL3UPG – Epiphany Solenoid Coil11 Solenoid Head12 Solenoid BracketThe solenoid valve is the heart of the Epiphany.When the circuit board supplies it with power, itredirects gas flow to allow the bolt to close andfire the marker. During normal maintenance thesolenoid valve should not need to be disassembled.However, if it becomes clogged ordevelops a leak it is simple to disassemble forcleaning or repair. When replacing hoses orsolenoid valve components, Epiphany specificmodels must be used. The Epiphany solenoidvalve can be identified by its red protective coilwrap with black Ion logo.01 02 03 04 05 0607Follow the disassembly instructionsto remove the circuit boardfrom the Epiphany. Using a 3/32-inch allen wrench, hold the circuitboard and solenoid body thenpry the bracket from the backof the solenoid valve. Place thewrench between the bracket andthe upper, black section of thesolenoid valve body.Do not pry against the redsolenoid coil or the Epiphanyheat shrink coil protector, asthis will cause damage.After the solenoidbracket isremoved, lift thesolenoid headstraight out, wigglingif necessaryto loosen it.Tip the circuitboard over and allowthe armatureto fall into yourhand. The armaturefits loosely inthe center of thecoil, and shouldfall out easily.Clean the insideof the solenoidwith a cottonswab, and cleanthe armaturewith a soft cloth,removing any debris,oil or grease.Reassemblethe solenoidvalve. Place thearmature back inthe coil with thearmature facingdown.Push the solenoidhead back intothe solenoid valvebody, makingsure that the longhoses and Visionwiring harnessare aligned on thesame side of thecircuit board asthe trigger switch.Replace the solenoid bracket,pressing it back into place. Thebent bracket section goes overthe bottom side of the solenoid.A very light layer of SL33K lubricatingthe hose barb will makethe installation of new hoseseasier, but extreme care must betaken that no excess grease isable to enter the solenoid valve.Holding the solenoid head witha box end or small adjustablewrench over the hose barb willallow the hose to be pulled awayfrom the wrench which will holdback the solenoid head.18800.922.2147 www.smartparts.com